The ERR_CONNECTION_CLOSED error is a common nuisance that web users might encounter, symbolizing a frustrating halt in their internet browsing journey. This error message essentially means that the connection between your web browser and the website’s server was unexpectedly closed before the transfer of data could be completed. It’s like being in the middle of a conversation and suddenly, the other person walks away without a word. This can happen for various reasons, ranging from network issues to server problems, and it highlights a breakdown in the communication pathway that web browsers and servers use to exchange information.
Understanding this issue requires a bit of insight into how the internet works. When you try to visit a website, your browser sends a request to the server where the website is hosted. The server then processes this request and sends back the requested page. However, if something goes wrong in this process, and the connection between your browser and the server is lost, you’ll likely see the ERR_CONNECTION_CLOSED error. This error is not specific to any one browser or device, meaning it can occur whether you’re using Chrome, Firefox, Safari, on a PC, Mac, or mobile device.
Say goodbye to website errors
Achieve peace of mind with 99.99% uptime on 10Web Managed
WordPress Hosting, powered by Google Cloud.
Variations of ERR_CONNECTION_CLOSED
The ERR_CONNECTION_CLOSED error can present itself in slightly different ways depending on the browser or device you’re using. Here are some variations of how this issue might be phrased or experienced across different platforms:
- The site can’t be reached; the connection was closed.
- Unable to access the network ERR_CONNECTION_CLOSED.
- ERR_CONNECTION_CLOSED in Google Chrome
Chrome on desktop versus Chrome on mobile might display the error slightly differently.
Variations in wording based on the operating system (Windows, macOS, Linux) and Chrome versions.
- Connection unexpectedly closed in Firefox
- The connection to the server was reset while the page was loading in Mozilla Firefox
- Safari can’t open the page because the network connection was lost in Safari
- The connection was unexpectedly dropped in Microsoft Edge
- Internet Explorer cannot display the webpage because the connection was closed
- The webpage might be temporarily down or it may have moved permanently to a new web address
Despite these variations, the underlying issue remains the same: the browser was unable to maintain a stable connection to the server to retrieve the requested data.
Why this error occurs
Several factors can contribute to the occurrence of the ERR_CONNECTION_CLOSED error. Understanding these can help in diagnosing and fixing the issue:
Network connection issues: Simple connectivity problems, such as unstable Wi-Fi or mobile data connection, can cause this error. If the connection is weak, intermittent, or drops entirely, the browser-server communication can be prematurely cut off.
Server-side problems: If the website’s server is experiencing issues like overloads, maintenance, or configuration errors, it may close the connection unexpectedly from its end.
Client-side configuration: Incorrect settings on your device or browser, such as misconfigured network settings or an overly aggressive firewall, can also lead to this error.
Outdated browser: Sometimes, using an outdated version of your web browser can cause compatibility issues with modern web protocols, leading to connection closures.
Corrupted browser cache or cookies: Corrupted files in your browser’s cache or problematic cookies can interfere with the connection process, prompting this error.
Extensions or third-party applications: Certain browser extensions or third-party applications, especially those related to security, can interfere with web connections, leading to various errors including ERR_CONNECTION_CLOSED.
How to fix the ERR_CONNECTION_CLOSED error (Chrome)
Check your internet connection
The rationale behind checking your internet connection first is to isolate the problem. If the issue is network-wide, affecting multiple devices or services, it implies a problem beyond Chrome itself. This step is crucial because it helps to avoid unnecessary troubleshooting on the browser if the actual issue lies with the internet connection or network hardware. By confirming that other websites or services are accessible without issues on different devices, you can determine whether to focus on network troubleshooting or browser-specific solutions.
- Use a different device connected to the same network to access the internet. If the second device also cannot connect, the issue likely lies with your network and not Chrome specifically.
- Try accessing several websites from your browser. If all sites fail to load, this indicates a broader internet connection issue.
- Most operating systems have built-in network diagnostic tools that can automatically detect and sometimes resolve internet connectivity problems.
Restart your router
Restarting your router is a widely recommended troubleshooting step for resolving network connectivity issues. This action clears the router’s memory, resolves IP conflicts, and forces it to re-establish connections to your ISP. It’s effective because routers, like any computer, can experience software bugs or memory leaks that impact performance. A restart can also resolve issues related to dynamic IP address renewal or network congestion.
To restart your router:
- Locate the power button on your router or unplug it from the power source.
- Give the router time to fully shut down. This waiting period ensures that the router’s memory is cleared and all temporary configurations are reset.
- Turn the router back on or plug it back into the power source. Wait for a few minutes for the router to fully restart and re-establish a connection to your ISP.
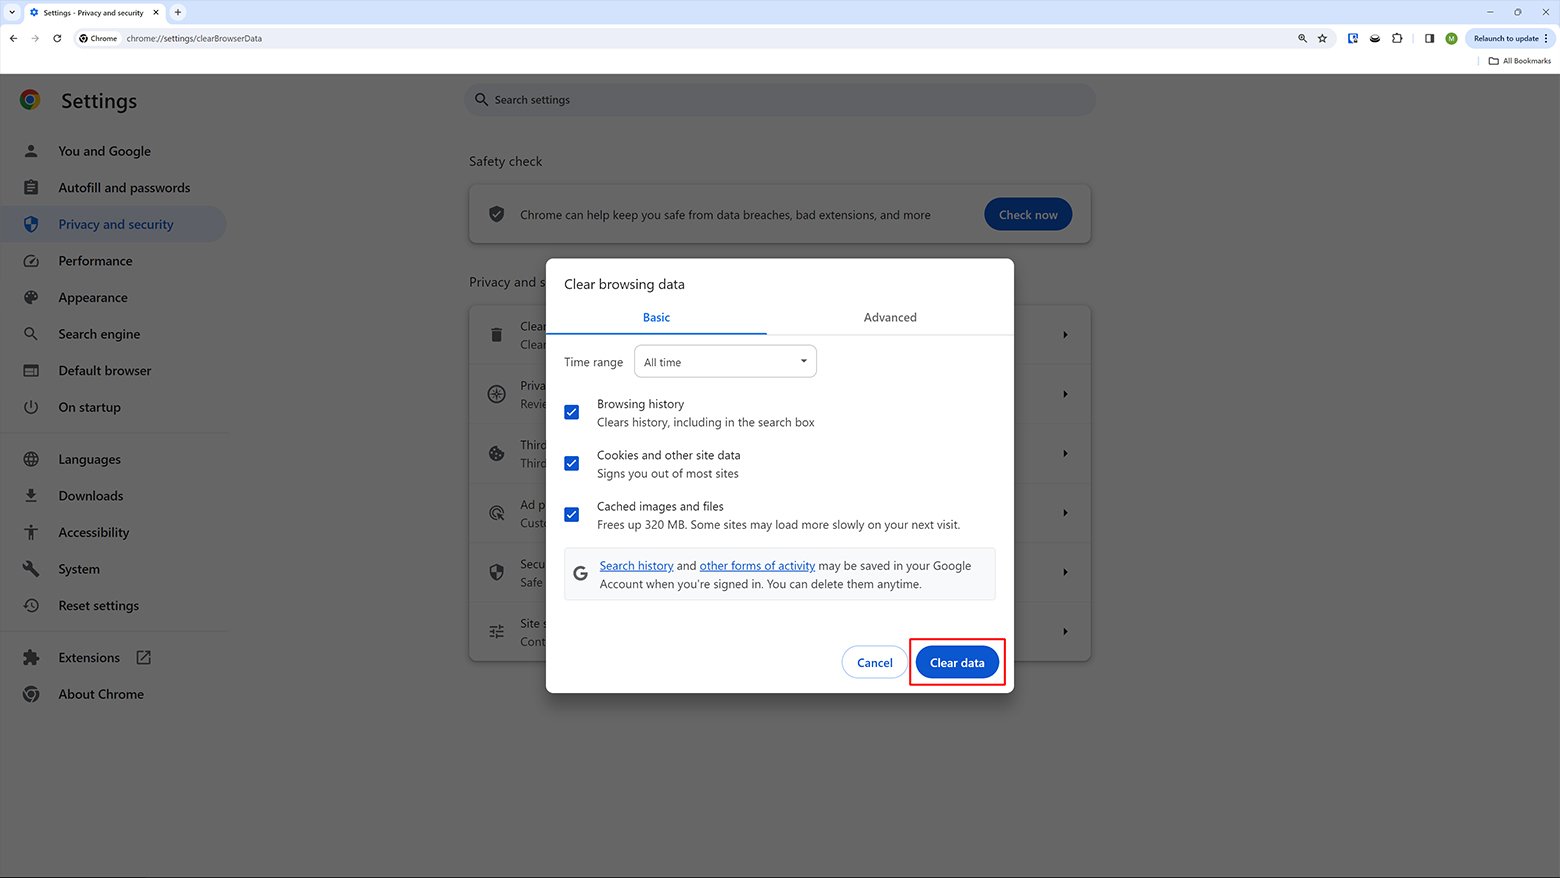
Clear Chrome’s browsing data
Over time, Chrome accumulates cached data and cookies, which are meant to improve browsing speed and user experience. However, this data can become corrupted, leading to loading errors or connectivity issues. Clearing Chrome’s cache and cookies removes outdated or corrupted files, resolving errors that stem from data conflicts or storage overloads. This step ensures that Chrome can fetch fresh data from websites, potentially fixing connection-related issues.
- Open Chrome, click on the three dots in the upper right corner, and select ‘Settings.’
- Find the ‘Privacy and Security’ section and click on ‘Clear browsing data.’
- Choose ‘Cookies and other site data’ and ‘Cached images and files.’
- For a comprehensive clean, select ‘All time’ from the time range options.
- Click on the ‘Clear data’ button to remove the selected browsing data.
Update Chrome
Regular updates are essential for maintaining the security, efficiency, and compatibility of Chrome. Developers continuously work on fixing bugs, patching vulnerabilities, and enhancing browser performance. An outdated browser may encounter compatibility issues with newer web technologies or bugs that have been resolved in later versions. Keeping Chrome updated ensures that you have the latest improvements and security measures, reducing the risk of connection issues and other errors.
To check for updates and update Chrome:
- Click on the three vertical dots in the upper right corner of Chrome.
- Go to Help > About Google Chrome: This page automatically checks for updates.
- If an update is available, follow the prompts to install it.
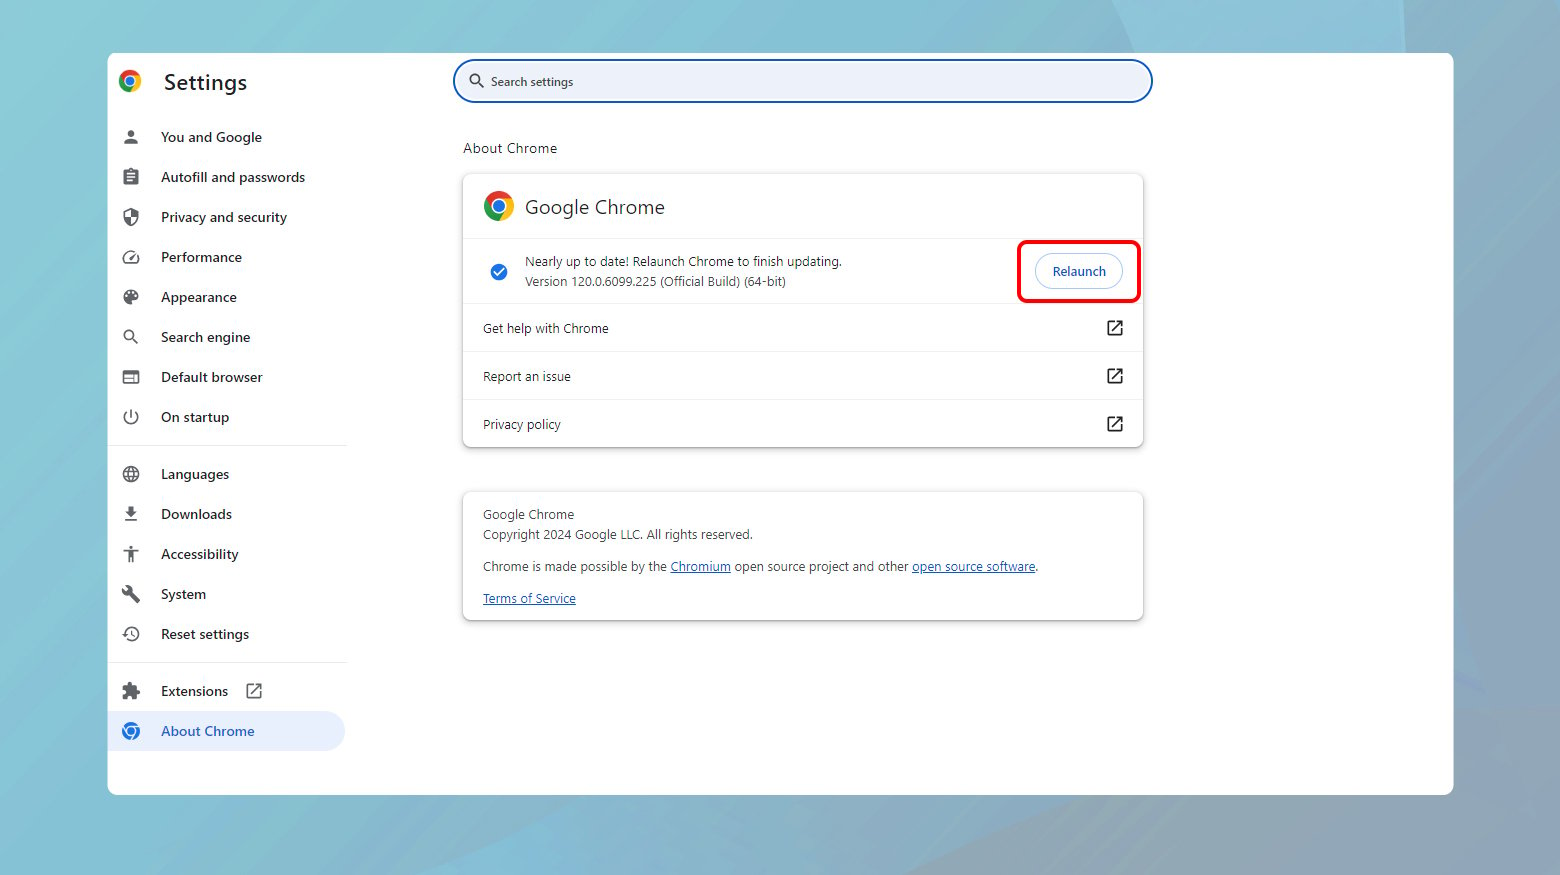
Chrome may need to restart to apply the update.
Disable Chrome extensions
Extensions can significantly enhance browser functionality, but they can also cause problems. Some extensions modify web pages, intercept data, or alter browser behavior, which can inadvertently lead to connectivity issues or conflicts with websites. Disabling extensions helps to identify if a particular add-on is the source of the problem, allowing you to use Chrome without interference from third-party software.
To disable Chrome extensions:
- Type ‘chrome://extensions’ in the Chrome address bar and press Enter.
- Use the toggle switch to disable each extension.
- After disabling, refresh your browser and check if the issue persists.
- Re-enable extensions one by one and check connectivity.
This helps identify if a specific extension is causing the problem.
Reset Chrome settings
Custom configurations, whether manually set or altered by extensions, can cause Chrome to behave unexpectedly. Resetting Chrome settings to their original defaults is a broad stroke that can resolve issues arising from misconfigurations or corruption without deleting essential data like bookmarks and passwords. This step effectively gives you a clean slate, potentially fixing issues by removing any problematic settings.
To reset:
- Go to Chrome settings.
- Scroll to the bottom and click on ‘Advanced.’
- Find the ‘Reset and clean up’ section and select ‘Restore settings to their original defaults.’
- Click on ‘Reset settings’ to confirm.
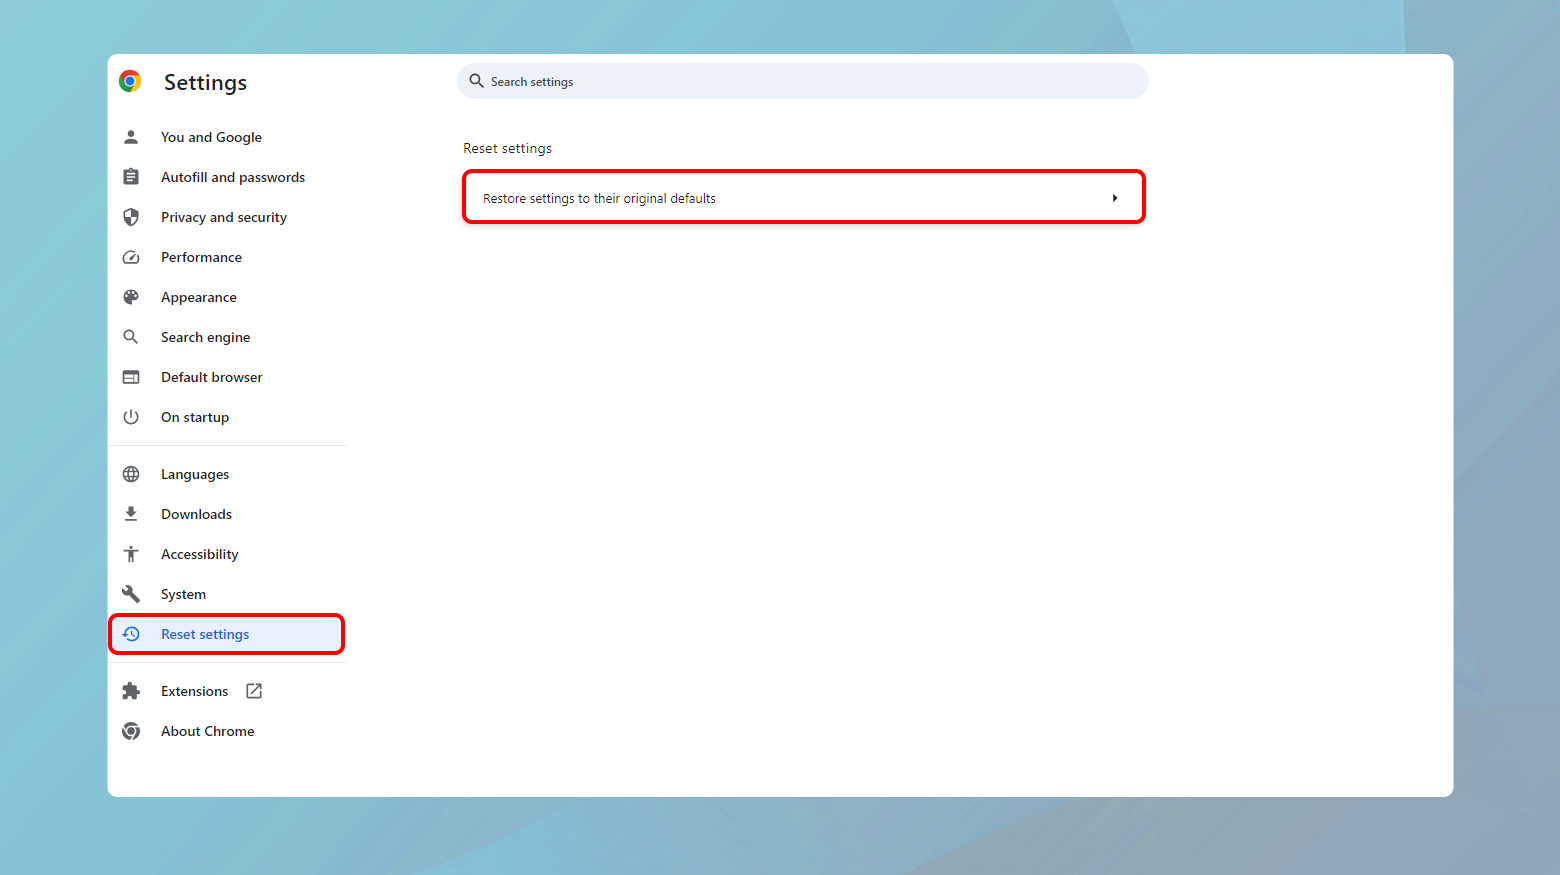
This will reset your startup page, new tab page, search engine, and pinned tabs. It will also disable all extensions and clear temporary data.
Check your firewall and antivirus settings
Firewalls and antivirus software are designed to protect your system from malicious traffic and software. However, these security measures can sometimes block legitimate applications like Chrome, especially if they mistakenly identify it as a threat. Checking and adjusting these settings ensures that Chrome has the necessary permissions to access the network and internet, preventing security software from inadvertently blocking your browser.
To customize the settings:
- Access the control panel or settings of your antivirus or firewall.
- Look for a section related to program permissions or an exception list.
- Add Chrome to the list of allowed programs if it isn’t already.
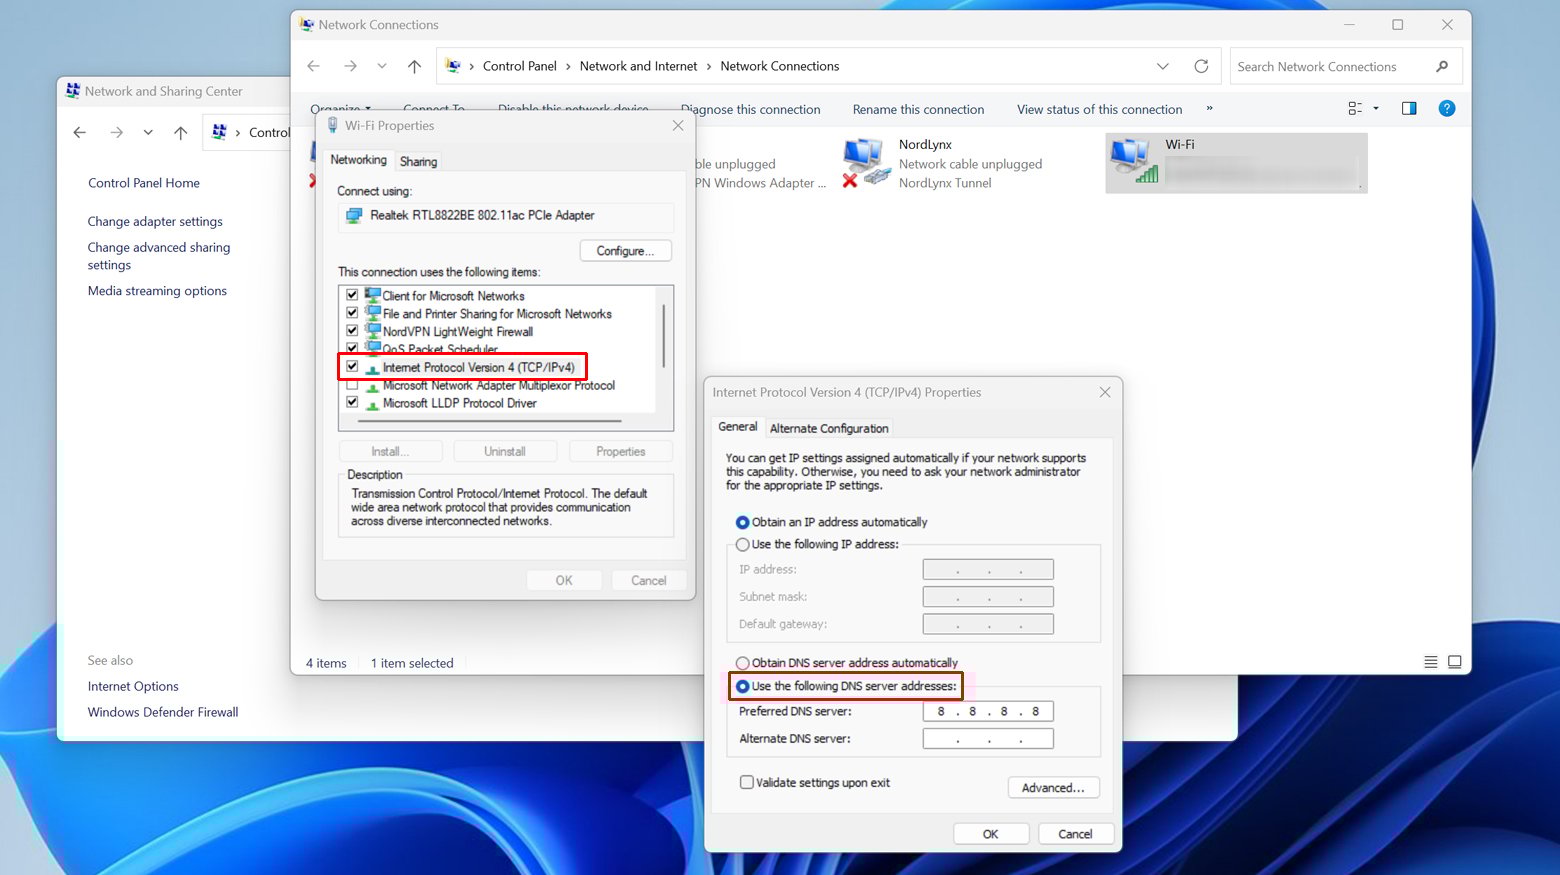
Switch DNS servers
The Domain Name System (DNS) is crucial for translating human-friendly domain names into IP addresses that computers use to communicate. If your default DNS server is slow or experiencing issues, it can lead to connection problems and slow website loading times. Switching to a reliable public DNS server can improve your browsing speed and reliability by ensuring that DNS queries are handled more efficiently and reliably.
Windows
- Open Control Panel > Network and Internet > Network Connections.
- Right-click your current connection and select ‘Properties.’
- Scroll to ‘Internet Protocol Version 4 or 6 (TCP/IPv4/IPv6)’ and click ‘Properties.’
- Select ‘Use the following DNS server addresses’ and enter the DNS servers you wish to use (e.g., Google DNS: 8.8.8.8 and 8.8.4.4).
- Click ‘OK’ to save changes and close all dialog boxes.
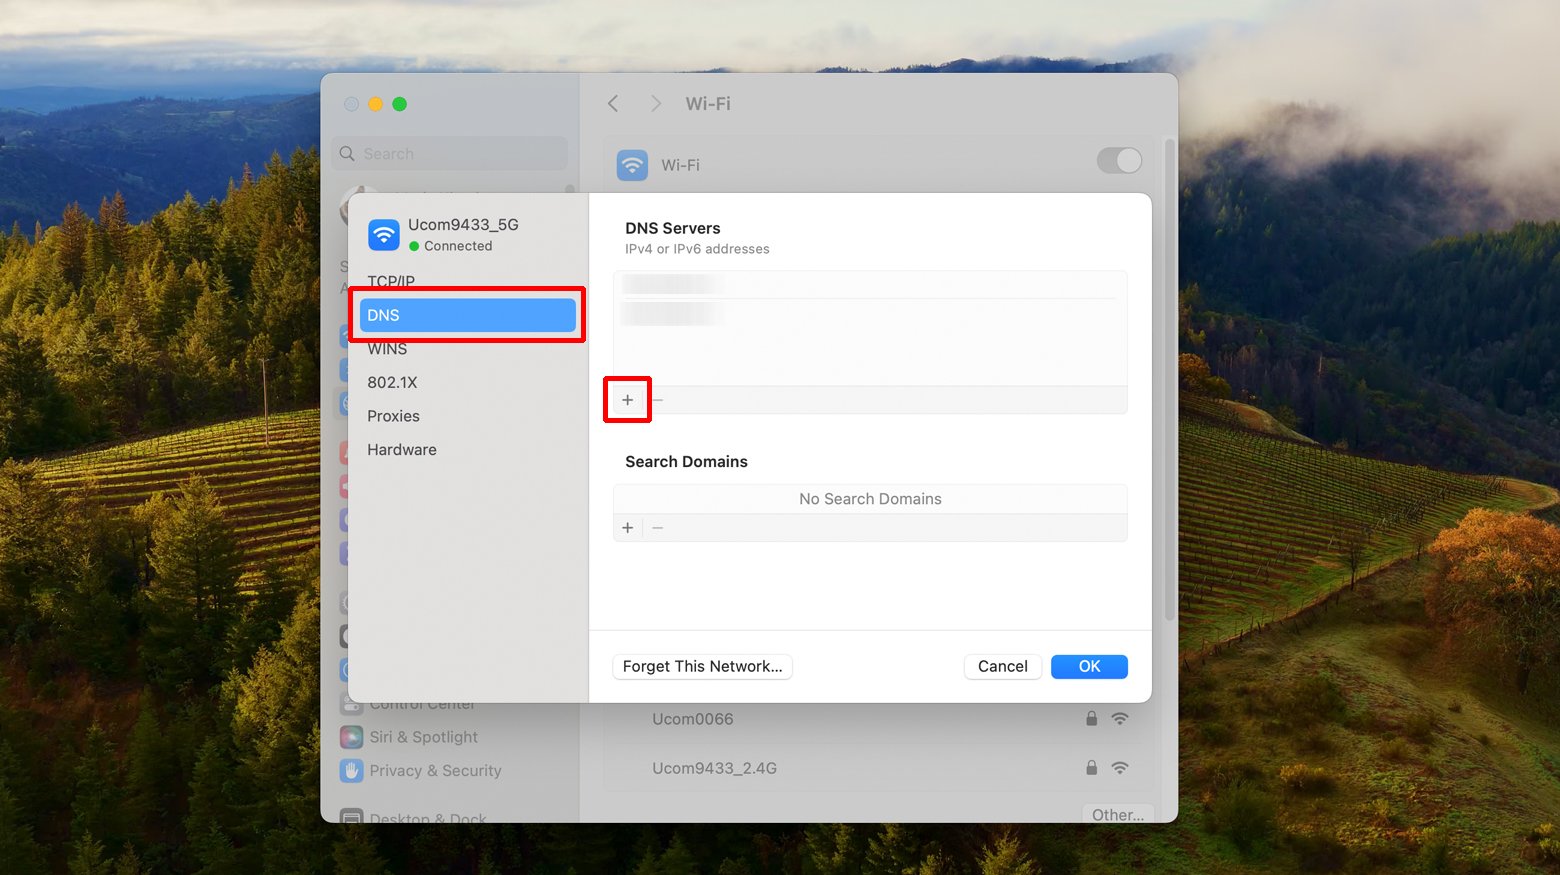
Mac
- Click on the Apple menu and select ‘System Preferences’
- In the System Preferences window, find and click on the ‘Network’ icon.
- Select the network connection you want to configure.
- Click on the ‘Advanced’ button.
- In the Advanced settings window, go to the ‘DNS’ tab.
- To add a new DNS server, click the ‘+’ button under the DNS Servers list.
- Enter the IP of the DNS server you want to use.
- Click Ok > Apply to apply the changes.
Use Cloudflare DNS
Switching to a reliable DNS service like Cloudflare’s 1.1.1.1 can improve your connection stability and speed. Cloudflare offers a fast, secure, and privacy-focused DNS service that can help bypass poorly performing or over-filtered local DNS servers. Changing your DNS settings to use Cloudflare’s addresses might resolve the ERR_CONNECTION_CLOSED error by ensuring more reliable domain resolution.
- Follow the instructions in the previous section and enter Cloudflare’s DNS servers 1.1.1.1 and 1.0.0.1.
Try using a VPN
Sometimes, network restrictions or geo-blocking can lead to connection issues. Using a Virtual Private Network (VPN) can help you bypass these restrictions by routing your connection through a server in a different location. This can be particularly useful if the website is not accessible due to regional restrictions or if your ISP is blocking access to certain domains.
- Choose a reliable VPN service and install their application on your device.
- Open the VPN app and connect to a server. Try accessing the internet again through Chrome to see if the issue resolves.
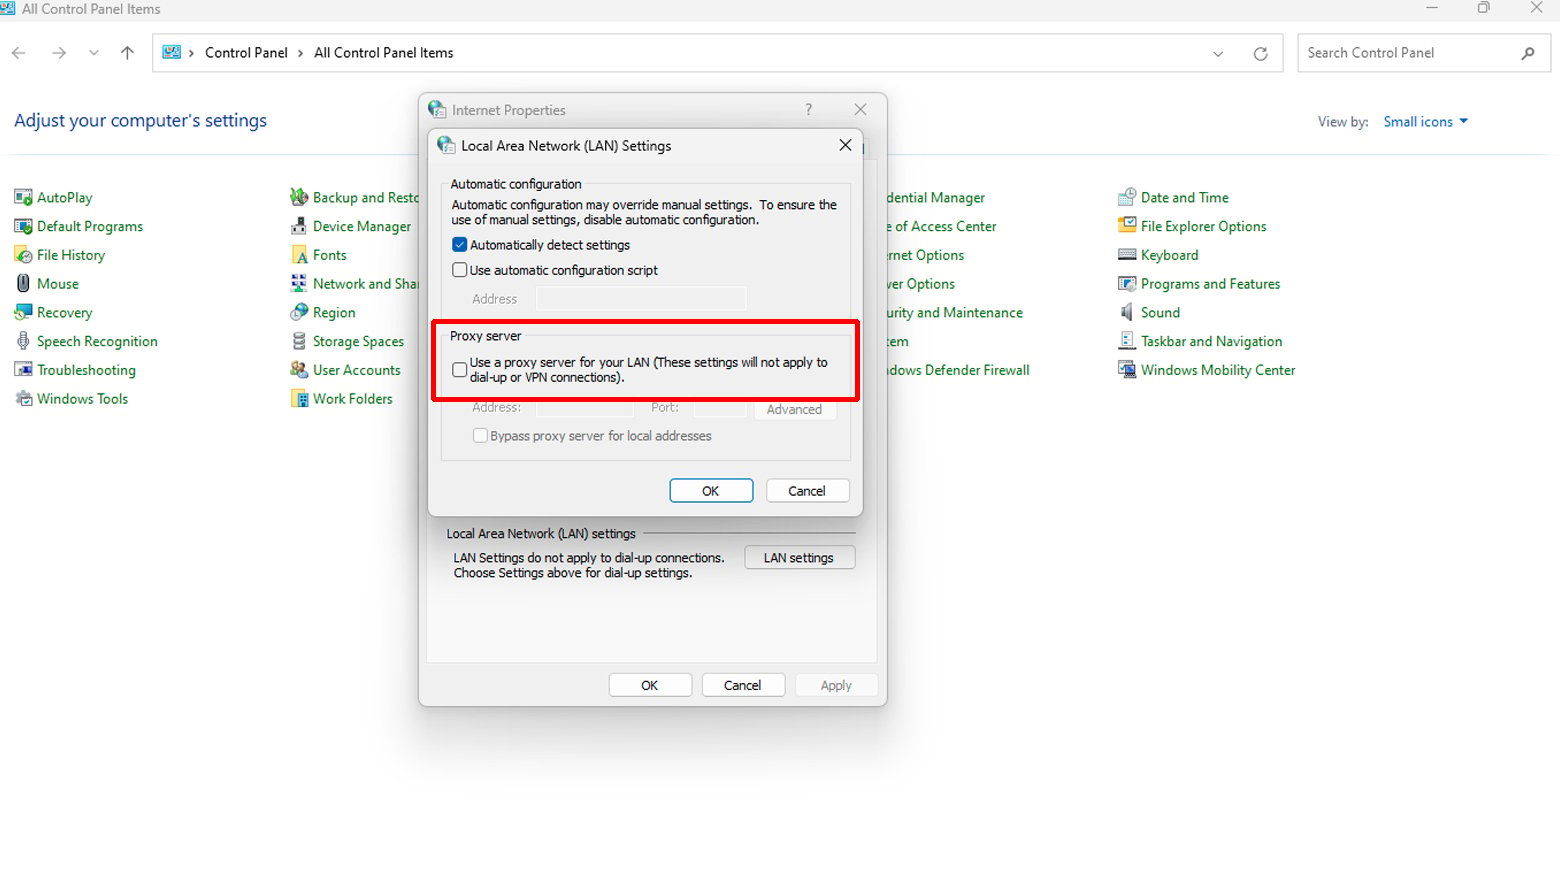
Disable proxy server and VPN
Conversely, if you’re already using a VPN or a proxy server, this could be the source of the problem. Some websites might block traffic from known VPNs or proxies, and some network configurations might not support them well. Disabling your VPN or proxy temporarily can help determine if this is causing the connection error.
To disable in Windows:
- Go to Settings > Network & Internet > Proxy.
- Turn off all options under ‘Automatic proxy setup’ and ‘Manual proxy setup.’
For VPN: Disable or disconnect your VPN through the application’s interface or by removing VPN configurations from your network settings.
Flush DNS cache
Your computer’s DNS cache stores the addresses of previously visited websites, which can speed up subsequent access to those sites. However, if the cache becomes outdated or corrupted, it can lead to connection issues. Flushing the DNS cache clears out this stored information, forcing your computer to fetch fresh DNS information for websites.
Windows
- Type cmd in the Start menu, right-click on Command Prompt, and select “Run as administrator.”
- Type ‘ipconfig /flushdns’ and press Enter.
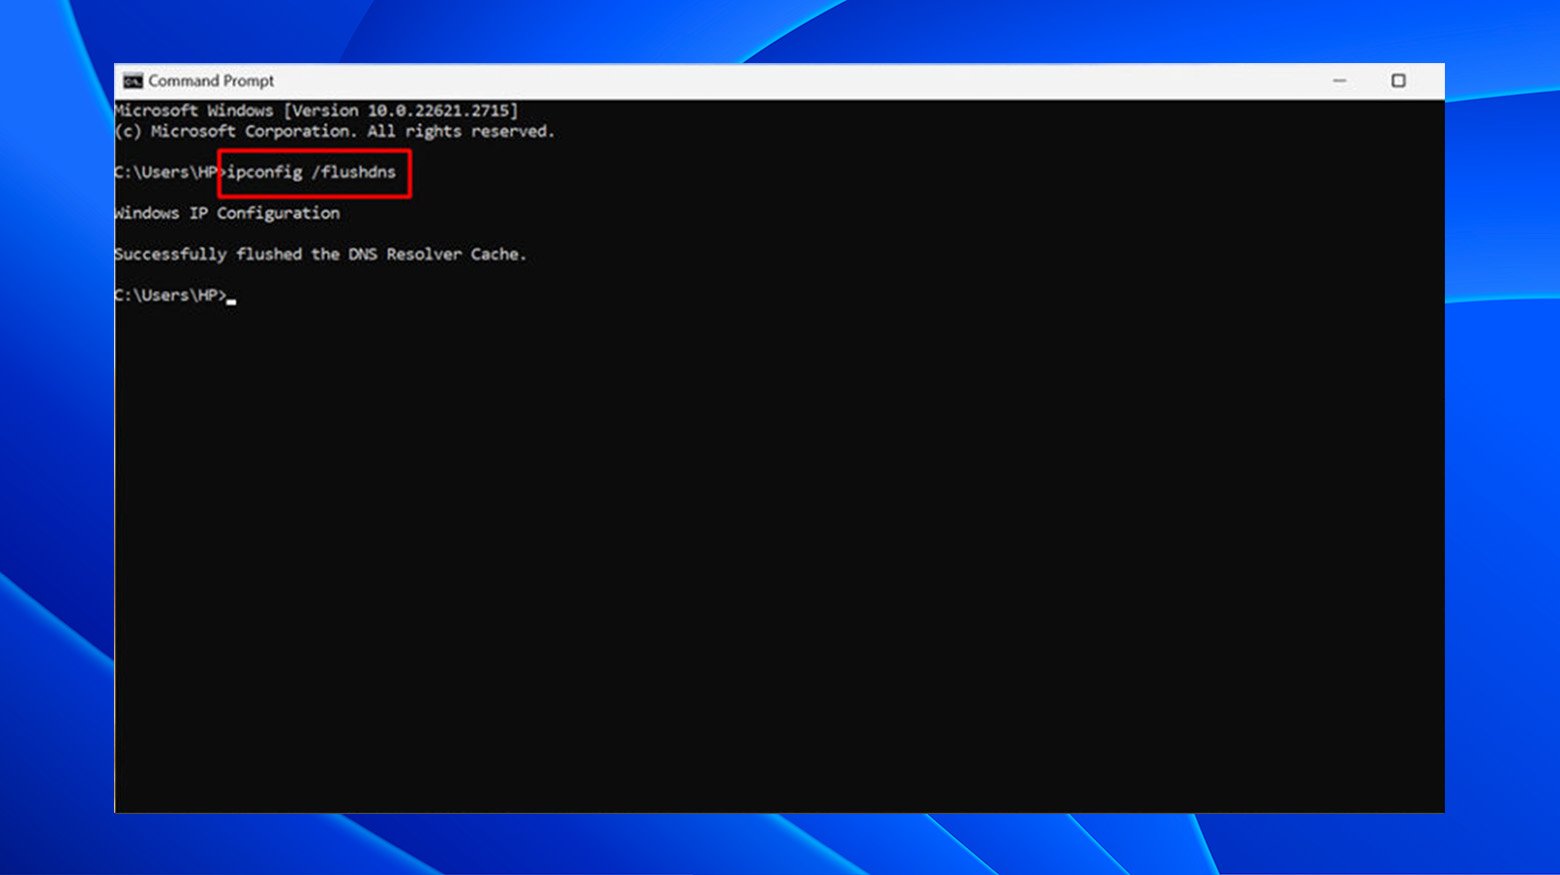
This clears the DNS cache.
Mac
- Go to Utilities > Terminal
- Enter the DNS flush command: ‘sudo killall -HUP mDNSResponder’ and hit Enter
- If prompted, enter your administrator password and press Enter
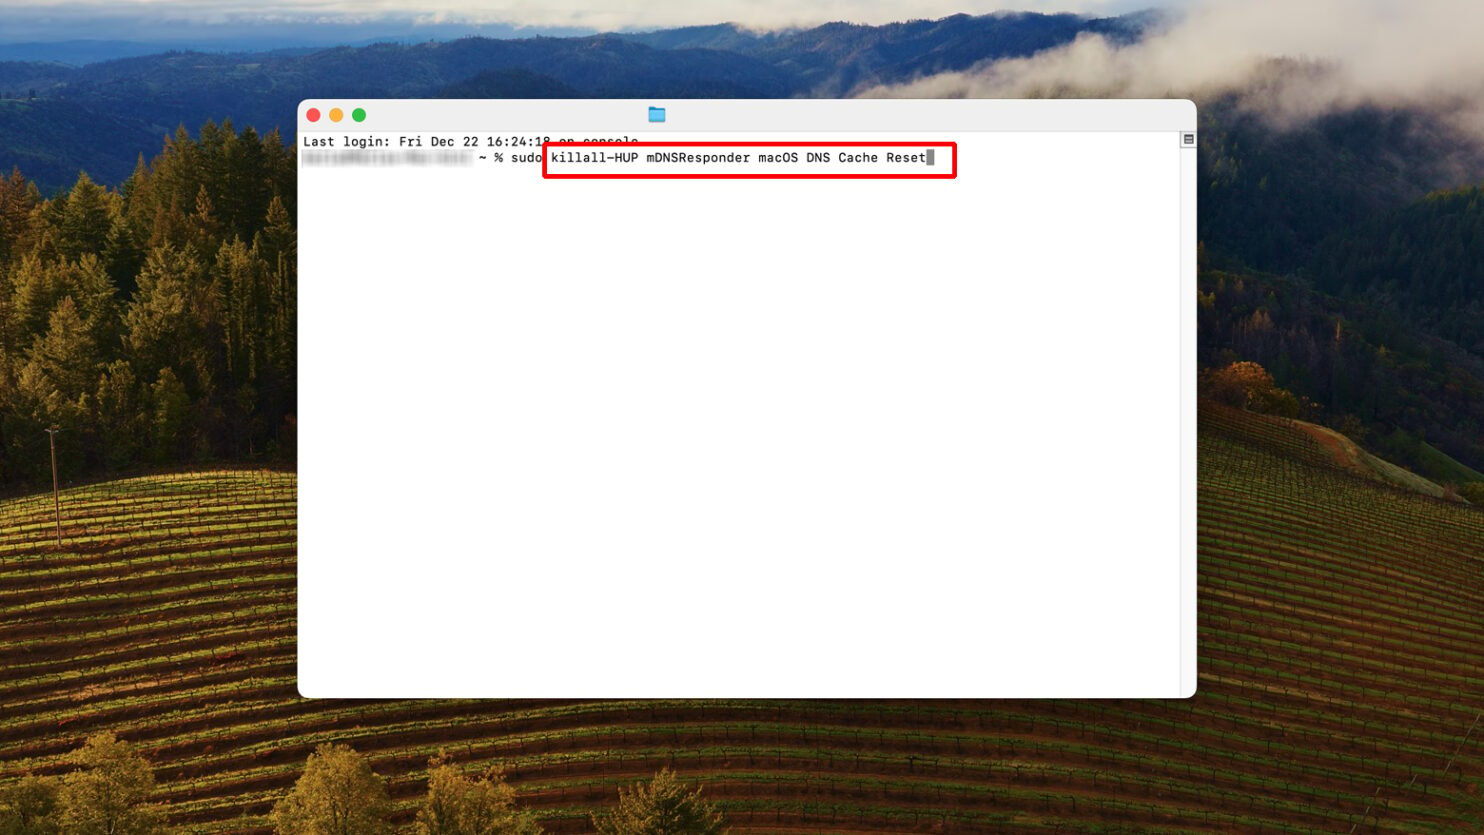
If there is no error message, then most likely the DNS cache has been flushed.
Malware scan
Malware can interfere with your internet connection and modify your browser’s behavior, leading to various errors including ERR_CONNECTION_CLOSED. Running a thorough malware scan on your computer can help identify and remove any malicious software that might be affecting your network connection. Use your installed antivirus software to perform a full system scan. Follow any prompts to remove detected malware.
Tidy up with Chrome cleanup tool
Google Chrome offers a built-in tool for scanning and removing software that might cause problems with Chrome, including malware, bad extensions, and other harmful software. This utility can help identify and remove unwanted software that might be causing connection issues or other disruptions in Chrome.
To clean up:
- Type ‘chrome://settings/cleanup’ in the Chrome address bar and press Enter.
- Click on “Find and remove harmful software” and follow the prompts to clean up your Chrome installation.
Closing thoughts
In this blog we have provided a thorough exploration of how to troubleshoot and resolve connection issues in Google Chrome. From checking the internet connection and restarting the router to clearing browsing data, updating Chrome, managing extensions, and adjusting DNS settings, each step offers a strategic approach to enhance browser performance and connectivity. By following these detailed instructions, you can effectively address common obstacles, ensuring a more stable and efficient online experience with Chrome.
Say goodbye to website errors
Achieve peace of mind with 99.99% uptime on 10Web Managed
WordPress Hosting, powered by Google Cloud.
Say goodbye to website errors
Fix all the website errors in one click
Migrate your website to the world's best Managed WordPress Hosting.