Installing an SSL certificate on your WordPress site is like giving your website a security badge, allowing it to transmit data securely over HTTPS. However, even with the best intentions, setting up SSL can sometimes hit a snag, particularly when you run into the “SSL Handshake Failed” error.
To grasp why an SSL/TLS handshake might fail, it’s important to understand what exactly this handshake is. Both Secure Sockets Layer (SSL) and Transport Layer Security (TLS) are cryptographic protocols that secure communications over a computer network. Though there’s a technical difference between SSL and TLS, they’re often referred to interchangeably. For the purposes of simplification, we’ll use SSL.
The SSL handshake is essentially the conversation that the browser and server have to agree on how to securely communicate. It’s the groundwork for any HTTPS connection, involving the exchange of public keys and the creation of shared secrets. Without a successful handshake, your browser and the website can’t establish a secure connection, leading to potential security risks and a loss of visitor trust.
Achieve peace of mind with 99.99% uptime on 10Web Managed ![]()
Say goodbye to website errors
WordPress Hosting, powered by Google Cloud.
What causes an SSL handshake failure?
SSL Handshake Failures, or the more specific Error 525 when using Cloudflare, indicate that the secure channel of communication could not be established. This failure can stem from various issues, both client-side and server-side.
Client-side issues
- Incorrect date and time settings on the user’s device can interfere with SSL certificate validation.
- Misconfigured browser settings or outdated browser versions may not support required SSL protocols.
- Interception of the connection by third-party software or hardware, posing as a man-in-the-middle attack.
Server-side issues
- Cipher suite mismatches occur when the server and client don’t support a common set of encryption algorithms.
- Unsupported protocols by the server can lead to a failure if the client uses a protocol version the server doesn’t recognize.
- Problems with the SSL certificate itself, such as being incomplete, invalid, or expired, can prevent a successful handshake.
How to fix SSL handshake failures
The “SSL Handshake Failed” error can stem from various reasons, making it a bit tricky to pinpoint and solve right off the bat.
Luckily, we’ve got several strategies to diagnose and tackle these issues. Let’s dive into step by step effective approaches to address and potentially resolve the SSL Handshake Failed error.
Check your system’s date and time
Your computer’s clock plays a surprisingly pivotal role in the SSL handshake process. The SSL certificate has a validity period, and if your computer’s clock is set outside this period (too far in the future or in the past), the SSL handshake will fail. This is because the SSL handshake involves verifying the SSL certificate’s validity, which includes checking the current date and time.
During an SSL handshake, the client (your browser) and the server share various pieces of information, including SSL certificates. These certificates are essentially digital passports, proving the server’s identity. Each certificate comes with a specific validity period. If your system’s clock is incorrect, it might falsely appear that these digital passports are expired or not yet valid, leading to a failed handshake.
Windows
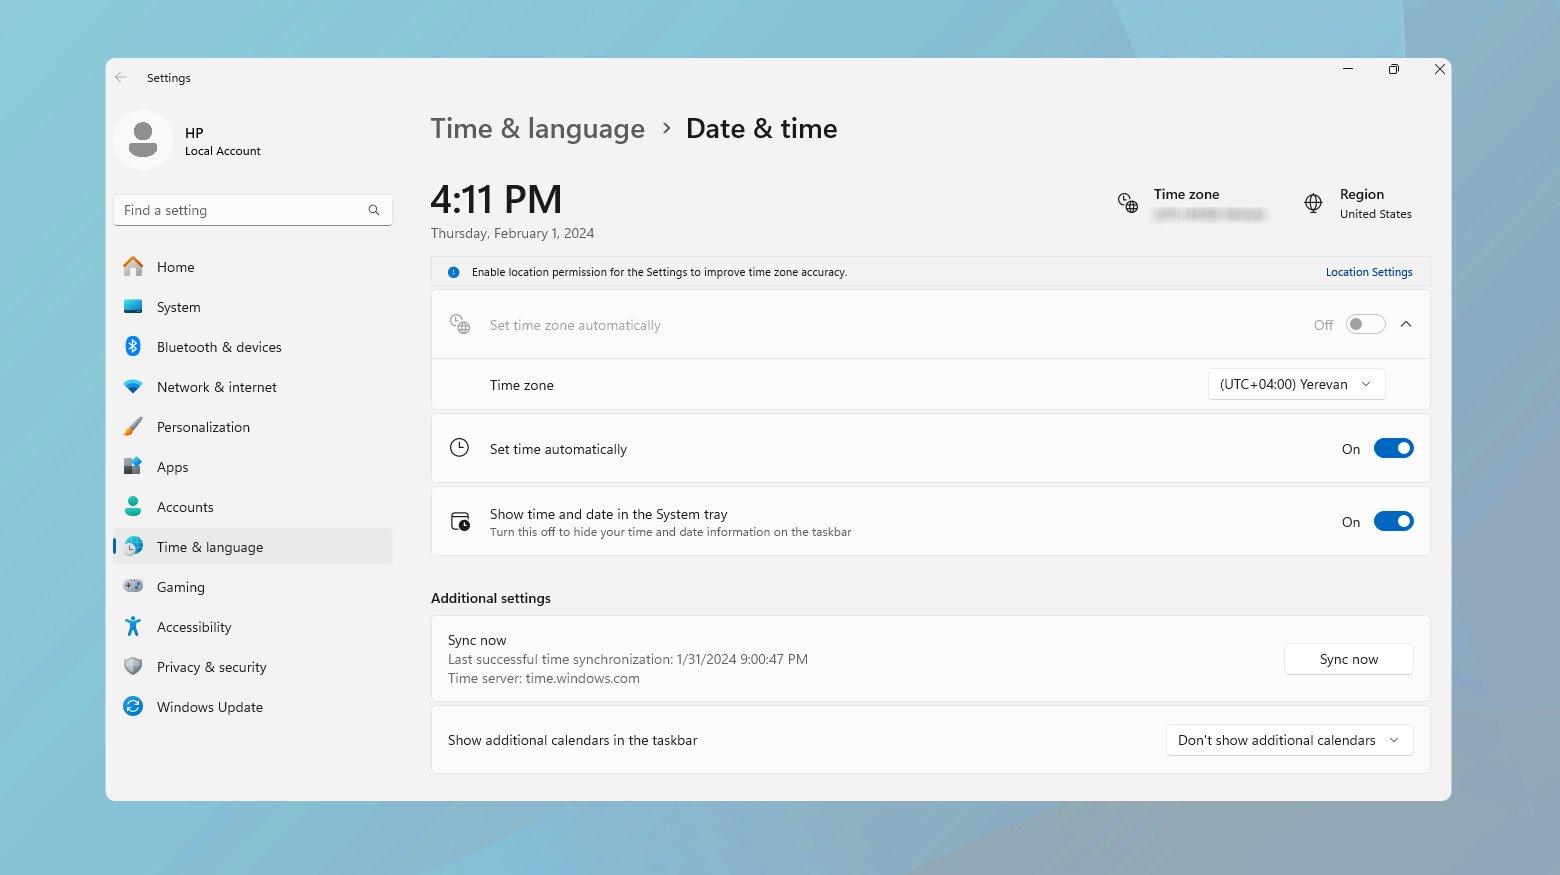
- Right-click on the time display on the taskbar.
- Select “Adjust date/time.”
- Ensure that “Set time automatically” is toggled on. If it’s already on but the time is incorrect, toggle it off and then on again.
- If the issue persists, manually set the date and time by toggling off “Set time automatically” and clicking “Change” under “Set the date and time manually.”
- After adjusting, restart your browser and try accessing the SSL-secured website again.
Mac
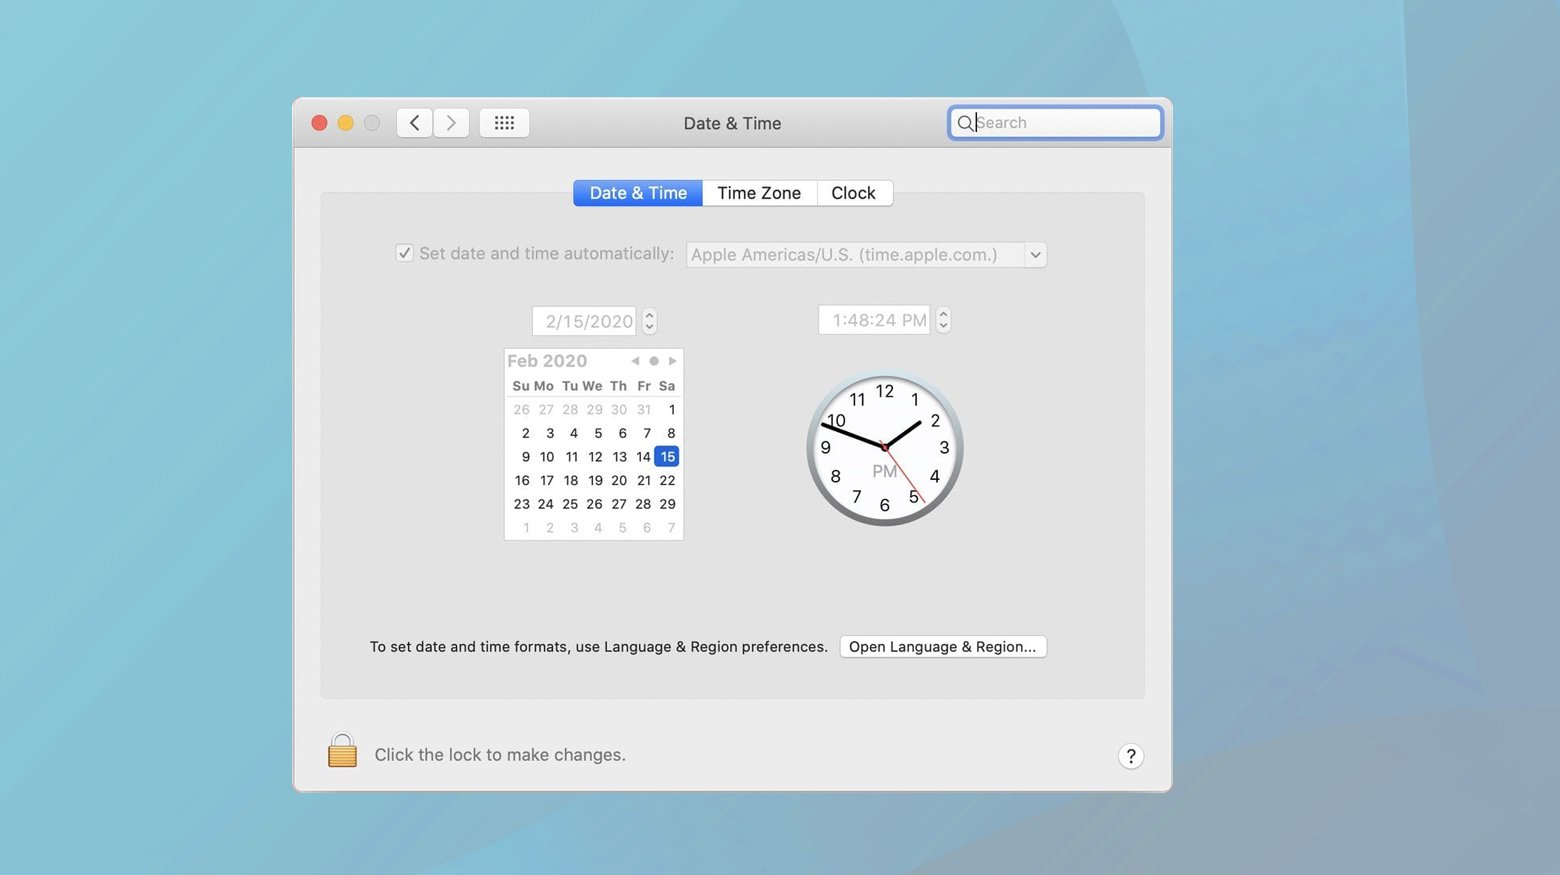
- Click on the Apple menu and select “System Preferences.”
- Choose “Date & Time.”
- If the padlock at the bottom left is locked, click it and enter your administrator password to make changes.
- Check “Set date and time automatically” and select the appropriate time zone. If it’s already selected but incorrect, uncheck and recheck it.
- Close System Preferences and restart your browser to test the changes.
This step, while seemingly simple, is crucial for the intricate process of SSL certificate verification during the handshake.
Check the validity of your SSL certificate
SSL certificates are the backbone of secure communication on the internet, encrypting data in transit and verifying the identity of websites. They come with a shelf life to ensure that the information they contain is up-to-date and the encryption standards they rely on are still secure. An expired or invalid certificate is like an expired passport; it’s no longer a reliable form of identification.
Certificates can expire, be revoked, or become otherwise invalid for a number of reasons:
Expiration: To ensure ongoing security, certificates are issued for a limited duration. Regular renewal is necessary to maintain a secure connection.
Revocation: Certificates can be revoked before their expiration date if they are compromised, no longer secure, or if the details they certify change.
Installation issues: Sometimes, a certificate might not be installed correctly, missing crucial chain certificates, which can also lead to handshake failures.
Using an SSL certificate checker
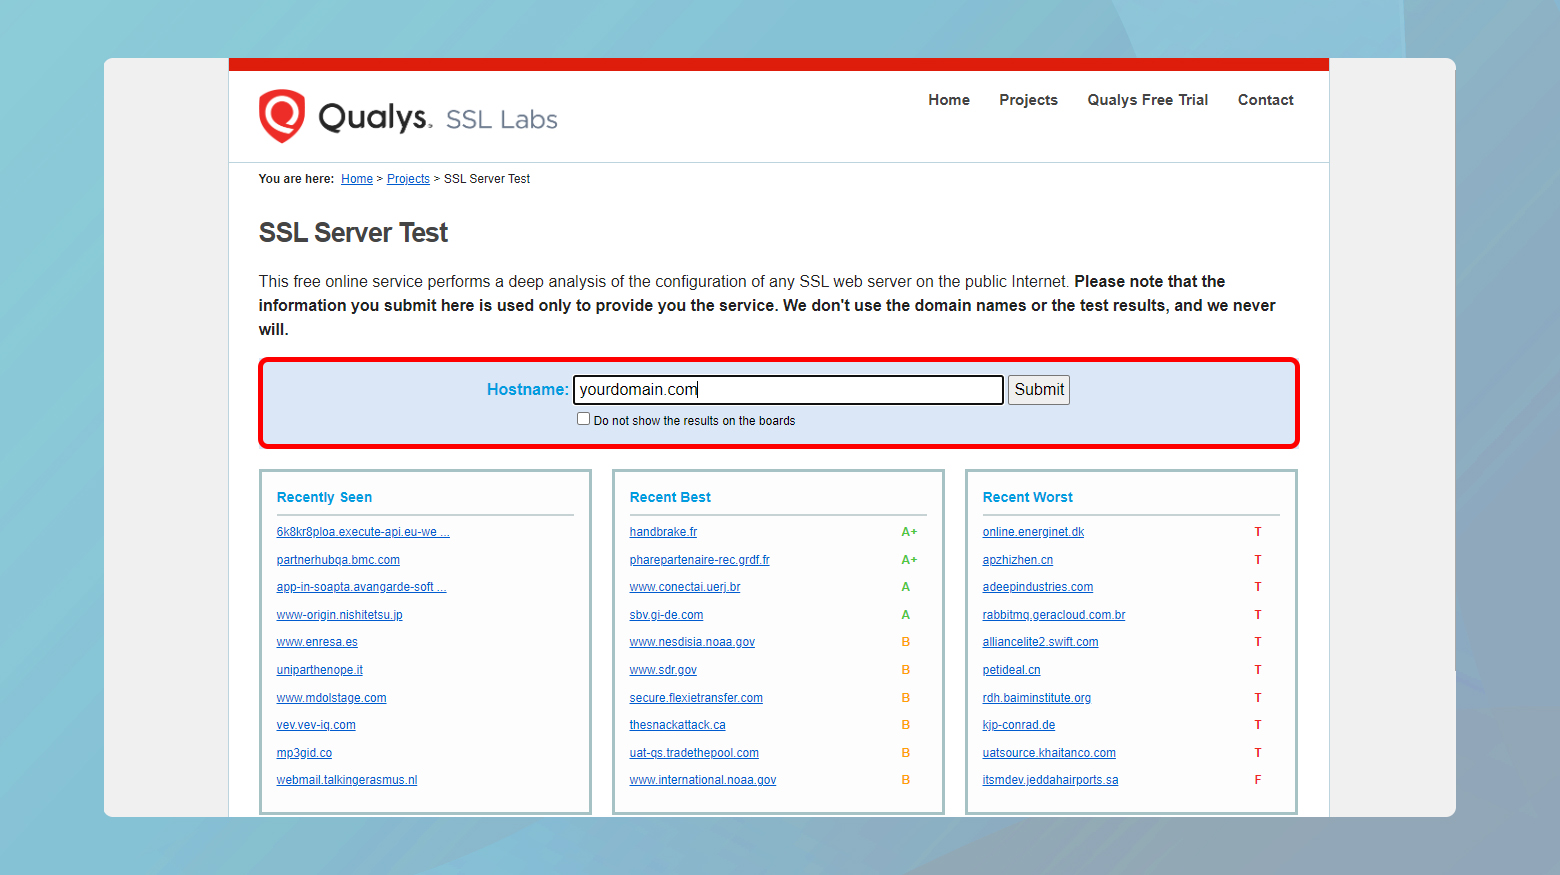
- Navigate to a reliable SSL certificate checker website, such as the Qualys SSL Labs’ SSL Server Test.
- Enter your domain name into the “Hostname” field and hit “Submit.”
- Wait for the tool to analyze your site’s SSL/TLS configuration.
- Check the expiration date. If your certificate has expired, you’ll need to renew it.
- Ensure the entire certificate chain is present and valid. Missing intermediate certificates can cause issues.
- Verify that your certificate has not been revoked.
Renewing or reissuing your SSL certificate
If your certificate is expired or invalid:
- Contact your certificate authority (CA) for renewal instructions. This process typically involves generating a new certificate signing request (CSR) on your server.
- Follow the CA’s process to validate your domain ownership again, if necessary.
- Once issued, install the new certificate on your server, making sure to include any intermediate certificates provided by the CA.
- Test your website again using the SSL certificate checker to ensure everything is correctly set up.
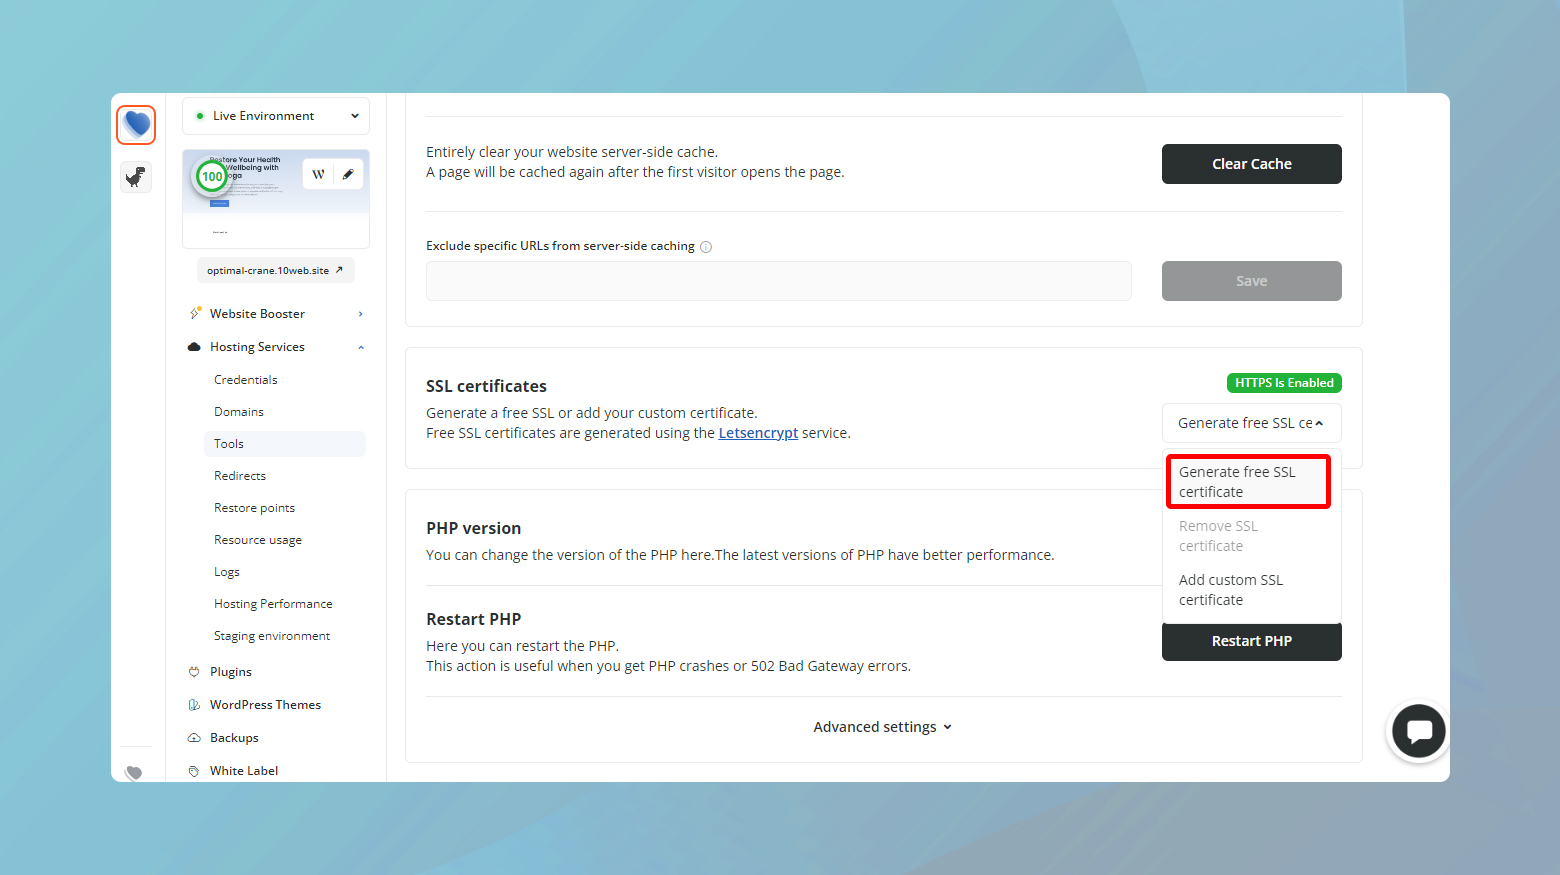
If your website is hosted on 10Web, you can generate a free Let’s Encrypt SSL certificate from your dashboard.
Update your browser
Browsers are the vehicles through which we travel the internet. An outdated browser might not understand or support the latest security protocols, leading to a communication breakdown during the SSL handshake. This is where the handshake fails, not because the credentials are invalid, but because the browser and server can’t agree on how to communicate securely.
If the server supports a newer version of TLS (e.g., TLS 1.2 or 1.3) and your browser doesn’t, they can’t establish a secure connection. It’s like trying to tune into a digital TV signal with an analog TV without the proper converter.
Sometimes, the issue isn’t with the browser’s version but its configuration. Incorrect settings can prevent a successful handshake. Also, certain plugins or extensions might interfere with SSL/TLS processing, causing handshake failures.
You can try accessing the website using a different browser. If it works, the issue might be with your primary browser.
Update Chrome
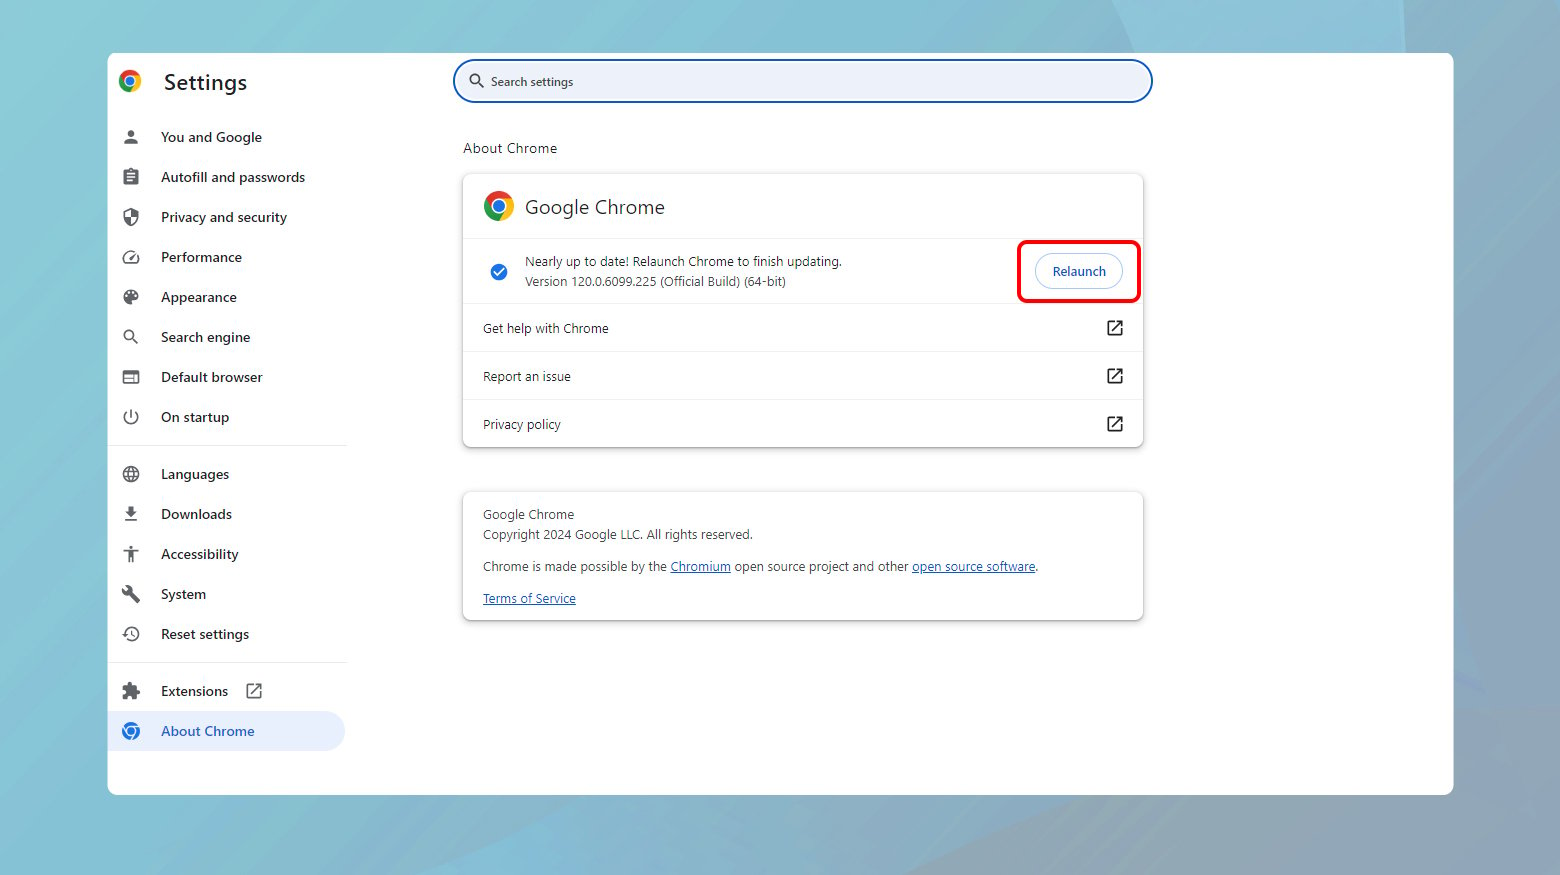
Click the three dots in the top right corner, go to “Help” > “About Google Chrome.”
Chrome will automatically check for and install any updates.
Update Firefox

Open the menu, click “Help” > “About Firefox.”
Firefox will similarly check for updates and prompt you to restart to apply them.
Update Safari
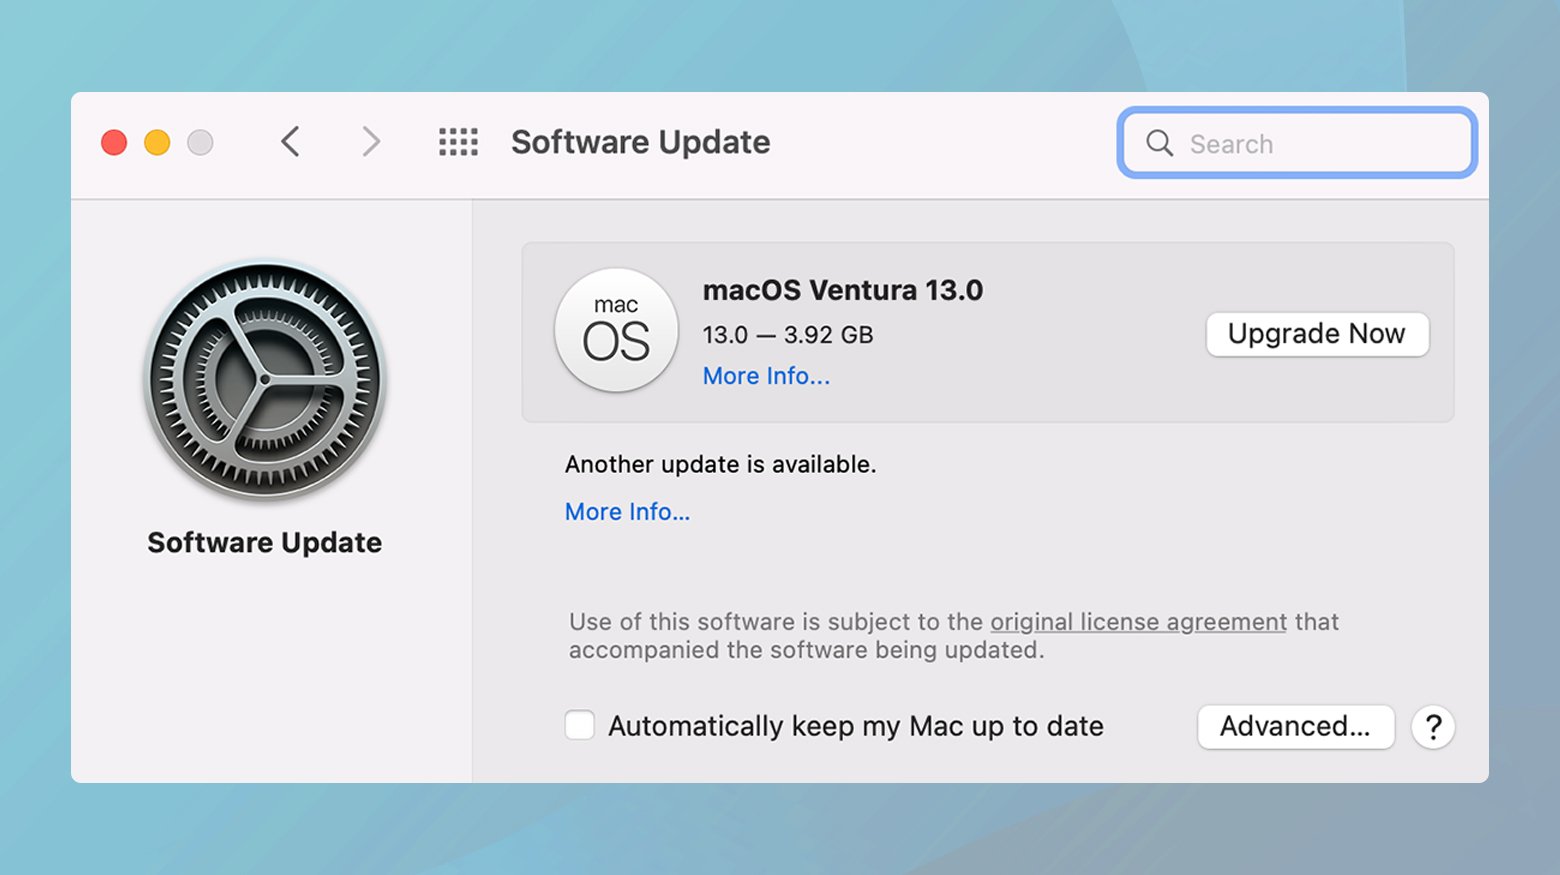
Safari updates are included with macOS updates.
Go to “System Preferences” > “Software Update” to check for new updates.
Reset your browser to default settings
This can help eliminate any configuration issues that might cause handshake failures. The process varies by browser, but you can usually find it in the settings under “Advanced” or “Reset.”
Check TLS/SSL protocol support
A protocol mismatch between the browser and server can lead to an SSL handshake failure. This happens, for instance, if the server is set up to support only TLS 1.2, but the browser is still operating on older protocols like TLS 1.0 or TLS 1.1, resulting in no common protocol for communication.
Chrome
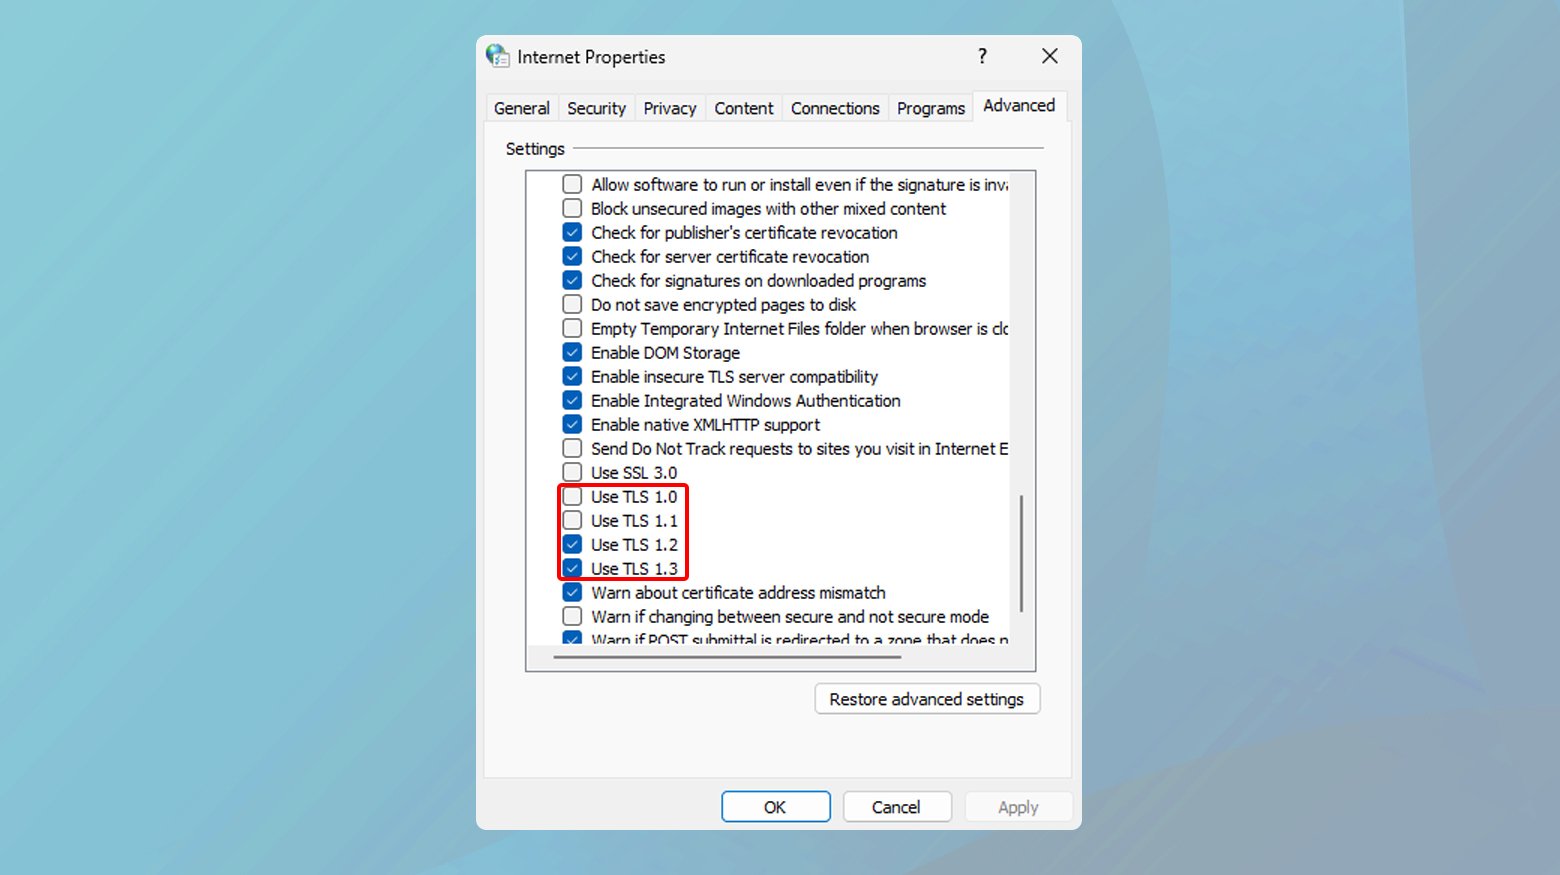
- Go to “Internet Options” > “Advanced” tab.
- Under “Security,” ensure that TLS 1.2 and TLS 1.3 are checked.
- Uncheck SSL 2.0, SSL 3.0, TLS 1.0, and TLS 1.1.
Safari
TLS 1.2 is enabled by default. Ensure your macOS is up to date to support the latest protocols.
Configure supported protocols and Cipher Suites
Protocols and cipher suites are essential for defining the security parameters of an SSL/TLS connection. Protocols like TLS 1.2 and TLS 1.3 specify the overall security standards, while cipher suites determine the encryption algorithm used. If the client and server don’t support a common set of protocols and cipher suites, they won’t be able to establish a secure connection, leading to an SSL handshake failure.
Protocols are the rules governing the secure exchange of data. Older protocols like SSL 3.0 and TLS 1.0 are now considered insecure and should be disabled in favor of newer versions like TLS 1.2 and TLS 1.3.
A cipher suite is a combination of encryption, key exchange, and authentication algorithms. These suites determine how the security protocols protect the data in transit. The choice of cipher suite affects the security and performance of the SSL/TLS connection.
The server needs to be configured to support a broad but secure set of protocols and cipher suites to accommodate various clients while maintaining a high security standard.
Review and adjust server configuration
- Use tools like OpenSSL to list the protocols and cipher suites supported by your server. The command `openssl ciphers -v` can show you a detailed list.
- Ensure that your server configuration explicitly disables older, insecure protocols such as SSL 2.0, SSL 3.0, and TLS 1.0. The method to do this varies by server software (e.g., Apache, Nginx).
- Configure your server to prioritize secure cipher suites, typically those that support forward secrecy and strong encryption algorithms. Avoid cipher suites that use weak encryption algorithms like RC4 or MD5.
- While prioritizing security, ensure your server supports cipher suites and protocols that are commonly used by the majority of clients. This might require enabling TLS 1.2 and TLS 1.3 while ensuring that the cipher suites supported are compatible with most modern browsers and clients.
Apache example: Edit the `ssl.conf` file to include directives like `SSLProtocol -all +TLSv1.2 +TLSv1.3` and `SSLCipherSuite` with a list of desired cipher suites.
Nginx example: In the `nginx.conf` file, use the `ssl_protocols` directive to specify `TLSv1.2 TLSv1.3;` and `ssl_ciphers` to list your preferred cipher suites.
After making changes, use SSL/TLS configuration testing tools like Qualys SSL Labs’ SSL Server Test to evaluate your server’s security posture. This test will highlight any compatibility issues, insecure protocols, or cipher suites that you might have overlooked.
Make sure your server is correctly configured for SNI
Server Name Indication (SNI) plays a crucial role, especially when it comes to SSL handshake failures. SNI allows a web server to host multiple SSL certificates for multiple domains on a single IP address. It’s an economical and efficient solution for web hosting, especially in environments where IP addresses are scarce. However, if SNI isn’t properly configured, the server may not present the correct SSL certificate to the client, resulting in an SSL handshake failure.
During the SSL handshake, the client sends a “ClientHello” message that includes the hostname it’s trying to connect to. The server then uses this information to select the appropriate SSL certificate for that hostname. Without SNI, the server would have no way of knowing which certificate to use in multi-domain environments, as it would receive the request without specific domain information.
There are tools and methods to check if a site requires SNI and if the server is correctly configured to support it. Using these tools, you can quickly determine whether SNI misconfiguration is at the root of your SSL handshake issues.
Using Qualys SSL server test
- Navigate to the SSL Server Test site and enter your domain name.
- After the test completes, check the results for a message indicating whether the site requires SNI support. This is a straightforward way to identify if your site is set up to use SNI.
Using OpenSSL to test SNI support
Without SNI: Run openssl s_client -connect host:port. This command tries to establish an SSL connection without specifying the hostname.
With SNI: Run openssl s_client -connect host:port -servername host. This command explicitly sends the hostname in the ClientHello message.
Compare the certificates returned by these two commands. If they are the same and correctly correspond to the requested host, SNI is supported and properly configured. If not, there may be a configuration issue.
Resolving SNI configuration issues
Check server configuration: Ensure that your server software (Apache, Nginx, etc.) is configured to support SNI. This usually involves specifying the correct certificate files for each hosted domain in the server configuration.
Consider a dedicated IP: If SNI configuration issues persist or if you’re hosting for clients that use very old browsers or systems that don’t support SNI, you might need to move to a dedicated IP address for each SSL certificate. However, this is less common with the wide adoption of SNI support.
Conclusion
In our exploration of resolving SSL handshake failures, we’ve traversed a range of solutions, from straightforward system checks to intricate server configurations. This journey highlights the complex yet critical nature of secure client-server communications. Tools like the Qualys SSL Server Test have emerged as invaluable for diagnosing issues, emphasizing the importance of compatibility between client and server protocols, and the necessity of regular updates and configurations. The essence of this blog points towards a proactive approach to maintaining secure SSL/TLS connections, underlining the pivotal role of ensuring smooth, encrypted communications for a safer web experience.
Say goodbye to website errors
Achieve peace of mind with 99.99% uptime on 10Web Managed
WordPress Hosting, powered by Google Cloud.
Say goodbye to website errors
Fix all the website errors in one click
Migrate your website to the world's best Managed WordPress Hosting.