

Let’s dive into one of the web’s handier responses, the HTTP 304 Not Modified status code. This status code is all about efficiency and speed. When you’re browsing the web, there’s a lot of back-and-forth communication happening between your browser (the client) and the servers hosting the websites you visit. This communication is governed by HTTP (Hypertext Transfer Protocol). HTTP uses status codes to indicate different types of responses. The 304 status code plays a crucial role in making the web faster and more efficient. This code tells your browser to use a cached version of a page, image, or file instead of downloading it all over again.
Say goodbye to website errors
Achieve peace of mind with 99.99% uptime on 10Web Managed
WordPress Hosting, powered by Google Cloud.
What does HTTP 304 mean?
In essence, the HTTP 304 Not Modified status code means “nothing has changed.” It’s a server’s way of saying that the content you’re asking for hasn’t been updated since the last time you requested it. Instead of sending you the same data again, the server instructs your browser to use the version already stored in its cache. This process significantly reduces bandwidth usage and improves page load times, making your browsing experience quicker and more seamless.
Where does this code come from?
The HTTP 304 status code is generated by the server when a website or web application is accessed. It’s based on specific headers sent by the client (your browser), like `If-Modified-Since` or `If-None-Match`. These headers include dates or identifiers that tell the server when you last got the resource. If the server finds that the resource hasn’t changed since that date or the identifier still matches, it responds with a 304 status code.
Understanding this mechanism is crucial because it underlines the importance of proper cache management both on the server and the client side. Misconfigured headers or cache settings can lead to outdated content being served, or, conversely, resources not being cached effectively, which could slow down the web experience.
Occasionally, you may encounter an HTTP 304 response when it is not expected. The primary causes for this can be attributed to:
- Configuration issues with the server or problems with the Domain Name Server (DNS).
- A cached resource that has become compromised or corrupted, such as by malware or viruses affecting the browser.
The 304 status code indicates a scenario that could originate from either the server-side or the client-side, necessitating a thorough diagnostic process to identify and rectify the issue.
How to fix the HTTP 304 status code
The 304 status code is not an error in the traditional sense. It is a feature designed to optimize web browsing by making it faster and more efficient. The HTTP 304 status code means “Not Modified,” indicating that the requested resource hasn’t changed since the last time it was accessed and there’s no need to resend it. However, if you’re developing or debugging a website and come across this status unexpectedly, it may signal the need for a closer look at your caching policies and configurations. Let’s delve into understanding and addressing the nuances of HTTP 304.
Clear your browser’s cache
The cache is a tool browsers use to decrease load times and save bandwidth by storing copies of webpages locally. When you revisit a website, the browser can load it from the cache if it hasn’t changed, rather than downloading it all over again. However, if the cache doesn’t update properly or becomes too full, it might cause your browser to repeatedly serve the 304 status code, even when updates are available. Clearing the cache removes these outdated or corrupt files, compelling the browser to fetch the latest content from the web server. This ensures you’re viewing the most current version of the website.
Chrome
- Click the three-dot menu in the top right corner.
- Navigate to “More tools” > “Clear browsing data.”
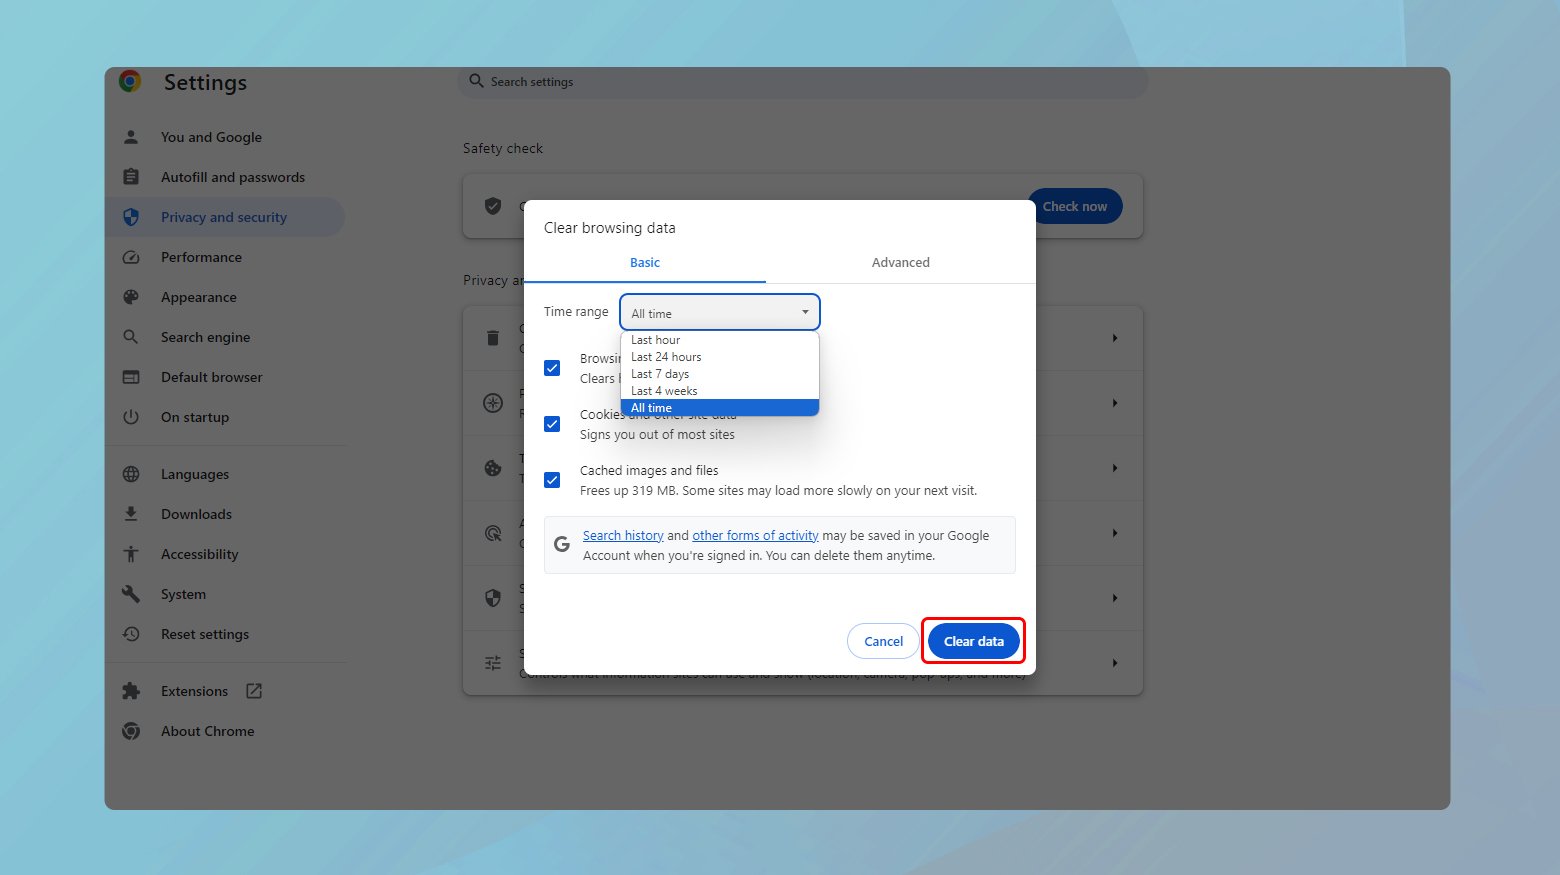
- Choose the time range (selecting “All time” to clear everything).
- Check the boxes for “Cookies and other site data” and “Cached images and files.”
- Click “Clear data.”
Firefox
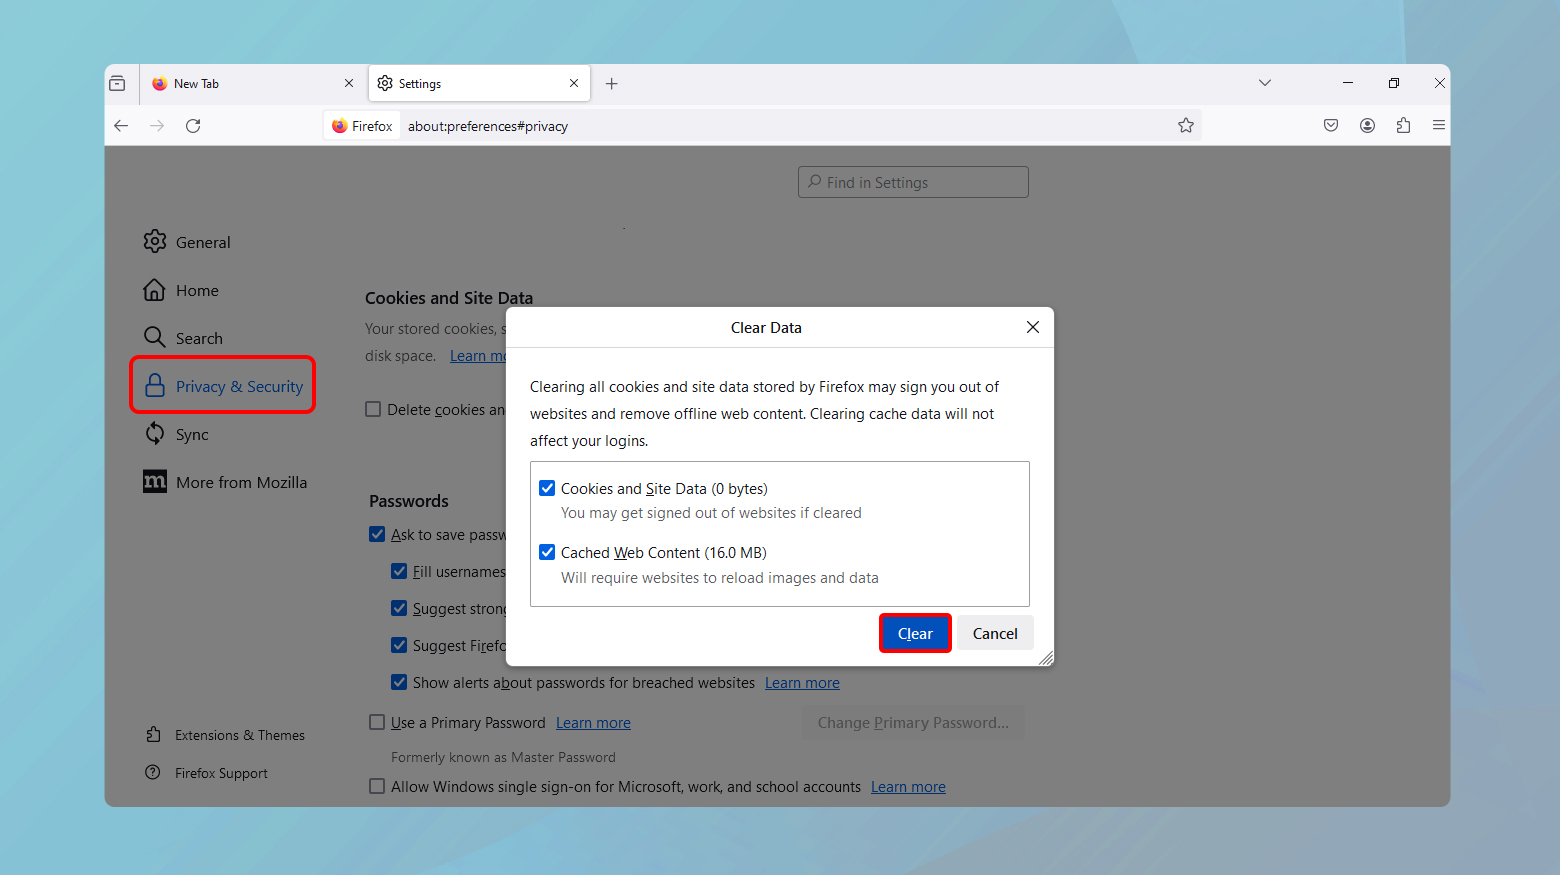
- Click the menu button and select “Options.”
- Go to “Privacy & Security” and scroll down to “Cookies and Site Data.”
- Click “Clear Data” and select “Cached Web Content.”
- Confirm by clicking “Clear.”
Safari
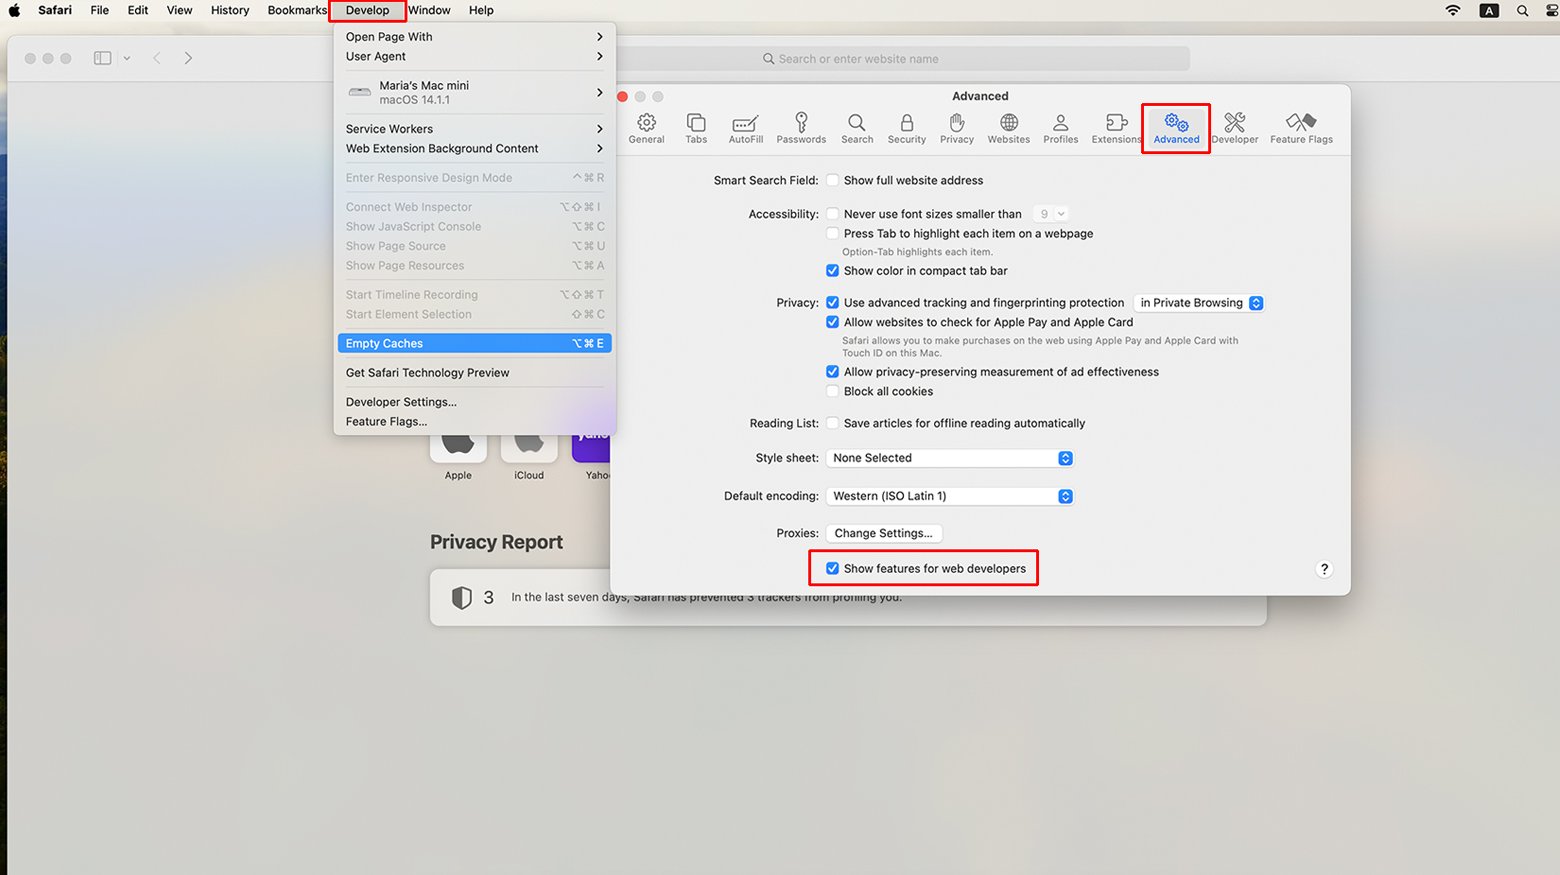
- Go to Safari > Preferences > Advanced.
- Enable the “Show Develop menu in menu bar” option.
- From the Develop menu, select “Empty Caches.”
Scan for malware
Malware can interfere with your computer’s normal operations in myriad ways, including manipulating how your browser interacts with websites. Some malicious software is designed to hijack browser sessions, redirect web traffic, or alter the way your computer handles DNS lookups and caching. This can lead to receiving the 304 status code erroneously.
Running a malware scan helps identify and remove any malicious programs that might be causing your browser to behave unpredictably. By purging these unwanted applications, you restore standard browsing functionality, potentially resolving issues related to the 304 status code.
To run a malware scan:
- Open your antivirus software.
- Select the option to run a full system scan.
- Follow the on-screen instructions to complete the scan and remove any detected malware.

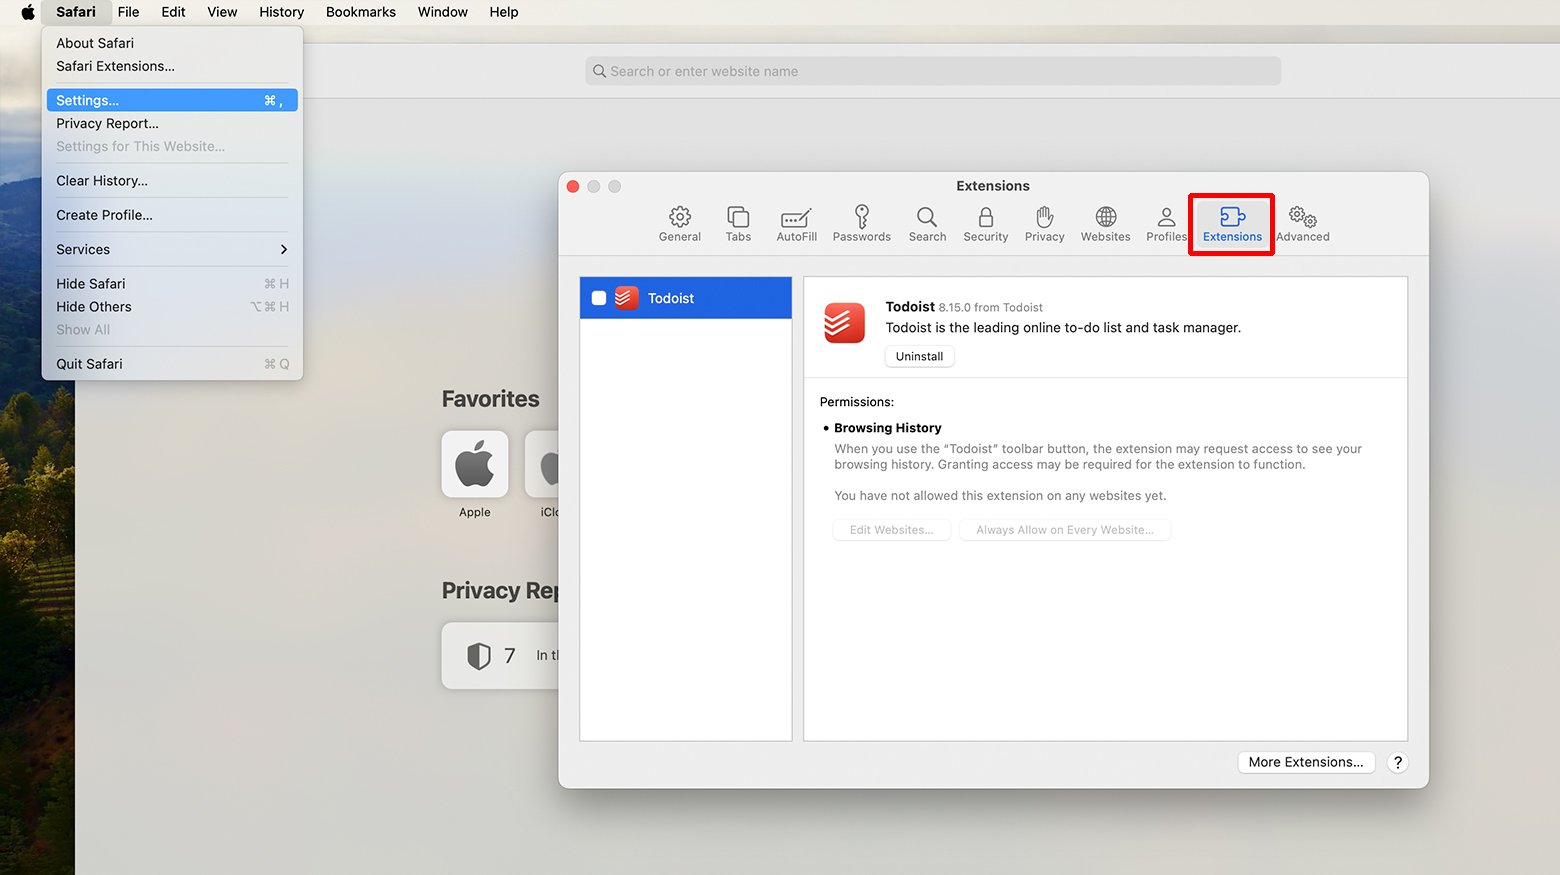
Deactivate browser extensions
Browser extensions can sometimes interfere with how web pages are loaded and displayed. An extension might be designed to modify webpage data, manage cookies, or control cache behavior, inadvertently leading to a 304 status code by preventing the browser from retrieving updated content. An extension can also become corrupted.
Deactivating these extensions can help pinpoint the one causing the issue. Once extensions are disabled, and the problem resolves, you can reactivate them one by one to identify which extension was at fault. This selective process ensures you keep the utility of your extensions while eliminating any negative impact they have on web page loading.
Chrome
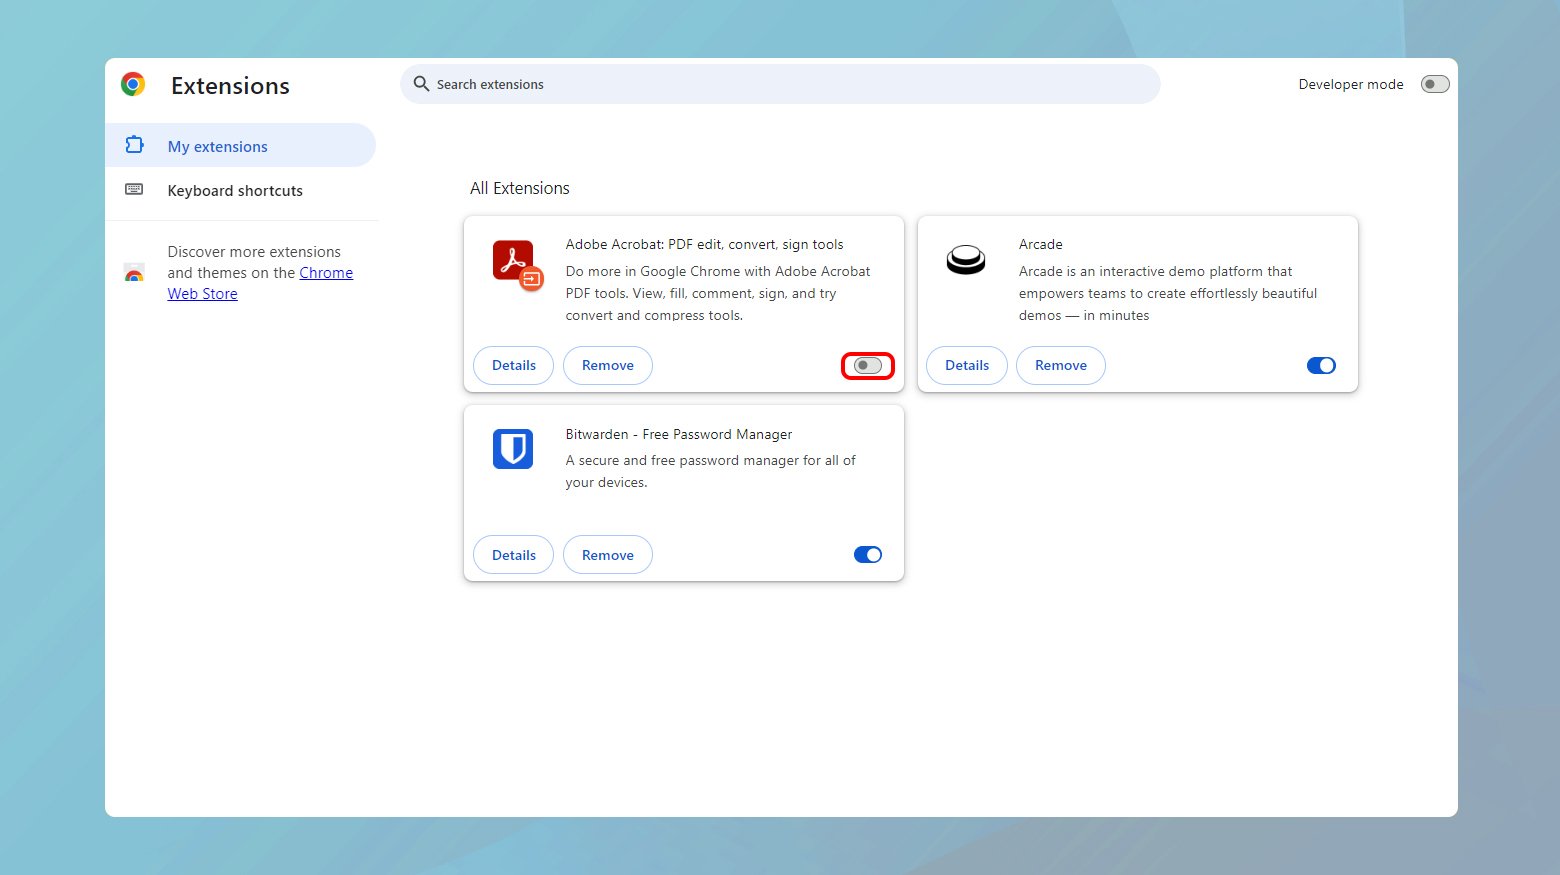
- Click on the three dots at the top right corner
- Go to “Extensions” > “Manage Extensions.”
- Disable extensions one by one by toggling them off.
- After each disable, check if the issue persists to identify the problematic extension.
Safari
- Go to Safari > Preferences > Extensions.
- Uncheck the box next to the extension to disable it.
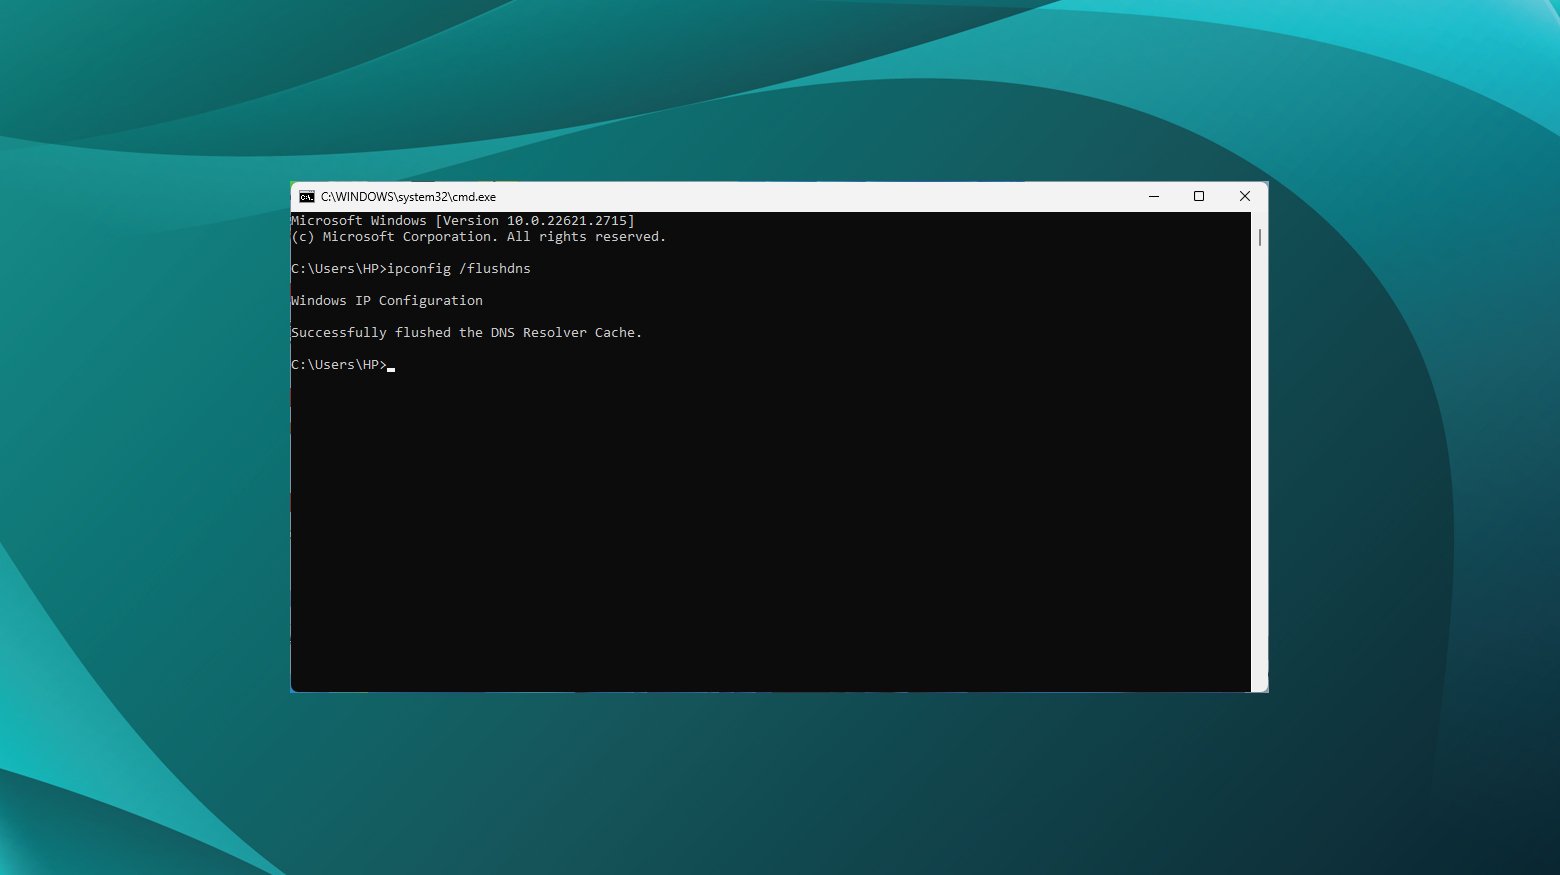
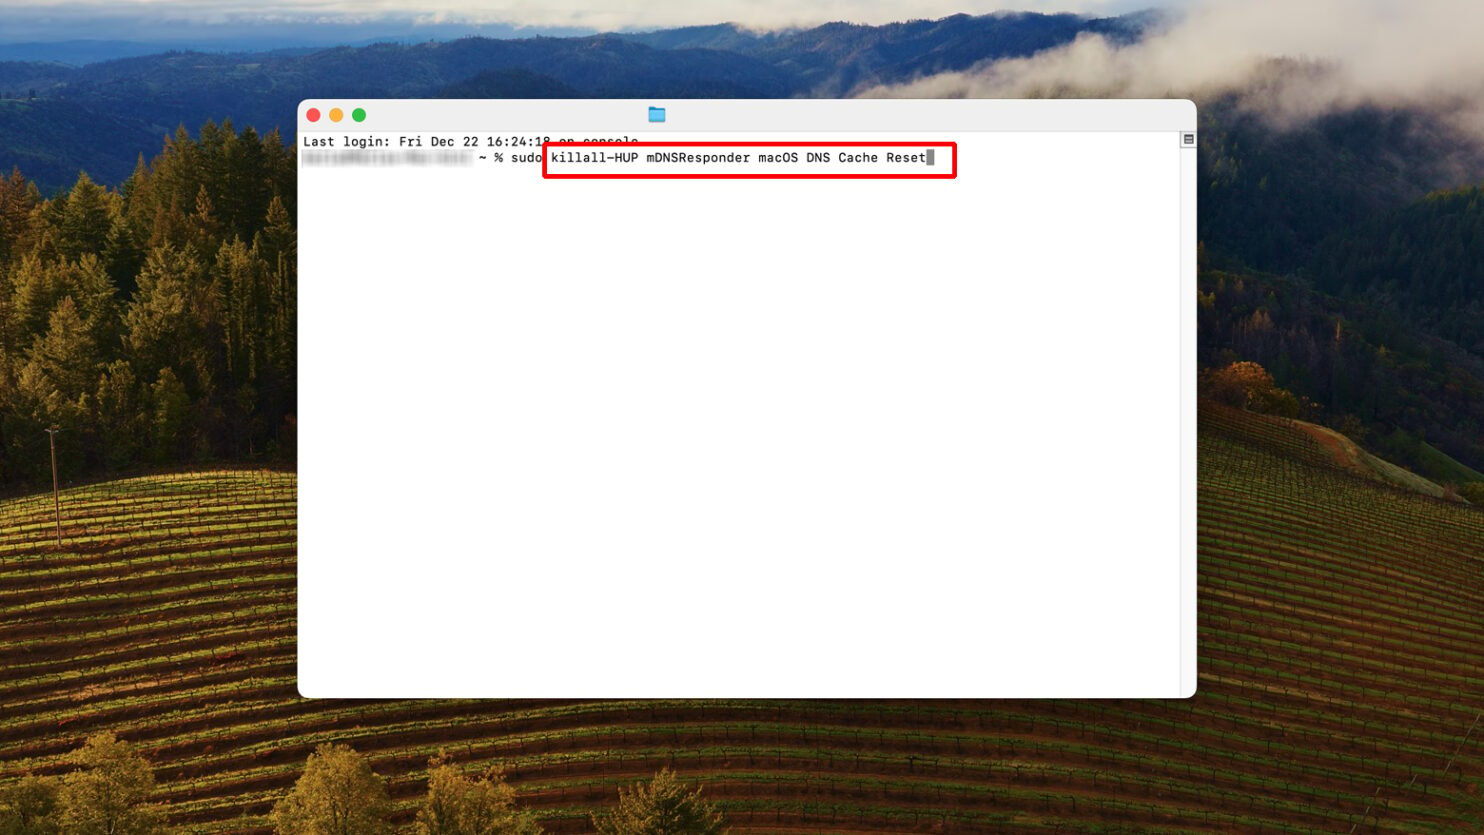
Flush DNS and reset the TCP/IP
Sometimes, your computer’s DNS cache can become outdated or corrupted, leading to issues with loading websites and potentially causing the 304 status code. Flushing the DNS cache clears out these old entries, ensuring your computer queries for the most up-to-date domain information.
Resetting the Transmission Control Protocol/Internet Protocol (TCP/IP) stack, on the other hand, can resolve underlying issues with your internet connection that might be causing the 304 error. This step reverts your internet connection settings back to their defaults, potentially fixing problems caused by misconfiguration or corruption.
Windows
- Open Command Prompt as administrator.
- Type `ipconfig /flushdns` and press Enter to flush the DNS.
- Type `netsh int ip reset` and press Enter to reset TCP/IP.
MacOS
- Open Terminal.
- Type `sudo dscacheutil -flushcache;sudo killall -HUP mDNSResponder` and press Enter to flush the DNS.
- TCP/IP reset is not typically required on macOS, but renewing DHCP lease via System Preferences > Network can help.
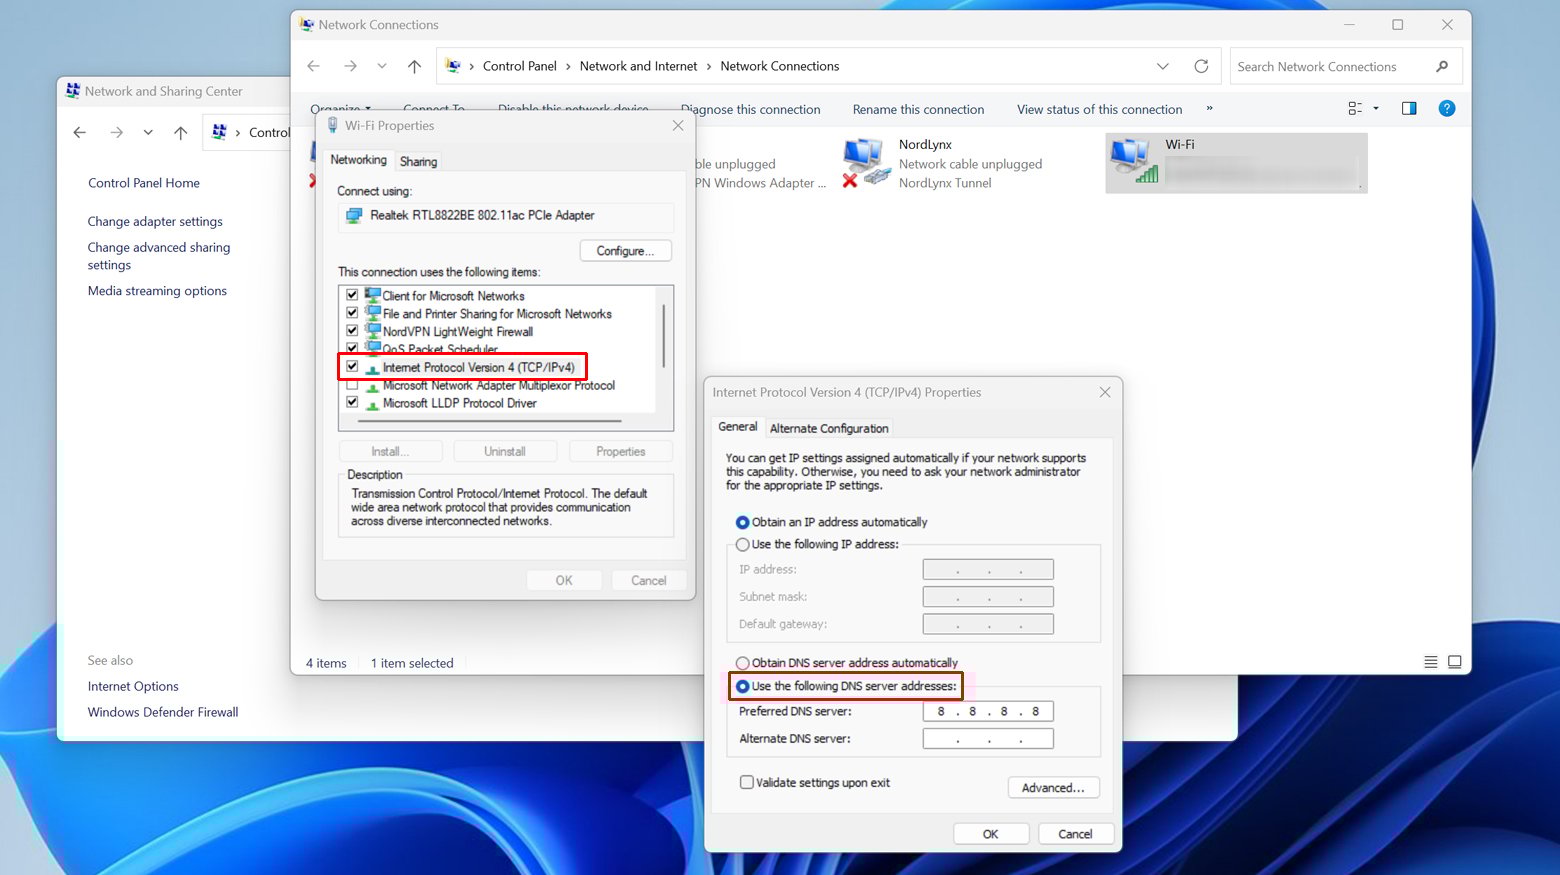
Change DNS
Switching to a different DNS server can improve your internet browsing experience by potentially bypassing issues related to your default DNS settings, which might be causing the 304 status code. Different DNS servers can have different update frequencies or routes for resolving domain names, which might allow you to access a more current version of the website you’re trying to visit. This is particularly useful if the DNS server you’re currently using is slow to update or is experiencing technical difficulties.
Windows
- Go to Control Panel > Network and Internet > Network and Sharing Center > Change adapter settings.
- Right-click your active network connection and select Properties.
- Select Internet Protocol Version 4 (TCP/IPv4) and click Properties.
- Choose “Use the following DNS server addresses” and enter 8.8.8.8 and 8.8.4.4.
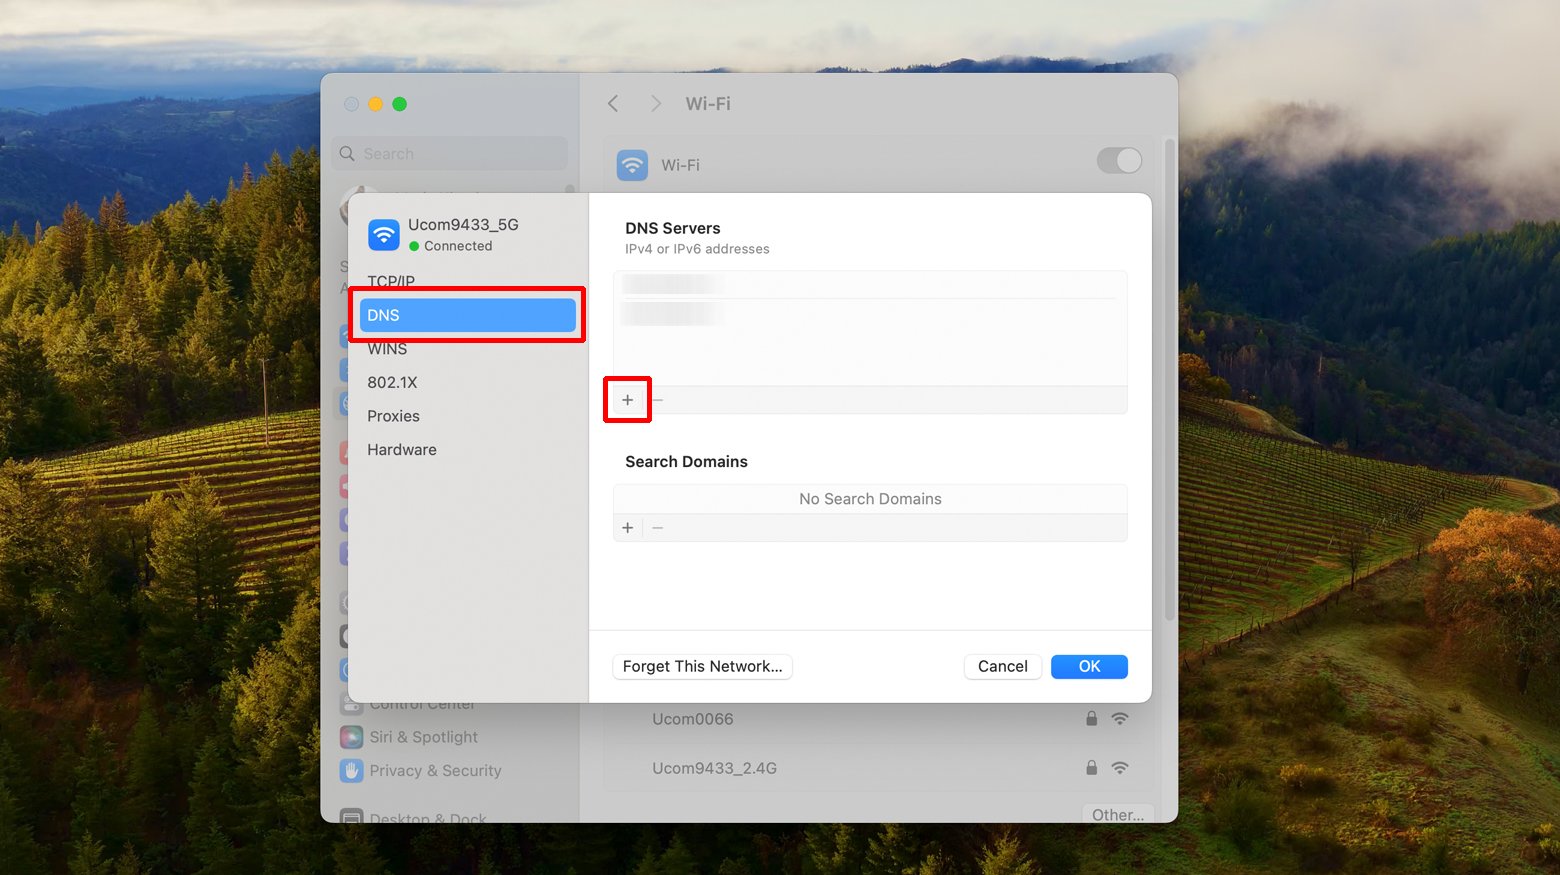
MacOS
- Go to System Preferences > Network.
- Select your active connection and click Advanced.
- Go to the DNS tab and click the + button to add 8.8.8.8 and 8.8.4.4 as DNS servers.
Review your server configuration files for wrong redirect rules
For web developers and administrators, the server’s configuration files dictate how requests are handled, including redirects and caching policies. Incorrect or overly aggressive caching directives can lead to situations where browsers are instructed to rely on cached versions of pages, resulting in a 304 status code even when updates are made. By reviewing and correcting these configuration files, you ensure that your server is providing the correct instructions to browsers, allowing for the proper loading of updated content.
Apache
Apache’s configuration files are typically located in /etc/httpd/ (for CentOS/RHEL) or /etc/apache2/ (for Ubuntu/Debian). The main configuration file is usually named httpd.conf or apache2.conf.
Site-specific configurations can be found in the sites-available directory with symbolic links in sites-enabled for active sites.
-
- Look for directives like Redirect or RewriteRule that might be improperly configured. For example:
Redirect 301 /oldpage.html /newpage.html
RewriteEngine On
RewriteRule ^old-directory/(.*)$ /new-directory/$1 [R=301,L]
- Check for caching-related directives such as CacheControl, ExpiresActive, and ExpiresDefault.
- Verify that these are set appropriately to prevent browsers from relying on outdated cached versions of your content.
- For redirects, ensure that the syntax is correct and points to the valid URL.
- For caching, adjust the times or disable caching for dynamic content that changes frequently.
- After making changes, save your configuration file and restart Apache to apply them. Use the command sudo systemctl restart apache2 on Ubuntu/Debian or sudo systemctl restart httpd on CentOS/RHEL.
Nginx
Nginx configurations are typically found in /etc/nginx/. The main configuration file is nginx.conf, with site-specific configurations located in the sites-available directory and enabled through symbolic links in sites-enabled.
-
- Look for rewrite directives that might be causing incorrect redirects or 304 responses. Ensure that the rewrite rules are correctly implemented and lead to the correct URLs. For example:
server {
 ...
 rewrite ^/oldpage.html$ /newpage.html permanent;
 ...
}
-
- Examine caching configurations, particularly those within location blocks, such as expires directives. These should be set carefully to ensure that dynamic content is not being cached inappropriately, leading to stale content being served. For example:
server {
 ...
 location /static/ {
 expires 30d;
 }
 location /dynamic/ {
 expires off;
 }
 ...
}
- Adjust any rewrite rules that are not correctly directing traffic.
- Update or remove expires directives that are causing excessive caching.
- Once your changes are made, save the configuration file. Restart Nginx to apply the changes with the command sudo systemctl restart nginx.
Notes:
- Always backup configuration files before making changes. This ensures you can revert back if something goes wrong.
- Test your configuration changes using tools like curl to ensure that the expected headers are being sent and received.
- Consider using configuration management tools or version control to track changes to your configuration files, providing an audit trail and simplifying rollback if necessary.
Check error logs
Error logs are a goldmine of information for diagnosing web server issues, including those leading to the 304 status code. These logs can reveal patterns or specific errors related to content delivery, caching, and redirection that might not be immediately apparent. By identifying and addressing the underlying issues highlighted in the error logs, you can resolve factors contributing to the 304 status code, ensuring that your web content is served correctly and is up-to-date.
Closing thoughts
By carefully addressing each potential cause of connectivity issues—from clearing cache data to checking server configurations—you can not only resolve the current problem but also enhance your overall browsing experience. Remember, the key to a smooth and reliable internet experience often lies in regular maintenance and proactive troubleshooting.
Say goodbye to website errors
Achieve peace of mind with 99.99% uptime on 10Web Managed
WordPress Hosting, powered by Google Cloud.
Say goodbye to website errors
Fix all the website errors in one click
Migrate your website to the world's best Managed WordPress Hosting.


