Stumbling upon an error message when you’re trying to access a website can be disappointing. The ‘DNS_PROBE_FINISHED_BAD_CONFIG’ error is a common yet puzzling issue that can pop up across different browsers and operating systems, from Windows and macOS to Android and Ubuntu. But there’s no need to let it dampen your spirits. This error essentially signals a hiccup in the Domain Name System (DNS) – the internet’s way of matching the website you want to visit with its corresponding IP address. When something goes wrong in this matching process, you’re left staring at an error message instead of the website you were hoping to see.
But here’s the good news: DNS-related problems often come with a set of straightforward fixes. Whether you’re a tech newbie or a seasoned pro, there are several steps you can take to resolve the DNS_PROBE_FINISHED_BAD_CONFIG error. In this blog, we’ll first take a look at what the error means and how it may be triggered. Then, we’ll guide you through practical solutions to tackle this issue.
Say goodbye to website errors
Achieve peace of mind with 99.99% uptime on 10Web Managed
WordPress Hosting, powered by Google Cloud.
What does DNS_PROBE_FINISHED_BAD_CONFIG mean?
The DNS_PROBE_FINISHED_BAD_CONFIG error points to a problem with the DNS (Domain Name System) settings on your computer or device. DNS acts like the internet’s phonebook, translating human-friendly domain names into IP addresses that computers use to communicate with each other. When there’s a misconfiguration in your DNS settings, your device struggles to translate these names, leading to an inability to access websites.
The issue could stem from various sources—your local computer, the router you’re connected to, or even your Internet Service Provider (ISP). It’s crucial to understand that this error doesn’t necessarily point to a single point of failure. Instead, it’s an indication that somewhere along the line, your device can’t properly communicate with the DNS server.
Variations of the DNS_PROBE_FINISHED_BAD_CONFIG error
The DNS_PROBE_FINISHED_BAD_CONFIG error is generally consistent across different browsers and devices, but the way it’s presented might vary slightly. You could encounter messages like:
- DNS_PROBE_FINISHED_BAD_CONFIG
- This webpage is not available DNS_PROBE_FINISHED_BAD_CONFIG
- The website could not be found because the DNS lookup failed
Regardless of the variation, the root cause remains a DNS resolution issue.
Reasons why this error occurs
Several factors can lead to the DNS_PROBE_FINISHED_BAD_CONFIG error. Understanding these can help pinpoint the problem:
Incorrect DNS server addresses: If the DNS server addresses on your device or router are incorrect or outdated, you’ll likely face this issue.
Network configuration issues: Misconfigurations in your network settings can prevent your device from accessing the DNS server correctly.
ISP problems: Sometimes, the fault lies with your ISP. If their DNS servers are down or experiencing issues, you might encounter this error.
Firewall or security software: Overzealous firewall settings or security software can block DNS queries, leading to resolution failures.
Router glitches: Routers can occasionally glitch, causing DNS errors. A simple restart can often resolve this.
Temporary connectivity issues: Brief internet or connectivity problems can also trigger this error message, even if everything is configured correctly.
Fixing the DNS_PROBE_FINISHED_BAD_CONFIG error
Now, let’s talk about solutions. Here are some ways to tackle this error:
Restart your router
Restarting your router is like giving your internet connection a fresh start. It clears the router’s internal memory (cache), which can sometimes become cluttered with outdated or corrupt data. A restart helps in renewing your connection to your Internet Service Provider’s (ISP) DNS server, possibly rectifying any DNS-related errors you’re encountering.
When you restart your router, you effectively sever and then re-establish the connection between your home network and your Internet Service Provider (ISP). This process is crucial because it allows your router to renegotiate the best possible connection based on current network traffic and conditions. It’s like hanging up a call that’s got static and redialing for a clearer connection.
Routers, much like computers, store a DNS cache. This cache is a temporary database of recent DNS lookups that the router has performed. While caching DNS lookups speeds up web browsing by reducing the time needed to resolve domain names to IP addresses, this cache can become outdated or corrupt. When this happens, it can cause DNS errors. Restarting the router clears this cache, ensuring that all subsequent DNS lookups are fresh and uncorrupted.
Networks assign IP addresses to each device connected to them. Sometimes, two devices might end up with the same IP address, leading to conflicts that can disrupt internet access. Restarting your router forces it to reassign IP addresses to each connected device, potentially resolving any conflicts that could be causing DNS errors.
Like any computer, a router runs software that handles all its tasks, from routing traffic to performing DNS lookups. Over time, software glitches can occur, leading to performance issues or errors. Restarting the router can reset these software processes to their default state, clearing out any glitches that might have developed.
- Locate the power button on your router.
- Press the power button to turn off the router. If there’s no power button, you might need to unplug the power cable.
- Wait for at least one minute.
- Power on the router.
- Restart your computer.
- Reconnect to your network.
- Test the connection. Try accessing the website again.
Flush browser cache.
While it might seem unrelated at first glance, clearing your browser’s cache can be a surprisingly effective step in troubleshooting the DNS_PROBE_FINISHED_BAD_CONFIG error. Before delving into more technical network configurations, it’s worth considering this simpler solution, especially since the issue could stem from cached data in your browser causing conflicts.
Your browser’s cache stores copies of web pages, images, and other data to speed up your browsing experience. However, if there’s an error stored in this cache or if the cached version of a page is outdated, it could lead to DNS or connection errors when trying to access certain sites.
Clearing the cache forces your browser to load the latest version of web pages, ensuring that any changes to the site or its DNS records are accurately reflected in your browsing session.
Sometimes, the DNS error might be isolated to a single browser due to its unique caching mechanism. Clearing the cache can eliminate these browser-specific issues, providing a clean slate for accessing websites.
Google Chrome
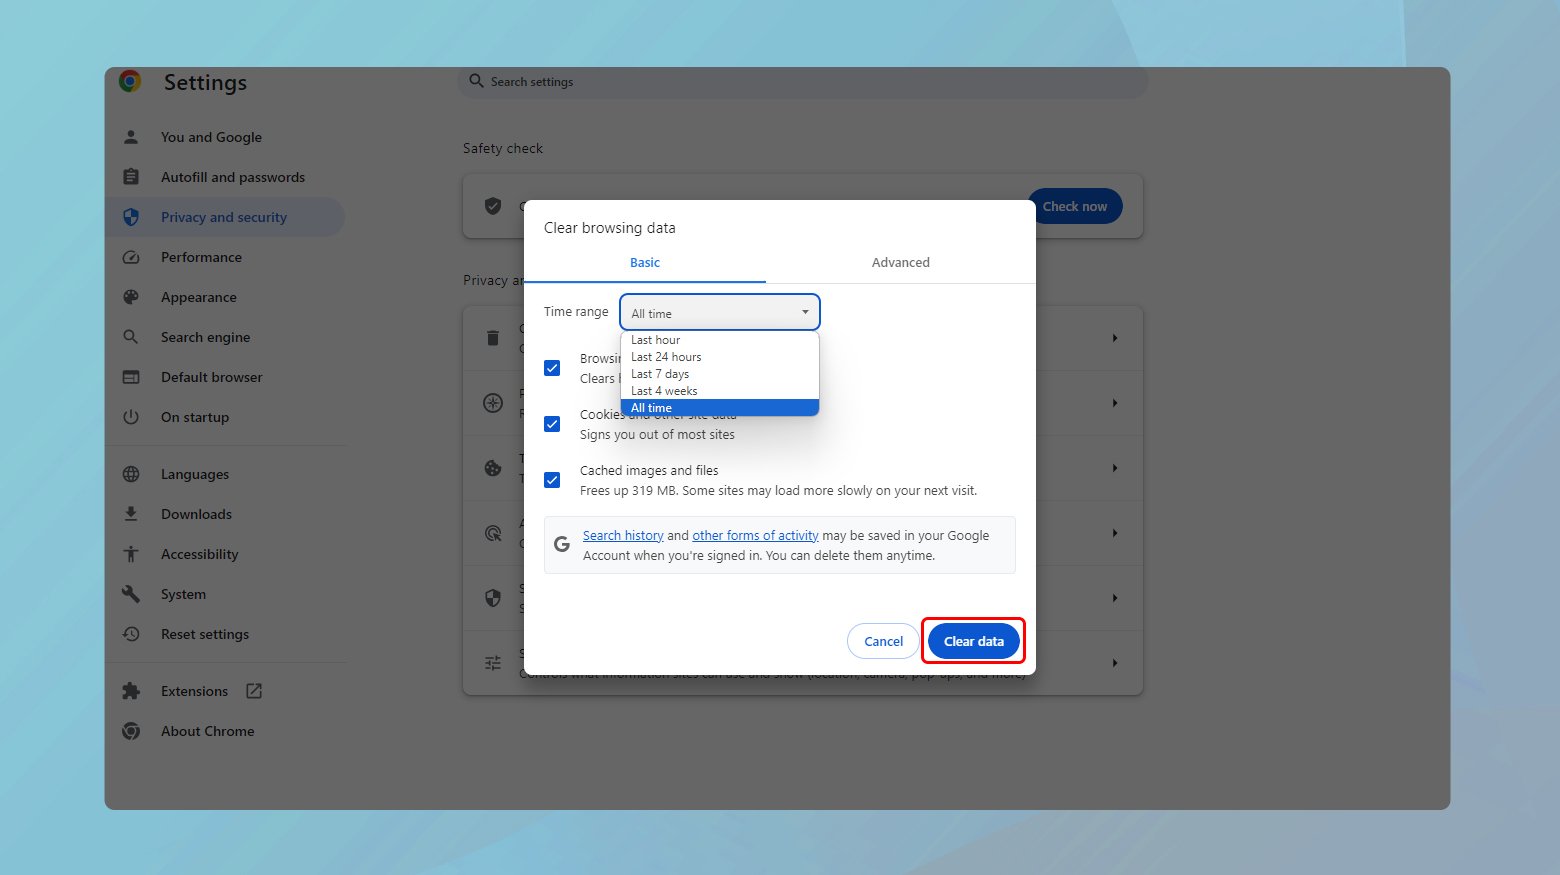
- Click on the three dots in the top right corner to open the menu.
- Navigate to More tools > Clear browsing data.
- In the “Clear browsing data” window, select the time range. To completely clear the cache, select “All time”.
- Check the boxes for “Cookies and other site data” and “Cached images and files”.
- Click on the “Clear data” button to flush the cache.
Mozilla Firefox
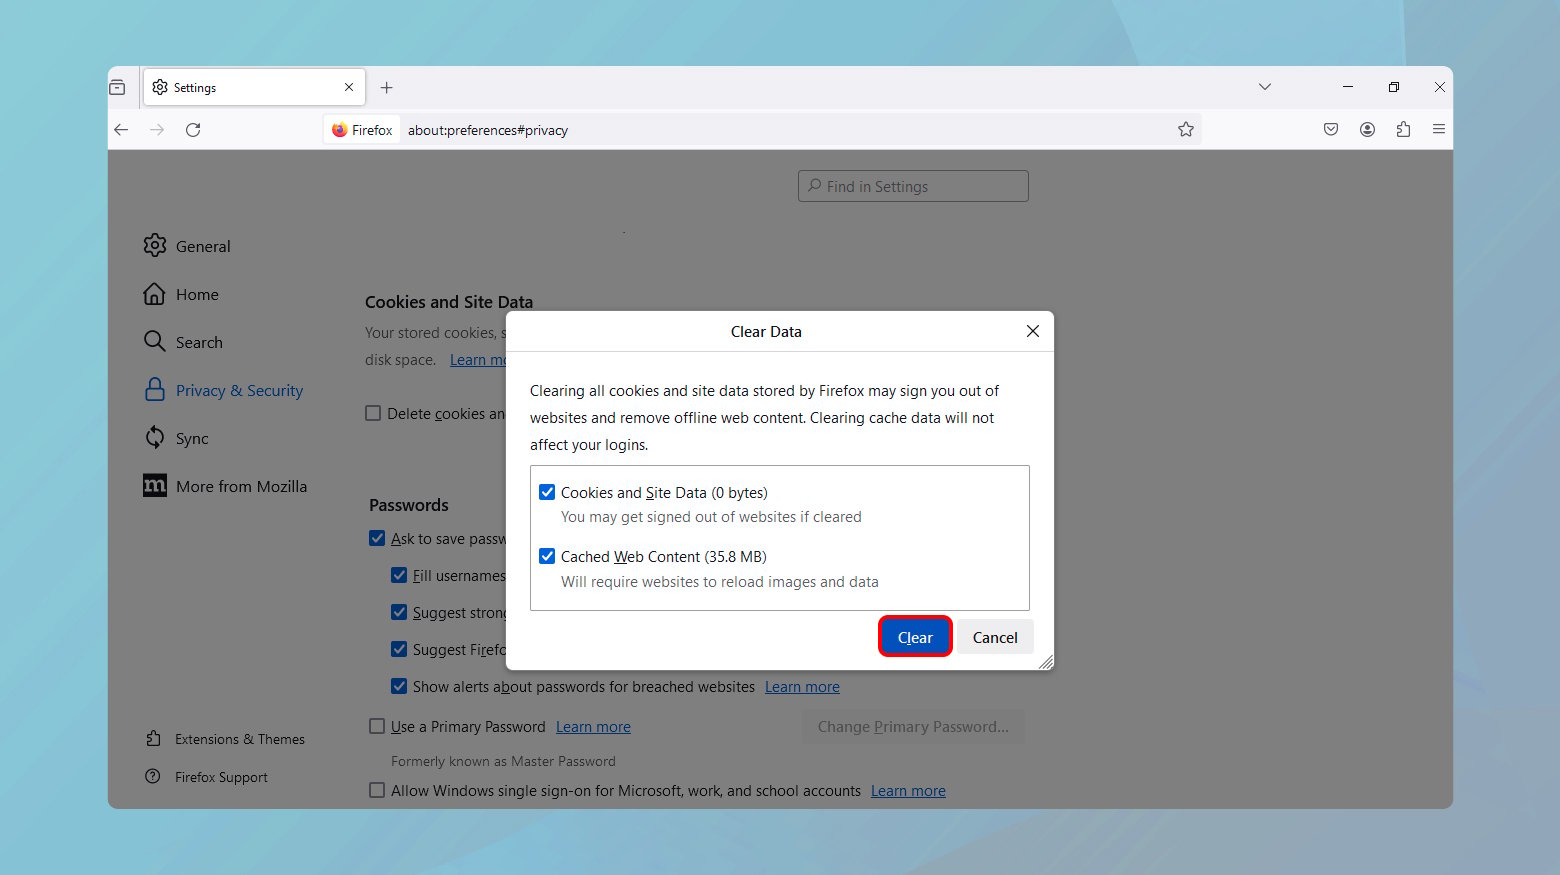
- Click on the menu button (three horizontal lines) and select Options.
- Scroll down to the “Cookies and Site Data” section.
- Click on “Clear Data”.
- Ensure “Cached Web Content” is checked.
- Click “Clear” to remove the cached content.
Safari
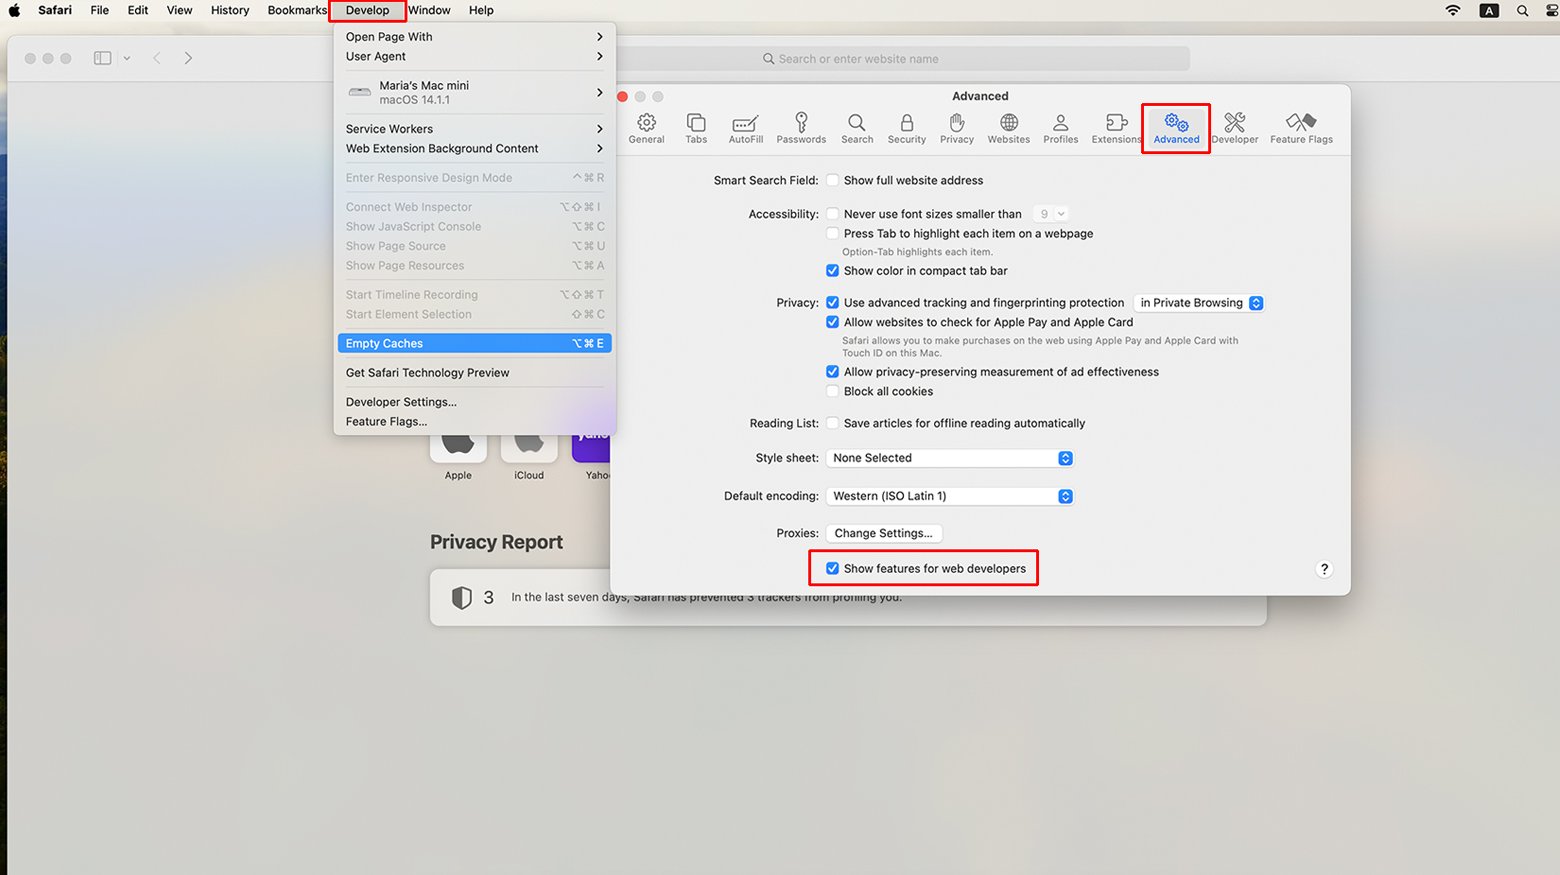
- Click on Safari in the menu bar, then select Preferences.
- Enable the “Show Develop menu in menu bar” option at the bottom.
- In the menu bar, click Develop, then select “Empty Caches”.
Flushing DNS cache and renewing IP address
After addressing the simpler solutions like checking your connections and restarting your router, if you’re still facing the DNS_PROBE_FINISHED_BAD_CONFIG error, it’s time to delve into more technical territory. This involves flushing your computer’s DNS cache and renewing your IP address. Let’s break down why these steps are effective and how to perform them across different operating systems.
Flushing DNS cache
Your computer’s DNS cache stores the addresses of websites you visit to speed up future access. However, if this cache holds outdated or incorrect information (due to changes in the website’s IP address or DNS misconfigurations), it can lead to DNS errors. Flushing the cache removes these stale entries, forcing your computer to retrieve fresh DNS information.
Corrupted cache entries can be a direct source of DNS_PROBE_FINISHED_BAD_CONFIG errors. By clearing the cache, you eliminate potential error sources, ensuring that DNS lookups start with a clean slate.
Renewing IP address
The process of releasing and renewing your IP address resets your computer’s connection to the network and its router, potentially resolving conflicts or misconfigurations that could be causing DNS errors.
DHCP (Dynamic Host Configuration Protocol) assigns IP addresses within a network. Renewing your IP address can fix issues related to DHCP misconfigurations or exhaustion of IP addresses.
Windows
- Click the Windows icon/Start button.
- Type “cmd” into the search field.
- Right-click on Command Prompt and select “Run as administrator”.
- Enter the following commands and press enter after each command.
Flush DNS:
`ipconfig /flushdns`
Release IP:
`ipconfig /release`
Renew IP:
`ipconfig /renew`
macOS
- Click on the Apple icon.
- Navigate to Applications > Utilities > Terminal.
For macOS v10.11 or later:
`sudo killall -HUP mDNSResponder`
For Yosemite v10.10 through v10.10.3:
`sudo discoveryutil mdnsflushcache`
For Mavericks, Mountain Lion, and Lion:
`sudo killall -HUP mDNSResponder`
For Snow Leopard:
`sudo dscacheutil -flushcache`
Renew IP address:
Go to Apple menu icon > System Preferences > Network > Advanced > Renew DHCP.
Android
- Go to Settings > Applications > App info.
- Select your browser (e.g., Chrome), then Storage.
- Tap on the Clear Cache button.
Ubuntu
- Open Terminal (CTRL + ALT + T).
- Type the following code and press Enter.
`sudo systemd-resolve --flush-caches`
Change DNS servers
When you’ve tried flushing your DNS cache and renewing your IP address but still can’t shake off the DNS_PROBE_FINISHED_BAD_CONFIG error, it might be time to consider changing your DNS servers. Internet Service Providers (ISPs) automatically assign DNS servers, but these aren’t always the fastest or most reliable. Switching to a public DNS service like Google DNS or OpenDNS can often resolve DNS-related issues by providing a more stable and faster DNS resolution service.
Public DNS servers are typically more reliable than ISP-assigned ones, reducing the likelihood of DNS errors. Services like Google DNS and OpenDNS often provide faster DNS lookup times, improving your overall browsing speed. Public DNS services often have better security features, like phishing protection, which can enhance your browsing safety. In some cases, switching DNS servers can help circumvent geographical restrictions or ISP DNS manipulation, providing access to content that might be blocked or redirected in your region.
Windows
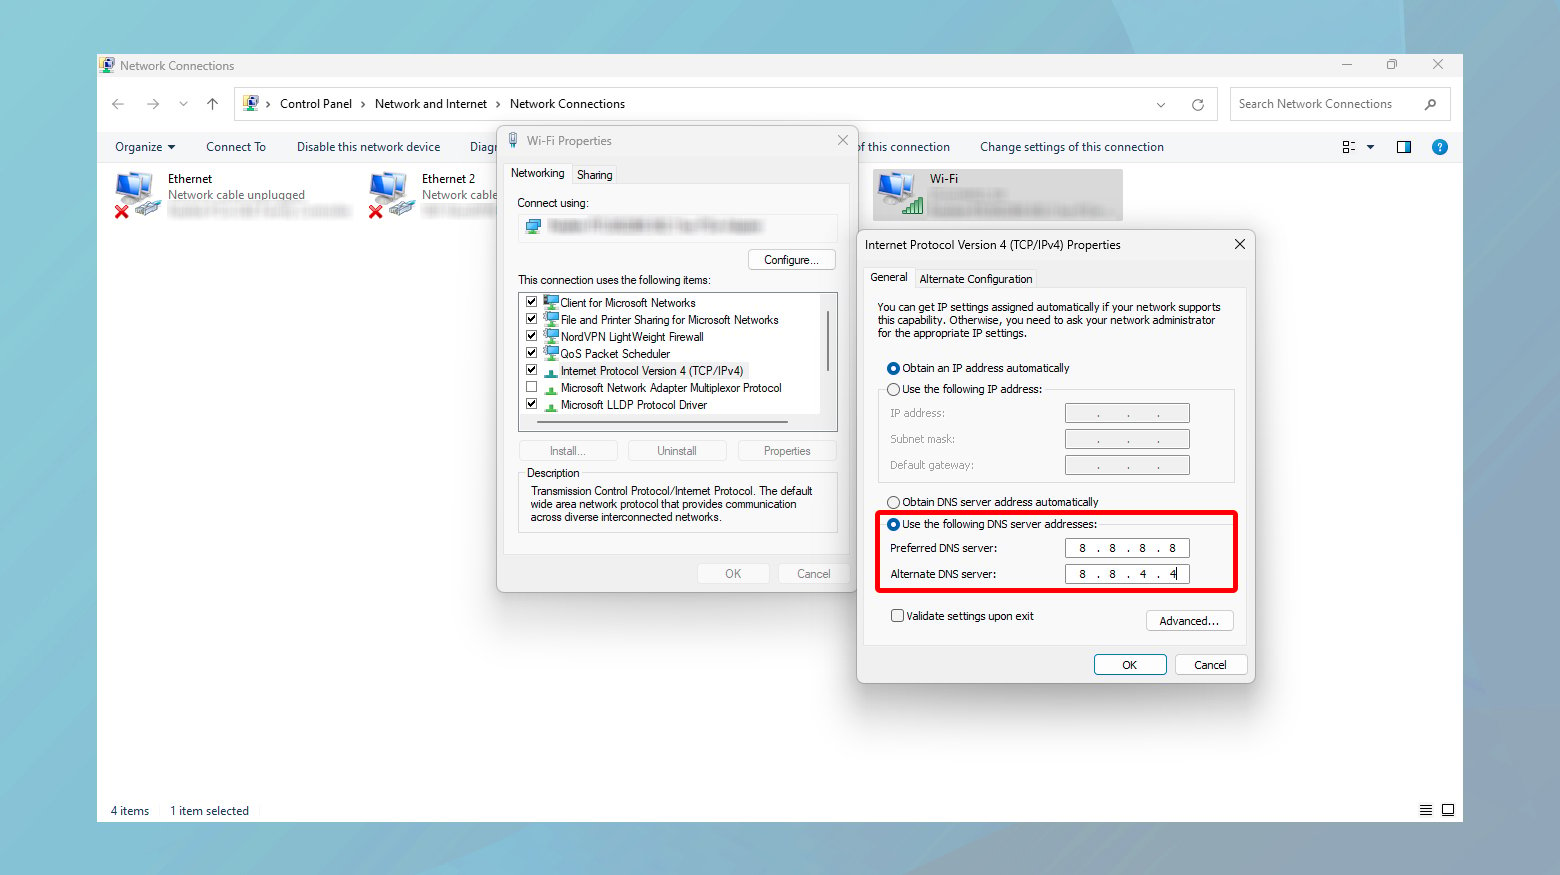
- Right-click the network icon in the system tray and select Open Network & Internet settings. Then, click on Change adapter options.
- Right-click on your active network connection (Wi-Fi or Ethernet) and select Properties.
- Select Internet Protocol Version 4 (TCP/IPv4) and click Properties.
- Choose “Use the following DNS server addresses”.
- Enter 8.8.8.8 as the Preferred DNS Server and 8.8.4.4 as the Alternate DNS Server (for Google DNS).
- Click OK to apply the changes.
macOS
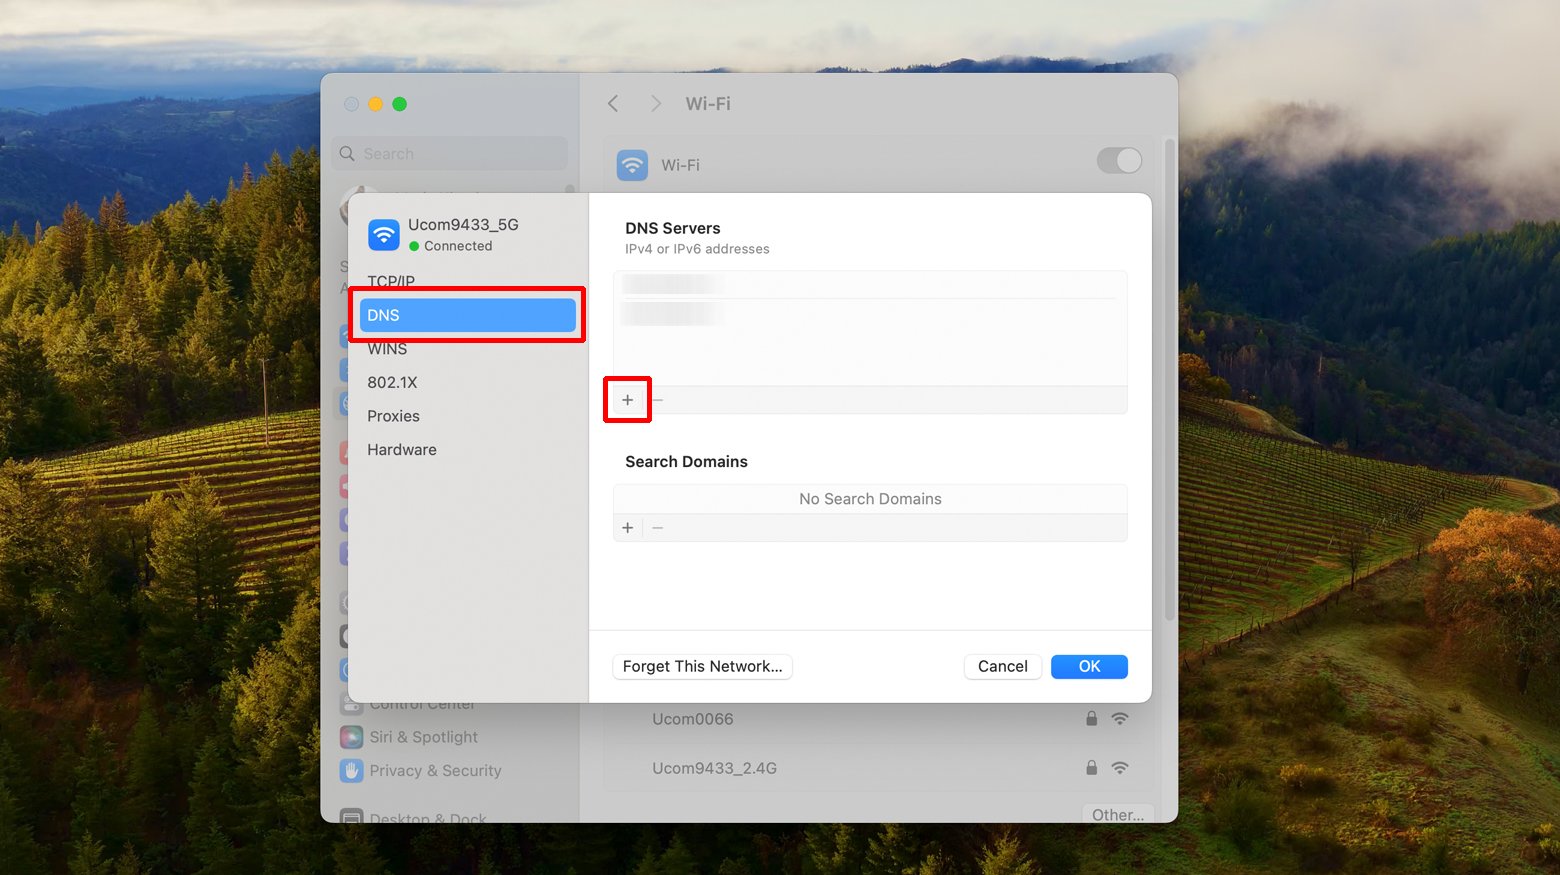
- Click on the Apple menu icon, then System Preferences > Network.
- Select your network connection on the left.
- Click the Advanced button, then the DNS tab.
- Click the (+) button and add 8.8.8.8 and 8.8.4.4 to the DNS Servers list.
- Click OK, then Apply.
Android
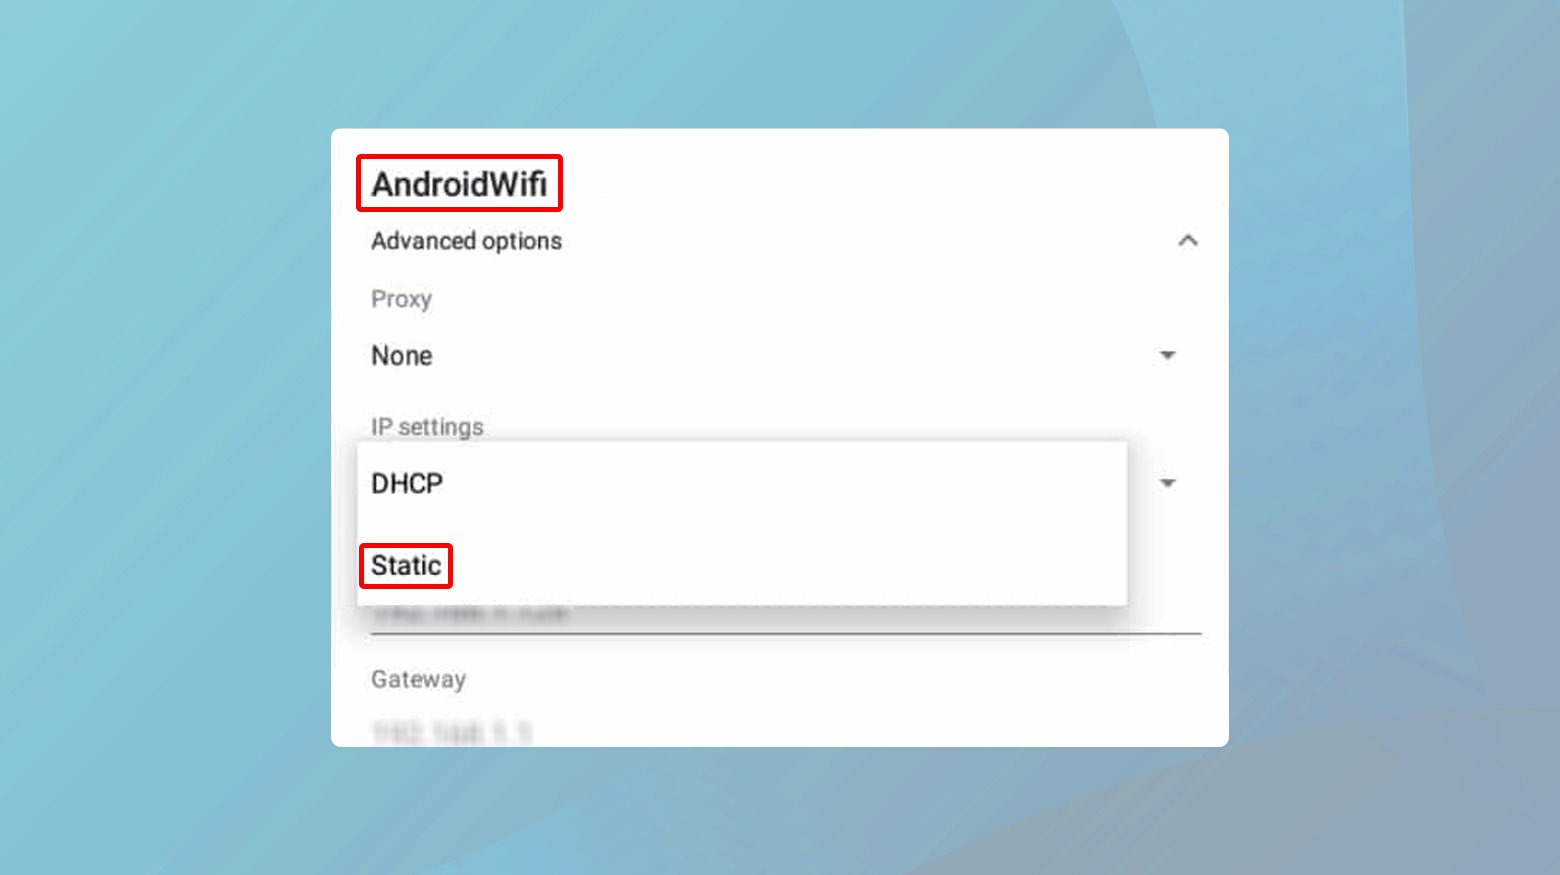
- Go to Settings > Wi-Fi.
- Press and hold your connected network, then select Modify network.
- Tap Advanced options and change IP settings to Static.
- Under DNS 1 and DNS 2, enter 8.8.8.8 and 8.8.4.4, respectively.
- Save your changes.
Ubuntu
- Click on the network icon in the top right corner, then Settings next to your network.
- In the network settings, navigate to the IPv4 tab.
- Turn off the Automatic toggle for DNS.
- Enter 8.8.8.8,8.8.4.4 in the DNS field.
- Click Apply to save your changes.
Check firewall and security software
These security measures are essential for protecting your computer, but they can occasionally interfere with your network connections, including DNS requests. Temporarily disabling these can help you pinpoint if they’re the reason behind your DNS troubles.
Some security programs have overly aggressive settings that might block DNS requests. This is because they might interpret these requests as suspicious activity, especially if they’re directed to unfamiliar DNS servers.
If you’re using a VPN, it could alter your DNS settings or route DNS requests in a way that causes conflicts with your current network setup.
Custom firewall rules might inadvertently block traffic to and from DNS servers, especially if those rules are too restrictive or incorrectly configured.
Windows
To temporarily disable the antivirus:
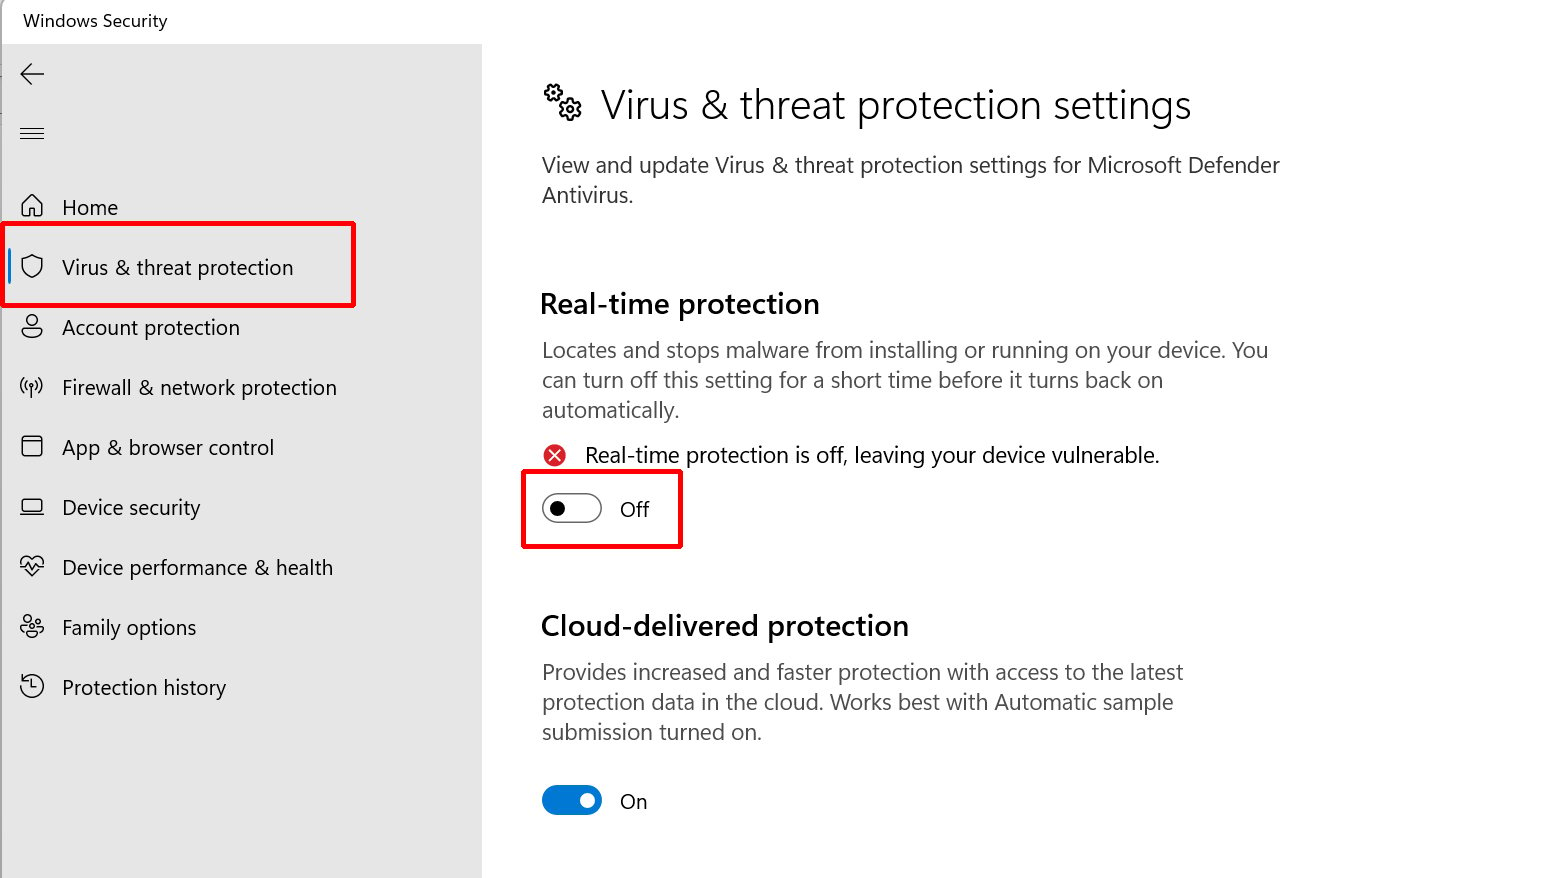
- Click on the Windows icon and type “Windows Security” into the search field, then select “Virus & threat protection”.
- Navigate to “Virus & threat protection settings” and click on “Manage settings”.
- Toggle the switch for “Real-time protection” to Off. Remember, this is temporary; you’ll want to re-enable it as soon as you’re done testing.
To temporarily disable the firewall:
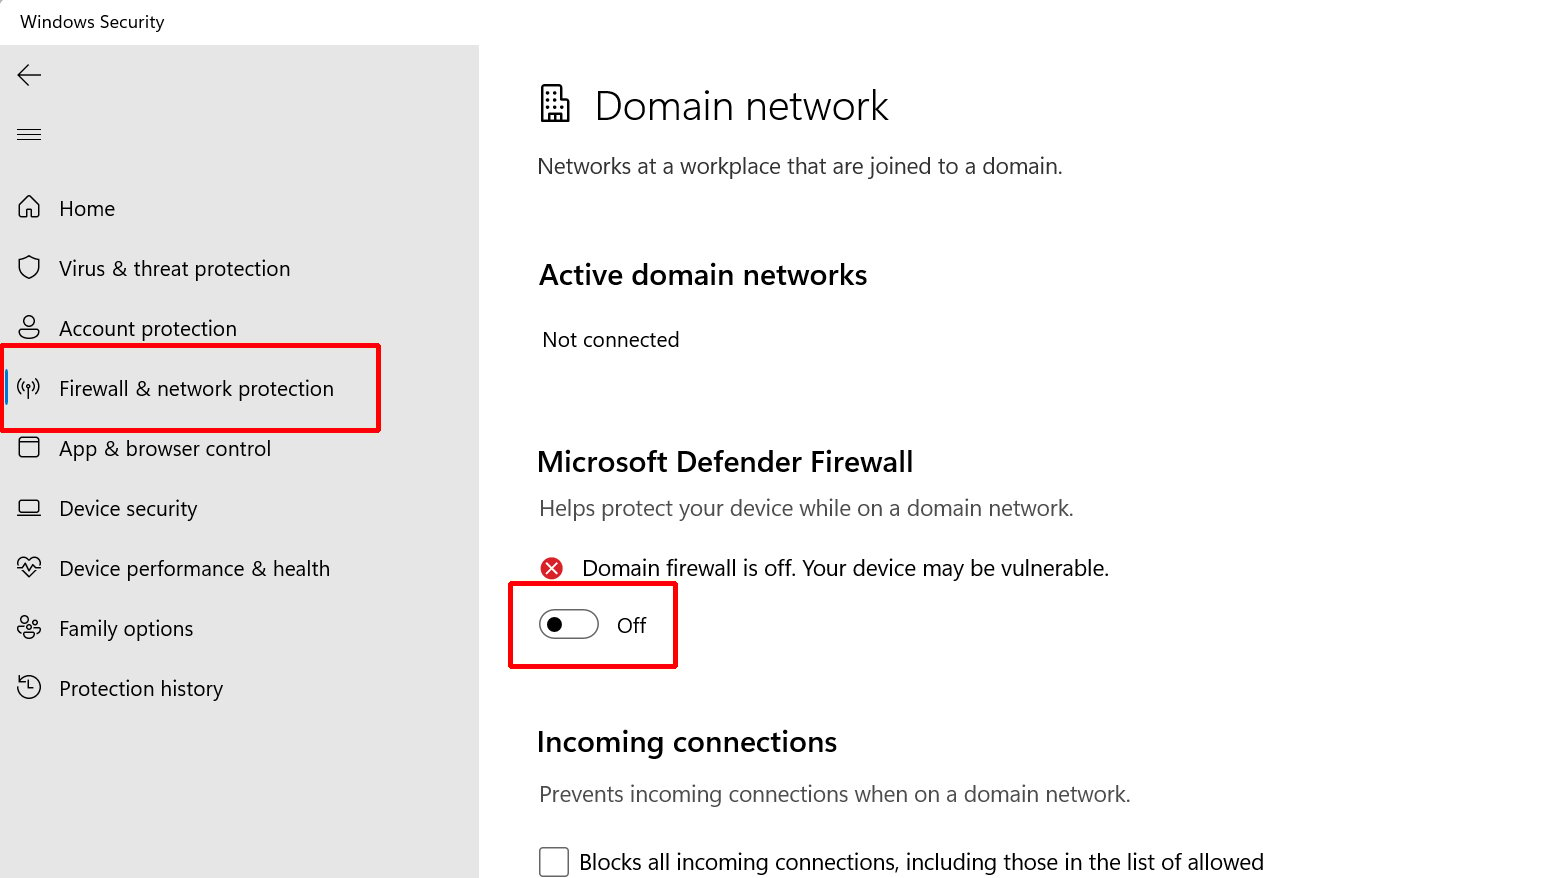
- In the Windows Security window, click on “Firewall & network protection”.
- Select your active network profile (usually “Private network” or “Public network”).
- Toggle the switch to turn off Windows Defender Firewall. Again, this is just for testing purposes.
macOS
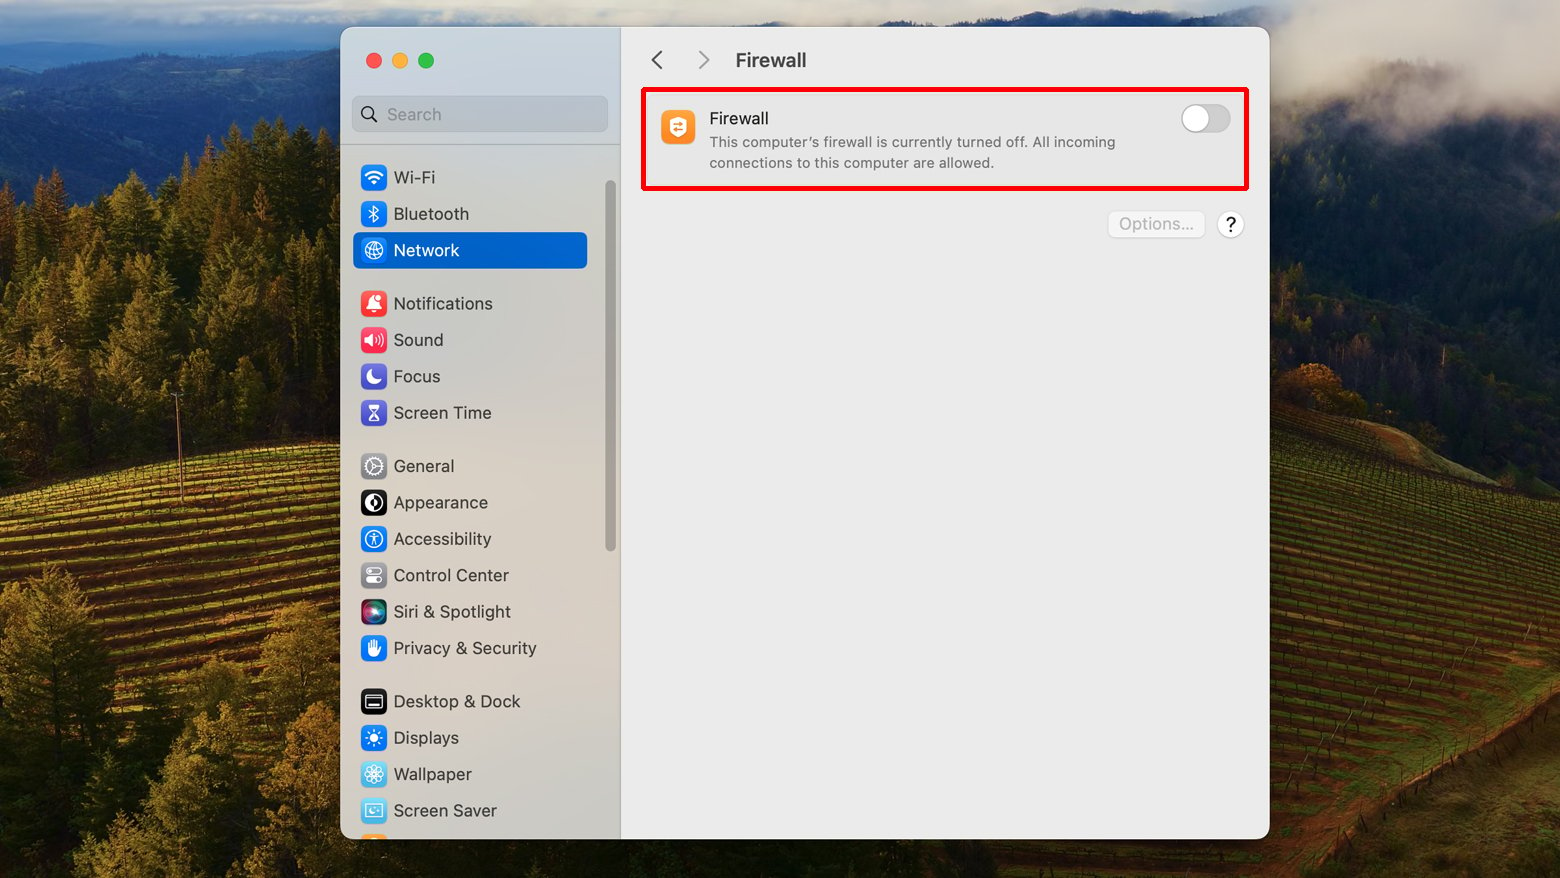
To temporarily disable the firewall:
- Go to System Preferences > Security & Privacy.
- Click on the Firewall tab.
- Click the lock icon at the bottom left to make changes (you may need to enter your password).
- Click “Turn Off Firewall”.
macOS doesn’t come with built-in antivirus that requires disabling like Windows, but if you have third-party antivirus software, consult the software’s help guide for instructions on temporarily disabling it.
After disabling security software
Once you’ve temporarily disabled your firewall and antivirus, try accessing the website again. If the DNS_PROBE_FINISHED_BAD_CONFIG error no longer appears, you’ve found the culprit. You’ll need to adjust your security software’s settings to prevent this issue in the future. This might involve setting exceptions for certain DNS servers or adjusting the sensitivity of your firewall’s rules.
Important considerations
- Always remember to turn your antivirus and firewall back on after testing. These are critical components of your computer’s security.
- If disabling the security software resolves your issue, look into more specific configurations that allow you to use your preferred DNS settings without completely disabling your security protections.
Update network drivers
If the DNS_PROBE_FINISHED_BAD_CONFIG error still lingers after exploring previous solutions, it’s time to inspect your network drivers. Outdated or corrupt network drivers can lead to a plethora of connectivity issues, including DNS errors. Although Windows Updates usually keep these drivers up to date, there might be instances where a manual update is necessary to ensure optimal performance and connectivity.
Newer operating system versions may require updated drivers to function correctly. Outdated drivers might not fully support the latest network protocols or features, leading to DNS errors.
Driver updates often include fixes for known bugs that could be causing network disruptions or DNS errors. Updated drivers can offer improved performance and more stable connections, potentially resolving DNS_PROBE_FINISHED_BAD_CONFIG errors.
Windows
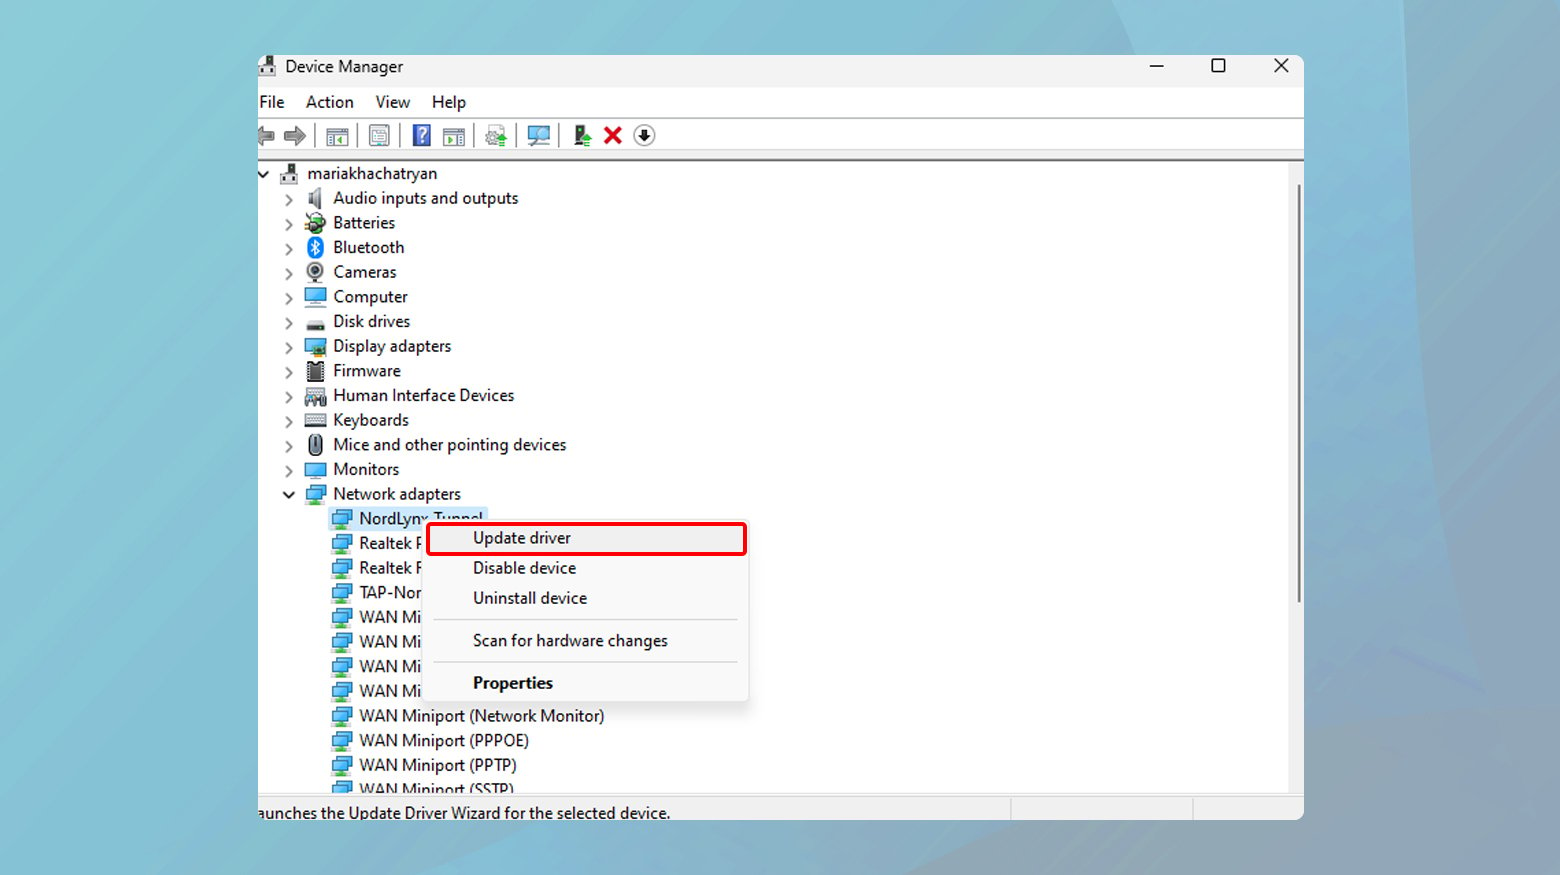
- Type “device manager” into the search field on your taskbar and click on the Device Manager app that appears in the results.
- In the Device Manager window, expand the “Network adapters” section.
- Right-click on your network adapter (it may be named after the manufacturer, like Intel or Realtek) and select “Update driver”.
- Choose “Search automatically for updated driver software” and follow the on-screen instructions.
- Once the update is complete, restart your computer to ensure the new driver is properly applied.
macOS
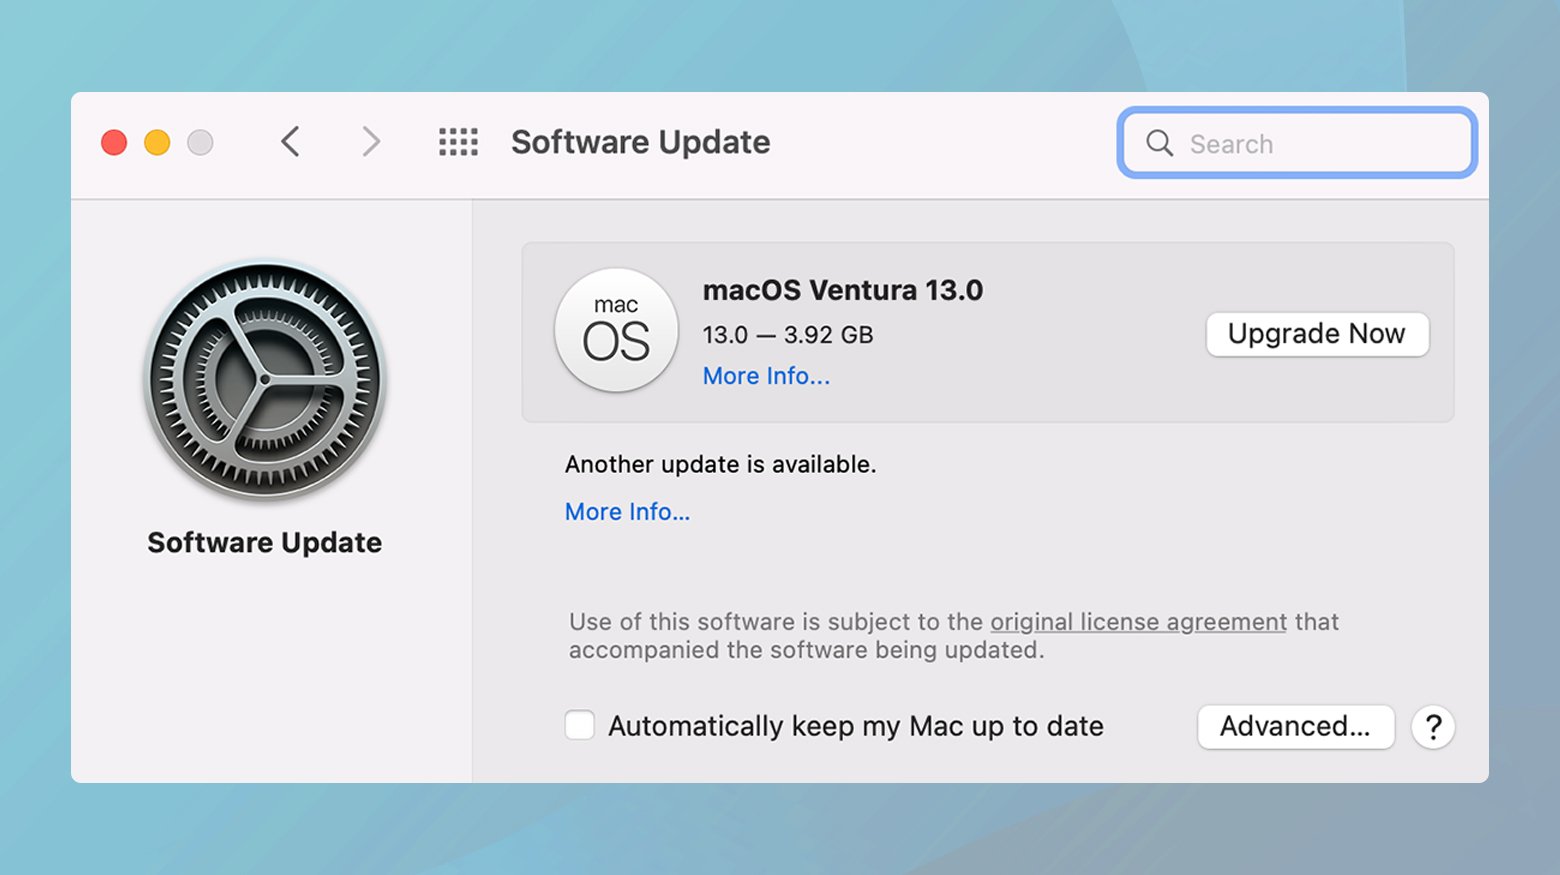
- Click on the Apple menu icon > “About This Mac” > “Software Update”.
- If there are any available updates, follow the prompts to install them. macOS updates include driver updates, so this process will ensure your network drivers are up to date.
Android
- Navigate to “Settings” > “About Phone” or “System Updates” (the exact path can vary based on Follow the prompts to check for and install any available updates.
Additional tips
- If the automatic update doesn’t find a new driver, you can visit the manufacturer’s website for your network adapter or computer. They often have the latest drivers available for direct download.
- There are third-party software solutions designed to keep all your drivers up to date. While useful, ensure you choose a reputable program to avoid installing incorrect or malicious drivers.
Updating your network drivers is a crucial step in resolving DNS errors and enhancing your overall internet connectivity. This process, while slightly technical, can make a significant difference in resolving the DNS_PROBE_FINISHED_BAD_CONFIG error and improving your browsing experience.
Conclusion
Tackling the DNS_PROBE_FINISHED_BAD_CONFIG error requires a step-by-step approach that ranges from simple fixes like restarting your router and refreshing web pages to more technical solutions such as updating DNS settings, flushing DNS caches, and updating network drivers. We also covered the importance of checking firewall and antivirus settings to ensure they’re not interfering with DNS requests. Through these methods, you can address various potential causes of DNS errors, ultimately enhancing your internet connectivity and browsing experience. Keeping your system and network configurations up to date is key to avoiding such issues and ensuring a seamless online experience.
Say goodbye to website errors
Achieve peace of mind with 99.99% uptime on 10Web Managed
WordPress Hosting, powered by Google Cloud.
Say goodbye to website errors
Fix all the website errors in one click
Migrate your website to the world's best Managed WordPress Hosting.