When you’re trying to access a website and bump into the “Server IP Address Could Not Be Found” error, it feels like you’re knocking on a door that just won’t open. This issue is a bit like trying to call a friend but dialing the wrong number – you know they’re there, but you just can’t connect.
This error message is your browser’s way of telling you that it’s having trouble finding the website’s address on the internet. Let’s dive deep into what this means, why it happens, and how you can fix it.
Say goodbye to website errors
Achieve peace of mind with 99.99% uptime on 10Web Managed
WordPress Hosting, powered by Google Cloud.
Variations of the issue
This error might appear under different guises depending on the browser or device you’re using, such as:
- DNS Address Could Not Be Found
- DNS_PROBE_FINISHED_NXDOMAIN
- The site can’t be reached
- Server IP address could not be found.
- www.example.com’s server IP address could not be found.
- DNS lookup failed
Each of these messages points to a similar underlying issue: the browser is unable to resolve the website’s domain name into an IP address, which is crucial for establishing a connection to the site’s server.
Understanding the server IP address could not be found error
Understanding the “Server IP Address Could Not Be Found” error requires a bit of background on how the internet operates, particularly in terms of navigating from one site to another. Here’s a simplified breakdown:
When you enter a domain name (like www.example.com) into your web browser the internet performs a DNS lookup to translate that domain name into the IP address where the server hosting the site is located. This process involves querying the Domain Name System (DNS), a vast network of servers acting as the internet’s phone book.
If the DNS lookup fails at any point in this chain, for any reason, your browser will display an error because it can’t find the server’s IP address.
The “Server IP address could not be found” or “DNS_PROBE_FINISHED_NXDOMAIN” error specifically indicates that this DNS lookup process was unsuccessful in finding an IP address for the domain you entered. This can happen for several reasons:
The site is down: If the server hosting the website is not operational, the DNS lookup will realize the domain exists but can’t connect to the server.
Caching issues: Occasionally, old or corrupted cache entries in your browser or operating system can cause this error, even though the site is perfectly reachable.
DNS server problems: The error might also occur if the DNS server your device is using (often provided by your ISP) is down or experiencing issues.
Reasons why this error occurs
Several factors can lead to this error, each with its technical nuances:
DNS server issues: Your computer uses DNS (Domain Name System) servers to look up website addresses. If the DNS server is down or experiencing issues, it can’t translate domain names into IP addresses.
Misconfigured DNS settings: Incorrect DNS settings on your device or router can also lead to this error. This might happen if you’ve manually set DNS servers that are no longer working properly.
Cache problems: Sometimes, your browser or operating system might cache (store) an outdated or incorrect IP address for a website, leading to connection issues.
Firewall or security software: Overzealous firewall or security software settings might block your computer’s attempts to query DNS servers or access certain websites.
ISP issues: Occasionally, the problem could be on your Internet Service Provider’s end, especially if they’re experiencing outages or DNS problems.
Resolving the server IP address could not be found error
While it might seem like these issues are beyond your control, there are several steps you can take to troubleshoot and potentially resolve the problem from your end.
Basic troubleshooting
Check the website’s status: Use online tools to see if the website is down for everyone or just for you. This can help determine if the issue is with the site itself or something on your end.
Clear your browser’s cache: Outdated or corrupt cache data can interfere with DNS lookups. Clearing your browser’s cache might resolve the issue.
Flush your DNS cache: Your operating system also caches DNS lookup results. Flushing this cache (through command line instructions, depending on your OS) can help refresh potentially stale or incorrect DNS information.
Change your DNS server: Switching from your ISP’s default DNS server to a public DNS service like Google DNS or Cloudflare DNS can improve lookup reliability and speed, possibly bypassing the issue altogether.
Restart your router and computer: Sometimes, the problem can be resolved with a simple restart, which clears temporary glitches in your network or device.
Check for typos: Ensure the domain name was entered correctly. Even small typos can lead to DNS lookup failures.
Say goodbye to website errors
Achieve peace of mind with 99.99% uptime on 10Web Managed
WordPress Hosting, powered by Google Cloud.
How to fix the Server IP Address Could Not Be Found error
The “Server IP Address Could Not Be Found” error can be particularly frustrating as it prevents access to websites. Lets dive deeper into the reasons behind each solution and provide detailed, step-by-step instructions to resolve the issue.
Clear browser cache
Clearing your browser’s cache eliminates stored data that may include outdated DNS information or corrupted files, which could interfere with your browser’s ability to connect to a website. Over time, cached data can become corrupted due to technical glitches or when websites get updated. By clearing the cache, you ensure that your browser requests the most current version of the website from the server, bypassing any stored data that might lead to connectivity errors.
Chrome
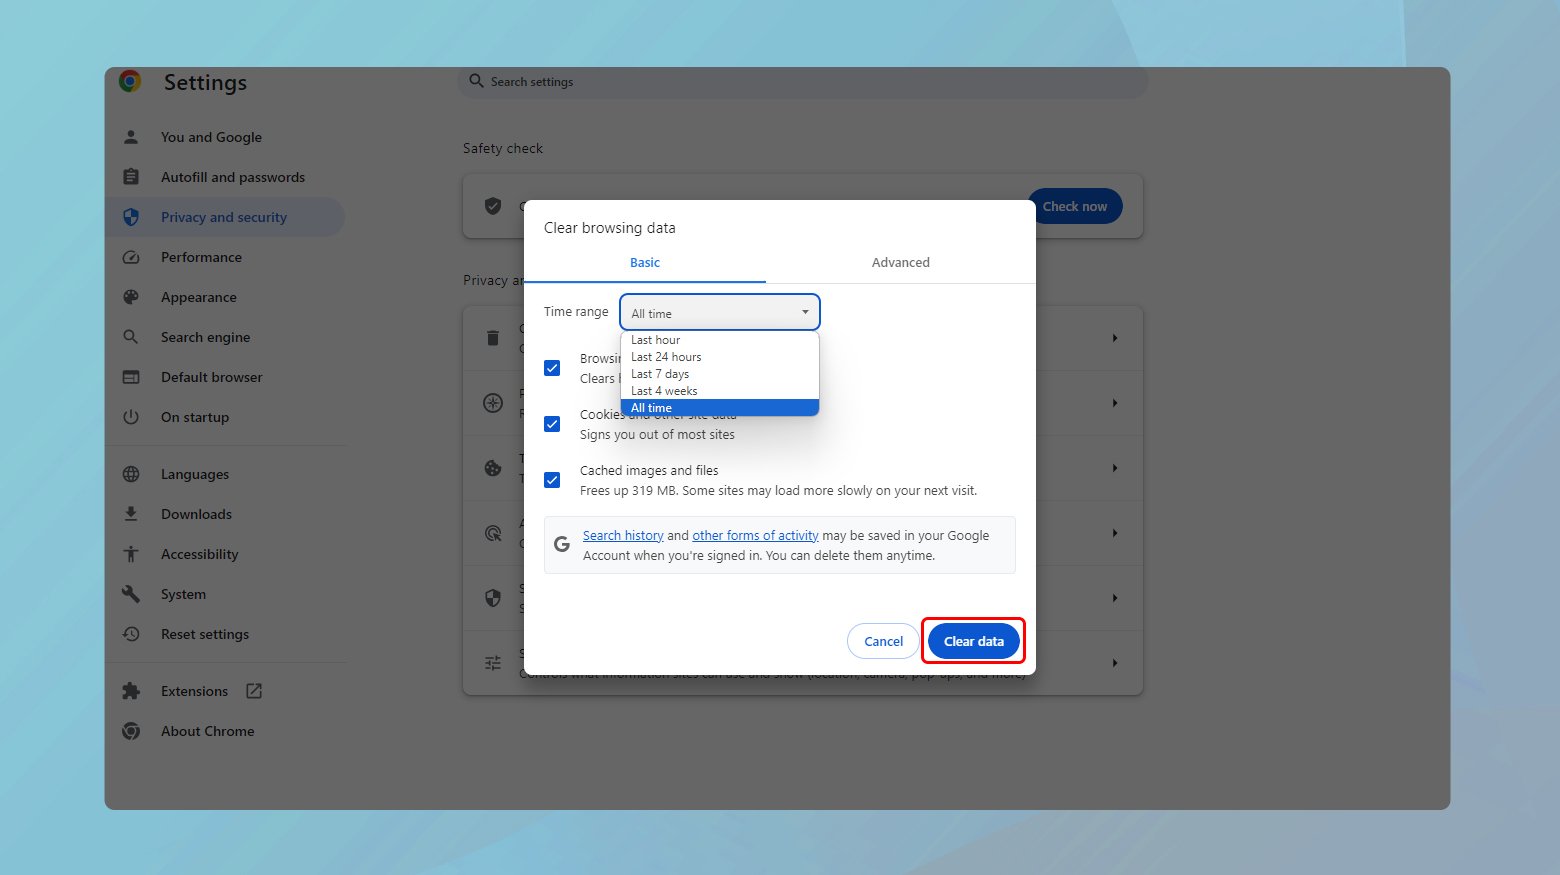
- Click the three dots in the upper-right corner.
- Go to More tools > Clear browsing data.
- Choose a time range or select “All time” to delete everything.
- Check “Cached images and files” and click “Clear data”.
Firefox
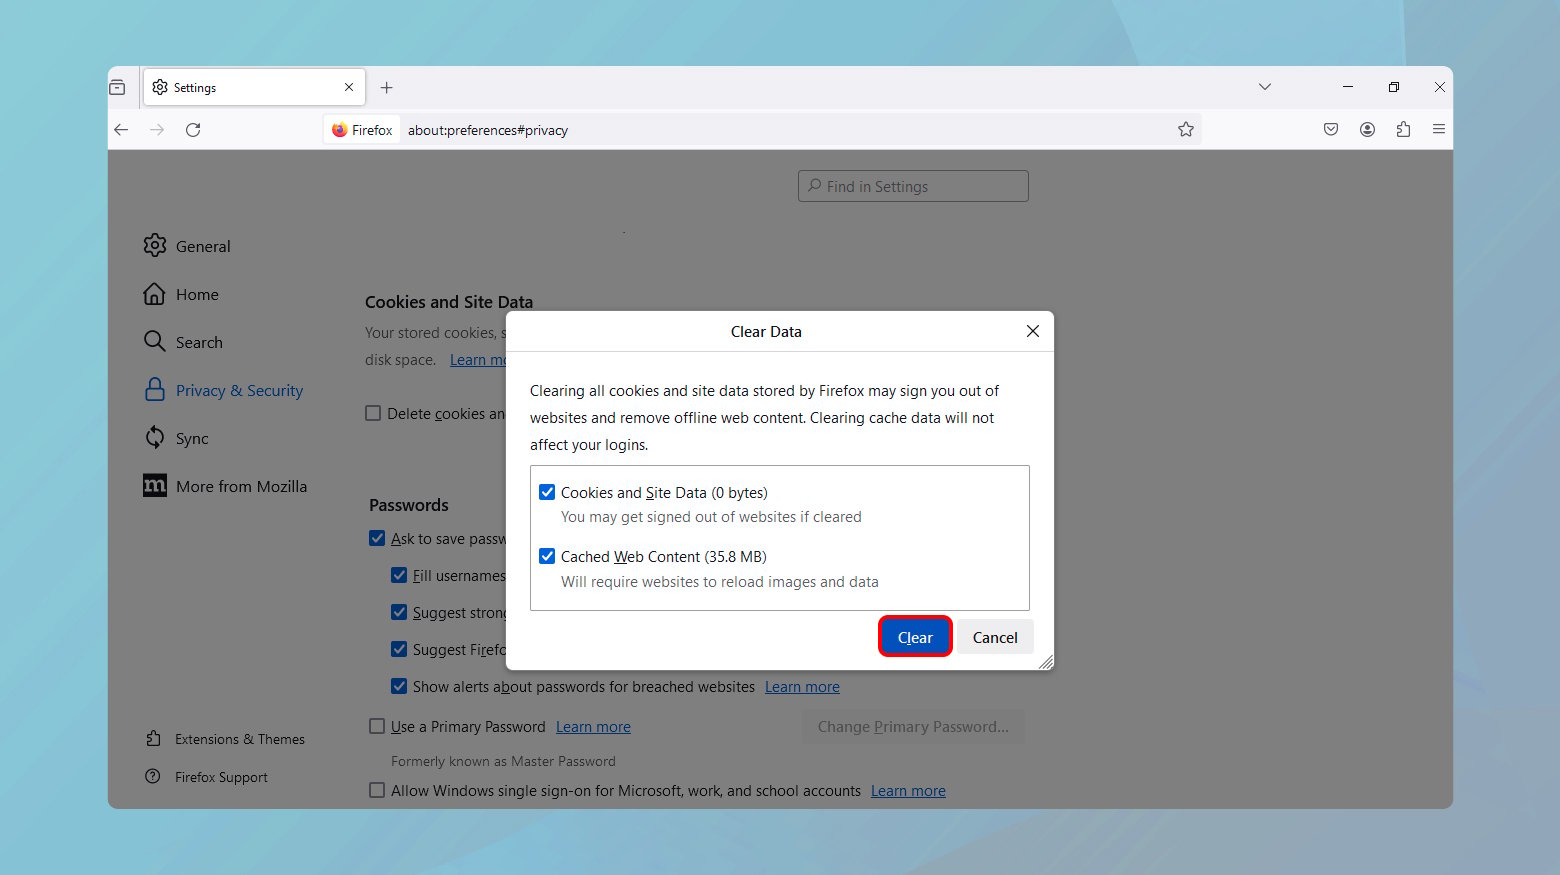
- Click the menu button (three horizontal lines) and select “Options.”
- Go to Privacy & Security and scroll down to “Cookies and Site Data.”
- Click “Clear Data…” and select “Cached Web Content.”
- Click “Clear.”
Safari
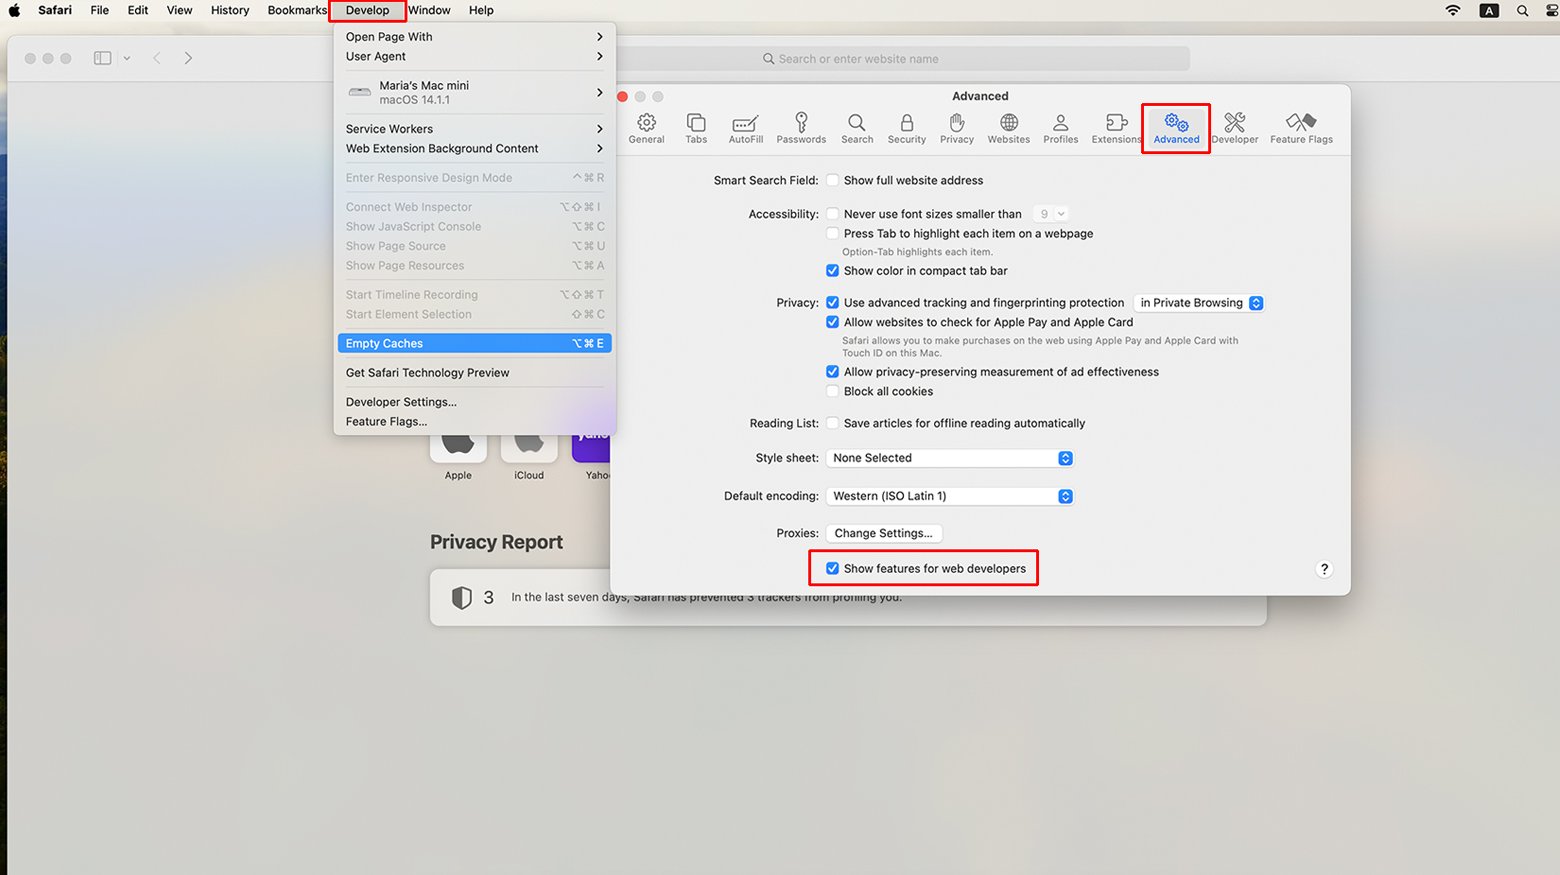
- Go to Safari in the upper-left corner and select “Preferences.”
- Click the “Advanced” tab and check the box at the bottom that says, “Show Develop menu in menu bar.”
- In the menu bar at the top, find “Develop” and select “Empty Caches.”
Change DNS servers
DNS servers translate domain names into IP addresses. If your ISP’s DNS servers are slow or experiencing issues, they might not resolve domain names correctly, leading to errors. Public DNS servers like Google DNS or Cloudflare DNS are often more reliable and faster, providing a more stable internet experience and resolving DNS errors by ensuring efficient and accurate translation of domain names to IP addresses.
Windows
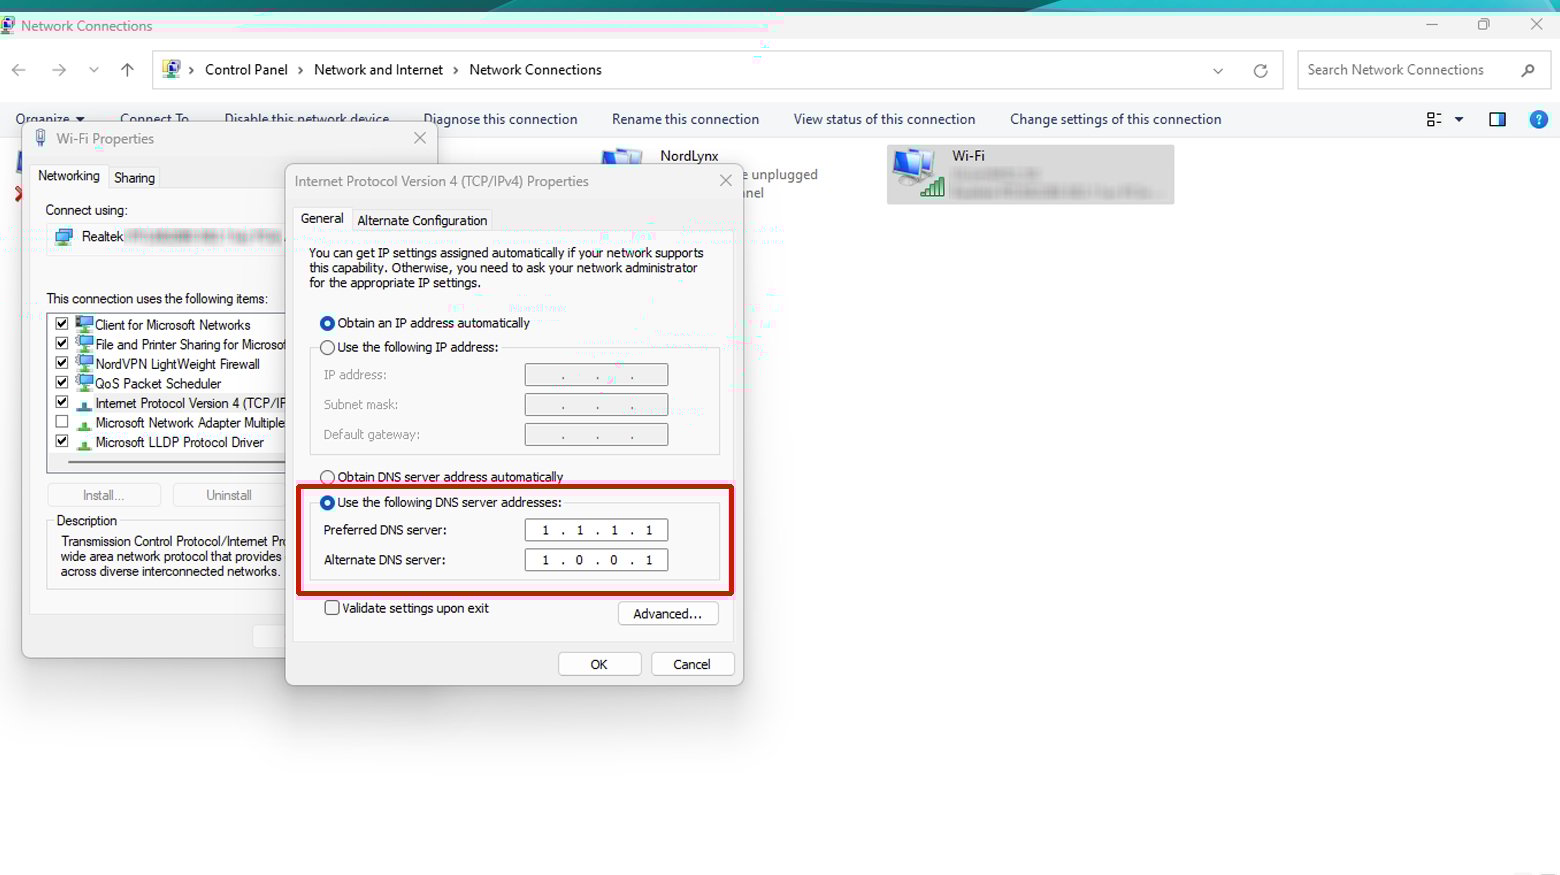
- Open Control Panel and navigate to Network and Internet > Network and Sharing Center > Change adapter settings.
- Right-click your active network connection (e.g., Wi-Fi or Ethernet) and select Properties.
- Scroll down to Internet Protocol Version 4 (TCP/IPv4), click it, then click Properties.
- Select “Use the following DNS server addresses”, and enter the DNS addresses (e.g., Google DNS: 8.8.8.8 and 8.8.4.4).
- Click OK to save your changes.
Mac
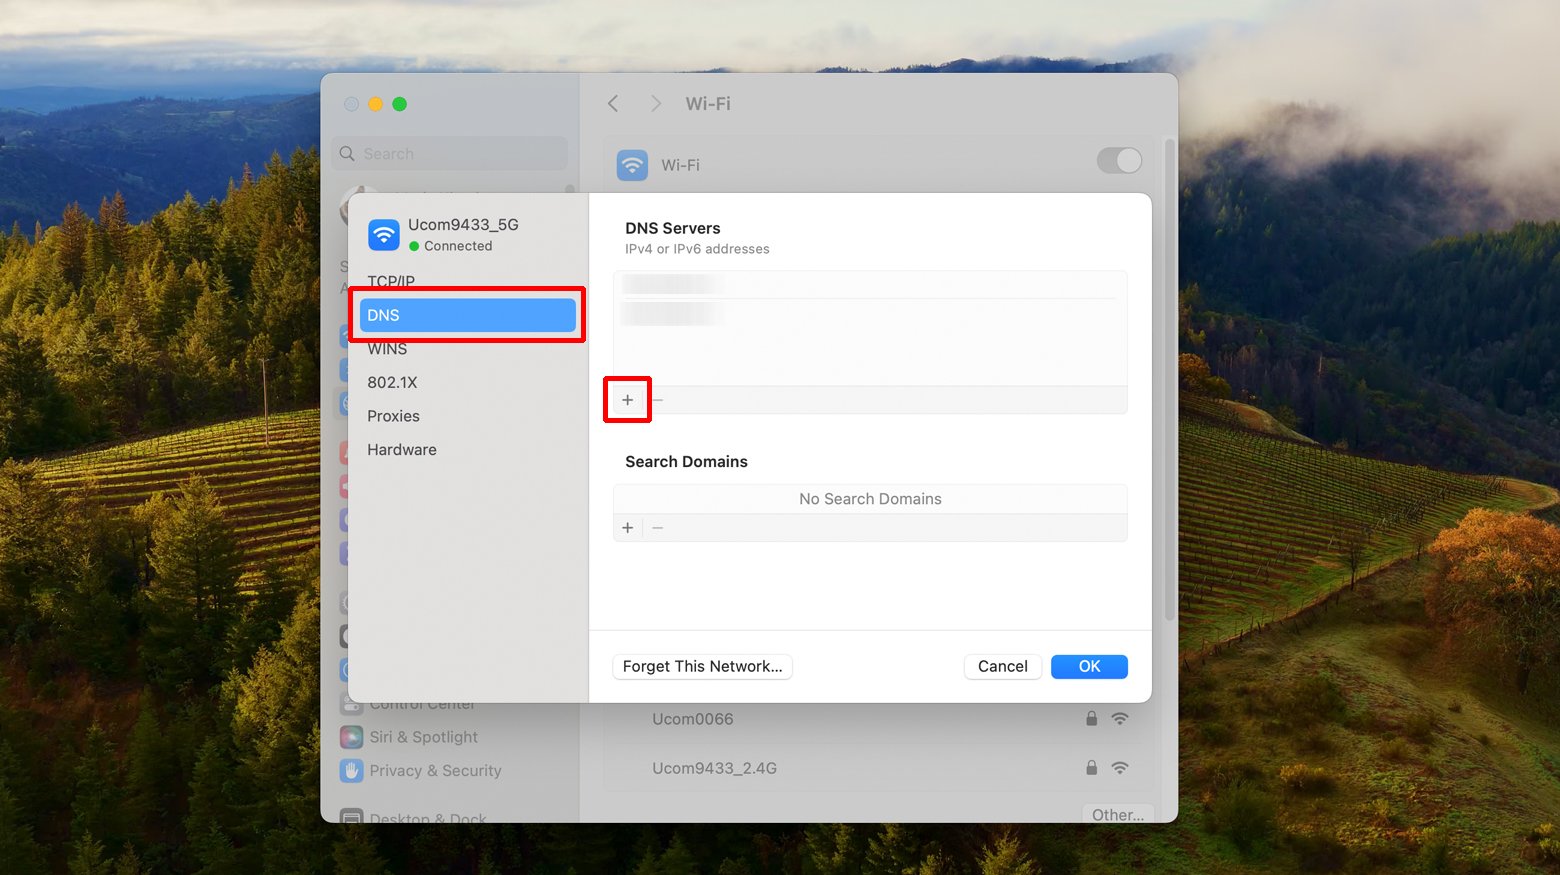
- Open System Preferences and click Network.
- Select your active connection from the list on the left and click Advanced.
- Go to the DNS tab and click the “+” button to add new DNS servers.
- Enter the addresses of the DNS servers you wish to use (e.g., Cloudflare DNS: 1.1.1.1).
- Click OK, then Apply to save the changes.
Check firewall and security software
Firewalls and security software are designed to protect your computer from unauthorized access and various threats. However, they can mistakenly block legitimate network traffic, including DNS queries, if they’re configured too strictly or incorrectly. By ensuring your firewall or security software is correctly set up to allow DNS queries and website access, you can eliminate these as potential causes of the error.
- Open your firewall or security software settings. This process varies depending on the software you’re using.
- Look for a section related to allowed applications, network settings, or exceptions.
- Ensure your web browser and DNS services are allowed to communicate through the firewall. You might need to add them to an exceptions list if they’re not already present.
- Save any changes you make and restart your computer to ensure the new settings take effect.
Flush DNS cache
The DNS cache stores the addresses of websites you’ve visited to speed up future access. However, if this cache becomes outdated or corrupt, it can lead to DNS resolution errors. Flushing the DNS cache removes all the information stored in it, forcing your computer to fetch fresh DNS information the next time you try to access a website. This can resolve issues related to stale or incorrect DNS data.
Windows
- Press Windows key + R to open the Run dialog.
- Type `cmd` and press Enter to open Command Prompt.
- Type the following command and press Enter.
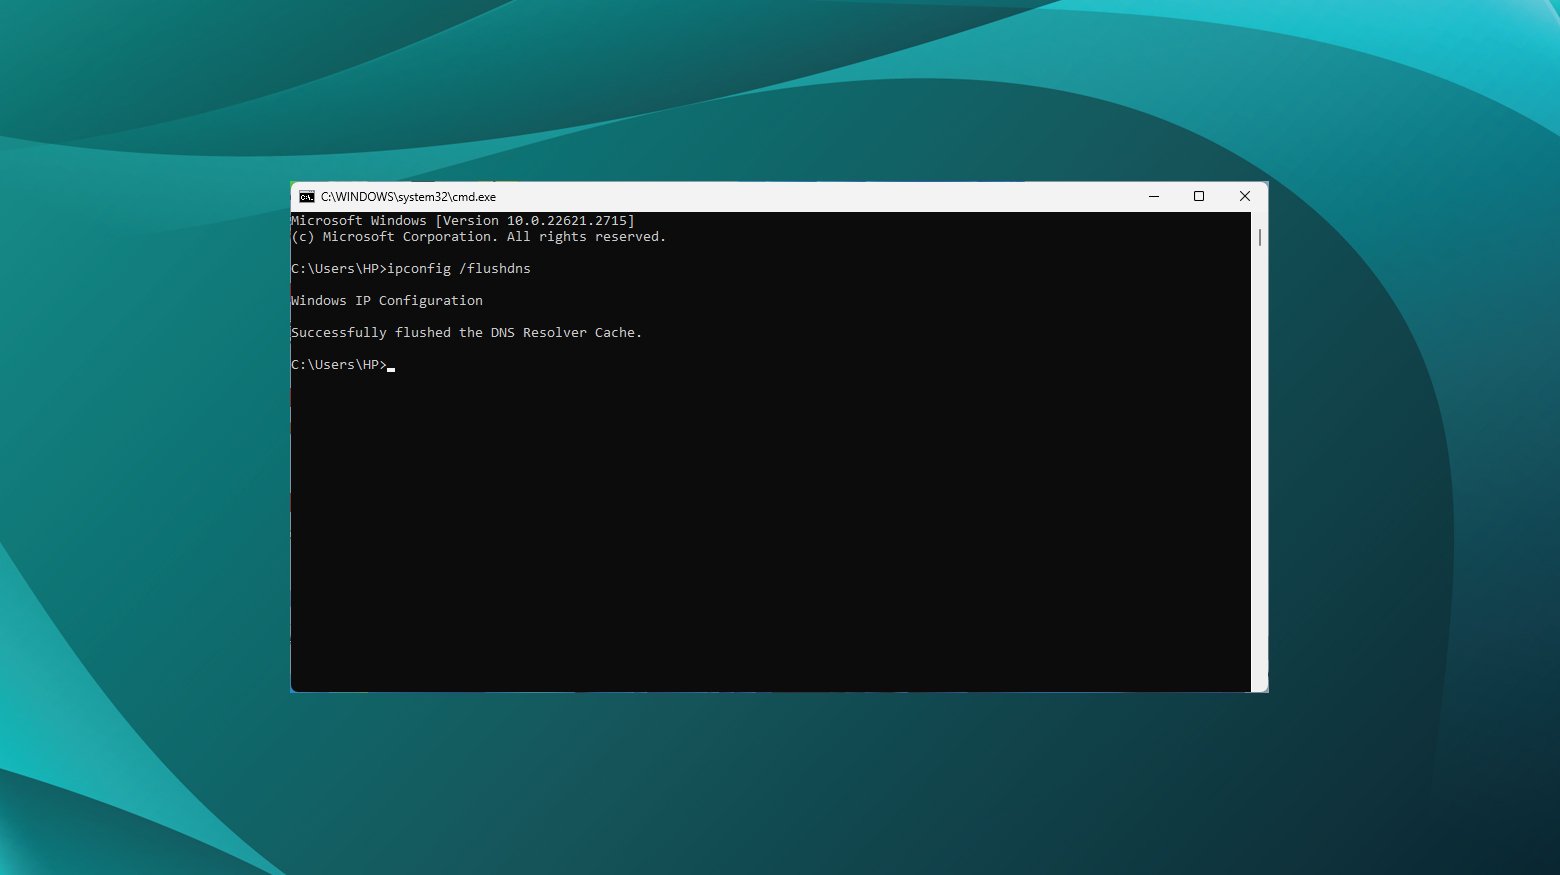
ipconfig /flushdns
You should see a confirmation message stating the DNS Resolver Cache was successfully flushed.
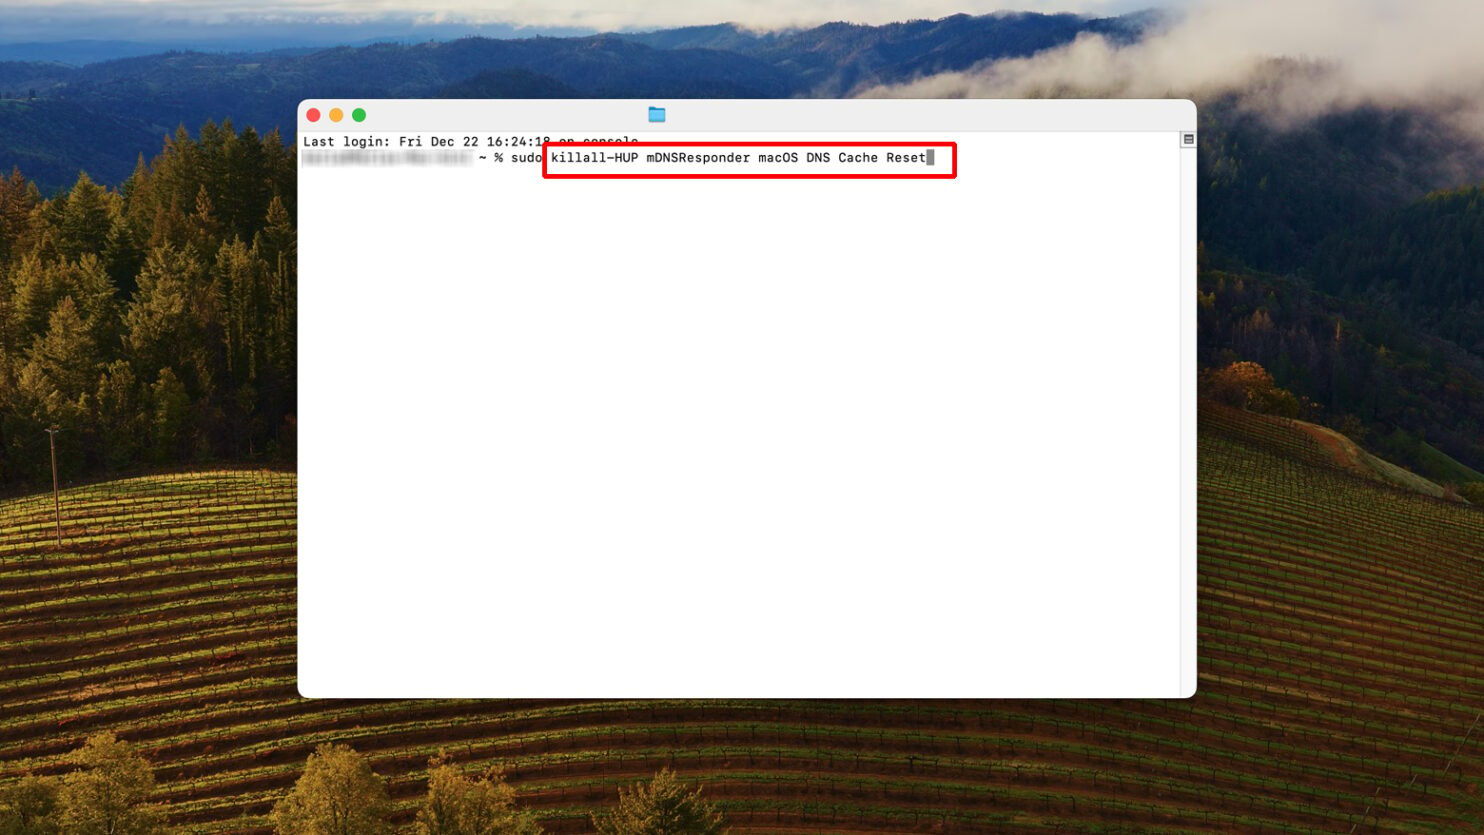
Mac
-
- Open Terminal (found in Applications > Utilities).
- Type the following command and press Enter.
sudo killall -HUP mDNSResponder
- Enter your administrator password and press Enter.
This command doesn’t produce a confirmation message, but it effectively flushes the DNS cache.
Check proxy settings
Proxy settings in your computer’s network configuration can redirect internet traffic through a proxy server, which can interfere with DNS resolution and website access. Incorrect or unnecessary proxy settings might route requests in a way that prevents your browser from reaching the intended server. By disabling these proxy settings, you ensure direct communication with DNS servers and websites, potentially resolving the “Server IP Address Could Not Be Found” error.
Windows
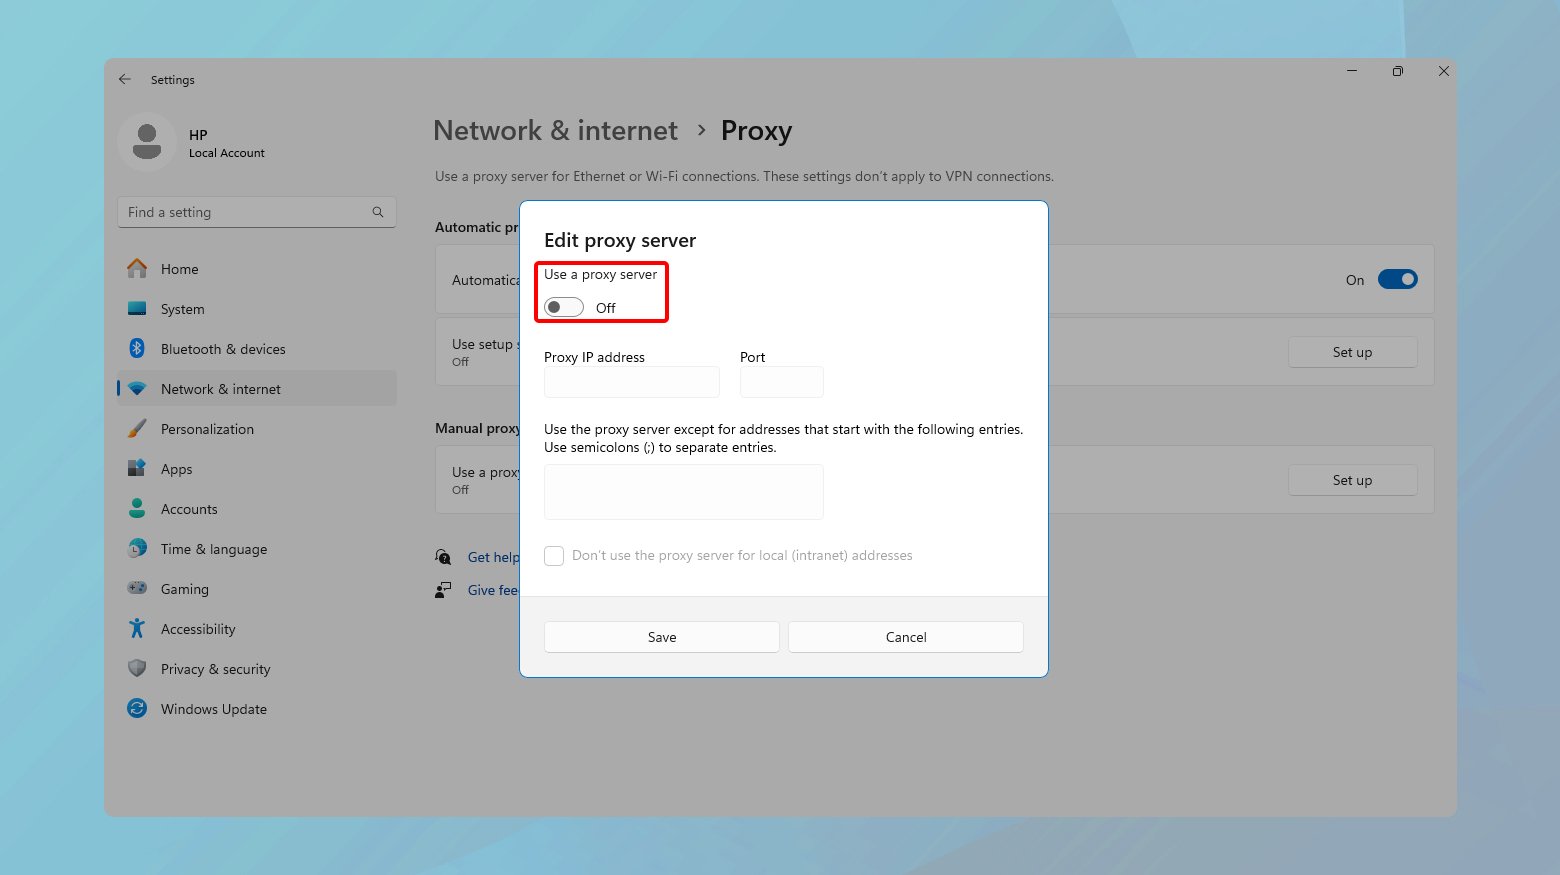
- Open Settings by pressing Windows key + I.
- Go to Network & Internet > Proxy.
- Under Manual proxy setup, set the Use a proxy server switch to Off.
- Close the settings window to apply the changes.
Mac
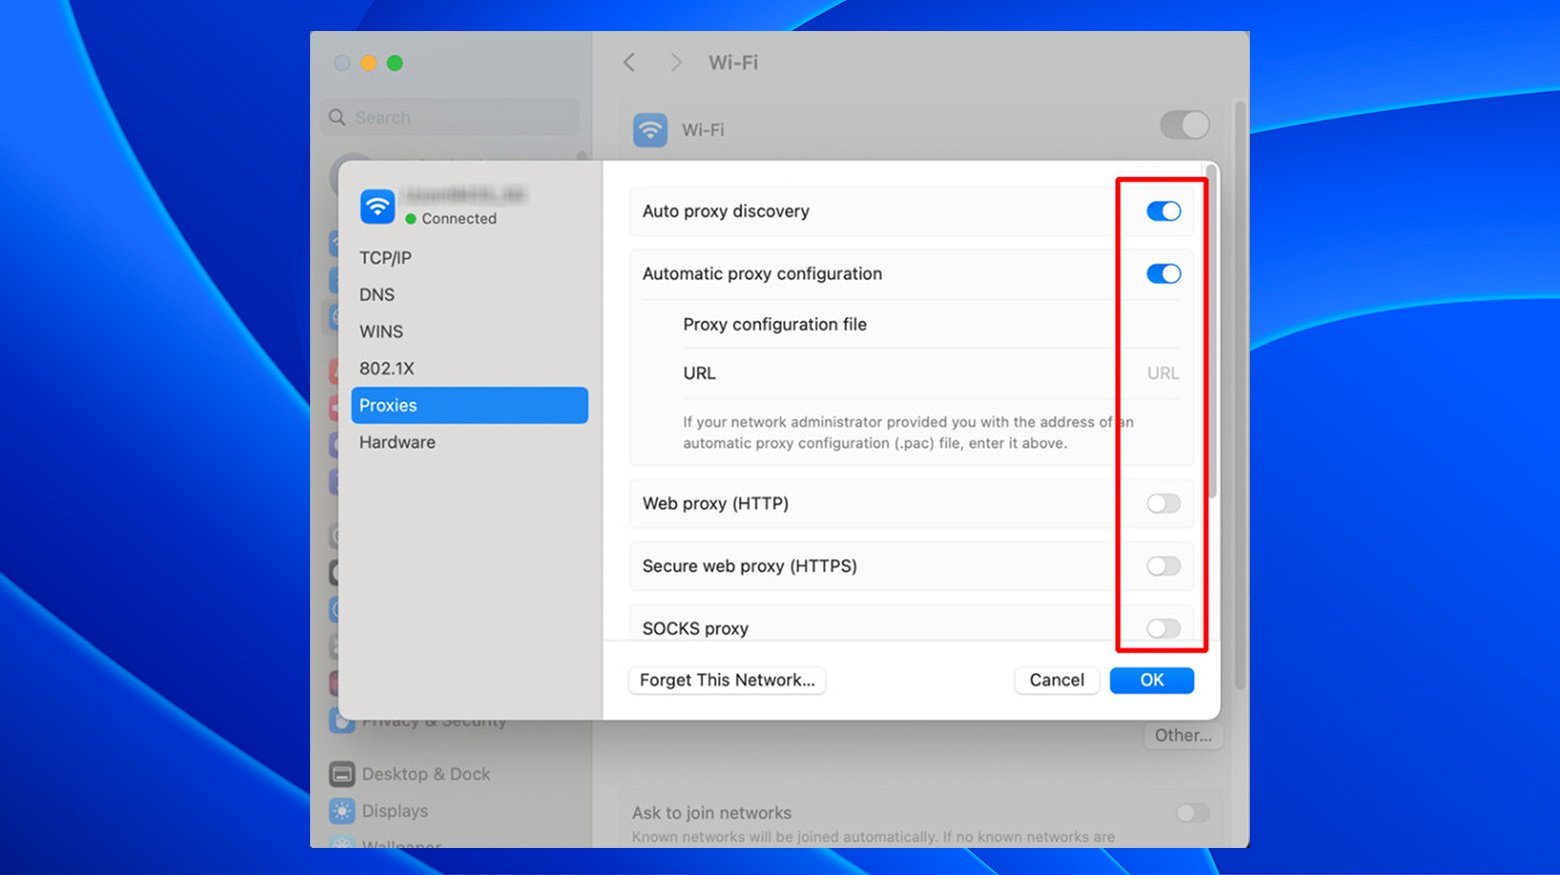
- Open System Preferences and click on Network.
- Select your active network connection and click Advanced.
- Go to the Proxies tab.
- Uncheck all proxies that are checked (unless you specifically require a proxy for your network). This includes options like “Web Proxy (HTTP)” and “Secure Web Proxy (HTTPS).”
- Click OK, then Apply to save the changes.
Release and renew your IP address
Your IP address is essential for network communication, acting as your computer’s identifier on the internet. Sometimes, network issues can be resolved by obtaining a new IP address, as this process refreshes your connection to your local network and the wider internet. This can resolve issues caused by IP address conflicts or other network connectivity problems, improving DNS resolution.
Windows
-
- Press Windows key + R to open the Run dialog.
- type `cmd` and press Enter to open Command Prompt.
- Type the following commands and press Enter after each command.
ipconfig /release
ipconfig /flushdns
ipconfig /renew
- Close the Command Prompt window after the commands complete.
Mac
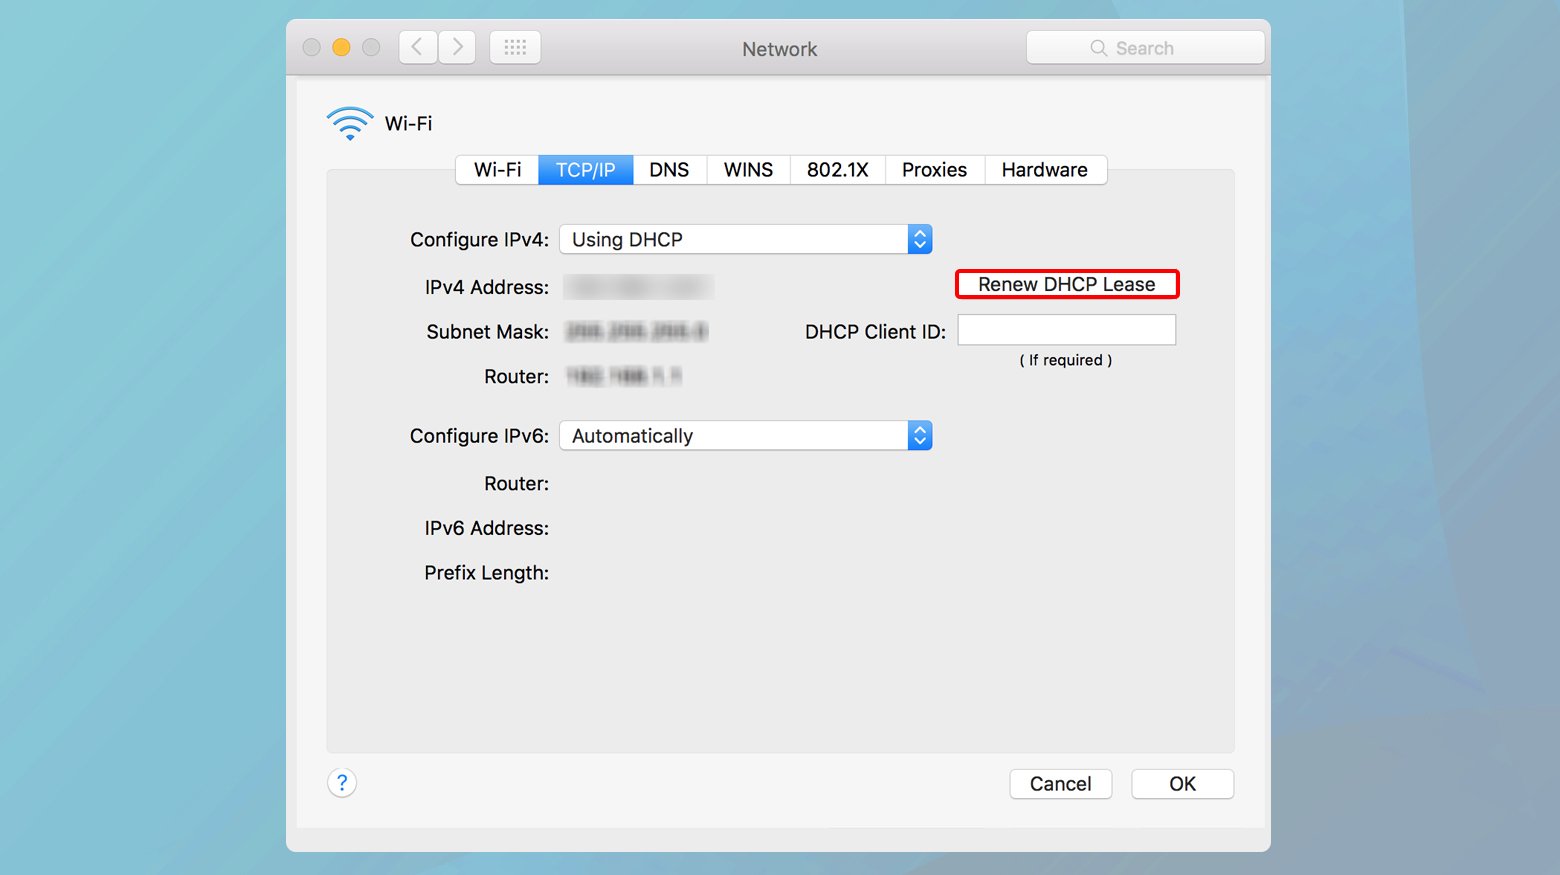
- Go to System Preferences > Network.
- Select your active network connection and click Advanced.
- Go to the TCP/IP tab.
- Click the “Renew DHCP Lease” button. This action requests a new IP address from your network’s DHCP server.
- Click OK, then Apply to save the changes.
Include the site’s IP address in your hosts file
The hosts file on your computer allows you to map domain names to specific IP addresses manually. This can be useful for bypassing DNS servers altogether for a particular domain, which can resolve the “Server IP Address Could Not Be Found” error if the issue is related to DNS resolution. By directing requests for a domain directly to its IP address, you can eliminate DNS as a potential source of the problem.
Windows

- Press Windows key + R to open the Run dialog.
- Type `notepad.exe` and then press CTRL + Shift + Enter to open Notepad with administrator privileges.
- In Notepad, go to File > Open and navigate to `C:\Windows\System32\drivers\etc\hosts`.
- Add a new line at the bottom of the file with the format `IP_ADDRESS DOMAIN_NAME`, e.g., `93.184.216.34 example.com`.
- Save the file and close Notepad.
Mac
- Open Terminal.
- Type `sudo nano /etc/hosts` and press Enter to edit the hosts file in Nano editor, using your administrator password when prompted.
- Move the cursor to the bottom of the file and add the domain and its IP address in the same format as Windows.
- Press Control + O to save changes, then Control + X to exit Nano.
Remove files from the “etc” folder
The `etc` folder on Windows contains network configuration files, including the hosts file. Sometimes, files in this folder can become corrupted or outdated, leading to network and DNS resolution issues. By removing unnecessary files, you can eliminate potential sources of the error.
- Navigate to `C:\Windows\System32\drivers\etc` using File Explorer.
- Back up the contents of the folder by copying them to another location.
- Delete the contents of the `etc` folder. If unsure, start by removing only temporary files or files that were recently added or modified.
- If the issue resolves, try restoring files one at a time to identify the problematic file.
Reboot your DNS service
The DNS Client Service in Windows caches DNS lookups to speed up internet browsing. If this service malfunctions, it can lead to DNS resolution issues. Restarting the service clears the cache and restarts the process, which can resolve these issues.
- Press Windows key + R to open the Run dialog.
- Type `services.msc` and press Enter to open the Services application.
- Scroll down and find the DNS Client service. Right-click it and choose Restart. If Restart is greyed out:
- Open Command Prompt as an administrator.
- Type `net stop dnscache` and press Enter.
- Then type `net start dnscache` and press Enter.
- Close the Services window or Command Prompt.
Bring your network adapter driver up to date
Outdated or corrupt network adapter drivers can cause connectivity issues, including DNS resolution problems. Updating these drivers ensures your network adapter communicates efficiently with your operating system, improving overall network performance and potentially resolving the “Server IP Address Could Not Be Found” error.
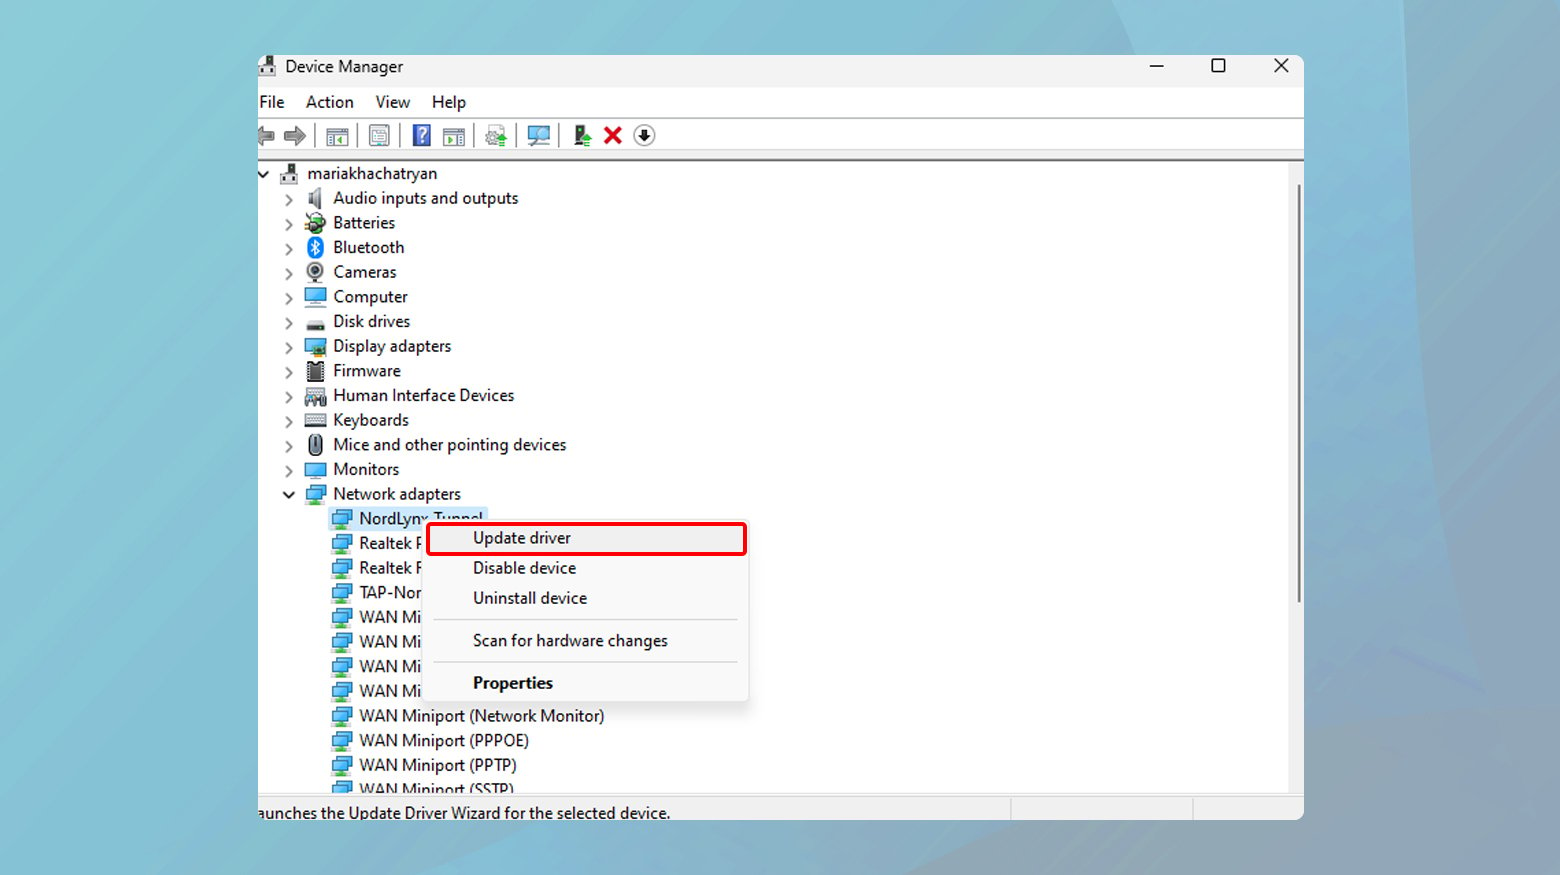
- Press Windows key + X and select Device Manager.
- Expand the Network adapters section.
- Right-click your network adapter and select Update driver.
- Choose “Search automatically for updated driver software” and follow the prompts.
- Restart your computer after the update completes.
Ensuring effectiveness and additional troubleshooting tips
After implementing the solutions provided, it’s crucial to verify their effectiveness. Each step addresses a specific potential cause of DNS resolution issues, and their success can depend on various factors, including your network environment, the specific website you’re trying to access, and the current state of your computer’s network configuration.
Verifying changes
After clearing browser cache or changing DNS servers: Restart your browser and attempt to access the website again. Sometimes, changes require a fresh start to take effect.
After adjusting firewall settings or disabling proxy settings: Check if other websites are accessible to ensure that the internet connection is generally working. If only a specific site is problematic, the issue might lie with the site itself or its server.
After flushing DNS cache, releasing/renewing IP, or editing hosts file: Use the command `ping [website address]` in Command Prompt (Windows) or Terminal (Mac) to test connectivity with the website. A successful ping indicates that the IP address can be reached, suggesting that DNS resolution issues are resolved.
After deleting files from the “etc” folder or rebooting DNS service: Monitor your computer’s network performance for a while to ensure that the problem doesn’t recur. Sometimes, issues may be intermittent and require observation over time.
After updating network adapter driver: Check the manufacturer’s website for your network adapter to compare the driver version installed on your computer with the latest one available. Ensuring you have the most recent driver can prevent a wide range of connectivity issues.
Closing thoughts
By understanding the “why” behind each solution and following the detailed “how to” instructions, you can systematically address and eliminate potential causes of the “Server IP Address Could Not Be Found” error. Remember, the effectiveness of each solution can vary based on individual network environments and configurations. Continuous verification, additional troubleshooting tips, and sometimes professional assistance are key to resolving this issue and ensuring a seamless internet browsing experience.
Say goodbye to website errors
Achieve peace of mind with 99.99% uptime on 10Web Managed
WordPress Hosting, powered by Google Cloud.
Say goodbye to website errors
Fix all the website errors in one click
Migrate your website to the world's best Managed WordPress Hosting.