At its core, the “414 request-URI too large” error is straightforward – it tells you that the URL requested is simply too long for the server to handle.
This error is a common hiccup encountered in the web development space, especially when working with platforms like WordPress.
It’s part of the HTTP status codes family, particularly the 400 series, which signals client-side errors. Essentially, the server finds the URL’s length beyond what it’s configured to process, leading to this specific error message.
Say goodbye to website errors
Achieve peace of mind with 99.99% uptime on 10Web Managed
WordPress Hosting, powered by Google Cloud.
Understanding the 414 request-URI too large error
Understanding why this occurs can help us address the issue more effectively. Typically, the error springs from a few scenarios, such as overly long query strings in GET requests, which might happen with extensive tracking codes or complex redirection loops.
In some rare cases, it could also indicate a security concern, where an excessively long URL might be part of a malicious request intended to exploit server vulnerabilities.
Variations of the error
The manifestation of the 414 error can vary based on different server configurations, browsers, or even specific conditions under which the request is made.

Like other 400 errors, there are a few different ways this error might show up:
- HTTP Error 414 – Request-URI Too Large
- 414 URI Too Long
- Request-URI Too Large
- URI Too Long (414)
- Failed Request Due to URI Length Exceeding the Allowed Limit
Regardless of how it’s presented, the underlying issue remains the same: the URL exceeds the server’s acceptable length.
Why 414 errors occur
Several factors can lead to the 414 Request-URI Too Large error, each requiring a specific approach to resolve.
Common causes include
- Excessive query parameters: URLs with numerous query parameters can quickly become too lengthy, especially when using tracking codes or when data is passed via the URL in a GET request.
- Redirection loops: Improperly configured redirects can create a loop where the URL grows with each iteration until the server rejects the request with a 414 error.
- Server configuration limits: Server settings, by default, impose limits on URL length. These limits are there for efficiency and security, but sometimes, they need adjustment based on the application’s needs. If you’ve ever tried to troubleshoot a 413 error, you’re probably familiar with the types of issues these limitations can cause.
How to fix a 414 request-URI too large error
Before diving into the more technical aspects of resolving the 414 Request-URI Too Large error, taking a few preliminary steps is wise. These initial actions can help you avoid the complexities of server configuration adjustments altogether.
Initial steps and considerations
Start by exploring simple solutions that don’t require altering server settings. This proactive approach saves time and keeps your system’s configurations intact, minimizing potential disruptions.
Review WordPress plugins
WordPress plugins are notorious for adding functionality that, while useful, can sometimes lead to unintended consequences like excessively long URLs. This is particularly true for comprehensive security plugins that pack a myriad of features. These plugins may inadvertently generate URLs that surpass your server’s length threshold.
It’s not always immediately obvious if a plugin is the culprit behind the 414 error. However, delving into the settings of your plugins could reveal options specifically designed to limit URL length. Activating such settings might quickly resolve the issue without further ado.
Diagnostic steps
If adjusting plugin settings doesn’t clear the error, there are a few more diagnostic steps you can undertake:
Server logs: These logs are treasure troves of information, often containing direct references to the 414 error or hints towards its cause. Regularly reviewing these logs can provide valuable insights into the issue at hand.
Browser developer tools: Modern browsers come equipped with developer tools that offer a closer look at what happens behind the scenes of a web page. The Console, in particular, can shed light on the error’s origin, offering clues that point towards a solution.
If you’re not the site owner or developer, inform them about the error. They might already be aware of the issue and can offer specific advice or solutions. Conversely, if a particular plugin seems to be associated with the error, reaching out to its developer could yield helpful guidance or prompt them to release a fix in future updates.
After completing these preliminary steps without resolving the error, it’s time to proceed with more in-depth troubleshooting. These initial efforts are not in vain; understanding the broader context of the error can streamline the process of finding a lasting solution. Remember, the goal is to address the issue efficiently, ensuring your site remains accessible and performs optimally.
Correcting and preventing 414 errors
Fixing this error involves a few steps that typically require server access and the ability to modify server configuration files.
Generally, increasing URL length limits resolves this issue. On Apache servers, this involves editing the Apache configuration file (`httpd.conf` or `apache2.conf`). For Nginx servers, modify the Nginx configuration file (`nginx.conf`).
While allowing longer URLs can resolve 414 errors, it’s best to review and optimize URL structures. If your application generates URLs, consider optimizing the structure to reduce length. This might involve shorter query parameters or moving data from GET to POST requests, where data is sent in the request body rather than the URL.
Finding and correcting any redirect loops should be a priority. If redirects are causing the issue, review your site’s redirection logic to eliminate unnecessary loops and ensure URLs remain concise.
Each situation might require a different combination of these steps, depending on the exact cause of the error on your site.
General tips:
- Backup everything before making changes: Always back up your website before making changes. This includes backing up any server configuration files before making any changes. This way, you can revert back if something goes wrong.
- Use a staging environment: If possible, test these changes in a staging environment before applying them to your live site to avoid unexpected downtime.
- Check for syntax errors: Use `nginx -t` or `apache2ctl configtest` (depending on your server) to test your configuration files for syntax errors after making changes and before restarting the server.
How to configure your server to allow longer URLs:
For Apache servers:
- Use SFTP to log into your server. You’ll need an FTP client like FileZilla and your SFTP credentials, which you can obtain from your hosting provider.
- Locate and open the primary Apache configuration file. It’s usually named `apache2.conf` or `httpd.conf` and is found in the `/etc/apache2/` or `/etc/httpd/` directories, respectively. The exact location can vary based on your server setup.
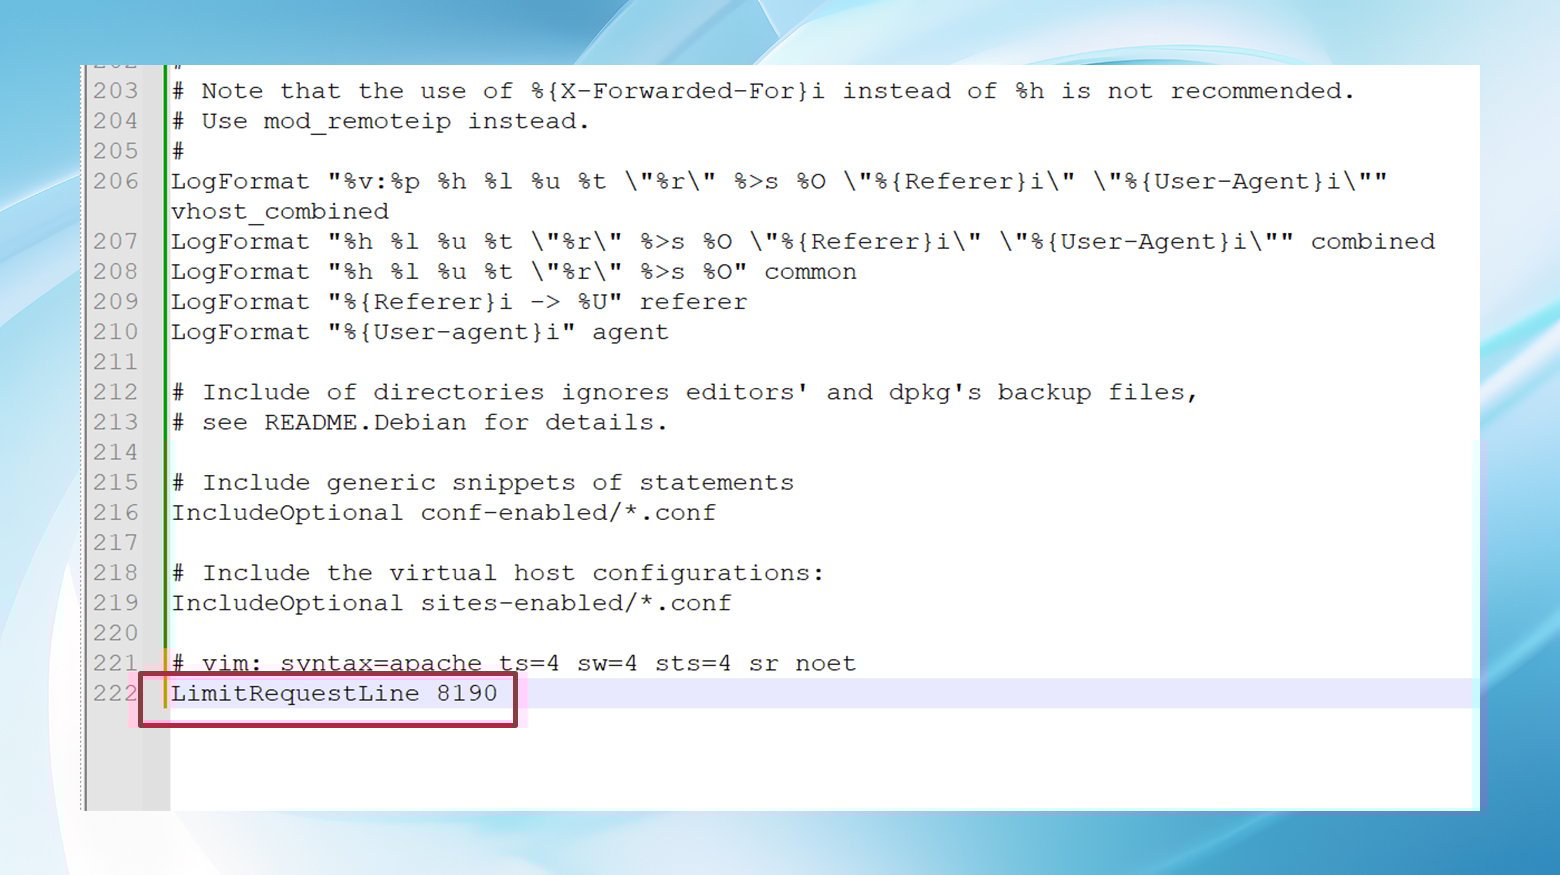
- Edit the configuration file:
- Look for the `LimitRequestLine` directive. If it’s not present, you’ll need to add it.
- Increase the limit by adding or editing the line: `LimitRequestLine 8190` (The maximum value for this directive is 8190 for Apache versions up to 2.2. For Apache 2.4 and later, you can set this value higher if needed).

The apache2.conf file.
- If you’re also encountering issues with header size, consider adjusting the `LimitRequestFieldSize` directive in a similar manner.
- After making changes, save the file and exit the text editor.
- For the changes to take effect, restart Apache using the command: `sudo service apache2 restart` or `sudo systemctl restart apache2`, depending on your system.
For Nginx servers:
- Access your server files by connecting to the server via SFTP.
- Locate and open the Nginx configuration file. It’s typically found at `/etc/nginx/nginx.conf`.
- Edit the Configuration File:
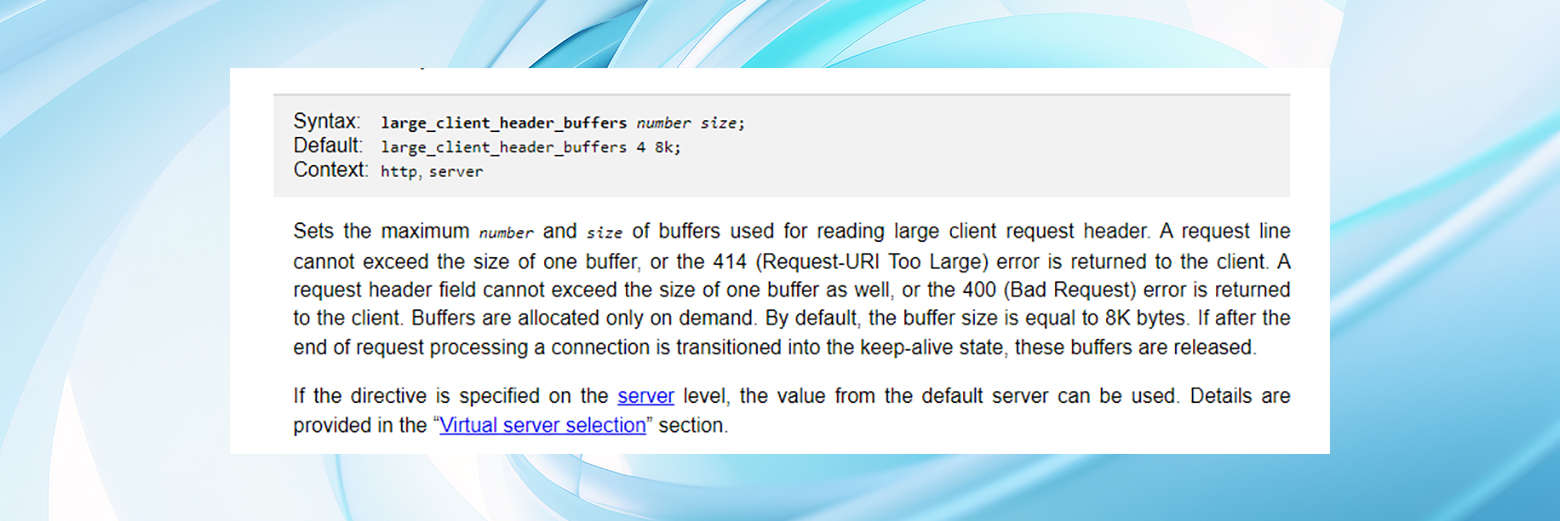
- Search for the `large_client_header_buffers` directive. If it’s not in the `nginx.conf` file, you may need to add it within the `http` block or under specific `server` blocks, depending on where you need the change to apply.

Nginx documentation on the large_client_header_buffers directive.
- Set the directive with appropriate values, e.g., `large_client_header_buffers 4 16k;`. This directive takes two parameters: the number of buffers and the size of each buffer.
- Search for the `large_client_header_buffers` directive. If it’s not in the `nginx.conf` file, you may need to add it within the `http` block or under specific `server` blocks, depending on where you need the change to apply.
- After adjusting the settings, save your changes and close the editor.
- Apply the changes by restarting Nginx with `sudo service nginx restart` or `sudo systemctl restart nginx`.
Adjusting server settings to fix the “414 Request-URI Too Large” error can help accommodate requests with longer URLs. Still, it’s also important to consider if extremely long URLs are necessary for your application, as they could indicate an underlying issue that needs addressing.
Summing things up
While the 414 Request-URI Too Large error can be a bit of a roadblock, understanding its causes and how to address them can help you resolve it efficiently. Whether it’s tweaking server settings or optimizing how your web application generates URLs, there’s always a path forward to ensure your site runs smoothly and is accessible to your users.
Say goodbye to website errors
Achieve peace of mind with 99.99% uptime on 10Web Managed
WordPress Hosting, powered by Google Cloud.
Say goodbye to website errors
Fix all the website errors in one click
Migrate your website to the world's best Managed WordPress Hosting.