Navigating through the digital world, we often encounter various hurdles that can momentarily halt our progress. Among these, HTTP errors stand out, especially when they render our content unreachable, potentially affecting user experience, sales, or conversions. A particularly challenging issue is the HTTP Error 407, also known as “Proxy Authentication Required.” This error can be a bit of a headache, but with the right approach, it’s manageable.
What Does “407 Proxy Authentication Required” mean?
The HTTP 407 error signifies a breakdown in communication between the client and the server, mediated by a proxy server. This glitch occurs because the proxy server, which acts as an intermediary for requests from clients seeking resources from other servers, requires authentication credentials from the client but hasn’t received them. The proxy’s inability to authenticate the client’s request results in this error, making the desired resource inaccessible.
Understanding the dynamics of this error involves recognizing the roles of various actors in the network communication process. The complication often lies in pinpointing where the authentication process falters—whether the issue stems from the client, the proxy, or perhaps, the server settings themselves.
Variations of this error
- 407 Proxy Authentication Required
- HTTP Error 407 – Proxy Authentication Required
- Error 407: Proxy Authentication Required
- HTTP/1.1 407 Proxy Authentication Required
- 407: Authentication Required
- Proxy Authentication Required (407)
- Error Code 407: Proxy Authentication Required
- Failed to Authenticate with Proxy (Error 407)
- Access Denied – Proxy Authentication Required (407)
- The request failed with HTTP status 407: Proxy Authentication Required
Causes of the HTTP Error 407
Diving deeper into the HTTP Error 407, it’s crucial to grasp that this issue is fundamentally about authentication and communication protocols between the client, proxy, and server. It shares similarities with the 401 Unauthorized error, with the distinction that the 407 error deals with proxy authentication failures.
The authentication process is integral to establishing secure connections across the network. This process involves the exchange of digital certificates, which serve as electronic passports, providing the proxy (or server) with the client’s credentials. These certificates might represent individuals, companies, programs, or devices, allowing servers to validate requests based on the contained information.
Problems leading to the 407 error can arise from various sources, such as connection delays, input errors, or mismatches in the expected authentication credentials. These issues might cause the digital certificate to be misinterpreted, leading to the rejection of the client’s request for access.
Say goodbye to website errors
Achieve peace of mind with 99.99% uptime on 10Web Managed
WordPress Hosting, powered by Google Cloud.
Resolving the HTTP Error 407
Addressing the HTTP Error 407 involves a two-pronged approach: client-side and server-side adjustments. From the client’s perspective, ensuring that the correct authentication credentials are provided to the proxy server is paramount. This might involve configuring the web browser or application settings to include the necessary proxy authentication details.
On the server or proxy side, administrators must verify that the proxy is correctly set up to request and validate authentication credentials. This could involve checking the proxy server’s configuration files for errors or omissions related to authentication mechanisms.
Client-side solutions
Starting with client-side checks is often the most straightforward and quickest method. To eliminate any peculiarities, consider accessing the site from a different browser or device. For example, if you encounter a 407 error on your computer but not on your phone, the problem might lie with your computer’s digital ID or security software.
If you’ve recently made updates to your site, reverting those changes and testing the connection again could be a wise move. Moreover, if there’s a suspicion that the issue originates from the client side, following these steps could lead to a solution.
Make sure you have the correct URL
Double-checking the URL is a great first step. Yes, it might seem a bit basic, but you’d be surprised how often a simple typo is the culprit. By ensuring the URL is correct, you eliminate the simplest mistake that could be causing the HTTP 407 error.
Typos in the URL could lead you to a completely different destination or no destination at all. Ensuring the URL is correct is your first line of defense against unnecessary troubleshooting.
You can also try clearing your browser’s cache. Sometimes, your browser might be trying to use outdated or stored data to access a site. Clearing your cache removes this old data and forces your browser to load the most current version of the webpage.
Chrome
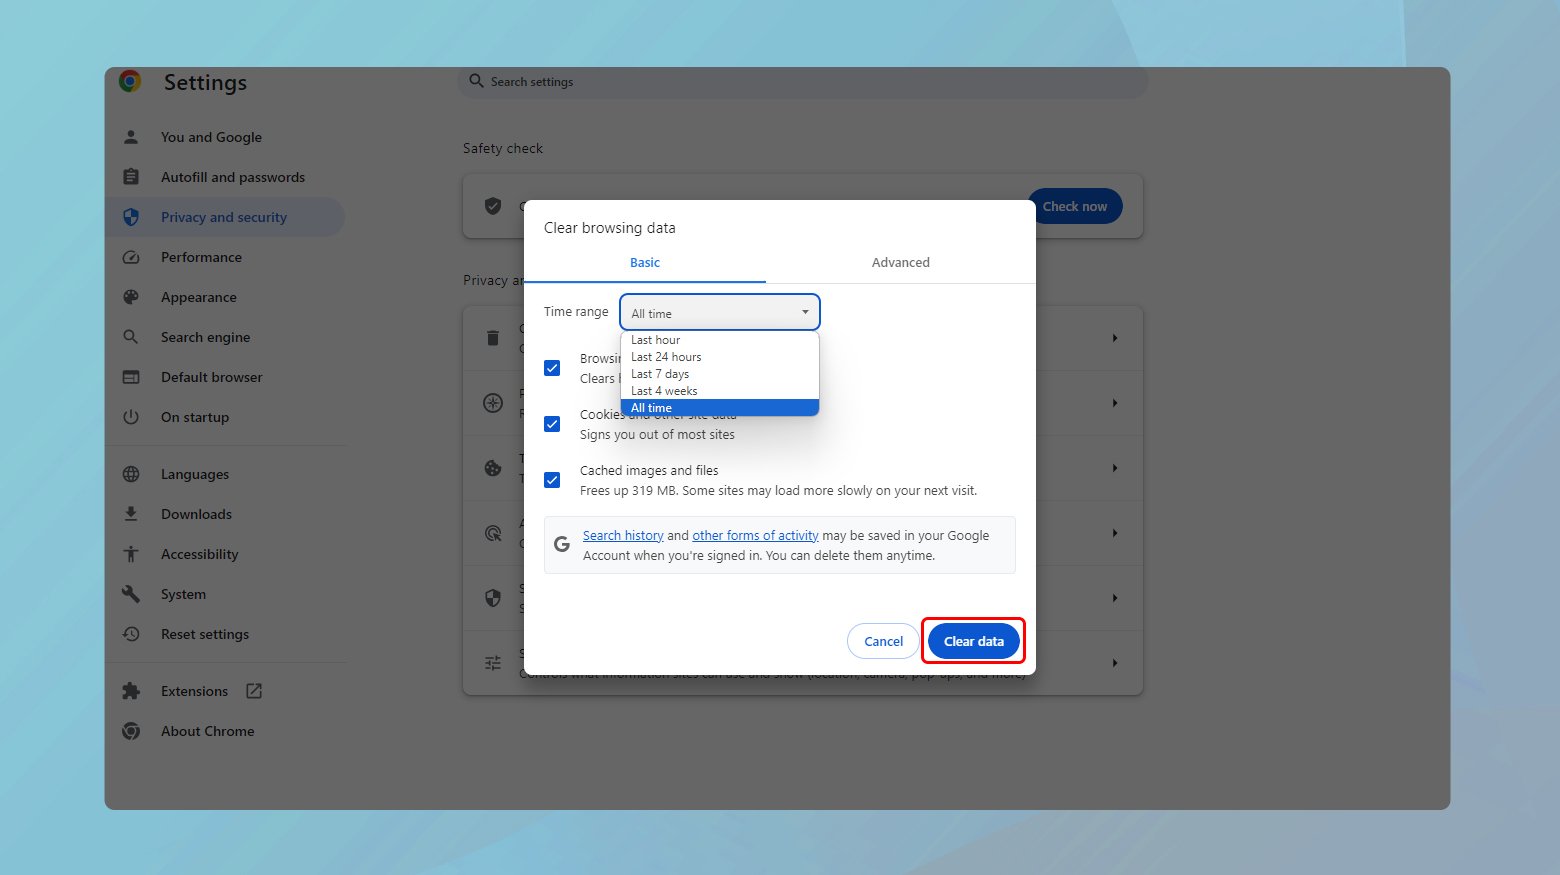
- Click on the three dots in the upper right corner.
- Go to “More tools” > “Clear browsing data.”
- Choose the time range to “All time” and make sure “Cached images and files” is selected. Then, click “Clear data.”
Firefox
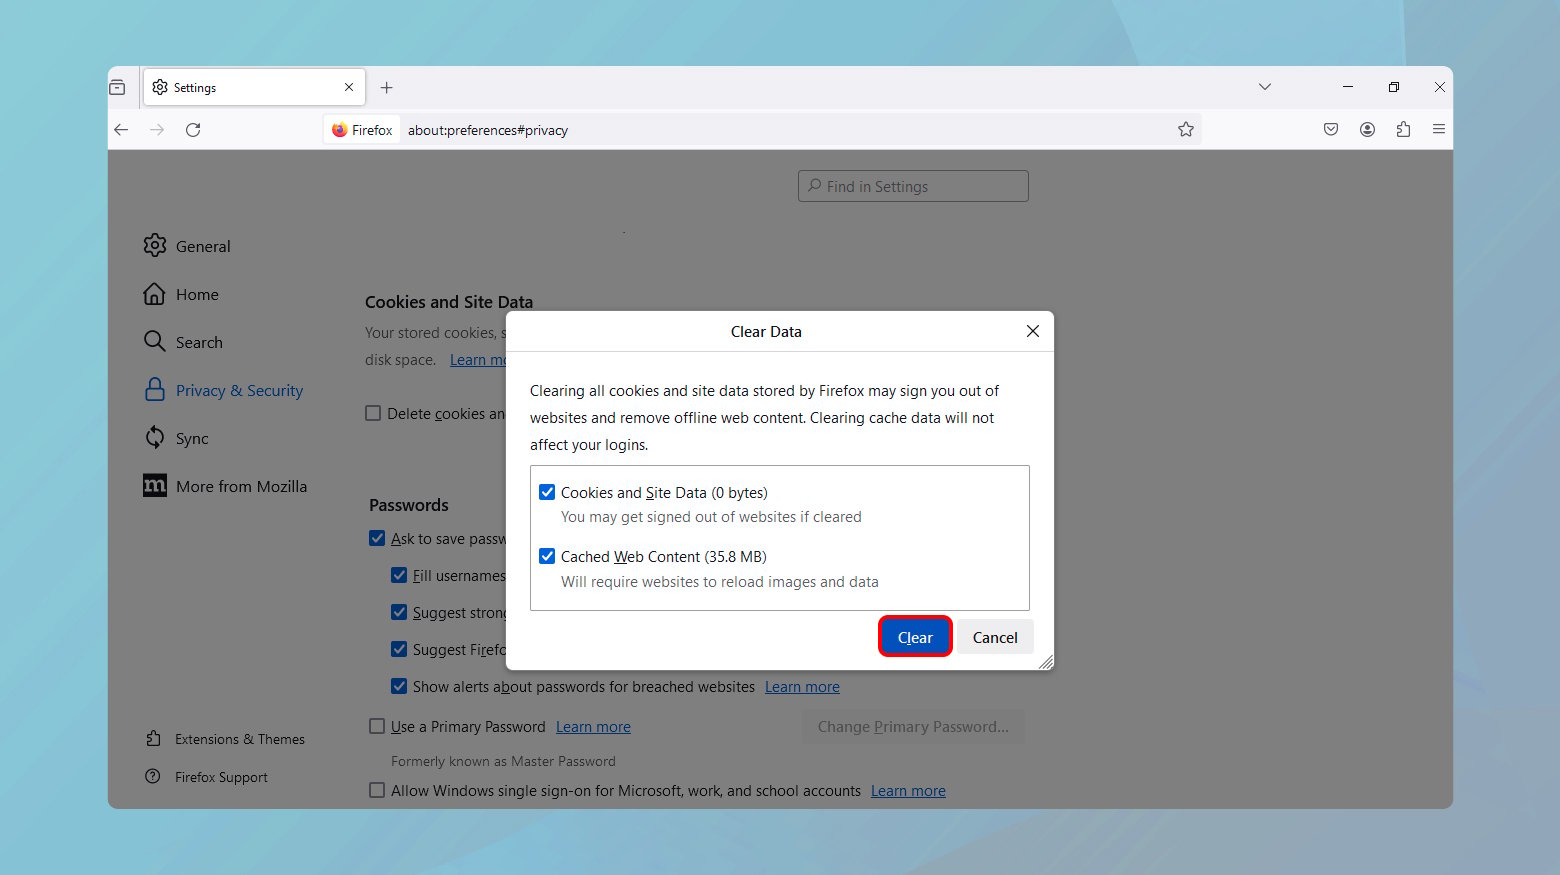
- Click on the menu button, select “Options.”
- Go to “Privacy & Security,” and under “Cookies and Site Data,” click “Clear Data.”
- Ensure “Cached Web Content” is checked, then click “Clear.”
Use a search engine to navigate to the site instead of typing the URL directly. This can help avoid typos and ensure you’re going to the correct site.
Deactivating your plugins to troubleshoot HTTP Error 407
This proxy authentication required error can sometimes be triggered by recent changes on your website, particularly with plugins, themes, or extensions you’ve recently added or updated. Let’s dive into how you can troubleshoot this issue, starting with your plugins.
Deactivating plugins from the WordPress dashboard
If the error coincides with recent changes to your website, and you’re still able to access your WordPress dashboard, the plugins page is a good starting point. Here’s what you need to do:

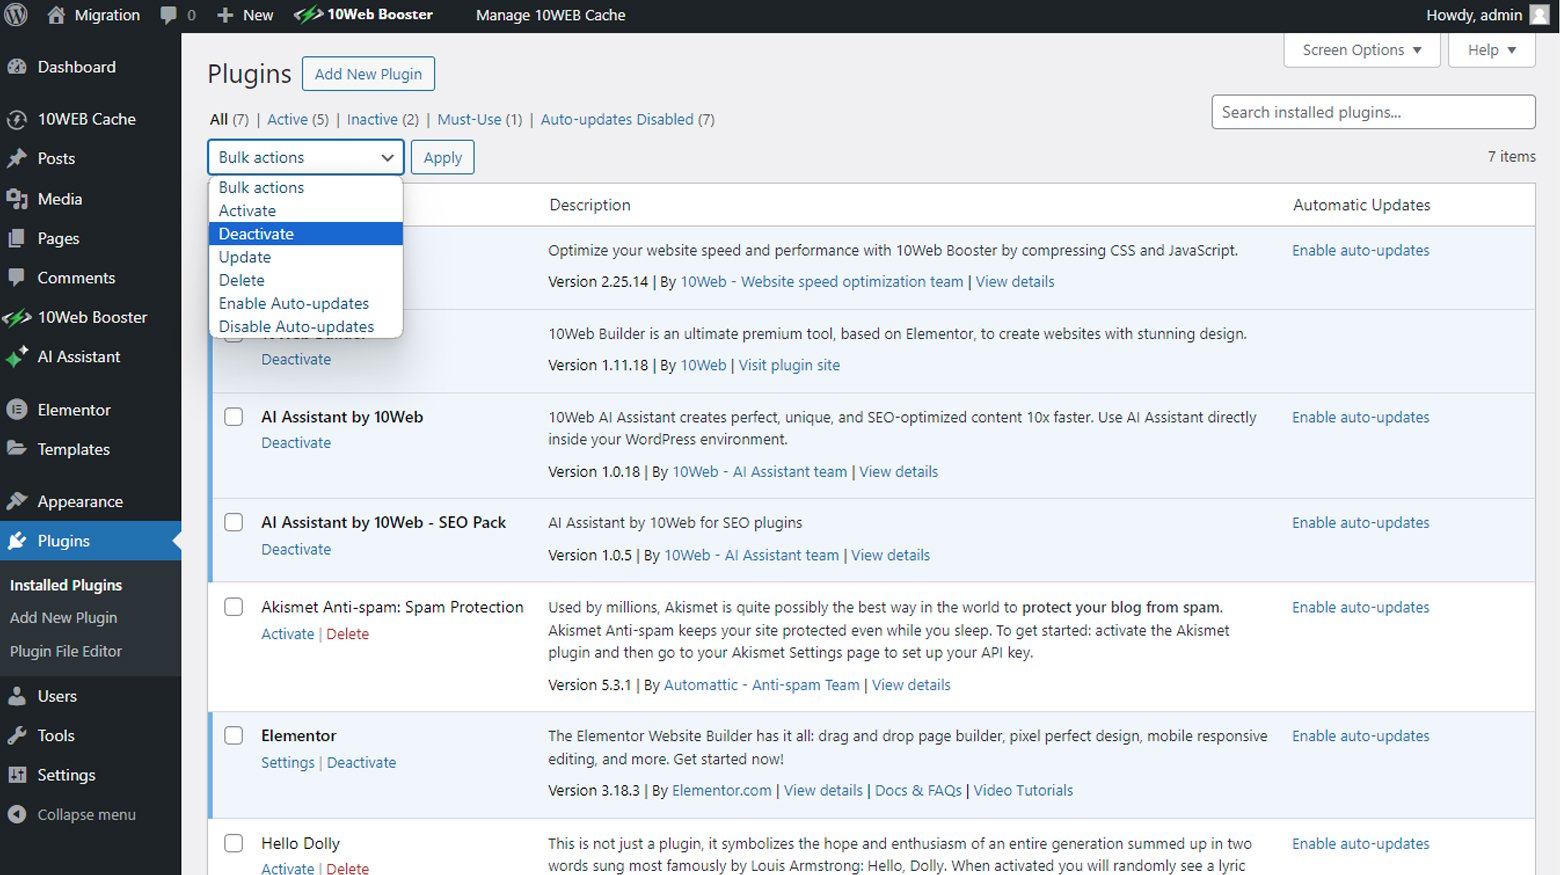
- Log in to your WordPress dashboard.
- From your dashboard, head over to the Plugins section. This area allows you to manage all your installed plugins.
- Select all the plugins by clicking the box next to plugins. This allows you to deactivate in bulk.
- Choose ‘Deactivate’ from the bulk actions dropdown menu, and apply the change. This method quickly turns off all plugin functionality on your site.
With all plugins deactivated, try accessing your site again. If the HTTP Error 407 disappears, you’re on the right track. This indicates one (or more) of your plugins is likely causing the issue.
Next, reactivate your plugins one at a time, refreshing your page after each activation. Pay close attention to when the error reappears. This process helps pinpoint the problematic plugin.
Plugins can sometimes interfere with how your website communicates with your server or a proxy server. By isolating the issue to a specific plugin, you can address the root cause of the problem.
Deactivating plugins via FTP
If accessing your WordPress dashboard is not an option, using an FTP client like FileZilla is a viable alternative. Here’s how to deactivate your plugins using FTP:
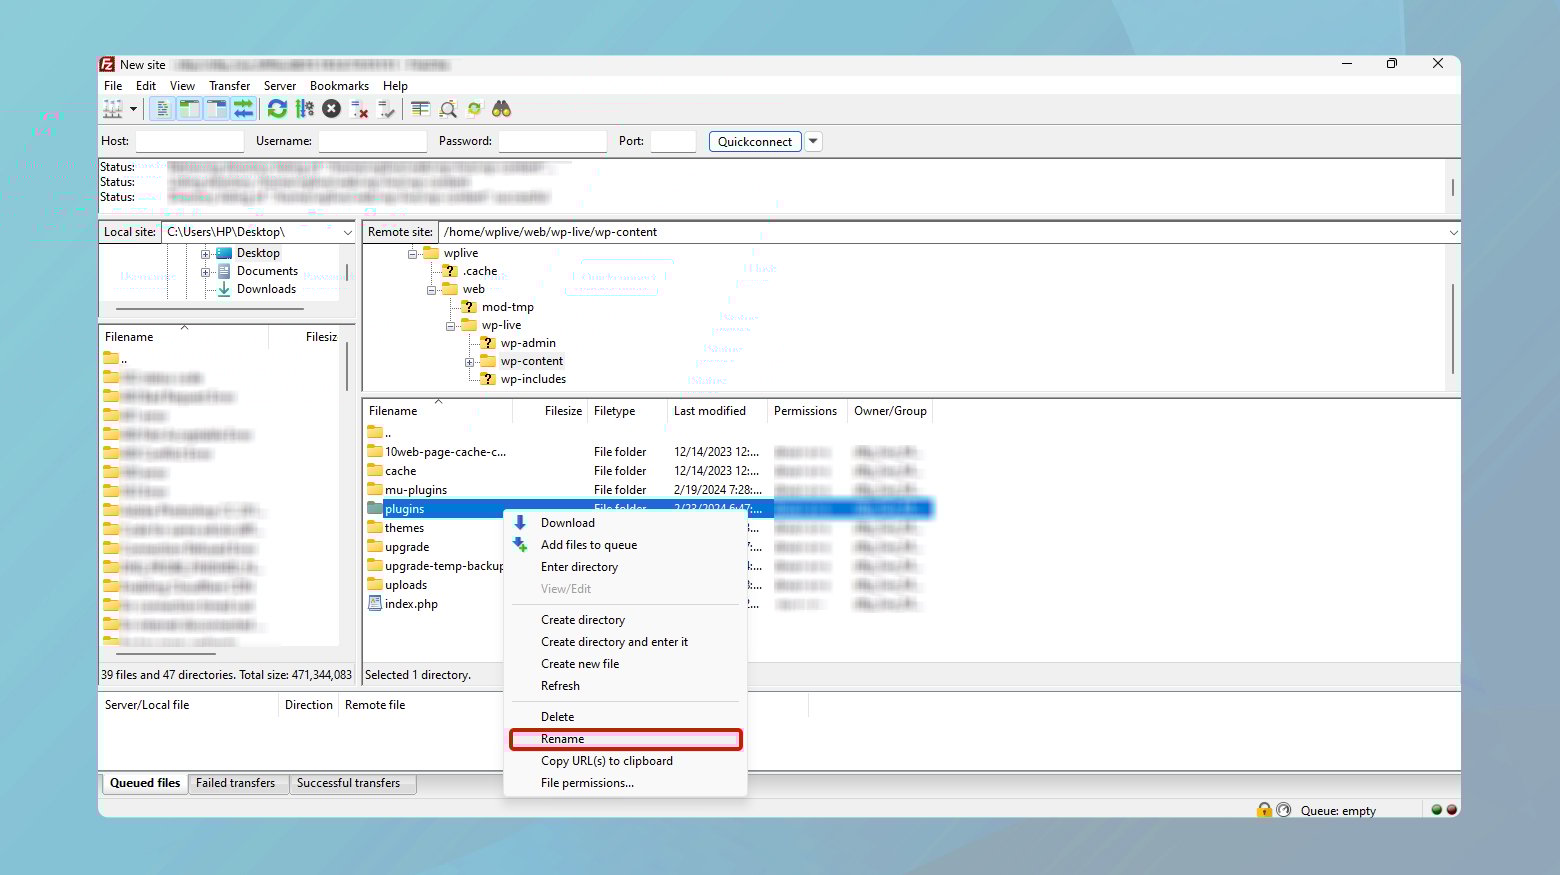
- Open your FTP client and enter your credentials to connect to your site.
- Navigate to the `public_html > wp-content` directory.
- Find the `plugins` folder, right-click on it, and select ‘Rename’. You can rename it to anything, such as `plugins_old`. This action deactivates all plugins on your site.
- With the plugins deactivated, visit your site again. If the error is gone, it confirms a plugin is causing the issue.
- Rename the folder back to `plugins` and then, via the WordPress dashboard or FTP, reactivate each plugin one by one until you find the culprit.
Once you’ve identified the plugin causing the HTTP Error 407, check for updates, as a fix may already be available. If the problem persists, contacting the plugin developer for support or looking for alternative plugins may be necessary.
Running a restoration
The idea behind a restoration is straightforward: revert your site to a previous state when the error was non-existent. This works because it eliminates any recent changes that could be conflicting with your site’s operation or with the proxy server’s authentication process. It provides a clean slate to systematically identify and address the cause of the HTTP Error 407.
While rolling back changes can be effective, it’s not a decision to take lightly due to the potential for data loss or affecting site functionality. Always ensure that you have a recent backup before proceeding. Here’s a step-by-step guide on how to effectively run a restoration and what to keep in mind during the process.
How to restore to a previous version
Before you do anything drastic, make sure to run a backup of your current site. This is crucial because if the rollback doesn’t solve the problem, or if it introduces other issues, you’ll want the option to return to your current state without losing any work.
If your site is hosted on 10Web, you can backup your entire site from the 10Web dashboard.
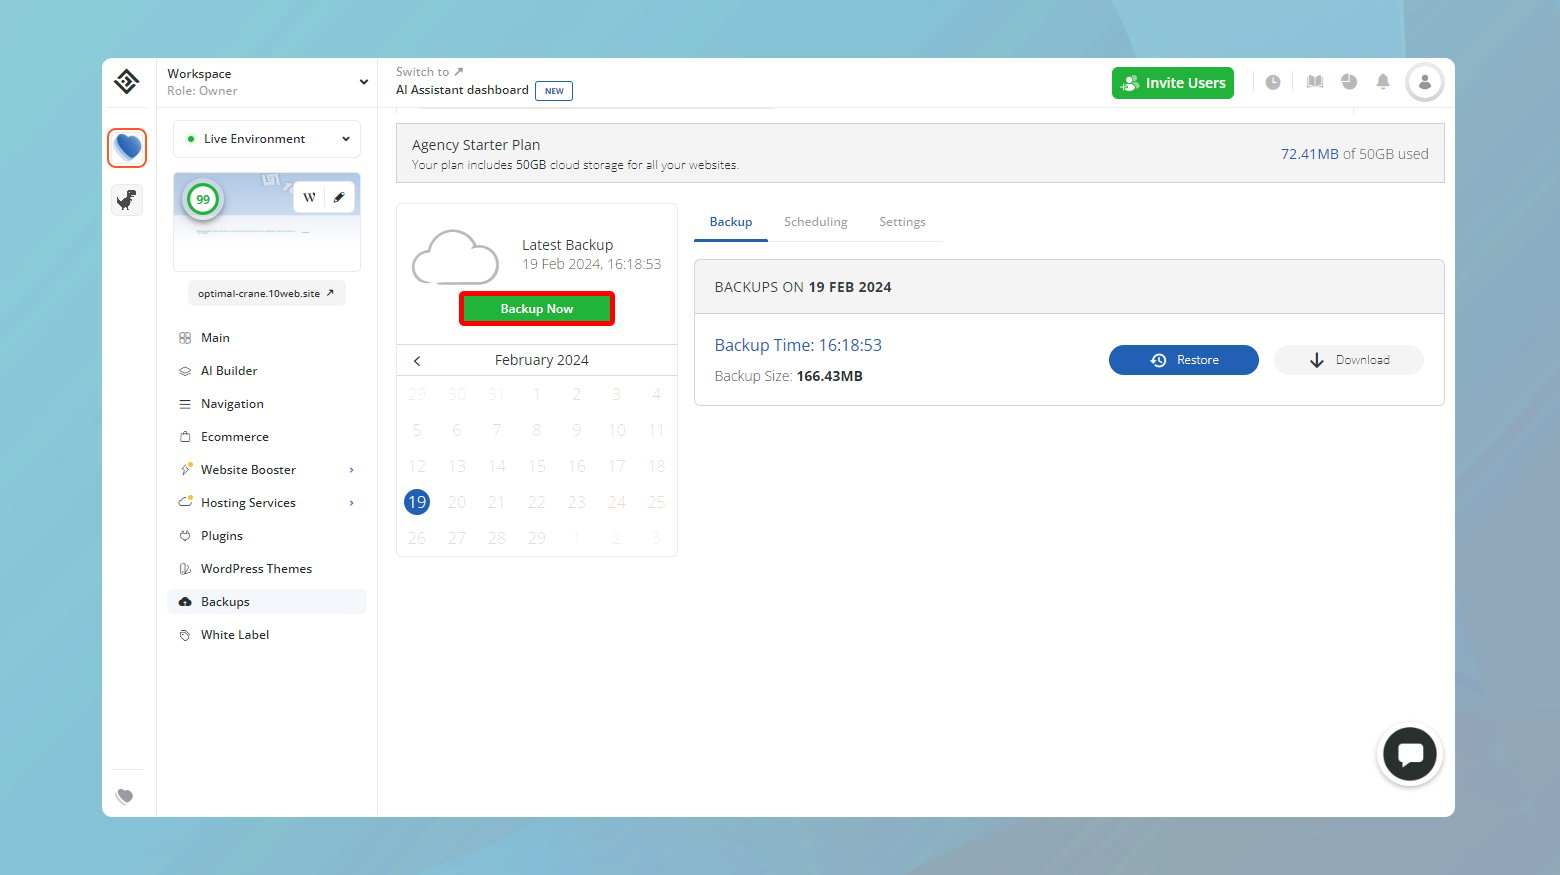
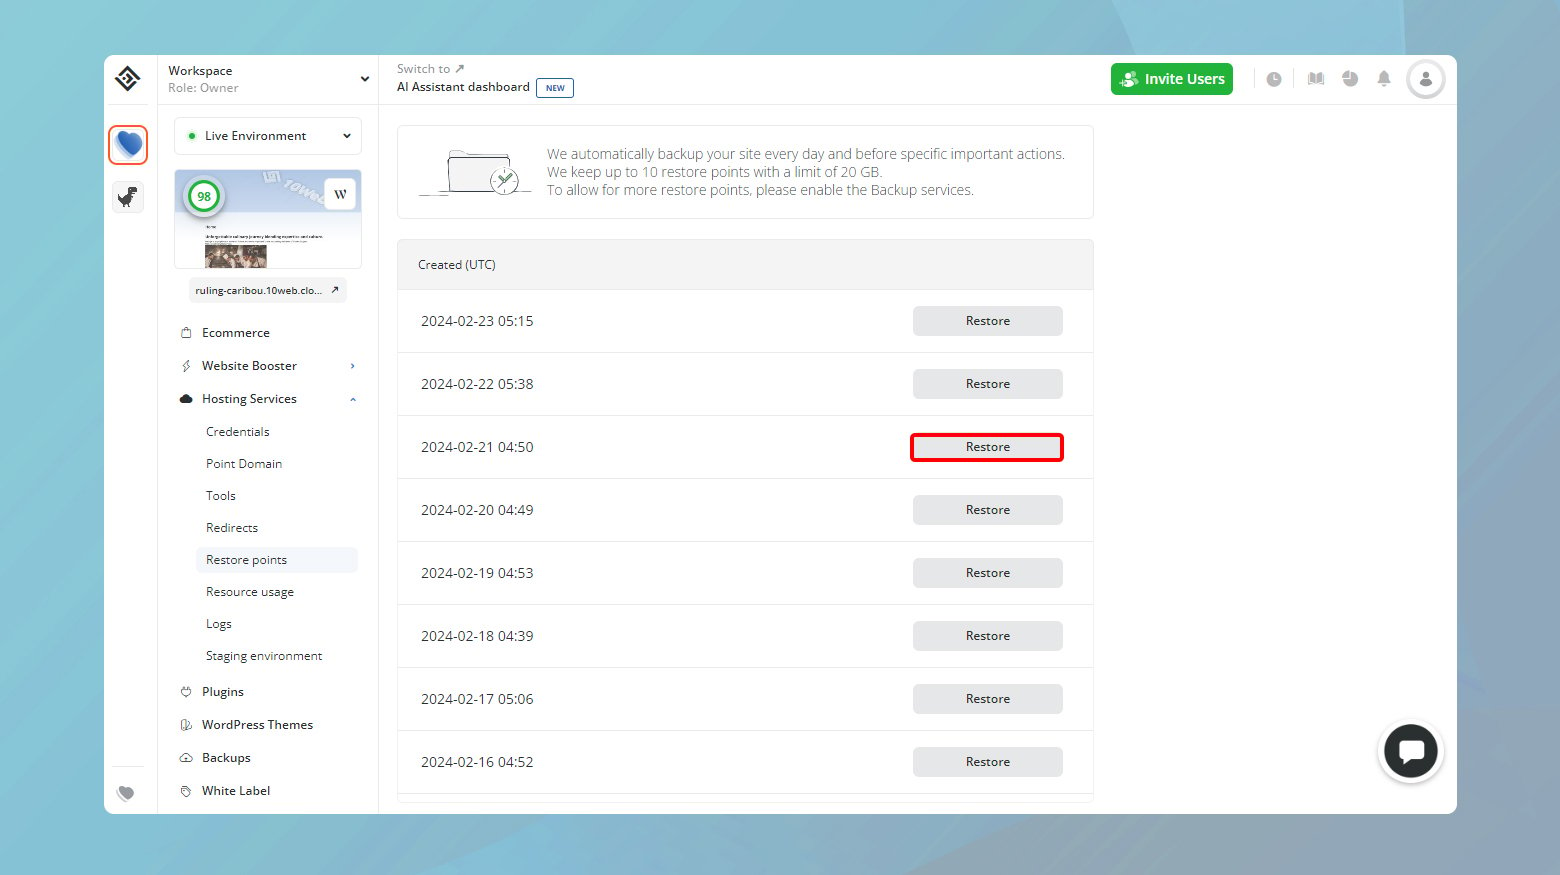
Use your website’s backup system to revert to a point before the error first appeared. Most hosting services offer easy-to-use backup and restoration features. If you’re unsure how to do this, your hosting provider’s support team can likely help.
10Web makes a backup of your entire site every day. You can use these restore points to revert to a previous version or if you have scheduled automatic backups of your website, use any of these versions to restore your site.
After the rollback, carefully test your site to see if the HTTP Error 407 persists. If the error is gone, it’s a strong indication that something changed recently is the cause. Knowing what likely caused the issue can save you time by allowing you to test these elements first.
If the rollback resolved the error but you’re unsure what specific change caused it, the next step is to redo your updates one by one. Apply each change slowly and test for the error after each. This methodical approach helps isolate the exact modification responsible for the error.
Should the problem persist even after a rollback, it might be time to consult with a professional developer or your hosting provider for more advanced diagnostics.
Server-side solutions
This error, signaling “Proxy Authentication Required,” might not just be about your local setup but could stem from the server hosting your website. Especially if you manage multiple sites on the same server, checking for consistency in the error’s occurrence can provide valuable clues.
Analyze error logs
Error logs are invaluable resources that provide a behind-the-scenes look at what’s happening on your server and websites. They track all kinds of activities, including the successful ones and the ones that end in errors, like our infamous HTTP Error 407.
These logs offer a timestamped record of server activities, making it easier to correlate certain actions or changes with the onset of the error. By pinpointing when the error started occurring, you can better understand its cause and work towards a resolution.
How to access and review error logs
- Using an FTP client (like FileZilla), log into your server with the credentials provided by your hosting service. .
- Navigate to the root folder of your site, which is typically named `public_html` or `www`.
- Inside the root folder, look for a directory named `logs` or something similar. This is where your server stores its activity records.
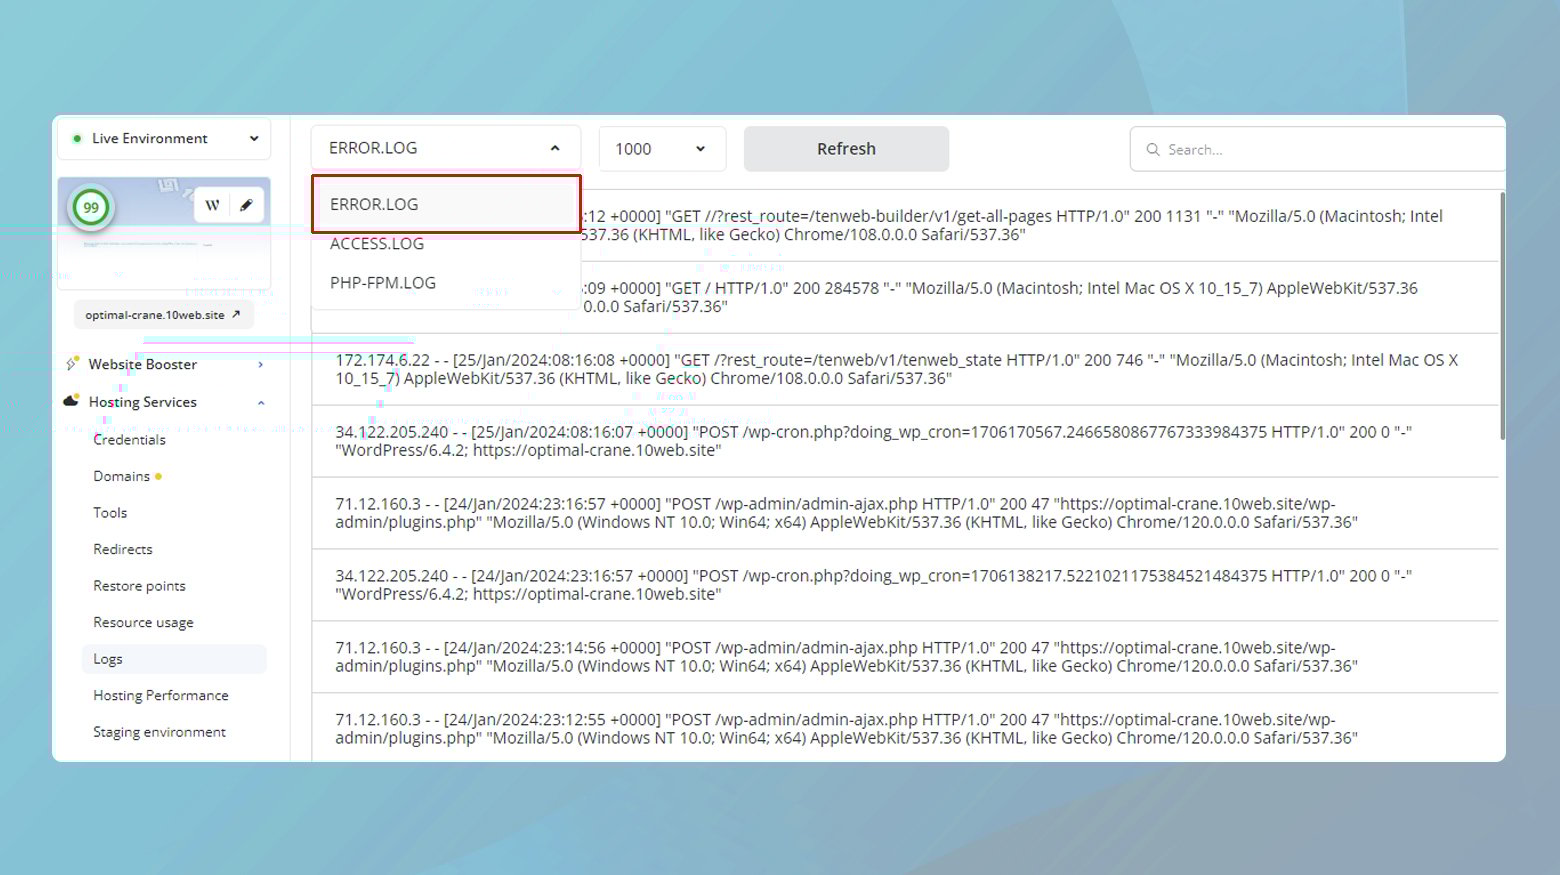
If your website is hosted on 10Web you can access your logs from your 10Web website dashboard under Hosting Services > Logs.
Within the logs directory, you’ll likely find separate folders or files for Nginx and PHP errors.
These are crucial if your server uses Nginx for handling requests. Nginx logs can reveal issues related to serving content, proxying requests, or caching behaviors.
Given that many web applications, including WordPress, rely on PHP, these logs are essential for identifying script-related issues.
Open the log files (you can download and view them in any text editor) and search for instances of “407”. This could help you uncover patterns or specific requests that are triggering the error.
Look for any commonalities around the error occurrences. Are they tied to specific actions on your website, certain times of the day, or after particular updates? If you notice the error started appearing after a specific change (e.g., server configuration, software update), this could be your lead.
If the logs don’t provide a clear direction or if you’re unsure how to interpret them, reaching out to your hosting provider’s support team can be a wise move. They can offer insights based on their infrastructure and might have seen similar issues before.
Checking server config files to resolve HTTP Error 407
HTTP Error 407, indicating a “Proxy Authentication Required,” can sometimes be triggered by configuration mishaps, such as unintended redirects within your server’s setup. These redirects might appear suspicious to a proxy server, leading to access denials. One of the prime spots to investigate such issues is within your web server’s configuration files, particularly the `.htaccess` file for Apache servers.
The `.htaccess` file plays a crucial role in defining how your server handles requests, including redirects and URL rewrites. It contains directives that instruct the server on how to behave in certain scenarios, including handling URLs and managing redirects. Misconfigurations here can inadvertently cause issues with proxy servers, leading to errors like 407.
Here’s how to find and examine it:
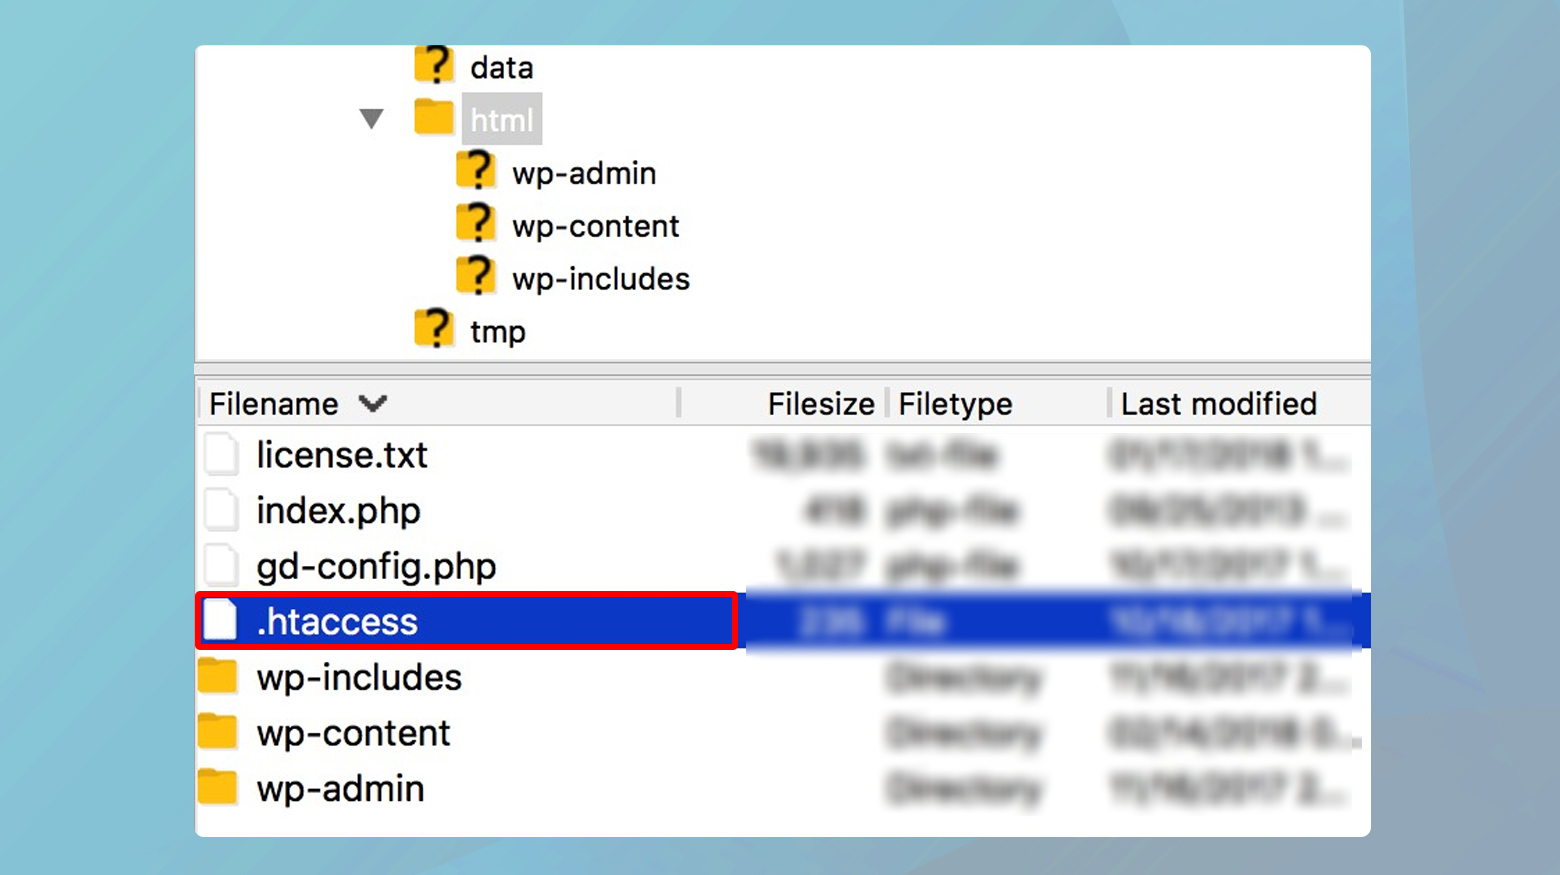
- Open your preferred FTP client (like FileZilla) and connect to your website’s server using the login credentials provided by your hosting service.
- Once connected, navigate to your site’s root directory. This is typically named `public_html`, `www`, or directly after your domain.
- Within the root directory, look for an `app` folder, then navigate into the `public` directory. Here, you should find the `.htaccess` file.
Review and modify the .htaccess file
- Upon locating the `.htaccess` file, the next step is to examine its contents for any directives that might be causing unintended redirects or URL rewrites.
- Download the file and open it with a text editor to review its contents.
- Look for lines that contain the term “redirect” or are involved in rewriting URLs. Pay special attention to any directive that seems out of place or unnecessary.
- Before making any changes, it’s wise to create a backup of the `.htaccess` file. Simply copy the file and save it with a different name or in a different location.
- If you identify any lines that could be causing the issue, consider commenting them out (by adding a `#` at the beginning of the line) or removing them entirely.
After saving the changes, upload the modified `.htaccess` file back to the server. Then, check if the HTTP Error 407 persists when accessing your site.
Considerations
Modifying the `.htaccess` file can impact your site’s functionality, so proceed with caution. If removing certain directives resolves the HTTP Error 407 but negatively affects your site, you’ll need to find a balance. It might involve tweaking the directives for desired functionality without triggering the proxy authentication error.
Given the technical nature of `.htaccess` modifications and their potential impact on site performance, don’t hesitate to contact your hosting provider for guidance. They can offer insights specific to your server’s configuration and help you navigate these changes safely.
Debugging your app or scripts to resolve HTTP Error 407
This approach is particularly relevant if you’ve recently integrated custom code or installed new plugins that might not be compatible with your site’s existing ecosystem. Here’s how you can proceed with this step:
Debugging directly on your live site can lead to unexpected downtime or further issues. A staging environment mirrors your live site, allowing you to experiment without affecting your real users. 10Web users can enable the staging environment for any of their sites with a single click.
The free WordPress plugin Query Monitor, is a powerful ally in your debugging arsenal. It provides a detailed overview of your site’s queries, hooks, conditionals, HTTP requests, and more, pinpointing areas that may contribute to the HTTP Error 407.
To give you that extra help, you can activate WordPress debugging. This will monitor and track bugs logging them for you to go through later.
Enabling WordPress debugging
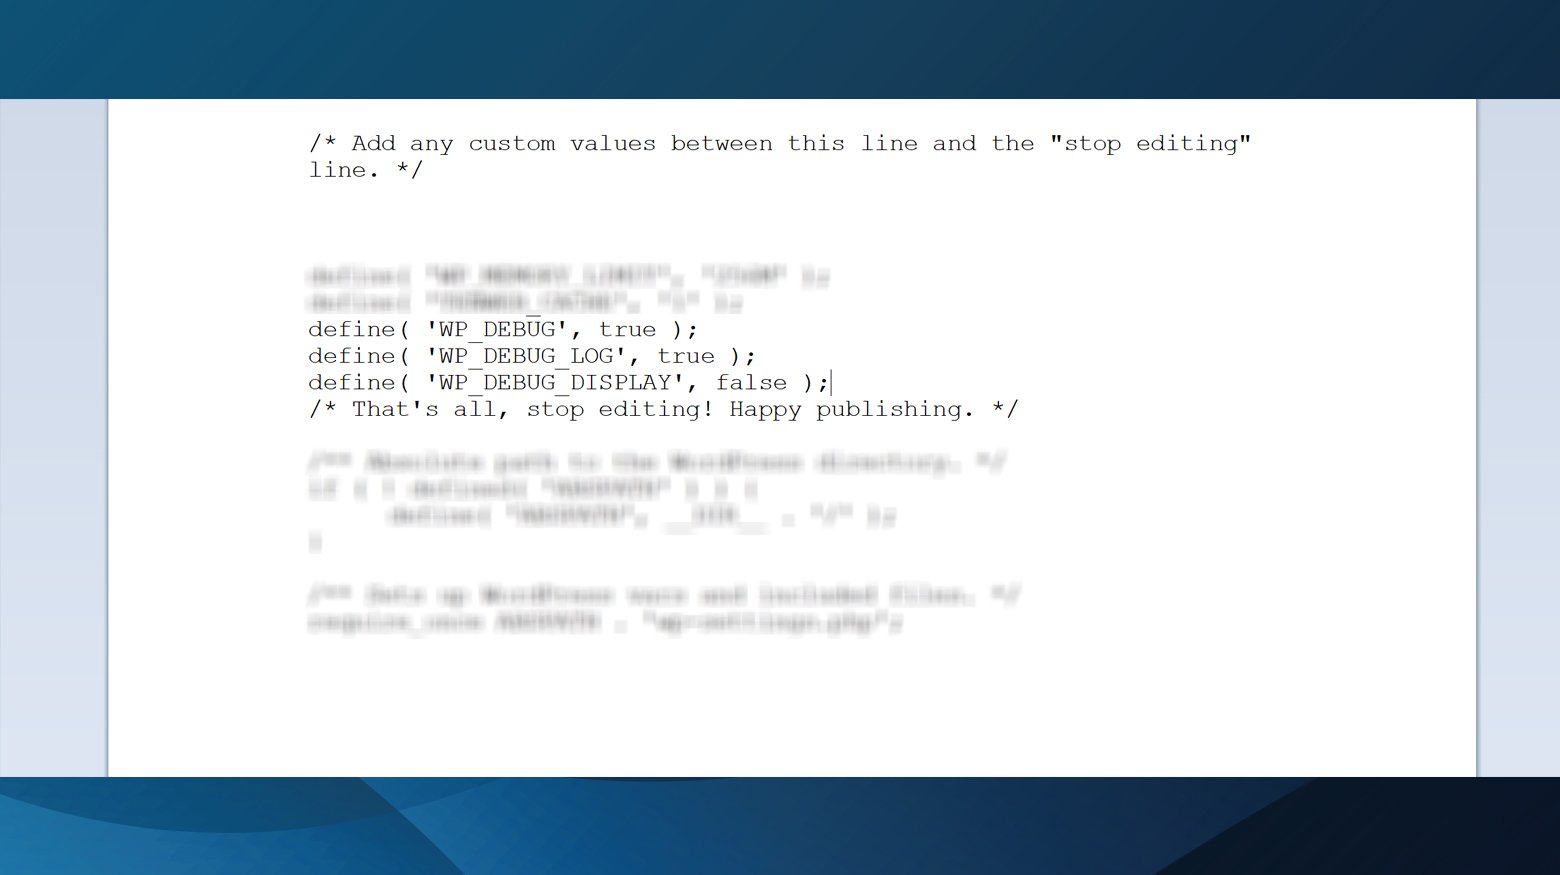
- Using an FTP client, navigate to your WordPress site’s root directory and find the `wp-config.php` file.
- Open `wp-config.php` and look for the line that says `define(‘WP_DEBUG’, false);`.
- Change `false` to `true`. This enables the default debugging mode in WordPress, which can reveal critical error messages directly on your site.
- Direct these messages to a log file by adding `define(‘WP_DEBUG_LOG’, true);` in your `wp-config.php` file. This tells WordPress to save error messages to a debug.log file within the `wp-content` directory.
Conclusion
In this blog, we tackled the HTTP Error 407, focusing on identifying and resolving proxy authentication issues. We covered a range of solutions, from client-side checks like verifying URLs and updating proxy settings to server-side investigations including reviewing error logs and examining `.htaccess` files for unintentional redirects. The key takeaway is the importance of a methodical approach, examining both client and server-side configurations, to effectively diagnose and fix this error. This ensures that users can navigate and rectify proxy authentication requirements, maintaining smooth access to websites and internet services.
Say goodbye to website errors
Achieve peace of mind with 99.99% uptime on 10Web Managed
WordPress Hosting, powered by Google Cloud.
Say goodbye to website errors
Fix all the website errors in one click
Migrate your website to the world's best Managed WordPress Hosting.