
The “jQuery is Not Defined” error is a common hurdle encountered in web development, especially for those new to integrating jQuery, a widely used JavaScript library, into web pages.
This error message pops up in the browser’s console when the JavaScript code attempts to utilize jQuery syntax or functions before the library has been loaded, or if it hasn’t been loaded at all.
Essentially, it’s the browser’s way of saying, “I don’t know what jQuery is,” which leads to the immediate halt of any jQuery-related script execution.
Say goodbye to website errors
Achieve peace of mind with 99.99% uptime on 10Web Managed
WordPress Hosting, powered by Google Cloud.
Variations of the error
The “jQuery is Not Defined” error can manifest in various ways, depending on the browser, the environment (like a development environment versus a production server), or how the script is included in the web page. Some common variations of this error message include:
- jQuery is not defined
- $ is not defined
- Uncaught ReferenceError: $ is not defined
- Uncaught ReferenceError: jQuery is not defined
- ReferenceError: jQuery is not defined
- ReferenceError: $ is not defined
- TypeError: $(…). is not a function
- TypeError: jQuery(…). is not a function
Understanding “jQuery is Not Defined” in WordPress
In the WordPress ecosystem, jQuery is used extensively by themes and plugins to add interactivity and enhance user experience. Perhaps a plugin you’re using was designed to leverage jQuery for its functionality—sliders, pop-ups, form validation, and more. When the browser reports that “jQuery is not defined,” it essentially means that your site’s JavaScript is attempting to call upon jQuery functions before jQuery itself has been loaded, or it hasn’t been loaded at all.
Common causes of this error in WordPress
Several scenarios specific to WordPress can lead to this error, including:
Themes and plugins: A theme or plugin that improperly enqueues jQuery, or relies on an outdated version, can cause this issue.
Manual edits: Custom edits to theme files, especially if jQuery is manually deregistered or enqueued incorrectly, can result in this error.
Conflicts: Sometimes, installing multiple plugins that all attempt to load their own versions of jQuery can lead to conflicts and subsequently, the error.
General causes of this error
Incorrect order of scripts: The most common cause is that your HTML page is trying to use jQuery before it has been loaded. Scripts relying on jQuery must be placed after the jQuery library’s <script> tag.
Failure to include jQuery: Simply forgetting to include jQuery on your webpage can cause this error. Ensure you have a <script> tag that correctly sources the jQuery library.
Conflicting libraries: Sometimes, other JavaScript libraries or scripts can conflict with jQuery, especially if they also use the $ symbol. This can inadvertently lead to jQuery being overwritten or not properly initialized.
Caching issues: In some cases, your browser might cache an old version of your webpage that didn’t include jQuery, or the path to jQuery might be incorrect, leading to a failure in loading the library.
Content delivery network (CDN) issues: If you’re loading jQuery from a CDN, and the CDN is down or unreachable, your site will not be able to load the library, resulting in this error.
Say goodbye to website errors
Achieve peace of mind with 99.99% uptime on 10Web Managed
WordPress Hosting, powered by Google Cloud.
How to fix the jQuery is not defined error
Before making any changes, ensuring you have a full website backup is essential. If you have access to a staging or development environment you can use that environment to fix the error and bypass any potential disruptions from direct edits on the live site.
With those safeguards in place, you’re ready to tackle the “jQuery is not defined” error.
Verify jQuery is loaded by testing the script source
One common cause behind this issue is that while jQuery might be included, it’s not properly loaded due to various reasons like incorrect URLs, network issues, or file access permissions. To verify if jQuery is correctly loaded, a simple yet effective approach involves testing the script source directly in your browser.
Steps to test jQuery script source
-
- Firstly, you need to locate the script tag that includes jQuery in your HTML code. This tag is crucial because it specifies the source from which jQuery is supposed to be loaded. Look for a line in your code that looks like this:
<script src="http://code.jquery.com/jquery-1.11.2.min.js"></script>
- This src attribute contains the URL of the jQuery library you’re trying to load.
- Extract the URL from the src attribute of the script tag. This is the direct link to the jQuery file you’re including on your site. Ensure you’re copying the entire URL accurately, including the http:// or https:// part at the beginning.
- Open a new tab or window in your web browser and paste the copied URL into the address bar. Press Enter to navigate to this URL.
If the jQuery file is correctly loaded, you will see the entire contents of the jQuery library displayed as plain text in your browser. This indicates that the jQuery script source is accessible and functioning as expected.
Alternate methods to verify jQuery loading
How to verify jQuery loading via page source
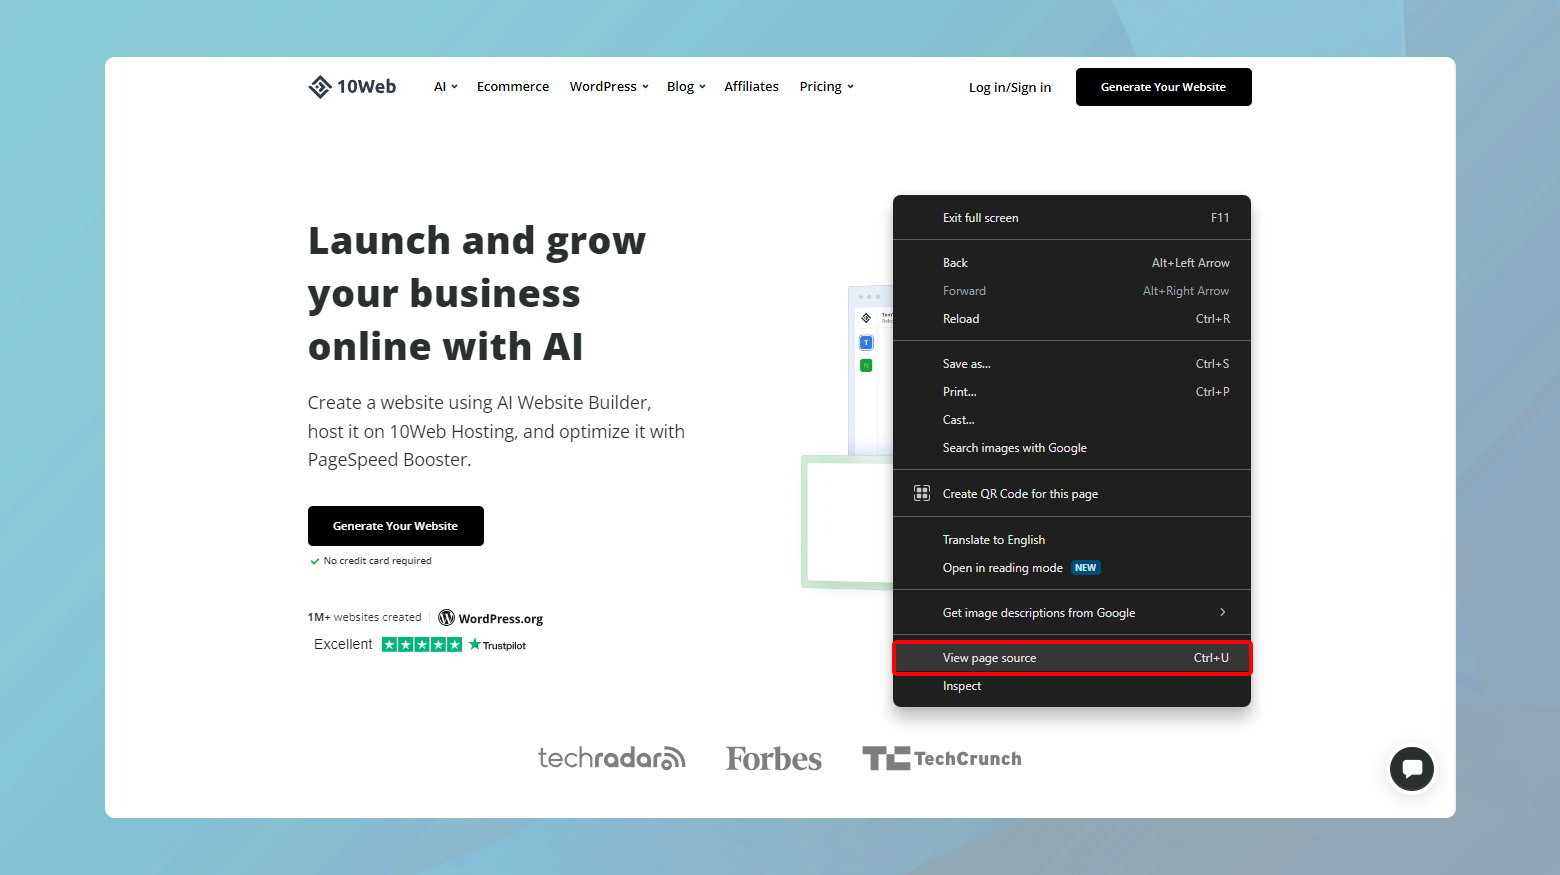
- Navigate to the webpage you want to inspect using your preferred web browser.
- Right-click anywhere on the web page and select View Page Source from the context menu. This option might slightly vary between browsers.
- With the source code open, you will now need to find the jQuery script inclusion. This can easily be done by using the search function built into your browser:
- Press Ctrl+F on Windows or Command+F on Mac to open the search bar.
- Type jquery into the search field and press Enter. This action will highlight all occurrences of jquery in the source code.
- Look for a line in the highlighted results that resembles a script tag linking to a jQuery library.
It might look something like this:
<script src="https://ajax.googleapis.com/ajax/libs/jquery/3.5.1/jquery.min.js"></script>
or for locally hosted jQuery, something like this:
<script src="/path/to/jquery.min.js"></script>
If you find such a line, jQuery is included in your page. If not, jQuery may not be loaded, which could be causing the issues you’re experiencing.
Using the developer tools to verify jQuery loading
- Access your website and open the developer tools in your browser. This can typically be done by right-clicking on the page and selecting Inspect or by pressing F12 or Ctrl+Shift+I (Windows) / Cmd+Option+I (Mac).
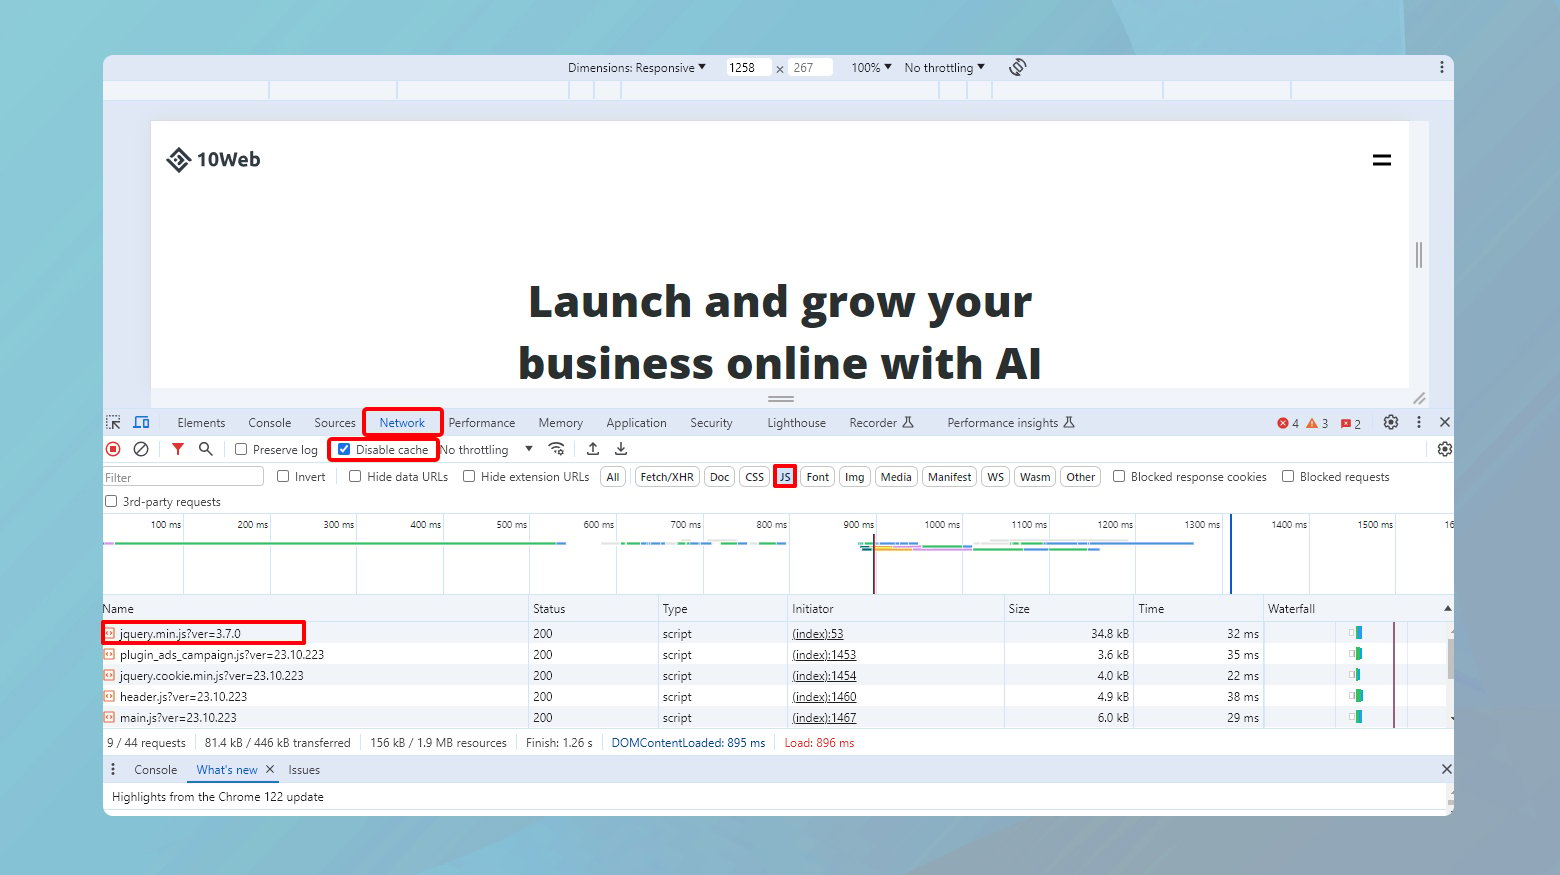
- Within the developer tools, find and click on the Network tab. This tab shows all network requests made by your website as it loads.
- Check the Disable cache option and with the Network tab open, reload your website to capture all loading activities.
- Use the filter options to narrow down the results to JavaScript files. You can typically do this by selecting the JS filter or typing jquery into the filter/search box.
- Scroll through the list of scripts being loaded or use the search function within the Network tab to find entries related to jQuery. You’re looking for a file that contains jquery in its name, indicating the jQuery library is being loaded.
Ensure jQuery is correctly included in WordPress
If you find that jQuery is not being loaded or you’re encountering issues despite its presence, you may need to ensure it’s correctly included in your WordPress theme or plugin. WordPress offers a robust way to manage scripts through the wp_enqueue_script function. This method is preferred because it handles script dependencies efficiently and helps avoid conflicts.
Enqueue jQuery in WordPress
- Connect to your WordPress site using an FTP client or the file manager provided by your hosting service.
- Navigate to your theme’s folder and find the functions.php file. It’s advisable to create a child theme and make changes there to avoid losing customizations when your theme updates.
- If jQuery is missing, you can enqueue it by adding the following code snippet to your functions.php file:
function my_theme_enqueue_scripts() {

 wp_enqueue_script('jquery');

}

add_action('wp_enqueue_scripts', 'my_theme_enqueue_scripts');
This ensures that WordPress includes jQuery on all pages of your site.
If you’re adding custom scripts that depend on jQuery, ensure to list jQuery as a dependency, like so:
wp_enqueue_script( 'custom-script', get_template_directory_uri() . '/js/custom-script.js', array('jquery'), '1.0', true );
Implement a local fallback with Google hosted jQuery
Including a Google-hosted version of jQuery in your website is a common practice to take advantage of Google’s CDN for fast and reliable delivery of this popular JavaScript library. However, to ensure your website remains robust against potential CDN outages or network issues, implementing a local fallback is crucial. This setup allows your site to automatically use a locally hosted version of jQuery if, for any reason, the Google-hosted version fails to load. This method adheres to web development best practices by optimizing performance while ensuring redundancy. Below is a step-by-step guide to implementing this strategy effectively.
Include Google-hosted jQuery
First, you need to add the Google-hosted jQuery script tag to your website. Place this tag within the <head> section of your HTML document or right before the closing </body> tag to ensure other scripts that depend on jQuery can use it. For example:
<script src="https://ajax.googleapis.com/ajax/libs/jquery/3.5.1/jquery.min.js"></script>
Add the local fallback script
Immediately following the script tag for the Google-hosted jQuery, you’ll add a small piece of JavaScript. This script checks if jQuery has been successfully loaded from the Google CDN. If not, it dynamically writes a new script tag into your HTML document to load jQuery from a local source.
<script>

 window.jQuery || document.write('<script src="/path/to/local/jquery-3.5.1.min.js"><\/script>');

</script>
Make sure to replace “/path/to/local/jquery-3.5.1.min.js” with the correct path to the jQuery file hosted on your server.
Understanding the code
window.jQuery: This part of the script checks if the jQuery object is available globally, which would indicate that jQuery has been loaded successfully.
document.write: This method is used to insert HTML into the document. It’s used here to add a script tag for the local jQuery file if the CDN version is not loaded. The escape sequence <\/script> is used to prevent the string from being interpreted as the end of the script block.
Understanding the fallback mechanism
The fallback mechanism operates on a simple check: window.jQuery. If the jQuery object is not defined, it implies that the CDN version did not load properly. The document.write method is then used to inject a new <script> tag that loads jQuery from a local file.
Benefits
- Ensures jQuery is always available, even if the CDN fails.
- Loading jQuery locally can reduce latency in certain scenarios, especially if the CDN version is slow to respond or if the user’s network has issues connecting to the CDN.
- Having a local copy gives you control over the version of jQuery being used, allowing for consistent testing and debugging.
Add a snippet to wp-config.php file
When you’ve tried various methods to resolve the “jQuery is not defined” error or similar JavaScript issues in WordPress without success, disabling script concatenation can be a useful troubleshooting step. Script concatenation is a WordPress feature that combines multiple JavaScript files into a single request to improve load times. However, this can sometimes cause errors or lead to script loading issues, especially if there’s a conflict or a specific script isn’t loading correctly.
Editing the wp-config.php file
Use an FTP client or the file manager provided by your web hosting control panel to access your WordPress site’s files.
Open the wp-config.php file in a text editor. If you’re using an FTP client, you’ll need to download the file first, open it with a text editor on your computer, and then upload it back after editing. If you’re using a file manager in a web hosting control panel, you can usually edit the file directly in your browser.
Scroll to the bottom of the file, just before the line that reads /* That’s all, stop editing! Happy blogging. */. Here, paste the following code snippet:
  /** Absolute path to the WordPress directory. */

 if ( !defined('ABSPATH') )

 define('ABSPATH', dirname(__FILE__) . '/');

 define('CONCATENATE_SCRIPTS', false);
After adding the snippet, save your changes. If you’re editing the file locally on your computer, make sure to upload it back to the server, replacing the existing wp-config.php.
Understanding the snippet
ABSPATH definition: This line ensures the absolute path to the WordPress directory is correctly defined, which is a fundamental requirement for WordPress to operate correctly.
Disabling concatenation: The `define(‘CONCATENATE_SCRIPTS’, false);` line explicitly tells WordPress not to link scripts. This can help with debugging script issues by loading each script individually, making it easier to identify which script might be causing problems.
Manually add jQuery library
Manually including the jQuery library directly in your WordPress theme’s header.php file is a straightforward approach, especially when other methods to resolve jQuery-related issues haven’t been successful. This method ensures that jQuery is loaded early in the page rendering process, reducing the risk of “jQuery is not defined” errors.
How to manually include the jQuery library
-
- Go to the Google Hosted Libraries page to access the latest version of jQuery.
- Find the most recent version of jQuery listed on the page and copy the script tag provided. T
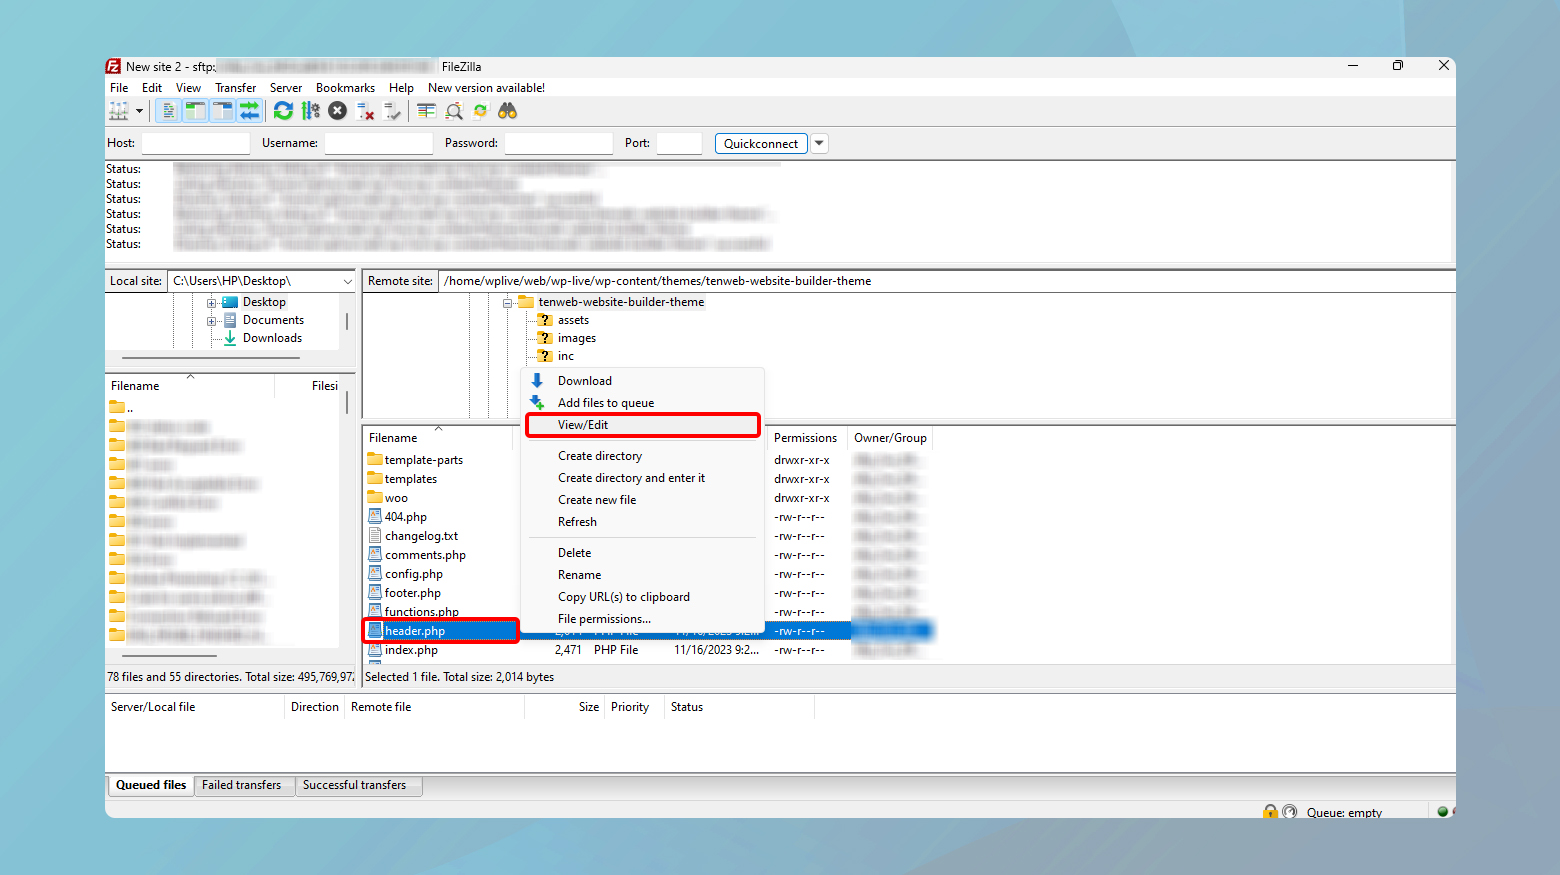
- Use an FTP client or the file manager provided by your hosting service to access your WordPress site’s files.
- Within your WordPress directory, go to wp-content/themes/your-theme-folder/ and find the header.php file. Replace your-theme-folder with the actual name of your theme.
- Open the header.php file in a text editor. If you’re using a file manager through your web hosting control panel, you may be able to edit the file directly in your browser.
-
- Paste the jQuery script tag you copied from Google Hosted Libraries right after the opening <head> tag in your header.php file. Placing it near the top of the head section ensures that jQuery is loaded early and is available to any scripts that depend on it.
For example,
 <head>

 <script src="https://ajax.googleapis.com/ajax/libs/jquery/3.5.1/jquery.min.js"></script>

 <!-- Your other head content below -->
- After adding the script tag, save the header.php file. If you edited the file locally on your computer, don’t forget to upload it back to the server, replacing the old version of the file.
Important considerations
Child theme: If you’re making changes to a theme directly, it’s best practice to use a child theme. This prevents your changes from being overwritten when the parent theme is updated.
Test your site: After adding jQuery manually, thoroughly test your site to ensure that scripts are running as expected and that there are no compatibility issues.
Closing thoughts
In our blog, we navigated through various solutions to address the “jQuery is not defined” error, emphasizing the importance of ensuring jQuery is correctly loaded and implemented on a website. We covered verifying jQuery’s presence through page source inspection and the browser’s Network tab, and we discussed enhancing site reliability with a Google-hosted jQuery complemented by a local fallback.
Additionally, we explored advanced WordPress troubleshooting techniques, such as disabling script concatenation in the wp-config.php file and manually adding jQuery to the header.php file of a theme. Throughout, the emphasis was placed on cautious editing practices, including using staging environments and child themes for safe modifications, to maintain website functionality and user experience.
Say goodbye to website errors
Achieve peace of mind with 99.99% uptime on 10Web Managed
WordPress Hosting, powered by Google Cloud.
Say goodbye to website errors
Fix all the website errors in one click
Migrate your website to the world's best Managed WordPress Hosting.