

You’ve got your file ready to jazz up your site, only to be met with the “Sorry, This File Type Is Not Permitted for Security Reasons” error. No, your site isn’t under attack, nor does it mean your file is malicious. This roadblock is WordPress’s built-in safeguard, keeping a tight leash on what gets uploaded to ensure your site remains secure and running smoothly.
Unpacking the error
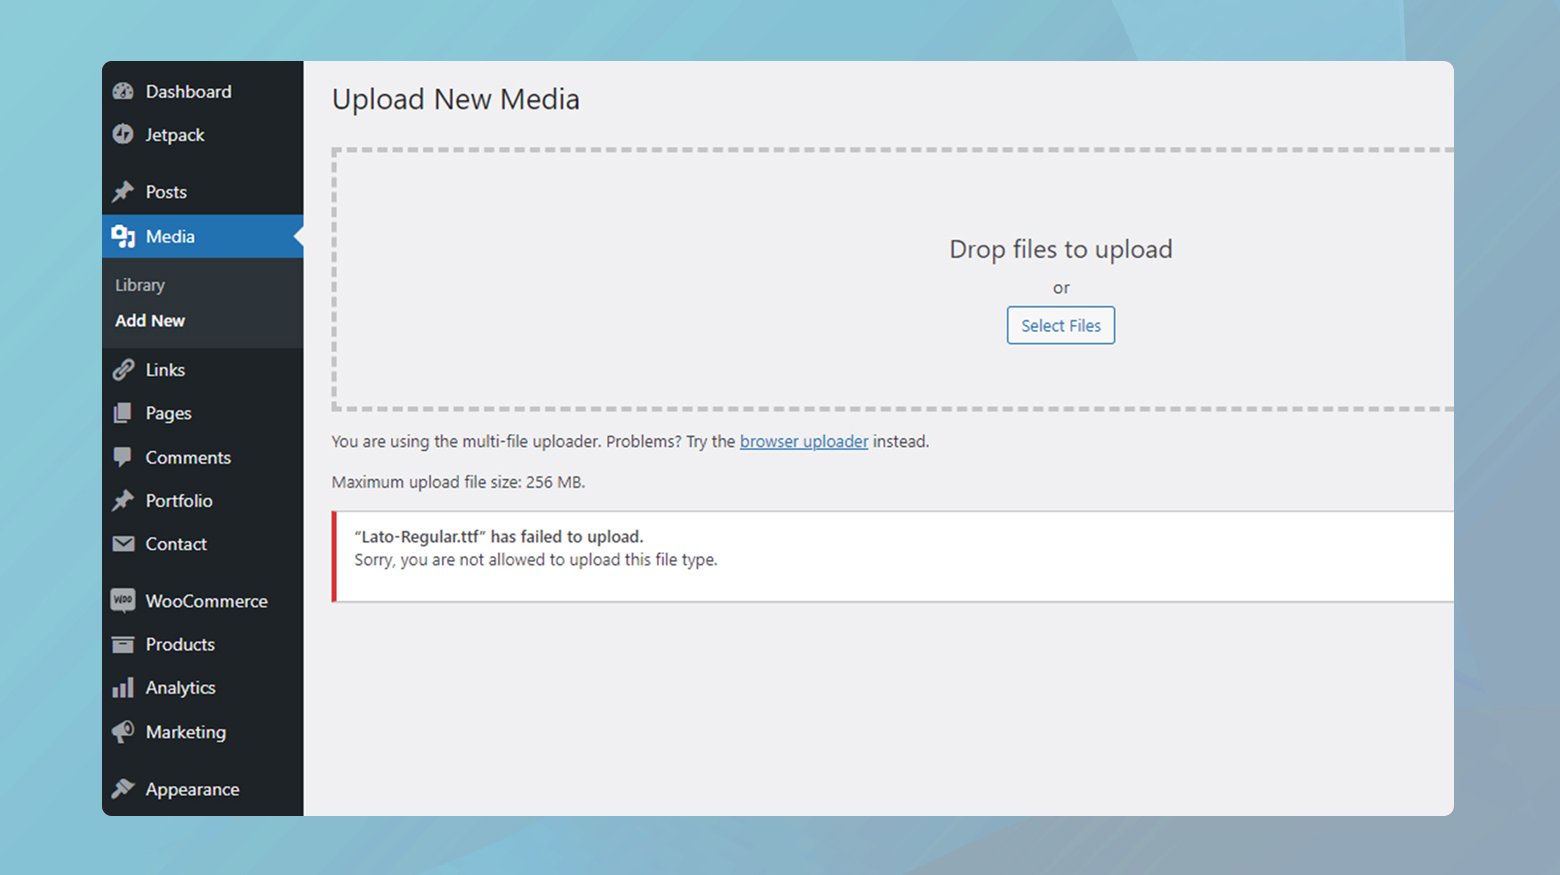
This error pops up because WordPress has a curated list of file types it considers safe and supported. When you attempt to upload something outside this list—like an AVIF image file, a relatively new format known for its impressive compression efficiency—WordPress throws up this warning. It’s less about the specific file being a threat and more about WordPress not recognizing the file type.
Supported file types in WordPress
When you upload a file to your WordPress site, what you’re essentially doing is introducing a new piece of content to the web’s vast ecosystem. Here, MIME types play the role of a digital introducer, helping web browsers understand the nature of the file you’re uploading, whether it’s an image, a video, a document, or an audio file.
MIME types, standing for Multipurpose Internet Mail Extensions, are essentially the internet’s way of categorizing content types. Think of it as the digital equivalent of food labeling. Just as labels help you understand what’s inside a can without opening it, MIME types let browsers know how to treat different files. For example, a .jpg or .png file is recognized as an image, while .mp3 and .wav are audio files. WordPress leverages this system to manage and display the content you upload.
WordPress supports a broad range of file types, especially the most commonly used ones across the web. These include:
- Images: .jpg, .jpeg, .png, .gif, .ico.
- Documents: .pdf, .doc, .docx, .ppt, .pptx, .pps, .ppsx, .odt, .xls, .xlsx, .psd.
- Audio: .mp3, .m4a, .ogg, .wav.
- Video: .mp4, .m4v, .mov, .wmv, .avi, .mpg, .ogv, .3gp, .3g2.
Additionally, HTML files can also be uploaded, broadening the scope of content you can manage through WordPress.
As technology evolves, new file formats emerge, like the AVIF image format, which offers superior compression without sacrificing quality. WordPress’s conservative approach means it can lag in supporting such newer formats out of the box.
Variations of the error
Depending on the context and the platform you’re using, this error can wear several different masks:
- “Sorry, this file type is not permitted for security reasons.”
- “Error: File type not allowed for security reasons.”
- “Upload failed: This file type is not supported.”
- “Cannot upload this file type for security reasons.”
- WordPress file type security error.
- “The uploaded file type is not allowed.”
- “File type is not permitted.”
Whether you’re uploading a new theme, a plugin, or just a media file, the essence of the error remains the same: WordPress is putting up a red flag on the file type.
Reasons why this error occurs
The root of this issue is WordPress’s security measure designed to prevent the upload of potentially harmful files that could compromise your website’s safety and integrity. Here’s why it might rear its head:
Unsupported file types: WordPress has a whitelist of allowed file types and extensions for uploads, and if your file doesn’t match, the door closes.
WordPress configuration: The wp-config.php file or plugin settings might have restrictions set, intentionally or not, that limit file uploads.
Hosting restrictions: Some hosting services impose their own file type restrictions, adding another layer of gatekeeping.
Security plugins: To beef up security, plugins might restrict file types further than WordPress’s default settings.
Multisite network settings: If you’re on a WordPress Multisite, network admins can apply file type restrictions network-wide.
Initial checks
Before delving into complex solutions involving changes to your WordPress configuration, it’s crucial to verify the extension of the file you’re trying to upload. Incorrect file extensions are a common cause of this error. For instance, attempting to upload an image with a .jpg extension that has been mistakenly saved as .avi can trigger this message.
How to correct the file extension
Windows
- Navigate to the folder containing the file.
- If you don’t see the file extension, open File Explorer, click on View at the top, and check the box for File name extensions.
- Right-click the file, select Rename, and change the extension to the correct format (e.g., from .avi to .jpg).
- Press Enter and confirm the change if prompted.
Mac
- Open Finder and locate the file.
- Press Command + I to open the file’s information window.
- In the Name & Extension field, change the extension to the correct format (e.g., from .avi to .jpg).
- Close the information window to save your changes.
If adjusting the file extension resolves the issue, you can proceed to upload the file again. If the error persists, move on to the troubleshooting solutions.
Resolving the “Sorry, this file type is not permitted for security reasons” error
There are a couple of ways you can go about resolving this issue. Essentially, both methods will achieve the same outcome of adding new file types into the permitted file types of your WordPress installation.
Editing wp-config.php to allow unfiltered uploads
Enabling the ALLOW_UNFILTERED_UPLOADS configuration in your WordPress site’s wp-config.php file allows you to upload any file type to your WordPress Media Library, bypassing the default security restrictions. This can be particularly useful for uploading file types not typically supported by WordPress. However, it’s important to proceed with caution, as allowing unfiltered uploads can potentially expose your site to security risks if not managed properly. Below is a detailed guide on how to safely enable this feature.
Backup your site
Before making any changes to critical WordPress files, creating a complete backup of your site is essential. This precaution ensures that you can restore your site to its previous state if something goes wrong during the process.
Editing the wp-config.php file
-
- Use an FTP client like FileZilla or an SFTP client to connect to your web hosting account. Navigate to the root directory of your WordPress installation.
- Locate the wp-config.php file, right-click on it, and choose the option to edit. The wp-config.php file contains your WordPress site’s base configuration details. It’s located in the root folder of your WordPress installation. If your FTP client doesn’t support editing, you can download the file to your computer and open it with a text editor like Notepad (Windows) or TextEdit (Mac).
- In the editor, scroll to find the line that says /* That’s all, stop editing! Happy blogging. */. Just above this line, insert the following code:
define('ALLOW_UNFILTERED_UPLOADS', true);
This line of code enables unfiltered uploads on your WordPress site.
- After adding the code, save your changes. If you downloaded the file to edit, make sure to re-upload it to the same location in your site’s root directory.
For the change to take effect, you need to refresh your WordPress session by logging out and then logging back into your WordPress admin. You should now be able to upload any file to your WordPress website.
Using a plugin for custom file uploads in WordPress
For WordPress users seeking an alternative to editing the wp-config.php file for uploading unsupported file types, the WP Extra File Types plugin offers a user-friendly and free solution. This approach not only avoids potential risks associated with direct file edits but also grants more granular control over the types of files you can upload to your site. Here’s how to get started with this plugin.
Installing and activating the plugin
- Log in to your WordPress admin account.
- Navigate to Plugins > Add New Plugin.
- In the search field search for the WP Extra File Types plugin.
- Click on Install > Activate.
Configuring file type settings
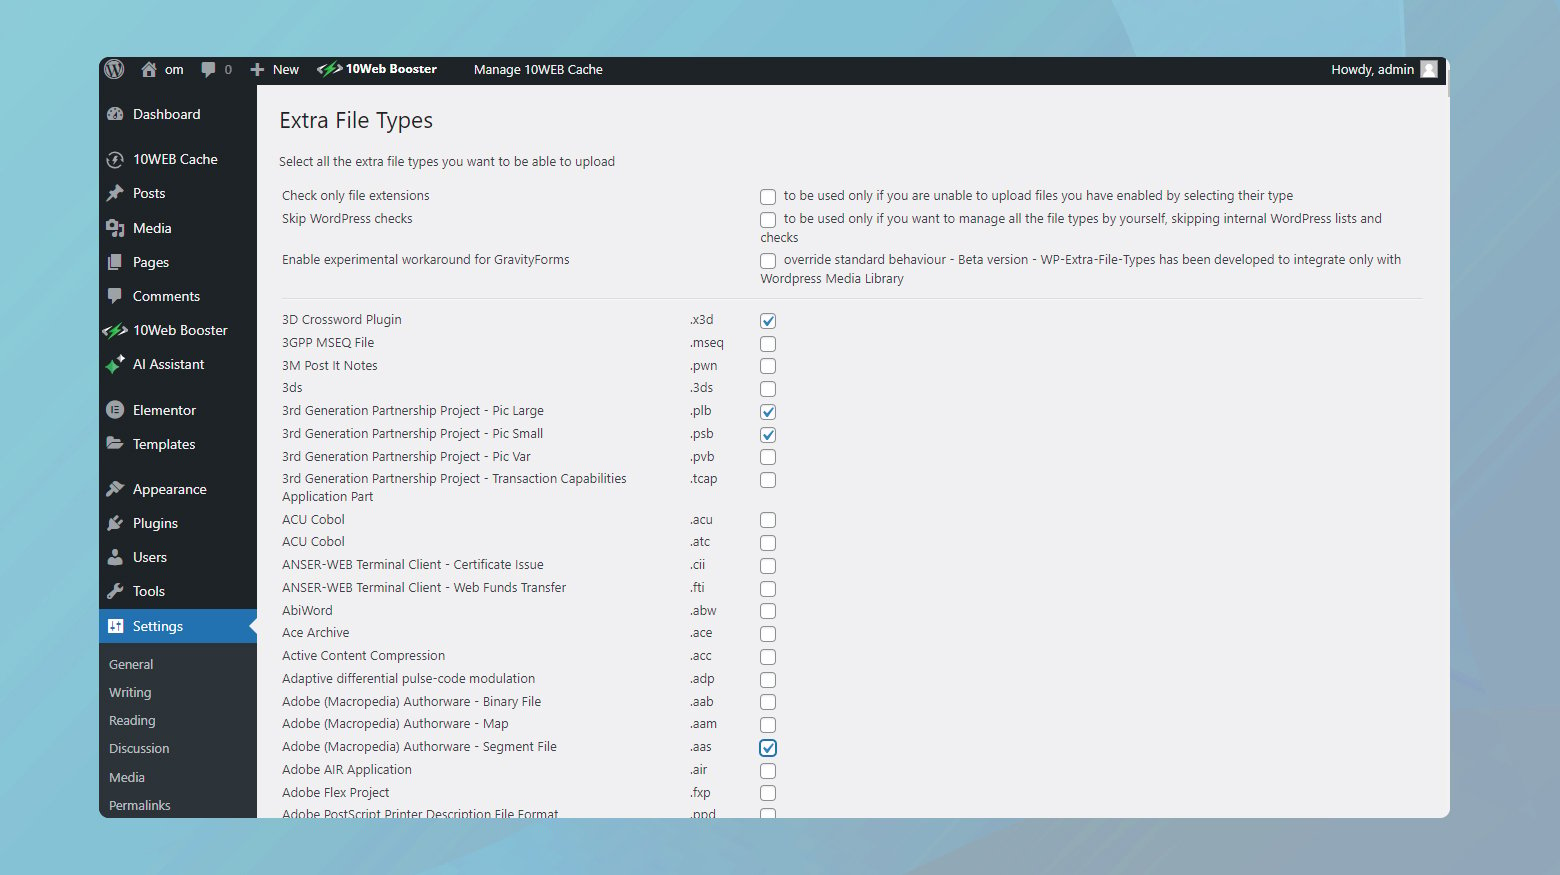
To configure the file types and the settings:
- In your WordPress dashboard, navigate to Settings > Extra File Types.
- You’ll see a comprehensive list of file types with checkboxes next to them. Scroll through this list and check the boxes next to the file type(s) you wish to enable for uploads on your site.
- After selecting your desired file types, click Save Changes at the bottom of the page to apply your settings.
Adding custom file types
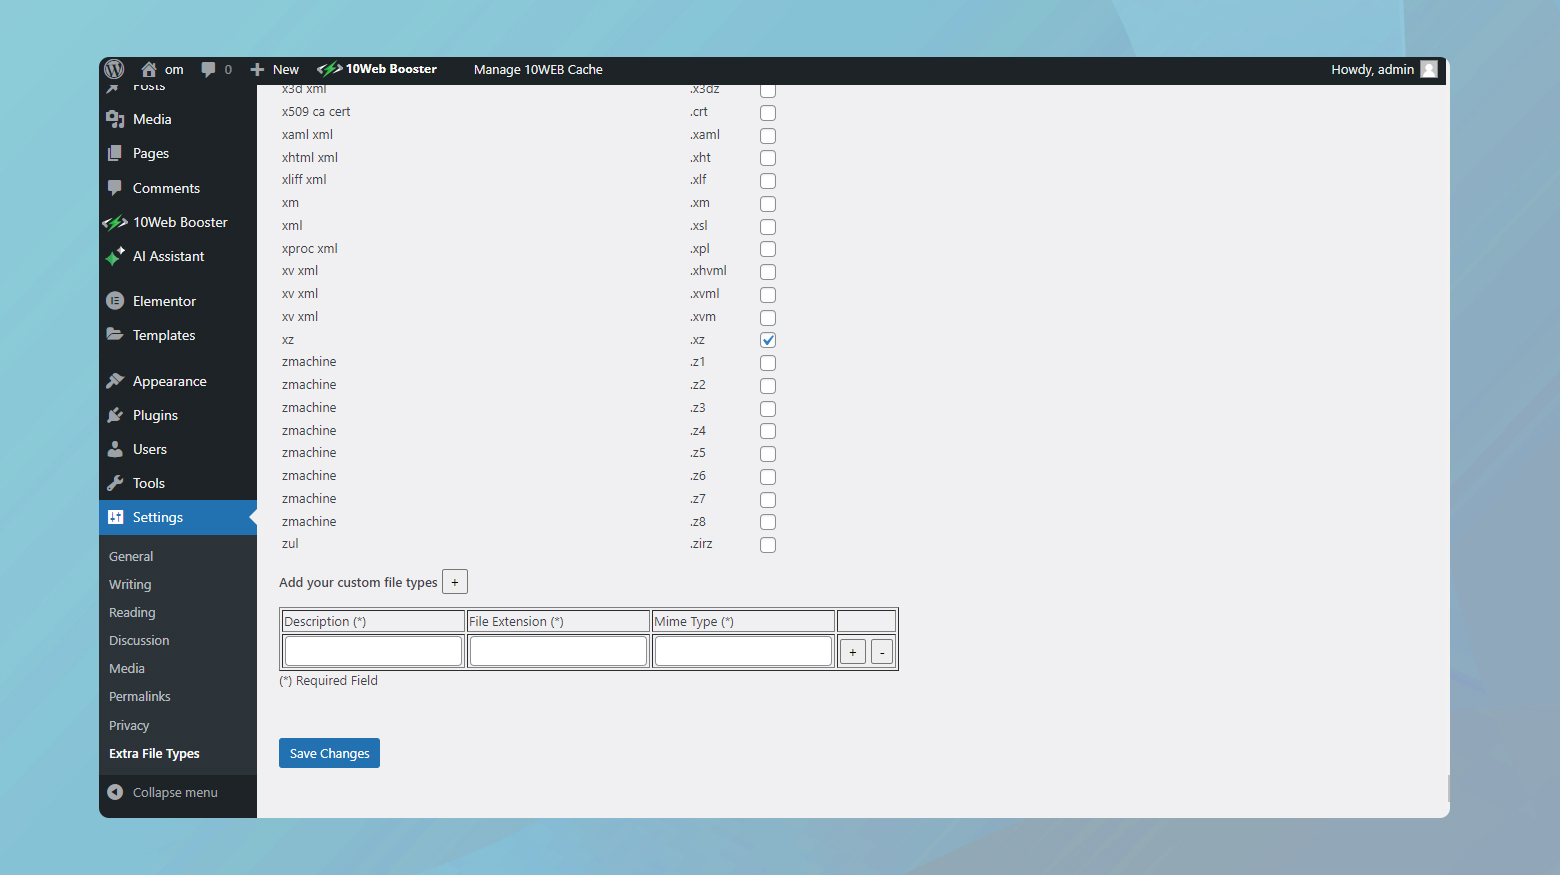
If the file type you need to upload isn’t listed, you can add it manually.
- Scroll to the bottom of the Extra File Types settings page.
- You will find fields to input the file extension (e.g., `.custom`) and the MIME type (e.g., `application/custom`). The MIME type is a standard way to identify the nature and format of a file; ensure you input the correct MIME type for your custom file extension.
- After entering the details for your custom file type, click the Add button next to the entry fields.
- Lastly, click Save Changes to ensure your custom file type is recognized for uploads.
Final thoughts
In this blog, we covered strategies for resolving the “Sorry, this file type is not permitted for security reasons” error in WordPress. Starting with a simple check of the file’s extension, we moved on to modifying the wp-config.php file for broader upload permissions and introduced the WP Extra File Types plugin as a safer, more customizable solution. Each method was explained with detailed instructions to cater to users with varying levels of technical expertise. We have also emphasized the importance of site backups before making changes and maintaining security while enhancing site functionality. These solutions provide a comprehensive toolkit for WordPress users to manage and troubleshoot file upload issues effectively.
Create a custom WordPress website tailored to your business needs 10X faster with 10Web AI Website Builder.Accelerate your WordPress website creation with AI
![]() No credit card required
No credit card required
Say goodbye to website errors
Fix all the website errors in one click
Migrate your website to the world's best Managed WordPress Hosting.