

When you see the message “Could Not Establish Trust Relationship for the SSL/TLS Secure Channel with Authority,” it signals a glitch in the secure communication channel between your client application and the server. This issue roots deeply in the SSL/TLS protocol, which is the backbone of secure data exchange on the internet. SSL (Secure Socket Layer) and TLS (Transport Layer Security) are cryptographic protocols designed to provide communications security over a computer network.
The problem typically arises when the client application does not trust the SSL/TLS certificate presented by the server. This could be due to several reasons, such as the certificate being self-signed, expired, or not issued by a trusted Certificate Authority (CA). To grasp the complexity of this issue, one must understand the mechanics of how secure connections are established and the role of certificates in this process. Certificates serve as digital passports, verifying the identity of the server to the client, ensuring that the entity you’re communicating with is indeed who they claim to be.
Say goodbye to website errors
Achieve peace of mind with 99.99% uptime on 10Web Managed
WordPress Hosting, powered by Google Cloud.
Understanding SSL and TLS
SSL (Secure Sockets Layer) and TLS (Transport Layer Security) serve as the bedrock for securing online communications. They encrypt data and authenticate connections, ensuring that sensitive information such as personal and payment details remain confidential during transmission between a user’s browser and a website’s server. Despite their shared goal, it’s essential to recognize the differences between SSL and TLS. Notably, TLS is an updated, more secure version of SSL, designed to address vulnerabilities found in earlier SSL protocols.
The necessity of SSL/TLS for website security cannot be overstated. The process begins when a user attempts to access your site; their browser first verifies the validity of your SSL certificate. Upon validation, an encrypted connection is established, safeguarding the data exchange against potential eavesdropping or tampering.
Various types of SSL certificates are tailored to different needs:
Single-Domain Certificates: Ideal for securing one website, providing a straightforward solution for individual sites.
Wildcard Certificates: A step up, these certificates secure a single domain along with its subdomains, offering a flexible solution for businesses that operate multiple service fronts under one main domain.
Multi-Domain Wildcard Certificates: The most versatile option, perfect for organizations with multiple websites and subdomains. This type eliminates the need for separate certificates for each domain, simplifying management and deployment.
Quality hosting providers, recognizing the importance of SSL/TLS, often include free SSL certificates as part of their hosting plans. This inclusion removes a barrier to entry for secure web hosting, making it easier for website owners to adopt HTTPS. For instance, providers like 10Web offer free SSL certificates from Let’s Encrypt and leverage Cloudflare integration. Such hosting packages come with additional benefits, such as enhanced security measures, speed-optimized infrastructure, and advanced performance monitoring tools.
For those with specific requirements or preferring a different certificate authority, purchasing a custom SSL certificate from trusted entities like Comodo or DigiCert is another viable route. Regardless of the source, the critical steps post-acquisition include properly installing the SSL certificate on your server and ensuring it functions correctly to maintain the secure status of your site.
In essence, the integration of SSL/TLS into your website’s security protocol is not just a best practice but a fundamental requirement in today’s digital landscape. It not only protects your users’ data but also boosts your site’s credibility and trustworthiness in the eyes of both visitors and search engines. Whether you opt for the convenience of a hosting provider’s free SSL or the customizability of a purchased certificate, the key lies in diligent installation and maintenance to ensure ongoing security and performance.
Variations of the issue
This SSL/TLS trust relationship issue can manifest in various environments and platforms, including web browsers, email clients, API connections, and any software that relies on secure connections over the internet. The error message might slightly differ depending on the context or the software you are using, but the essence remains the same. Some common variations include:
- The underlying connection was closed: Could not establish trust relationship for the SSL/TLS secure channel.
- Trust relationship between the workstation and primary domain failed.
- Error: Could not establish a trust relationship for the SSL/TLS secure channel with authority ‘[Authority Name]’.
- SSL Certificate problem: unable to get local issuer certificate.
- The request was aborted: Could not create SSL/TLS secure channel.
Reasons why this error occurs
Expired SSL/TLS Certificate: Just like your passport, SSL/TLS certificates have an expiration date. If a certificate has expired, the client will refuse to establish a secure connection with the server.
Self-Signed Certificates: For development purposes, servers often use self-signed certificates. However, these aren’t trusted by client applications unless explicitly added to the trust store, leading to this error.
Mismatched domain names: The domain name on the certificate must match the domain name being accessed. If there’s a discrepancy, the client will flag the connection as untrustworthy.
Certificate not issued by a trusted authority: Browsers and client applications have a predefined list of trusted CAs. If the server’s certificate isn’t issued by one of these authorities, the client will not establish a trusted connection.
Intermediate Certificates missing: Sometimes, the server fails to provide the complete chain of trust, omitting intermediate certificates. Clients unable to verify the full path will reject the connection.
Say goodbye to website errors
Achieve peace of mind with 99.99% uptime on 10Web Managed
WordPress Hosting, powered by Google Cloud.
Resolving the Could Not Establish Trust Relationship error
Having explored the typical reasons behind the “Could not establish trust relationship for the SSL/TLS Secure Channel with Authority” error, let’s delve into strategies to address and resolve it.
Identifying the error cause
First, identifying the root cause of the error is essential. The method to do this varies based on the browser through which you are accessing the website.
Safari
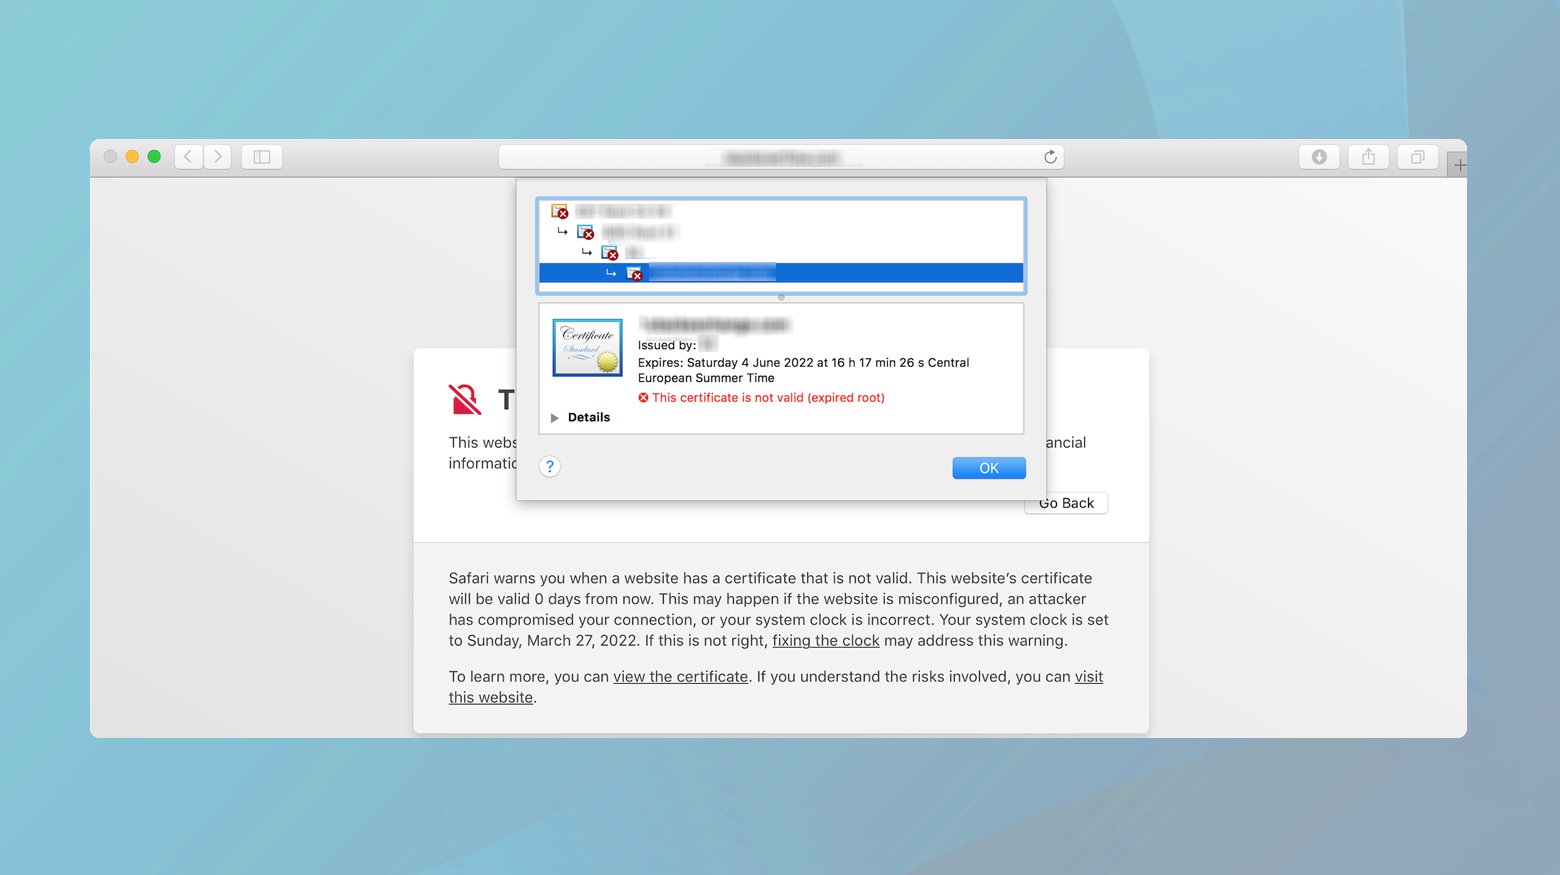
- Click on the “Show Details” button when you encounter the error. This action reveals more information about the security warning.
- Select to view the website’s certificate. This review might reveal that the site’s certificate is expired or it is using a self-signed certificate, which is not trusted by default as it lacks third-party verification.
Chrome
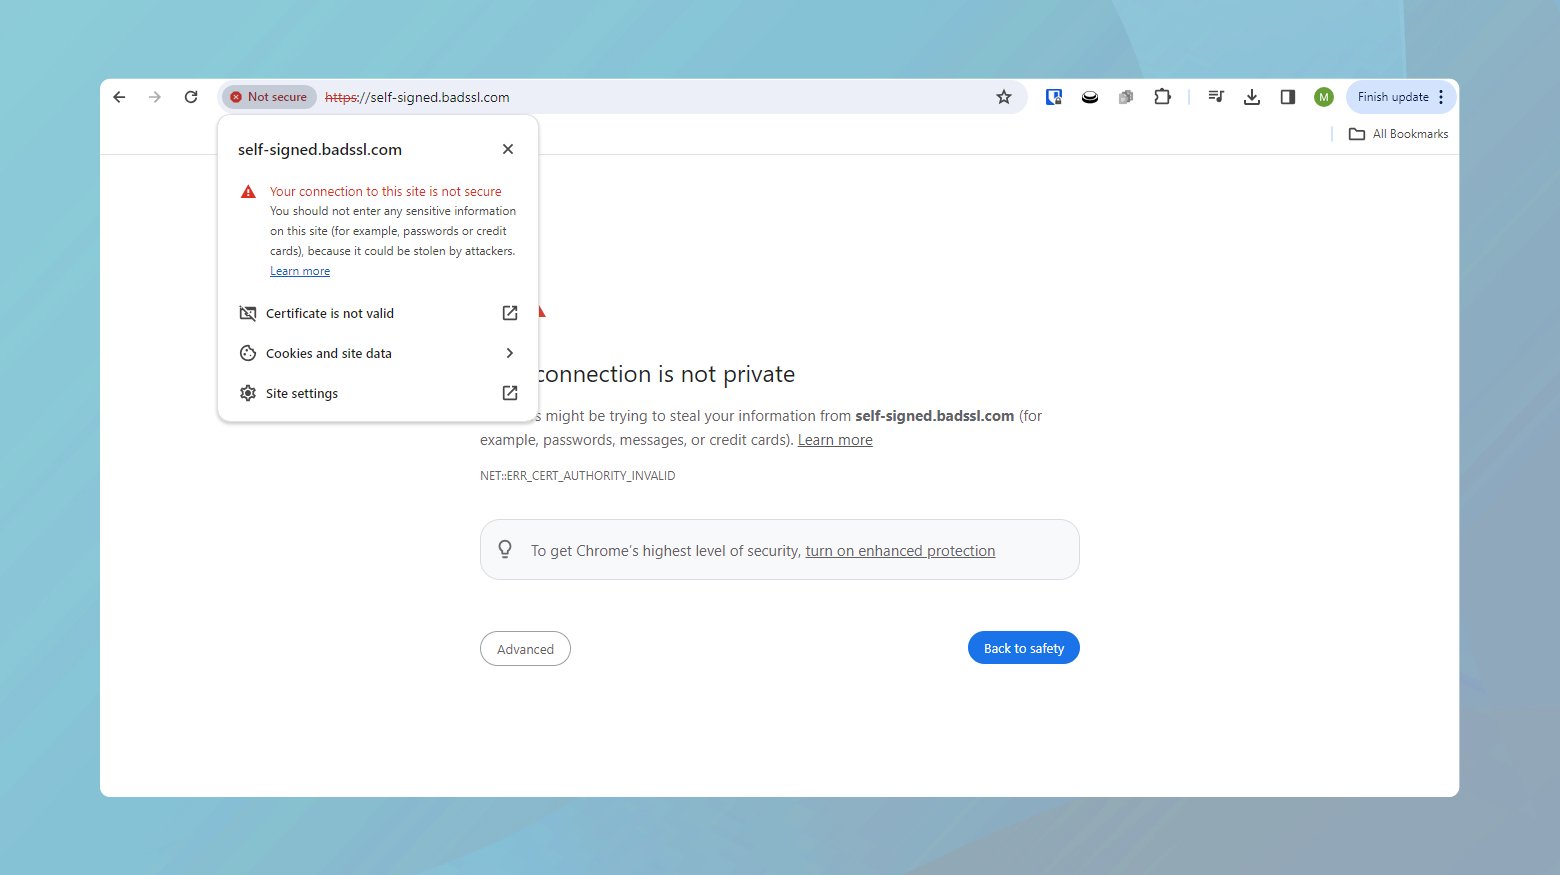
- Click on the “Not Secure” warning next to the website’s URL in the address bar to get a general idea of the problem.
- For more specifics, clicking on “Certificate is not valid” opens a popup with the certificate’s details, such as issue and expiry dates, and the Certifying Authority (CA).
After identifying the root cause, you can proceed with the following solutions:
Update or install a trusted certificate
- If the issue is due to a self-signed certificate, consider replacing it with one issued by a recognized CA. This ensures browser trust and secures your data transfer.
- Renew the certificate before its expiration date to avoid trust issues. Regularly check your certificates’ validity to prevent unexpected errors.
Adjust your browser’s security settings
Navigate to your browser’s security settings. While not recommended for everyday browsing, you can choose to lower security settings temporarily to bypass the error. However, ensure you understand the risks associated with accepting unverified certificates.
General troubleshooting
Correct date and time settings
One of the simplest yet crucial checks is ensuring your device’s date and time settings are accurate. Incorrect settings can lead to SSL certificate validation failures because the system might think the certificate is expired when it’s not.
Mac

Navigate to System Preferences > Date & Time. If changes are needed, click the lock icon at the bottom to make adjustments. You can set the time automatically or manually ensure it’s correct.
System and browser updates
Outdated software is not only a security risk but can also cause compatibility issues with SSL/TLS certificates. Ensuring your operating system and browser are up-to-date is crucial.
Updating macOS
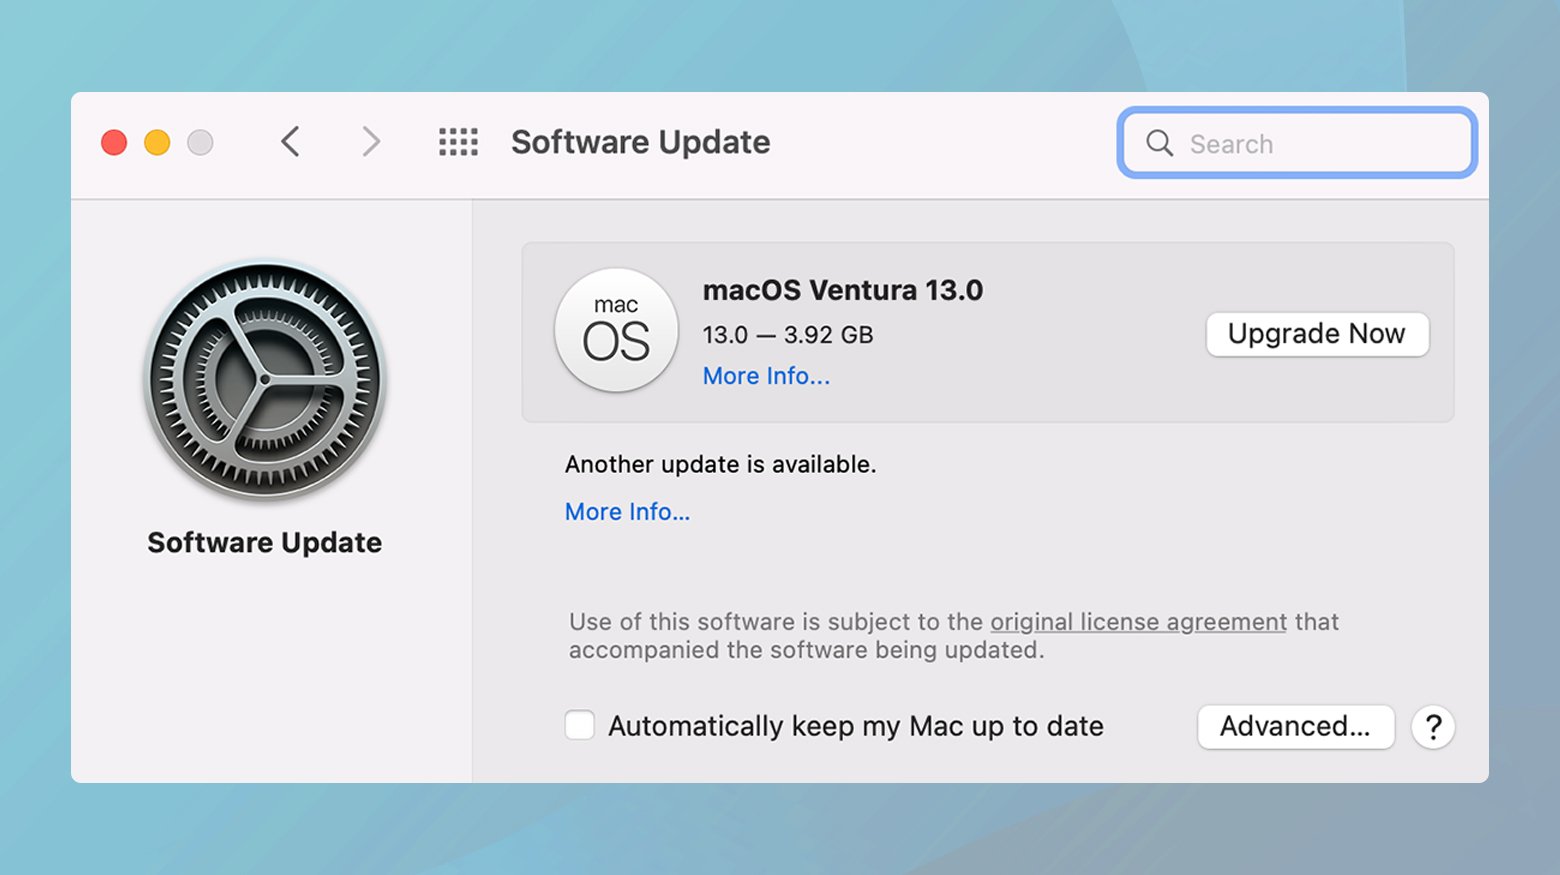
- Go to System Preferences > Software Update.
- If an update is available, follow the prompts to download and install it.
Updating Google Chrome
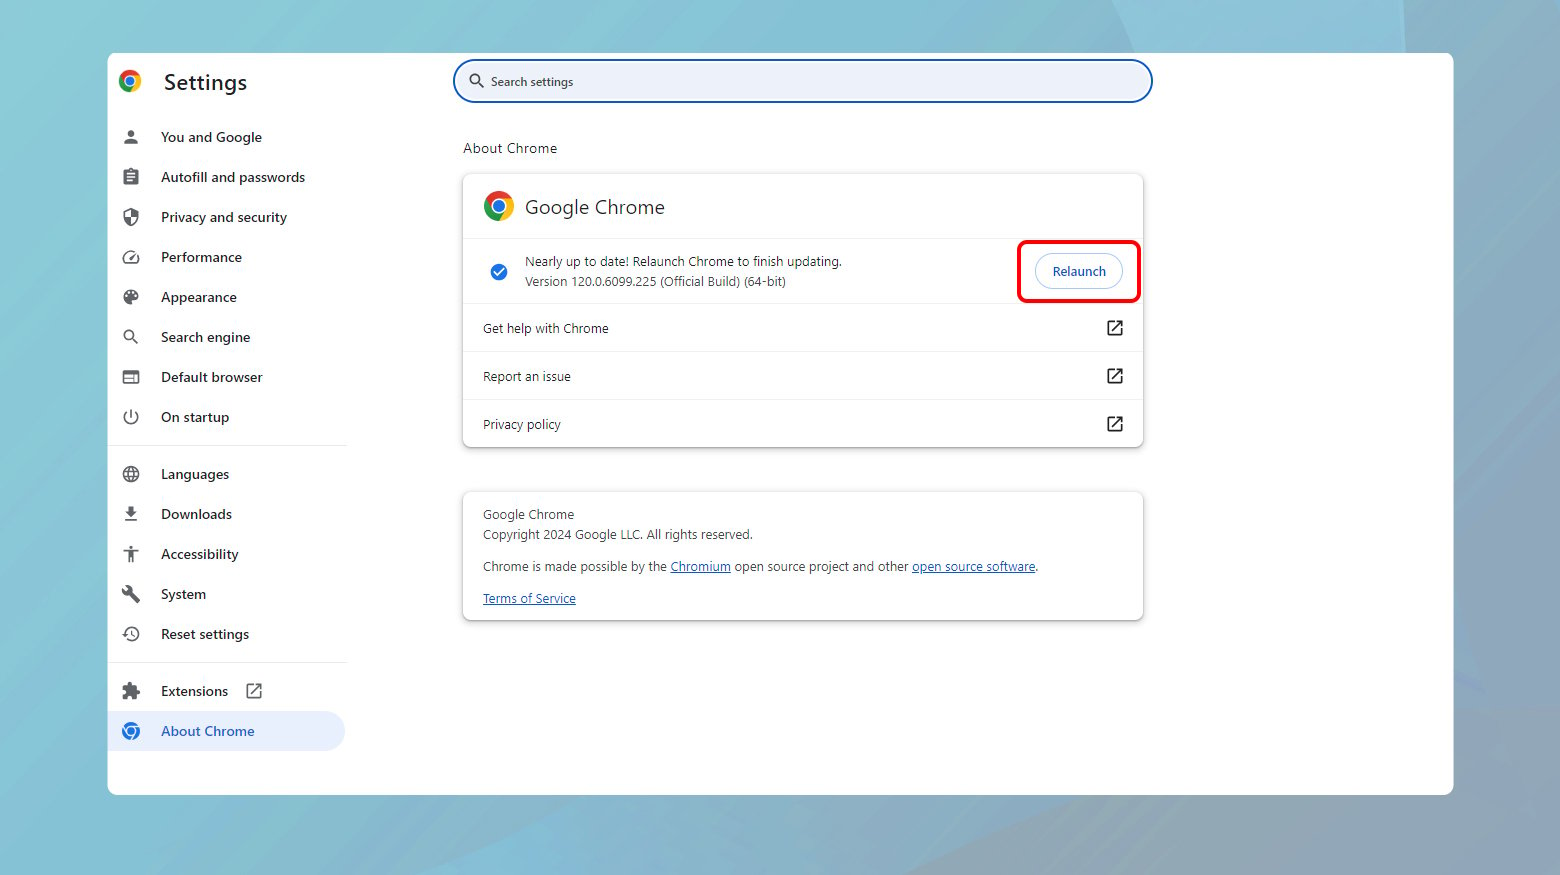
- In Chrome, click the three dots at the top right to open the menu.
- Hover over Help and select About Google Chrome.
- Chrome will automatically check for updates. If an update is found, follow the instructions to install it and then relaunch the browser.
These steps are similar across most browsers, although the exact navigation may vary. Always ensure you’re running the latest version of your software to avoid unnecessary issues.
Why these steps matter
Accuracy of date and time: SSL/TLS certificates have a specific validity period. If your system’s clock is set incorrectly, it can falsely trigger errors indicating that a certificate is not yet valid or has expired.
Software updates: Updates often include security patches and fixes for known issues. Running the latest version of your OS and browser ensures you’re not encountering errors due to already resolved vulnerabilities or compatibility problems.
Say goodbye to website errors
Achieve peace of mind with 99.99% uptime on 10Web Managed
WordPress Hosting, powered by Google Cloud.
Solutions per error
How to troubleshoot the error depends on what was identified as the cause of the error. Here are a few solutions based on common causes.
Name mismatch
When the common name on your SSL certificate doesn’t match the domain you’re trying to reach, browsers just won’t let you in without the correct credentials. This mismatch is a common issue but thankfully, one with straightforward fixes.
The SSL certificate’s common name (CN) acts as its identity, telling your browser that the website it’s connecting to is indeed who it claims to be. When there’s a mismatch—say, the certificate is for www.example.com but you’re trying to access example.com—the browser raises a red flag, resulting in the “Could Not Establish Trust Relationship” error.
This problem often arises due to the “www” prefix. Many users may not include it when typing a web address, so it’s crucial for your website’s SSL certificate to recognize both.
Aligning your SSL Certificate with your domain
Single-domain
If your certificate is valid for only one specific version of your domain (with or without “www”), here’s what you need to do:
- First, confirm the mismatch by checking the certificate’s details. Most browsers allow you to view the certificate by clicking on the padlock icon next to the URL, where you can find the common name under the details or certification path section.
- Contact your certificate authority (CA) or SSL provider to issue a new certificate that matches the domain name users are most likely to use. Ideally, opt for a certificate that covers both “www” and the non-www version of your domain to cover all bases.
Multi-domain
If you have the flexibility of a multi-domain certificate, you’re in a better position to quickly address this issue:
Subject Alternative Names (SANs) allow your certificate to be valid for multiple domain names. You can add the “www” version of your domain (or remove it) by adjusting the SANs through your SSL provider’s control panel or by contacting them directly for assistance.
Expired SSL certificate
Using an expired SSL certificate not only risks your credibility but can also expose your visitors to nefarious activities, including data theft. Let’s break down the process of securing your site with a fresh certificate.
Installing a valid SSL certificate
Renewing your SSL certificate promptly is paramount for maintaining a secure connection between your website and its users. Here’s how to go about it:
- Reach out to the CA that issued your original certificate. Most CAs send out renewal notices as the expiration date approaches, but if yours hasn’t, take the initiative to contact them directly.
- Before you can renew your certificate, you might need to generate a new CSR from your server. This process varies depending on your hosting environment, so consult your hosting provider or server documentation for specific instructions.
- Once you have your CSR, submit it to your CA. They’ll use the information in the CSR to create a new SSL certificate for your website.
- After your CA issues the new certificate, you’ll need to install it on your server. Again, the exact steps will depend on your hosting setup, so refer to your provider’s guidelines or ask their support team for assistance.
Don’t just assume everything’s working; verify that your new certificate is installed correctly. Tools like SSL Labs’ SSL Test can help you confirm that your site is secure and the SSL is functioning as expected.
Set up reminders for future renewals
Forgetting to renew your SSL certificate can lead to unnecessary downtime and security risks. Here’s how to avoid this:
- It might seem basic, but setting up a calendar reminder is an effective way to remember your renewal date. Set the reminder a few weeks to a month before the actual expiry, giving you ample time to act.
- Depending on your CA, you might be able to set up automatic renewals for your SSL certificate. This service automates the renewal process, ensuring that your certificate is always up to date without manual intervention.
- Use monitoring tools that specifically look for SSL validity and alert you when your certificate is nearing its expiration date. Some web hosting providers offer this as part of their service package.
An up-to-date SSL certificate is your first line of defense against certain types of cyber threats. It encrypts data transmitted between your server and your visitors’ browsers, safeguarding sensitive information from interception. Moreover, it reinforces your site’s credibility, as browsers display security warnings for sites with expired certificates, which can deter visitors and harm your reputation.
Regular monitoring and a proactive renewal strategy are key to maintaining this essential aspect of your website’s security infrastructure.
Add certificate to trusted store
When the browser flags a security warning due to an untrusted certificate authority (CA), adding the certificate to your trusted store is a common workaround, especially in environments where the CA is known to be secure (like internal networks). Let’s look at how you can do this in both Safari for Mac users and Windows environments.
Safari users on Mac
For individual certificates:
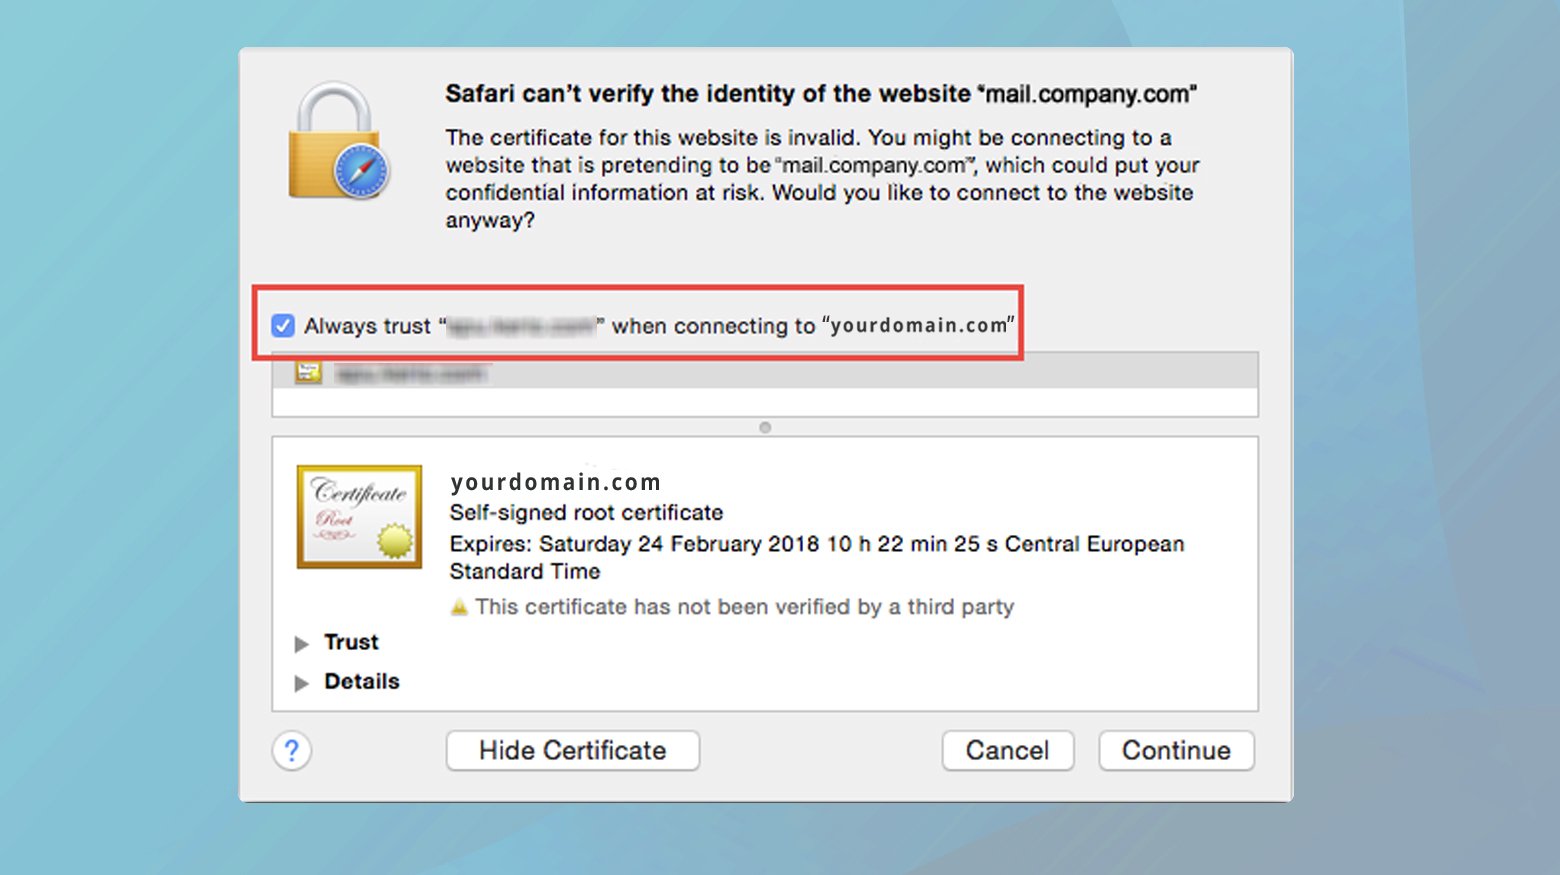
- Navigate to the website causing the trust issue, click on the padlock icon (or similar security indicator) next to the URL, and select “View the certificate.”
- In the certificate information window, expand the “Trust” section. Here, you’ll find a dropdown menu for “When using this certificate.” Set it to “Always Trust.”
For all certificates:
- Use the question mark or “help” icon in the certificate popup to launch Keychain Access directly, or manually open it from Applications > Utilities.
- In Keychain Access, under “System Roots,” find the “Certificates” section. Here, you can review all installed certificates.
- Find the certificate in question, right-click it, and choose “Get Info.” Within the trust section of this info window, you can modify the settings to “Always Trust.”
Windows users
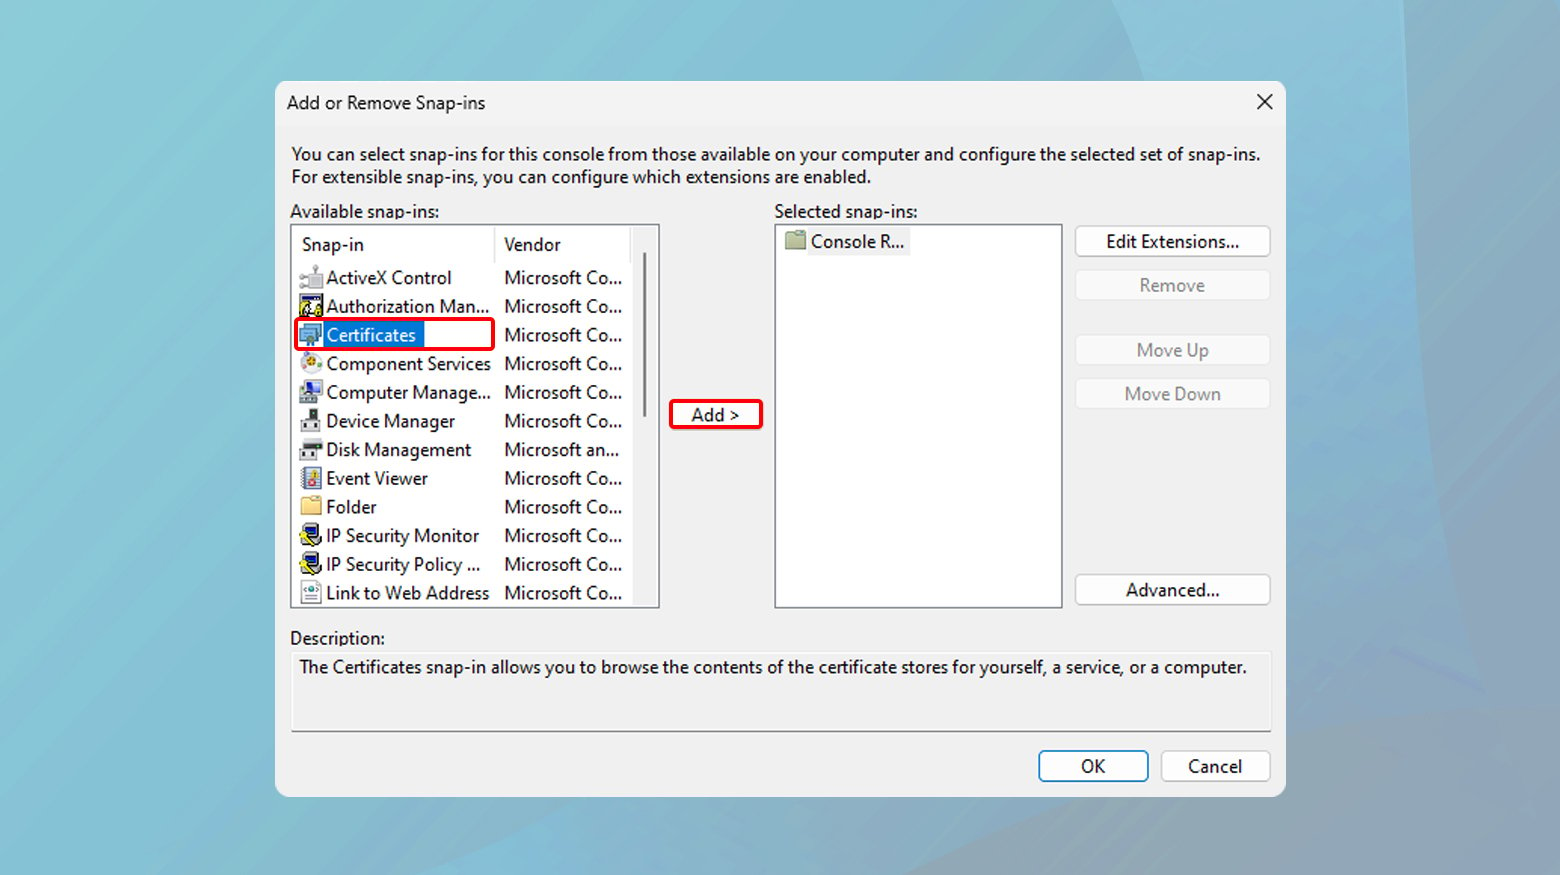
- Click the windows key and type “mmc” into the search bar and open the console.
- Go to File > Add/Remove Snap-in, select “Certificates,” and click “Add.” Choose “Computer account,” then “Local computer,” and finish with “OK.”
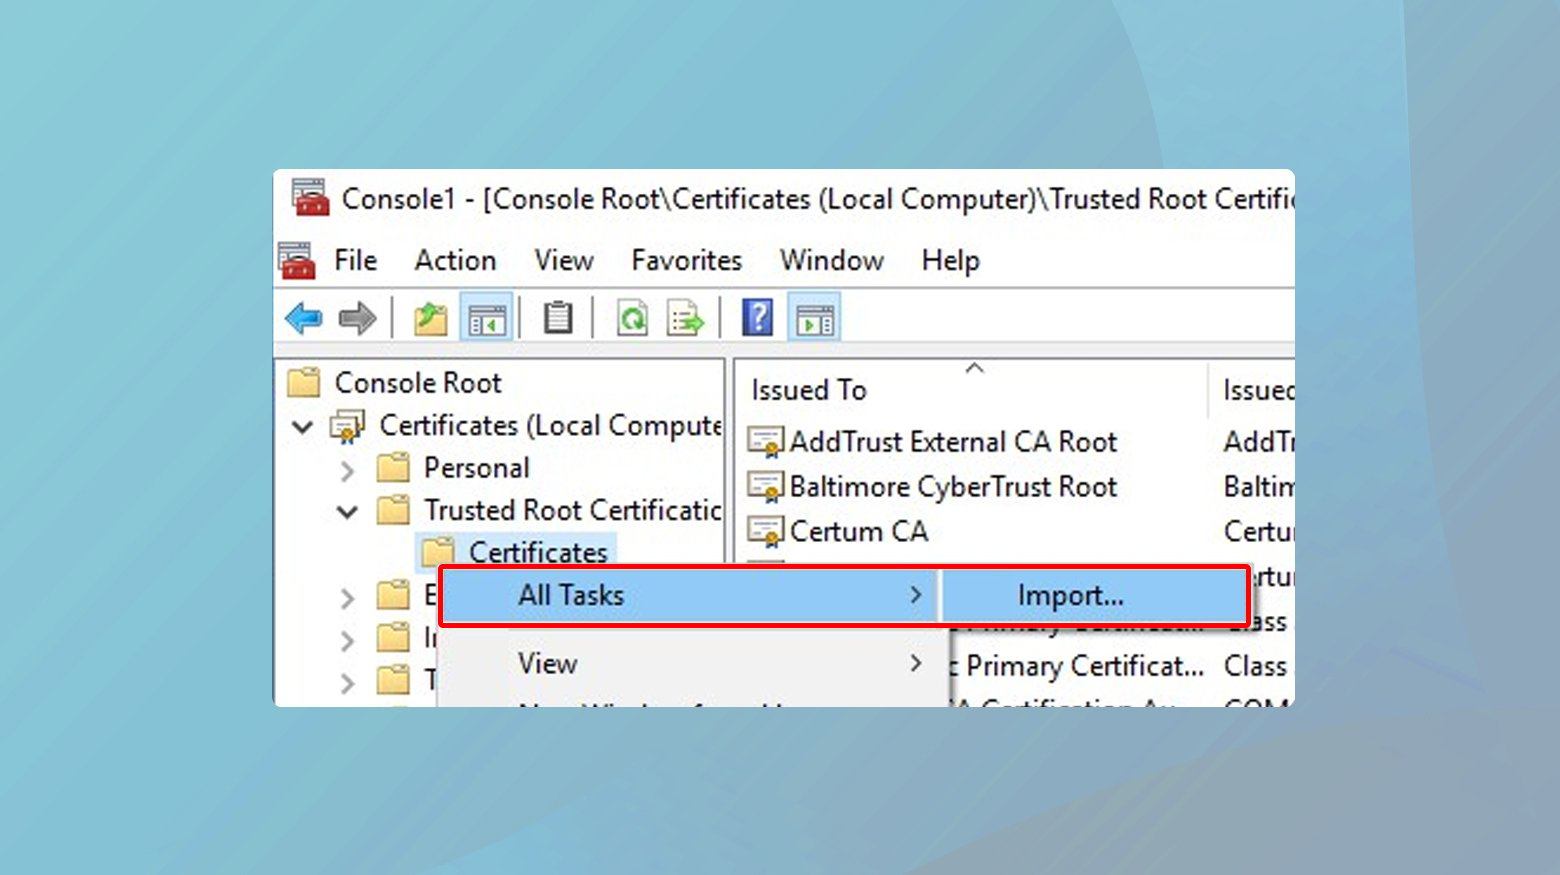
- Navigate to “Trusted Root Certification Authorities.” Right-click, select “All Tasks,” then “Import.” The Certificate Import Wizard will guide you through selecting and importing the certificate file.
- Follow the wizard’s instructions to locate and import the certificate. Confirm the action and close MMC. You may need to restart your browser or computer for the changes to take effect.
Adjusting trust settings or importing certificates to the trusted store is a powerful way to manage security warnings and access controls. However, it’s vital to proceed with caution.
- Only adjust trust settings or add certificates for CAs or websites you absolutely trust. Misplaced trust can expose you to security vulnerabilities.
- Use this method judiciously, primarily for internal networks or development environments. For public-facing sites, ensure certificates are issued by well-recognized and trusted CAs.
Self-signed certificates can be a bit of a double-edged sword. They offer a quick, cost-free way to encrypt data transmitted between your server and your users, making them an attractive option for certain scenarios like development and testing. However, the drawbacks become apparent when you step into the broader internet world, where trust and security are paramount.
Self-signed certificate
A self-signed certificate is essentially a certificate that is signed by the individual or organization that created it, rather than by a trusted certificate authority (CA). This means that while it can provide encryption, it lacks the third-party verification that browsers and users rely on to trust the connection’s security.
The major browsers and operating systems trust certificates from recognized CAs because these authorities have stringent verification processes. A self-signed certificate hasn’t undergone such scrutiny, leading browsers to warn users about the connection’s security, which can deter visitors and harm your site’s credibility.
If a self-signed certificate is compromised (e.g., the private key is leaked), there’s no way to revoke it. Trusted CAs, on the other hand, maintain lists of revoked certificates (CRLs and use OCSP), allowing browsers to check the certificate’s status in real-time and block potentially compromised connections.
Transitioning to a CA-signed certificate
For public-facing websites, moving to a CA-signed certificate is crucial for establishing trust and security. Here’s how to make the switch:
- Research and select a trusted CA. There are several reputable CAs, including some that offer certificates for free, such as Let’s Encrypt.
- This request contains your public key and details about your organization. Your web server software can usually generate a CSR for you.
- Once you’ve chosen your CA, you’ll need to submit your CSR to them. The CA will verify your domain and, potentially, other organizational information depending on the type of certificate you’re applying for (DV, OV, or EV).
- After the CA issues your certificate, you’ll need to install it on your web server. The installation process varies depending on your server software, so follow the instructions provided by your CA or hosting provider.
- Use tools like SSL Labs’ SSL Server Test to ensure your certificate is installed correctly and your site is secure.
- If your CA supports it (like Let’s Encrypt), setting up auto-renewal ensures your certificate remains valid without manual intervention, avoiding unexpected expiration.
Closing thoughts
Throughout this blog, we’ve navigated the complexities of SSL/TLS certificate errors and how they can impact your website’s security and user trust. From identifying the root cause of the “Could Not Establish Trust Relationship” error to exploring specific scenarios such as certificate mismatches, expiration, untrusted CAs, and the use of self-signed certificates, we’ve covered a range of solutions to safeguard your site. Whether adjusting browser trust settings, renewing or replacing certificates, or transitioning from self-signed to CA-signed certificates, the importance of maintaining secure, trusted digital communications has been a central theme. Implementing these measures not only enhances site security but also bolsters user confidence, ensuring a smooth and secure browsing experience.
Say goodbye to website errors
Achieve peace of mind with 99.99% uptime on 10Web Managed
WordPress Hosting, powered by Google Cloud.
Say goodbye to website errors
Fix all the website errors in one click
Migrate your website to the world's best Managed WordPress Hosting.