The 410 Gone error is a unique signal from a website, telling you that the content you’re seeking was once there, but has now been intentionally removed, leaving no forwarding address. Unlike its cousin, the 404 Not Found, which suggests you might have taken a wrong turn, the 410 error confirms that the destination no longer exists.
Understanding the 410 Gone error requires a bit of background on how the internet works. Essentially, when you try to access a webpage, your browser sends a request to the server where that page is hosted. The server then responds with a status code: a three-digit number that communicates the outcome of your request. The 410 Gone error is one such status code, specifically indicating permanent content removal. The reasons behind this can vary – perhaps the content is outdated, the website is undergoing restructuring, or the page was removed for legal or policy reasons.
Say goodbye to website errors
Achieve peace of mind with 99.99% uptime on 10Web Managed
WordPress Hosting, powered by Google Cloud.
Variations of the 410 Gone Error
The 410 Gone error can wear several different masks, depending on the server, the website’s design, or the device you’re using. Here are some of the forms it might take:
- 410 Gone
- Error 410
- HTTP 410 Error
- 410 Page Deleted
- Webpage has been permanently removed
- The requested resource is no longer available at this server and no forwarding address is known
- Error 410: This page has been removed
The difference between the 410 Gone and 404 Not Found errors
Though they might seem similar at first glance, the “410 Gone” and “404 Not Found” errors serve different purposes. The “404 Not Found” is more like a temporary roadblock, implying the content might just be lost or misplaced. On the other hand, “410 Gone” is a clear sign that the content has been permanently removed, which also signals search engines to de-index the URL, making it clear that the resource isn’t coming back.
Reasons why the 410 Gone Error occurs
Several scenarios can lead to the decision to issue a 410 error, including:
CMS changes: Updates or modifications in your Content Management System (CMS) could inadvertently cause content to be flagged as permanently removed.
Site restructuring: During a website overhaul, some pages might be permanently removed as part of a strategy to streamline content or improve user navigation.
Legal or policy requirements: Certain content might be taken down to comply with legal demands or policy violations.
Link cleanup: To improve SEO and user experience, old, unused, or low-quality content might be pruned, resulting in a 410 error for those URLs.
Server configuration: Misconfigurations on the server side can lead to unintended “410 Gone” responses.
Intentional removal: Sometimes, a “410 Gone” is exactly what you want to communicate, especially for time-sensitive material that’s no longer relevant or available.
Fixing the 410 Gone error
This error signifies that the webpage you’re trying to reach has been permanently removed from the site, making it inaccessible. There are several strategies you can employ to troubleshoot and potentially resolve this issue, ensuring content visibility for visitors and proper indexing by search engines. Let’s dive into the details.
Inspect the URL
First things first, let’s talk about checking the URL. It might seem like a no-brainer, but even the smallest typo in a web address can lead you down the path to a “410 Gone” error.
Sometimes, the issue is as simple as a mistyped URL. Double-check the address for any inaccuracies and try accessing the page again. Look over the web address in your browser’s address bar. Make sure there are no typos or errors. If you spot a mistake, correct it and press Enter to reload the page. If the content has been permanently removed, the server will return a “410 Gone” error. However, there’s a chance the page has been moved rather than deleted.
If correcting the URL doesn’t work, head over to your preferred search engine. Type in keywords related to the content you’re seeking, along with the website’s name. This can help you find the content on a new page or through an updated link. By using search engines to look for keywords, you’re essentially bypassing the direct need for the correct URL. This method is particularly effective if the content has been moved rather than deleted, as it can lead you to the new location of the page.
If available, access the website’s sitemap. This is a page or document that lists all the pages on a website, making it easier to find what you’re looking for. You can usually find a link to the sitemap at the bottom of the website’s homepage.
Revert to an older version
If you’ve taken the prudent step of backing up your website prior to making updates, there’s a straightforward way to address this issue by reverting your WordPress site to a previous version. This approach can help you bypass the complications that led to the error. Let’s walk through the process, particularly for users of 10Web, though the general steps can apply to various hosting services with similar features.
How to revert
- Your first step is to access your hosting provider’s dashboard. For 10Web users, this means signing into your 10Web account.
- Once logged in, you’ll see a list of your websites. Click on the website that’s displaying the “410 Gone” error to focus on resolving its issues.
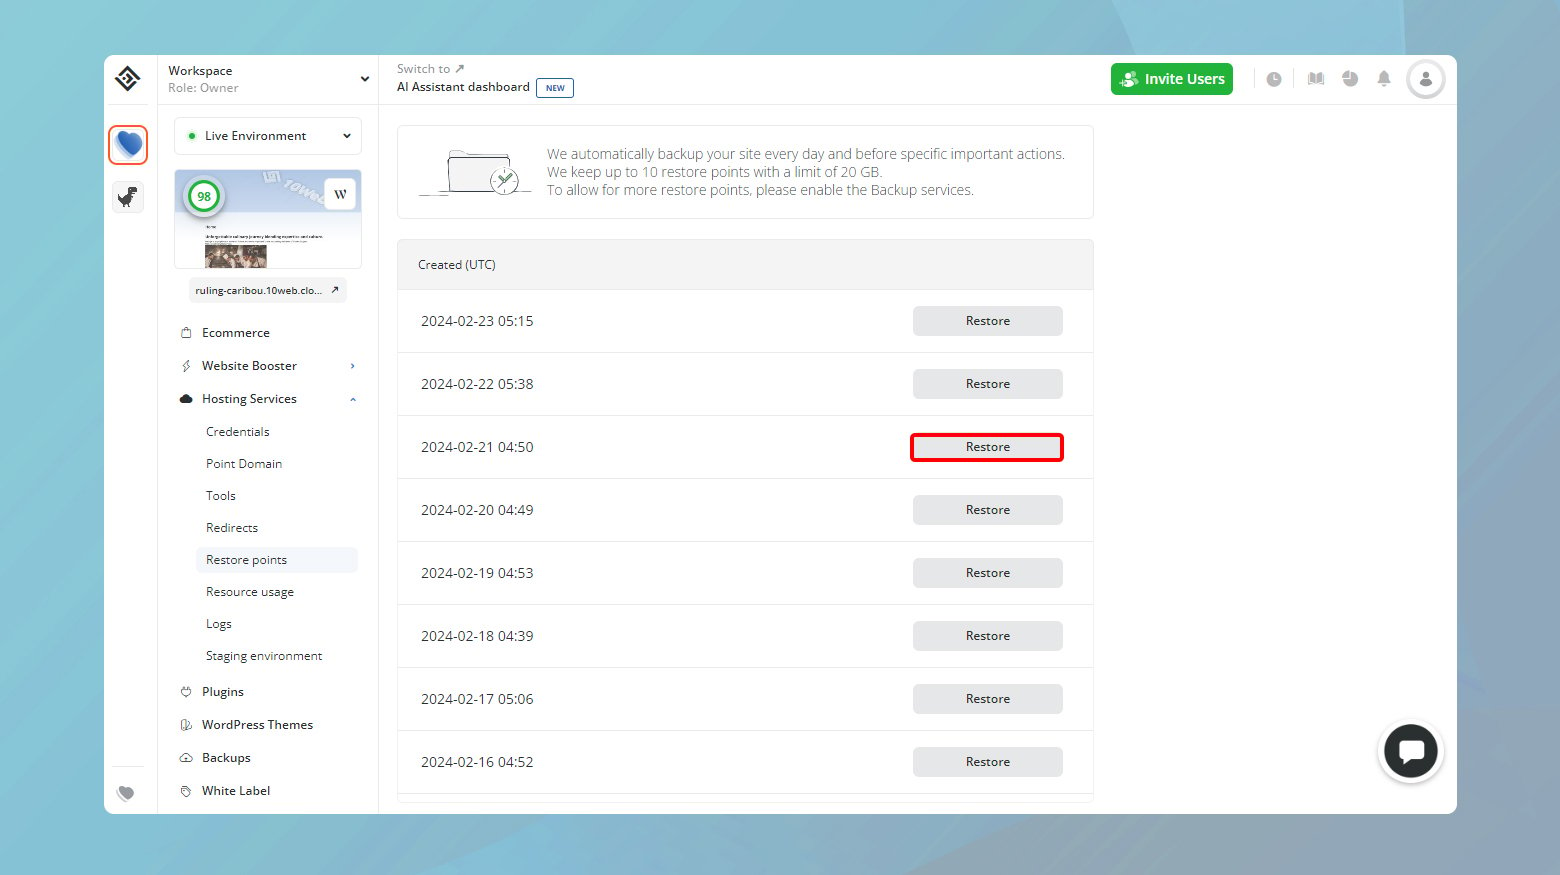
- In your dashboard, look for the “Hosting Services” section, then find the “Restore Points” option. This is where 10Web stores the everyday backups of your site.
- You’ll see a list of backups, each associated with a specific date. These represent different points in time you can revert your site back to. Choose the date prior to when you made the update or change that potentially caused the “410 Gone” error.
- Next to your chosen date, you’ll find a “Restore” button. Click this to begin the process of rolling your site back to the selected backup date.
- You will be prompted to confirm your decision to restore to this point. This is a safeguard to ensure you’re aware of the change and ready to proceed.
After the restoration process completes, which may take a few minutes, you should be able to log back into your WordPress dashboard. Check to see if the “410 Gone” error has been resolved.
Reverting to an older version of your site can undo changes that might have conflicted with existing configurations or plugins, leading to errors. This process brings back a version of your site that was stable and error-free, effectively bypassing the issue that caused the “410 Gone” status.
Deactivating all plugins
This error could also arise from general incompatibility issues between your site’s configuration and the installed tools. Fortunately, there’s a systematic approach to identify if plugins are the root cause and to resolve the issue effectively.
Since a “410 Gone” error typically doesn’t prevent you from accessing your WordPress dashboard, start by logging in. This is where you can manage all aspects of your site, including plugins.
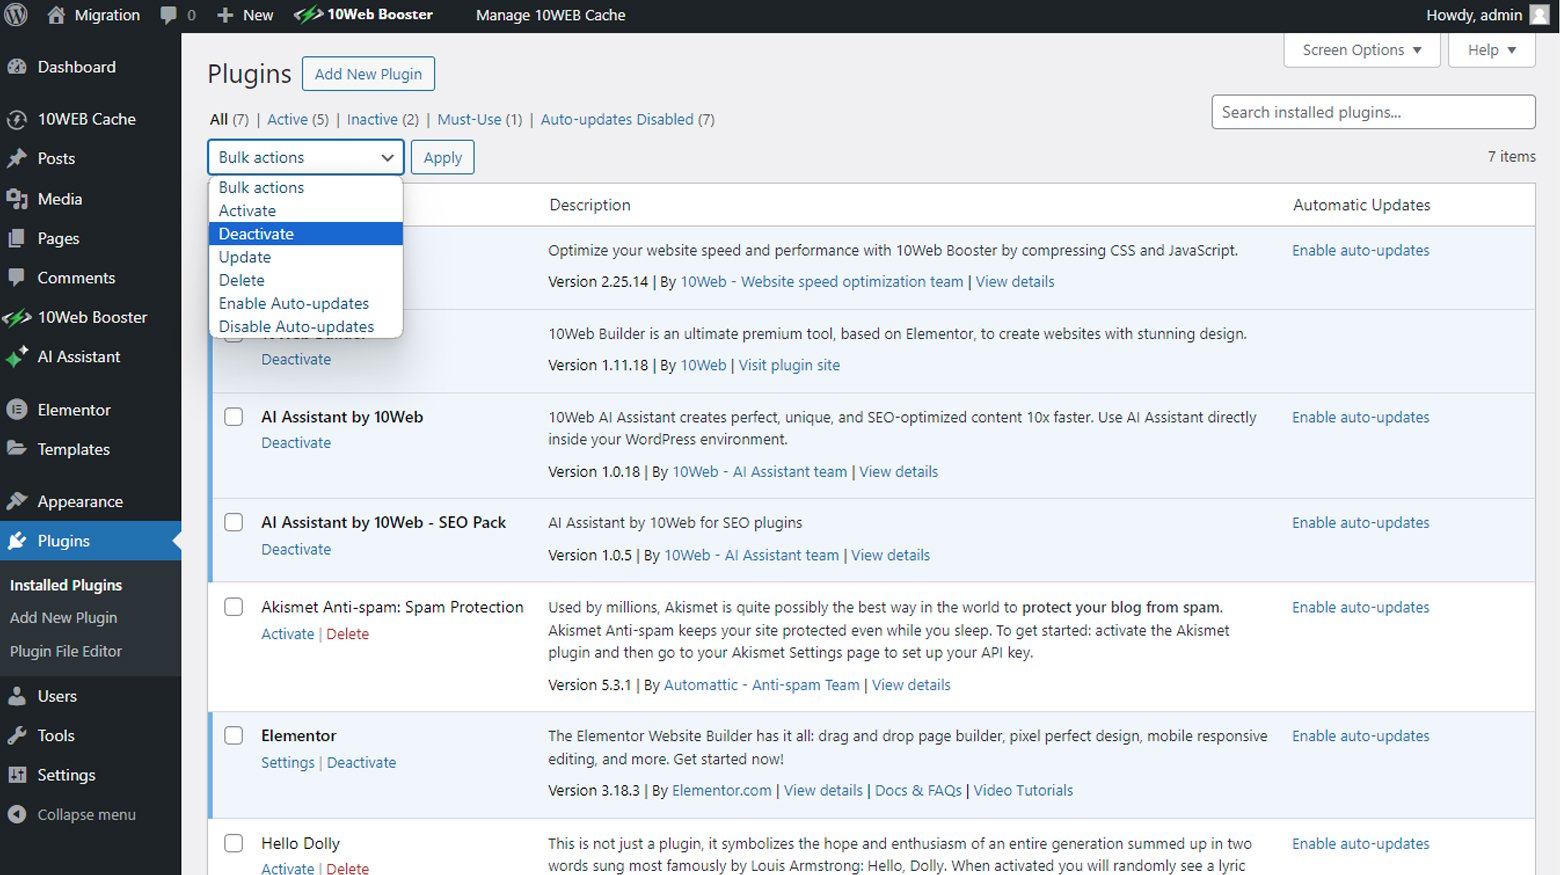
- Once in the dashboard, find the “Plugins” section on the left-hand menu. Clicking on it will bring up a list of all the plugins currently installed on your site.
- At the top of the plugin list, you’ll find a checkbox. Clicking this checkbox selects all your plugins simultaneously, making it easy to perform bulk actions.
- With all plugins selected, locate the “Bulk actions” dropdown menu, usually found above the plugin list. Select “Deactivate” from this menu, then click the “Apply” button. This action will deactivate all selected plugins at once, temporarily removing their functionality from your site.
After deactivating all plugins, visit your website to see if the “410 Gone” error has been resolved. If the error no longer appears, it’s likely that one (or more) of the plugins was causing the issue.
Return to the Plugins page in your WordPress dashboard. Reactivate each plugin one by one, checking your website for the error after each activation. This process helps identify the specific plugin responsible for the “410 Gone” error.
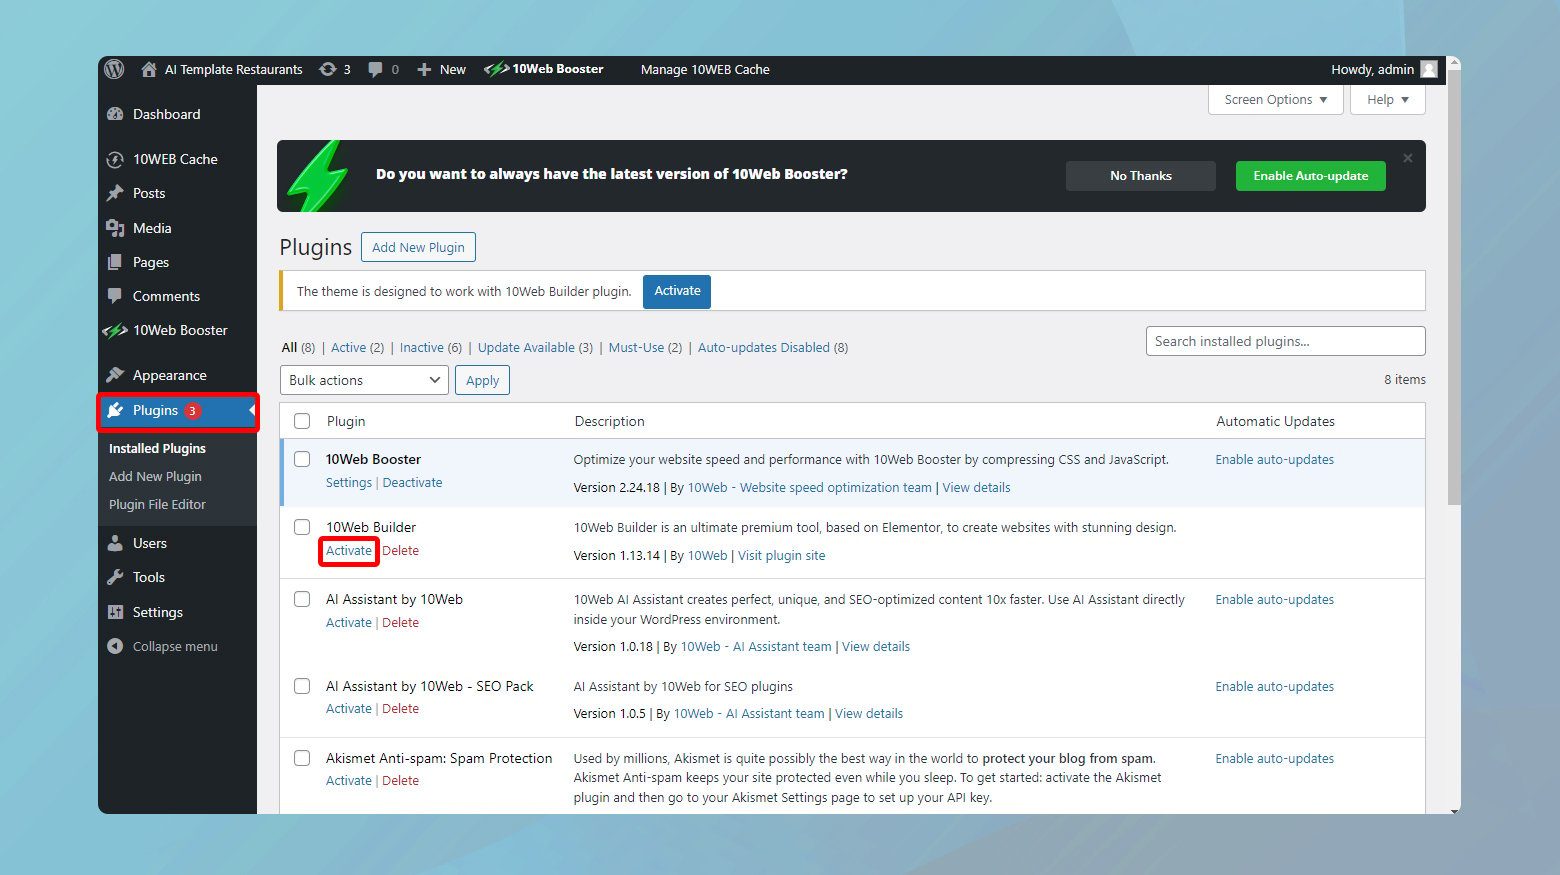
Once you’ve identified the problematic plugin, you can choose to delete it or look for an alternative that offers similar functionality without causing issues. If the plugin is essential for your site, consider reaching out to the plugin developer for support or an update that resolves the compatibility issue.
Check your logs
Server logs are invaluable for uncovering the root causes of HTTP status errors, including the “410 Gone.” For 10Web users, accessing and analyzing server logs is streamlined through the 10Web dashboard, eliminating the need for SFTP or SSH connections. Here’s a detailed guide on how to use 10Web’s tools to investigate and potentially resolve server-side issues related to the “410 Gone” error.
Accessing server logs with 10Web
- Start by signing into your 10Web account. The dashboard is your gateway to a wealth of site management tools, including server log access.
- Once logged in, you’ll see a list of your websites. Click on the website experiencing the “410 Gone” error to focus your investigation on it.
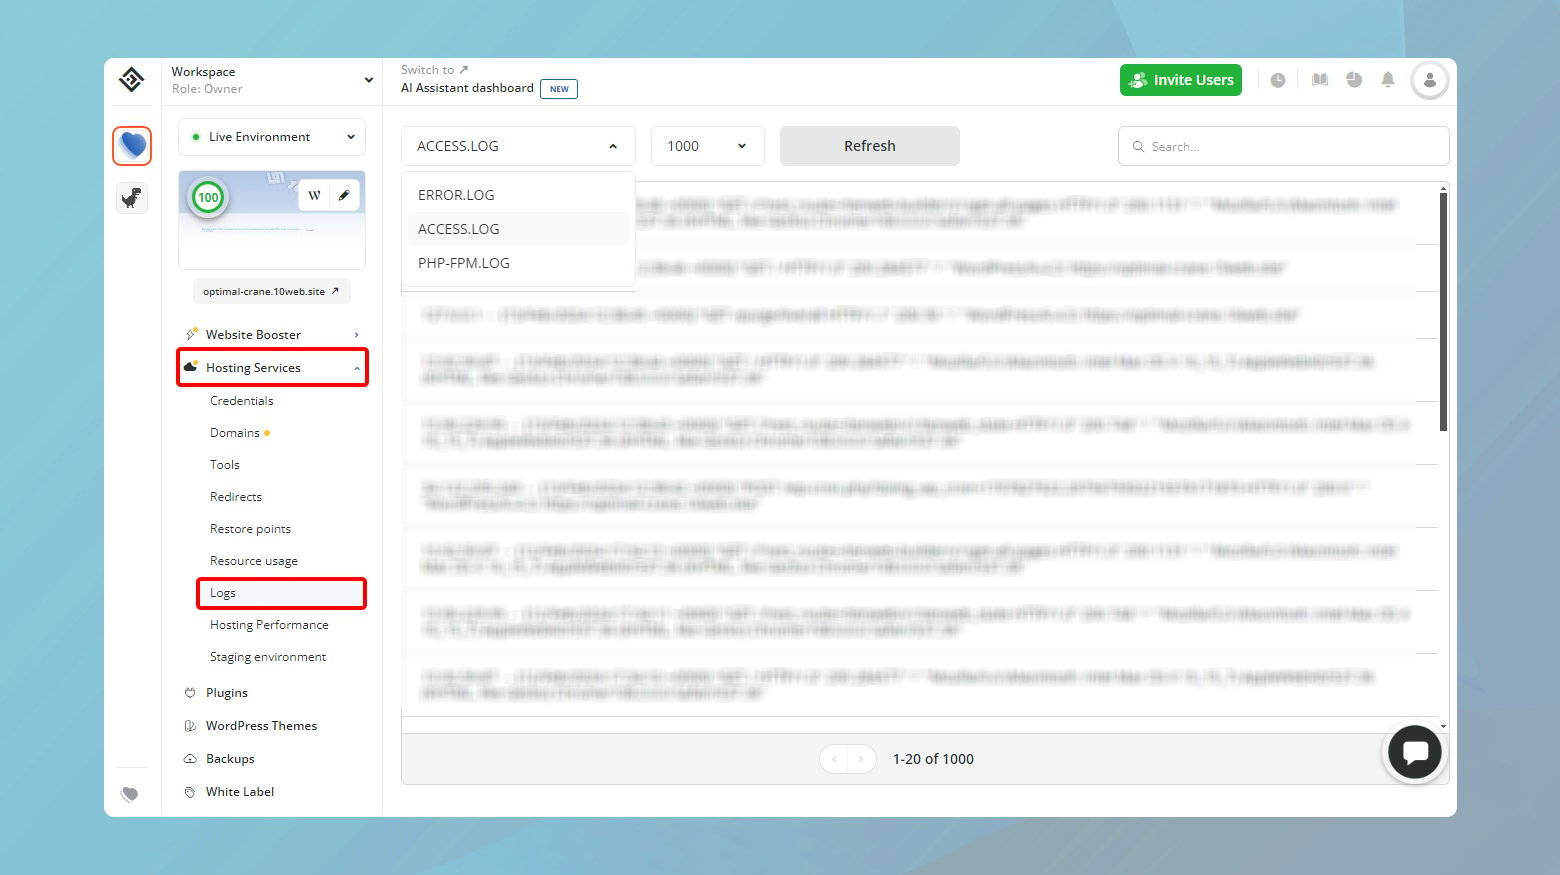
- In the dashboard menu, find and click on “Hosting Services,” then select “Logs” from the submenu. This action will take you to the log management area.
- Look for a dropdown menu at the top of the page. Choose `access.log` to view a record of all HTTP requests made to your website. This log is comprehensive, detailing each request’s timestamp, source, and the response code it received.
With the `access.log` file open, you can begin scanning through the HTTP requests for instances of the “410 Gone” error. These will be marked with the status code “410,” indicating pages or resources that are no longer available on your server.
To streamline your search, utilize the search bar to filter results by entering “410.” This will narrow down the log entries to those specifically related to the “410 Gone” errors, making it easier to identify problematic requests.
As you locate entries with the “410” status code, take note of the specific URLs or resources mentioned. This information is key to understanding which pages are causing the errors and why they might be doing so.
Debug your website
When faced with the stubborn “410 Gone” error and previous troubleshooting steps haven’t resolved the issue, delving into your website’s backend with a debugging tool can offer new insights. Query Monitor, a comprehensive and free plugin for WordPress, is a powerful ally in this endeavor. It provides a deep dive into your website’s inner workings, including database queries, PHP errors, enqueued scripts, and HTTP API calls.
Installing and using Query Monitor
- Log in to your WordPress admin account.
- Go click on “Plugins” > “Add New”.
- Search for “Query Monitor,” then click “Install” and “Activate.”
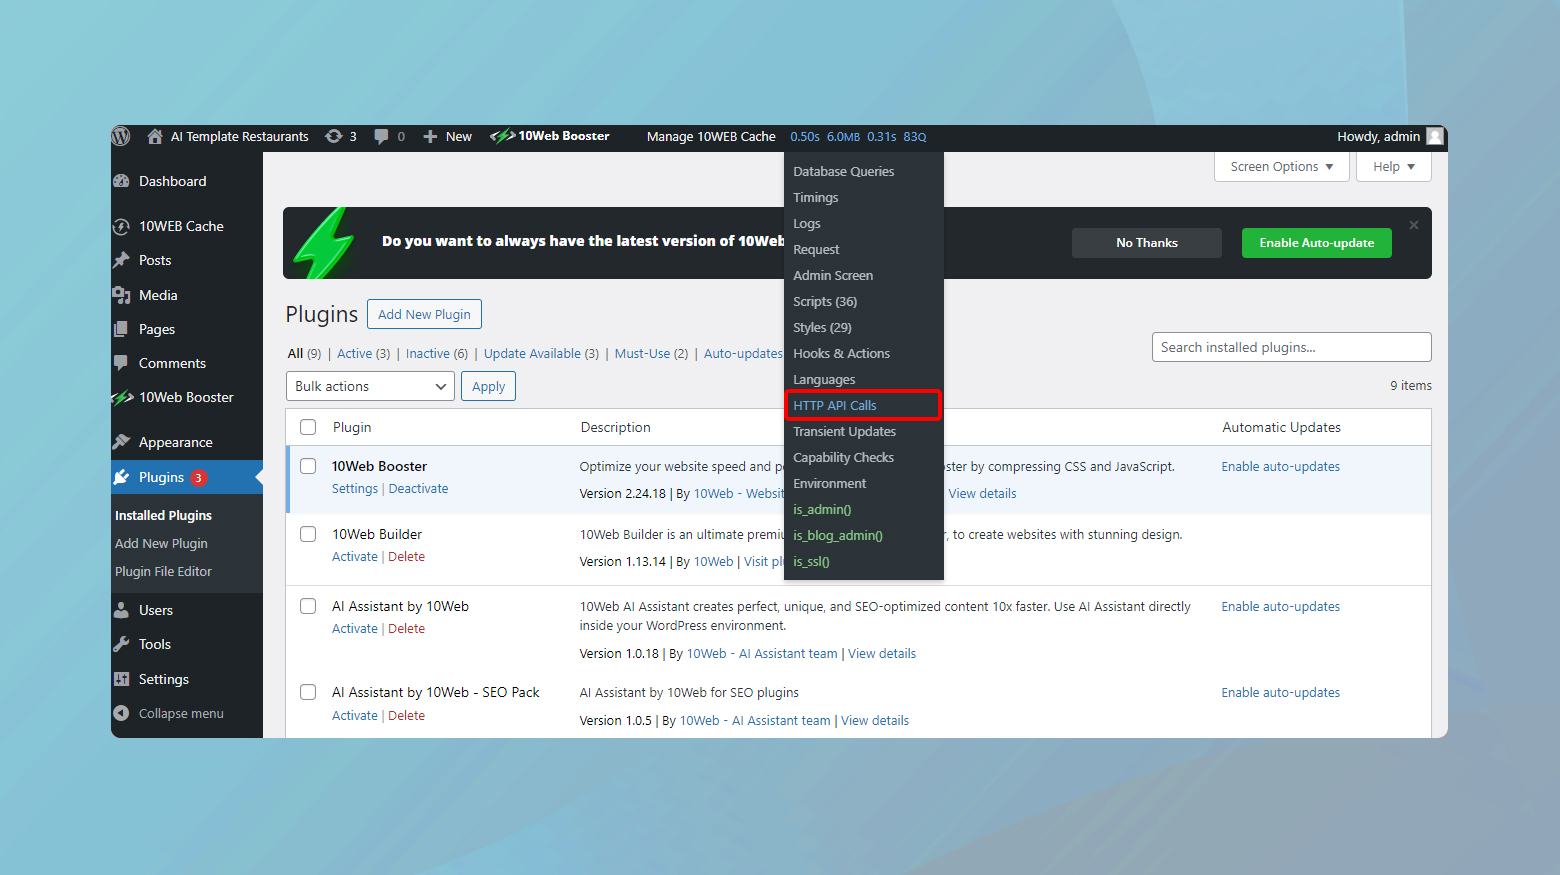
Once activated, Query Monitor will add a new tab to the top of your WordPress dashboard. This tab is your gateway to the wealth of debugging information that Query Monitor collects.
Click on the Query Monitor tab, and among the various options, select “HTTP API Calls.” This section specifically tracks server-side requests that your website makes, which is crucial for diagnosing the “410 Gone” error.
Analyzing server-side queries
In the “HTTP API Calls” section, you’ll see a list of all server-side queries made by your website. Look through these queries for any signs of errors or anomalies that might explain why certain pages or resources are returning a “410 Gone” status.
Pay special attention to any queries that result in errors. The “HTTP API Calls” section should highlight these, making it easier to spot potential issues. Errors here can indicate problems with your website’s interaction with external services or internal configuration issues that lead to the “410 Gone” error.
If you notice queries related to the “410 Gone” error, it suggests there’s a server configuration issue at play. This might involve incorrect rewrite rules, issues with your .htaccess file, or other server settings that inadvertently signal that a resource is permanently removed.
Adjust your server configuration
The “.htaccess” file in your WordPress website is a powerful configuration file that can control high-level settings on your server. It’s quite common for changes to this file, whether intentional or accidental, to lead to various HTTP errors, including the “410 Gone” error. Let’s walk through how to check and correct your .htaccess file using Secure File Transfer Protocol (SFTP).
Accessing your .htaccess file via SFTP
- Start by logging into your 10Web dashboard or the equivalent for your hosting provider. This is where you’ll find essential SFTP/SSH access information.
- Click on the site experiencing the error.
- Navigate to Hosting Services > Credentials
- Download and open an SFTP client like FileZilla. SFTP clients provide a secure method to access and edit your site’s files directly on the server.
- Log into your FTP client. Make sure to set the protocole to SFTP.
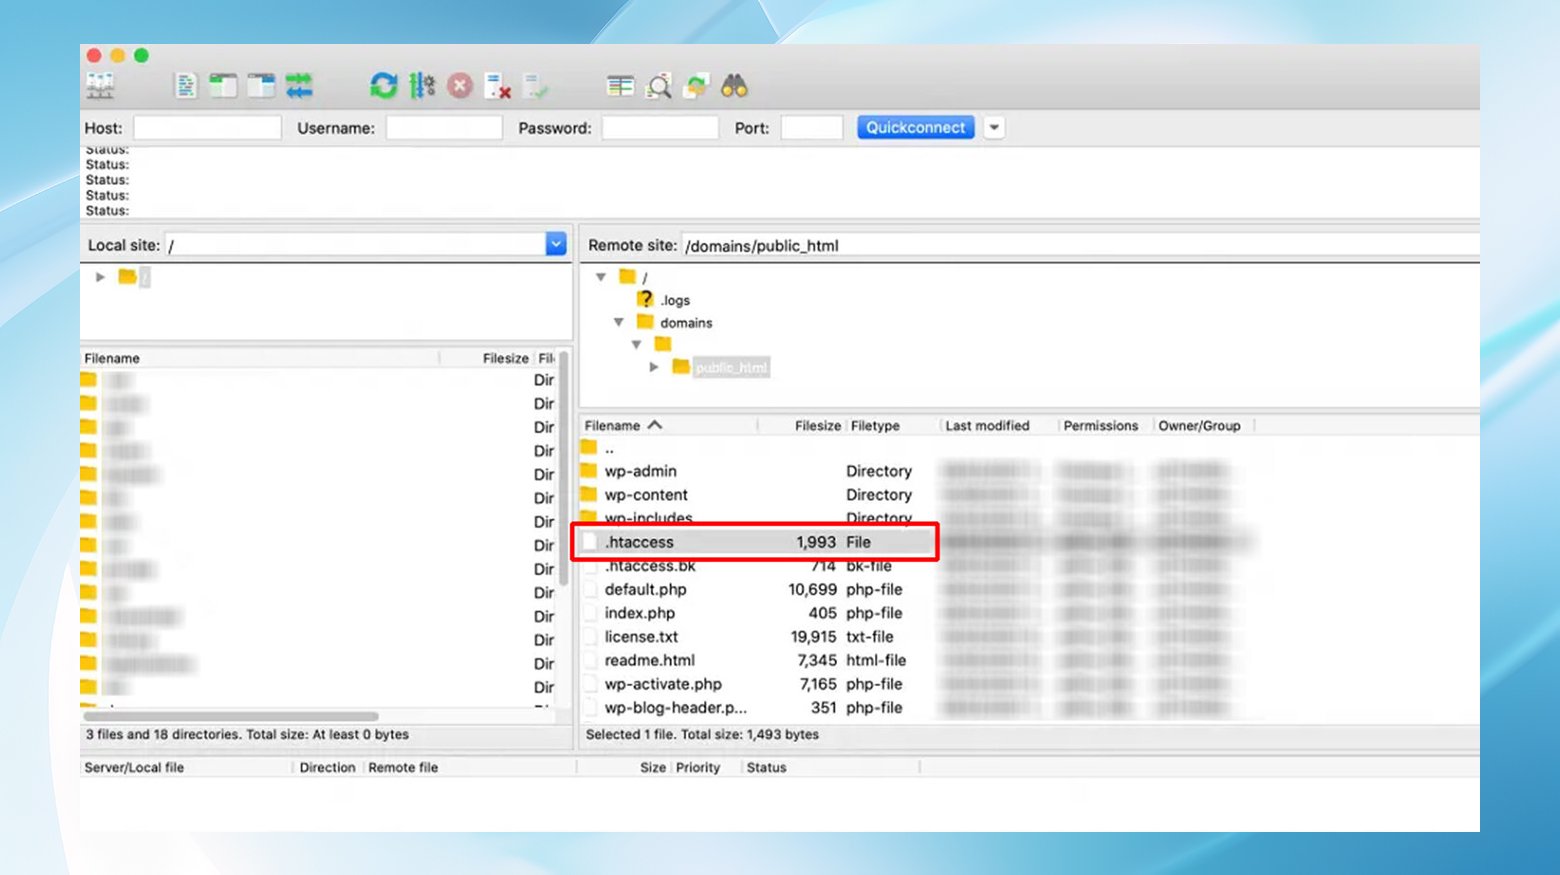
Once connected, navigate to the “public_html” directory. This is typically where your WordPress installation resides. Locate the .htaccess file within this directory. Open the .htaccess file to review its contents. The standard WordPress .htaccess file should look similar to the example provided, facilitating pretty permalinks and basic rewrite conditions.
Look for any lines that include “Redirect 410” followed by a URL path. These directives tell the server to return a “410 Gone” status for the specified paths. If these are the cause of your issue, removing them should resolve the error.
After making any necessary deletions or adjustments, save your changes to the .htaccess file. This will update the server’s configuration in real-time.
Once you’ve saved the changes, visit your website to check if the “410 Gone” error has been resolved. If the site is functioning correctly, the issue likely stemmed from the .htaccess file.
Closing thoughts
Throughout this blog, we’ve explored a variety of strategies to troubleshoot and resolve the “410 Gone” error on a WordPress website. Starting from simple client-side checks like verifying the URL, to more complex server-side adjustments involving plugins, server logs, the Query Monitor plugin, and direct modifications to the .htaccess file, we’ve covered a comprehensive range of solutions. Each method offers a unique approach to diagnosing and fixing the underlying issues that could lead to this error, emphasizing the importance of systematic troubleshooting and careful changes to website configurations. By following these steps, website owners and developers can effectively address the “410 Gone” error, ensuring their site remains accessible and performs optimally for all users.
Say goodbye to website errors
Achieve peace of mind with 99.99% uptime on 10Web Managed
WordPress Hosting, powered by Google Cloud.
Say goodbye to website errors
Fix all the website errors in one click
Migrate your website to the world's best Managed WordPress Hosting.