Curious about enhancing your WooCommerce store with flexible payment options? Learn how to add Afterpay to WooCommerce and offer your customers a convenient buy now, pay later solution. This guide covers the essentials, from installation to customization, ensuring a seamless integration that can boost sales and customer satisfaction.

Looking to sell online?
Create your custom online store in minutes with 10Web AI Ecommerce Website Builder and take your business online.
FAQ
How to enable Afterpay in WooCommerce?
To enable Afterpay in WooCommerce:
- Go to Plugins in your WordPress dashboard.
- Click Add New and search for Afterpay Gateway for WooCommerce.
- Install and activate the plugin.
- Navigate to WooCommerce > Settings > Payments.
- Enable Afterpay and configure the settings as needed.
How do I add pay later to WooCommerce?
To add a pay later option to WooCommerce:
- Go to Plugins in your WordPress dashboard.
- Click Add New and search for a buy now, pay later plugin like Afterpay or Klarna.
- Install and activate the plugin.
- Navigate to WooCommerce > Settings > Payments.
- Enable the pay later option and configure the settings.
Does WordPress accept Afterpay?
WordPress itself does not handle payment gateways. However, WooCommerce, a plugin for WordPress, supports Afterpay through additional plugins. You can install and activate an Afterpay plugin in WooCommerce to accept Afterpay payments.
How do I place a buy now, pay later order in WooCommerce?
To place an order using the pay later option in WooCommerce:
- Add items to your cart and proceed to checkout.
- On the checkout page, select the Afterpay or Pay Later option.
- Follow the on-screen instructions to complete your purchase.
- Confirm your order, and you will be redirected to Afterpay or the relevant provider to finalize the payment schedule.
Understanding Afterpay in WooCommerce
Afterpay is a popular buy now, pay later payment method that allows your customers to split their payments into interest-free installments. Deciding to add Afterpay to WooCommerce can enhance the shopping experience by offering more flexible payment options.
Integrating Afterpay in your WooCommerce store is straightforward. Here’s an overview of how to get started adding Afterpay to WooCommerce:
- Install the plugin: Navigate to your WordPress dashboard. Under Plugins, click Add New and search for the Afterpay plugin. Install and activate it.
- Access settings: Go to WooCommerce > Settings in your Admin Dashboard. Click on the Payments tab.
- Enable Afterpay: Find the Afterpay option and check the Enable Afterpay box. This allows your customers to choose Afterpay at checkout.
- Configure merchant details: Enter the Merchant ID and Secret Key provided by Afterpay in the respective fields. These credentials authenticate your store with Afterpay.
- Save changes: Click the Save changes button to apply your settings.
With Afterpay, customers can buy what they want online and pay over time. This payment option can increase sales and customer satisfaction by offering more flexibility and a seamless checkout process.
Initial setup requirements
Before you can add Afterpay to WooCommerce, you need to meet several essential requirements. These steps will ensure compatibility, security, and proper registration.
Verify WooCommerce and WordPress compatibility
First, make sure your WooCommerce and WordPress installations are up to date. Compatibility is crucial for a smooth setup process.
To check your versions, go to Dashboard > Updates in your WordPress Admin. Ensure WooCommerce matches the required version stated on the Afterpay plugin page. If needed, click Update Now.
Using incompatible versions may lead to functionality issues or installation failures, so verify you meet the minimum version requirements.
Secure your website
Security is essential when handling online transactions. Ensure your website has an active SSL certificate. This certificate encrypts data transferred between your server and your customers, providing safer transactions.
To check your SSL status, navigate to your site’s URL. A padlock symbol next to your URL indicates SSL is active. If you don’t see it, contact your hosting provider to get an SSL certificate.
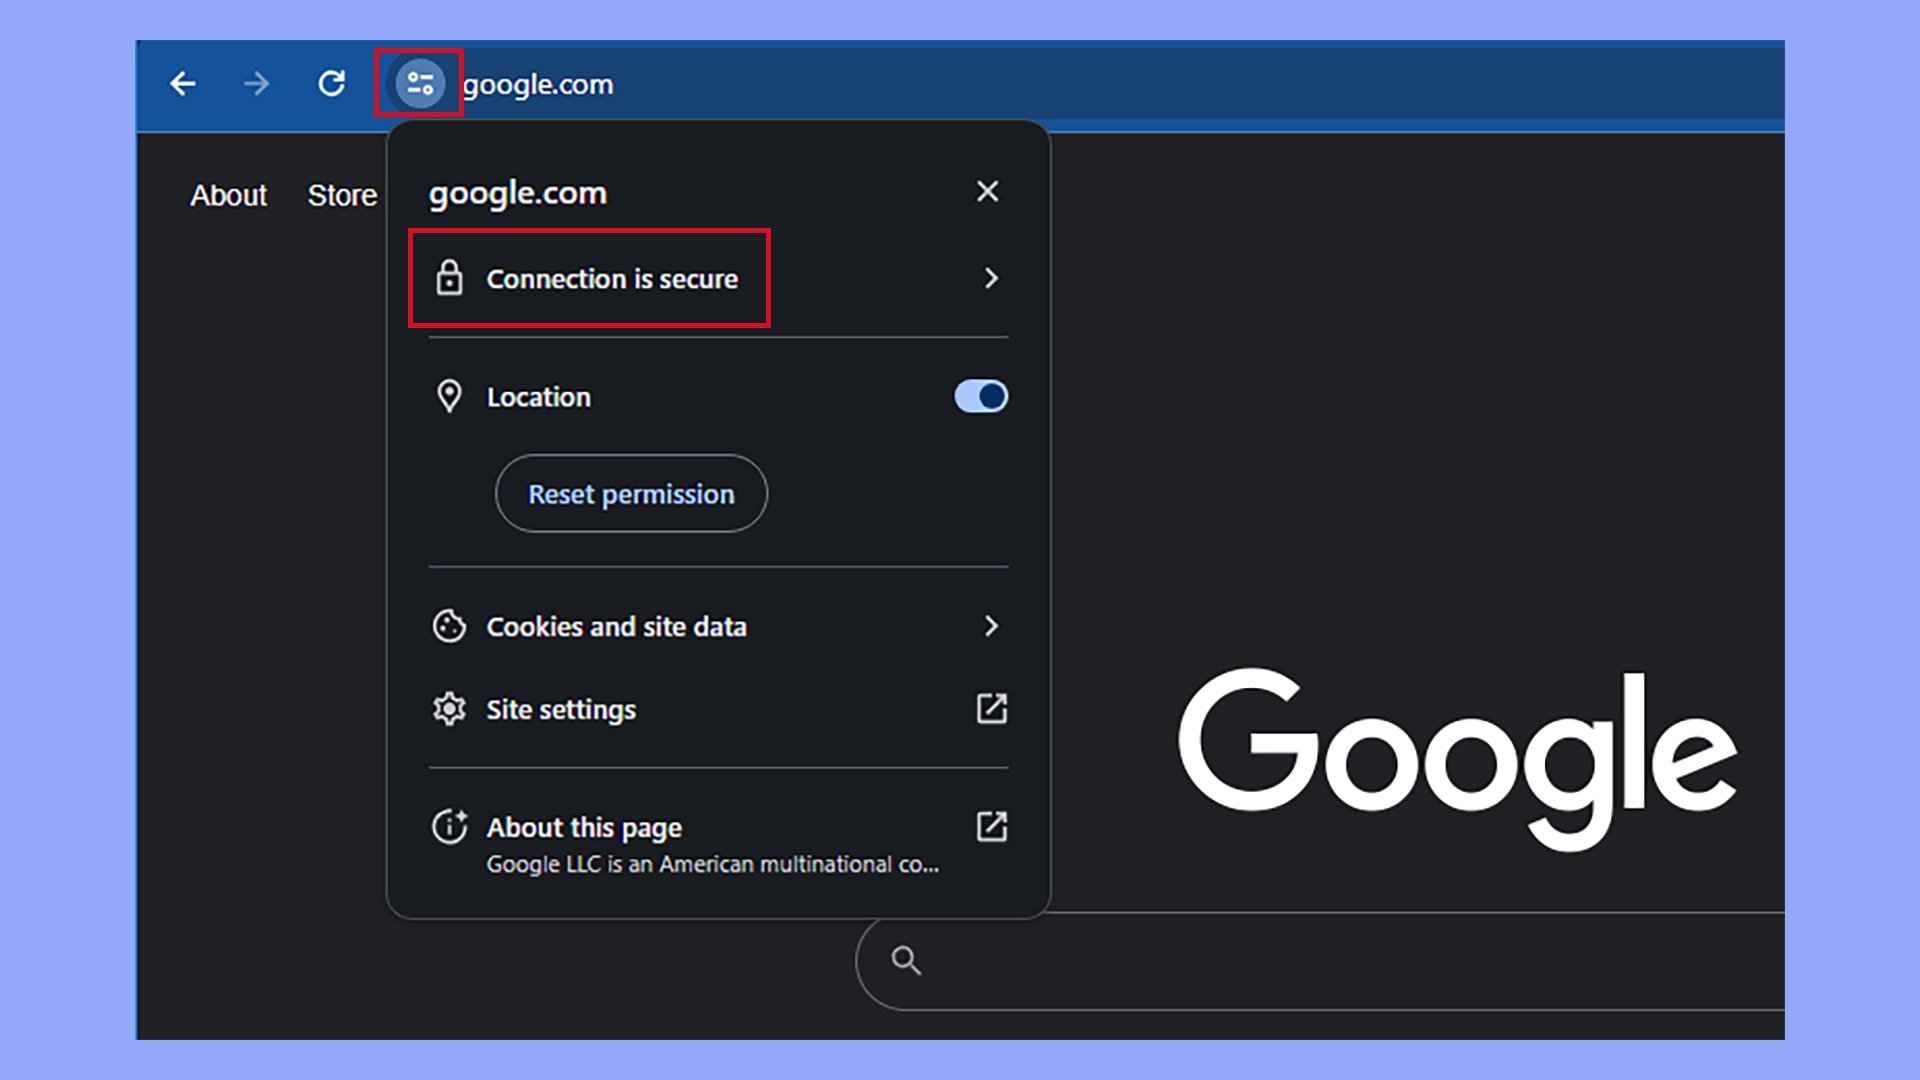
Securing your site builds trust and complies with Afterpay’s security standards, making it a mandatory step before configuration.
Register with Afterpay
To use Afterpay, you need to register as a merchant. Visit Afterpay’s website and complete the registration process.

After approval, you will receive a Merchant ID and a Secret Key. Keep these credentials safe. You will input these into your WooCommerce settings to link your account.
By completing this registration, you enable the Afterpay payment option for customers in regions such as Australia, New Zealand, the United States, Canada, and the United Kingdom.
Looking to sell online?
Create your custom online store in minutes with 10Web AI Ecommerce Website Builder and take your business online.
How to add Afterpay to WooCommerce
Adding Afterpay to your WooCommerce store involves a few simple steps. This section outlines how to find and install the Afterpay payment gateway plugin in your WordPress dashboard.
Finding the Afterpay Plugin
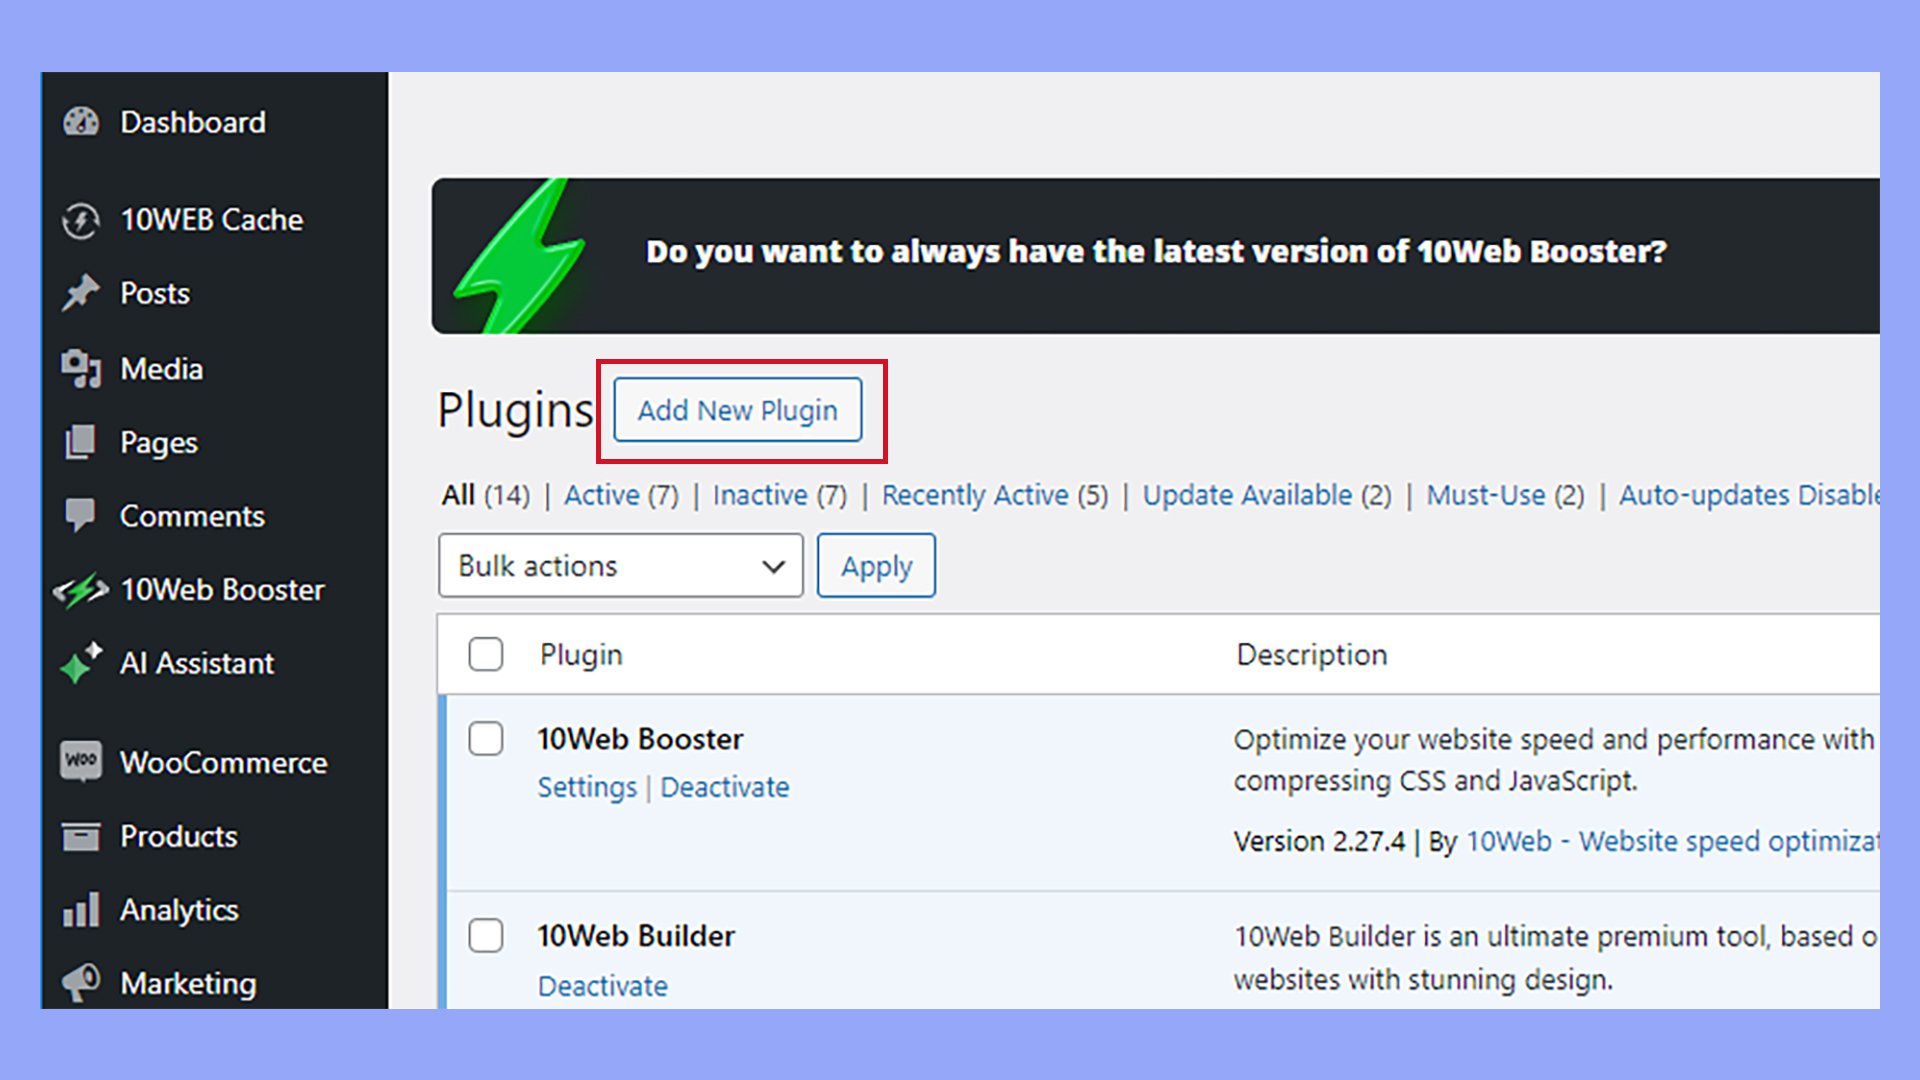
To begin, navigate to your WordPress dashboard. In the left-hand menu, locate and click on Plugins.
Once there, click the Add New button at the top of the screen.
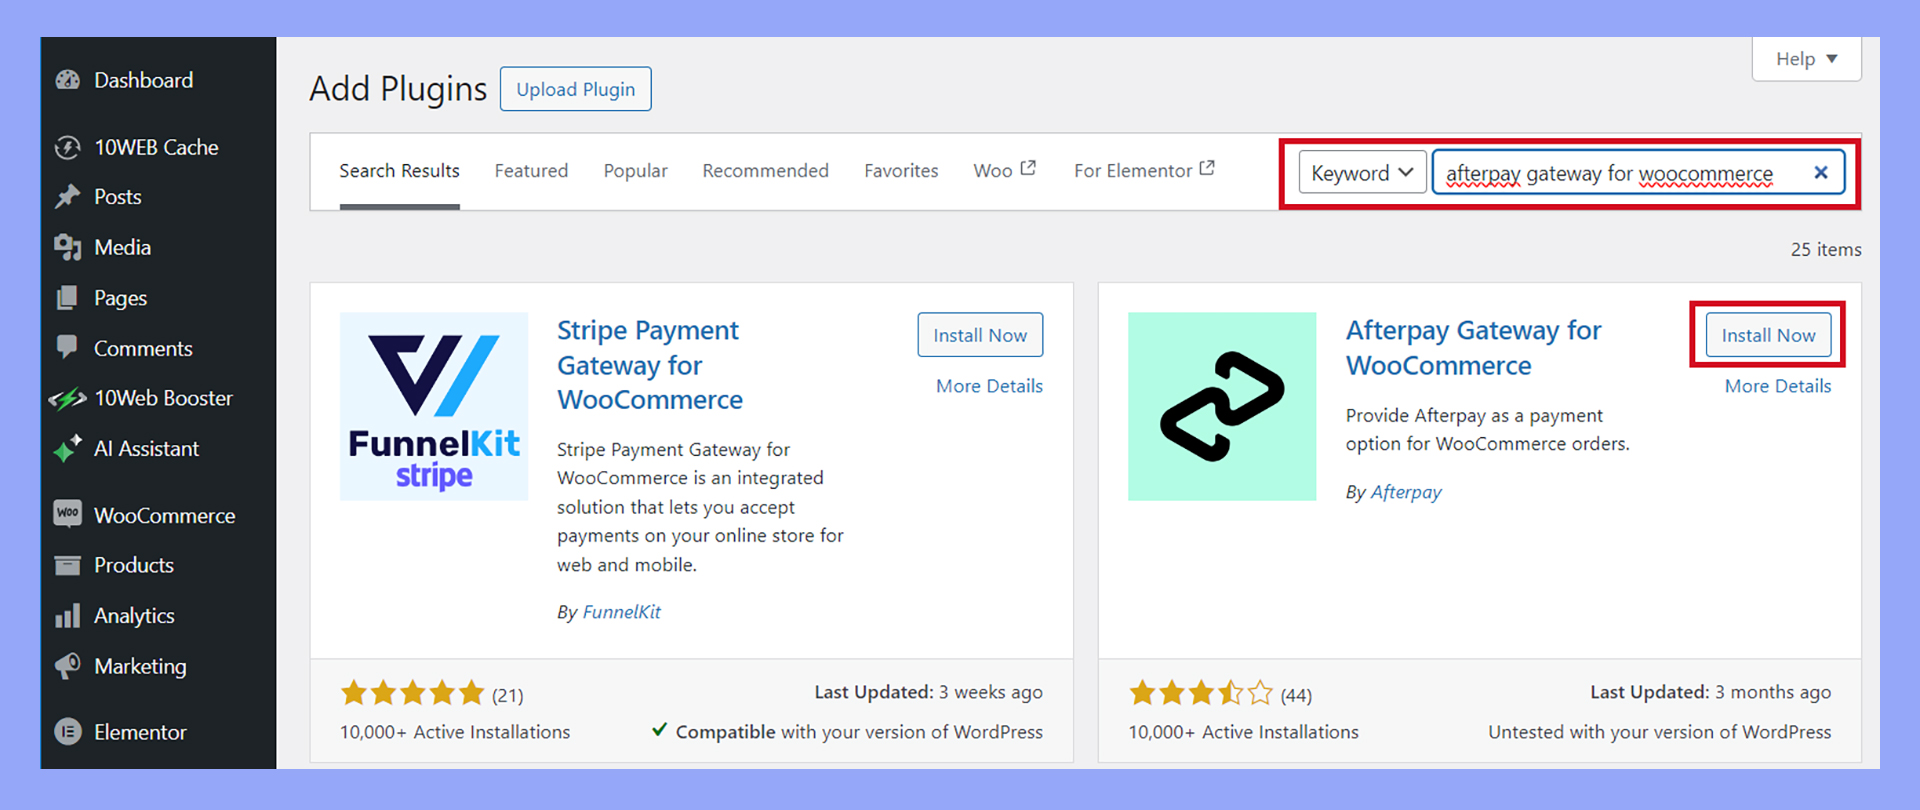
In the plugin search field, type Afterpay Gateway for WooCommerce.
Look for the official Afterpay Gateway for WooCommerce plugin. When you find it, check the ratings and reviews to ensure it’s the right plugin.
Plugin installation process
After you find the Afterpay plugin, click the Install Now button next to it. Wait a few moments for the installation to complete.
Once installed, the Install Now button will change to Activate. Click Activate to enable the plugin.
After activating, you need to configure Afterpay’s WooCommerce settings.
Configuring Afterpay settings
Properly configuring Afterpay in WooCommerce is crucial for a smooth and secure payment process. This section guides you through entering your merchant details, setting the appropriate currency and region, and configuring the payment options for Afterpay.
Entering merchant details
First, you need your Merchant ID and Secret Key from Afterpay.
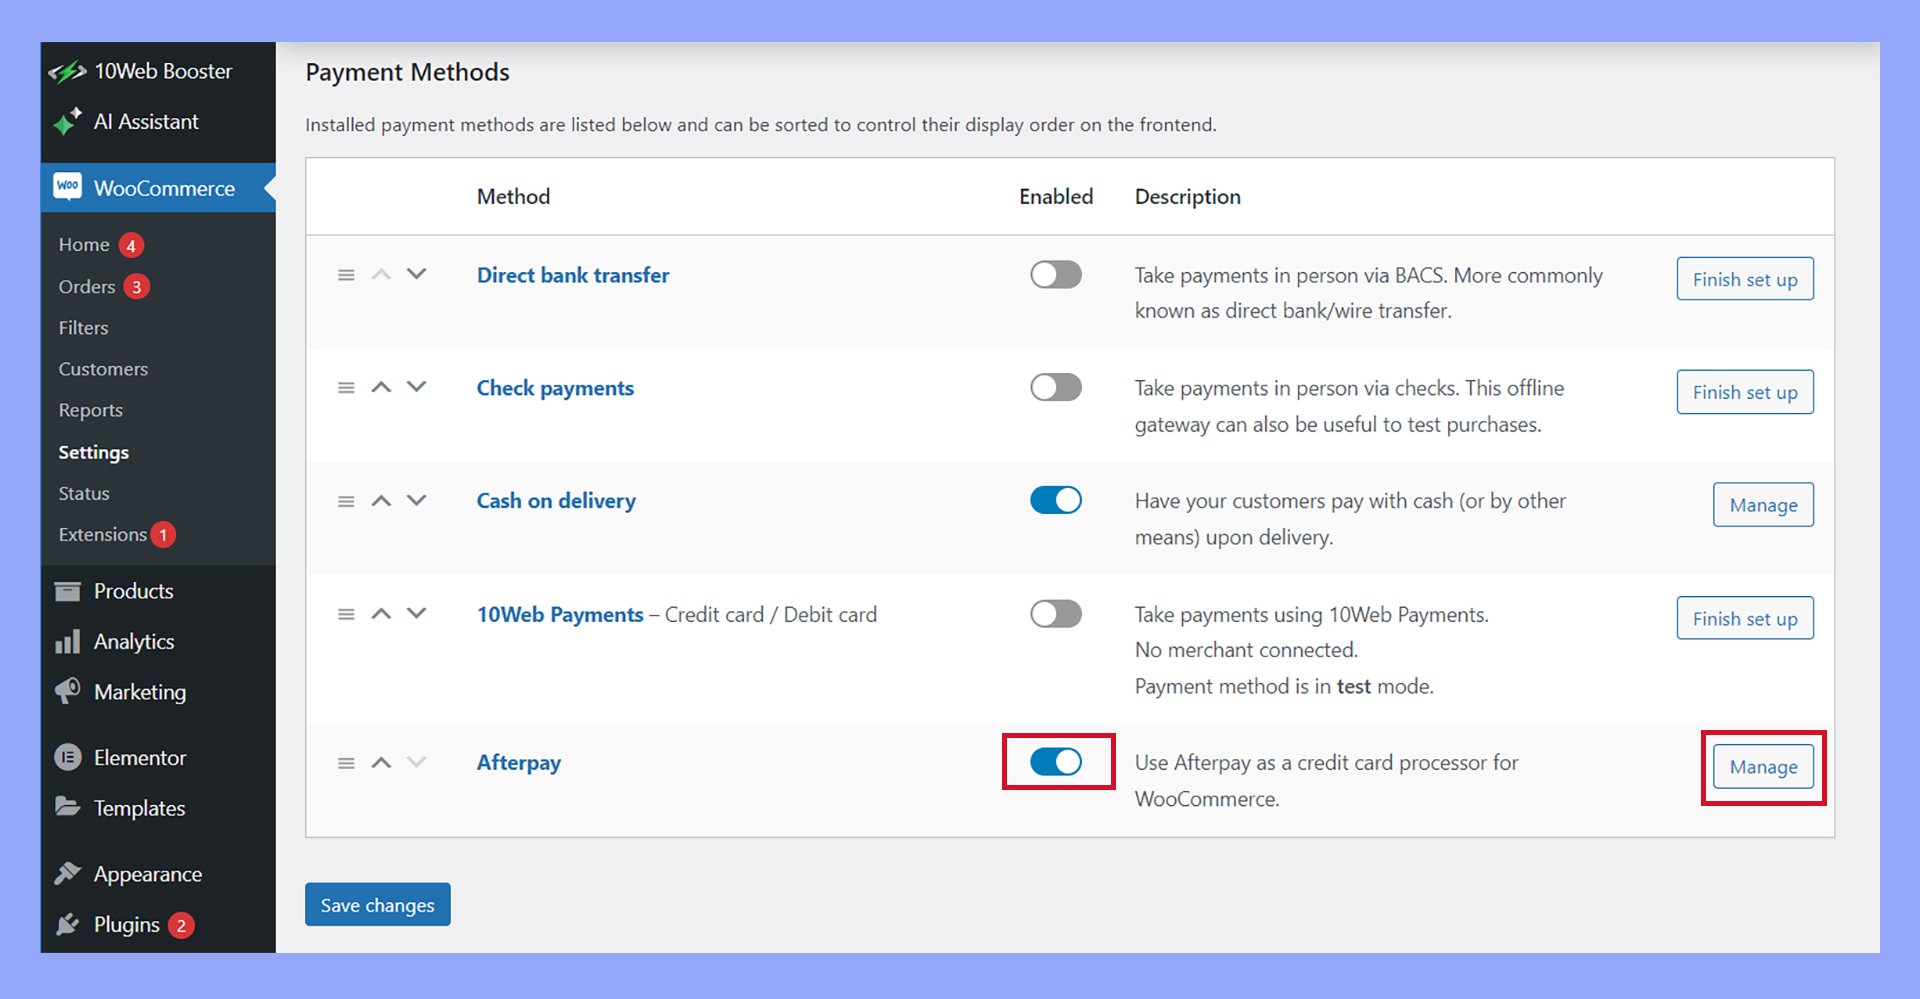
- Navigate to WooCommerce > Settings and select the Payments tab.
- Locate Afterpay and (if necessary) enable it by toggling the switch, then click Manage.

- Enter your Merchant ID and Secret Key provided by Afterpay.

- Click Save changes to update the settings.
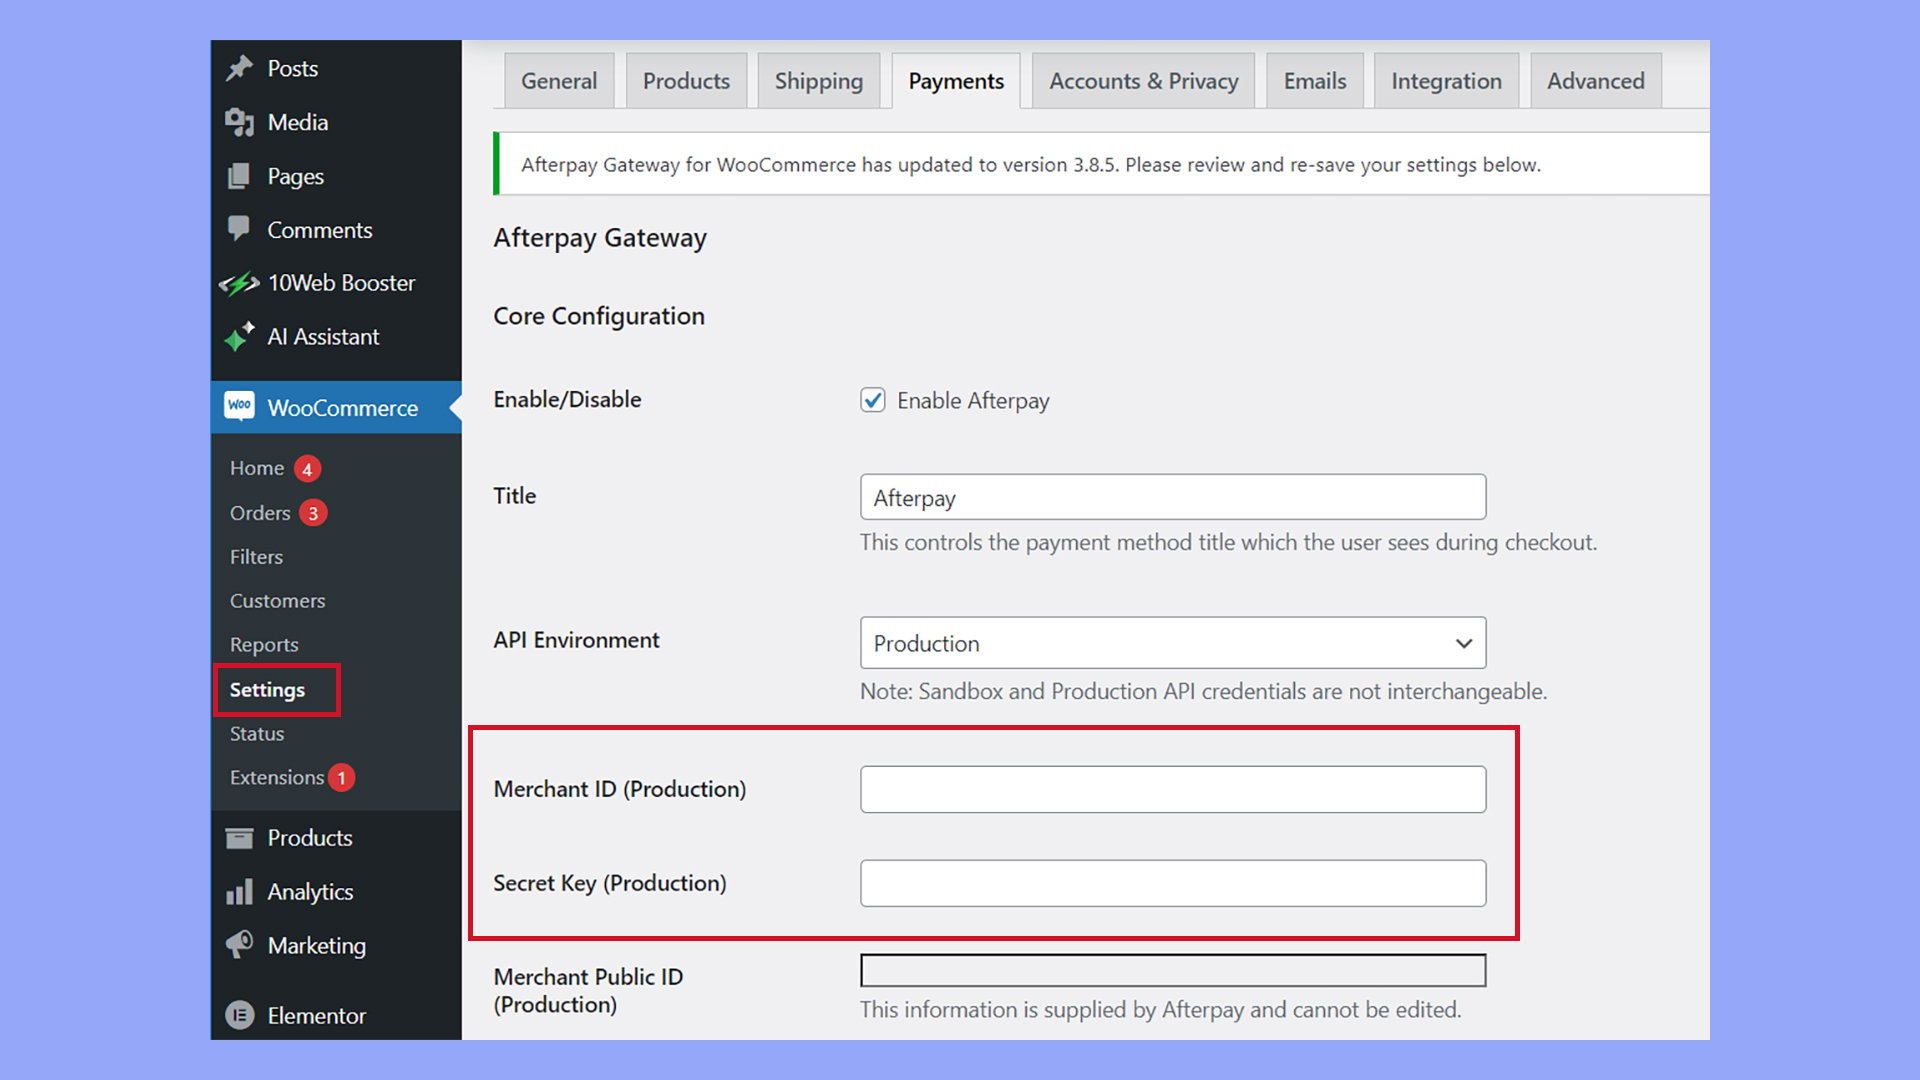
Having these details ensures that your transactions are authenticated and secure when you add Afterpay to WooCommerce.
Setting currency and region
After entering your merchant details, it’s important to set the correct currency and region. Afterpay operates in several countries, including Australia, New Zealand, the United States, Canada, and the United Kingdom.
- Under WooCommerce > Settings, go to the General tab.
- Make sure your store’s Currency Options are set to the appropriate currency for your region.
- Confirm that your store location matches one of Afterpay’s supported regions (Australia, New Zealand, United States, Canada, United Kingdom).
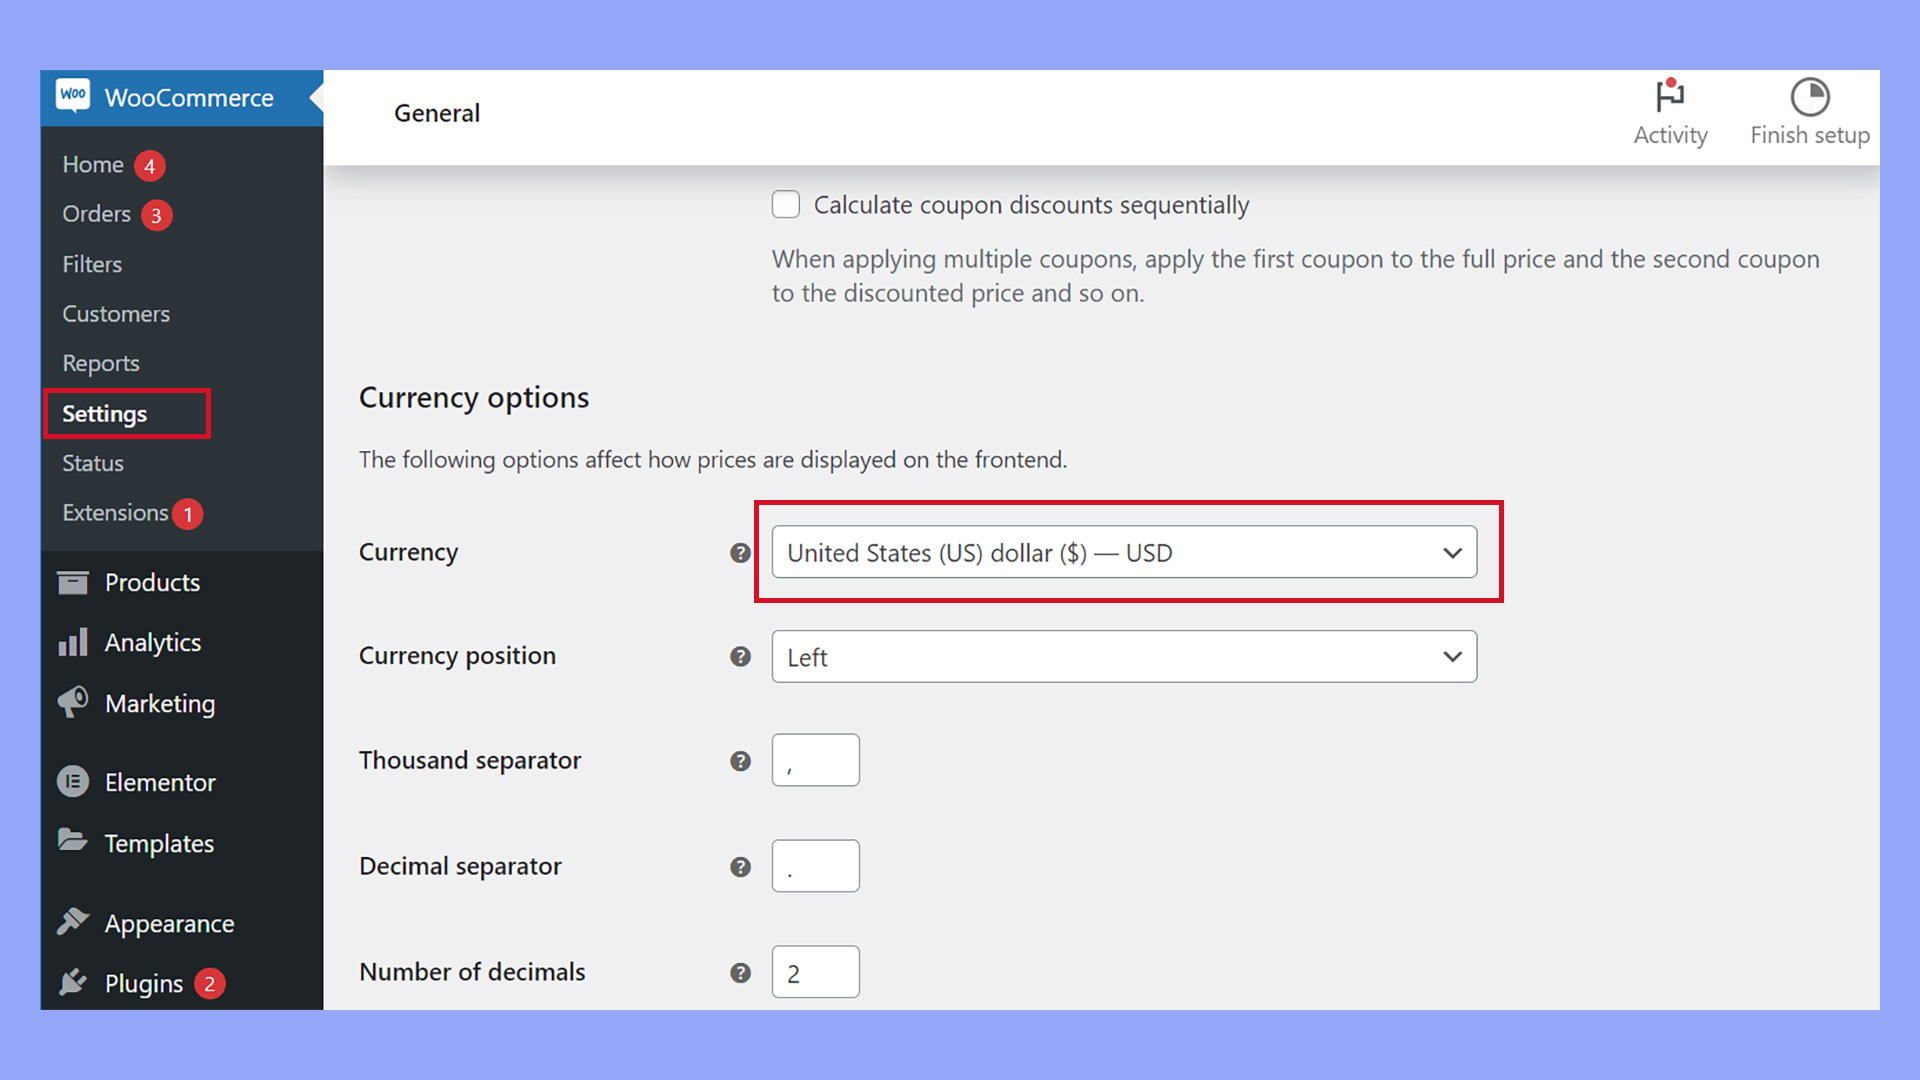
Correct currency and region settings help ensure that the checkout process runs smoothly and meets legal and regional requirements.
Implementing Afterpay on the storefront
Adding Afterpay to WooCommerce storefronts can enhance the shopping experience by providing flexible payment options on the shopping cart, product, and category pages. Customizing the Afterpay display is also essential for a seamless integration that matches your store’s aesthetics.
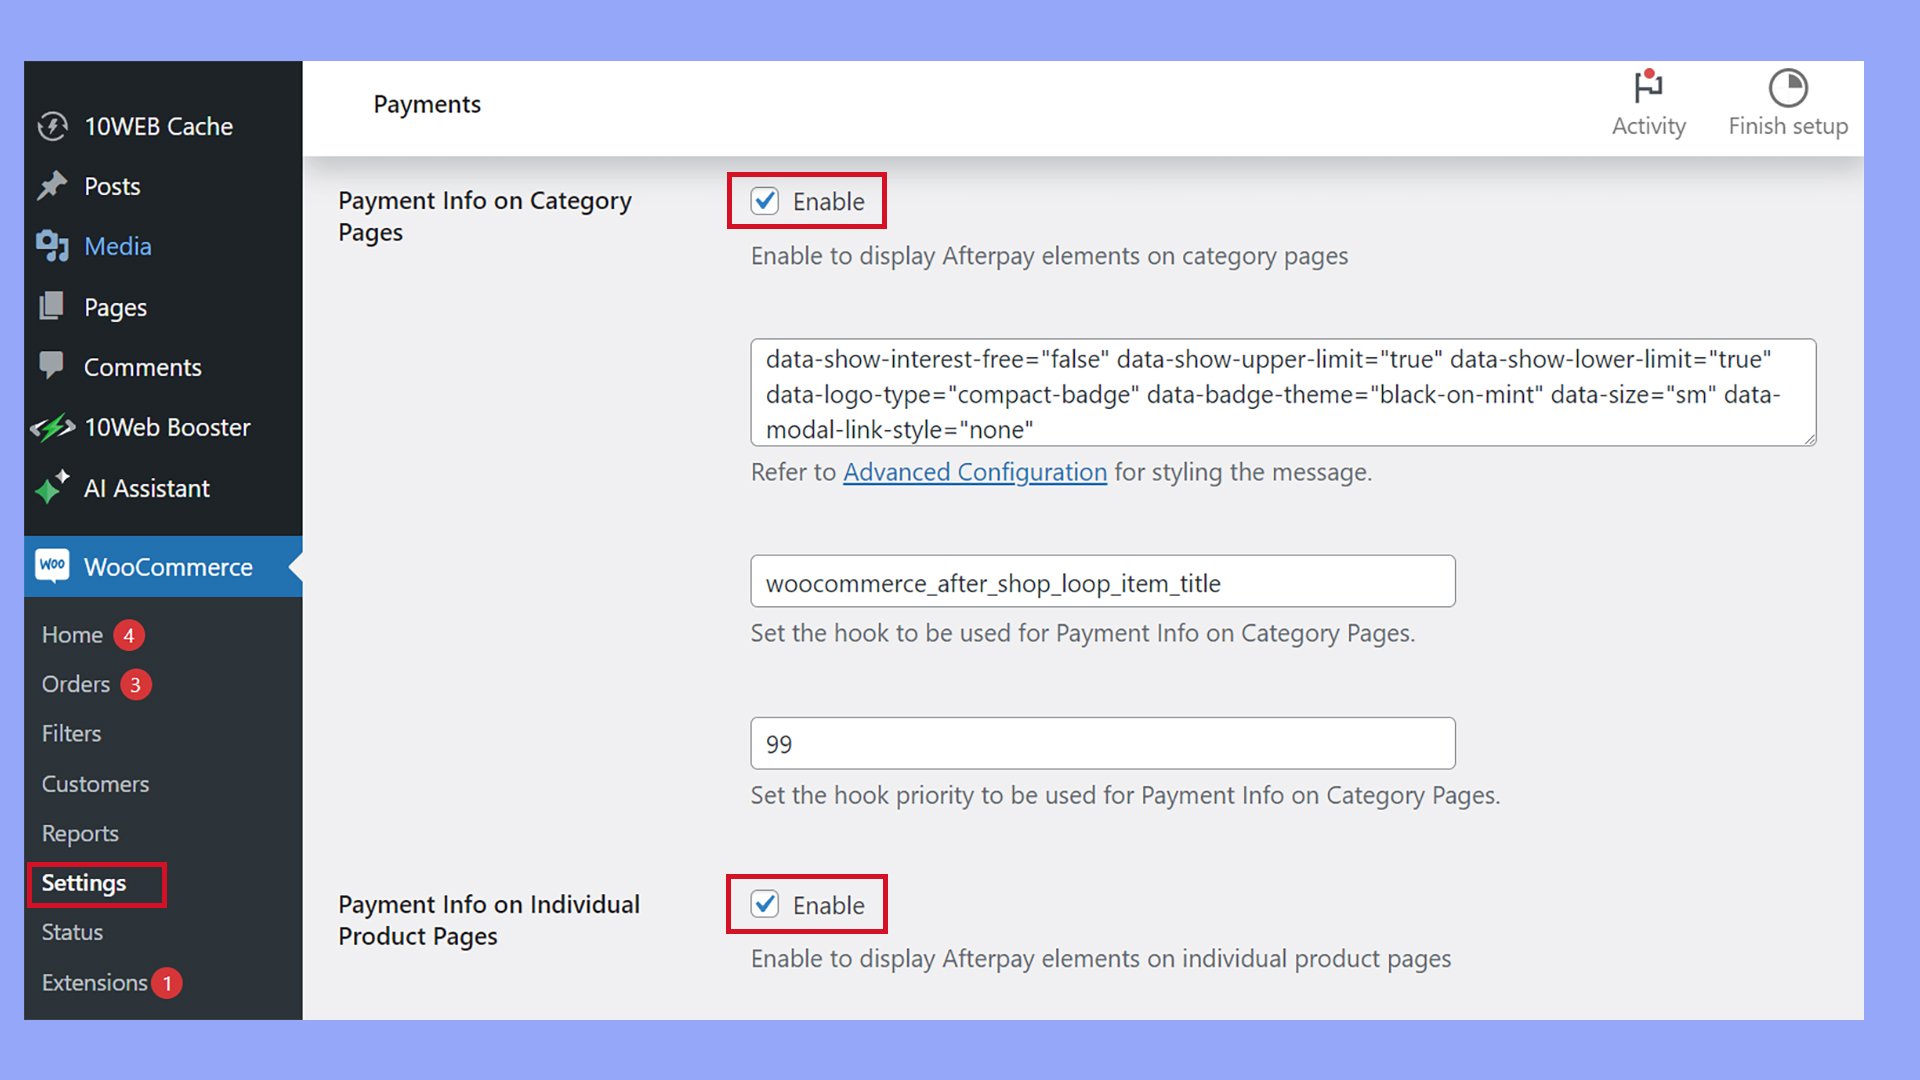
Displaying Afterpay on product and category pages
To add Afterpay to individual product pages or categories, you need to enable the options in your WooCommerce settings. These options let shoppers see Afterpay’s availability right on the product description page or on desired category pages.
- Go to WooCommerce > Settings in your WordPress admin.
- Navigate to the Payments tab and locate Afterpay in the list.
- Click Manage.
- Scroll down and Enable the desired display locations.
- Save changes and make sure Afterpay is displayed alongside product prices.
Excluding categories
Control which category pages display Afterpay by entering excluded categories in Afterpay’s WooCommerce settings.

Testing the Afterpay integration
Ensuring that Afterpay is properly integrated with your WooCommerce store is crucial. This involves using Sandbox mode for initial tests and verifying the entire checkout process as if you were a customer.
Using sandbox mode
Start by setting the environment to Sandbox mode to test transactions without processing real payments.
- Log into your WordPress Dashboard.
- Navigate to WooCommerce > Settings.
- Go to the Payments tab and click Afterpay’s Manage button.
- Find the Environment setting and switch it to Sandbox.
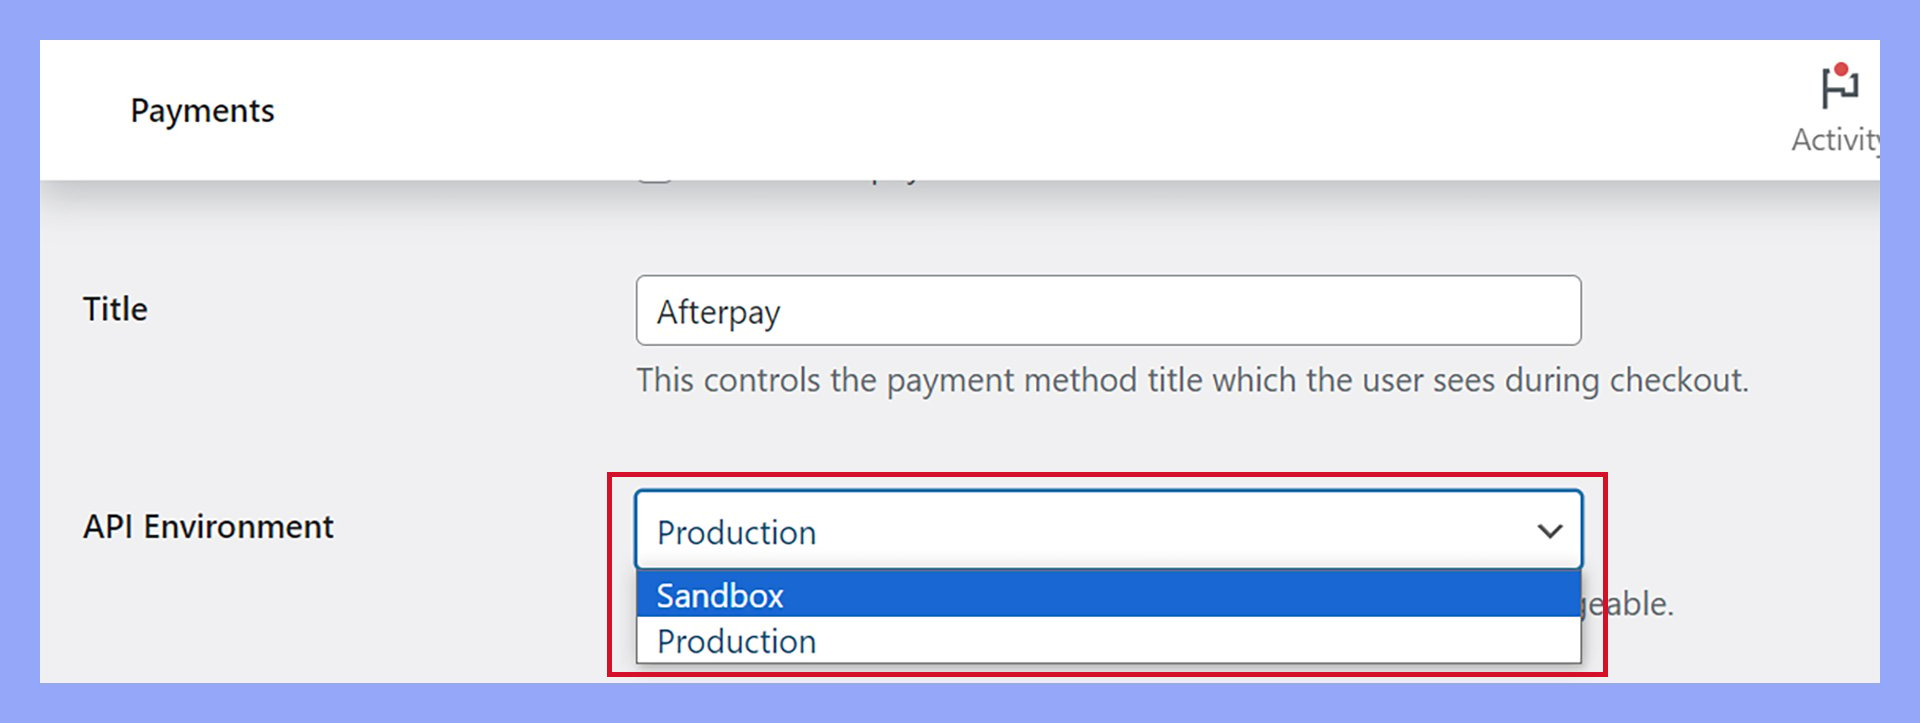
Using Sandbox mode allows you to place test orders when you first add Afterpay to WooCommerce, ensuring that the integration works without concerns about real financial transactions. This is particularly useful to developers and store managers who want to verify how the app behaves in different scenarios.
Verifying checkout process
After configuring Sandbox mode, the next step is to mimic the customer checkout to ensure everything runs smoothly.
- Add products to your cart as a customer would.
- Proceed to the checkout page.
- Select Afterpay as your payment option.
- Complete the checkout process.
Check for any errors and ensure the transaction flows seamlessly. Verify that order confirmations and receipts are correctly sent via email. This helps you confirm that the Afterpay app is effectively connected and functioning. Following these steps ensures that real-time transactions will be smooth for your customers after you add Afterpay in WooCommerce.
Advanced developer options for Afterpay
These advanced options provide methods to customize and integrate Afterpay with your WooCommerce store.
You can utilize custom integration techniques or directly work with the Afterpay API to achieve advanced functionality.
Custom integration techniques
When adding Afterpay to your WooCommerce store, you may choose custom techniques to suit your website’s unique requirements.
Start by downloading the Afterpay WooCommerce plugin from the WordPress plugin repository and installing it on your site.
After that, navigate to WooCommerce > Settings > Payments and enable Afterpay.
Next, modify the plugin files to fit your needs. For example, you can customize the messaging displayed to users by adjusting the templates in the plugin.
Add custom styles or scripts to ensure the Afterpay checkout process aligns with your site’s brand. This helps maintain a consistent user experience.
For developers who need to extend functionality, consider creating a child theme or a custom plugin. This allows you to add new features without altering core files.
Use custom hooks or filters provided by Afterpay to modify the default behavior of the payment gateway.
Make sure you test all modifications in a staging environment before deploying to your live site.
Utilizing Afterpay API
You can work directly with the Afterpay API for more advanced customizations. First, obtain your Merchant ID and Secret Key from Afterpay. These credentials are essential for authenticating API requests.
You can access the API documentation on the Afterpay developer portal. The documentation provides detailed instructions for various endpoints and request parameters.
Start by making test API calls in a sandbox environment. This helps you understand how different API endpoints function without affecting real transactions.
Common tasks include retrieving payment schedules, processing refunds, and managing orders.
Write custom scripts to implement the API calls in your WooCommerce store. Ensure these scripts handle API responses and errors gracefully.
For instance, if a payment fails, your script should prompt the user to reattempt the transaction or select a different payment method.
Finally, monitor your API integration using logs to track successful and failed requests. This helps identify any issues early and maintain a smooth payment experience for your customers.
Conclusion
Integrating Afterpay into your WooCommerce store is a game-changer for improving customer experience and increasing sales. By following these steps on how to add Afterpay to WooCommerce, you provide a flexible, interest-free payment option that attracts more shoppers and encourages larger purchases. Start offering Afterpay today to elevate your ecommerce business.
Looking to sell online?
Create your online store in minutes
Create your online store in minutes with 10Web AI Ecommerce Website Builder.