Understanding how payment gateways function in WooCommerce is crucial for managing transactions securely and efficiently. Payment gateways act as intermediaries between your store and financial institutions, ensuring safe data transmission and fund transfers. This guide covers setting up a custom payment gateway, managing order statuses, and maintaining security compliance, enabling you to provide a seamless checkout experience for your customers.
Understanding payment gateways
In your journey to set up an online store with WooCommerce, understanding how payment gateways function is essential. These gateways are the bridges between making a sale and receiving payment, ensuring the money reaches you safely.
Payment gateways in WooCommerce are crucial for handling transactions. They process customer payments by transferring key information from your WooCommerce shop to the financial networks involved and then return transaction details and responses from the payment network back to your store. Here’s a list that highlights their role:
- Security: Gateways encrypt sensitive information to ensure secure data transmission.
- Authorization: They relay requests to the relevant financial institution to authorize the transaction amount.
- Completion: Once authorized, gateways facilitate the actual transfer of funds from the customer’s account to the store’s account.
Payment gateway vs. payment method
While often used interchangeably, payment gateways and payment methods differ. A payment method refers to the way a customer chooses to pay, such as credit card, PayPal, or bank transfer. In contrast, the payment gateway is the service that processes the payment method selected during the checkout process.
- Payment Method: Visa credit card
- Payment Gateway: The service that processes the Visa credit card payment
It’s essential to offer a variety of payment methods to cater to customer preferences, which are processed securely through your chosen payment gateways. By integrating these gateways into your WooCommerce store, you ensure a smooth and secure checkout experience for your customers.
By adding a custom payment method, you’re essentially creating a new gateway that can process payments in a way that fits your business model.
Setting up a custom payment gateway
Before modifying your WooCommerce setup, it’s advisable to use a child theme or create a custom plugin. This approach ensures that your changes won’t be overwritten by future updates.
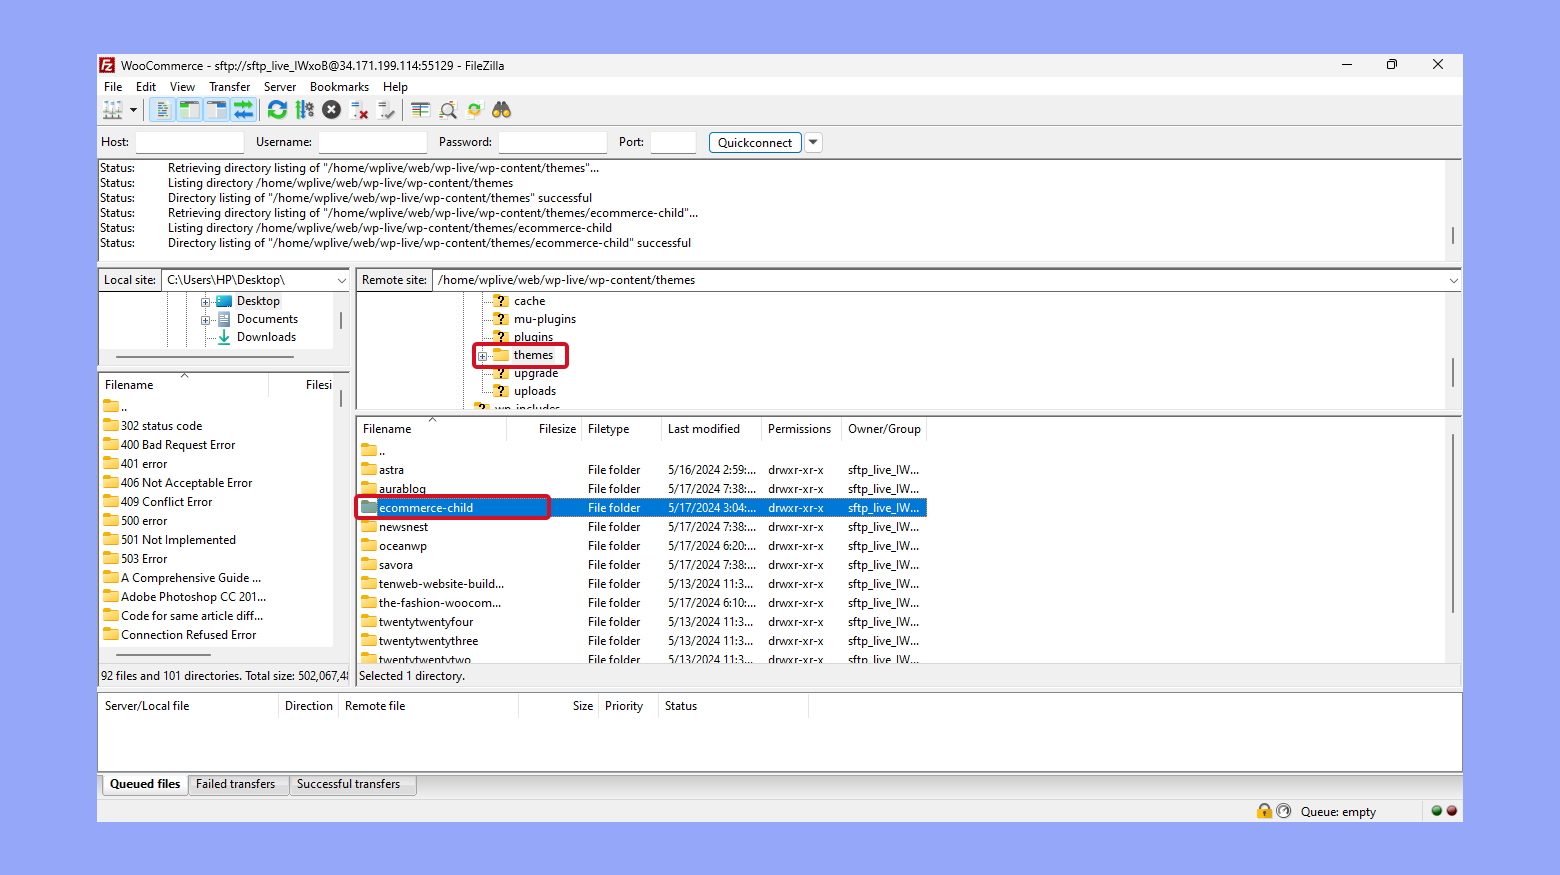
To create a child theme:
- Navigate to your WordPress directory, usually under wp-content/themes/.
- Create a new folder for your child theme (e.g., my-theme-child).

- Add a style.css and functions.php file within this folder.
Next, you’ll create a plugin to house your custom payment gateway. The foundation of your gateway will be WooCommerce’s wc_payment_gateway class, which you’ll extend to create your own gateway.
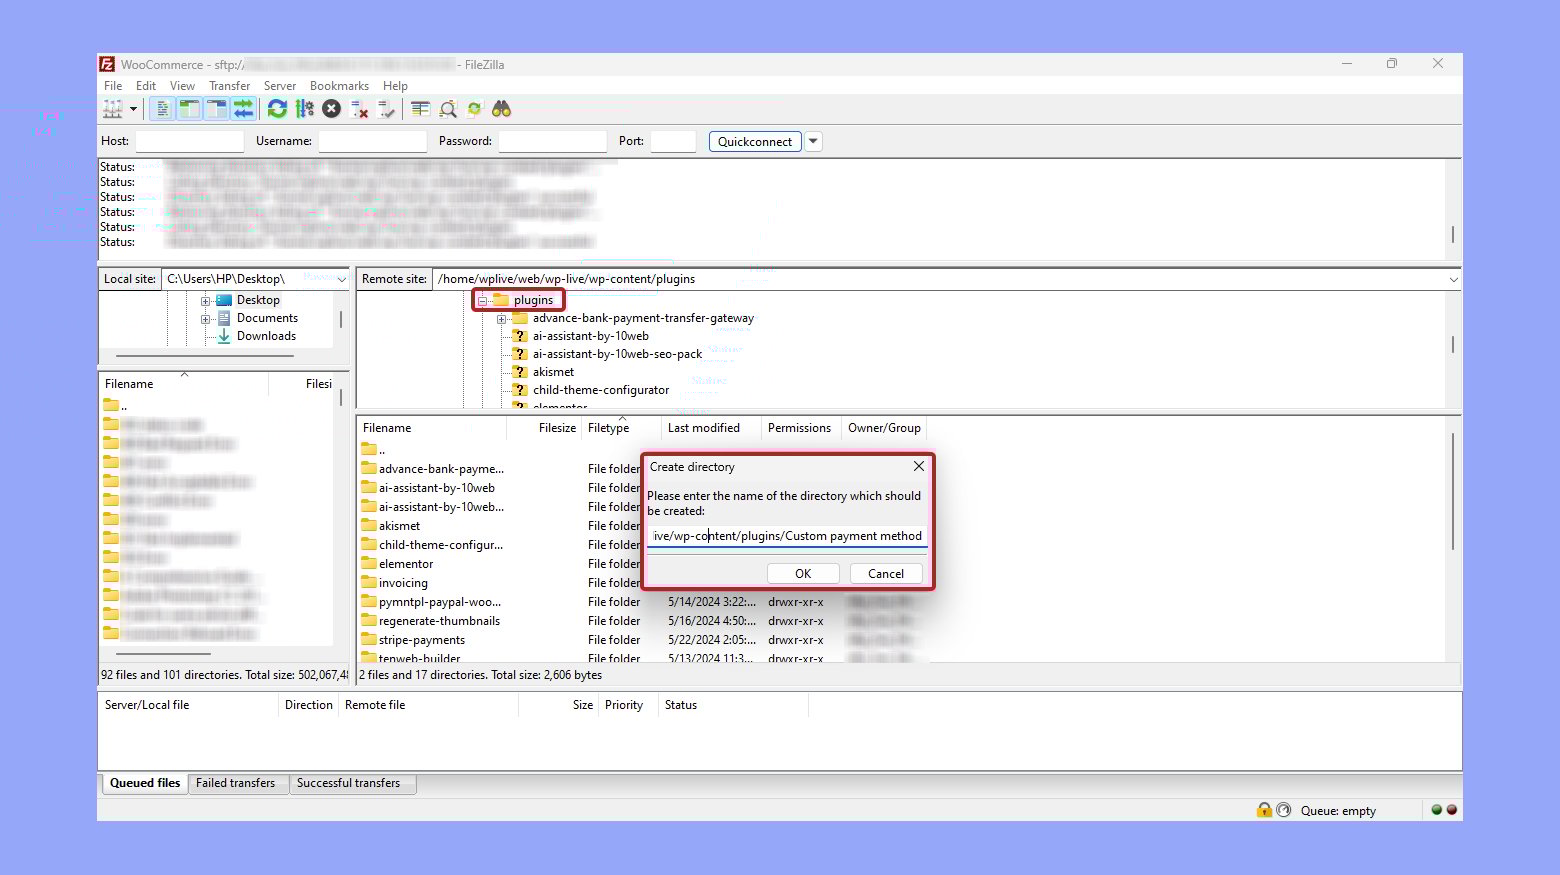
Create a new plugin for your payment gateway if you haven’t done so already. The plugin will reside in its own directory within the wp-content/plugins directory.
- Navigate to wp-content/plugins/.
- Create a new folder (e.g., custom-payment-method).
- Add a main plugin file (e.g., custom-payment-method.php) and include a plugin header.
Once your plugin is set up, your next step involves hooking into WooCommerce.
Registering the custom payment gateway
To start, you need to register your custom payment gateway with WooCommerce.
In your functions.php or plugin file, add:
add_filter('woocommerce_payment_gateways', 'add_custom_gateway_class');

function add_custom_gateway_class($gateways) {

 $gateways[] = 'WC_Gateway_Custom'; // Your gateway class name

 return $gateways;

}
This snippet tells WooCommerce about your new payment gateway.
Creating the payment gateway class
Now, define the class that will handle your custom payment gateway.
Add the following code to your child theme’s functions.php or plugin file:
if ( ! class_exists( 'WC_Payment_Gateway' ) ) {

 return;

}

class WC_Gateway_Custom extends WC_Payment_Gateway {

 public function __construct() {

 $this->id = 'custom_gateway';

 $this->icon = ''; // URL of the icon that will be displayed on checkout

 $this->has_fields = true; // If you need custom fields on checkout

 $this->method_title = 'Custom Gateway';

 $this->method_description = 'Description of your custom payment gateway.';

 // Load the settings

 $this->init_form_fields();

 $this->init_settings();

 // Define user settings

 $this->title = $this->get_option('title');

 $this->description = $this->get_option('description');

 // Actions

 add_action('woocommerce_update_options_payment_gateways_' . $this->id, array($this, 'process_admin_options'));

 }

 // Initialize form fields

 public function init_form_fields() {

 $this->form_fields = array(

 'enabled' => array(

 'title' => 'Enable/Disable',

 'type' => 'checkbox',

 'label' => 'Enable Custom Payment Gateway',

 'default' => 'yes'

 ),

 'title' => array(

 'title' => 'Title',

 'type' => 'text',

 'description' => 'This controls the title which the user sees during checkout.',

 'default' => 'Custom Payment Gateway',

 'desc_tip' => true,

 ),

 'description' => array(

 'title' => 'Description',

 'type' => 'textarea',

 'description' => 'This controls the description which the user sees during checkout.',

 'default' => 'Pay using our custom payment gateway.',

 ),

 );

 }

 // Process the payment

 public function process_payment($order_id) {

 $order = wc_get_order($order_id);


 // Mark as on-hold (we're awaiting the payment)

 $order->update_status('on-hold', __('Awaiting custom payment', 'woocommerce'));

 // Reduce stock levels

 wc_reduce_stock_levels($order_id);

 // Remove cart

 WC()->cart->empty_cart();

 // Return thank you page redirect

 return array(

 'result' => 'success',

 'redirect' => $this->get_return_url($order),

 );

 }

}
This class sets up the custom gateway, including fields for enabling the gateway, setting its title, and description. The process_payment function handles the payment logic, updating the order status, reducing stock levels, and redirecting the user after payment.
Create your custom online store in minutes with 10Web AI Ecommerce Website Builder and take your business online. 
Looking to sell online?
Adding custom fields (If needed)
If your payment method requires additional information from the user, such as account numbers or transaction IDs, you can add custom fields.
Modify the has_fields property and add a payment_fields method:
public function __construct() {

 // Other initialization code...

 $this->has_fields = true; // Enable custom fields

}

public function payment_fields() {

 echo '<p>' . __('Custom Payment Details', 'woocommerce') . '</p>';

 echo '<label for="custom_field">' . __('Custom Field', 'woocommerce') . '</label>';

 echo '<input type="text" name="custom_field" id="custom_field" />';

}
In the process_payment function, you can retrieve these fields and process them accordingly.
Add the following code to process_payment:
$custom_field = sanitize_text_field($_POST['custom_field']);

// Process custom field data.
Testing your custom payment gateway
After implementing the custom payment gateway, thoroughly test it to ensure it works correctly.
- Go to WooCommerce settings and enable your new payment gateway.
- Place a test order using the custom payment method.
- Verify that the order status updates as expected and the custom fields process correctly.
Security and compliance concerns
When adding a custom payment method to WooCommerce, it’s essential to prioritize the security of your transactions and ensure compliance with industry standards. Here are the specifics on the security measures you should implement.
Understanding ssl certificates
SSL (Secure Sockets Layer) certificates are fundamental for the security of your WooCommerce site. They encrypt the data exchanged between your customer’s browser and your website, ensuring that sensitive information such as credit card numbers and personal details are transmitted securely.
- Obtain an SSL certificate: Purchase an SSL certificate from a reliable certificate authority.
- Activate the certificate: Follow your hosting provider’s process to activate the SSL certificate for your domain.
- Ensure proper configuration: Check the certificate’s installation on your domain by using online tools provided by SSL vendors.
- Enforce HTTPS: Configure your website to use HTTPS by default to ensure all data is encrypted.
Websites hosted on 10Web can enable a free SSL certificate by Lets Encrypt. 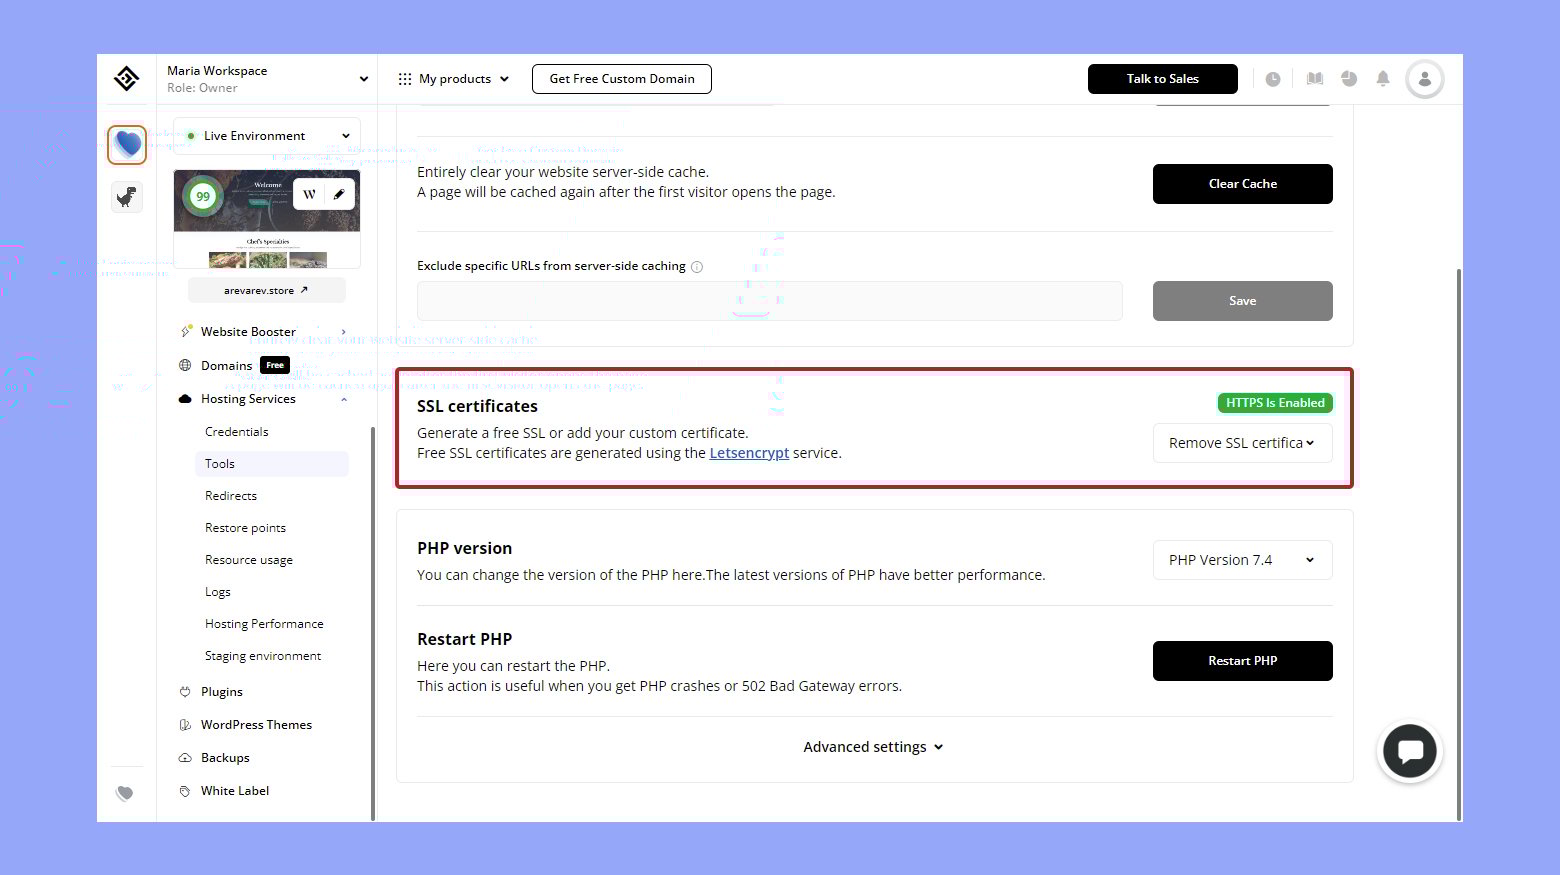
Pci compliance and secure transactions
PCI compliance is about adhering to the Payment Card Industry Data Security Standard (PCI DSS), which mandates a secure data environment when handling card payments.
- Understand your level of compliance: Requirements vary based on how many transactions you process annually.
- Secure your payment processing: Use payment gateways that are PCI-compliant and avoid storing sensitive payment information on your servers.
- Maintain a secure network: Implement strong access control measures and regularly monitor and test networks to ensure security.
- Educate your team: Make sure staff are aware of compliance obligations and security best practices.
Custom payment gateway integration
When adding a custom payment gateway to WooCommerce, it’s essential to ensure it integrates seamlessly with the checkout process and accurately manages order statuses and stock levels.
Integrating gateway with checkout process
Your custom payment gateway should naturally fit into WooCommerce’s checkout flow. Here’s how you start:
- Navigate to your WordPress dashboard, go to Plugins, and click on Add New. Search for Custom Payment Gateways for WooCommerce and then click Install Now followed by Activate.
- In your plugin file, create a new PHP class that extends the WC_Payment_Gateway class. This is where you’ll add your custom code.
- Hook your custom gateway into WooCommerce by attaching your new class to the woocommerce_payment_gateways filter.
- Implement function init_form_fields in your class to define user-facing settings such as title and description, that will display in the WooCommerce > Settings > Payments section.
- Within your gateway class, write a process_payment method to handle payment upon checkout.

Managing order status and stock
After integrating your custom payment gateway, you must carefully manage order statuses and inventory to mirror customer actions.
- Once the payment is processed, create an instance of WC_Order to represent the new order. for example:
// Create a new order
$order = wc_create_order();

// Add a product to the order
$product_id = 123; // Replace with the ID of your product
$quantity = 1; // Quantity of the product
$order->add_product( wc_get_product( $product_id ), $quantity );

// Set customer details
$order->set_address( array(
'first_name' => 'John',
'last_name' => 'Doe',
'email' => 'john.doe@example.com',
'phone' => '1234567890',
'address_1' => '123 Main St',
'address_2' => '',
'city' => 'Anytown',
'state' => 'CA',
'postcode' => '12345',
'country' => 'US'
), 'billing' );

$order->set_address( array(
'first_name' => 'John',
'last_name' => 'Doe',
'address_1' => '123 Main St',
'address_2' => '',
'city' => 'Anytown',
'state' => 'CA',
'postcode' => '12345',
'country' => 'US'
), 'shipping' );

// Calculate totals
$order->calculate_totals();

// Save the order
$order->save();
- Call reduce_order_stock method on your WC_Order instance when you need to decrease the product stock after a successful purchase. For example:
// Get the order ID $order_id = 456; // Replace with your actual order ID // Get the order object $order = wc_get_order( $order_id ); if ( $order ) { // Reduce the stock levels of the products in the order $order->reduce_order_stock(); } - Update the order status according to the payment result. If payment is successful, set the status to processing or completed; if unsuccessful, mark as failed.
With diligent implementation, your custom payment gateway can become an integral part of your WooCommerce store, providing your customers with a streamlined purchasing experience and ensuring your inventory is always in sync with sales.
Create your custom online store in minutes with 10Web AI Ecommerce Website Builder and take your business online.
Looking to sell online?
Troubleshooting and maintaining your gateway
When adding a custom payment method to your WooCommerce store, maintaining its functionality and promptly addressing any issues is vital for a seamless customer experience.
Common issues and fixes
If you encounter errors or issues with your WooCommerce payment gateway, consider these common problems and solutions:
- Activation Errors: If you can’t activate the gateway, double-check your code for syntax errors. Ensure all plugin files are in the correct directory and that you’ve followed WooCommerce standards.
- Transaction Failures: For transaction issues, verify that API keys and payment gateway credentials are correctly entered and that the gateway’s test mode is not accidentally enabled on your live site.
- Gateway Not Visible at Checkout: Make sure that the payment method is enabled in WooCommerce > Settings > Payments. If it’s hidden, it might not be fully configured, or there might be a conflict with another plugin or theme.
For more complex issues, refer to the payment gateway’s documentation and seek assistance from WooCommerce community forums or the support service of the gateway provider.
Keeping the gateway updated
Regular updates help keep your payment gateway secure and functioning as expected:
- Check for Updates: Regularly visit the WooCommerce > Extensions area in your dashboard to see if any updates are available for your custom gateway.
- Review the Changelog: Always read the changelog for each update. This document contains important information about what has changed, which can include security patches, new features, or bug fixes.
- Perform Regular Backups: Before applying updates, ensure your site is backed up. This way, if something goes wrong during the update process, you can restore to the previous version.
- Test on Staging: If possible, first apply updates on a staging environment. This prevents any potential issues from impacting your live site.
Keeping your payment gateway up-to-date will not only provide new features but also fix vulnerabilities and compatibility issues with the latest versions of WooCommerce.
Conclusion
Understanding payment gateways in WooCommerce is essential for securely processing transactions in your online store. These gateways ensure that payments are encrypted, authorized, and completed safely. Distinguishing between payment methods and gateways helps streamline the customer checkout experience.
Setting up a custom payment gateway involves creating a child theme, developing a plugin, and registering the gateway with WooCommerce. It’s crucial to secure your site with SSL certificates and maintain PCI compliance. Regularly updating and troubleshooting your gateway ensures seamless operation. By mastering these steps, you can provide a secure and efficient payment process for your customers.
Create your online store in minutes with 10Web AI Ecommerce Website Builder.Looking to sell online?
Create your online store in minutes


![]()