Learning how to import WooCommerce orders can streamline your ecommerce operations, saving time and reducing manual errors. This guide covers various methods and tools to efficiently import orders, including bulk uploads, migrations, and exports. With the right plugins and techniques, managing WooCommerce orders becomes a seamless part of your business workflow.

Looking to sell online?
Create your custom online store in minutes with 10Web AI Ecommerce Website Builder and take your business online.
FAQ
How to bulk upload orders in WooCommerce?
How do I migrate WooCommerce orders to a new site?
How do I download all orders from WooCommerce?
How do I export orders from WooCommerce to CSV?
Understanding WooCommerce import basics
Understanding how to import WooCommerce orders can be straightforward if you understand the correct tools and steps to use. This section will cover the primary methods available and the basic steps you’ll need to follow to import WooCommerce orders successfully.
How to import WooCommerce orders?
WooCommerce itself does not come with built-in import/export tools for orders, so you’ll need a third-party plugin. Some popular options include WP All Import and the Import Export Suite, which extend functionalities to handle orders specifically.
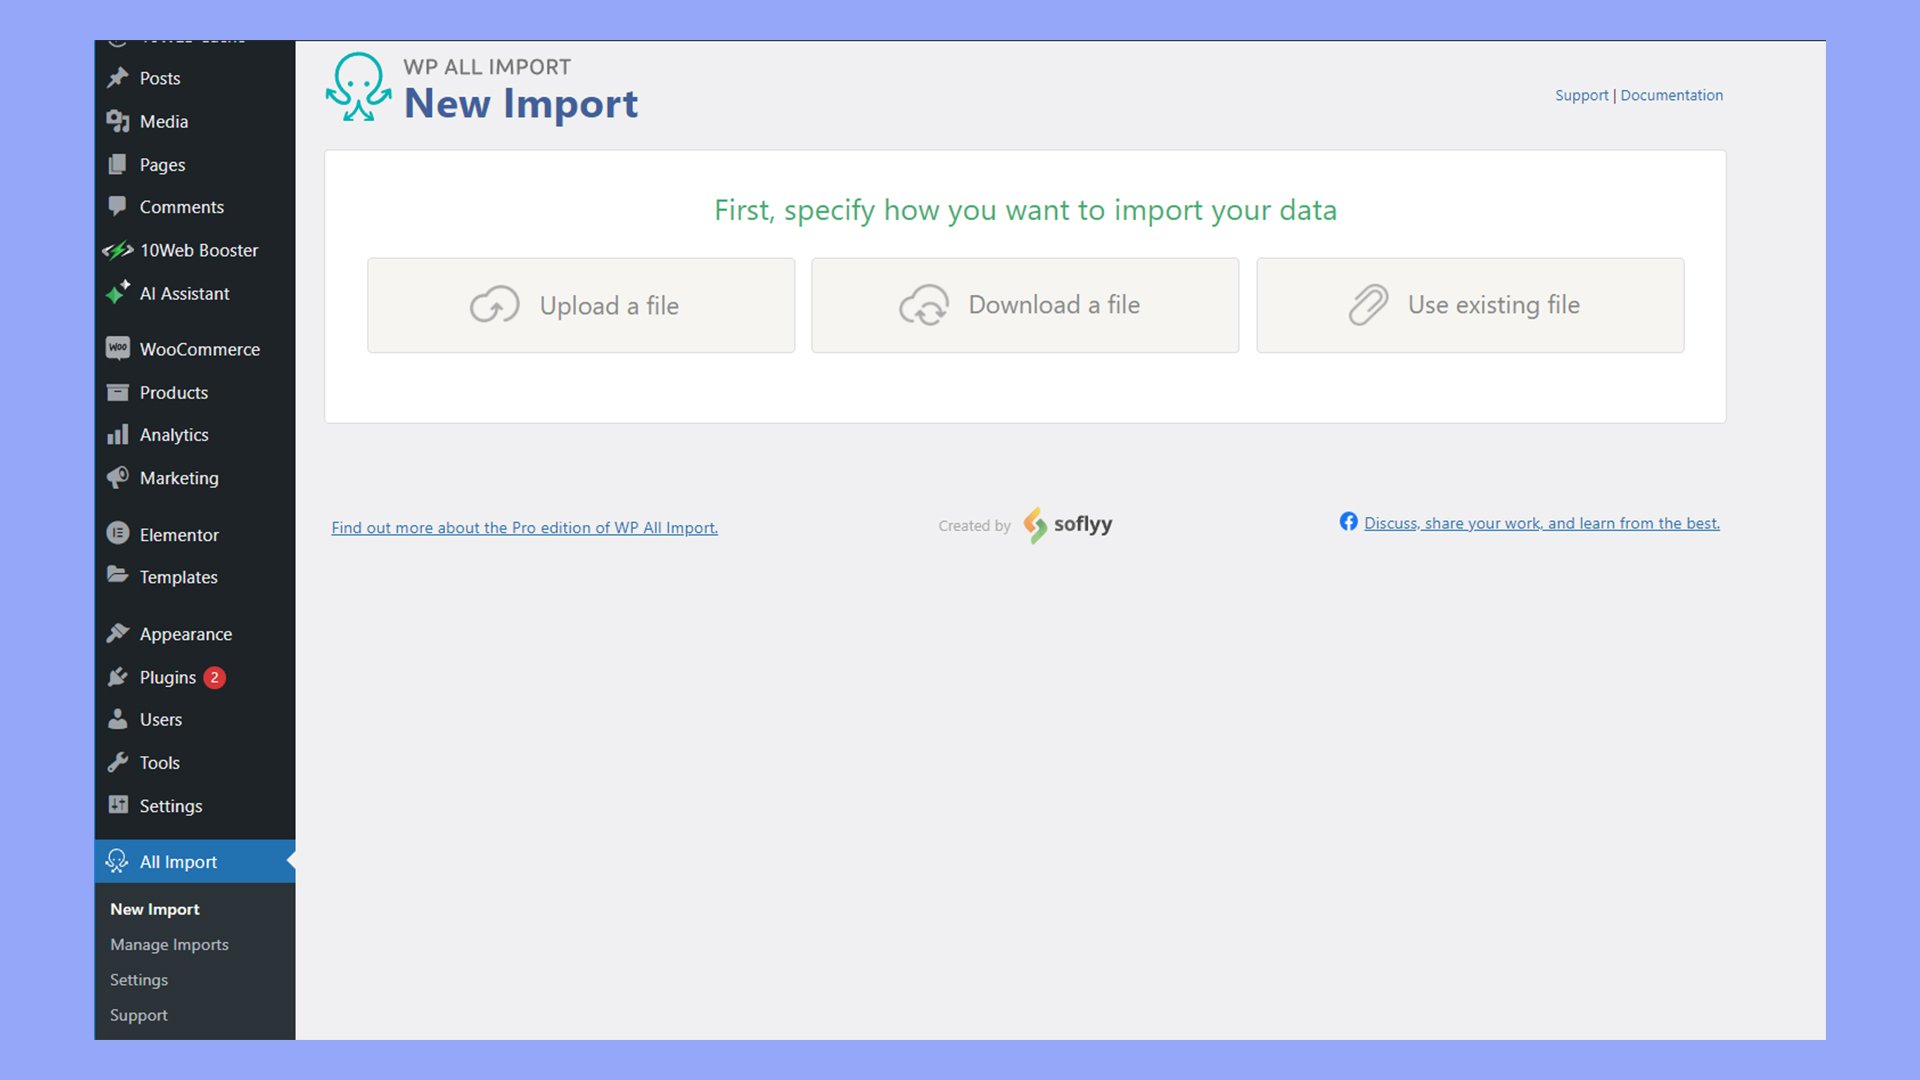
These plugins usually support importing data from CSV files. You can manually upload these files or fetch them from URLs like Dropbox or Google Drive. Each plugin has its unique interface but generally follows similar principles, enabling you to map data fields and configure import settings.
Basics of importing orders
To start importing orders, you need a properly formatted CSV file. The CSV should include all relevant order details like customer information, product details, quantities, prices, and order status.
- Prepare your CSV file: Ensure your CSV file is correctly formatted with appropriate headers matching WooCommerce order fields.
- Install a plugin: Depending on the plugin you choose, install it through your WordPress dashboard. WP All Import and WebToffee Import Export are reliable choices.
- Start a new import: Navigate to the import section in WooCommerce. For WebToffee Import Export, this can be found under WebToffee Import Export > Import.
- Upload the CSV file: You can either upload the file directly, fetch it from a URL, or use an existing file on your server.
- Map data fields: Match the columns in your CSV file to the appropriate WooCommerce order fields. This might include mapping customer names, product quantities, and prices.
- Configure import settings: Adjust any necessary import settings, such as handling duplicate orders or notifying customers.
- Run the import: Once all configurations are complete, initiate the import process. The plugin will process the data and import orders into WooCommerce.
Choosing the right import tool
Choosing the right tool to import WooCommerce orders can greatly impact how smoothly and efficiently the import process goes. Here are some key features and comparisons to help you decide.
Comparison of import plugins
When importing WooCommerce orders, you have several plugin options. WooCommerce Import Export Suite is a popular choice. It offers a straightforward interface and supports custom fields. WP All Import is another strong candidate, known for its drag-and-drop system that makes mapping data easy. Order Import Export for WooCommerce is an attractive option, as its order import feature is available with the plugin’s free version.
| Plugin | Key Features | Ease of Use |
| WooCommerce Import Export Suite | Supports custom fields, dates | Easy |
| WP All Import | Drag-and-drop mapping | User-friendly |
| Order Import Export for WooCommerce | Advanced options for multiple data types | Versatile |
Choose the one that matches your specific needs and comfort level.
Advanced order import features
Advanced import plugins can offer features like multiple import options and automation. Some plugins, like WP All Import, allow you to arrange orders using drag-and-drop, making it straightforward to map CSV data. Another great option is Order Import Export for WooCommerce, which supports custom fields and intricate data.
Key features:
- Multiple import options: Select from quick, pre-saved, or advanced methods.
- Custom fields: Allows detailed customization of orders.
- User-friendly interface: Simplifies mapping and importing data.
Looking to sell online?
Create your custom online store in minutes with 10Web AI Ecommerce Website Builder and take your business online.
How to use a plugin to import WooCommerce orders
WebToffee’s Order Import Export for WooCommerce is a versatile tool for importing WooCommerce orders from a CSV file. This guide walks you through the import process, addresses possible complications, and explores advanced import options.
Step 1: Install the plugin
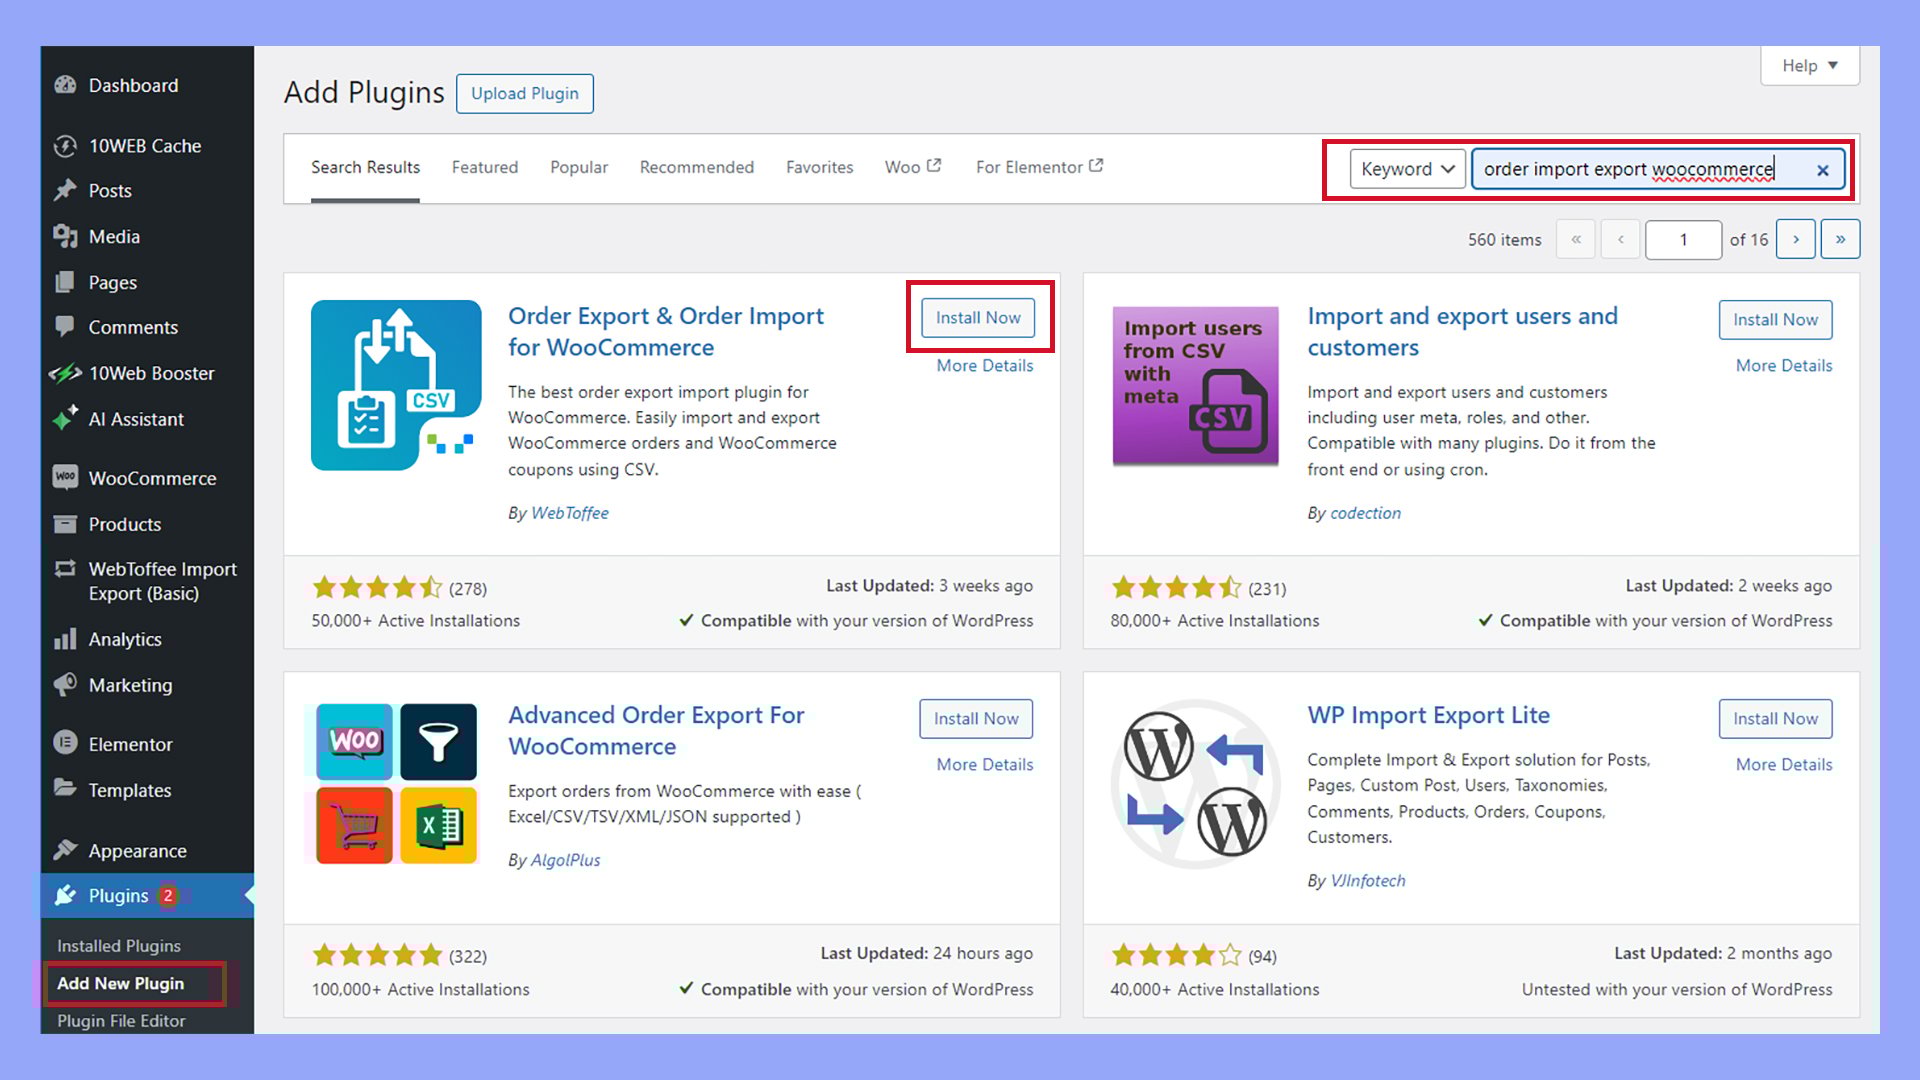
- Go to Plugins > Add New in your WordPress dashboard.
- Search for Order Import Export for WooCommerce.

- Click Install Now and then Activate.
Step 2: Prepare your import file
Ensure your import file is formatted correctly. You can download a sample CSV file from the plugin’s settings for reference.
Include all necessary fields, such as order ID, customer details, product details, and order status.
Alternatively, you can export the orders using the plugin and then upload the exported file to import the WooCommerce orders.
- Navigate to WebToffee Import Export > Export.
- Select Order, then click Step 2: Select an Export method.
- Select Quick export or Advanced export, then click Export or Step 3: Filter data.
- Click Download file.

Step 3: Import orders
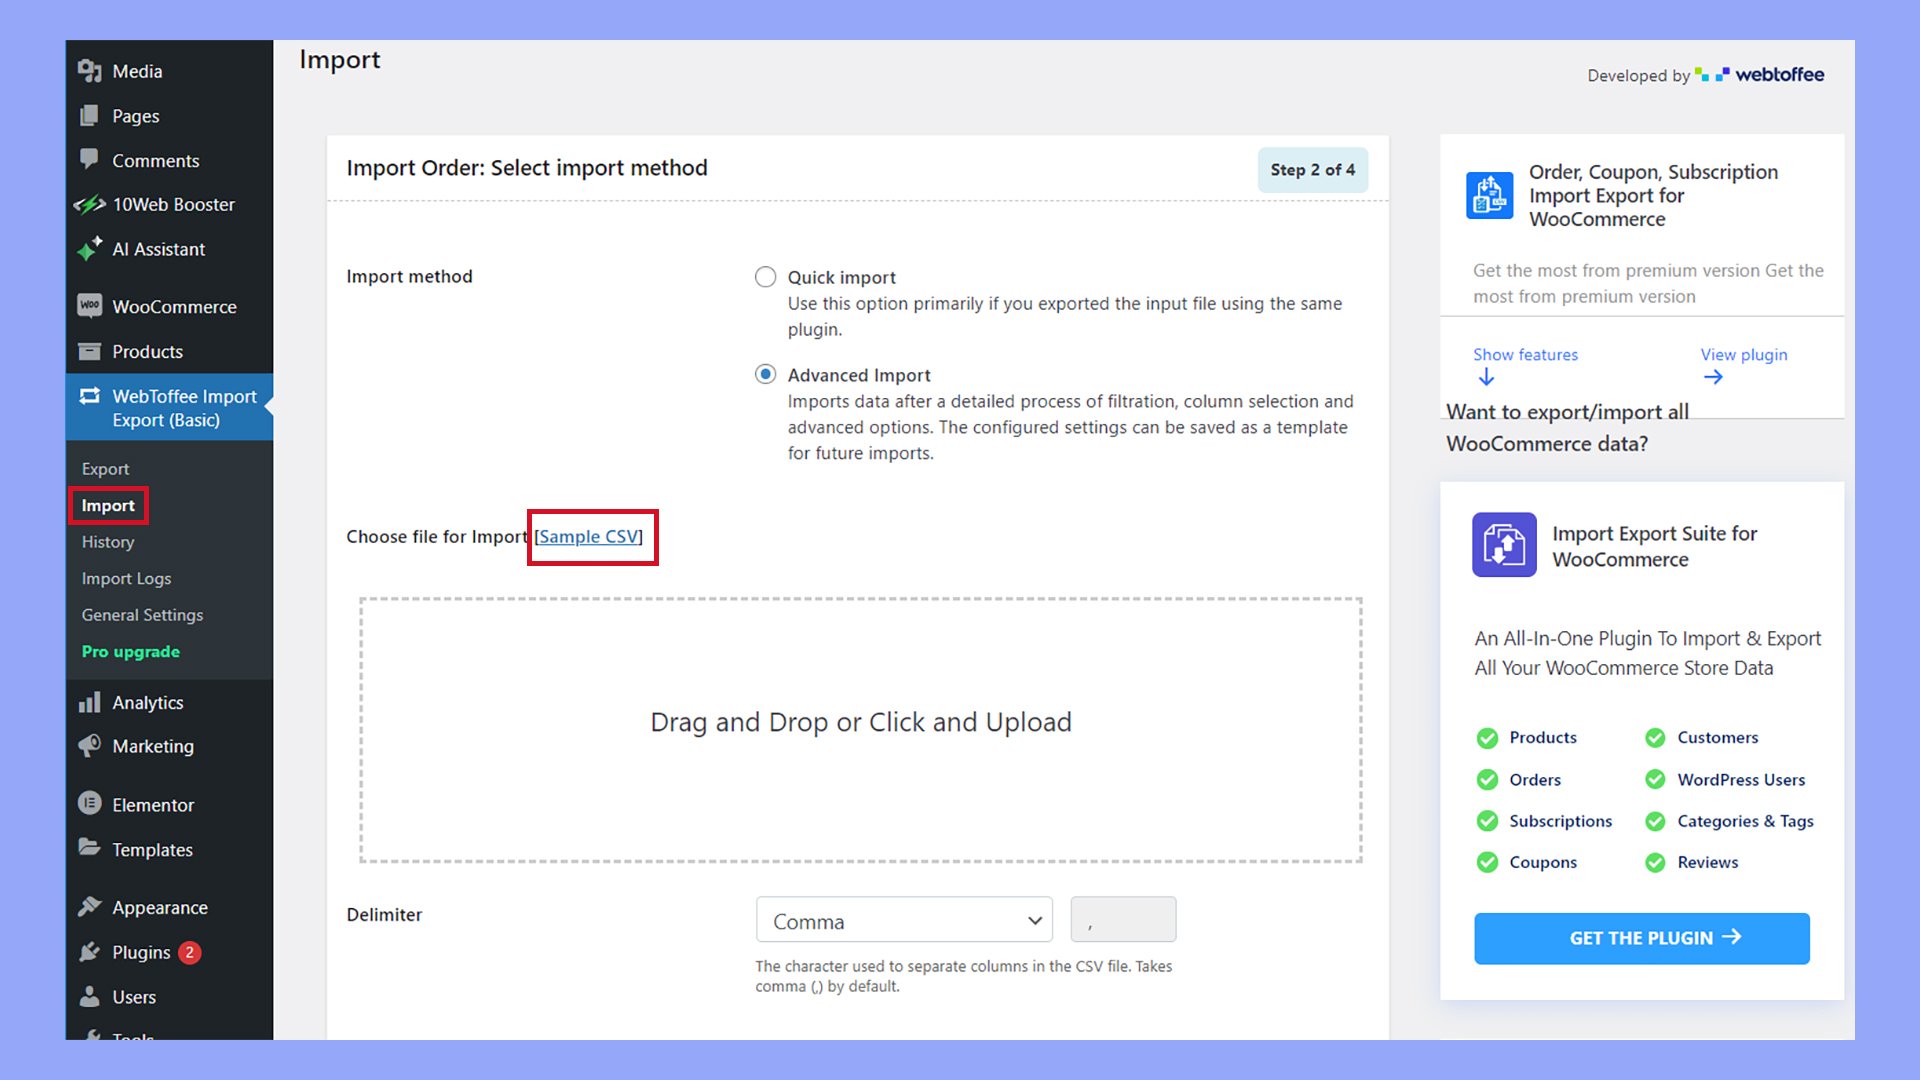
- Navigate to WebToffee Import Export > Import.
- Select Order, then click Step 2: Select import method.
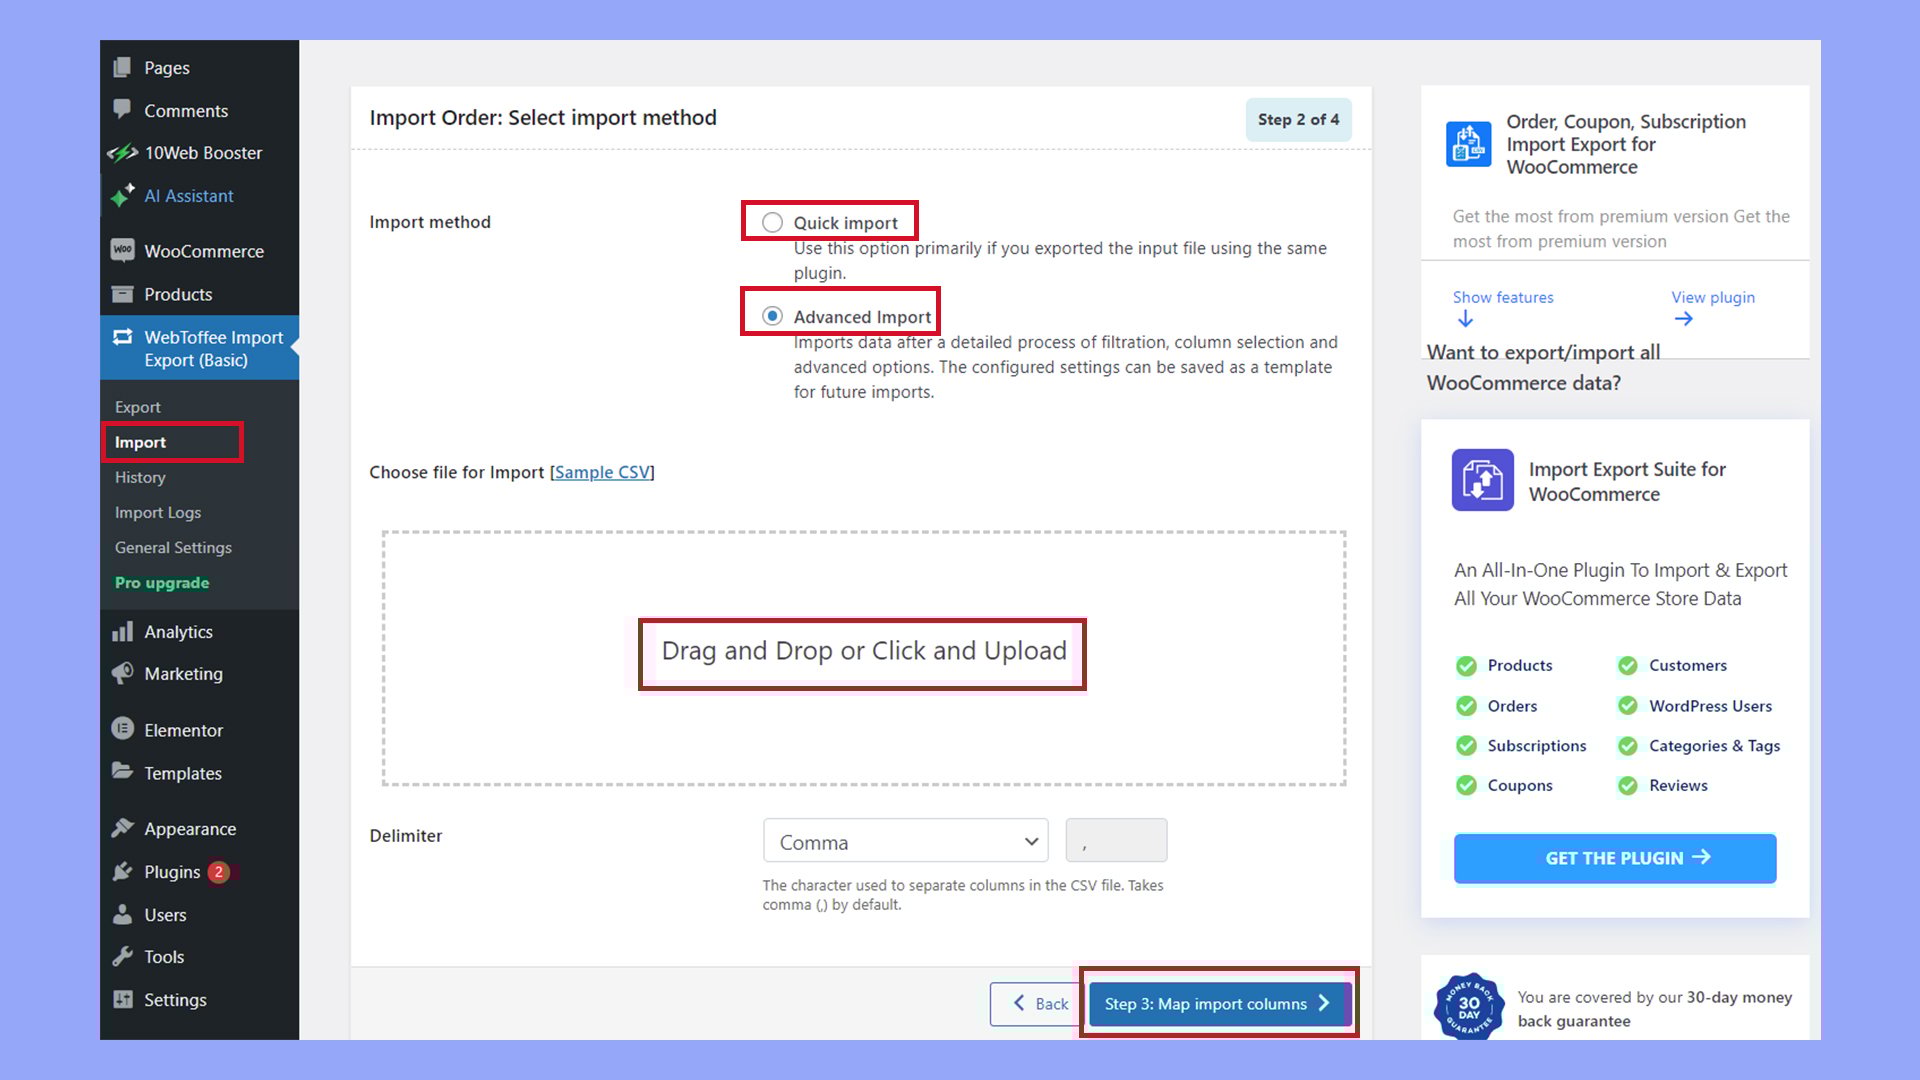
- Select Quick import or Advanced import.
- Drag and drop the import file, or click to select the file.
- Click Import or Step 3: Map import columns.
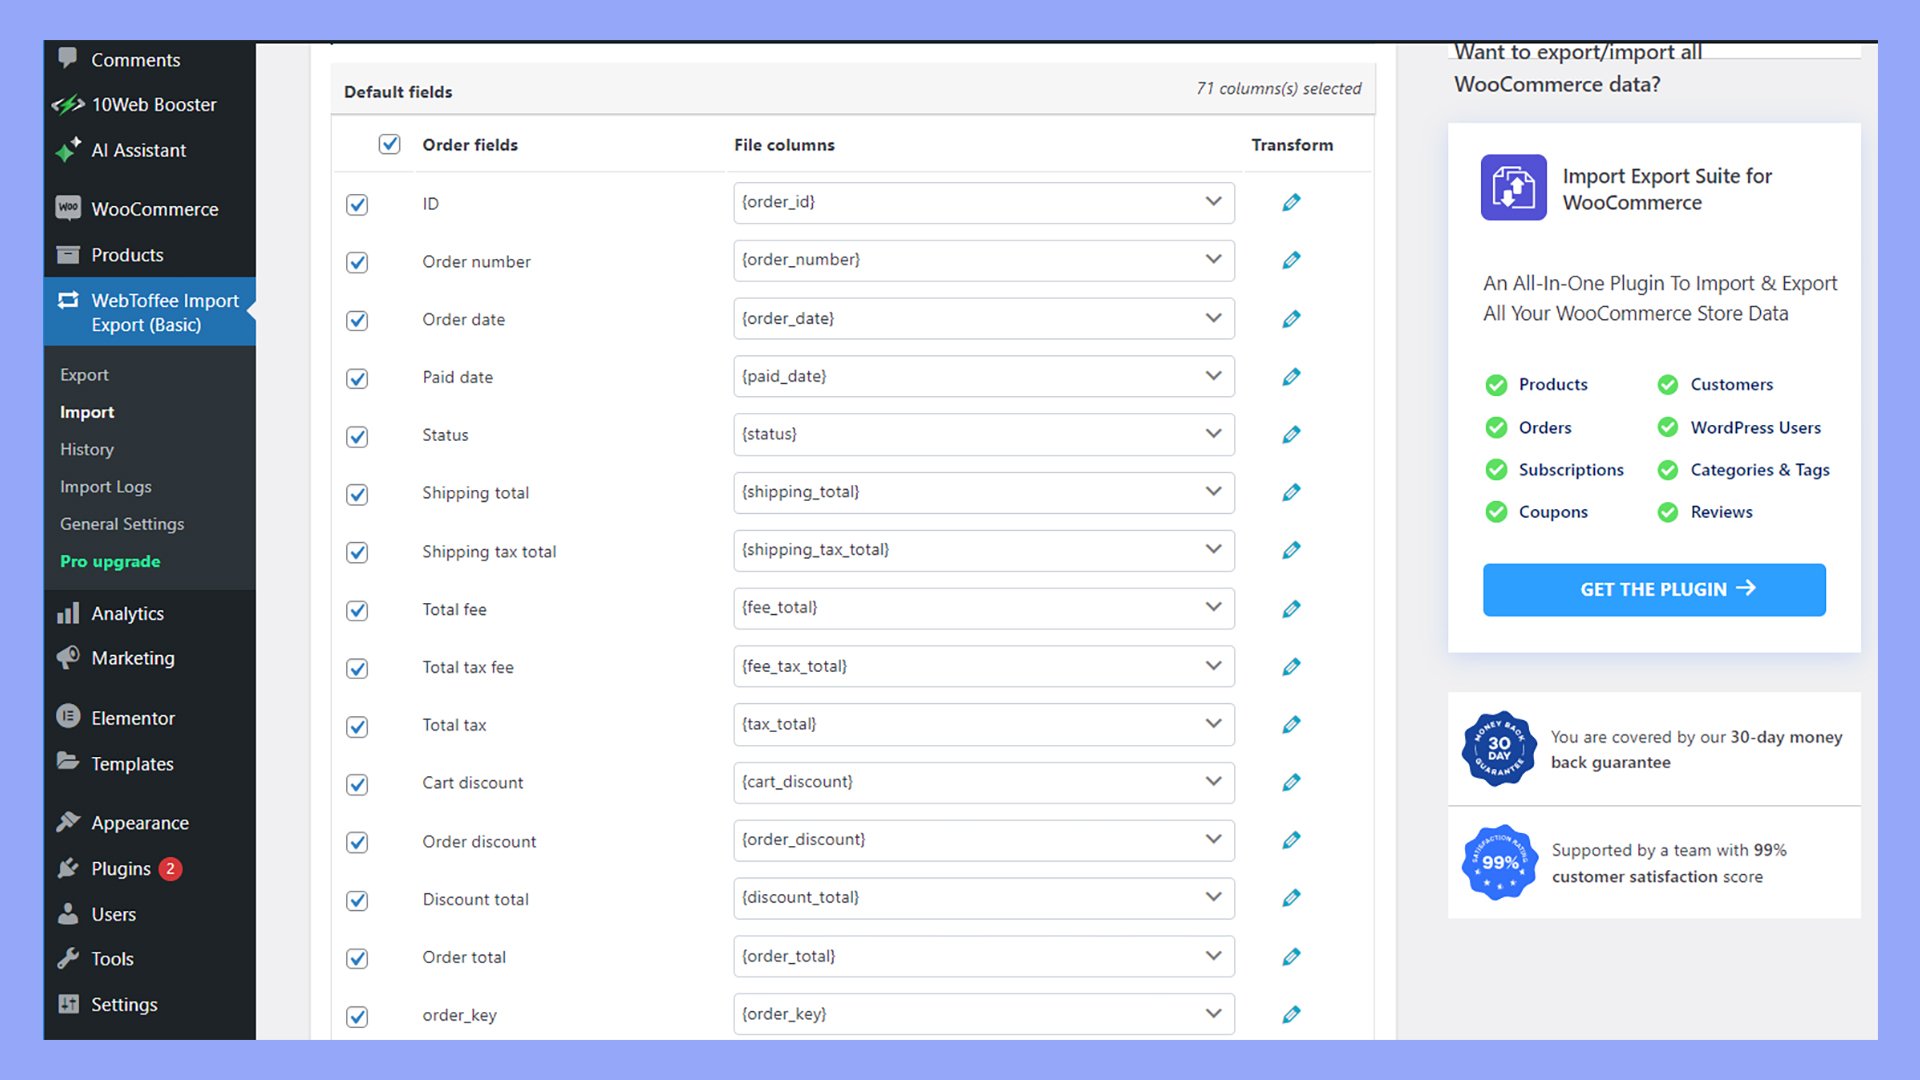
Step 4: Map fields
- After uploading, you will be prompted to map the fields from your CSV file to WooCommerce order fields.
- Match each column from your CSV file to the appropriate WooCommerce order field.
- Click Step 4: Advanced options/Batch import.
Step 5: Import settings
- Configure any additional settings, such as whether to skip existing orders or update them.
- Click Import to start the import process.
Step 6: Review and confirm
- Review the import summary to ensure all orders are correctly imported.
- Click View Orders or View log to see the imported orders.
Post-import practices
After you import WooCommerce orders, there are important steps you should take to ensure everything is running smoothly. These steps include reviewing the imported orders and updating the order status as needed.
Reviewing imported orders
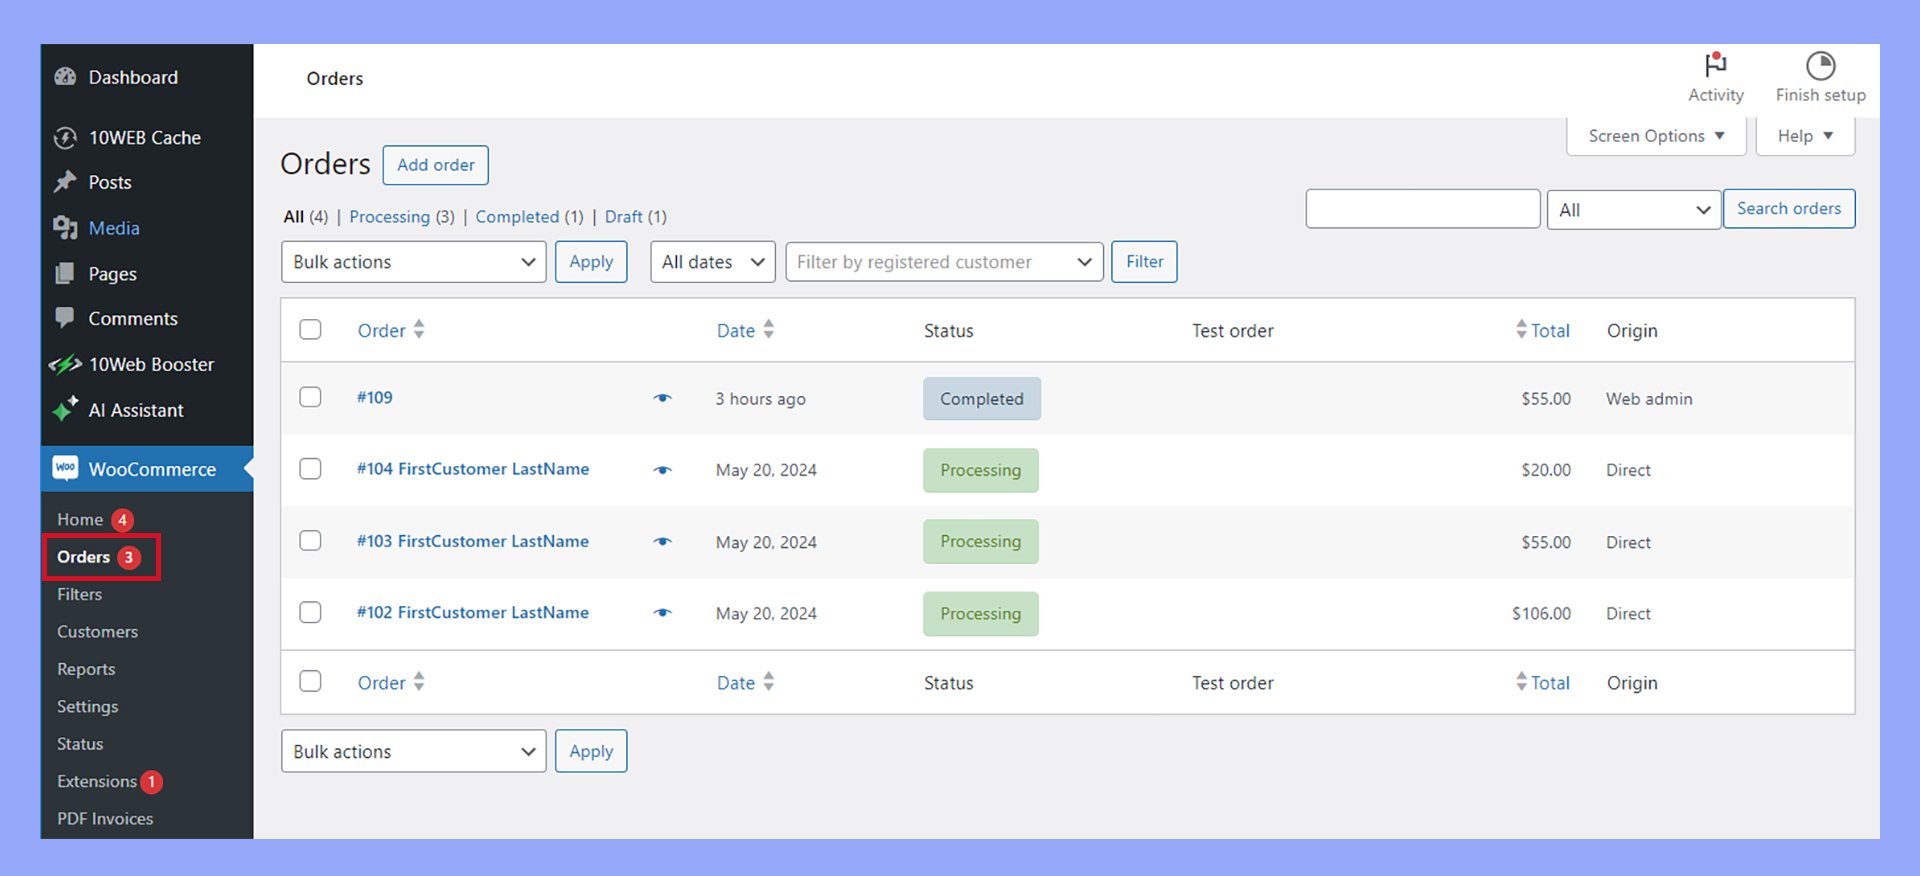
After you import WooCommerce orders, it’s important to review them to ensure everything is transferred correctly.
- Navigate to your orders: Go to WooCommerce > Orders to see your imported orders.

- Check order details: Look at the customer name, products, quantities, and addresses to ensure accuracy. Confirm that all information is complete and correct.
- Verify payment and shipping: Ensure payment methods and shipping details are accurate. Errors in these areas can lead to issues with order fulfillment.
- Spot-check for errors: Randomly select multiple orders to see if there were any errors during the import process. Fix any discrepancies you find.
Updating order status
Updating the order status is crucial to keep your business operations smooth and keep customers informed.
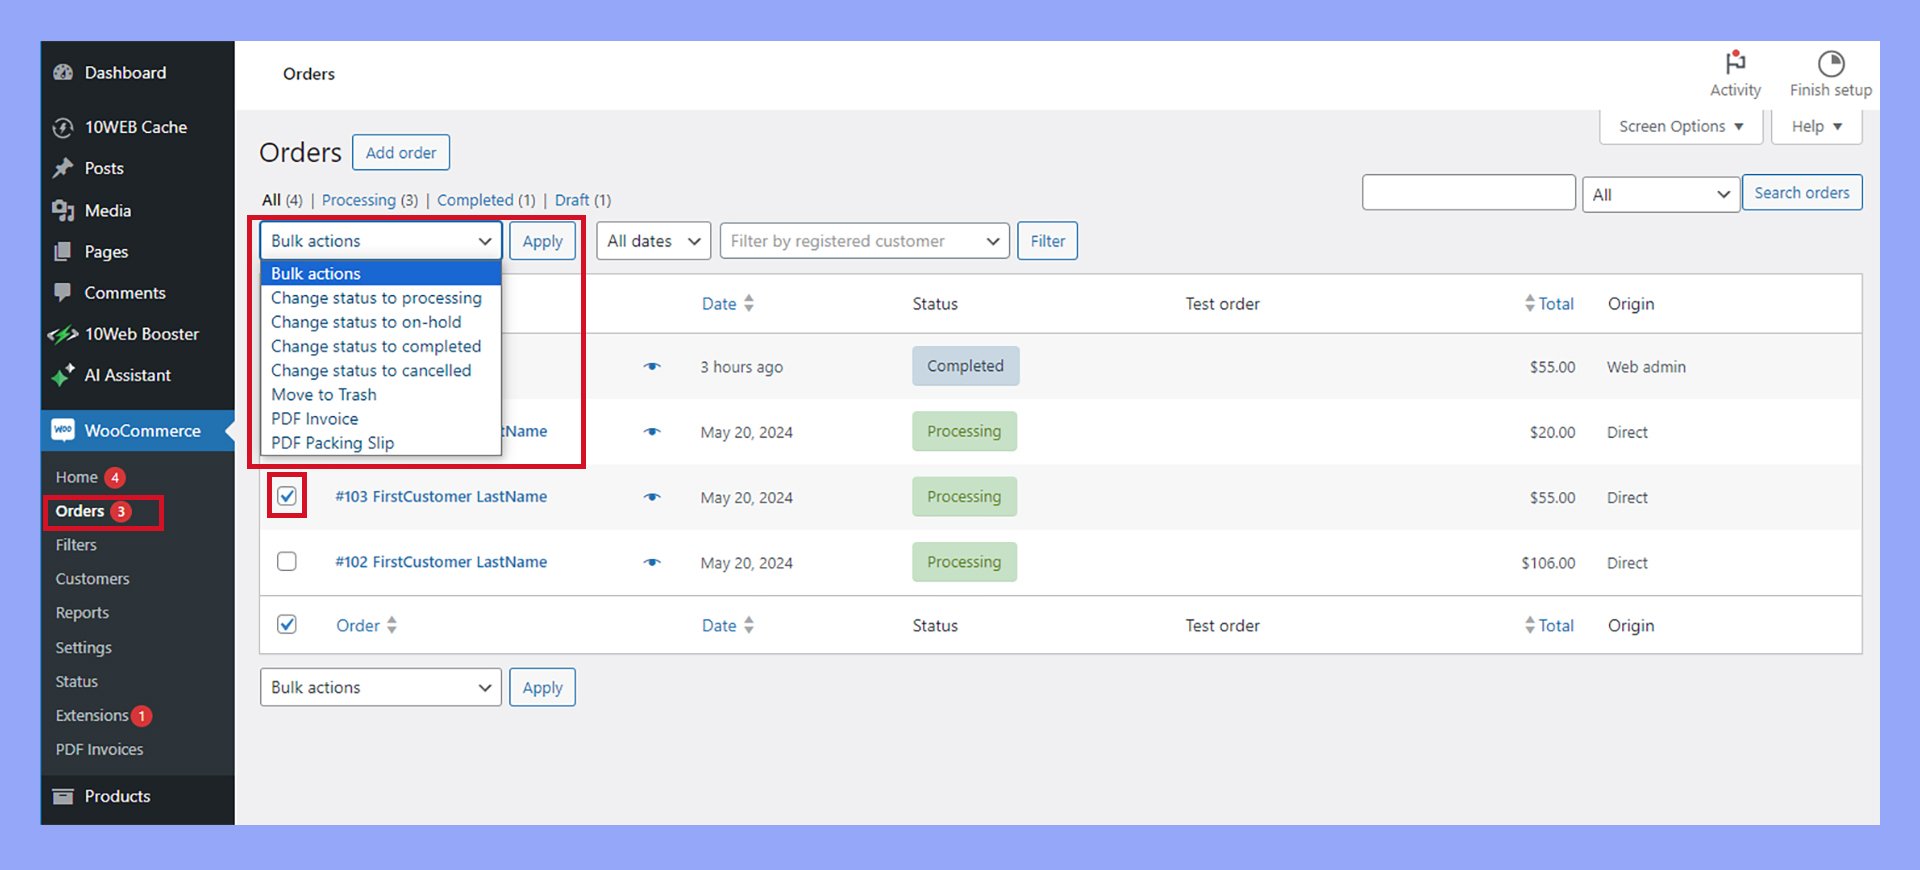
- Access order list: Go to WooCommerce > Orders.
- Select orders to update: Click on an order number to open its details.
- Change order status: Use the Order status dropdown to update the status. Common statuses include “Processing,” “On hold,” and “Completed.”

- Notify customers: Ensure the Notify customer option is checked to send an email update. Communication keeps customers in the loop about their order status.
Common challenges and solutions
When importing WooCommerce orders, you may face several challenges. This section will explore how to address import errors and use filters to solve problems effectively.
Addressing import errors
Sometimes, you may encounter errors during the import process. These can arise due to incorrect CSV file formatting, missing data, or mismatched fields between your CSV and WooCommerce store.
First, ensure that your CSV file’s format matches WooCommerce requirements. Each column should have a proper header and data corresponding to WooCommerce fields. Columns like order ID, customer details, product information, and prices should be correctly mapped.
Second, check for any missing or incomplete data. Missing customer information or product details can cause errors, so review and complete any necessary information using a CSV editor.
Finally, use WooCommerce’s built-in error reporting to identify and resolve issues. Go to WooCommerce > Orders and view error logs. Support from WooCommerce documentation or forums can also be useful in resolving particular import issues.
Using filters for problem-solving
Filters can help narrow down specific issues when importing orders. They allow you to include or exclude certain data, enabling a cleaner import process.
Begin by creating a new export file. You can filter orders by date range, status, or customer details, which helps you import relevant data without clutter.
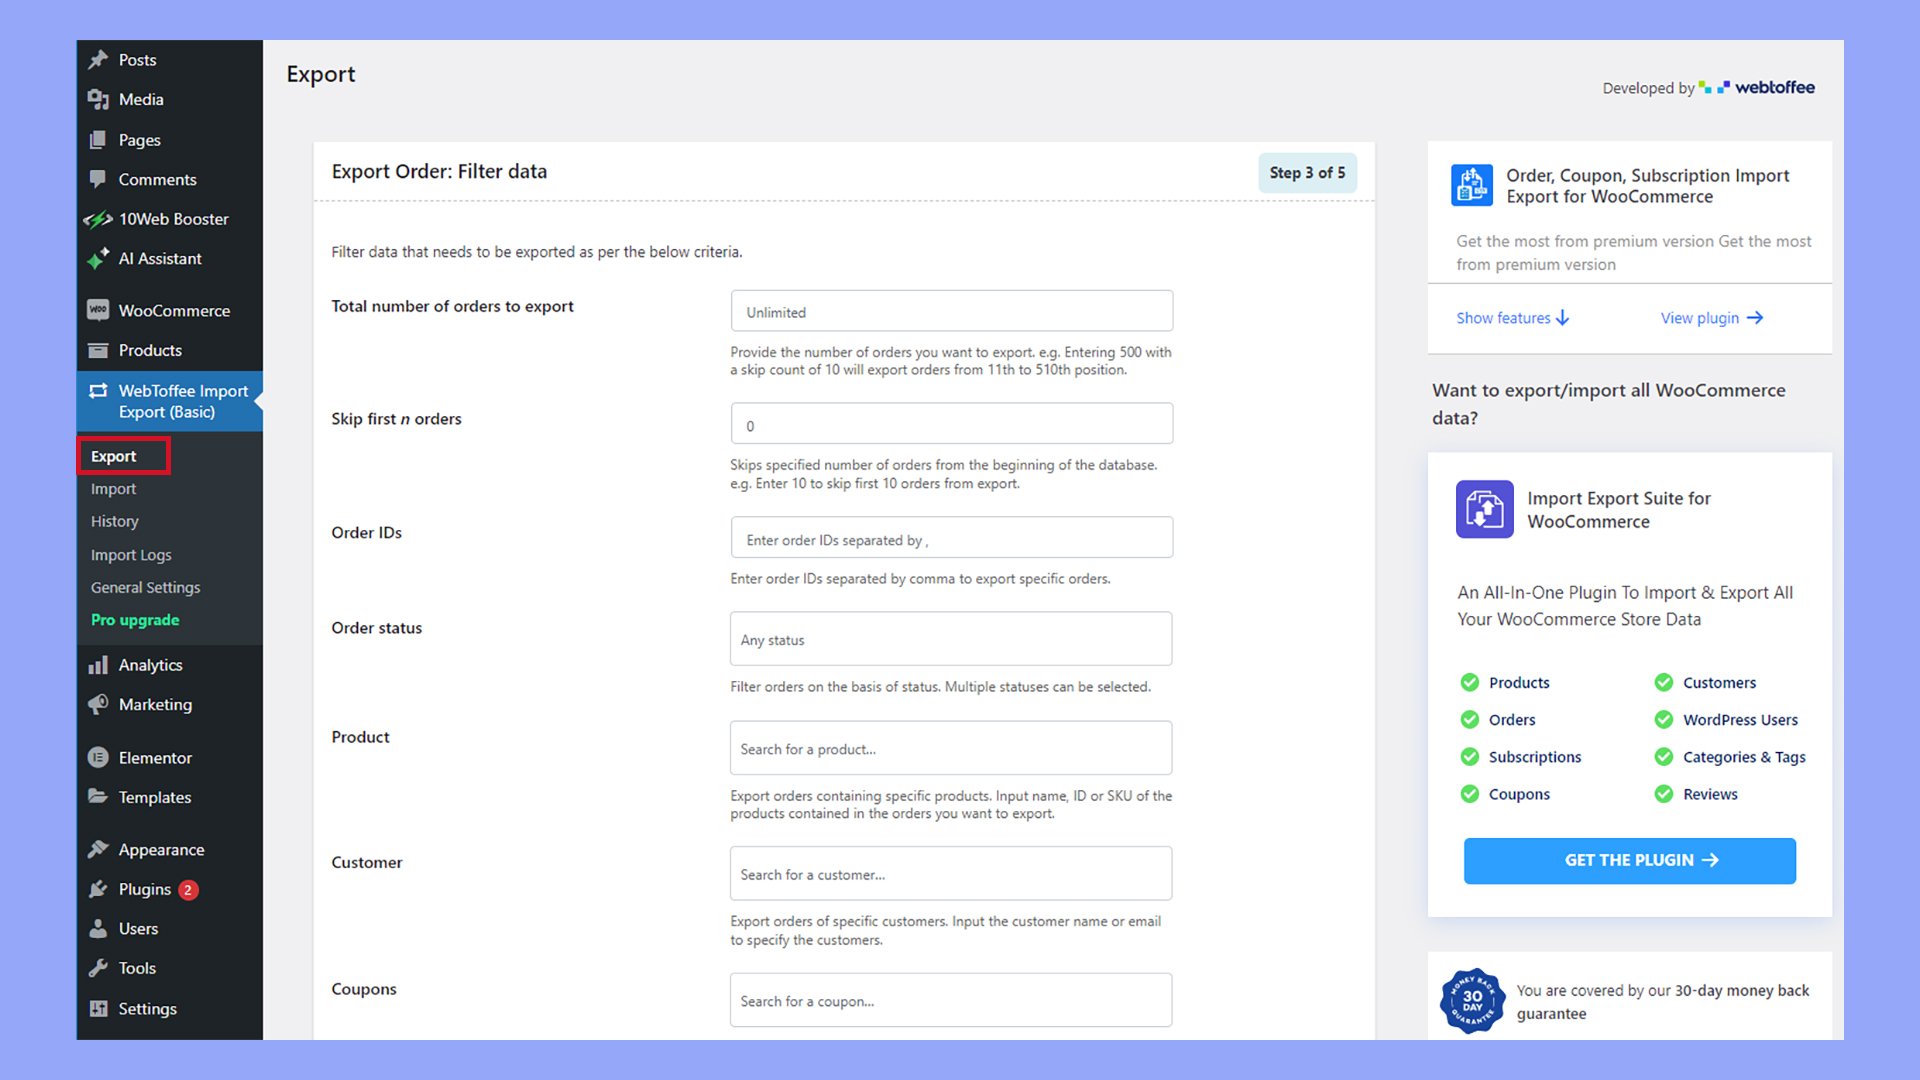
- Navigate to WebToffee Import Export > Export.
- Select Orders and click Step 2: Select an export method.
- Select Advanced export, then click Step 3: Filter data.
- Use the filters to include or exclude specific data or orders, then click Step 4: Map and reorder export columns.
- Make sure all columns and column names are mapped correctly, then click Step 5: Advanced options/Batch export.
- Select the advanced export options, then click Export.
Another useful strategy is filtering data within your CSV before import. Use a CSV editor to filter out unwanted orders or refine data fields.
For example, you can exclude orders that have already been completed or filter by specific product categories.
These filters ensure a more organized import process and reduce the chances of encountering errors.
Conclusion
Deciding how to import WooCommerce orders is essential for maintaining a smooth and efficient ecommerce operation. Whether you’re bulk uploading, migrating to a new site, or exporting order data, using the right tools and following best practices will ensure accuracy and save valuable time.
Embrace these techniques to enhance your WooCommerce store’s functionality and customer satisfaction.
Looking to sell online?
Create your online store in minutes
Create your online store in minutes with 10Web AI Ecommerce Website Builder.