Generating invoices in WooCommerce is a crucial task for managing transactions and maintaining professional records. This step-by-step guide on how to generate an invoice in WooCommerce will walk you through the process, ensuring accuracy and efficiency. Whether you’re a beginner or an experienced user, this guide covers everything you need to know for seamless invoice generation.
FAQ
Does WooCommerce issue invoices?
How to generate an e-invoice in WooCommerce?
- Go to your WordPress dashboard, navigate to Plugins > Add New, and search for a plugin like WooCommerce PDF Invoices & Packing Slips. Install and activate the
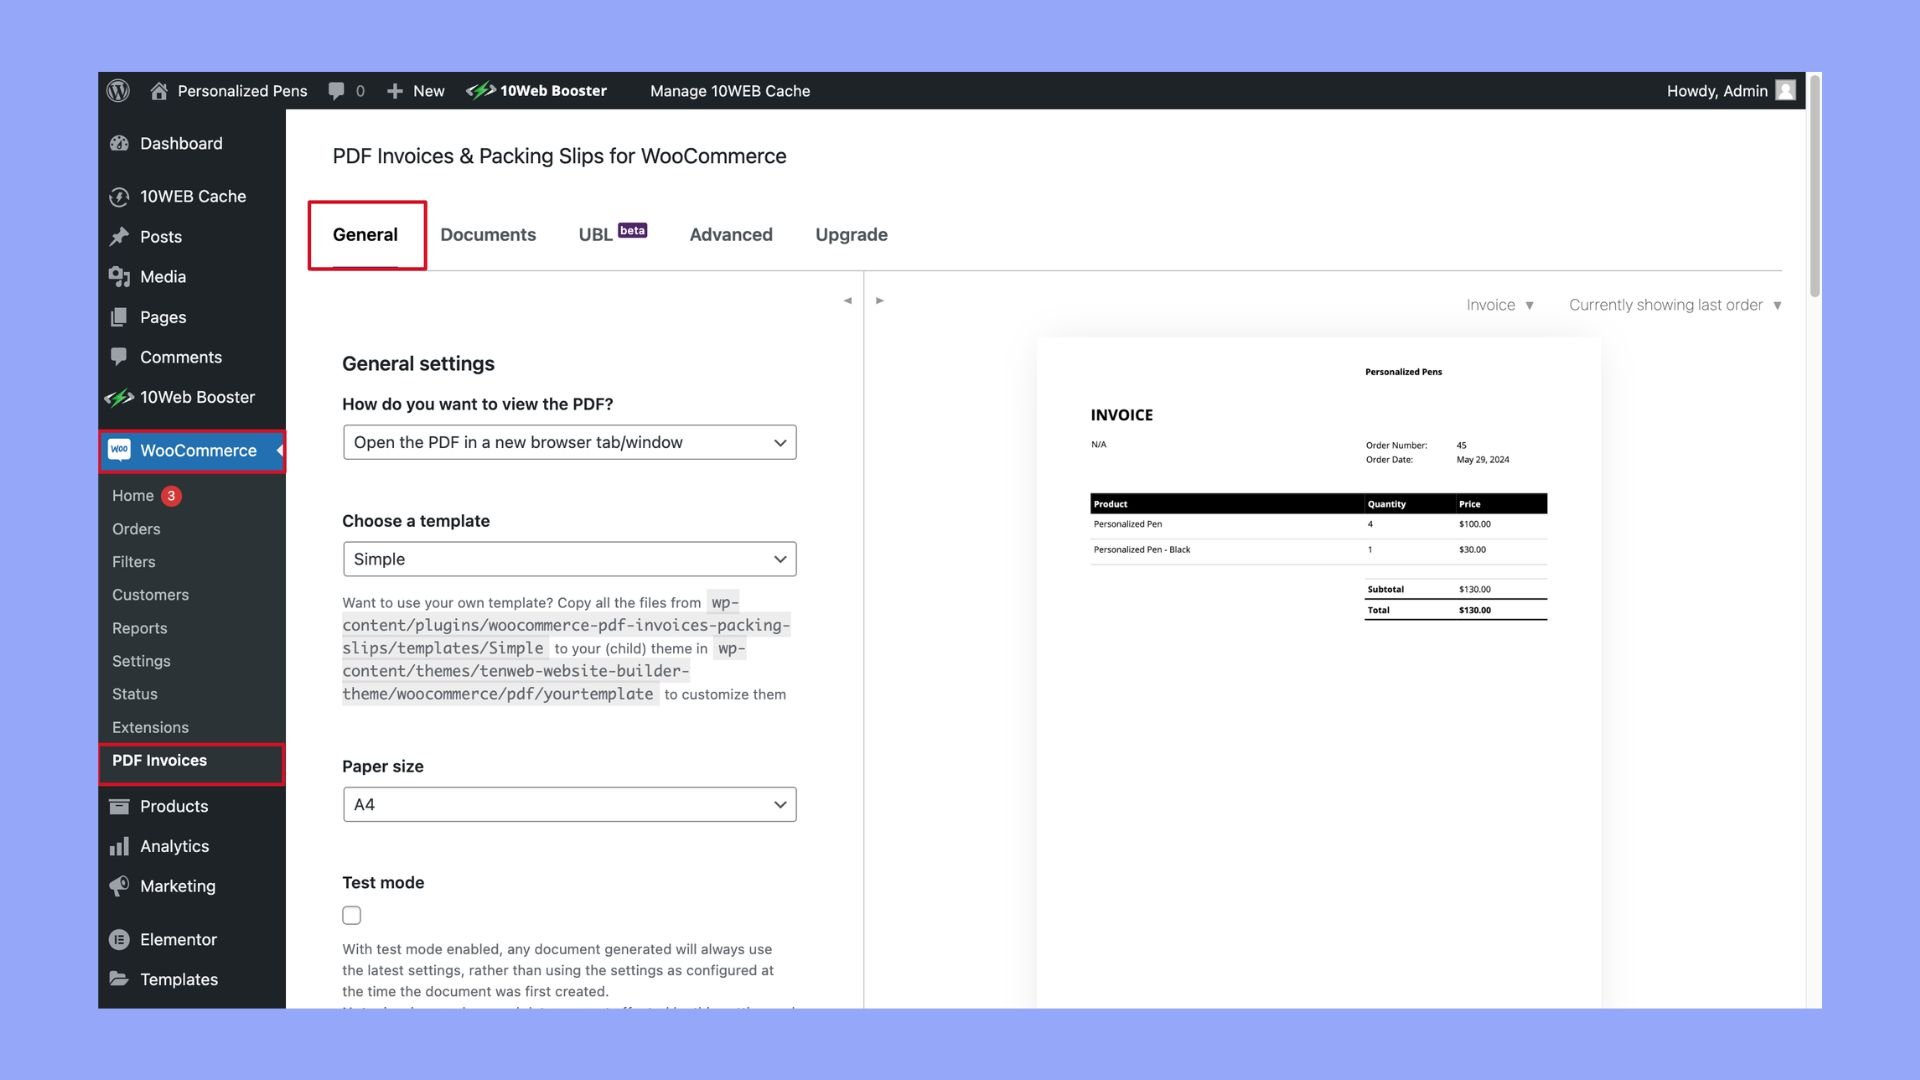
- Go to WooCommerce > PDF Invoices to configure the settings according to your preferences. Customize the invoice template, set up email options, and more.
- Once configured, the plugin will automatically generate and attach PDF invoices to order confirmation emails sent to customers. You can also manually generate invoices from the order details page.
How to generate an invoice in WordPress?
- Go to Plugins > Add New in your WordPress dashboard, search for an invoice plugin, install, and activate it.
- Navigate to the plugin’s settings to customize your invoice template, add your business information, and set payment options.
- Use the plugin’s interface to create a new invoice, enter client details, add items or services, and send the invoice directly from your WordPress site.
How to customize an invoice in WooCommerce?
- Use a plugin like WooCommerce PDF Invoices & Packing Slips which allows for customization. Go to Plugins > Add New, search for the plugin, install, and activate it.
- Navigate to WooCommerce > PDF Invoices > Template.
- Use the available options to customize the layout, colors, fonts, and content of your invoice. Some plugins also allow you to add custom fields or use your own HTML/CSS.
- Save your customized template. The new design will be applied to all future invoices generated by WooCommerce.
Create your custom online store in minutes with 10Web AI Ecommerce Website Builder and take your business online. 
Looking to sell online?
Understanding invoicing in ecommerce
In the world of ecommerce, invoicing serves as an essential record-keeping tool that documents the sale of goods or services. As an online store owner, you’re responsible for generating invoices that provide a detailed account of the transaction for both you and your customers.
An invoice typically includes:
- Order number: A unique identifier for the transaction.
- Order date: The date when the transaction took place.
- Customer name: The identity of the purchaser.
- Billing and shipping addresses: Where the order was billed to and where it will be sent.
- Item description: Details of the product or service purchased.
- Quantity and price: The number of items sold and their individual cost.
- Total amount: The overall price, including taxes and shipping, that the customer needs to pay.
Ensuring accurate invoicing is crucial as it reflects your professionalism and helps in tracking your financial flow. It also safeguards your business by providing legal protection and facilitating easy tax filing. By understanding and utilizing these invoice elements within WooCommerce, you can streamline your billing process and enhance customer satisfaction.
Benefits of sending invoices
When managing an online store with WooCommerce, ensuring that your customers receive invoices is not just a courtesy but a critical element of your business. Invoices serve as legal proof of purchase and facilitate better customer experience. Be providing invoices, your ecommerce store benefits in numerous ways, here are some of them:
Legal compliance
Invoices are legally binding documents that formalize a transaction. They provide crucial details like the date of sale, invoice number, and the items purchased. This transparency isn’t merely good practice—it’s often a legal requirement for tax and audit purposes. Governments and tax authorities require businesses to issue invoices for sales to ensure proper recording of taxable income and expenses. Proper invoicing helps in:
- Maintaining accurate financial records.
- Aiding in compliance with tax laws.
- Protecting both the seller and buyer in the event of a dispute.
Moreover, in many jurisdictions, businesses must retain copies of all invoices for several years, underscoring the importance of correct and detailed invoicing for legal compliance.
Professional branding
Your WooCommerce invoice can carry your company logo and branding elements. This not only bolsters brand recognition but also enhances professionalism. Customers often expect this level of detail and associate it with trustworthiness and reliability. A well-designed invoice:
- Reinforces your brand identity.
- Makes a positive impression on customers.
- Reflects your attention to detail and commitment to a professional business approach.
Consistent use of branding across all customer touchpoints, including invoices, helps build a cohesive brand image and increases customer loyalty and repeat business.
Improved customer experience
Sending a WooCommerce invoice immediately after purchase confirms a successful transaction, adding to a positive customer experience. These receipts allow customers to:
- Track their spending
- Submit expense claims
- Resolve any potential disputes regarding their purchases
Prompt and accurate invoicing reassures customers that their order has been processed correctly and efficiently. Detailed invoices can also serve as a useful reference for customers, enabling them to review their purchase history, check item details, and verify pricing. By providing this clarity and convenience, you enhance overall customer satisfaction and trust in your business.
Bookkeeping accuracy
For both you and your customers, invoices facilitate accurate record-keeping. By detailing transactions, they make tracking revenue and expenses much more manageable, which streamlines financial reporting and tax filings. Invoices provide a systematic way to document sales, ensuring that all income is accounted for. This precision is essential for:
- Preparing financial statements
- Budgeting
- Conducting audits
For customers, having detailed invoices helps them manage their personal or business finances more effectively, keeping track of their purchases and ensuring they have the necessary documentation for expense reports or warranty claims. In sum, accurate invoicing is a cornerstone of sound financial management for any business.
By integrating invoices into your transaction process, you’re not only following best practices but also improving the overall perception of your business.
How to generate an invoice in WooCommerce
Generating an invoice in WooCommerce is a straightforward process after you download an invoice plugin. By following these steps, you can ensure that your customers receive detailed and accurate billing information for their purchases.
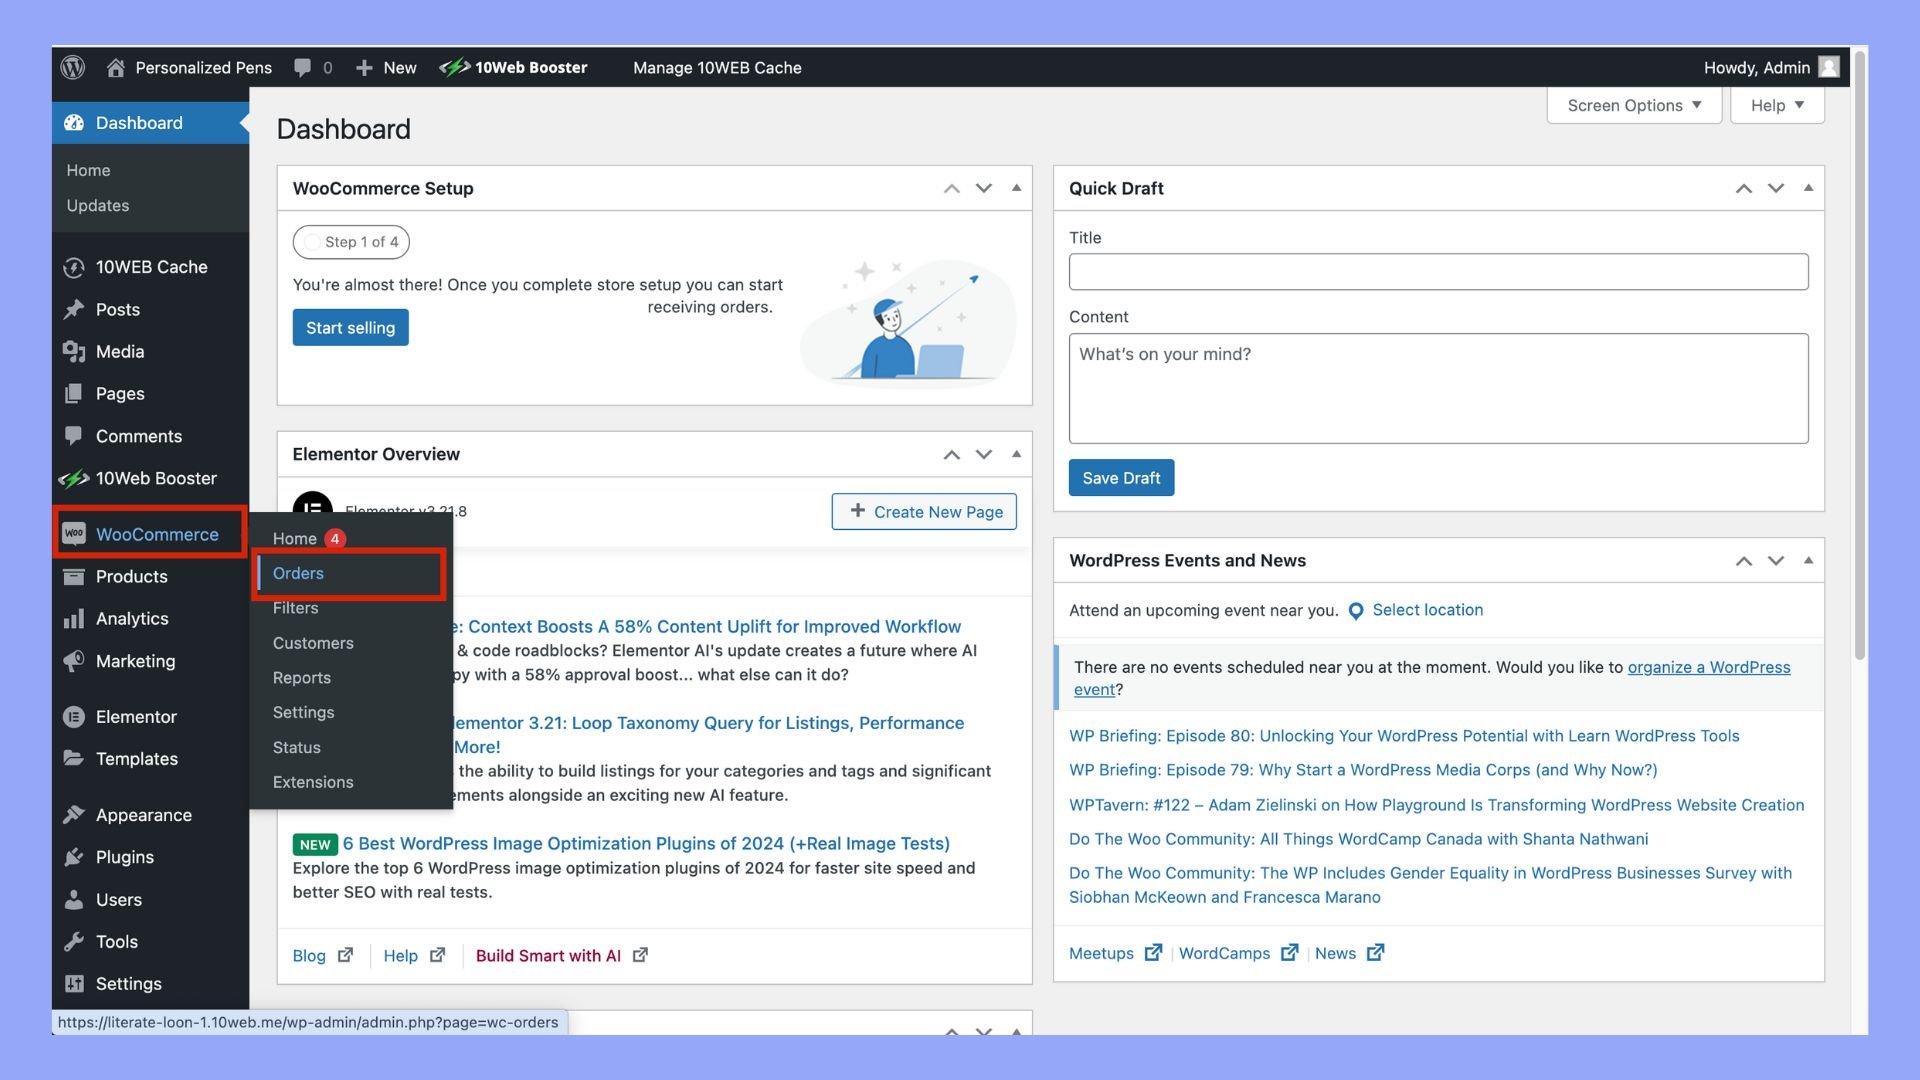
- Navigate to WooCommerce: Log in to your WordPress dashboard and click on WooCommerce on the left-hand menu.
- Go to orders: Find the Orders link in the WooCommerce menu and click on it. This will bring up a list of recent orders.

- Select order: Click on the order for which you want to generate an invoice.
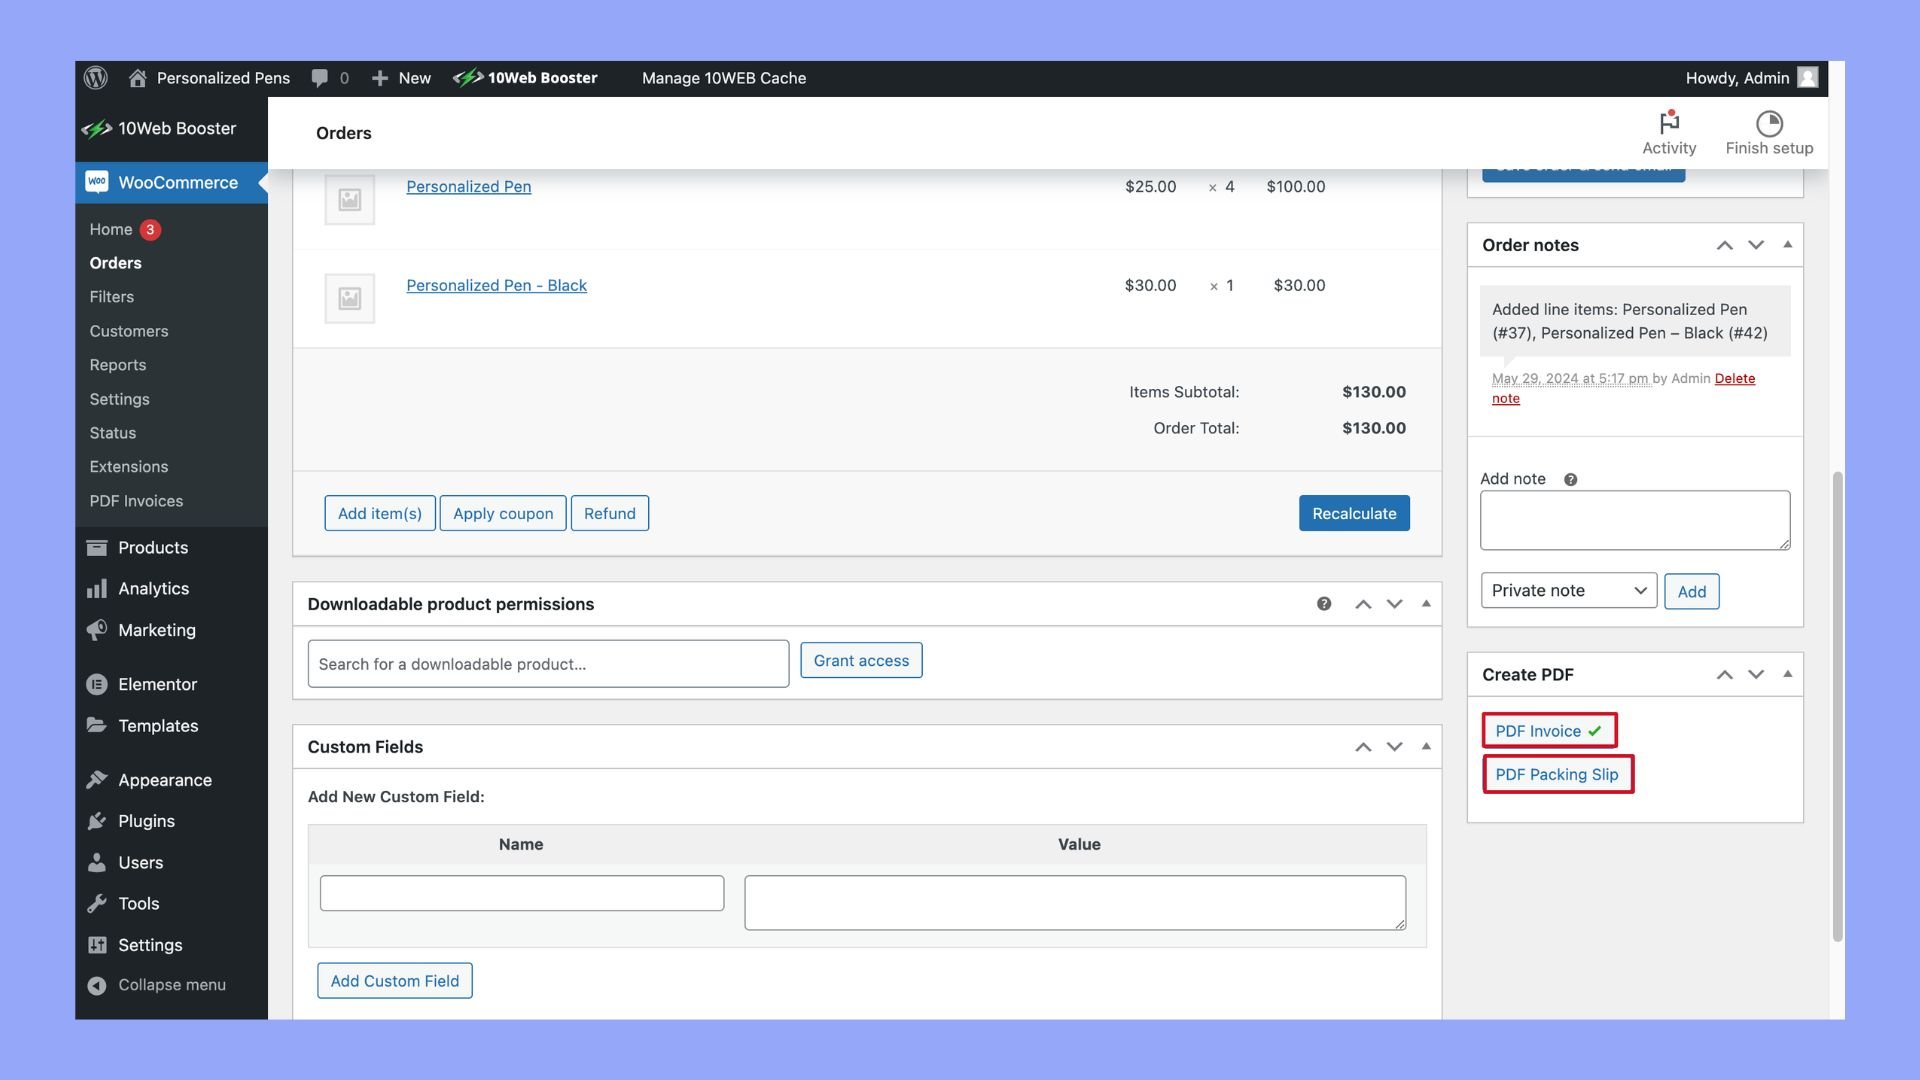
- Invoice actions: Within the order details, you should see an option for PDF Invoice or Print Invoice. Click on this button.
- Download or send: Depending on your setup, WooCommerce may generate a PDF invoice which you can then download or send directly to the customer via email.
Customizing your invoice templates
Personalizing the invoices with your company’s branding can leave a lasting impression on your customers.
- Access invoice settings: Within the WooCommerce menu, look for an option such as Settings or Invoice Settings, and select it.
- Choose a template: Pick one of the available invoice templates that best fits your brand.
- Customize template: Modify the template to your liking. Here are some elements you may want to customize:
- Add your company logo for a professional touch.
- Adjust the font and colors to match your company’s branding.
- Include custom fields if you need to add additional information such as tax numbers or a special message.
- Edit the footer to include important company information or policies.
- Preview invoice: Before saving your changes, preview the invoice to see how it will appear to your customers.
- Save changes: Once you’re satisfied with your customized invoice, make sure to save your changes.
Remember, a well-crafted invoice not only ensures clear communication regarding payment but also enhances your brand’s credibility.
Looking to sell online?
Create your custom online store in minutes with 10Web AI Ecommerce Website Builder and take your business online.
Invoice distribution strategies
Managing the distribution of invoices is crucial for the efficiency and professionalism of your WooCommerce store. Let’s look at how you can send invoices to customers and customize their design for better brand alignment.
How to send invoices to customers
Once an order is placed, you might want to ensure that your customers receive their invoices promptly. Here are the steps to send invoices via email:
- Finalize the order in your WooCommerce dashboard by going to WooCommerce > Orders.
- Click on the order you wish to send an invoice for to view the order details.
- Locate the Order actions meta box which often resides on the top right of the screen.
- Select Send invoice/order details to customer from the dropdown menu.
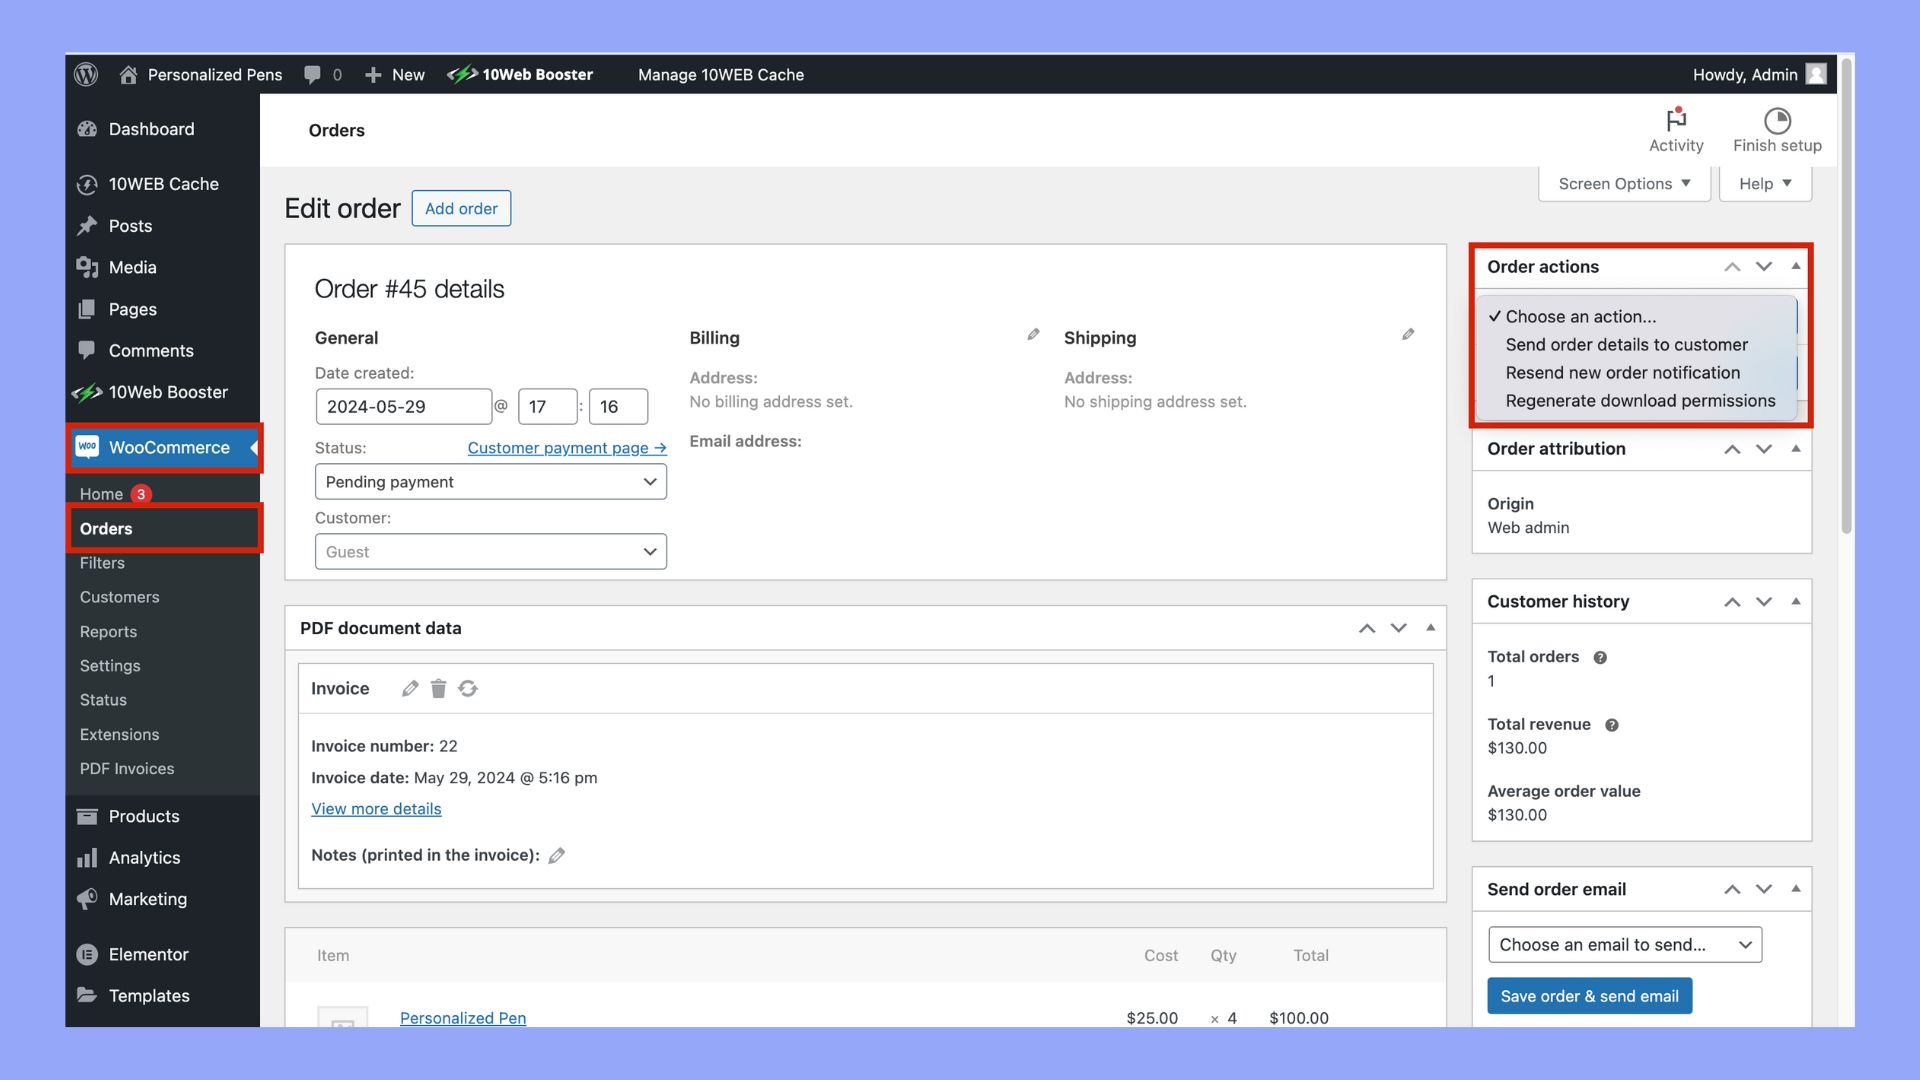
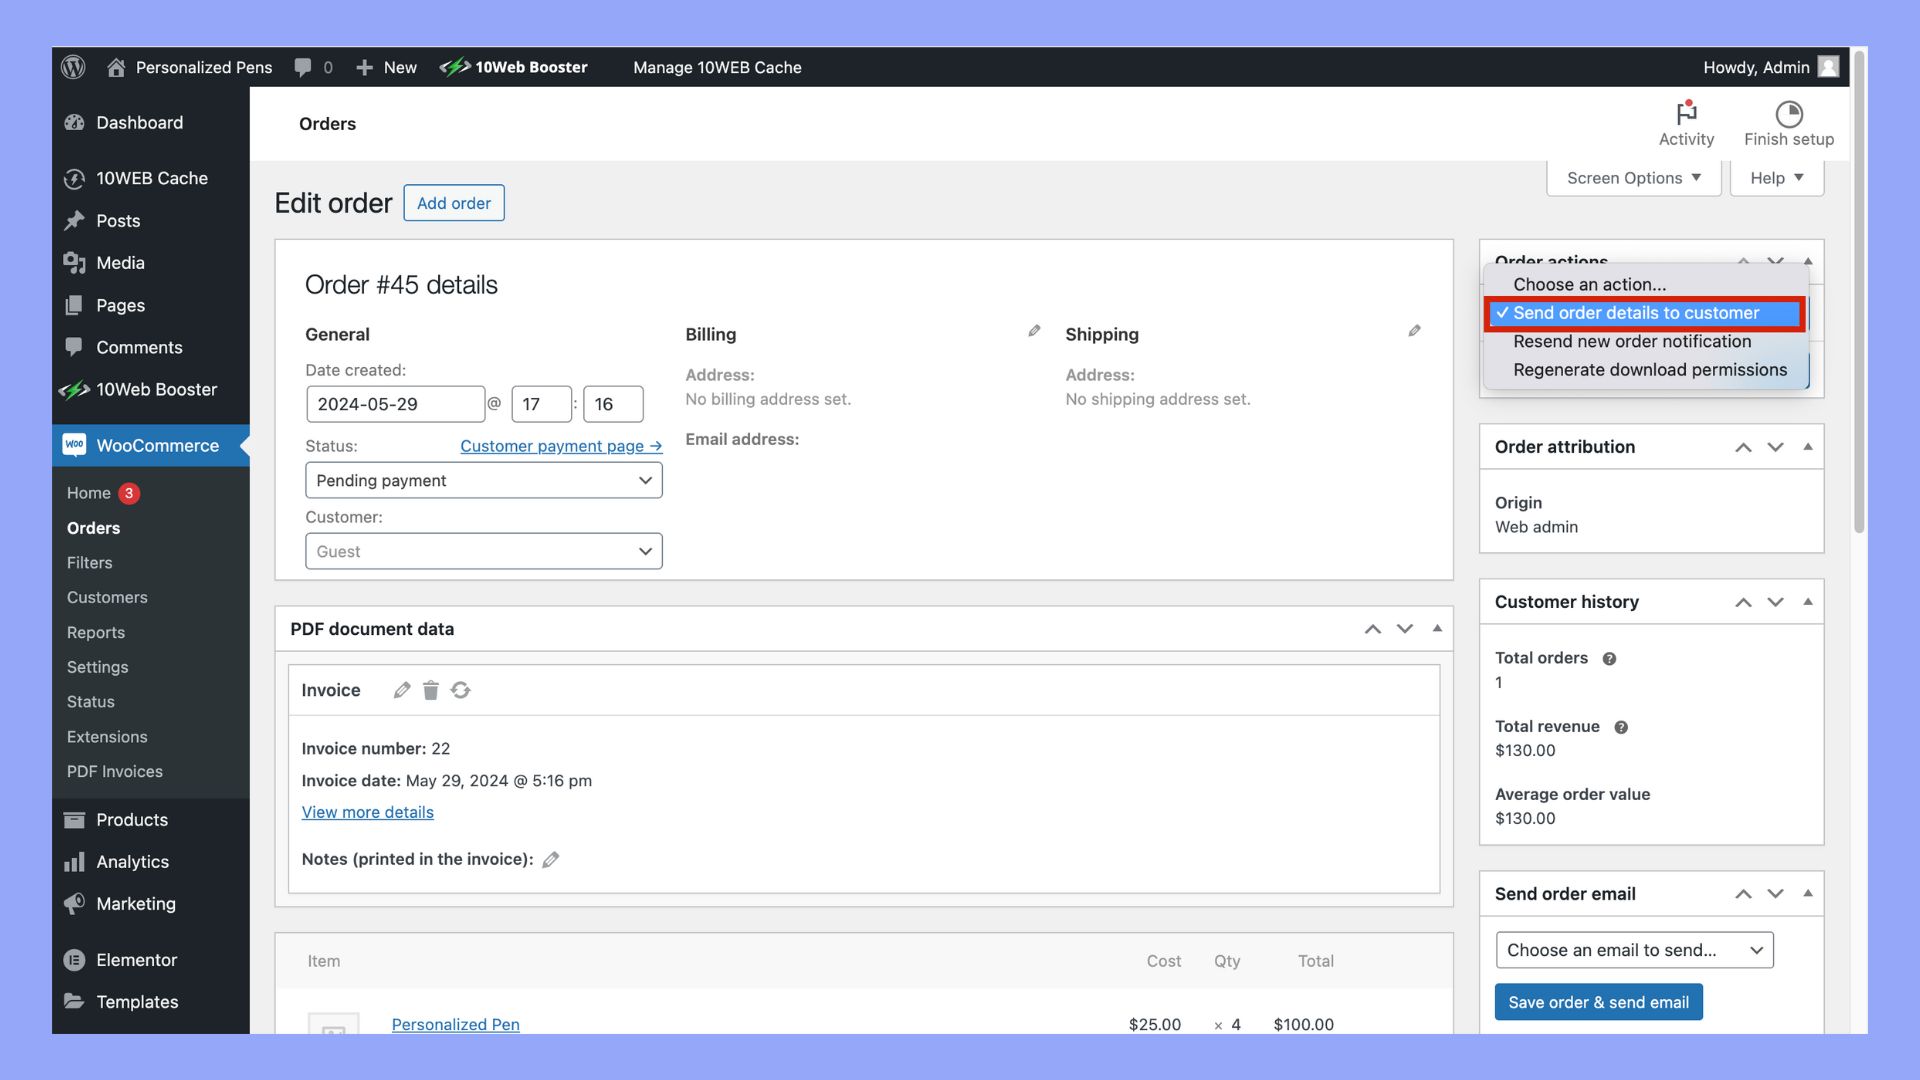
This will send an order confirmation email containing a link to Download invoice, which your customers can use to access their invoices directly.
Personalizing your invoice design
A personalized invoice not only reflects your brand’s identity but also makes the invoice clear and straightforward for customers to understand. To customize your invoice:
- Install a PDF invoice plugin if you haven’t already done so.
- Navigate to the plugin settings typically found under WooCommerce > PDF Invoices or a similar section.
- Update your logo by clicking on Set image and uploading a suitable image file that represents your brand.
- Configure any additional settings like invoice colors, layout, and text to match your company’s branding.
Remember, personalizing your invoices helps create a consistent brand experience from start to finish.
Automating your invoicing process
In WooCommerce, you can save time and streamline your workflow by setting up an automated invoicing system using the right plugins.
Selecting the right plugins for automation
To automate your invoicing process within WooCommerce, you need to select plugins that integrate seamlessly with your existing setup. Begin by exploring the WordPress plugin repository for WooCommerce extensions that support automatic invoice generation.
Steps:
- Visit your WordPress Dashboard and navigate to Plugins > Add New.
- Search for ‘WooCommerce invoice plugins’. Look specifically for those offering automatic order printing and automatic invoicing.
- Read reviews and check for updates to ensure the plugin is well-supported.
- Install and activate the chosen plugin.
Be aware that some plugins might offer additional functionality such as automatic processing of invoices for every new order, or allowing for manual issuance of invoices when needed.
Advantages of invoice automation
Invoicing automation within your WooCommerce storefront brings several benefits:
- Time savings: Automating the tedious task of invoice creation frees you up to focus on other aspects of your business.
- Consistency: An automated system provides consistent invoice formatting and information, ensuring professionalism.
- Efficiency: Plugins can add client details like SSN and VAT, making sure that invoices include all necessary information without requiring manual input.
By implementing an automated invoicing process, you’re not just speeding up one aspect of your sales cycle; you’re improving the overall efficiency of your business operations. With the right plugin, these benefits are merely a few clicks away.
Looking to sell online?
Create your custom online store in minutes with 10Web AI Ecommerce Website Builder and take your business online.
Extension and plugin management for better invoicing
When running an ecommerce site with WooCommerce, managing your invoices effectively is essential. WooCommerce doesn’t come with a built-in invoicing system, but numerous plugins and extensions can help you generate invoices with ease.
Step 1: Choose the right plugin
Look for plugins like Flexible PDF Invoices for WooCommerce & WordPress which is a free option that allows the generation of PDF invoices. Make sure the plugin supports features like one-click print and predefined items to streamline your invoicing process.
Step 2: Install the plugin
Go to your WordPress dashboard, navigate to Plugins and click on Add New. Search for your chosen invoicing plugin. Click Install Now, and then Activate.
Step 3: Configure plugin settings
In the plugin settings, enter your company details such as the name, address, and logo. This helps you personalize the invoices. You can usually find the settings under the WooCommerce tab, labeled Invoices or Invoice/Packing.
Step 4: Generate an invoice
To see how to generate an invoice in WooCommerce, open the Orders page under WooCommerce. Select an order and look for a Create PDF or similar option. Clicking this should generate your invoice.
Step 5: Manage your invoices
After creation, manage your invoices directly from the WooCommerce dashboard. You can view, download, print, and email them to customers directly if your plugin supports it.
By following these steps, you maintain better control over your invoicing process, ensuring a more professional experience for both you and your customers.
Managing PDF invoices and packing slips
When running an online store with WooCommerce, you’ll want to provide customers with PDF invoices and packing slips for their convenience. These documents give customers a detailed summary of their purchase and help facilitate a smoother order fulfillment process.
Generating a PDF invoice
- Select the order for which you need a PDF invoice from the main admin order page.
- Click on the ‘Invoice’ button to automatically generate a PDF invoice.
- Download or print the PDF directly from your browser.
Bulk generation is also available if you need to handle multiple orders. Go to the ‘Bulk Actions’ dropdown and select ‘Print Invoices’ for multiple orders at once.
Handling PDF packing slips
- For packing slips, navigate to the specific order in the WooCommerce admin.
- Choose the ‘Packing Slip’ option to generate this document.
- Download or print the packing slip for insertion into the customer’s package.
Remember, you can print using any standard printer connected to your computer. Always make sure your printer has enough ink and paper before starting the printing process.
The ease of accessing and printing these important documents directly from your WooCommerce dashboard means you can manage your orders more efficiently and provide a professional shopping experience to your customers.
Looking to sell online?
Create your custom online store in minutes with 10Web AI Ecommerce Website Builder and take your business online.
Advanced invoicing features
When managing a WooCommerce store, polishing your invoicing capabilities can make a significant difference. Advanced invoicing features allow you to streamline your billing process, ensuring you stay on top of your accounts and provide professional service to your customers. Here’s how you can make the most of these advanced features.
- Sequential invoice numbering: Maintaining a sequential order to your invoice numbers can make tracking sales much easier. To set this up, access your invoice settings and enable sequential invoice numbering. This often comes with options to add a prefix or suffix which can include elements like the year or month, helping you to stay organized and professional.
- Setting tax rates: You can automate the addition of relevant tax rates to your invoices. Go to the tax settings section within WooCommerce and input your standard tax rates. This way, every invoice generated will automatically contain the correct tax calculations without manual input.
- Credit notes: Sometimes, you’ll need to issue a refund or an adjustment after an invoice has been sent. Generating credit notes for these instances is essential and can be configured within your invoicing settings.
- Bulk actions: Handling multiple orders at once becomes more manageable with bulk actions. Go to your orders screen, select the orders you need to invoice, and choose the relevant action from the bulk actions dropdown menu. It saves time and ensures consistency across your transactions.
- Customization with prefixes and suffixes: Adding prefixes and suffixes to your invoice numbers can help differentiate between different types of transactions or periods. This can be configured in the invoice numbering settings.
Remember, these advanced features are there to aid your invoicing process, making it more efficient and tailored to your business needs. Utilize them to their full potential to streamline your operations and enhance your store’s professionalism.
Maintaining invoice records and compliance
When running an ecommerce store, knowing how to generate an invoice in WooCommerce is just the beginning. It’s crucial to maintain proper invoice records and stay compliant with legal requirements. Here’s how you can keep everything in order:
- Create documentation: Always have clear and accessible documentation for each transaction. Documentation should include details like the shipping address, respective invoice numbers, and any order actions taken.
- Use sequential invoice numbers: For better tracking and legal compliance, enable sequential invoice numbers. This alleviates confusion and ensures that every invoice is uniquely identifiable.
- Check invoice column: Regularly review the invoice column in WooCommerce’s order page to verify that invoices are being generated and recorded correctly.
- Perform test orders: Run test orders periodically to ensure that the invoice system is working seamlessly. This will help catch any issues before they affect your customers.
- Comply with legal requirements: Ensure all invoices include required legal information such as tax details and your company’s registered address.
- Save invoices appropriately: Store your invoices digitally or in print form as required by your local laws, and keep them for the duration specified for tax and compliance purposes.
By following these steps, you’ll ensure that your WooCommerce store remains organized and compliant, making how to generate an invoice in WooCommerce a smooth and reliable process.
Looking to sell online?
Create your custom online store in minutes with 10Web AI Ecommerce Website Builder and take your business online.
Conclusion
Mastering how to generate an invoice in WooCommerce streamlines your business operations and enhances customer satisfaction. By following this step-by-step guide, you can efficiently create accurate invoices, ensuring smooth financial management. Implement these practices to optimize your WooCommerce experience, boost professionalism, and keep your business running smoothly.
Looking to sell online?
Create your online store in minutes
Create your online store in minutes with 10Web AI Ecommerce Website Builder.


![Featured image for How to Make WooCommerce Faster [29 Tips and Tricks] article](https://10web.io/blog/wp-content/uploads/sites/2/2024/04/make_woocommerce_faster-742x416.jpg)