Learning how to import product variations in WooCommerce can significantly streamline your online store management. This simple guide will walk you through the process, ensuring you can efficiently handle different product types, sizes, and colors. By mastering this essential skill, you’ll enhance your ecommerce operations, saving time and reducing manual errors.

Looking to sell online?
Create your custom online store in minutes with 10Web AI Ecommerce Website Builder and take your business online.
FAQ
How do I import variations in WooCommerce?
How do I get product variations in WooCommerce?
How do I add product variables in WooCommerce?
How to add variable products in WooCommerce CSV?
- Prepare your CSV file: Ensure your CSV file includes columns for the parent product and its variations. Key columns include Type, SKU, Parent SKU, Attribute 1 name, Attribute 1 value(s), Regular price, and Stock.
- Set the parent product: In the CSV, set the parent product row with Type as variable and include attributes but leave variation-specific fields blank.
- Set the variations: For each variation, include Type as variation, reference the parent SKU, and specify the attribute values and other variation-specific details.
- Import the CSV: Go to WooCommerce > Products > Import, upload your CSV file, map the fields, and run the importer.
Understanding product variations in WooCommerce
Product variations in WooCommerce allow you to offer different versions of a single product, such as various sizes or colors. This flexibility helps meet customer needs and enhances their shopping experience.
Defining attributes for variations
Attributes are the building blocks for product variations. You first need to define the attributes like size, color, or material. These attributes are then used to create different variations of a product. For example, a t-shirt can have attributes such as size (small, medium, large) and color (red, blue, green). Here are the steps to define attributes for variations:
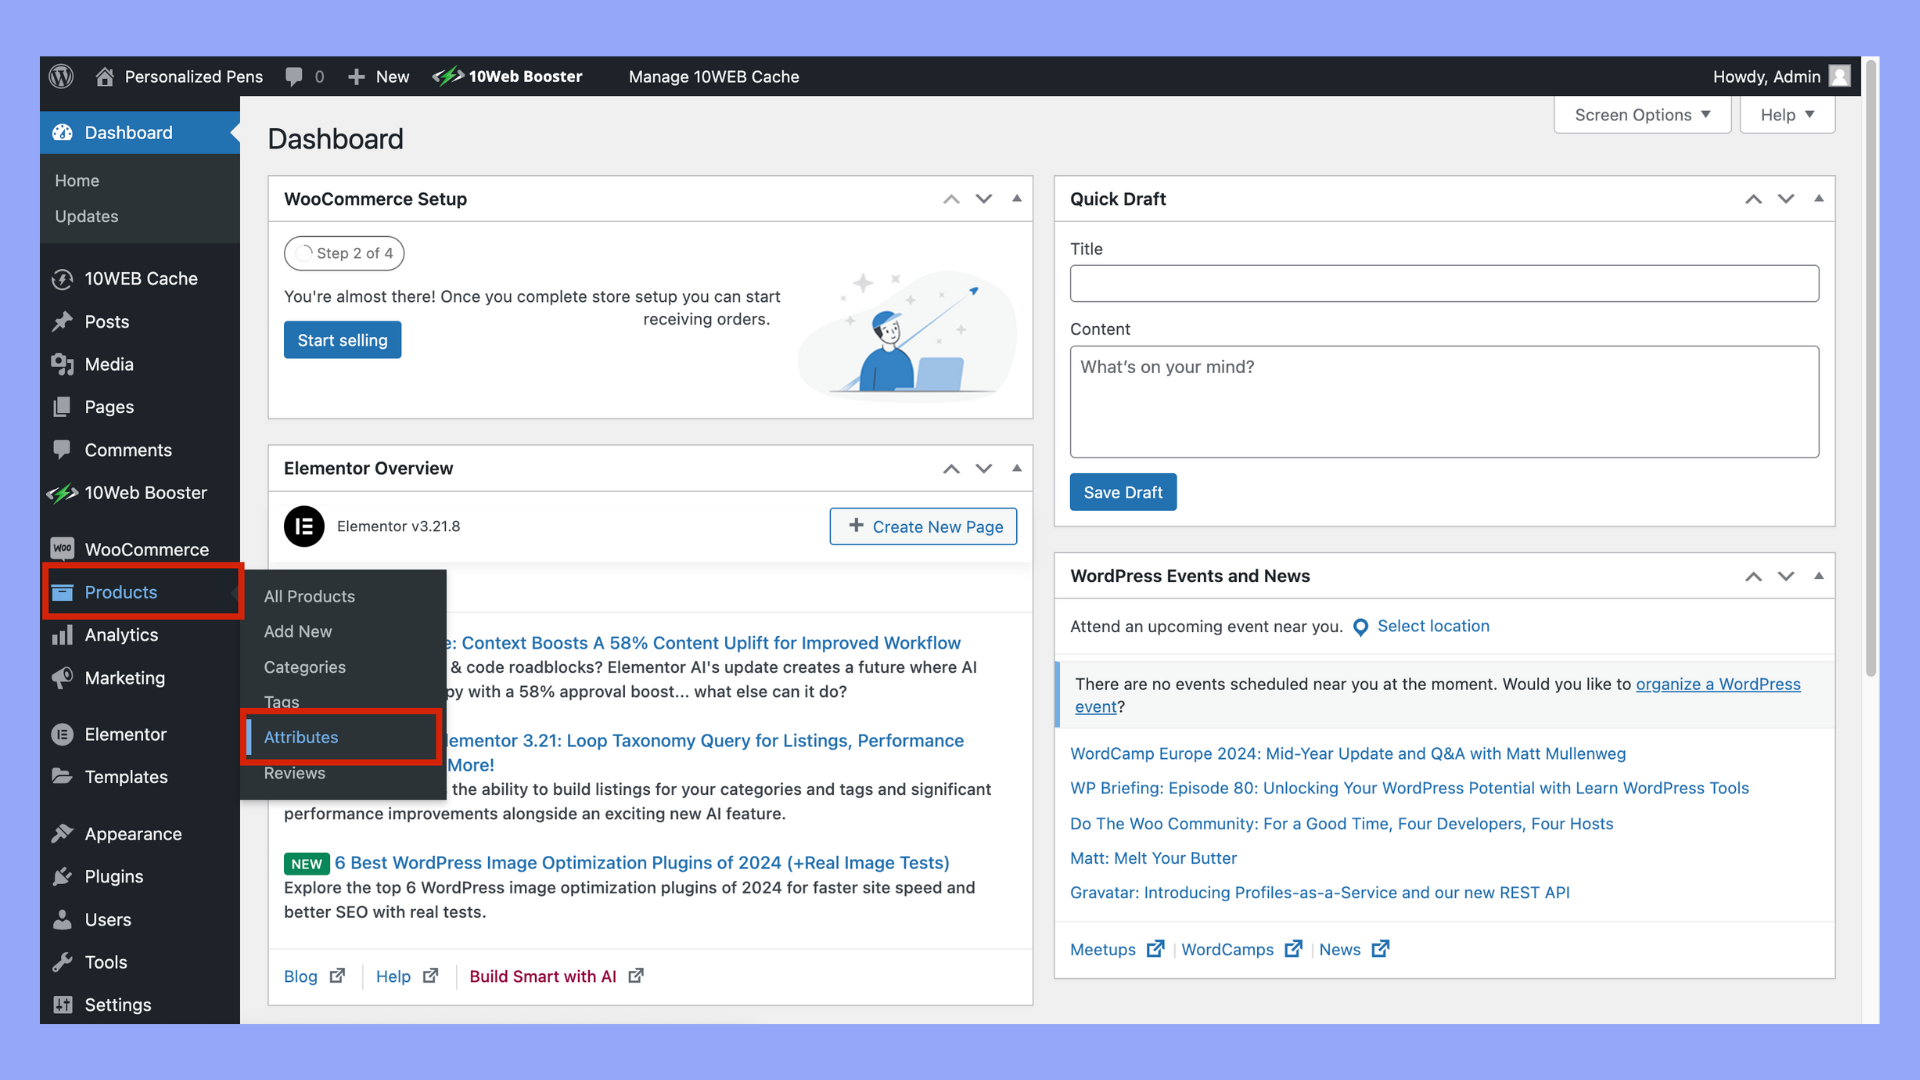
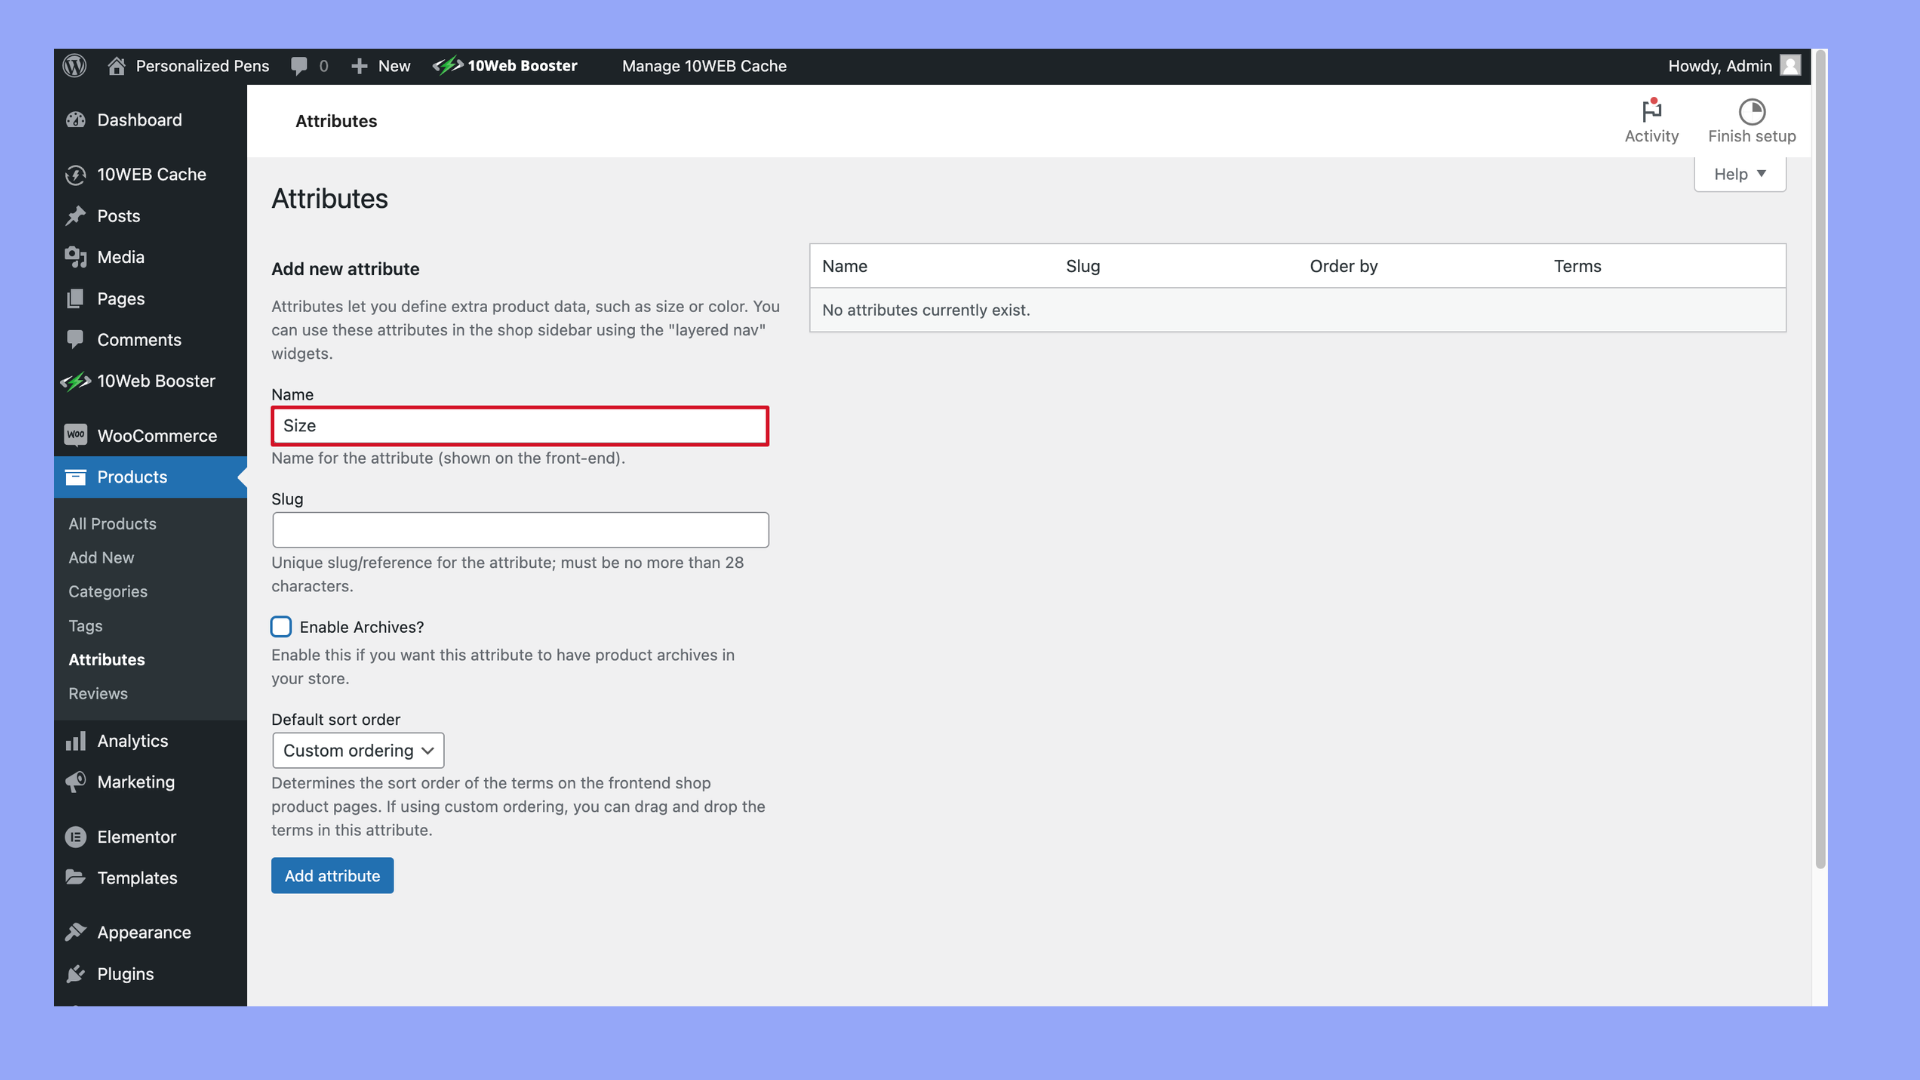
- Navigate to Products and select Attributes.
- Add a new attribute with a name like Size.
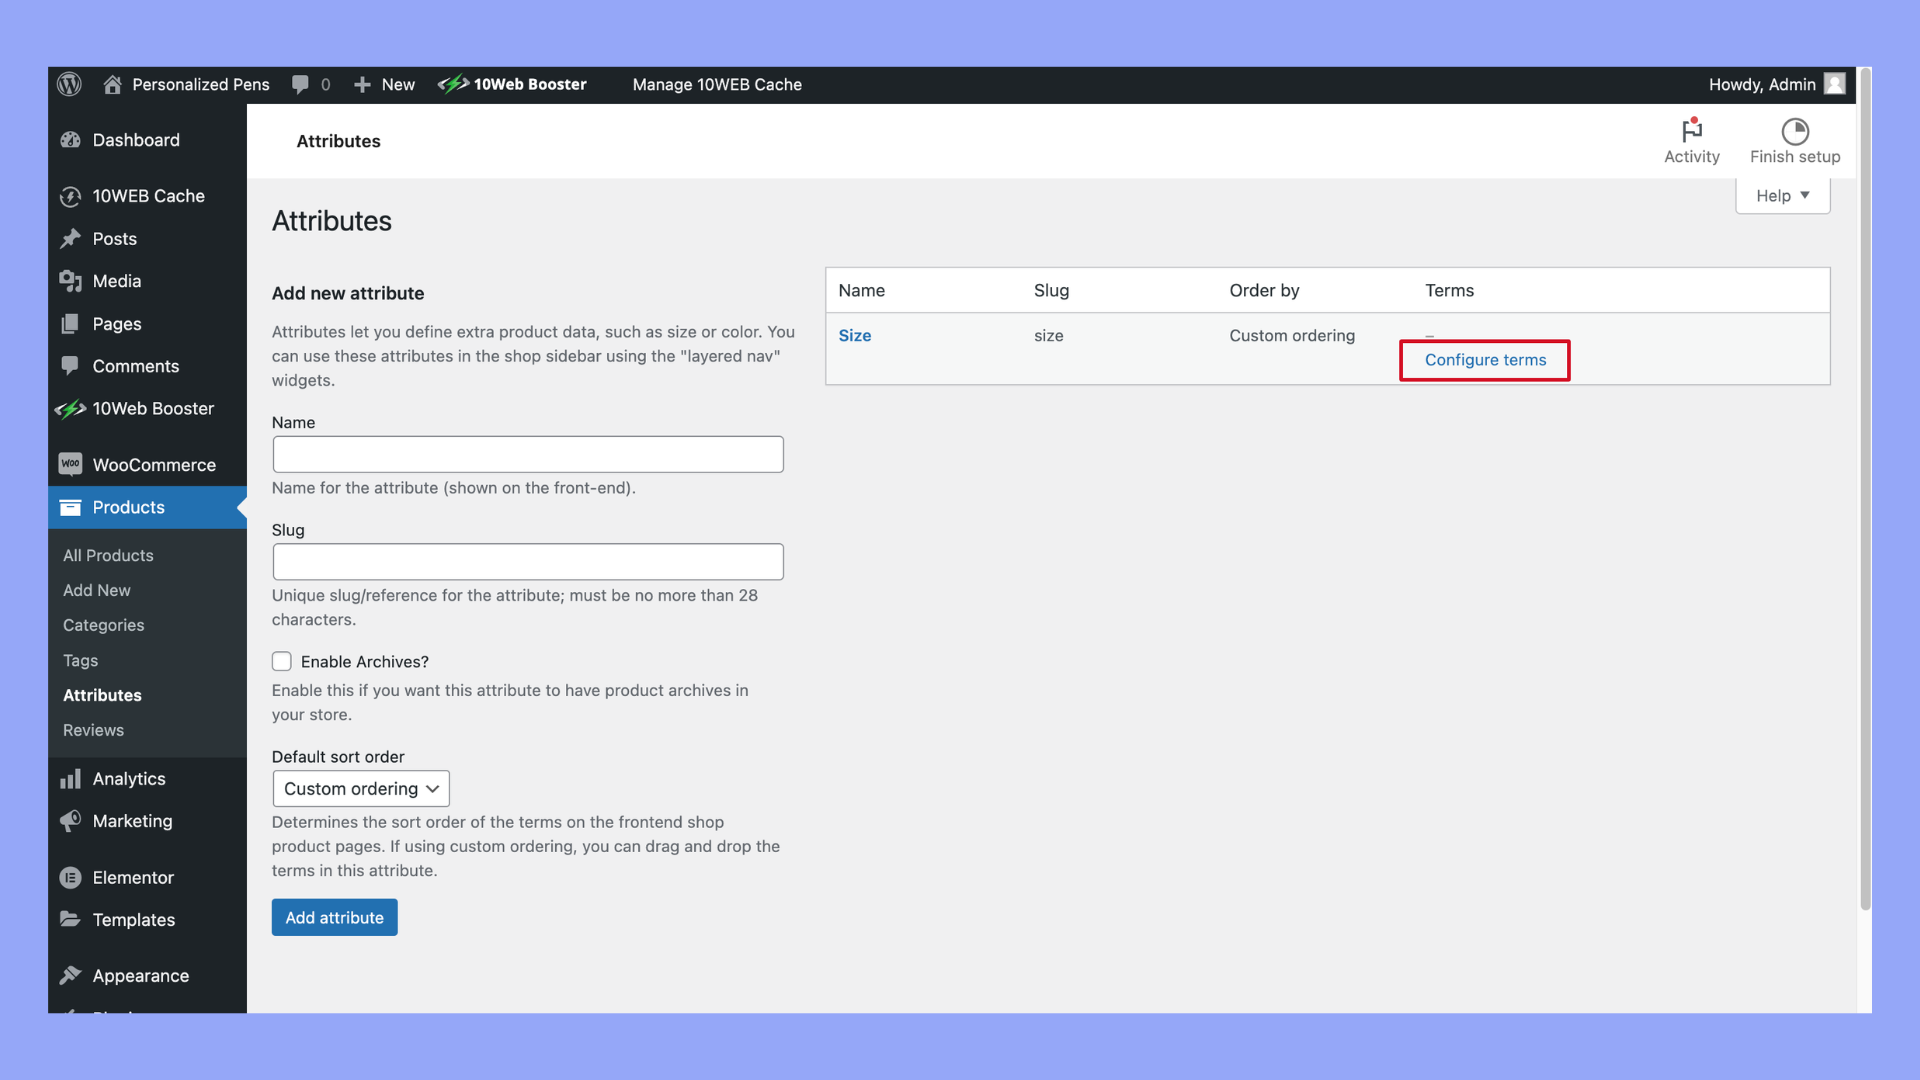
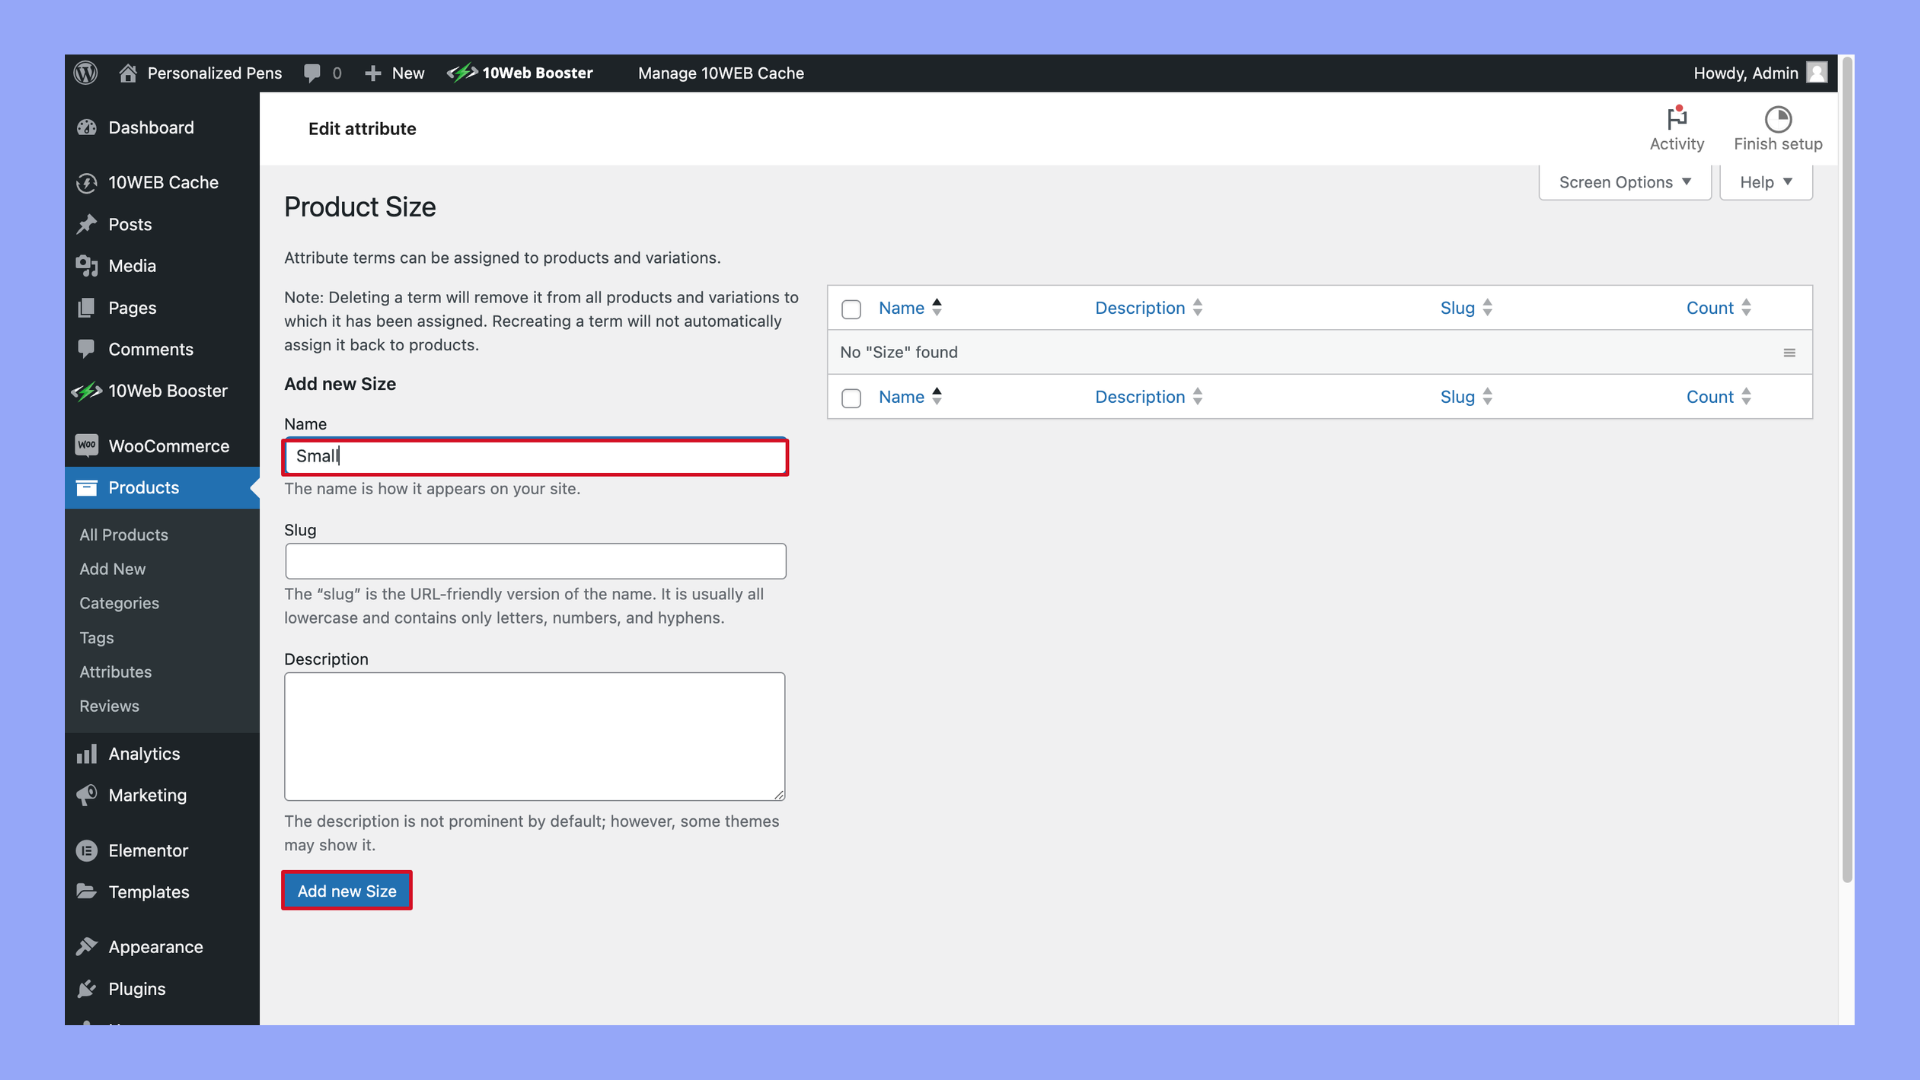
- Configure the terms for the attribute, such as Small, Medium, and Large.
- Repeat this process for other attributes like Color.
Variable products vs simple products
Variable products differ from simple products in WooCommerce by offering multiple variations within a single product listing. Simple products have no variations and are just a single item. For example, a simple product might be a book with no different versions, while a variable product could be a shirt available in various sizes and colors.
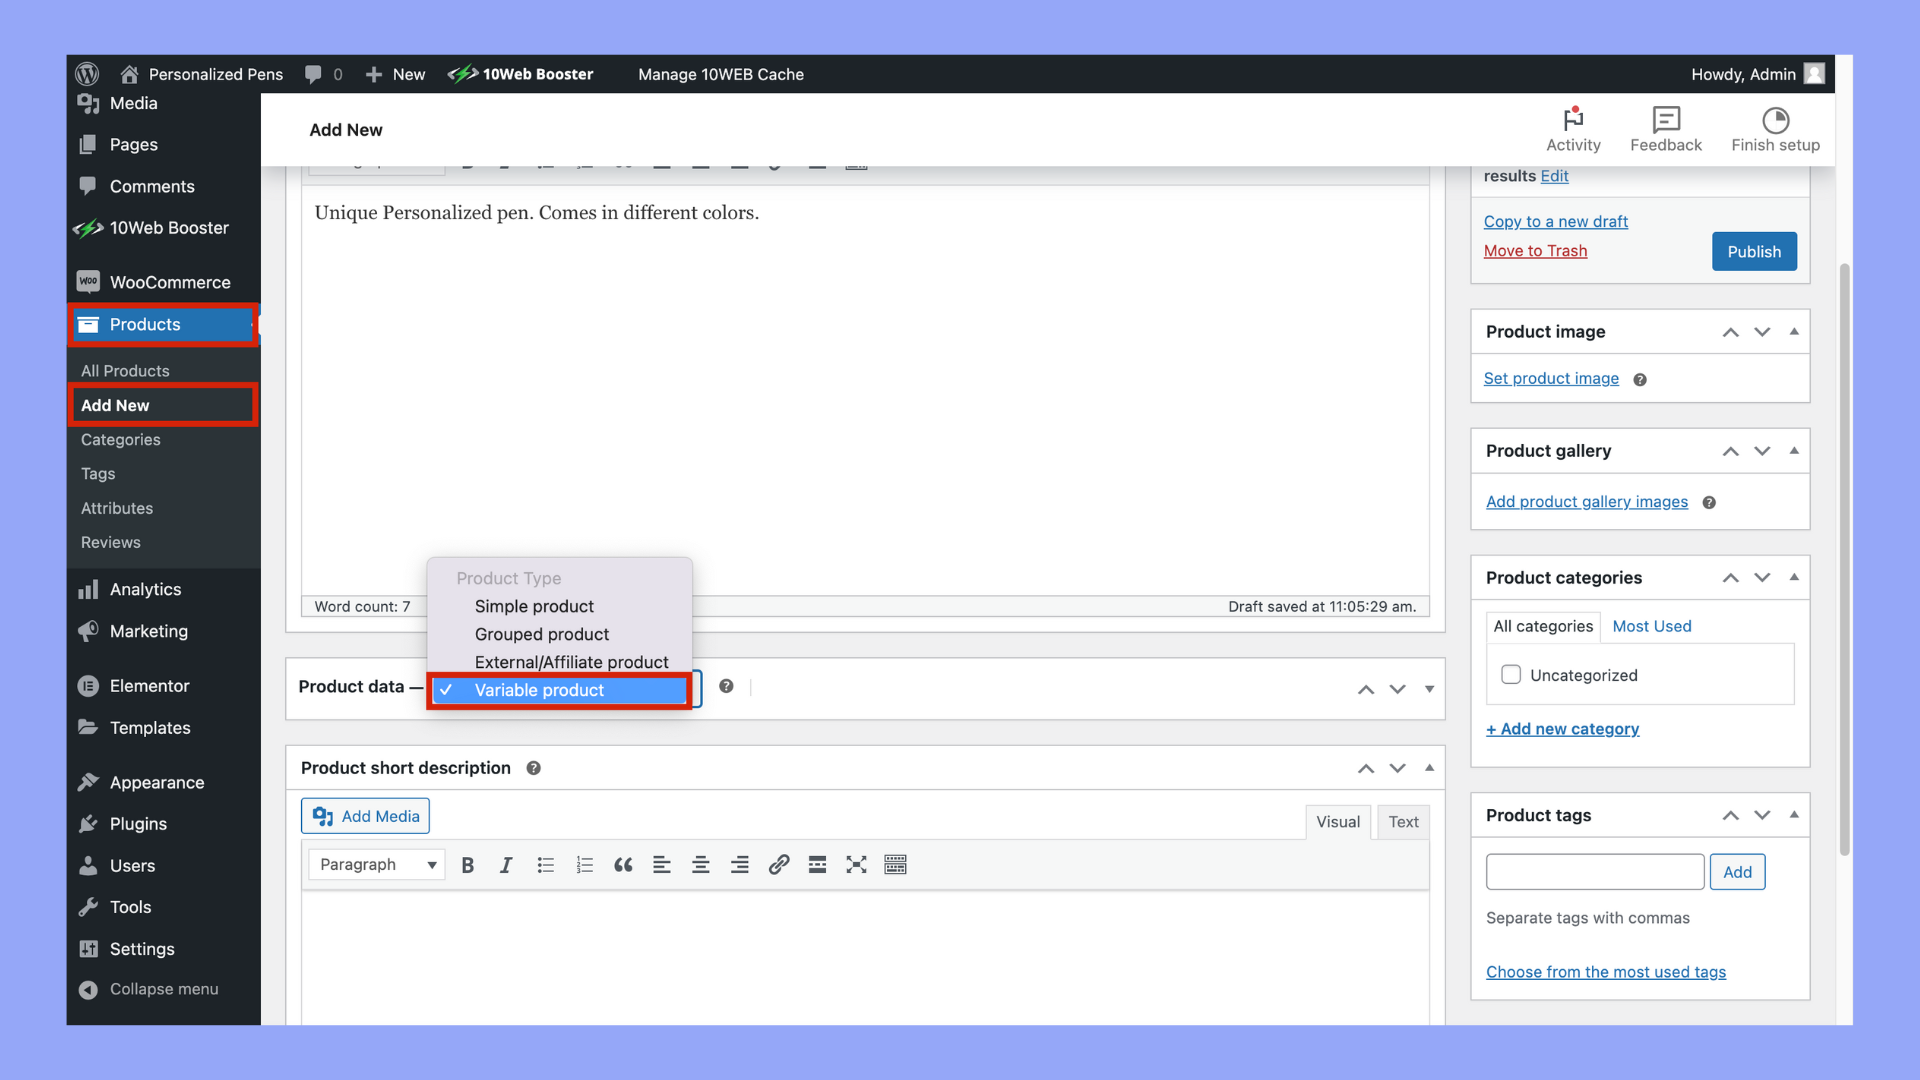
To set up a variable product, follow these steps:
- Go to Products and click Add New.
- Enter the product details and choose the Variable product from the product data dropdown.

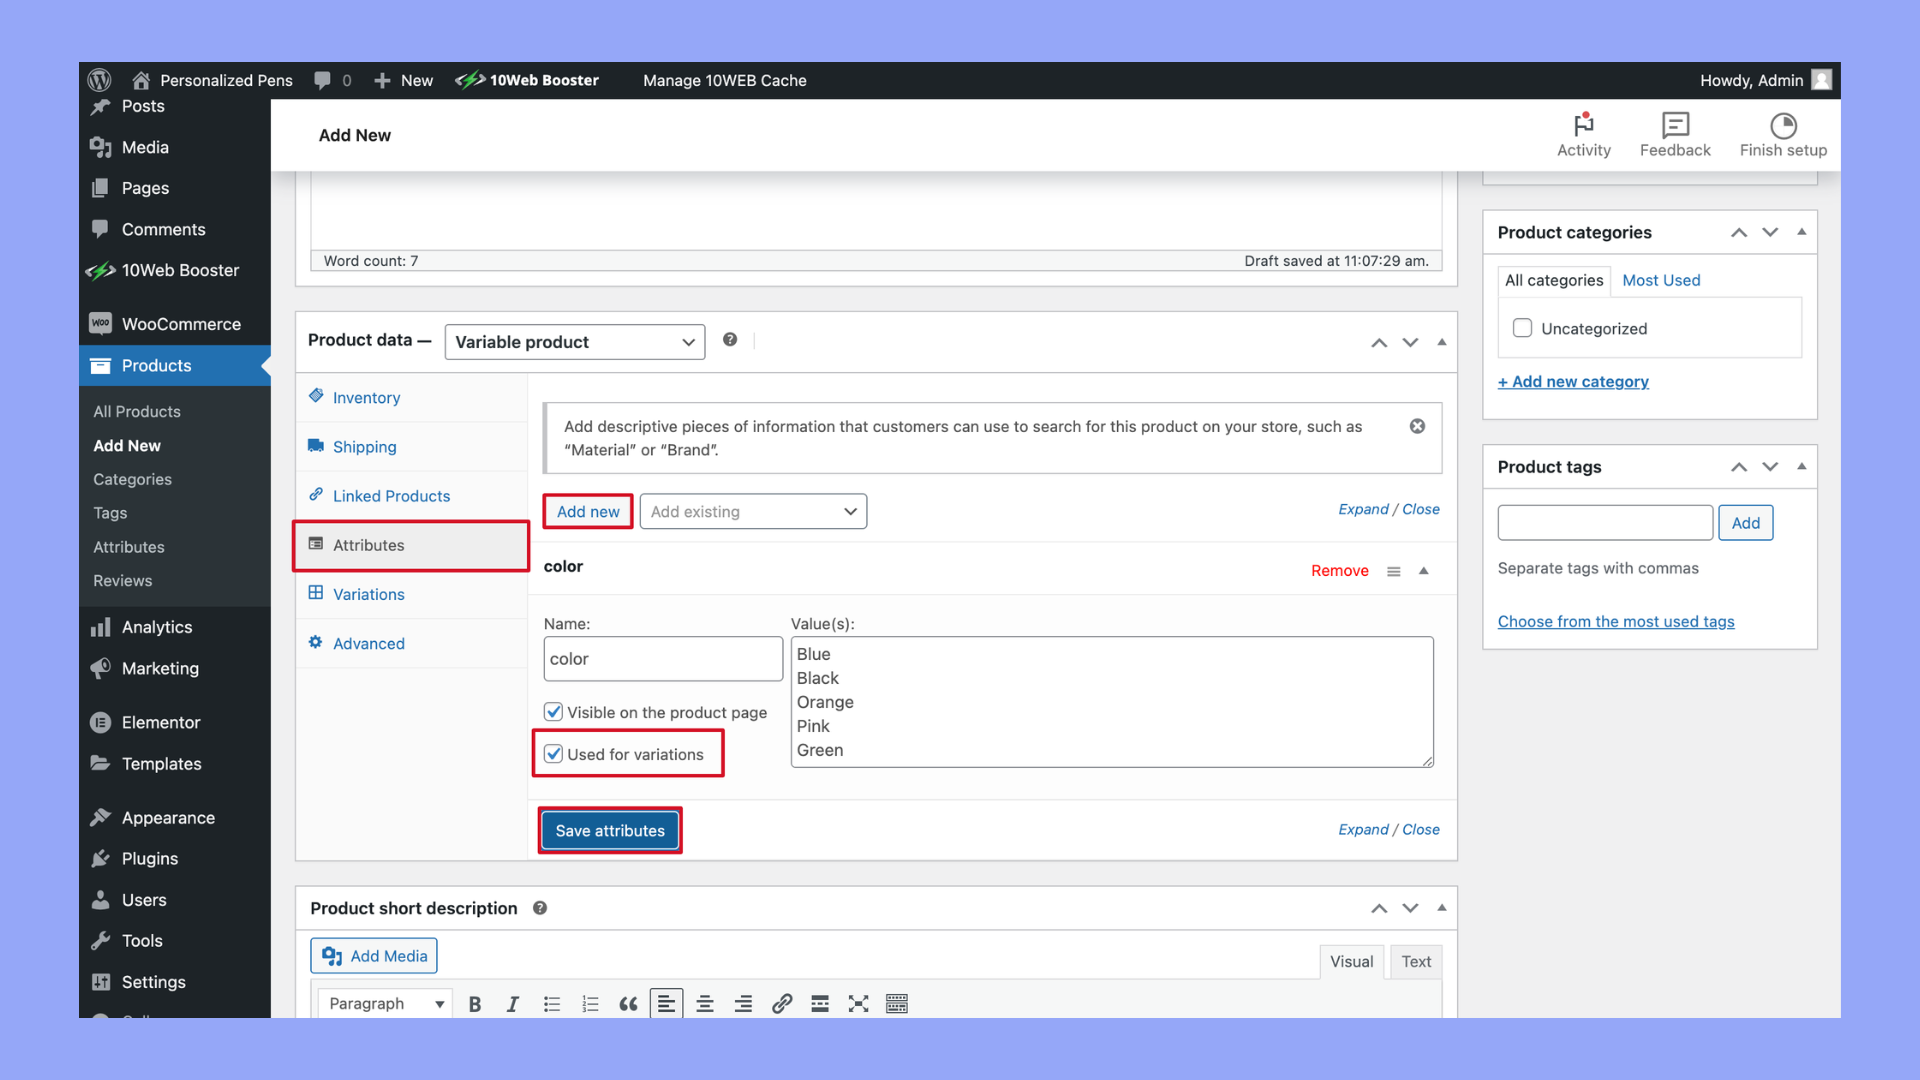
- Click the Attributes tab to add previously defined attributes.
- Select Used for variations and save attributes.
- Go to the Variations tab and click Add variation to create each version.
This process is key in understanding how to import product variations in WooCommerce, as it involves setting up the base product correctly before importing variations via CSV files. This ensures a smooth import process with all variations properly mapped.
Preparing for import
Before you begin importing product variations in WooCommerce, it’s essential to set everything up correctly. This includes configuring attributes, creating global attributes, and formatting your CSV file appropriately.
Step1: Setting up WooCommerce attributes tab
First, you need to set up attributes in the WooCommerce Attributes Tab. Attributes are important as they define your product variations, like size or color.
- Go to Products > Attributes.
- Add a new attribute by filling in the fields for Name and Slug.
- Click Add Attribute.
- Click Configure Terms.
- Add terms such as different sizes or colors
Repeat these steps for each type of attribute you plan to add to your product variations.
Step 2: Creating global attributes
Creating global attributes helps you reuse attributes across multiple products. This is useful for maintaining consistency.
- In the Attributes tab, ensure your attributes are global by configuring terms.
- Go back to Products > Attributes.
- Select an attribute, click Configure Terms, and add the terms that apply to the attribute, like Small, Medium, Large for the Size attribute.
Using global attributes ensures that your attributes are uniform across your store, which can streamline the process when importing variations.
Step 3: Formatting your CSV file
Properly formatting your CSV file is crucial for a successful import. Follow these steps to prepare your CSV file:
- Column headers: Make sure your CSV file has clear headers for each column, like SKU, Name, Regular Price, Attributes, and Images.
- Parent and child products: List the parent product first and then its variations. Use a unique identifier (SKU) for each.
- Attributes column: Ensure all attributes and their terms are listed correctly for each variation.
To learn more about how to import product CSV files in WooCommerce, go to WooCommerce > CSV Import Suite > Import Products. First, upload your parent product CSV file, and then follow the steps to map your fields correctly.
Proper setup and careful formatting can prevent errors and make your import process smooth and efficient.
Looking to sell online?
Create your custom online store in minutes with 10Web AI Ecommerce Website Builder and take your business online.
Performing the import
To import product variations in WooCommerce, you will need to use either the built-in importer or upload a CSV file containing the variations. Each method has its own steps and requirements.
Method 1: Using the WooCommerce built-in importer
Using WooCommerce’s built-in importer is a straightforward way to get your variations into your store.
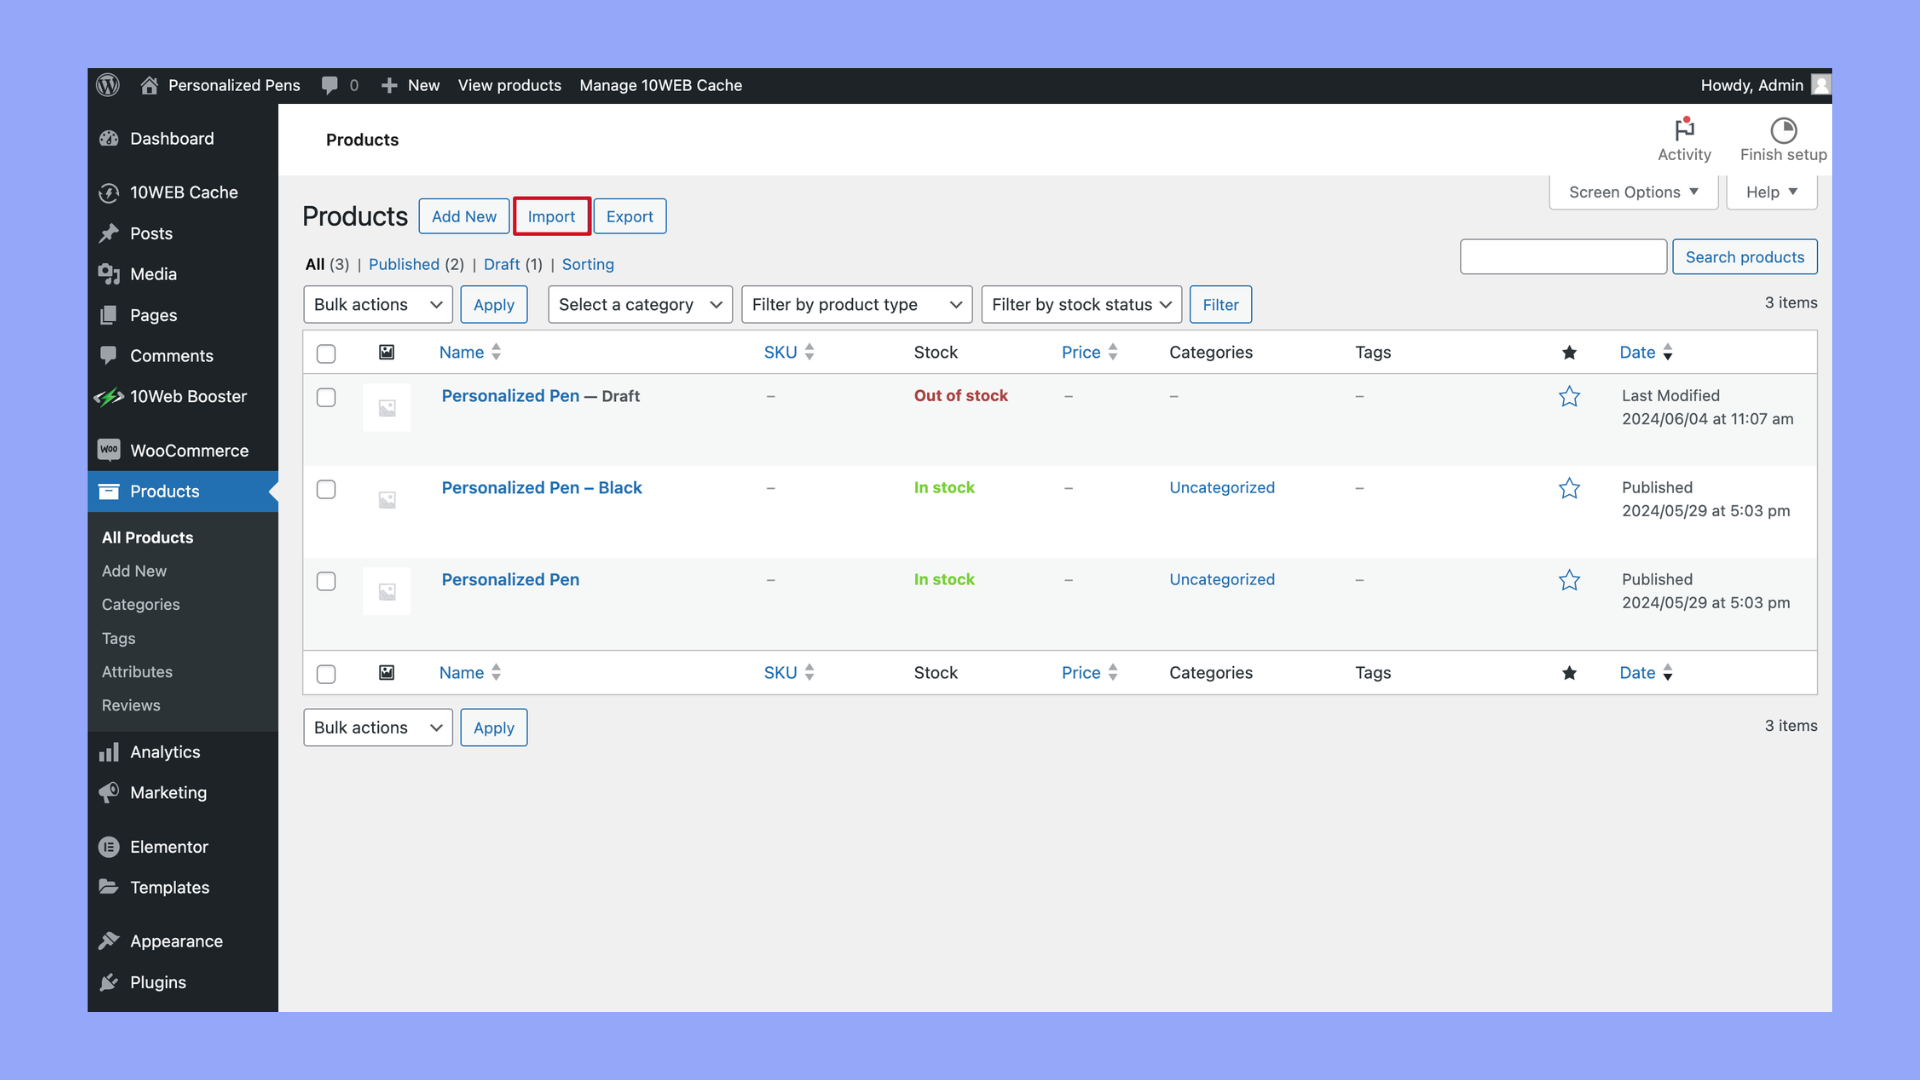
- Go to WooCommerce > Products in your WordPress dashboard.
- Click on Import at the top of the page.
- Choose the CSV file that contains your product variations.
- Click on Continue to proceed to the mapping screen.
- Map the columns from your CSV to WooCommerce fields.
- Once mapped, click on Run the Importer.
Each product and its variations will be imported based on your CSV data. Make sure your CSV file is correctly formatted to avoid errors.
Method 2: Understanding the variations CSV format
The correct format of your CSV file is crucial for a successful import.
- Header row: Include headers like SKU, Product type, Post status, Parent ID, etc.
- Product grouping: Use the Parent ID to link variations to the main product.
- SKU: Each product and variation needs a unique SKU.
- Product type: Specify variable for parent products and variation for each variation.
Here’s a simple example:
| SKU | Product type | Post status | Parent ID | Attribute 1 name | Attribute 1 value |
| PARENT001 | variable | publish | Color | ||
| VAR001 | variation | publish | PARENT001 | Color | Red |
| VAR002 | variation | publish | PARENT001 | Color | Blue |
Paying attention to these details ensures the smooth import of your product variations.
Whether you are using the built-in importer or preparing a CSV file, following these steps will guide you on how to import product variations in WooCommerce successfully.
What to do after importing
After importing your product variations in WooCommerce, you need to manage and tweak them for optimal performance. This includes editing details and managing inventory to ensure your stock stays updated.
Editing product variations
To edit product variations, navigate to Products in your WooCommerce dashboard and select the product you want to edit. Click on the Variations tab.
- Click the Expand button next to a variation to see its details.
- Edit fields such as price, weight, and SKU.
- Save your changes by clicking Update.
Editing these details allows you to provide accurate product information, ensuring your customers see the correct details for each variation.
Stock management for variations
Managing inventory for each variation ensures you can keep track of stock levels and avoid overselling.
- In the Variations section, find the Manage stock checkbox.
- Click the checkbox to enable stock management for that variation.
- Enter the stock quantity in the Stock Qty field.
- Select the stock status: In Stock, Out of Stock, or On Backorder.
Saving these settings helps WooCommerce automatically update your inventory, keeping your stock status accurate and up-to-date for each product variation.
Optimizing variations for user experience
Creating a seamless and enjoyable user experience involves thoughtful design and functionality. For WooCommerce stores, optimizing product variations can lead to higher customer satisfaction and better performance.
Creating user-friendly dropdowns
To enhance your product pages, you should present variations in a clear and easy-to-use way. Instead of using default dropdowns, consider replacing them with variation swatches. These can feature images, colors, or labels that make it easier for customers to see differences.
Follow these steps to create user-friendly dropdowns:
- Navigate to Products and select a product to edit.
- Click the Attributes tab and set up your product attributes.
- Go to the Variations tab and add a new variation.
- Choose the type of display option like color swatches or images.
- Save changes and preview the product to ensure the variations are easy to use.
Improving performance and flexibility
Performance is key to a good user experience. Optimizing how variations load can make your store faster.
To improve performance and flexibility, follow these steps:
- Install a caching plugin to reduce server load.
- Use lazy loading for images to ensure variations only load when needed.
- Optimize your CSV files for product imports by using default column headers.
- Enable AJAX loading for filters so the page doesn’t need to reload.
- Test your product pages to check for speed and responsiveness.
Creating an optimal experience with variations requires attention to detail. Little changes like better dropdowns and improved performance can make a big difference in customer satisfaction.
Looking to sell online?
Create your custom online store in minutes with 10Web AI Ecommerce Website Builder and take your business online.
Troubleshooting common import issues
When importing variations, errors can occur due to incorrect CSV formatting or missing data. Follow these steps to fix common errors:
- Check CSV formatting: Ensure your CSV file follows WooCommerce’s format. Verify column headers and data types.
- Remove extra spaces: Extra spaces in headers or data entries can cause errors.
- Map fields correctly: During the import, map your CSV columns to WooCommerce fields correctly. This ensures data goes to the right places.
- Validate data entries: Confirm that all required fields (like SKU, price, and variation attributes) are filled out. Missing information can prevent imports.
- Use lowercase for specific fields: Fields such as taxable, visibility, and others should be in lowercase as they can be case-sensitive in WooCommerce.
Enhancing variations with plugins
Adding plugins to your WooCommerce store can make handling product variations much easier and more efficient. Two plugins that stand out are WooCommerce Bulk Variations and the Product CSV Import Suite.
Woocommerce bulk variations for larger stores
The WooCommerce Bulk Variations plugin is a great tool if you have an extensive product catalog. It allows you to manage and display multiple variations at once. This is especially useful for stores that sell products with many attributes like size, color, and material.
To set up WooCommerce Bulk Variations:
- Download and install the plugin from the WooCommerce store.
- Navigate to Plugins in your WordPress admin dashboard.
- Click Add New and then Upload Plugin.
- Activate the plugin after installation.
- Go to the product you want to edit and find the Variations tab.
- Use the bulk options to apply attributes across many variations.
This plugin also helps customers choose from multiple variations seamlessly, improving their shopping experience.
The role of the product CSV import suite
The Product CSV Import Suite plugin is perfect for importing variations from a CSV file, making it easier to handle large inventories.
To use Product CSV Import Suite:
- Install and activate the plugin from the WooCommerce store.
- Go to WooCommerce > CSV Import Suite in your admin dashboard.
- Prepare a CSV file with your product data, making sure to include columns for attributes and variations.
- Click Import Products, then Browse to select your CSV file.
- Map the fields in your CSV to WooCommerce product fields.
- Click Upload file and import.
This plugin is essential for streamlining your inventory management process, especially for stores with many items.
Using these plugins can enhance the way your online store handles product variations, making management easier and improving the customer experience.
Using variations for different product types
When using WooCommerce, you can add product variations for items with different attributes. This feature is flexible and supports various product types.
Variable products with multiple options
To create variable products in WooCommerce, you need to start by adding a new product and selecting the Variable Product option. This allows you to add many variations under a single product listing.
Follow these steps:
- Navigate to Products in your WP-Admin area and click Add New Product.
- Enter the product name and select Variable Product from the Product data dropdown.
- Go to the Attributes tab and add the attributes relevant to your product (e.g., size, color).
- Move to the Variations tab and link each variation to the created attributes.
By using this method, you can offer items with multiple options without creating separate listings. This keeps your store organized and easy for customers to navigate.
Custom fields for unique attributes
If your products have unique attributes not covered by default WooCommerce settings, you can use custom fields. These fields help in adding specific details that enhance product descriptions and customer choices.
To add custom fields:
- Navigate to Products and edit or add a new product.
- Scroll down to the Product data section and click Custom Fields.
- Click Add Custom Field and enter the name and value of the custom attribute (e.g., material, personalized notes).
- Save your custom fields and ensure they are visible on the product page.
Custom fields are essential for products with unique characteristics that might not fit standard attributes. They allow you to add personalized information, giving customers more insights into your product offerings.
Looking to sell online?
Create your custom online store in minutes with 10Web AI Ecommerce Website Builder and take your business online.
Presenting variations in a product table
When showing product variations in a table, it’s important to design a clear and easy-to-navigate layout and list each variation in separate rows. This helps customers compare and choose the right options.
Designing a product table layout
First, you need to design a clean and organized product table layout. Use clear headings for each column like Product Name, Image, Price, Stock Status, and Options. Each column should provide specific information that helps users quickly identify and compare product variations.
Using tables makes it visually easier for customers to see all product details at a glance. Ensure that the font size is legible and the table fits well on different screen sizes. Highlight important information like price or sale items to draw attention.
Listing variations in separate rows
To effectively present product variations, list each variation in a separate row. For example, if you have a t-shirt available in multiple sizes and colors, each size-color combination should have its own row. This method is especially useful when you import product variations in WooCommerce.
By listing variations separately, you make it easier for customers to find the specific version they want. This also helps in managing inventory, as each variation will have its own stock status. Use clear labels and appropriate images to help users identify each variation quickly.
In summary, following these steps will enhance your WooCommerce store’s user experience, making the product selection process simple and efficient for customers.
Conclusion
Mastering how to import product variations in WooCommerce is essential for optimizing your ecommerce store. By following this guide, you can efficiently manage diverse product options, improve your inventory accuracy, and enhance customer satisfaction. Embrace these techniques to streamline your workflow and ensure a seamless shopping experience for your customers.
Looking to sell online?
Create your online store in minutes
Create your online store in minutes with 10Web AI Ecommerce Website Builder.