Installing live chat on your WordPress site can significantly enhance your customer engagement and support. This guide is designed for beginners, providing a straightforward, step-by-step approach to learning how to install live chat on WordPress and enhance the features of your website. We’ll cover the selection of a suitable live chat plugin, the installation process, and basic configuration settings. We’ll discuss tips for effectively utilizing live chat to improve user interaction and resolve queries promptly. Whether you’re looking to boost sales, support, or user experience, integrating live chat on WordPress is a smart move that can yield substantial benefits.
How to install a live chat
Adding a live chat to your WordPress site is a simple process that can be completed in just a few steps. Here is the detailed process you should pass through:
Choose the right live chat plugin
When you decide to install a live chat plugin on your WordPress site, your primary focus should be on finding one that aligns perfectly with your site’s needs and goals. Find your best choice by going to WordPress dashboard > Plugins > Add New > search live chat.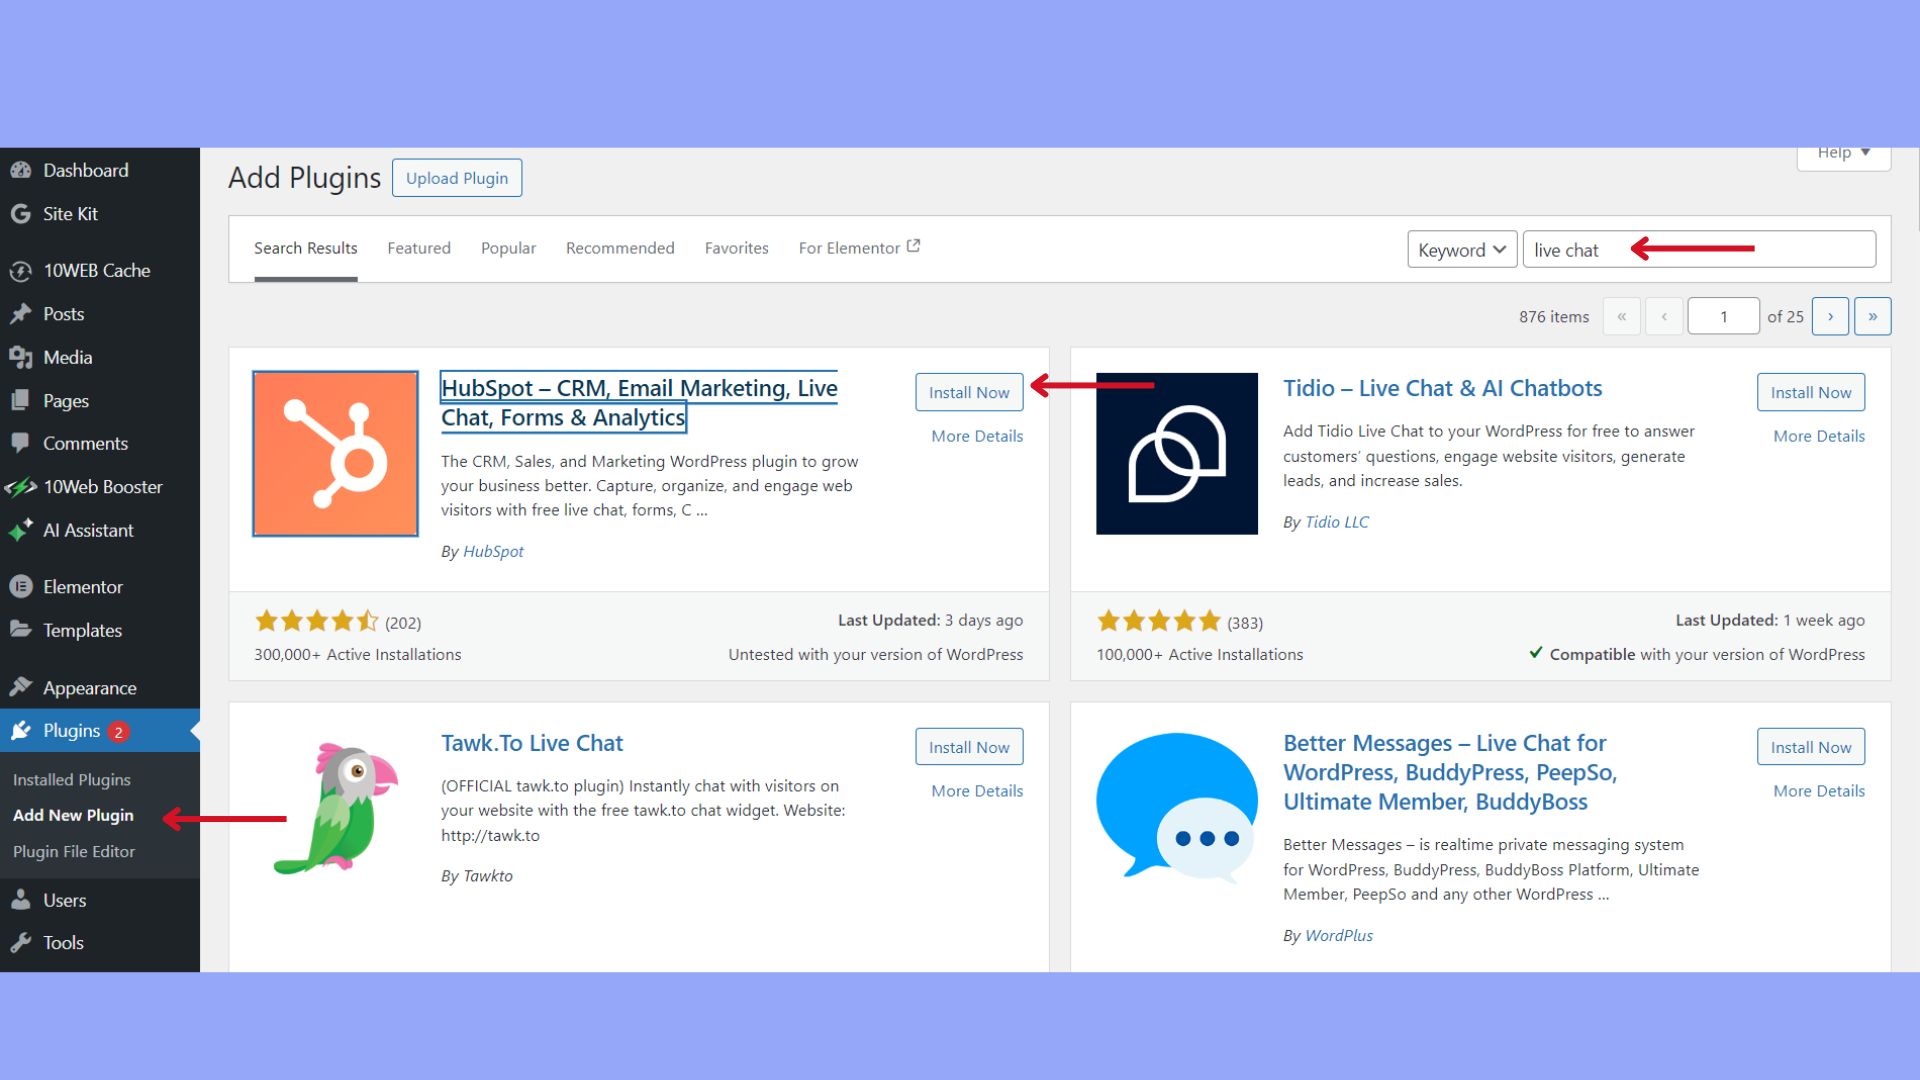
Assess your needs
Before diving into the numerous live chat plugins, and learning how to install live chat on WordPress, you should clearly define what you need. If your website is built on WooCommerce, seek a plugin that integrates seamlessly with it. For sites that rely on customer relationship management (CRM) systems, find plugins that offer CRM integrations. Consider whether you need a free version for a start or if a trial of a premium plugin might be more beneficial. So, there are many things you should consider for your individual and business needs.
Compare features and prices
Once you’ve understood your needs, it’s time to compare the features and pricing of the best live chat plugins:
Free vs. Premium: Many plugins come with a free version offering basic features. Premium versions usually expand functionality, such as increased chat volumes or advanced analytics.
Free live chat plugins: Typically include basic chat features suitable for small-scale operations.
Premium live chat plugins: Offer advanced features, like proactive chat invitations, which could justify their cost.
Always check the plugin’s page on the WordPress dashboard for the most up-to-date information and features. Look for live chat plugins with high ratings and a large user base, as these are likely to offer a proven track record of success and reliability.
Installing the live chat plugin
Integrating live chat into your WordPress website is either done by using the WordPress dashboard for direct installation or uploading the plugin manually if you have a plugin file available.
Installation via WordPress dashboard
If you are wondering how to install live chat on WordPress through the dashboard, here are your steps.
After searching and identifying the plugin you wish to use, click Install Now next to the plugin’s name. After the installation is complete, select Activate to enable the live chat on your WordPress website.
For example, I have installed the HotSpot plugin and after setting it up, it suggests creating a chat flow. Clicking it, I will land in this customization.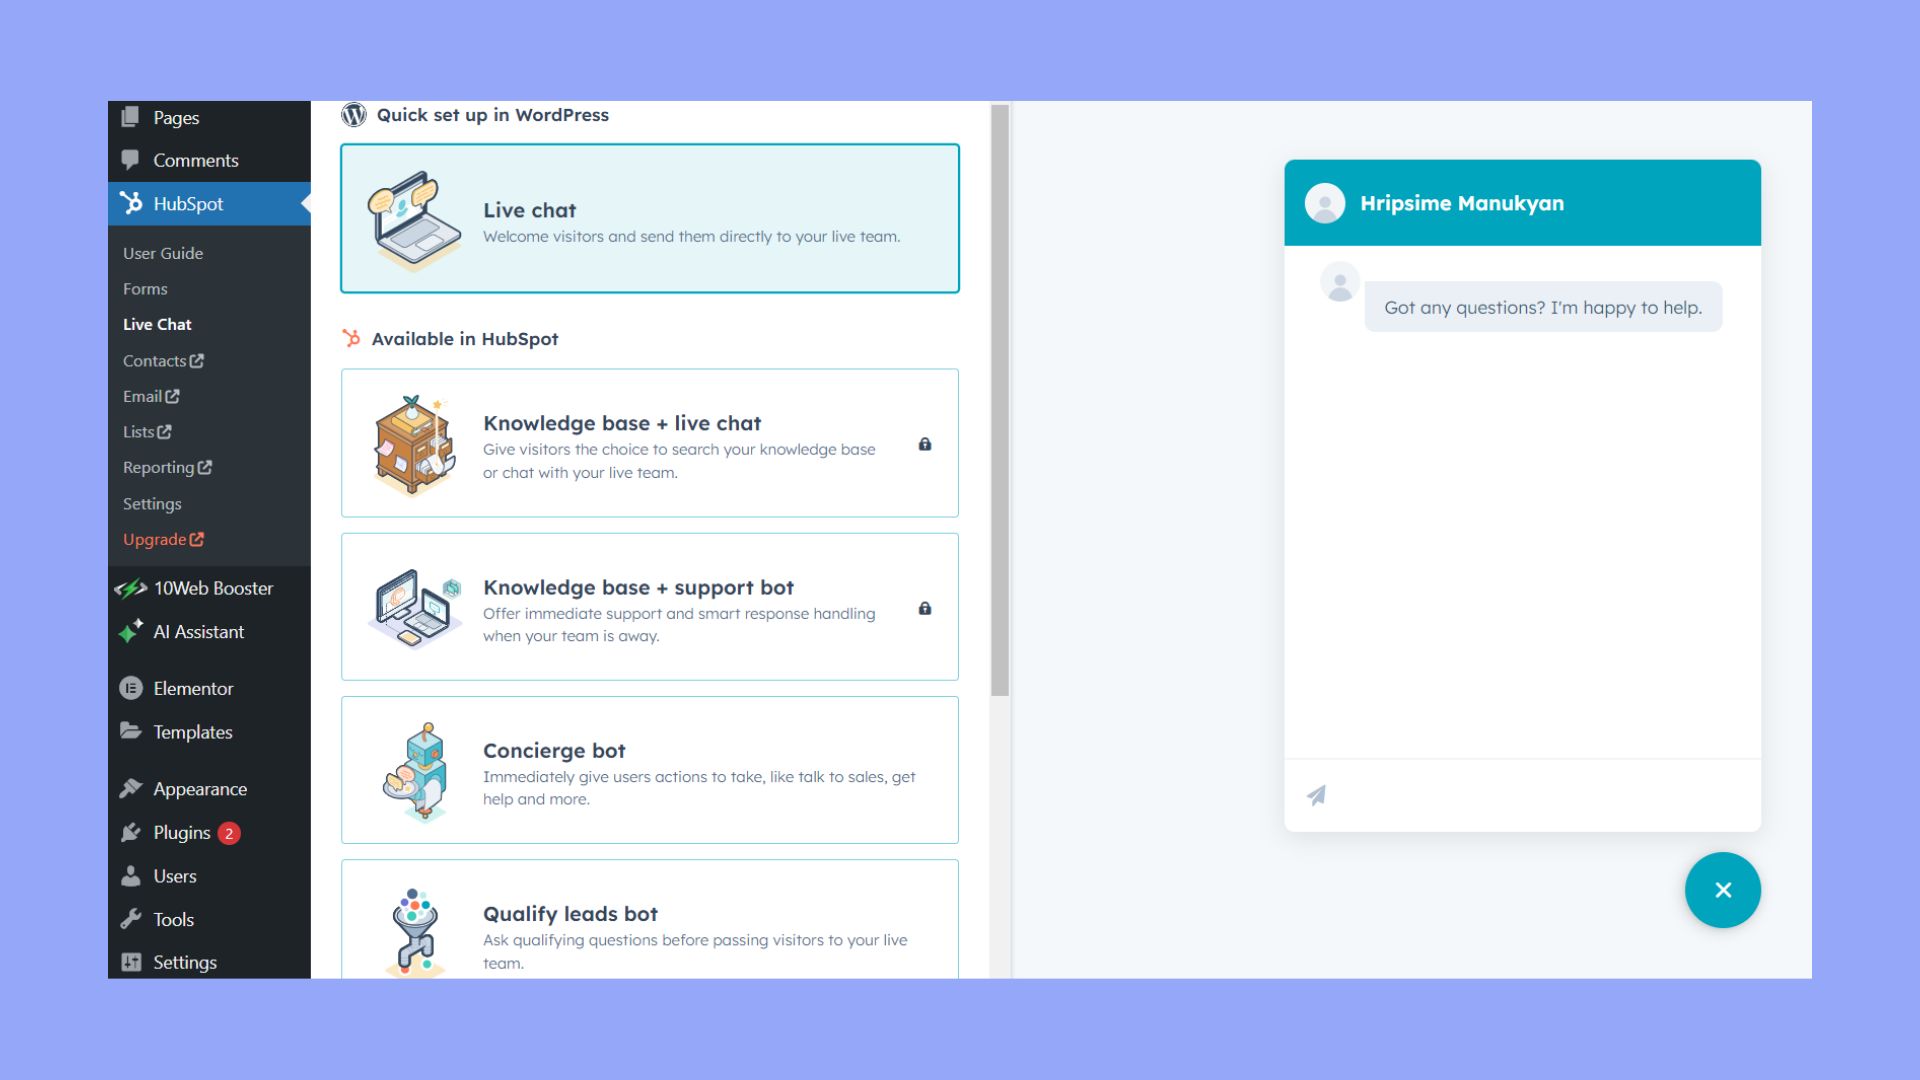
Manual plugin installation
If you have the plugin’s .zip file:
- Access your WordPress Dashboard.
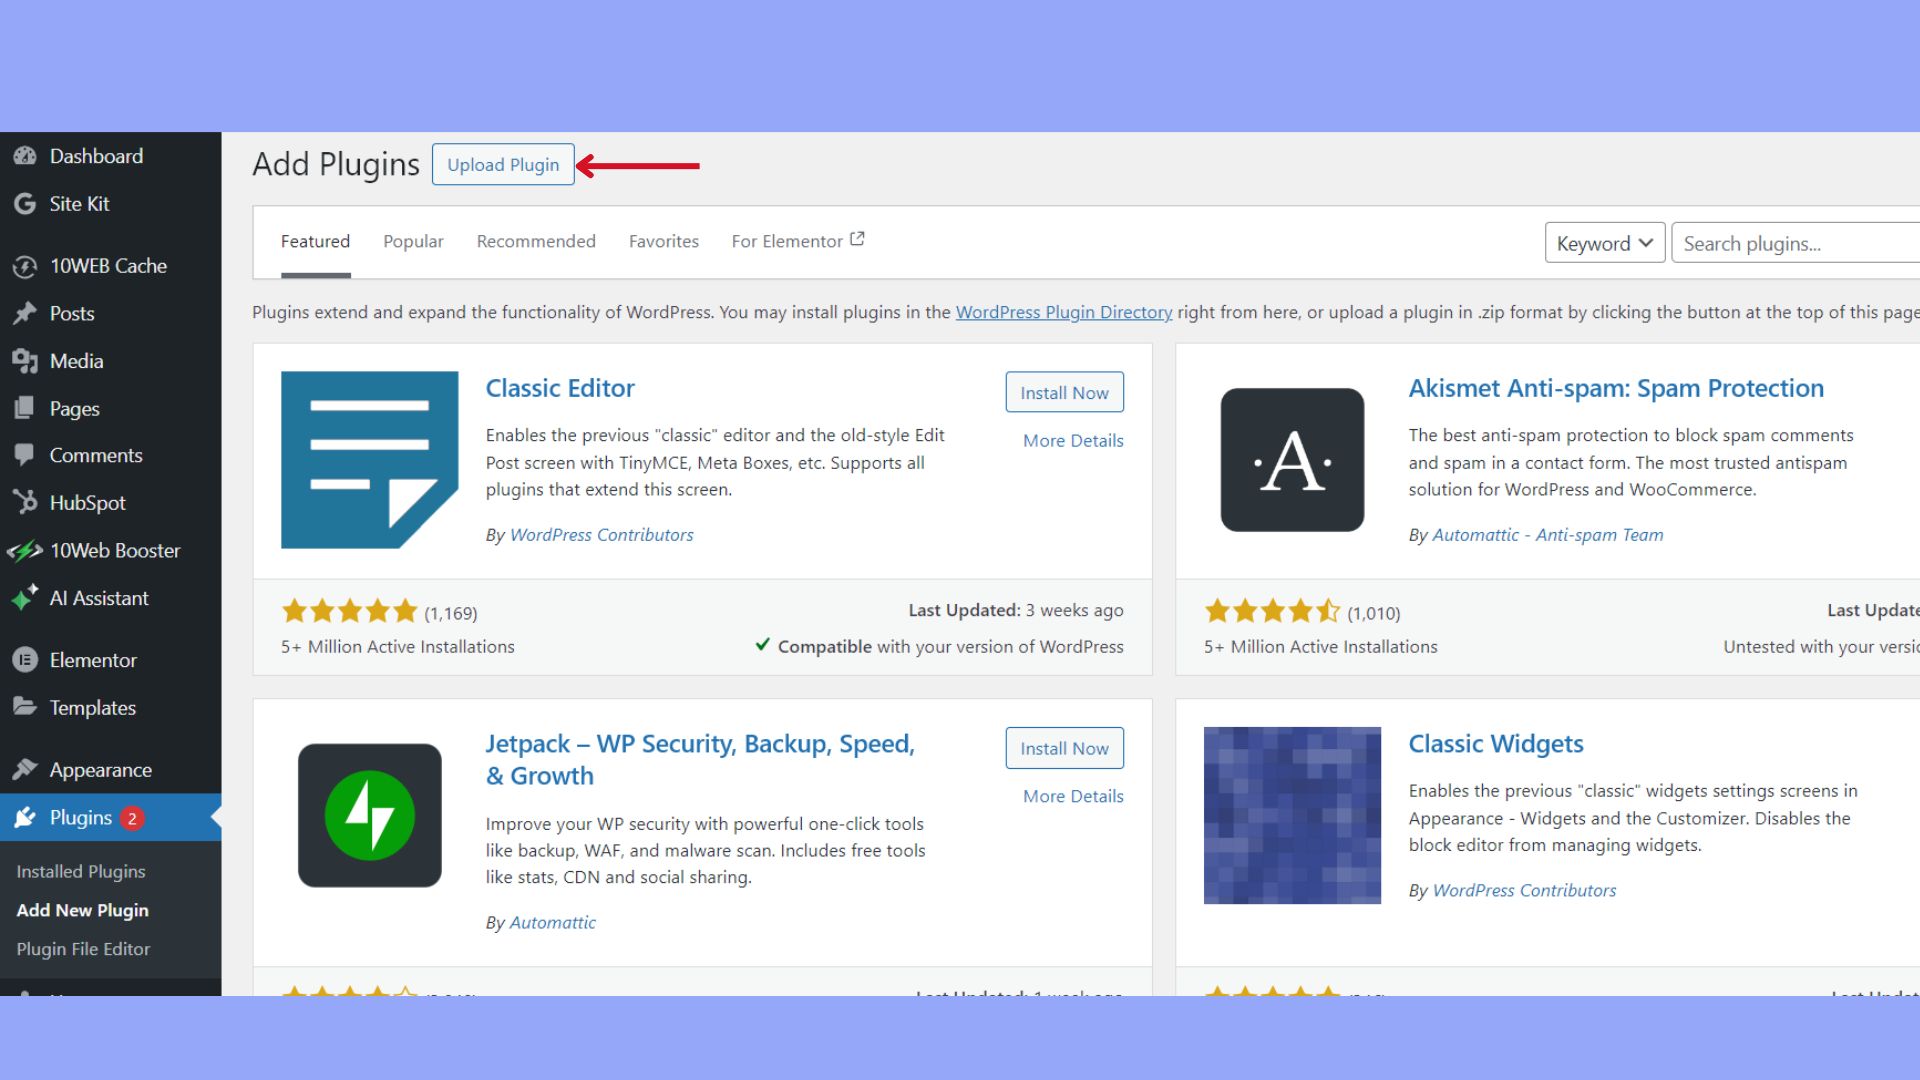
- Go to the Plugins section and choose Add New.
- Select the Upload Plugin button at the top of the page.

Afterward:
- Click Choose File and upload the plugin’s .zip file.
- Press Install Now to upload and install the plugin.
- Click Activate Plugin to start using the live chat on your WordPress site.
Throughout the installation, ensure to check the plugin’s documentation for specific instructions or tutorials provided by the plugin developer on wordpress.org, and always opt for plugins that are trusted and have good reviews.
Setting up live chat
Before you engage with your visitors through live chat, you need to first activate the live chat plugin on your WordPress website and then configure the essential chat settings to ensure a smooth experience for both you and your customers. You have installed and activated the live chat plugin now configure the settings to provide a personalized experience:
- Settings: Find the live chat settings under the newly appeared tab in your dashboard.
- Appearance: Customize the look of your chat window, including themes for both the maximized and minimized states.
- Notifications: Set up sound notifications to alert you of new messages.
- Customization: Adjust the chat widget’s appearance, such as colors and positions, to match your site.
Remember to save your settings once you’ve made all the necessary adjustments.
Customize live chat
To effectively integrate live chat into your WordPress site, the customization of the chat interface is critical for maintaining your brand’s identity. Tailor the visual design and response templates to offer your customers a seamless experience that reinforces your brand’s theme and message.
Adjust the visual elements
To align with your brand’s theme, start by tweaking the visual elements of your chat widget. Here’s what to consider:
- Upload your brand’s logo to the chat interface to foster brand recognition.
- Match the chat widget’s colors with your website’s color palette to ensure a cohesive look.
- Utilize any customization options available within your chosen live chat plugin to further tailor the chat’s appearance to reflect your brand’s aesthetic.
Add canned responses and templates
Using canned responses and templates saves time and ensures consistent communication. You can draft standardized replies for common inquiries that reflect your brand’s voice. And develop templates for personalized messages, which can be quickly adapted to address customer’s unique needs or questions.
By customizing the live chat widget to mirror your brand and preparing strategic responses, you’re set to offer a personalized and branded customer service experience directly from your WordPress site.
Integrate live chat with other tools
To optimize the performance of your WordPress website’s live chat, integrating it with other essential business tools enhances both functionality and efficiency. Let’s explore how you can connect live chat with your email and CRM systems and leverage analytics for actionable feedback.
Connecting to email and CRM
Most live chat software offers Application Programming Interfaces (APIs) that allow you to seamlessly connect with Customer Relationship Management (CRM) systems like HubSpot. By integrating live chat with your CRM, you can automatically save customer interactions and details, streamlining follow-ups.
- To integrate, locate the API settings within your live chat software.
- Follow the specific instructions to connect it with your CRM solution.
- Once integrated, real-time chat conversations can be converted into CRM records.
- This process automates the capture of leads and helps tailor email marketing strategies based on user interaction.
Use analytics and feedback
Integrating your live chat with analytics tools, such as Google Analytics, provides insights into user behavior and chat performance. It empowers you to make data-driven decisions.
Again you can utilize the provided plugin or API integrations to connect live chat with analytics software. Then you can track key metrics, such as engagement rate and customer satisfaction, directly within your analytics dashboard.
By implementing these integrations, you stay informed and reactive to the needs and behaviors of your website visitors, ensuring your live chat serves as an effective engagement tool.
Final thoughts
Installing live chat on your WordPress website is a step that can elevate your customer service and user engagement. With a variety of plugins available, you can select one that aligns with your business needs and seamlessly integrates with your website aesthetic. It is important to choose a plugin that is compatible with your version of WordPress and has positive user reviews.
With these considerations in mind, you now know how to install live chat on WordPress and improve your website’s interactivity through the addition of a live chat feature.
Simplify WordPress with 10Web
Skip and automate manual work with 10Web Managed WordPress Hosting. Optimize your WordPress website effortlessly.
Simplify WordPress with 10Web
Simplify WordPress with 10Web
Skip manual work with 10Web Managed WordPress Hosting.

Simplify WordPress with 10Web
Simplify WordPress with 10Web
-
 Experience automated website management
 -
Keep your site up-to-date with automatic updates
-
Forget about security threats and malware
 Experience automated website management