Understanding how to use shipping classes in WooCommerce is essential for managing your online store’s shipping rates efficiently. This guide for beginners will walk you through the process of setting up shipping classes, ensuring that your customers receive accurate shipping costs at checkout. Learn the basics, from creating shipping classes to applying them to your products, making your WooCommerce store more user-friendly and cost-effective.

Looking to sell online?
Create your custom online store in minutes with 10Web AI Ecommerce Website Builder and take your business online.
FAQ
How do WooCommerce shipping classes work?
What is the difference between shipping zone and shipping class in WooCommerce?
- Shipping zones: Define geographical areas where you ship products. You can set different shipping methods and rates for each zone, such as local, national, or international regions.
- Shipping classes: Group products with similar shipping requirements to set specific shipping rates. For example, you can create classes for heavy items, lightweight items, or special handling items.
How to set up shipping methods in WooCommerce?
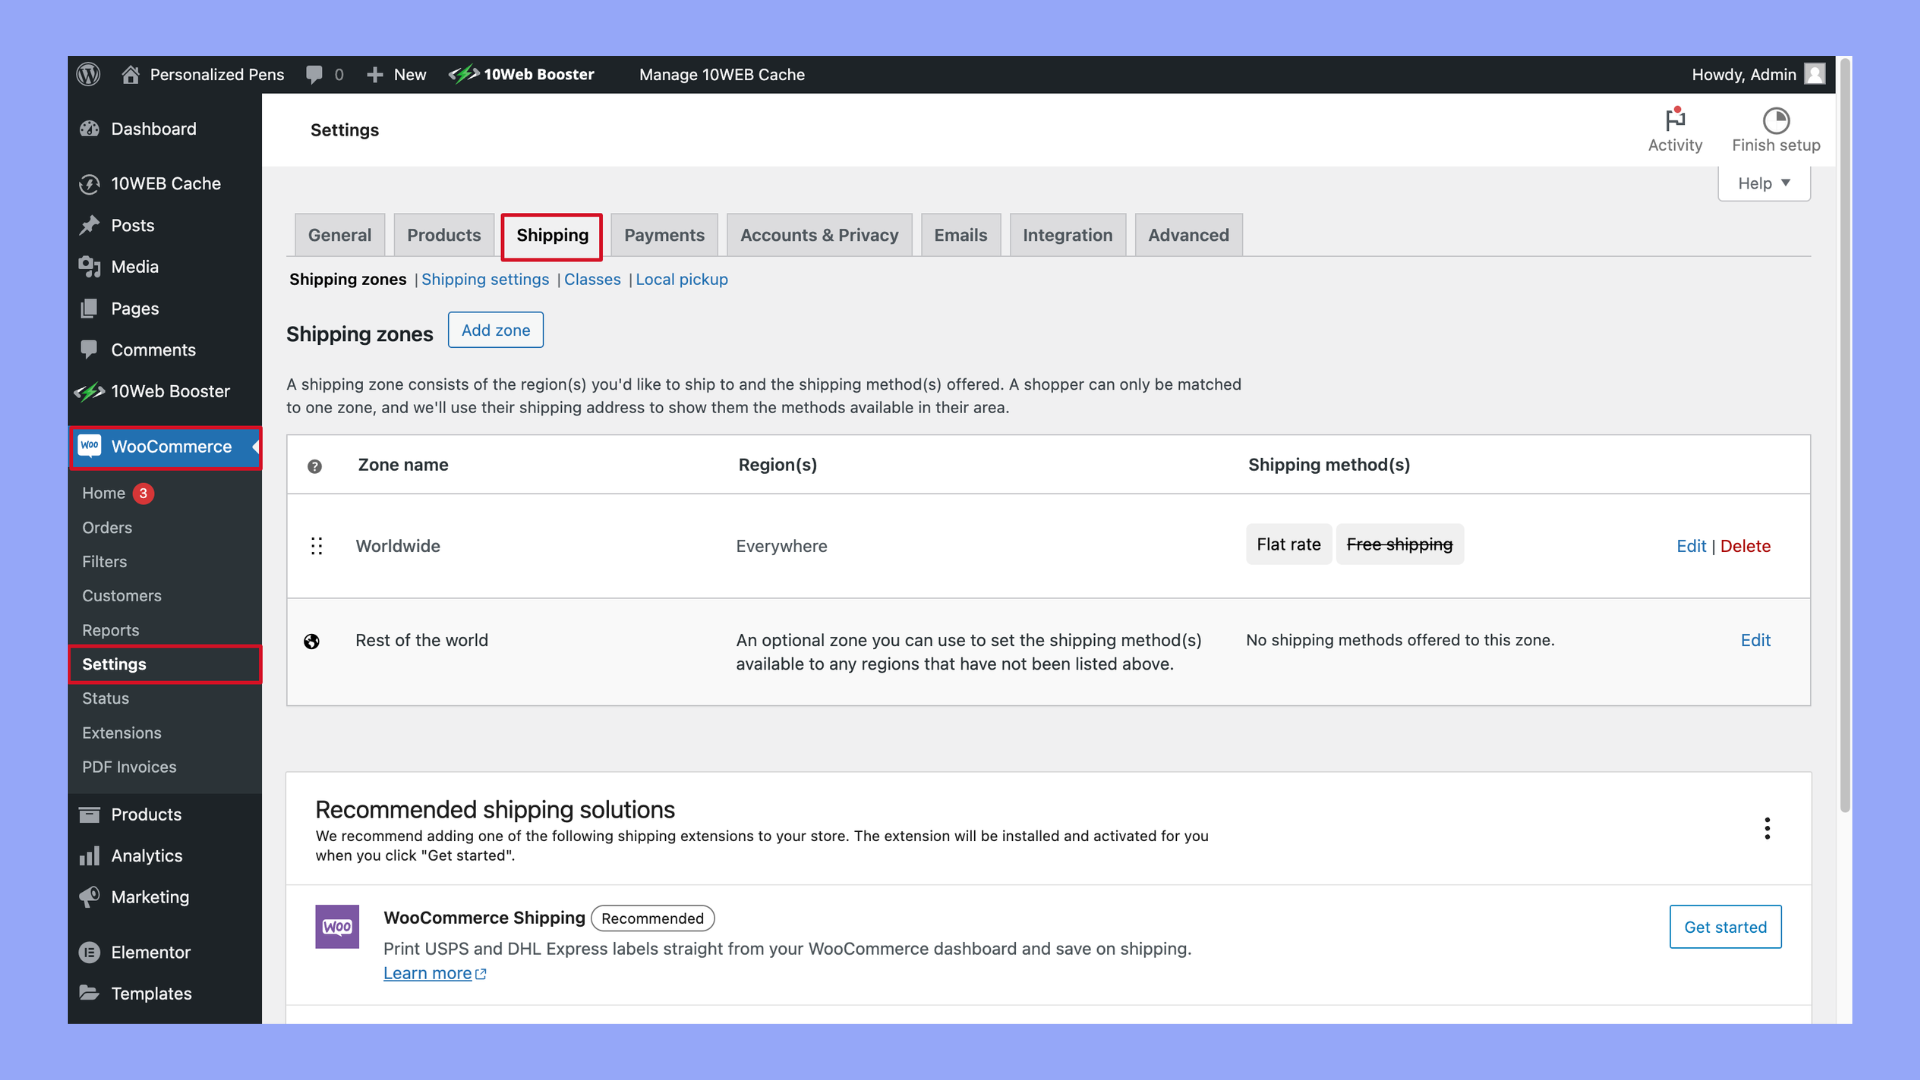
- Go to WooCommerce > Settings > Shipping.
- Click on Shipping Zones and add a new zone or edit an existing one.
- Within the zone, click Add shipping method and select the desired method (e.g., Flat Rate, Free Shipping, Local Pickup).
- Configure the settings for the chosen shipping method, such as cost, tax status, and conditions.
- Save your changes. Repeat for additional shipping zones and methods as needed.
How do I add a price to a shipping class in WooCommerce?
- Go to WooCommerce > Settings > Shipping.
- Click on the Shipping Zones tab and select the zone where you want to add the price.
- Click on the shipping method (e.g., Flat Rate) you want to edit.
- In the method settings, you will see a section for Shipping Class Costs.
- Enter the cost for each shipping class. You can specify different rates for different classes.
- Save your changes.
This configuration allows you to charge different rates based on the shipping class of the product being shipped.
Understanding WooCommerce shipping classes
Shipping classes in WooCommerce are a powerful tool that allows you to group products with similar shipping requirements. By using shipping classes, you can streamline your shipping processes, create more accurate shipping rates, and provide a better overall experience for your customers.
What are shipping classes?
Shipping classes are a way to categorize products that have the same shipping characteristics. For example, if you sell a variety of items such as books, clothing, and fragile glassware, you can create different shipping classes for each category. This allows you to assign specific shipping methods and costs to each class, ensuring that your shipping rates are fair and reflect the actual costs.
Why use shipping classes?
Using shipping classes can help you manage your shipping more effectively. Here are a few benefits:
- Simplified shipping rates: Instead of setting shipping rates for each individual product, you can set rates for entire classes of products. This makes it easier to manage and update shipping costs.
- Better cost control: By grouping similar products together, you can create more accurate shipping rates that reflect the actual shipping costs. This helps avoid overcharging or undercharging customers.
- Improved customer experience: Clear and fair shipping rates improve the customer experience and increase the likelihood of repeat purchases.
Example use cases
Here are a few examples of how you might use shipping classes:
- Heavy items: Create a shipping class for heavy items and assign a higher shipping rate to cover the additional cost.
- Fragile items: For items that need special handling, create a shipping class with specific shipping methods that ensure safe delivery.
- Free shipping: If you offer free shipping on certain products, create a shipping class for these items and set the shipping rate to zero.
By understanding and utilizing shipping classes, you can take greater control over your WooCommerce store’s shipping process, ensuring that your customers receive the best possible service at fair shipping rates.
Difference between shipping classes and shipping rates
Shipping classes and shipping rates are important parts of managing your WooCommerce store. They help you organize products and control shipping costs.
Shipping classes are used to categorize products. For example, you might have a class for bulky items like furniture and another for lightweight items like jewelry.
Shipping rates are the costs you charge for shipping. These rates can be different depending on the shipping class.
Here’s how to set shipping classes in WooCommerce:
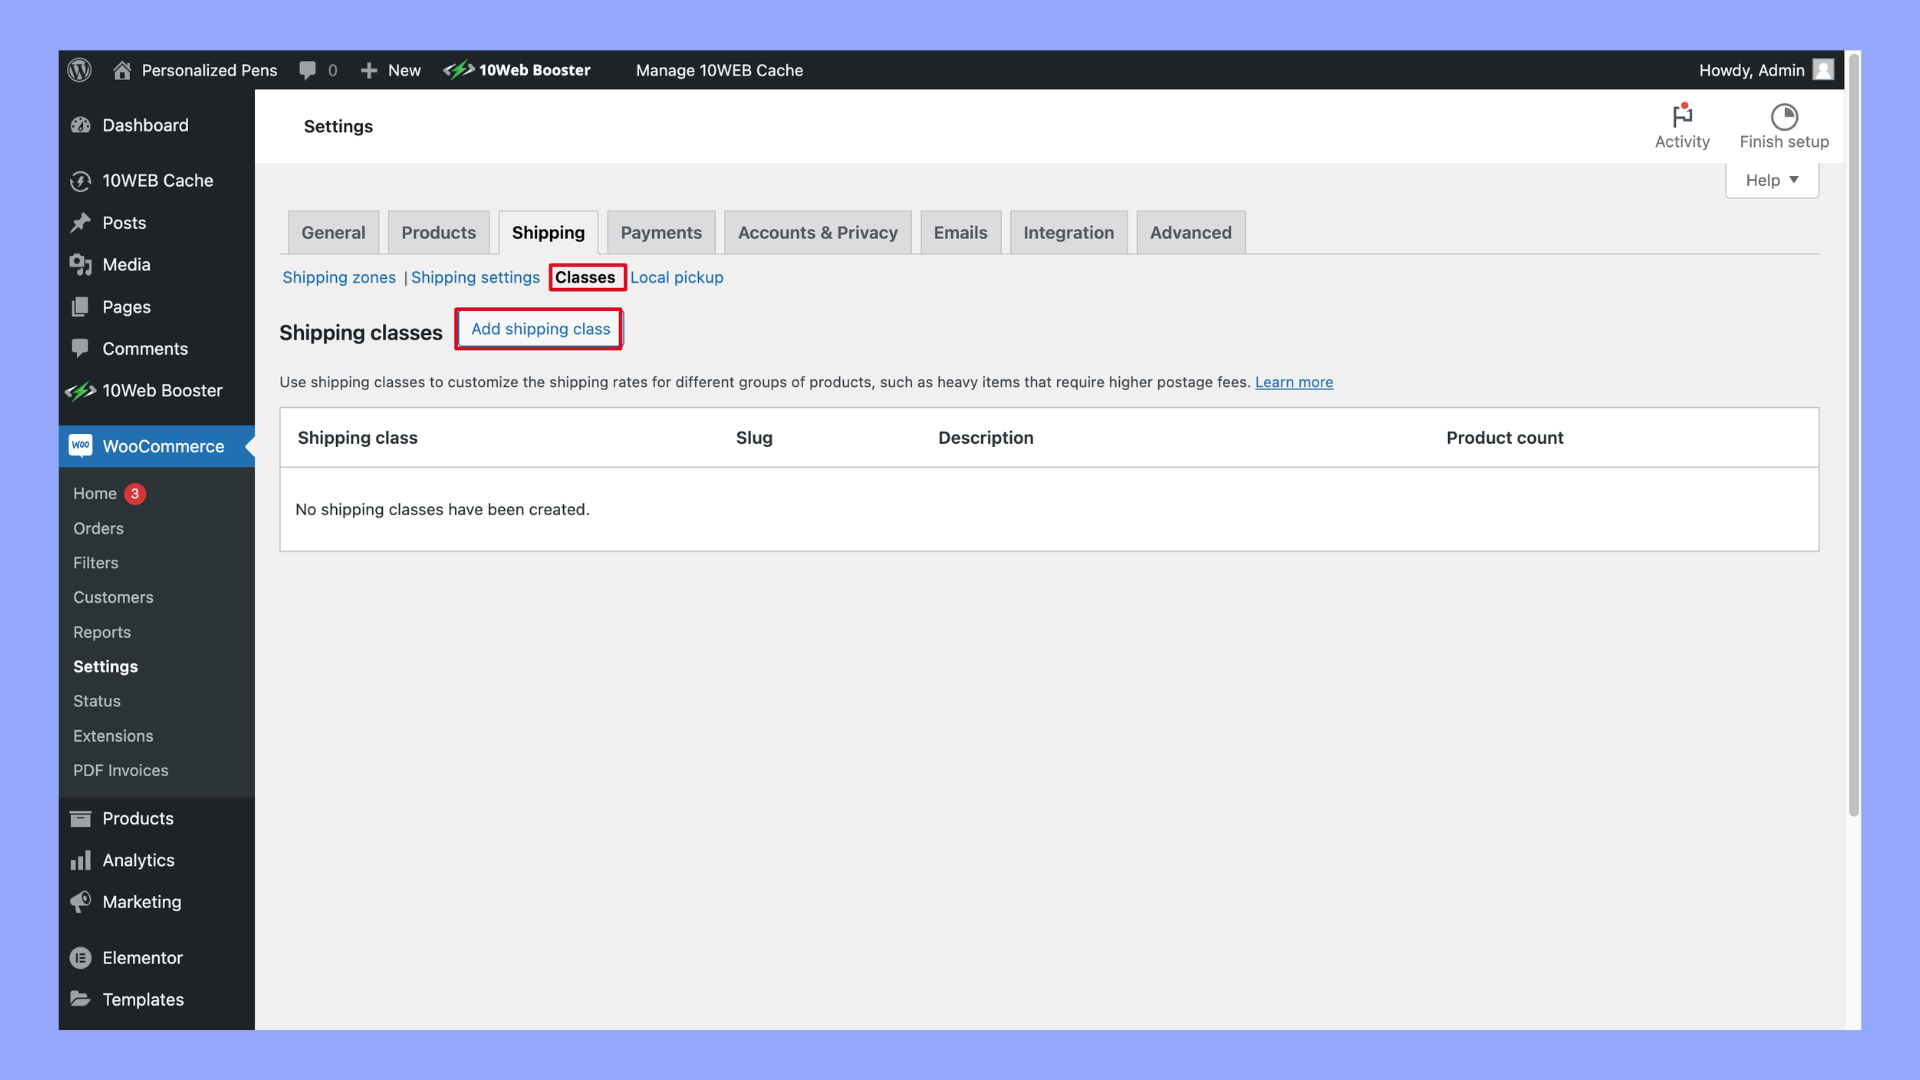
- Go to WooCommerce > Settings > Shipping > Classes.
- Click Add shipping class.
- Fill in the Shipping Class name and Slug.
- Save your shipping class.
Using a table to illustrate:
| Shipping Class | Example | Shipping Rate |
| Bulky | Couches, chairs | Extra $50 charge |
| Lightweight | Jewelry, t-shirts | Standard rate or free |
Different products may cost more or less to ship, and shipping classes help manage these differences more easily.
In your settings, you can assign a specific rate to each shipping class. For example, products in the Bulky class can have a higher rate to cover extra shipping costs, while Lightweight products might have a lower rate or even free shipping.
Make sure to utilize these settings to offer fair and clear shipping rates for your customers. This ensures that heavier or larger items have fair shipping costs compared to smaller items.
Looking to sell online?
Create your custom online store in minutes with 10Web AI Ecommerce Website Builder and take your business online.
Importance of shipping classes in WooCommerce
Shipping classes are vital for managing your WooCommerce store. They help you organize your products better and offer accurate shipping costs.
By using shipping classes, you can categorize products based on size, weight, or any other factor. This means you can charge different shipping rates for different types of products.
For example, you might create a Bulky Items shipping class for large products. Customers who buy these items will see higher shipping costs compared to smaller items. This ensures you cover the extra shipping expenses without losing money.
Shipping classes also simplify the checkout process. When customers see clear shipping costs, they’re less likely to abandon their cart. Transparency about shipping fees builds trust and improves your store’s reputation.
Additionally, shipping classes make it easier to offer promotions. If you want to run a free shipping offer only on lightweight items, you can set this up using the appropriate shipping class. This flexibility makes your marketing efforts more effective.
Finally, managing returns becomes easier. If you know the shipping class of a returned item, you can quickly estimate the cost and time for the return process. This speeds up customer service and enhances customer satisfaction.
Here’s a quick overview of how you might categorize your products:
| Shipping Class | Example Products | Shipping Cost |
| Standard Items | Books, Clothes | $5 |
| Bulky Items | Furniture, Large Toys | $20 |
| Fragile Items | Glassware, Electronics | $15 |
In summary, shipping classes make your store more organized, help manage costs, and enhance customer experience.
Setting up shipping classes in WooCommerce
When you use shipping classes in WooCommerce, you make managing and charging for shipping much easier. This ensures your products are shipped with the correct rates and methods. Let’s walk through the process of setting up shipping classes.
Accessing shipping class settings
To start, you need to access the shipping class settings in WooCommerce. Follow these steps:
- Open your WordPress dashboard.
- Navigate to WooCommerce > Settings.
- Click on the Shipping tab located at the top of the settings page.

- Under the Shipping tab, you will find a link to classes. Click on it to proceed.
This opens the section where you can manage your shipping classes. You can add, edit, and remove shipping classes as needed.
Creating new shipping classes
Here’s how you create shipping classes for your products:
- Click the Add shipping class button.
- Enter the name of the shipping class. For example, you might name a class Heavy for larger items.
- Either leave the slug empty to auto-generate it or enter your custom identifier.
- Provide a brief description to clarify the use for this class, like Used for items over 20 lbs.
- Click the Save shipping classes button to store your new class.

After creating your shipping classes, you can now assign them to products within your WooCommerce store. This helps ensure that your shipping rates and methods are applied correctly based on the product type.
By following these steps, you will get a good understanding of how to use shipping classes in WooCommerce and improve your store’s shipping process.
Looking to sell online?
Create your custom online store in minutes with 10Web AI Ecommerce Website Builder and take your business online.
Assigning shipping classes to products
Assigning shipping classes in WooCommerce helps you better manage shipping rates for different types of products. You can set these classes for individual items or handle multiple products at once.
Individual product assignment
To assign a shipping class to a single product, follow these steps:
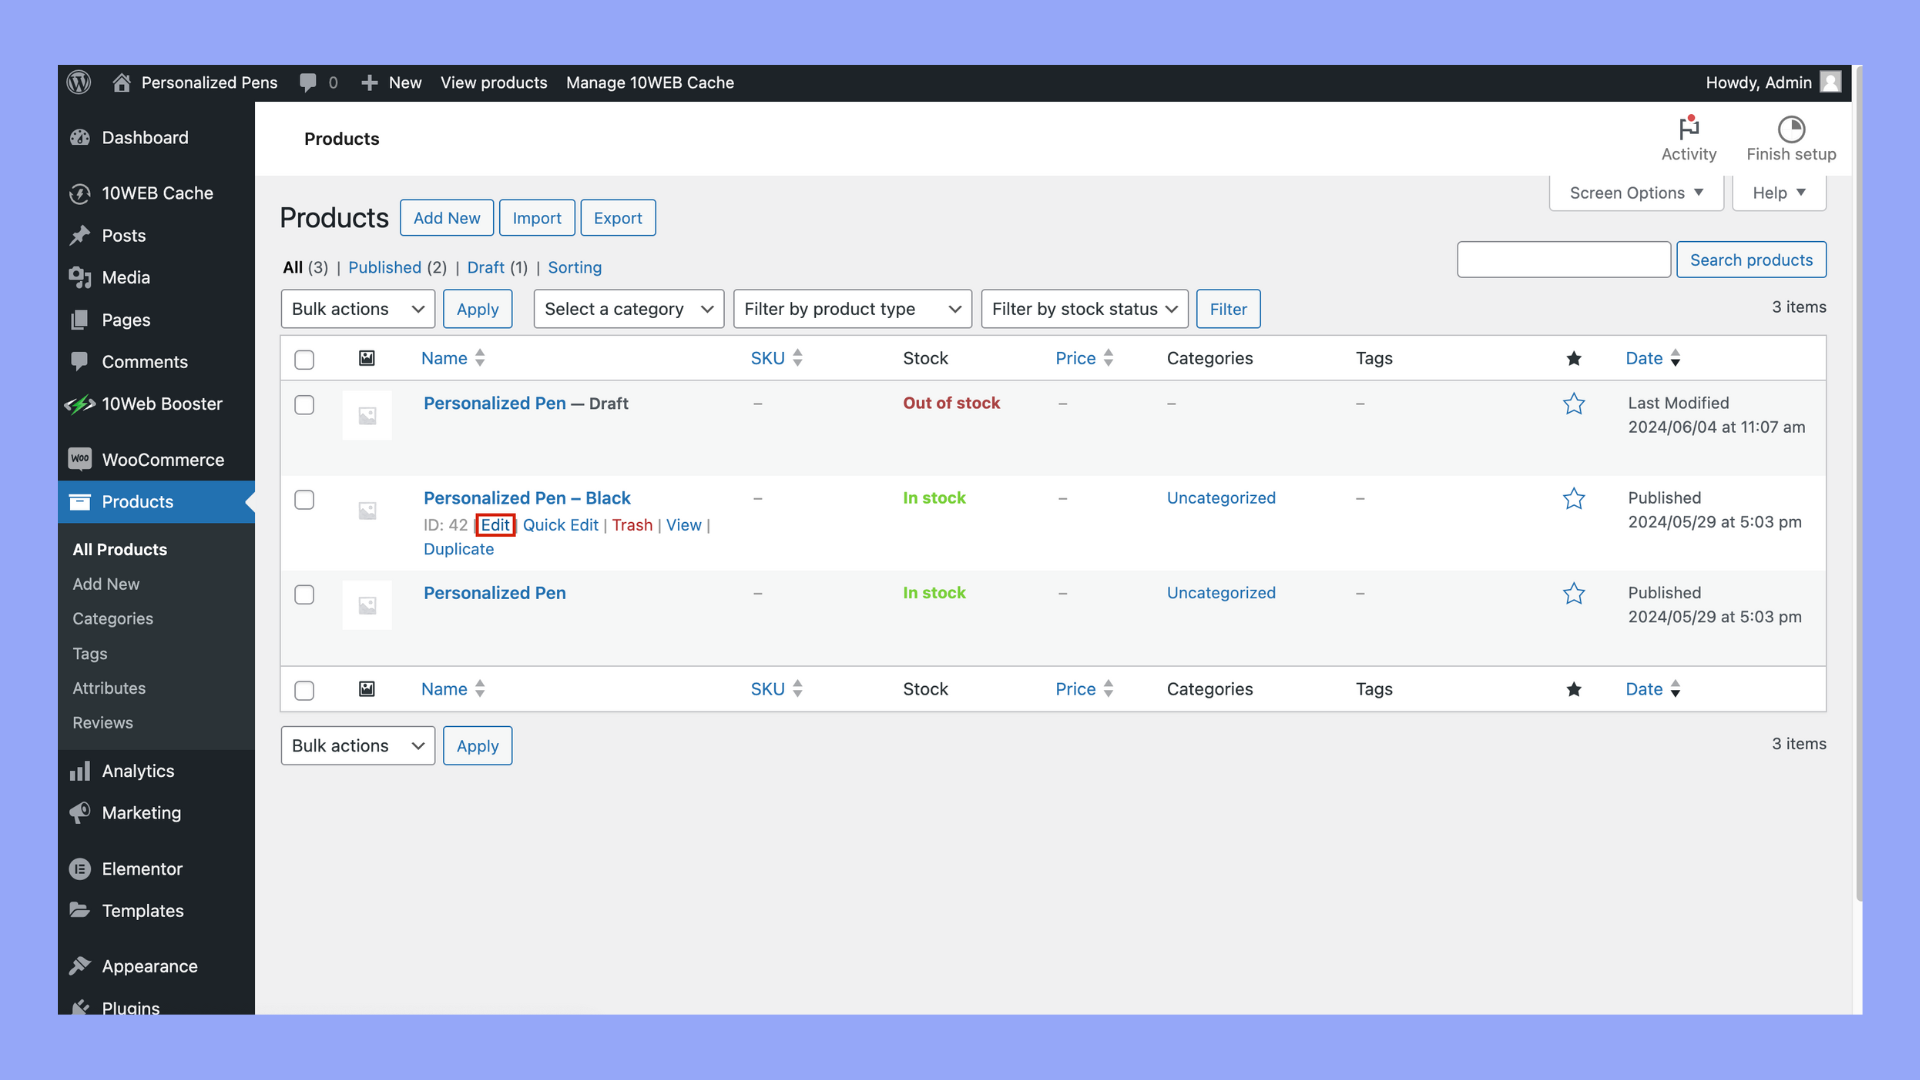
- Go to WooCommerce > Products in your WordPress admin dashboard.
- Locate the product you want to update and click Edit.
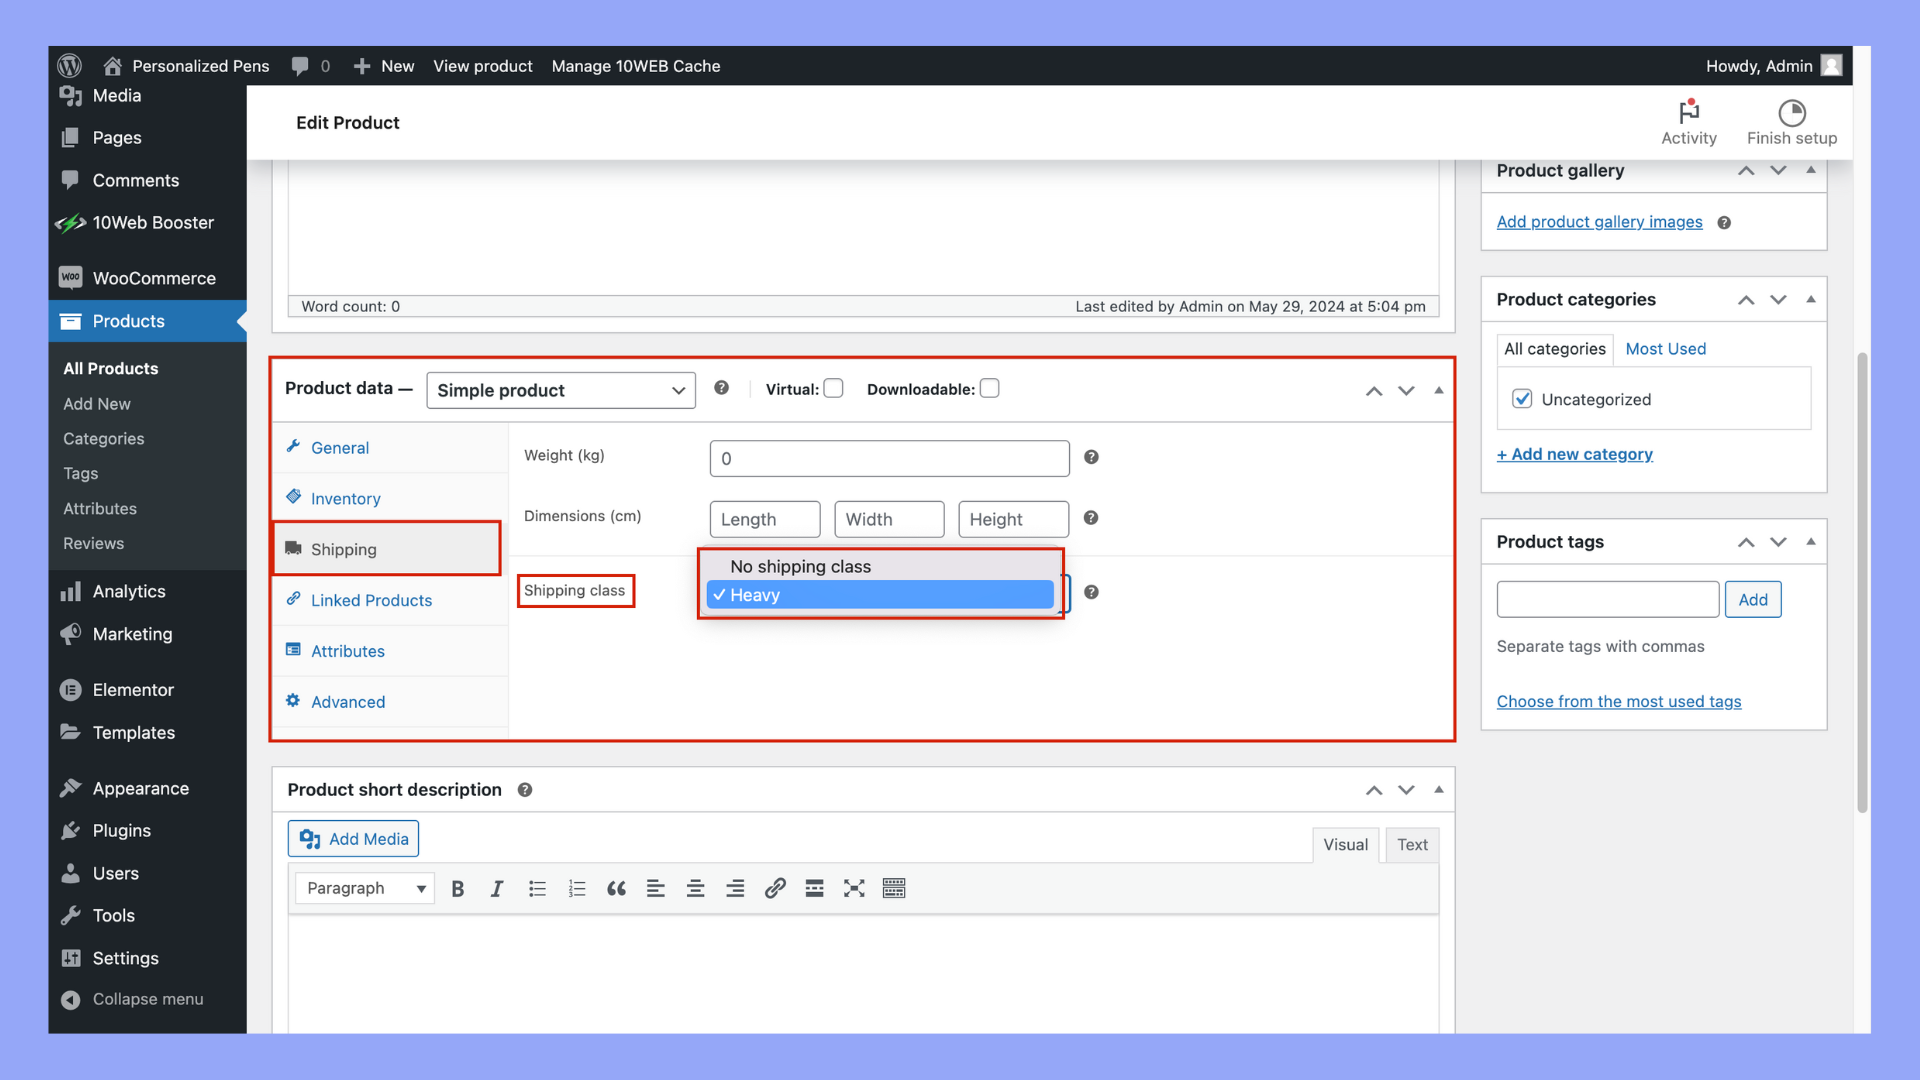
- In the Product Data box, go to the Shipping tab.
- In the Shipping Class dropdown, select the appropriate shipping class for the product.
- Click Update to save your changes.
This method is useful for updating products one at a time. For instance, you might have a couch that belongs in a Bulky Items shipping class due to its large size.
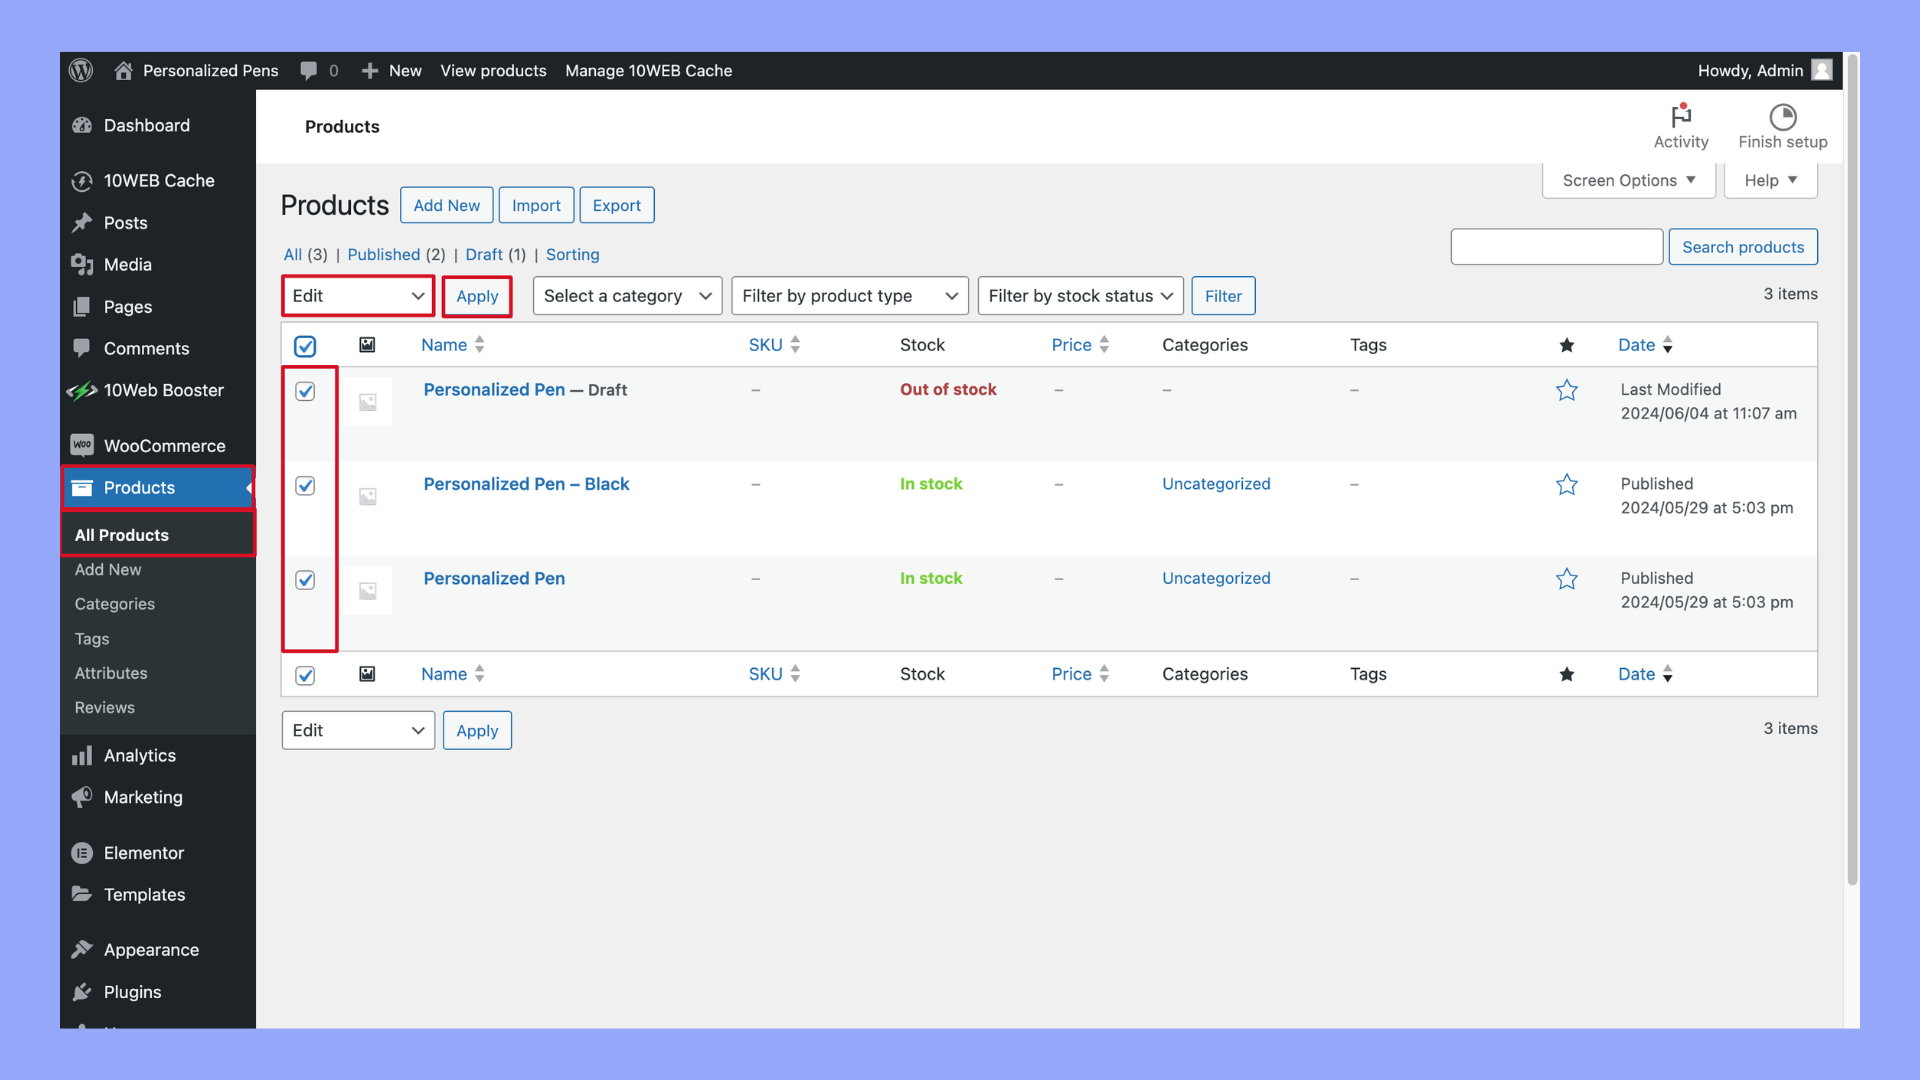
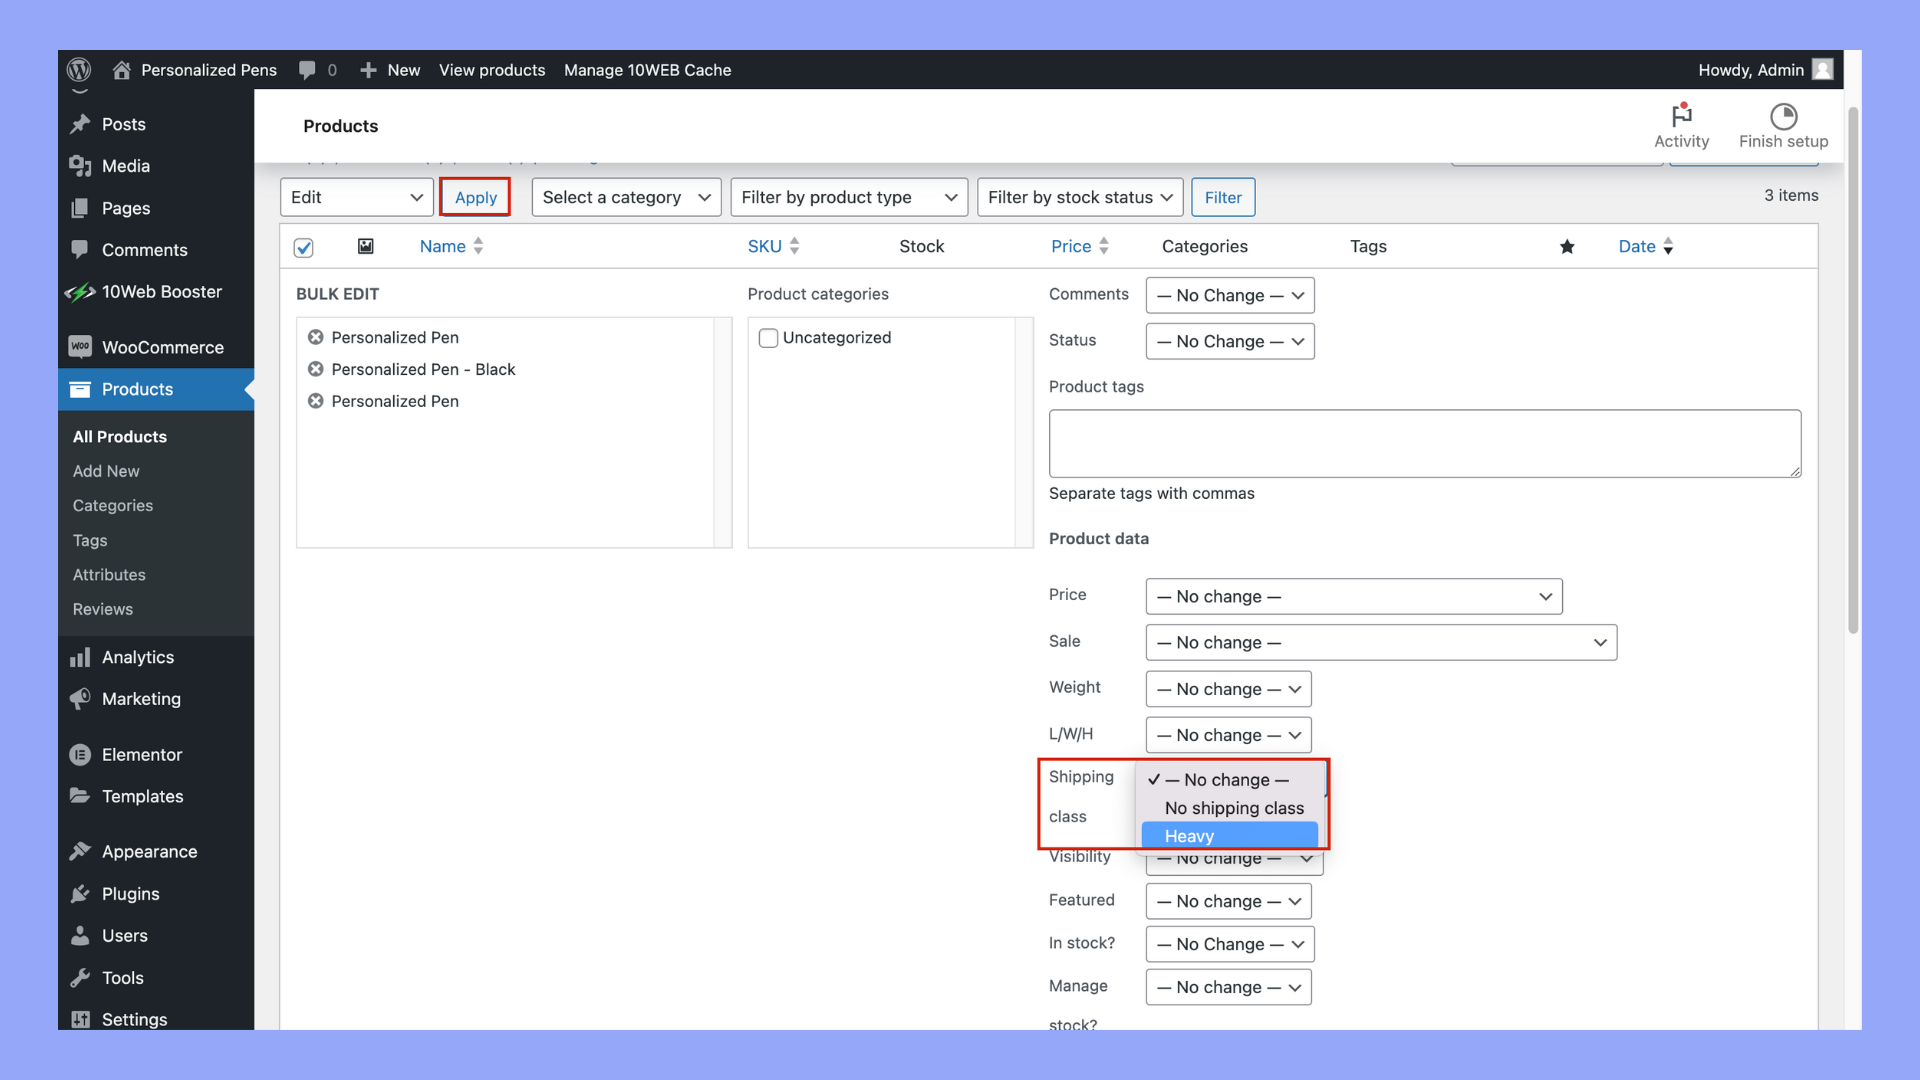
Bulk edit product shipping classes
If you need to update shipping classes for multiple products at once, bulk editing can save time. Follow these steps:
- Go to WooCommerce > Products in your WordPress admin dashboard.
- Select the checkbox next to each product you want to update.
- Click the Bulk Actions dropdown, choose Edit, and hit Apply.
- In the bulk edit screen, find the Shipping Class dropdown.
- Select the desired shipping class and click Update.
This process is ideal for assigning shipping classes like Lightweight Items to multiple small products in one go. Learning how to set up shipping classes in WooCommerce can be very helpful for managing different rates efficiently.
Cost calculation for shipping classes
Calculating shipping costs accurately in WooCommerce is crucial for both your business and your customers. You can set different costs based on the product’s shipping class, and combine costs if multiple classes apply.
Defining shipping class costs
To set up costs for shipping classes, go to WooCommerce > Settings > Shipping > Classes. Here, you’ll see options to Edit or Delete existing shipping classes.
- Click Edit to adjust existing classes or Add new ones.
- Enter a name, slug, and description for the class.
- Set the cost for the class in the Cost field.
You can specify unique costs for each shipping class. For example, you might charge an extra $20 for bulky items. Ensure the costs align with the product’s size and shipping requirements.
Combining costs for multiple shipping classes
When a product falls into multiple shipping classes, WooCommerce combines the costs. You need to configure how these costs should be calculated.
- Go to Shipping Zones and select Add Shipping Method.
- Choose Flat Rate and then click Edit.
- Set the Calculation Type to either Per Class or Per Order.
- Per class: Charges are calculated for each class separately and added up.
- Per order: A single highest cost is applied to the entire order.
For example, if you have a bulky item ($20) and a fragile item ($10), Per Class would result in a $30 shipping charge, while Per Order would only charge $20. Select the method that best suits your shipping strategy.
Looking to sell online?
Create your custom online store in minutes with 10Web AI Ecommerce Website Builder and take your business online.
Advanced shipping options and plugins
Adding advanced shipping options and plugins to your WooCommerce store can help tailor your shipping rules to fit various needs. This section explores flexible shipping plugins and configuring table rate shipping to meet specific requirements.
Flexible shipping plugins
Flexible shipping plugins offer a range of tools for managing complex shipping scenarios. These plugins allow you to set custom rules based on various factors such as weight, dimensions, and shipping zones.
Key features:
- Conditional shipping rules: Set different shipping rates based on order weight, item quantity, or cart value.
- Shipping zones: Define specific regions with their own shipping methods.
- Shipping class integration: Easily incorporate your existing shipping classes to fine-tune the shipping costs.
How to use a flexible shipping plugin:
- Navigate to WooCommerce > Plugins.
- Click Add New and search for a flexible shipping plugin.
- Install and activate the plugin.
- Go to the plugin’s settings under WooCommerce > Settings > Shipping.
- Configure the shipping rules based on your needs.
Flexible shipping plugins can simplify complex shipping setups, ensuring you meet customer expectations and control costs efficiently.
Table rate shipping configuration
Table rate shipping allows you to set shipping rates based on a range of criteria, making it ideal for stores with diverse product sizes and weights. These configurations can be managed through WooCommerce-compatible plugins or extensions.
Key options:
- Rate calculation: Set rates based on total weight, number of items, or order total.
- Multiple rates: Define separate rates for different shipping classes.
- Customizable tables: Create shipping tables that reflect various conditions.
Steps to set up table rate shipping:
- Go to WooCommerce > Settings > Shipping.
- Select Table Rate Shipping from the available methods.
- Click Add Shipping Method and enable it.
- Configure the shipping rates by adding new table rows. For each row, specify conditions like Weight, Max and Min Cost, and Shipping Class.
- Save changes to apply the new rates.
Using table rate shipping can provide precise control over your shipping costs and help streamline the order fulfillment process. Incorporating table rate settings with shipping classes ensures that different products are appropriately charged, enhancing your store’s flexibility and efficiency.
Managing shipping classes
Making changes to your shipping classes or removing ones you no longer need can help keep your WooCommerce store organized and efficient.
Editing shipping classes
To edit a shipping class:
- Navigate to WooCommerce > Settings in your WordPress dashboard.
- Click on the Shipping tab at the top.
- Select the Shipping classes link underneath.
- Find the shipping class you want to modify.
- Click the Edit button next to the shipping class name.
- Update the name, slug, or description as needed.
- Click Save to apply your changes.
Editing shipping classes allows you to keep details accurate, like renaming the class or updating its description to better reflect its purpose.
Deleting shipping classes
To delete a shipping class:
- Go to WooCommerce > Settings from your WordPress dashboard.
- Click on the Shipping tab.
- Navigate to the Shipping classes link.
- Locate the shipping class you wish to remove.
- Click the Delete button beside the class name.
- Confirm that you want to delete the shipping class.
Deleting a shipping class is useful for removing outdated or unused classes, ensuring that your shipping setup remains clean and relevant.
Conclusion
Mastering how to use shipping classes in WooCommerce enhances your store’s efficiency and customer satisfaction. By properly setting up and applying shipping classes, you ensure accurate shipping rates, which can boost your sales and streamline your operations. Implement these tips to make your WooCommerce store more professional and customer-friendly.
Looking to sell online?
Create your online store in minutes
Create your online store in minutes with 10Web AI Ecommerce Website Builder.