Integrating a payment gateway into your WordPress site is essential for seamless transactions. This guide covers evaluating options, understanding transaction fees, and exploring popular gateways like PayPal, Stripe, and Authorize.Net. It also delves into integrating without WooCommerce, using alternative plugins, payment forms, and custom solutions.
Additionally, it offers tips for managing online transactions, optimizing user experience, and ensuring a smooth launch. By following these steps, you’ll select and implement the right payment gateway, enhancing your e-commerce operations and customer satisfaction.
Choosing the right payment gateway
Before integrating a payment gateway into your WordPress site, it’s important to evaluate the options and understand their transaction fees to assess one that fits your payment needs best.
Popular payment gateways for WordPress
Below are some of the most widely-used payment gateways for WordPress sites. These providers offer various features tailored for an ecommerce store.
- PayPal: Well-known for its broad user base and ease of use.
- Stripe: Valued for its powerful API and flexibility in processing payments.
- Authorize.Net: Recognized for its security and reliability.
- Braintree: A member of the PayPal family, offering similar trustworthiness.
- 2Checkout: Renowned for international payment options with localized experiences.
Assessing your payment needs
First, list the currencies and regions your ecommerce store will serve. Next, consider the different payment options you’d like to offer your customers. It’s essential to choose a gateway that supports these elements and cater to your store’s specific needs.
Understanding transaction fees
All payment gateways come with their own set of transaction fees. Typically, you’ll encounter a percentage per transaction plus a fixed fee. Here’s a simplified breakdown:
- PayPal: 2.9% + $0.30 per transaction.
- Stripe: 2.9% + $0.30 per transaction.
- Authorize.Net: 2.9% + $0.30 per transaction plus a monthly fee.
- Braintree: 2.9% + $0.30 per transaction.
- 2Checkout: Varies by country, often higher for international transactions.
It’s crucial to consider these costs as they will impact your profit margins. Look for hidden fees or minimums that could affect smaller volume shops.
Integrating payment gateway without WooCommerce
While WooCommerce is a popular choice for adding payment gateways to WordPress, there are alternatives that allow you to integrate payment processing smoothly without the need for WooCommerce. Explore various methods such as using alternative plugins, payment forms, and shortcode, or developing a custom payment solution tailored to your site’s requirements.
Exploring alternative plugins
To add a payment gateway to your WordPress site without WooCommerce, start by exploring alternative plugins that provide a similar functionality:
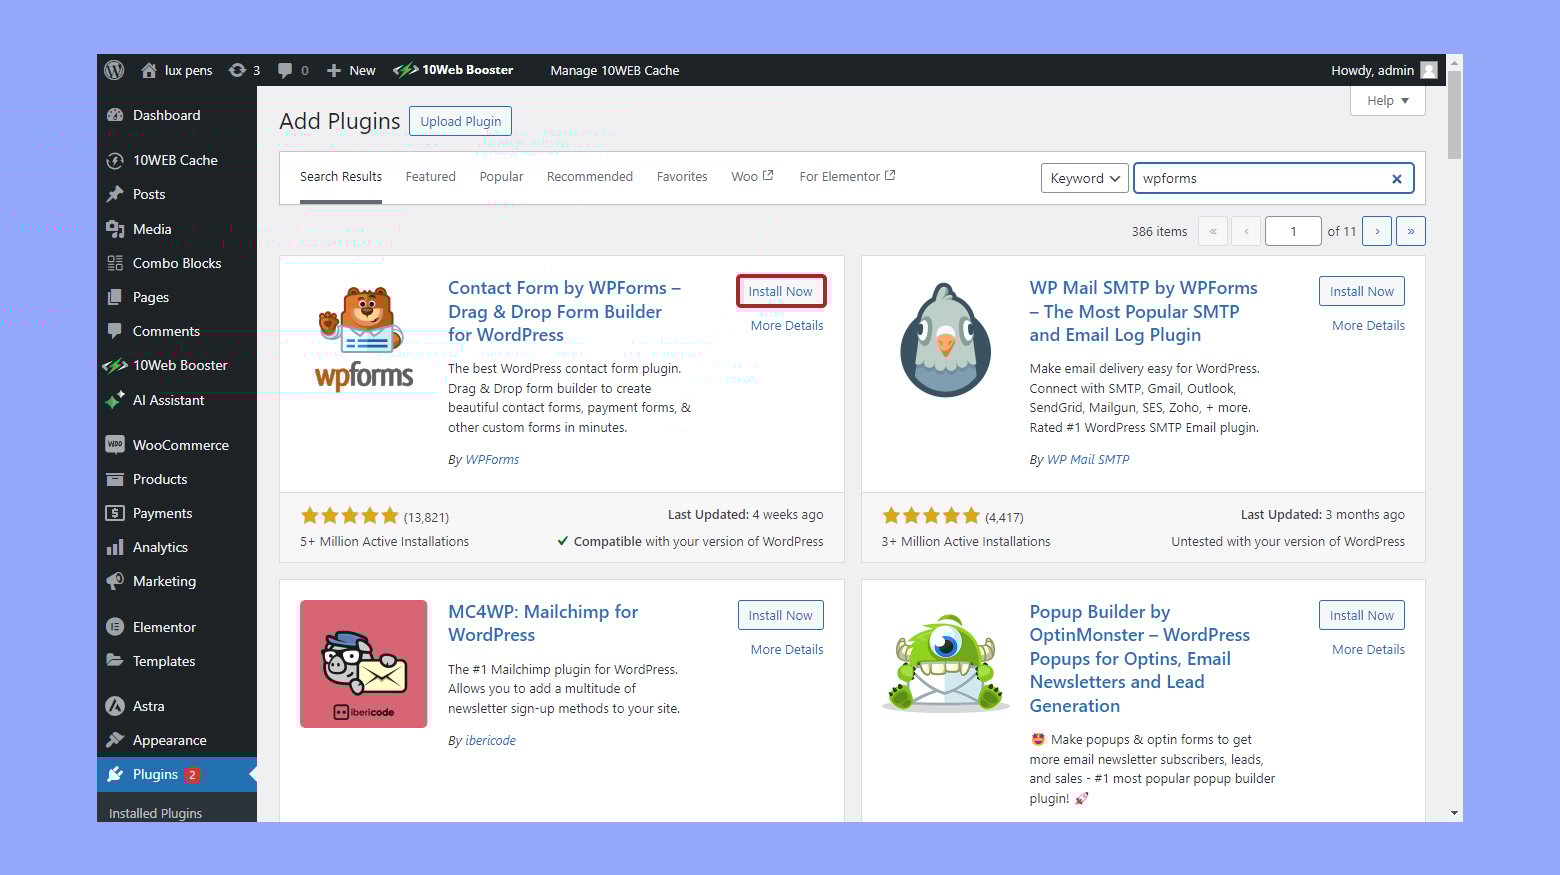
Look for plugins like ProfilePress, WPForms, or others that support payment gateway integration. For the purpose of this blog, we will use WPForms.
- Install your chosen plugin by going to your WordPress dashboard, clicking on Plugins, then Add New, and searching for the plugin by name.

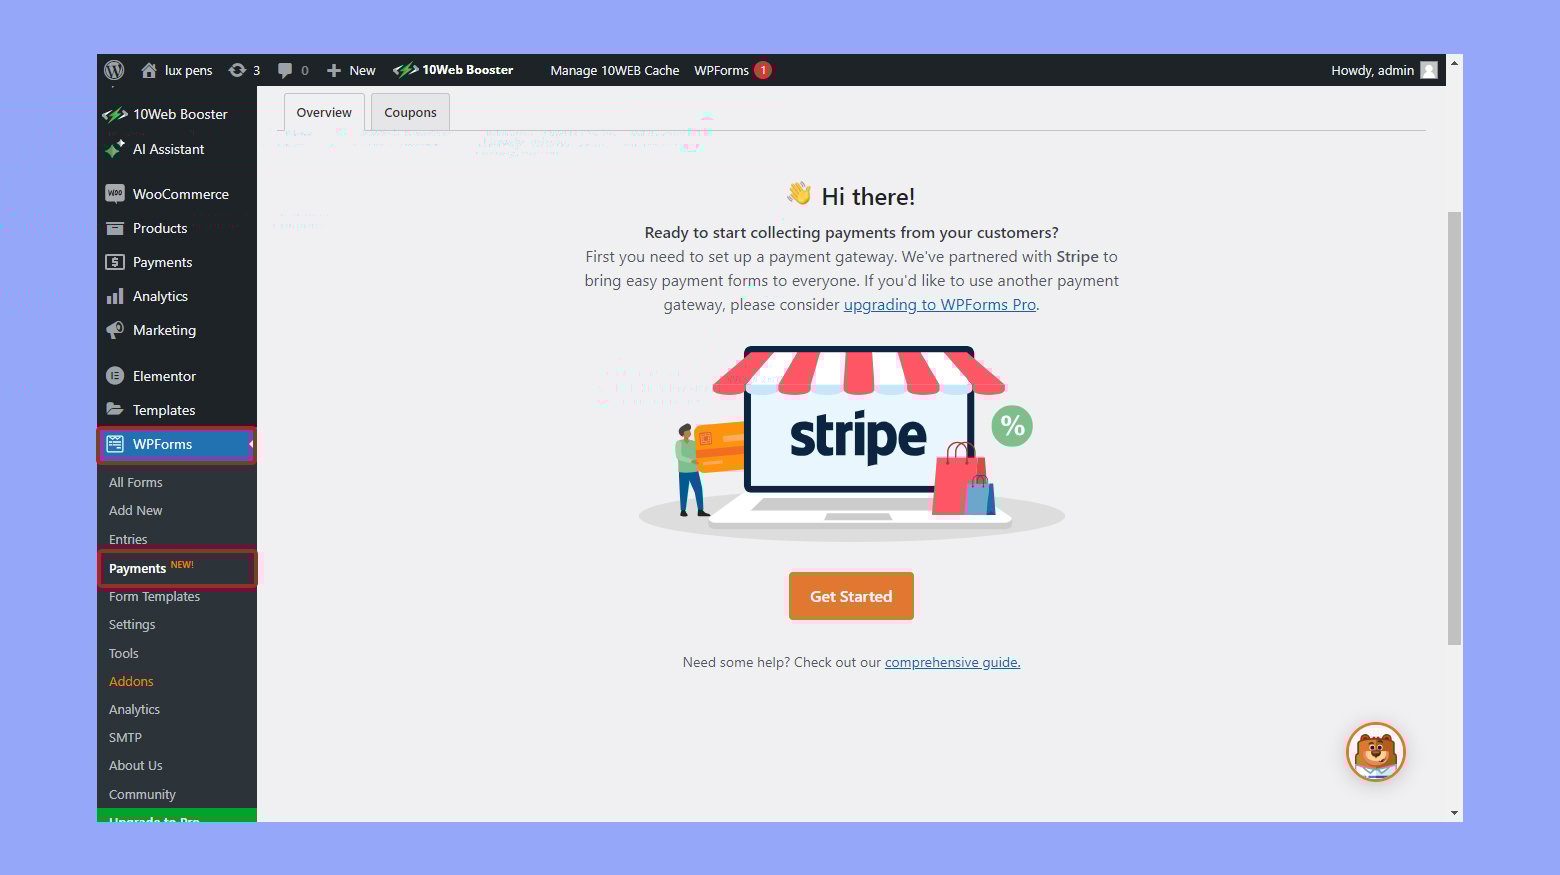
- Once installed, activate the plugin and access its settings, usually found in the WordPress dashboard’s side menu.
- Locate the section for payment integrations, which might be labeled Payments, Payment Gateways, or similarly.
- Configure your payment gateway by entering your API keys and selecting the specific payment methods you wish to accept.
Create your custom online store in minutes with 10Web AI Ecommerce Website Builder and take your business online. 
Looking to sell online?
Payment forms and shortcode integration
Another method for integrating a payment gateway involves using payment forms and shortcodes. Certain plugins, like WPForms, allow you to create customized payment forms that can be integrated with various payment gateways.
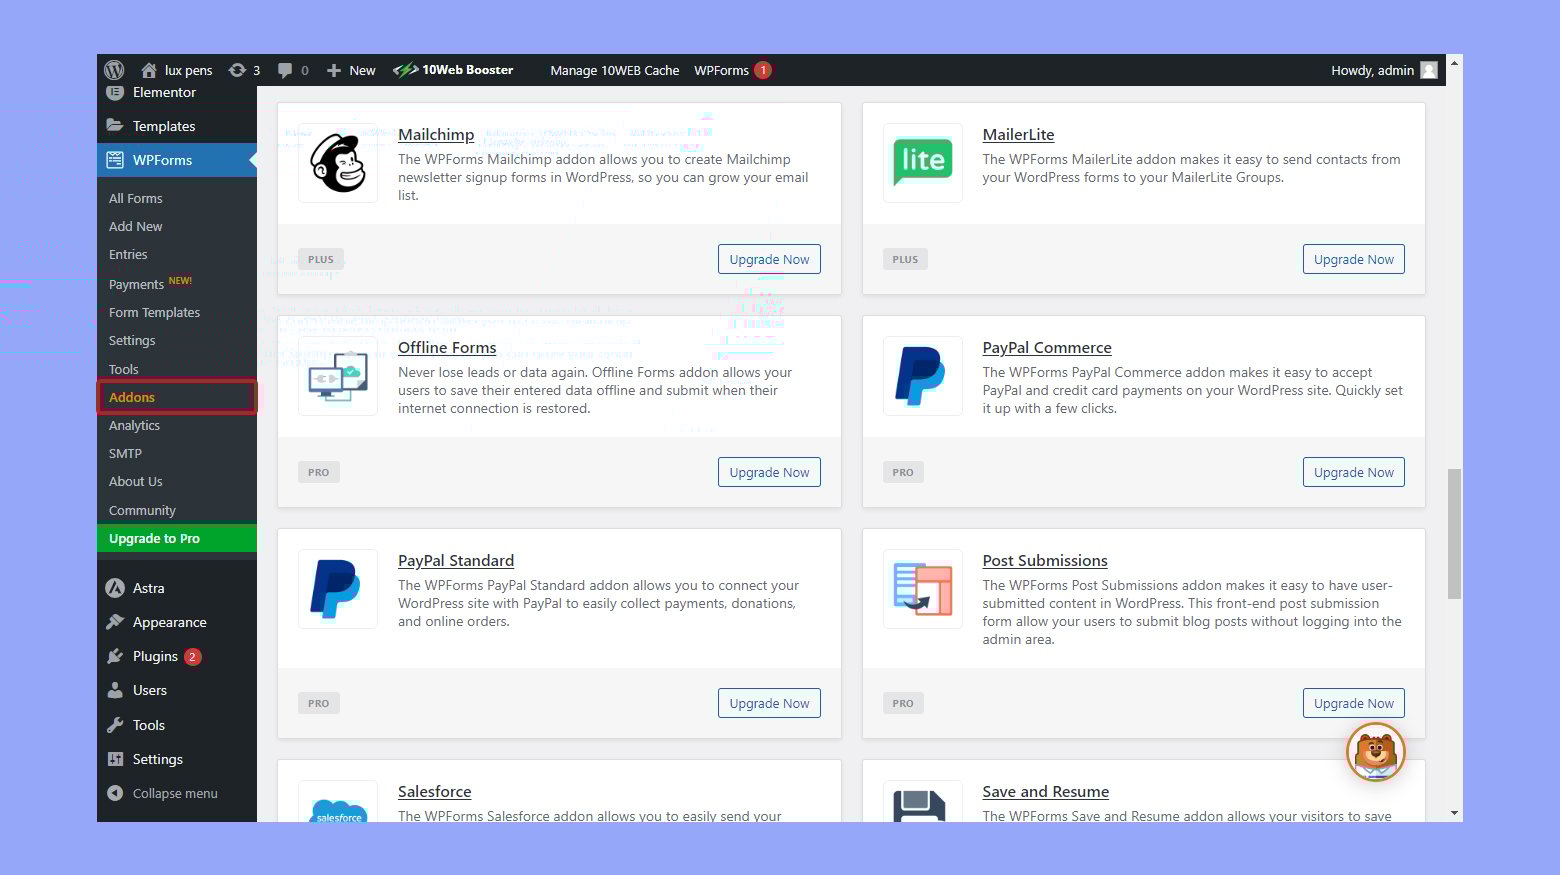
- After installing and activating a compatible plugin, navigate to a section usually titled Payments or Add-ons within the plugin settings.
- Create a new form and select the payment options you’d like to include—check for options like PayPal, Stripe, or Square.
- Once your payment form is created, place it on your website by copying the provided shortcode and pasting it into the desired page or post.
Creating a custom payment solution
If you prefer a more tailored approach, creating a custom payment solution might be the way to go. This will require a good understanding of APIs and PHP programming.
- Start by choosing the payment service provider and obtaining the necessary API keys for integration.
- Develop your own payment form, ensuring it complies with both WordPress and the payment gateway’s standards.
- Securely handle the payment data using WordPress’ wp_remote_post function or similar to transmit the data to the payment gateway.
- Test your custom solution extensively to ensure that transactions are processed correctly and securely.
Handling direct payment options
To integrate a payment gateway into your WordPress site without WooCommerce, you can explore different methods accepting direct payments. Here’s how you can set up various direct payment options.
Credit and debit card payments
You can accept credit and debit card payments by choosing a payment gateway that provides this service.
- Choose a payment gateway plugin that supports credit card payments, such as Stripe or Authorize.net.
- Install the plugin by navigating to Plugins > Add New in your WordPress dashboard, searching for the plugin, and then clicking Install Now.
- Activate the plugin and then enter your gateway API credentials in the settings, which you get from the payment provider.
- Configure the payment options by selecting the types of credit cards your business accepts. Options typically include Visa, MasterCard, American Express, and others.
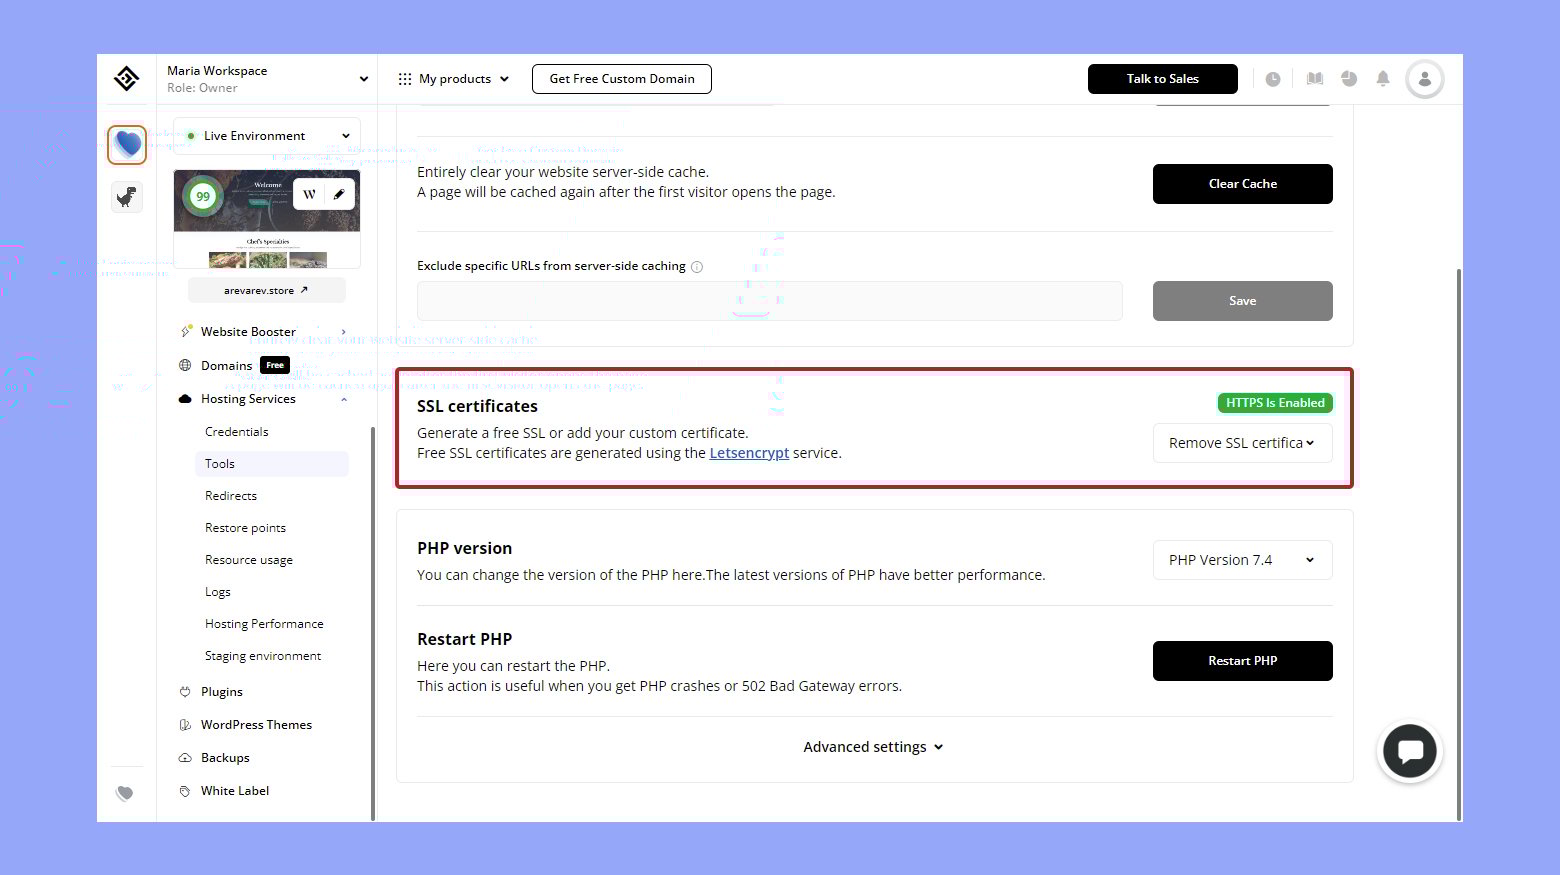
- Ensure that your site has an SSL certificate installed to securely process transactions.
Your customers can now pay using their credit or debit cards directly on your website.
Digital wallets and mobile payments
To offer customers the convenience of digital wallets like Google Pay and Apple Pay, you’ll have to:
- Select a compatible payment gateway plugin that supports digital wallet transactions.
- Install and activate it via the Plugins section.
- Configure your payment gateway settings to include digital wallet options.
- Enable these options and follow the provided setup instructions to link your gateway account with the wallets.
Now your site supports payments from digital wallets, providing a seamless checkout experience from mobile devices.
Bank transfers and manual payments
If you prefer offering bank transfers or need to handle manual payments:
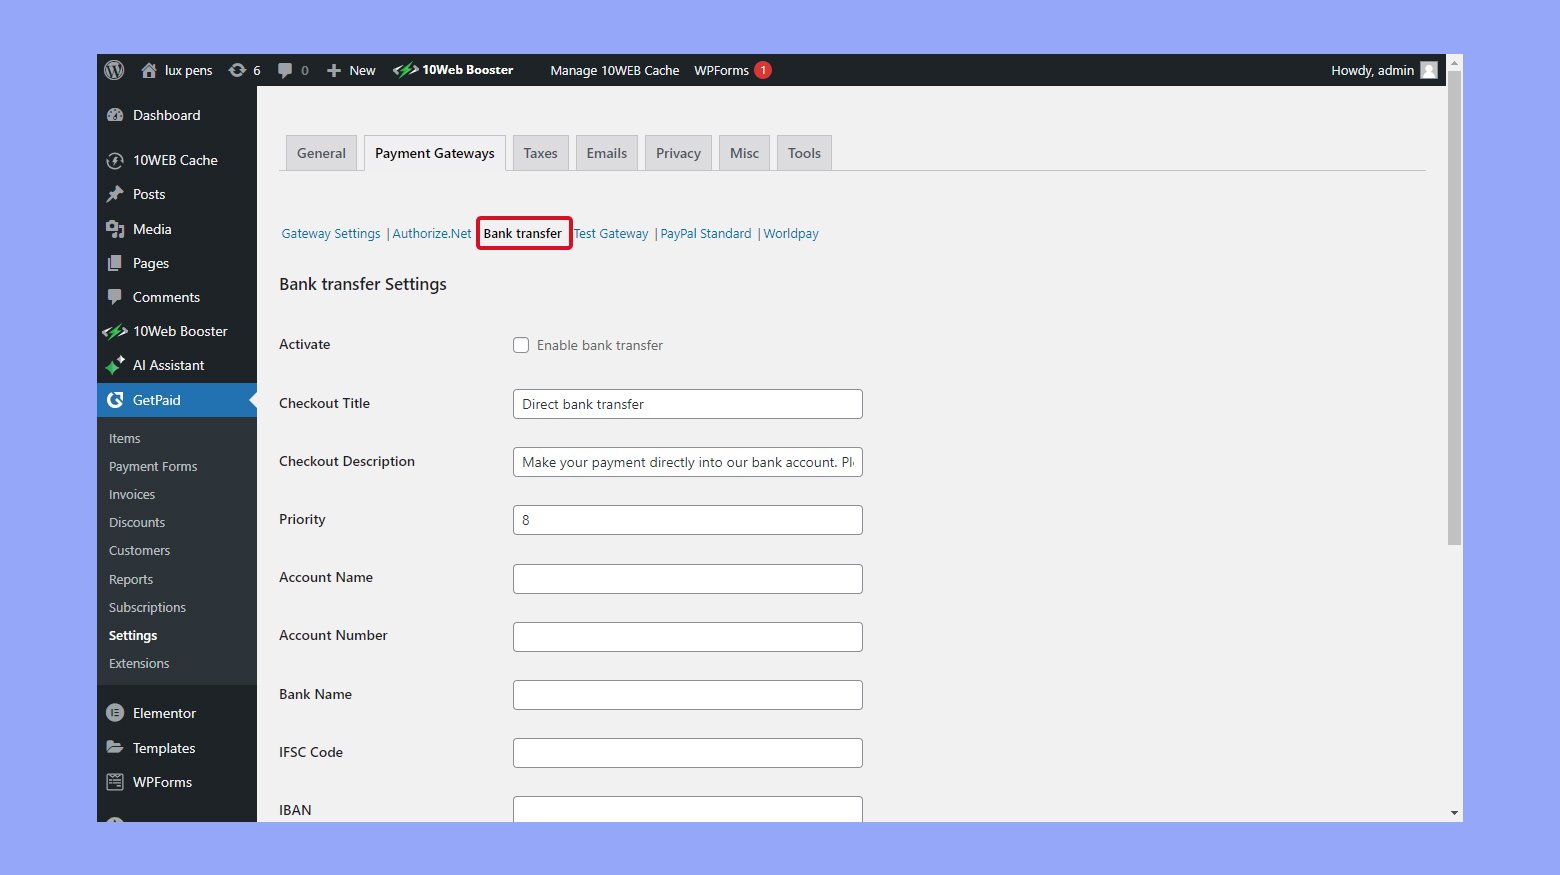
- Pick a plugin that includes direct bank transfer methods such as Get Paid or allows for manual payment.
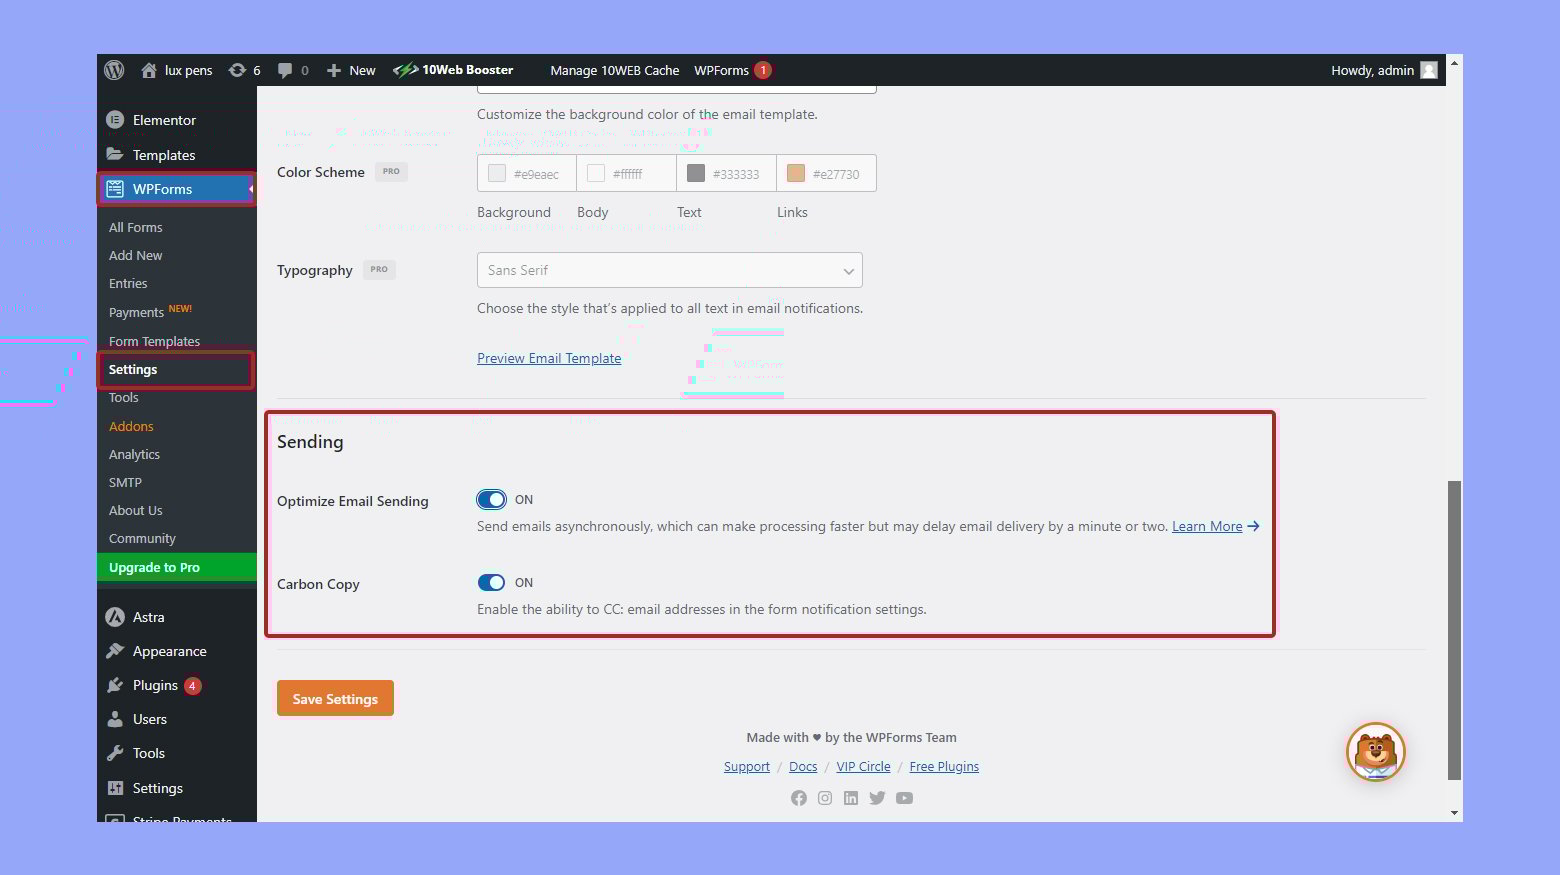
- Upon installation and activation, go to the plugin settings and look for Bank Transfers or Manual Payments options.
- Fill in your bank account details or specify how customers should pay you manually.
- If your payment gateway supports it, set up automatic email notifications to inform you of pending transactions.
With these settings, you can manually verify bank transfer payments and confirm orders as needed.
Create your custom online store in minutes with 10Web AI Ecommerce Website Builder and take your business online.
Looking to sell online?
Managing online transactions
Effectively managing online transactions is fundamental to the success of your WordPress site. This includes setting up reliable payment confirmations, handling refunds and chargebacks gracefully, and understanding the rules set by your payment processor.
Setting up payment confirmations
- Access your WordPress dashboard and navigate to the settings of the payment gateway plugin you’ve installed.
- Look for an option labeled Payment Confirmations or Email Settings.
- Ensure that the settings are configured to automatically send an email confirmation to both you and your customer after each transaction. This should include details of the purchase, transaction number, and delivery information.
Dealing with refunds and chargebacks
- Establish clear policies regarding refunds and chargebacks that are easily accessible to customers on your site.
- When a refund is requested, visit the Transaction History section within your payment gateway plugin.
- Select the transaction in question and initiate a refund by clicking Issue Refund. Be mindful that a processing fee may apply.
- In case of a chargeback, interact with your payment processor through their customer support to resolve the issue. Ensure you provide all the necessary documentation to dispute the chargeback if it’s unwarranted. Remember, a chargeback fee might be levied by the processor.
Understanding payment processor regulations
- Familiarize yourself with the regulations and compliance requirements of your payment processor, such as PCI Compliance standards.
- Maintain a secure transaction environment for your customers by implementing and updating security measures as recommended by the payment processor.
- Regularly check for any changes in processing fees, transaction limits, or regulations that could affect your online sales and customer experience.
Expanding payment functionality
When you’re ready to grow beyond simple transactions, integrating advanced payment functionality into your WordPress site is key. Here’s how you can offer more complex payment options to your customers:
Subscription and recurring payments
If you run a service or offer digital products that require regular payments, setting up subscription and recurring payments allows you to collect fees automatically. You can:
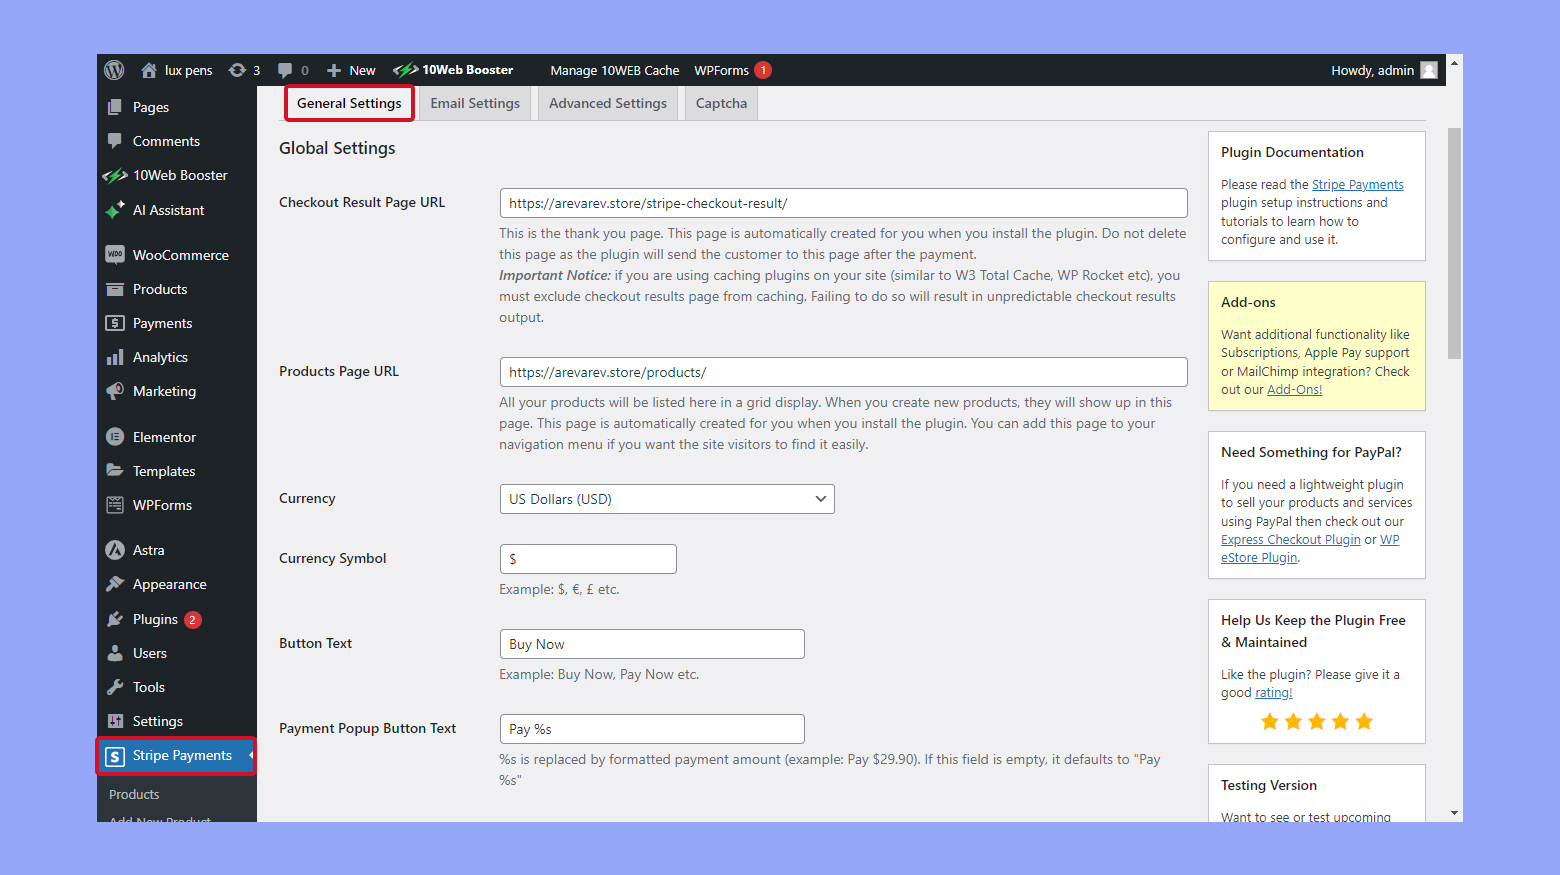
- Choose a plugin that supports recurring payments, like Stripe Payments.
- Install the plugin from your WordPress admin dashboard under Plugins > Add New.
- Set up the plugin by navigating to its settings and configuring the subscription options.

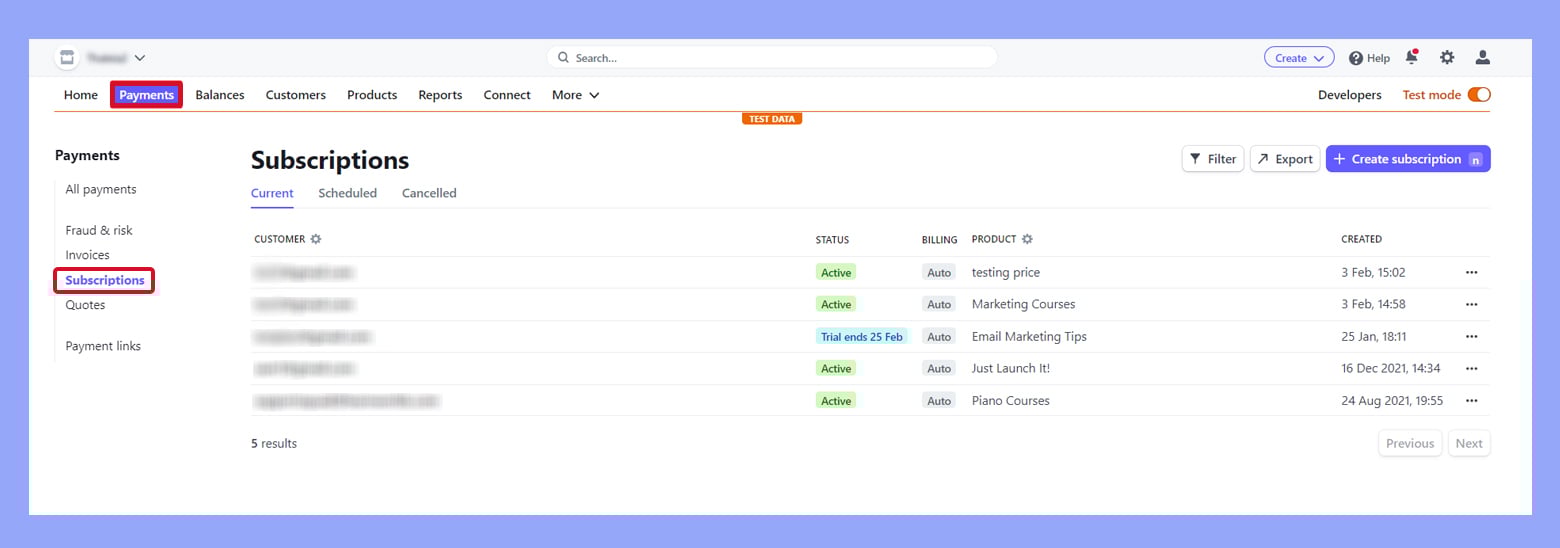
Remember, recurring payments keep your cash flow consistent and automate the billing process, providing a convenient experience for both you and your customers.
Selling digital products and services
For selling digital goods like ebooks or services, you’ll need a streamlined checkout process:
- Select a payment gateway plugin that handles digital product transactions securely such as Easy Digital Downloads.
- Install the plugin from Plugins > Add New within your WordPress dashboard.
- Configure the plugin settings to specify the types of digital products you’re selling.
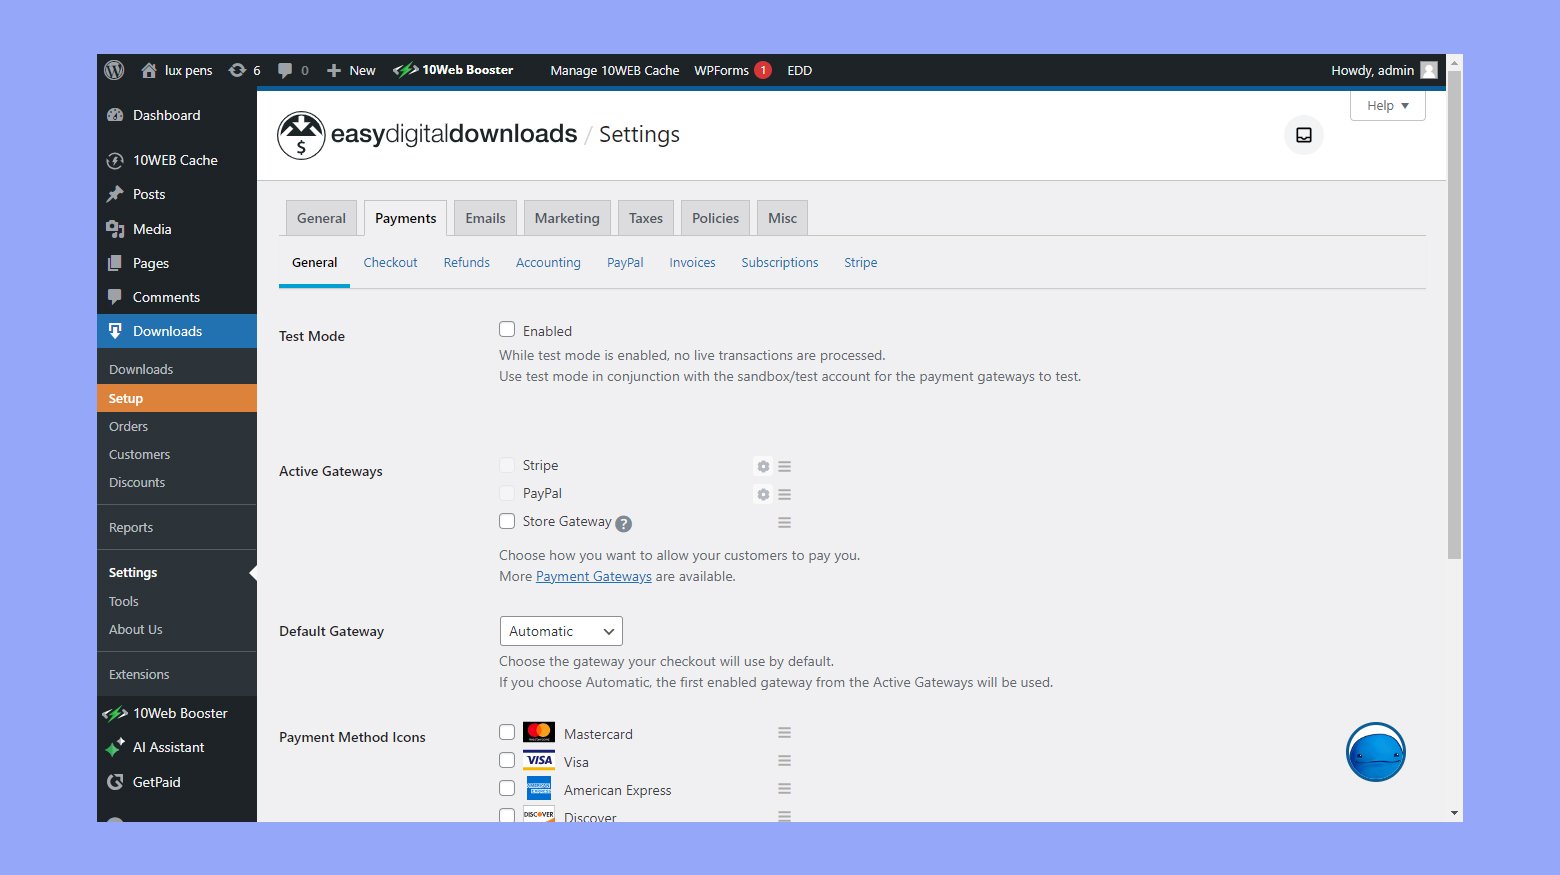
A good payment gateway will ensure that your digital products are only accessible to those who have completed the payment.
Membership sites and course payments
Building a membership site or selling online courses demands a payment system tailored to protecting content and managing member access:
- Choose a payment gateway plugin with membership management features.
- Install it by clicking Add New under Plugins in the dashboard of your WordPress site.
- Through the payment gateway’s settings, define the payment structure for your memberships or courses.
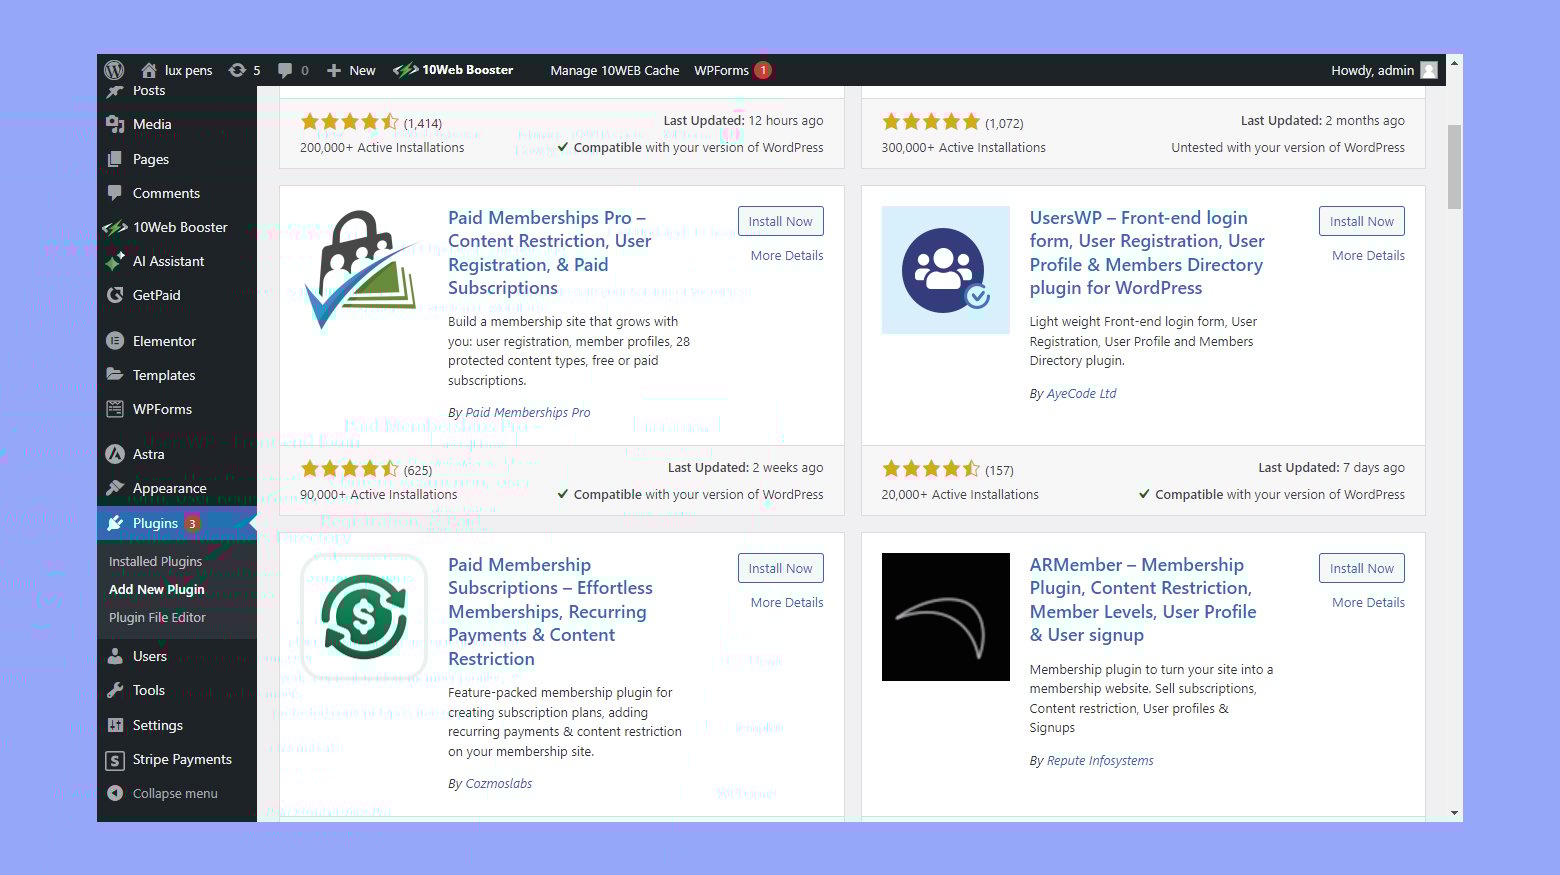
Integrating your payment process with membership levels automates access control upon successful transactions, making it easier to manage your online store.
Optimizing payment user experience
When you integrate a payment gateway into your WordPress site without using WooCommerce, your focus should be on creating a smooth and intuitive payment experience for your users. This section will guide you through improving the payment user experience using various optimization techniques.
Form builder and templates
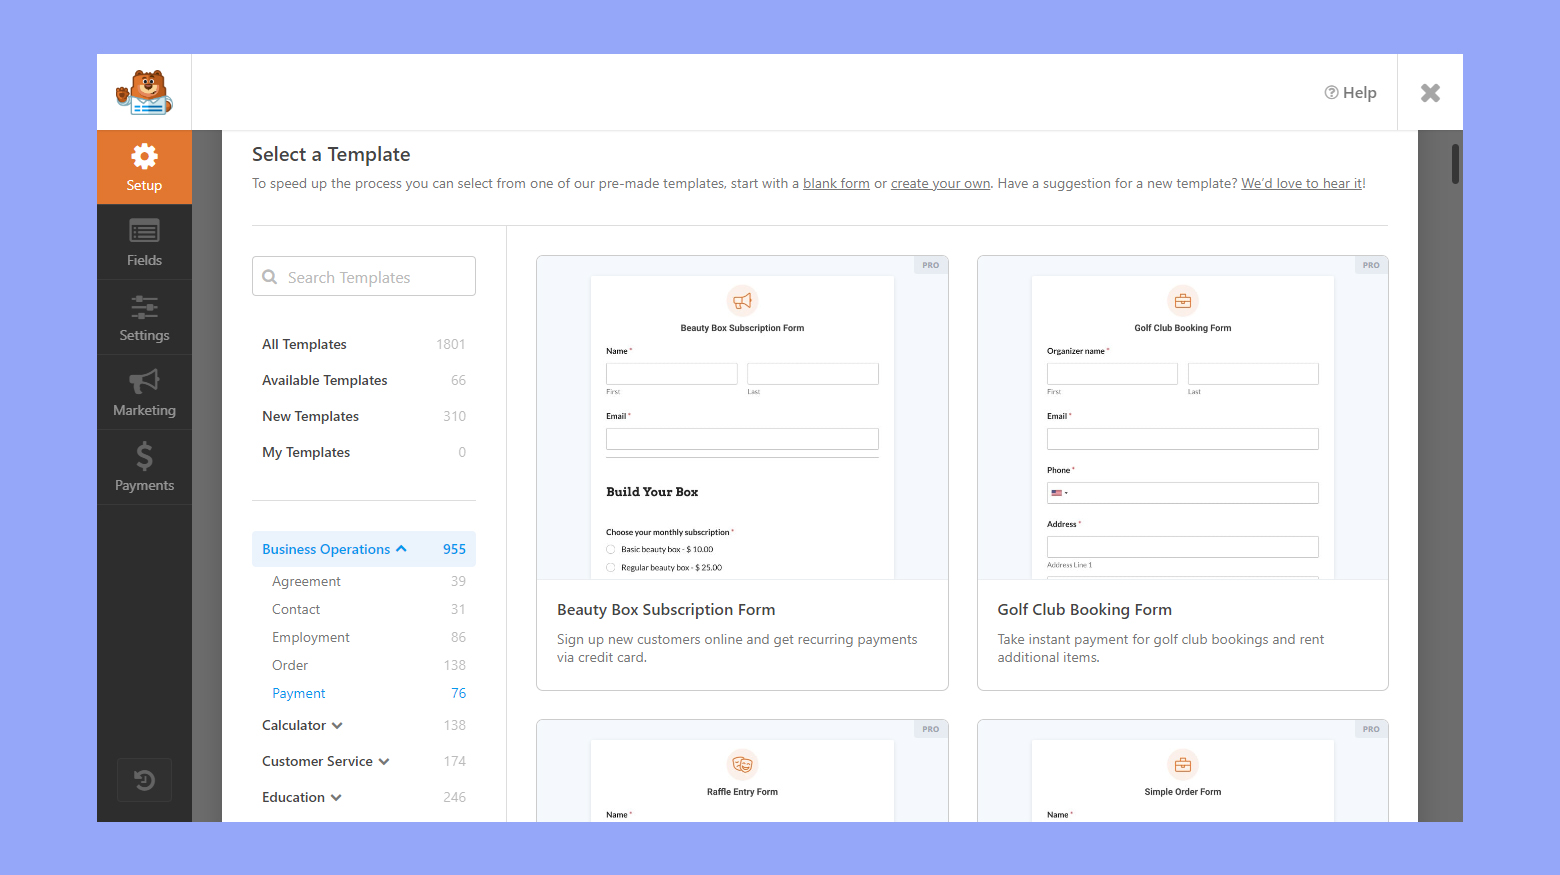
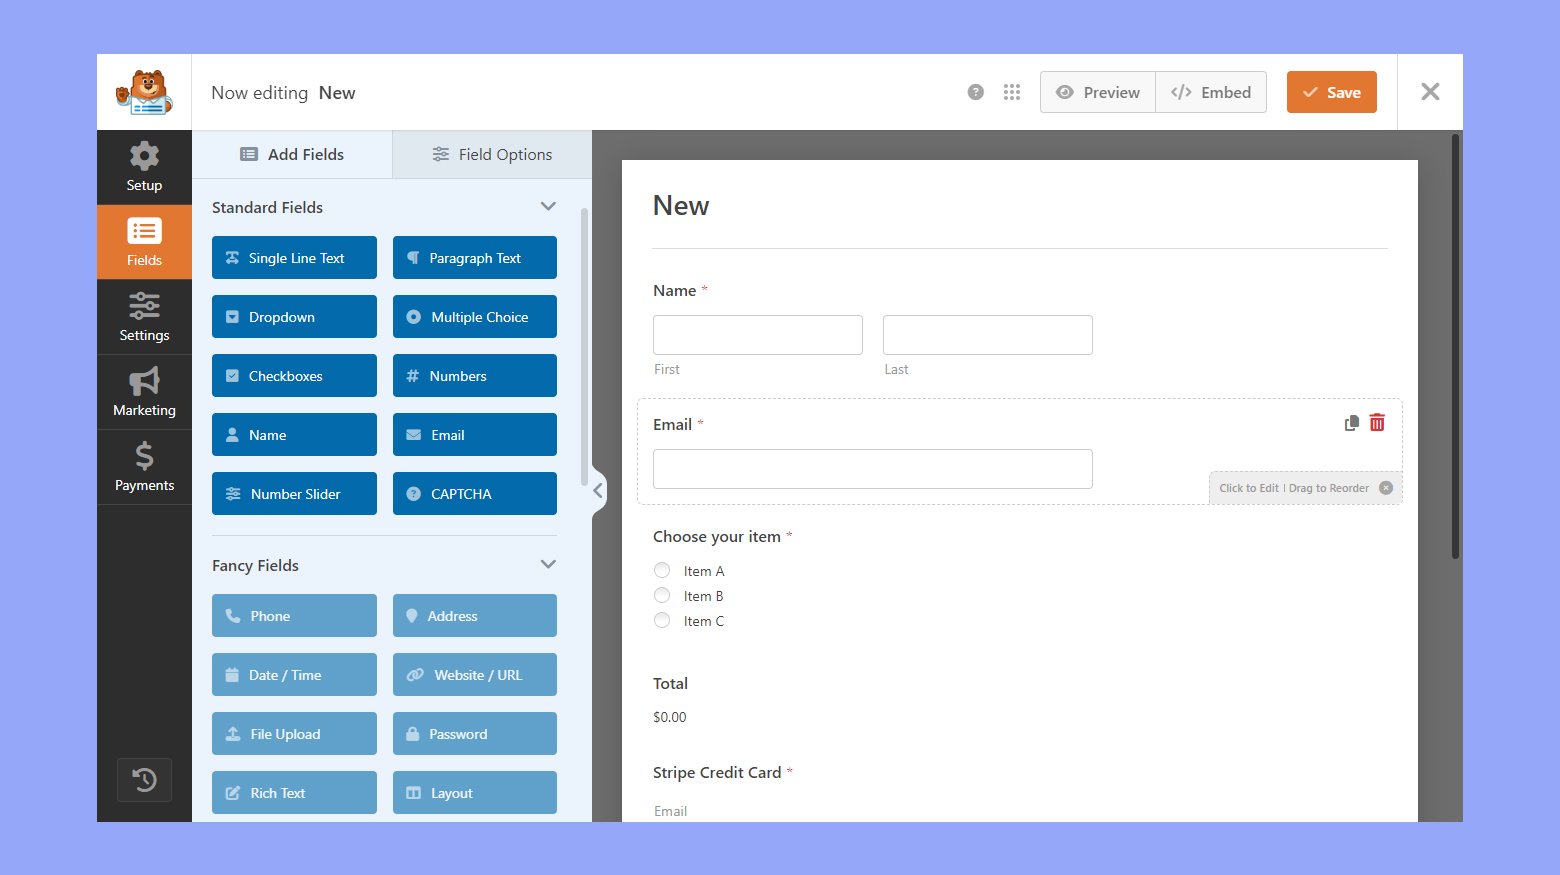
Your first step is to select a Form builder that provides a range of templates, ensuring that your payment form is not only functional but also visually appealing. Plugins like WPForms offer a user-friendly interface where you can drag and drop fields to create your form. A good practice is to:
- Choose a template that closely matches the intended payment workflow.
- Customize the form by adding or removing fields to suit your specific requirements.
Smart conditional logic in forms
Incorporating Smart conditional logic into your forms can significantly enhance the user experience by displaying or hiding form fields based on the users’ selections. This means your form will dynamically adapt to your user’s input, making it feel more personalized and easier to navigate. To use this feature:
- Access your form builder’s conditional logic settings.
- Define the rules that determine when certain fields should be shown or hidden.
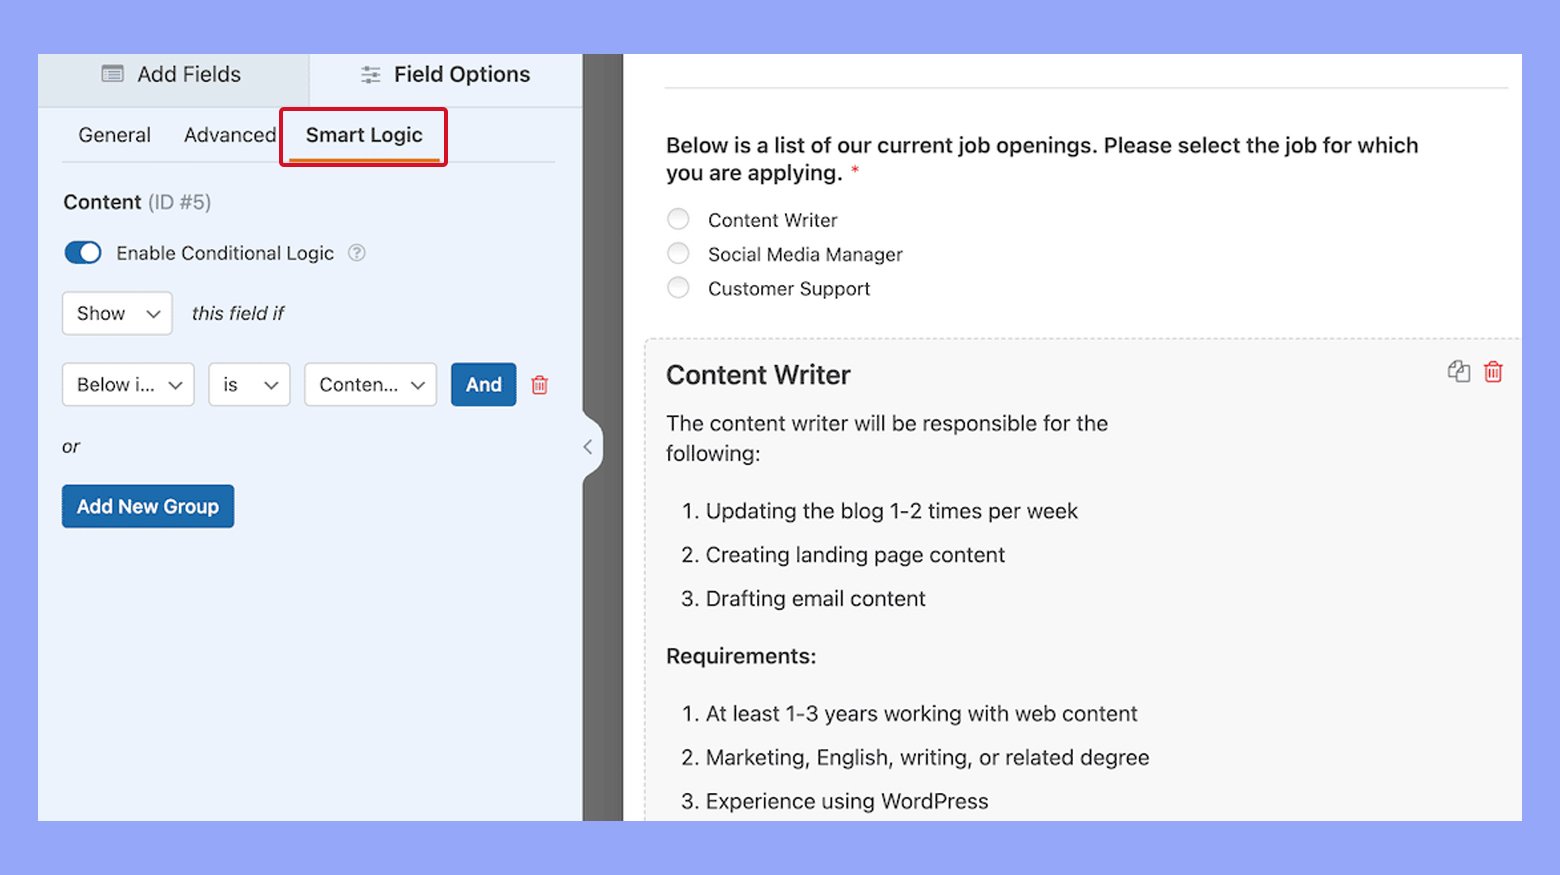
This way, users are only prompted with relevant questions, which streamlines the payment process.
Streamlining the checkout process
For a seamless checkout, it’s critical to minimize the number of steps required to complete an online payment. Integrating a service like PayPal Checkout directly on your payment form can reduce friction and make transactions quicker. Follow these tips to streamline your process:
- Embed your payment form directly on the purchase page to prevent redirecting users to another site.
- Use clear and concise field labels to aid quick comprehension and input.
- Connect your form to a service like Google Sheets for easy tracking of transactions and customer data.
By focusing on these strategies, you create an environment that facilitates a straightforward and efficient payment process, encouraging users to complete their purchases hassle-free.
Create your custom online store in minutes with 10Web AI Ecommerce Website Builder and take your business online.
Looking to sell online?
Testing and going live
Before you launch your payment gateway, ensure everything operates smoothly by conducting thorough tests and making the necessary verifications. You’ll be setting up a test mode, verifying the integration, and then confidently launching your payment system.
Configuring test mode
To prepare your payment gateway for testing in your WordPress site:
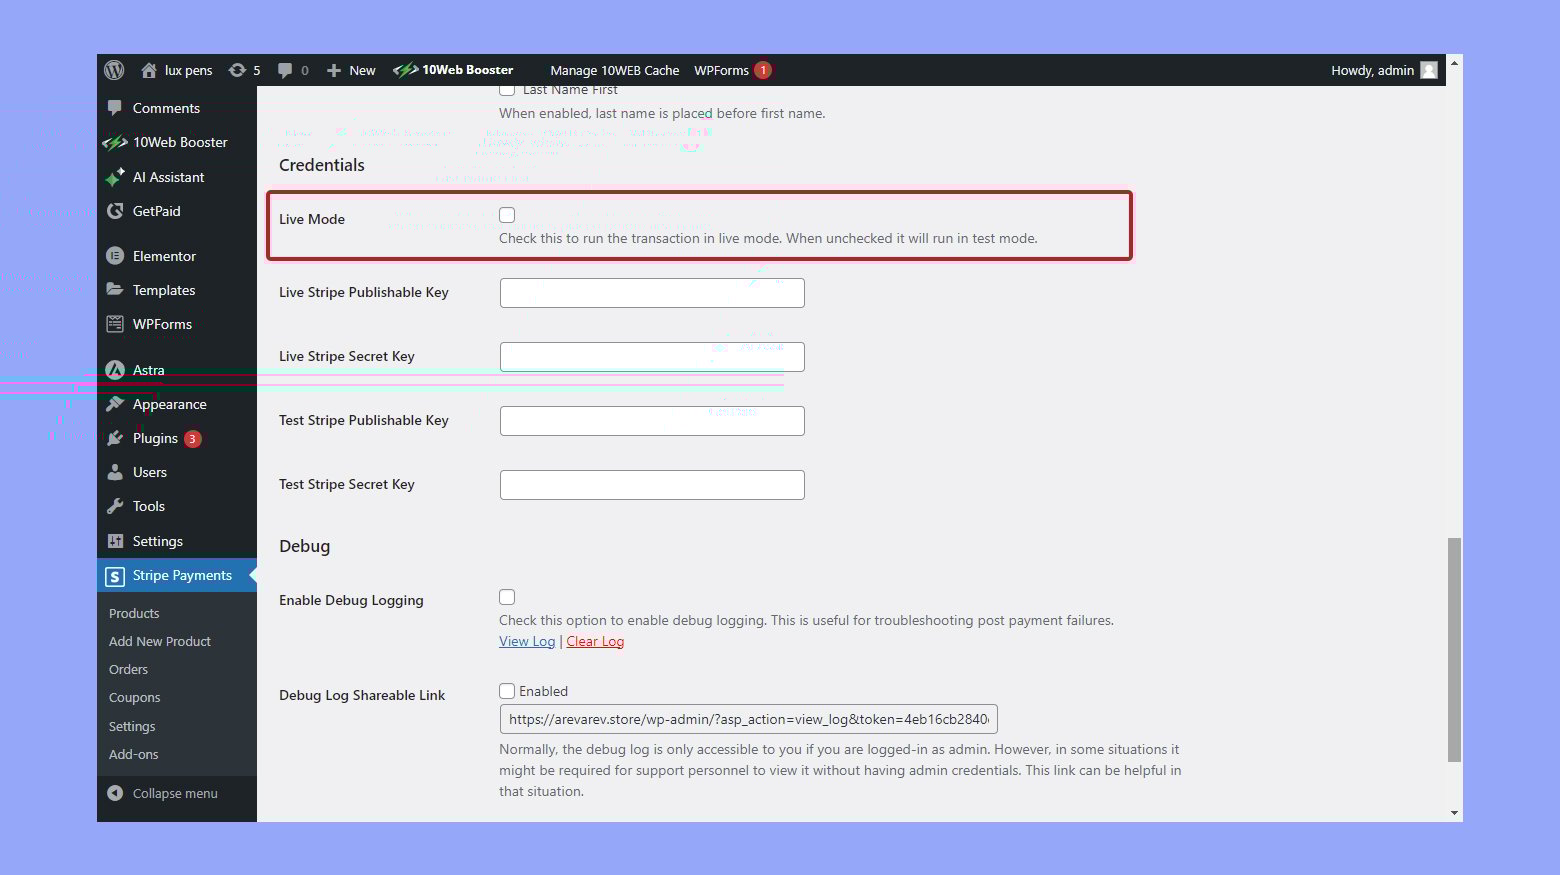
- Navigate to your payment gateway plugin’s settings within the CMS.
- Locate the test mode option and enable it. This is often a checkbox or toggle switch.
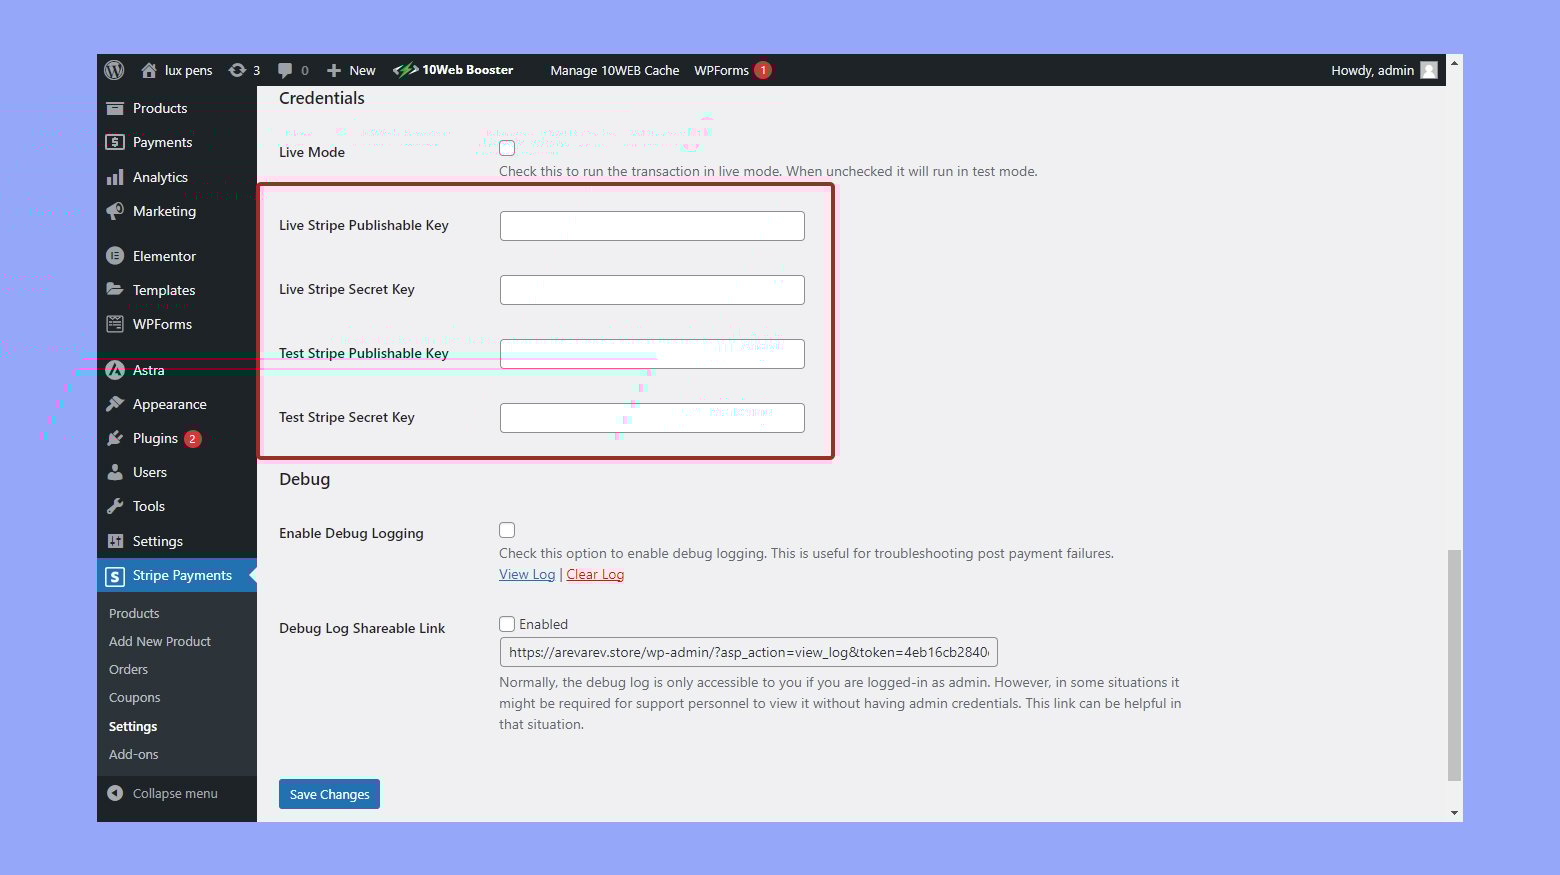
- Enter any required test credentials, which may include a test API key or license key. These are usually provided by the payment gateway service.
- Save your changes to ensure the system operates in test mode, allowing for safe transaction simulations.
Verifying payment gateway integration
After configuring test mode:
- Go to the payments tab on your online store’s frontend.
- Perform a test transaction using the provided test card numbers or test accounts.
- Check if the transaction appears in your payment gateway’s dashboard under the test mode section.
- Test other functionalities such as refunds, error handling, and customer notifications to assess overall performance and ensure support readiness.
Launching your payment system
Once you’re satisfied with the test results:
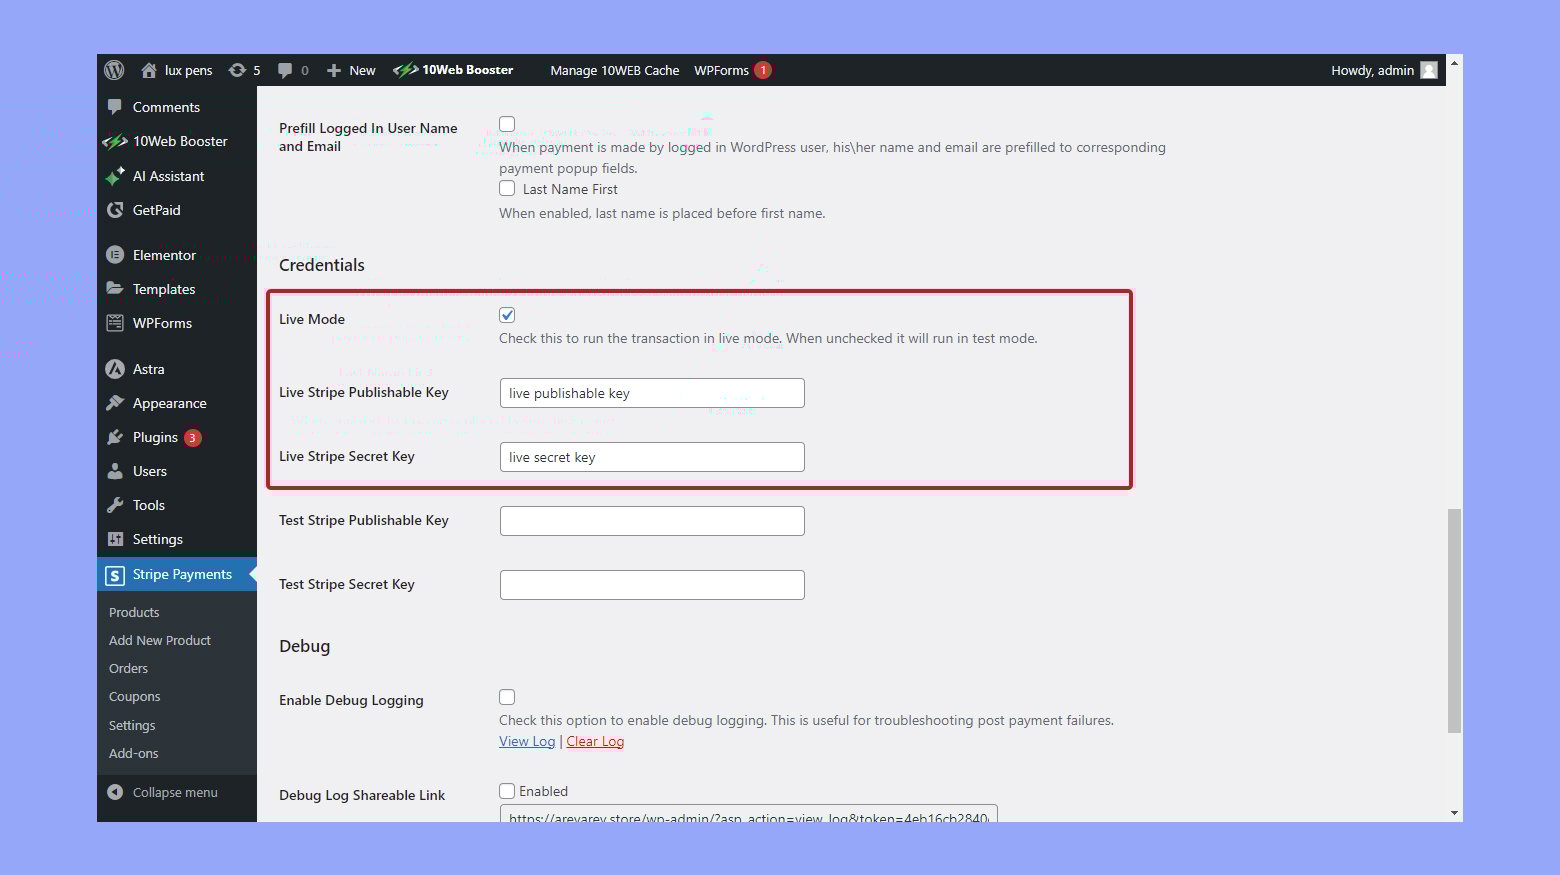
- Return to the payment gateway plugin’s settings.
- Disable test mode by unchecking or checking the option.
- Enter your live API keys and license key that correspond with your payment processor’s live environment.
- Conduct one final check or ask for support if you encounter any issues.
- Confirm the settings and your online store is ready to accept live payments.
Conclusion
This article explored the critical aspects of selecting and integrating a payment gateway into your WordPress site. It covered popular payment gateways like PayPal, Stripe, and Authorize.Net, emphasizing their unique features and transaction fees. The article looked at how to assess your payment needs based on currencies, regions, and payment options, and how to integrate these gateways without relying on WooCommerce, using alternative plugins, payment forms, shortcodes, or custom solutions.
Understanding transaction fees and the various integration methods ensures you choose the best option for your business, optimizing cost and functionality. Managing online transactions, including handling refunds and chargebacks, and expanding payment functionalities like subscriptions and digital product sales, were also discussed.
This knowledge empowers you to create a seamless, secure payment experience tailored to your ecommerce needs, enhancing customer satisfaction and streamlining your business operations.
Create your online store in minutes with 10Web AI Ecommerce Website Builder.Looking to sell online?
Create your online store in minutes


![]()