The HTTP 411 Length Required Error signals that the server refuses to accept the request without a defined Content-Length header. Essentially, the server is expecting the client (usually a web browser or an application) to specify the size of the data it is sending in the request’s body. But why does this matter, under what circumstances does this error pop up, and how can you fix it? In this blog, we’ll take a look at what this error means and offer possible troubleshooting steps.
Say goodbye to website errors
Achieve peace of mind with 99.99% uptime on 10Web Managed
WordPress Hosting, powered by Google Cloud.
The role of HTTP headers
HTTP headers are like the envelope for your request, carrying extra information between the client and server. They can include a variety of details, such as the source IP address, browser type (user-agent), and the type of content being requested. Among these headers, the Content-Length plays a key role by specifying how big the request body is, in octets (eight-bit bytes).
You might wonder, “Why does the server need to know the size upfront?” Well, it helps the server prepare for what’s coming its way, ensuring it can handle the request efficiently. It’s a bit like knowing the size of a package before you try to fit it through your mail slot.
Understanding the 411 Length Required error
The 411 Length Required error is about communication—or, more accurately, a lack thereof—between a client and a server over the web. It occurs in situations where a request is made to a server that requires a specific piece of information: the length of the content in the request body. This requirement isn’t arbitrary; it’s a way for the server to prepare for and process the incoming request efficiently. Without knowing the size of the incoming request, the server might struggle to manage its resources effectively or could become vulnerable to certain types of attacks.
The need for a Content-Length header typically arises in scenarios where the request includes a body of data, such as a POST or PUT request. These are common in web forms, API calls, or anywhere data is being sent to the server for processing or storage. The absence of a Content-Length header in such requests can lead to this error.
Variations of the 411 error
While the essence of the 411 Length Required error remains consistent, the way it’s presented might vary slightly across different web servers, browsers, or applications. You might encounter it as:
- 411 Length Required
- HTTP 411
- HTTP Error 411 – Length Required
- Error 411
- HTTP/1.1 411 Length Required
Despite these variations, the underlying issue remains the same: the server expects a Content-Length header that isn’t present in the request.
Reasons why this error occurs
The Content-Length header in an HTTP request is more than just a formality; it’s a crucial piece of information that allows the server to properly allocate resources and manage the incoming data. Here’s why its absence can cause an issue:
Context and clarity: HTTP headers, including Content-Length, provide context about the request, helping the server tailor its response. Other headers might include the source IP address, content type, browser type (user-agent), and the requested URL.
Data management: Specifying the content length (in a number of octets) lets the server know the expected size of the request body. This is essential for efficiently processing the request and ensuring that the server is prepared for the amount of data coming its way.
In a typical scenario, most HTTP requests that include a body (like those made during form submissions or API calls) will come with a Content-Length header. However, some clients opt to leave this out, especially when using chunked transfer encoding—a method where the data is sent in chunks, and the size isn’t known upfront.
Other reasons to consider
Misconfigured server: Sometimes, the server is configured to require a Content-Length header for all requests, even when it might not be strictly necessary. This can be an oversight or an overly aggressive security measure.
Intermediate devices: In some cases, proxies, load balancers, or other network devices that sit between the client and the server might strip out certain headers from requests, including the Content-Length header, leading to this error.
How to find the 411 error
Monitoring for specific HTTP status codes like 411 is more than just a technical exercise; it’s about ensuring that every visitor to your site can access the content they’re after without unnecessary roadblocks. While a “411 Length Required” error might not be the most common issue you’ll encounter, identifying and resolving it is part of maintaining a smooth, efficient, and accessible online presence.
This error, being on the client-side of things, might not directly show up in your day-to-day site management activities. Here’s how you can keep an eye out for this error. If you’re using 10Web as your website host, 10Web offers tools designed to help you efficiently monitor and manage your site’s health.
To find the error and information about the error, you will need to access your logs.
To do so:
- Log in to your hosting dashboard.
- If you are a 10Web customer, log in to your 10Web dashboard.
- Click on the website where the error is occurring.
- To the left of the dashboard, click on Hosting Services > Logs.
- At the top of the page, click on the drop down menu and choose ACCESS.LOG.
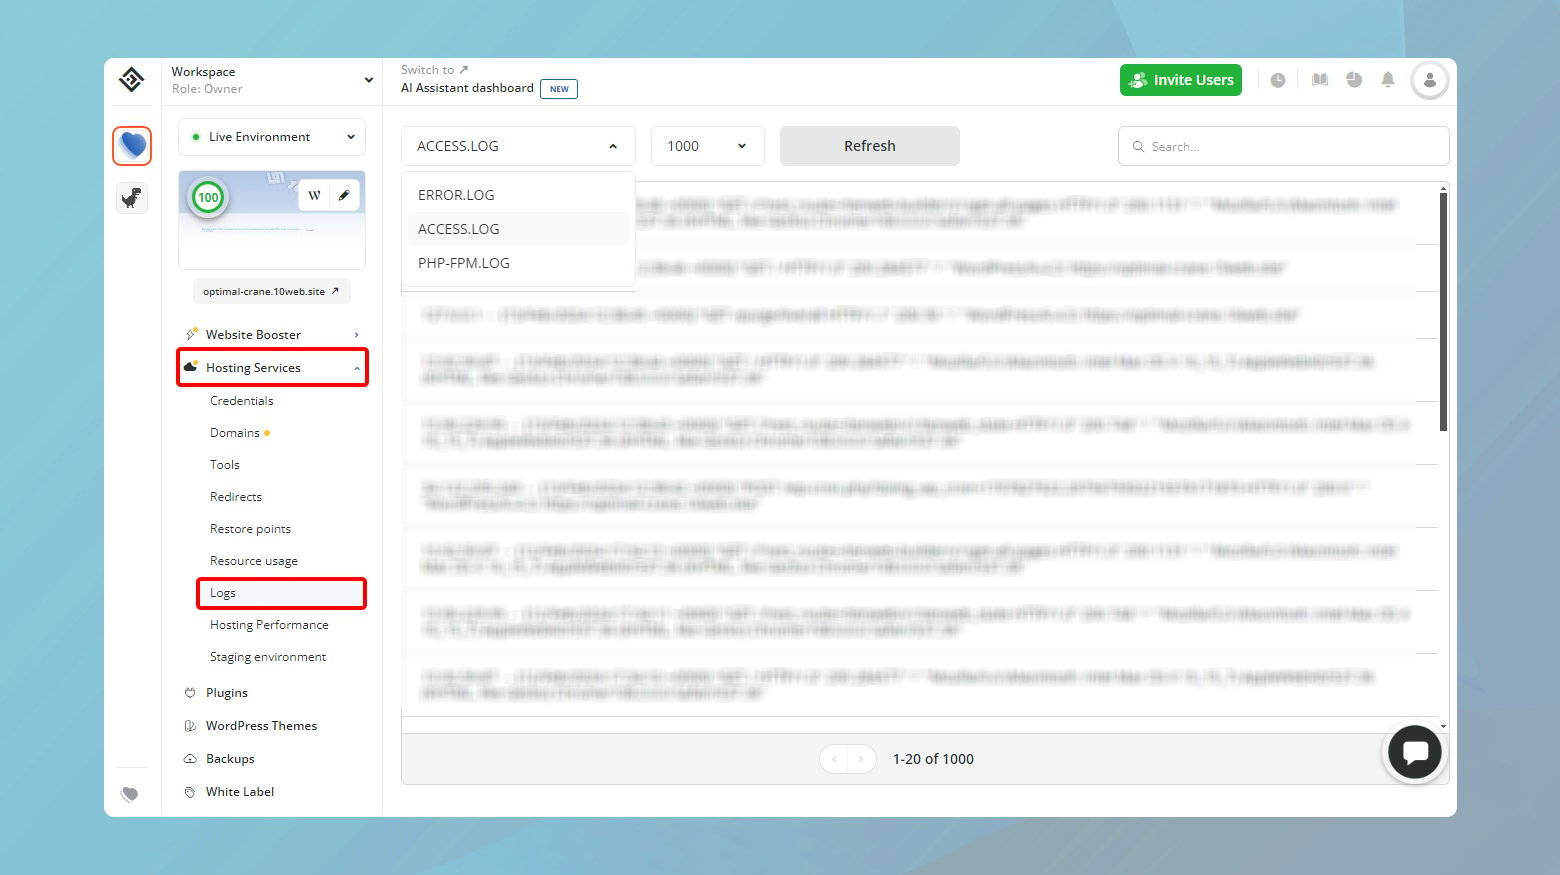
Your next step is to sift through the data to find any instances of the 411 Length Required error. You can make this task easier by using the search function to filter for “411” status codes. This will help you isolate the requests that were rejected due to the lack of a Content-Length header.
Say goodbye to website errors
Achieve peace of mind with 99.99% uptime on 10Web Managed
WordPress Hosting, powered by Google Cloud.
Resolving the 411 Length Required error
Encountering a “411 Length Required” error can be a frustrating experience, especially when you’re trying to access or interact with a website. This error falls under the 400 series of HTTP status codes, indicating it’s a client-side issue. This means the problem originates from the user’s end of the transaction, specifically with the HTTP request being sent. Fortunately, there are steps you can take to resolve this error, ensuring smoother interaction with web resources.
Check for typos in the URL
Simple typos in the URL can lead to a variety of 400 series errors, including the 411. Incorrectly entered URLs may lead your request to unintended endpoints that might enforce different requirements, such as the Content-Length header.
Ensuring the accuracy of the URL ensures that your request reaches the intended destination without unnecessary redirection or errors.
- Double-check the URL for any misspellings or incorrect characters.
- Retype the URL carefully in the browser or your HTTP request tool to ensure accuracy.
If you’re uncertain about the URL or if it’s your first time accessing a particular resource, leveraging search engines can help verify the correct address. Search engines can provide the correct URLs or alternatives, minimizing the chance of encountering errors due to incorrect addresses.
- Enter the main keywords of the website or resource you’re trying to access into a search engine, along with the domain if you know it (e.g., site:example.com resource name).
- Select the most relevant result, ensuring it directs you to the official and correct URL.
Add a Content-Length header
This particular error message is the server’s way of telling you, “Hey, I need to know the size of the data you’re sending me!” It’s a straightforward request from the server, asking for the `Content-Length` header in your HTTP request. Let’s break down how you can address this by properly setting the `Content-Length` header, especially when dealing with POST requests.
Understanding the Content-Length header
The Content-Length header is crucial in HTTP requests, particularly when you’re sending data to the server, like in a POST request. It informs the server of the exact size of the request body in bytes.
This header allows the server to correctly allocate resources for processing your request and ensures that it can read the entire request body without issues. Without the Content-Length header, the server might reject your request to prevent potential security risks or processing errors, resulting in a “411 Length Required” error.
How to add the Content-Length header in curl commands
When you’re interacting with web servers through the command line using curl, adding the Content-Length header is straightforward but requires you to know the size of your request body ahead of time.
Here is what to do:
Before you make your request, determine the size of your request body. If your request body is a simple string, you can calculate the length manually. For binary data or files, use tools or programming languages to get the byte size.
Once you know the size of your request body, modify your curl command to include the Content-Length header. The syntax is, -H ‘Content-Length: [size]’, where[size] is the size of your request body in bytes.
For example:
Let’s say you have a text payload that says “Hello!” you want to send it to yourdomain.com. The string “Hello!” consists of 6 characters. In ASCII, each character is 1 byte, making the total size 6 bytes. Your `curl` command would look like this:
curl --verbose -X POST -H 'Content-Length: 6' https://yourdomain.com -d 'Hello!'
In this command, -H ‘Content-Length: 6‘ explicitly tells the server that the size of the data being sent is 6 bytes. The -d ‘Hello!’ part is where you specify the data you’re sending.
Hexadecimal data
If your data is in hexadecimal format, the calculation involves a simple step. Each hexadecimal digit represents 4 bits, so two hexadecimal digits make up a byte.
For example:
If your data is 546869732069732061207465737421 (the hexadecimal representation of “This is a test!“), you have 24 hexadecimal digits. Dividing this number by 2 gives you the content length in bytes, which is 12 bytes in this case.
Clear browser cache
The 411 error may stem from residual data stored by your browser, which can affect how subsequent requests are handled. Clearing your browser’s cache and cookies can be a straightforward fix, offering your requests a clean slate to operate from.
Google Chrome
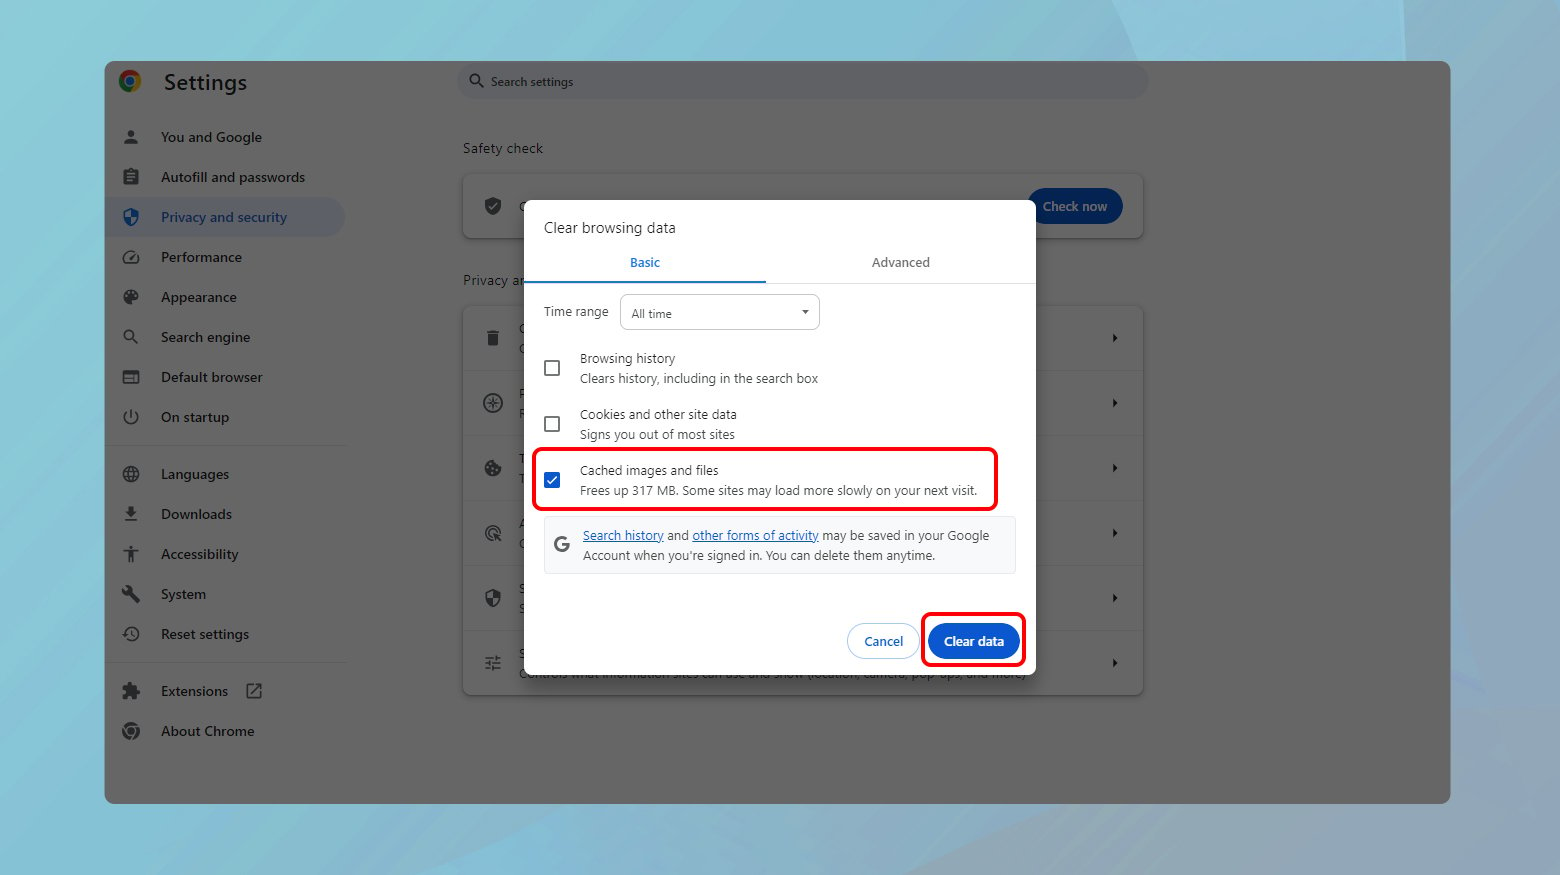
- Click on the three-dot icon in the top right corner of Chrome.
- Hover over More Tools and select Clear Browsing Data.
- In the pop-up window, navigate to the Advanced tab.
- Ensure Cached images and files is selected, along with any other types of data you wish to clear (e.g., cookies, browsing history).
- Click Clear data to complete the process.
Safari
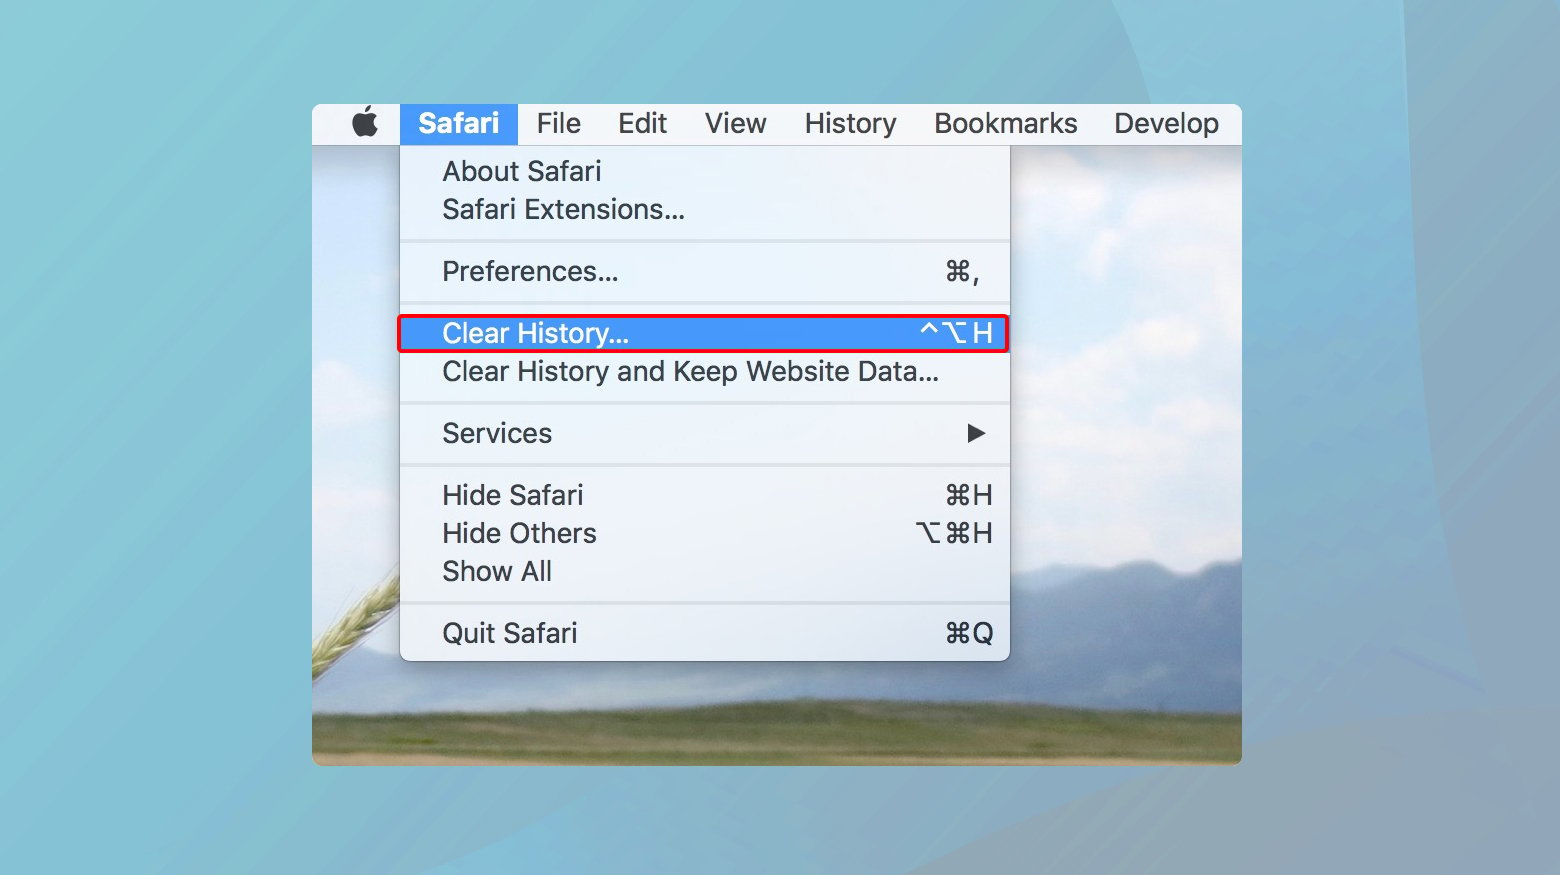
- Click Safari in the top menu bar.
- Select Clear History.
- Choose the time range for which you want to clear the history and cache. Options range from the last hour to all history.
- Click Clear History to finalize.
Mozilla Firefox
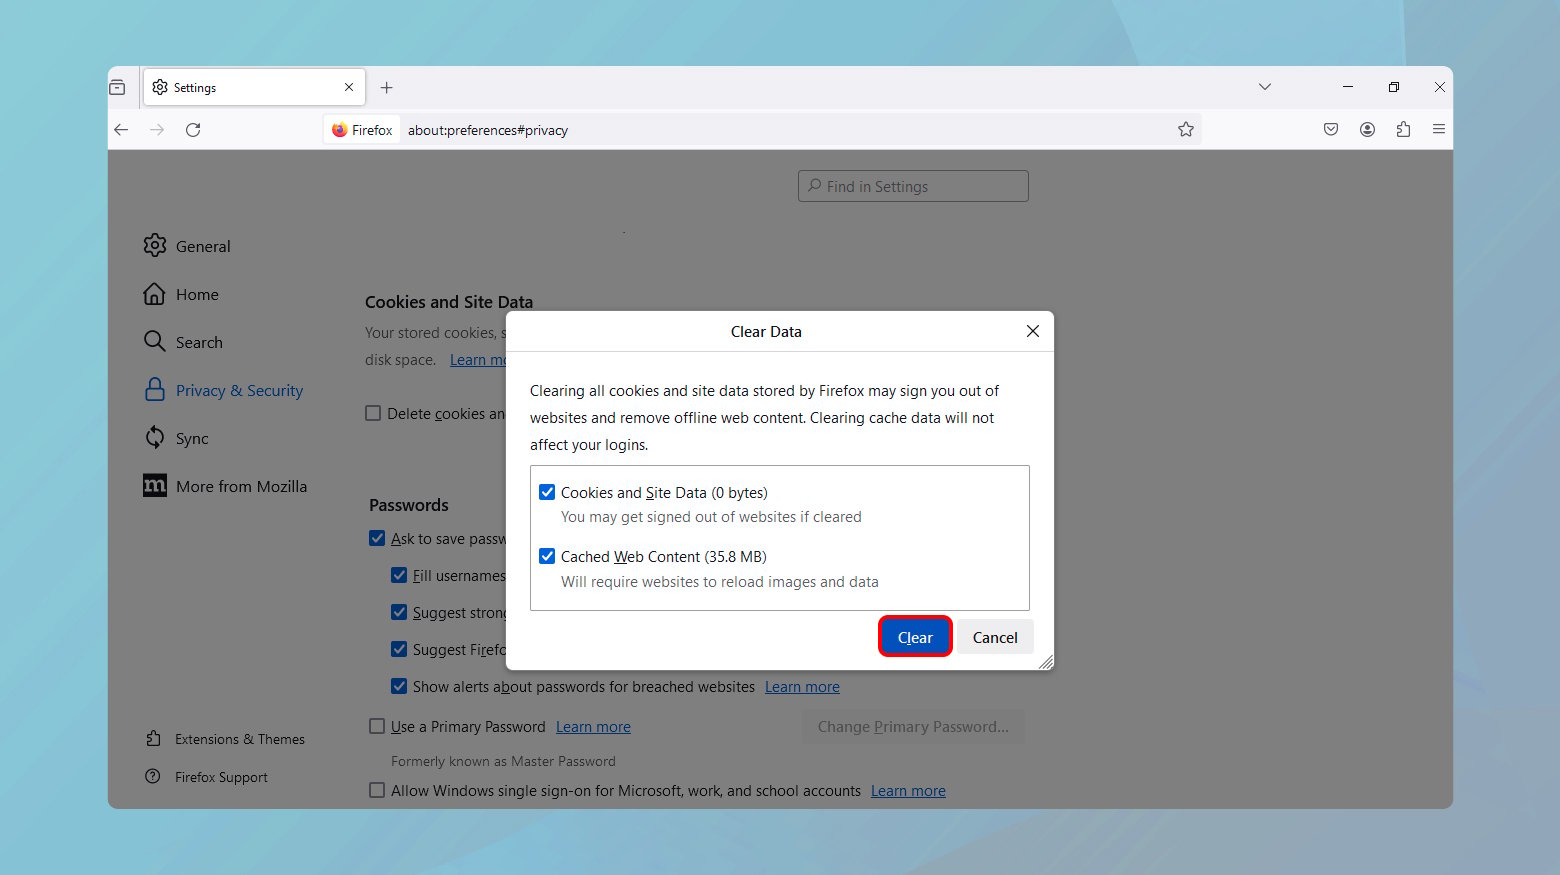
- Click on the hamburger icon (three horizontal lines) in the top right corner.
- Select Options (or Preferences on macOS).
- Navigate to the Privacy & Security panel.
- Scroll down to Cookies and Site Data and click Clear Data.
- Ensure Cached Web Content is selected and click Clear.
Removing browser extensions and system updates
Browser extensions can enhance your internet experience but sometimes interfere with web requests. Moreover, system updates, while crucial for security and performance, can occasionally introduce compatibility issues with web standards or applications.
Google Chrome
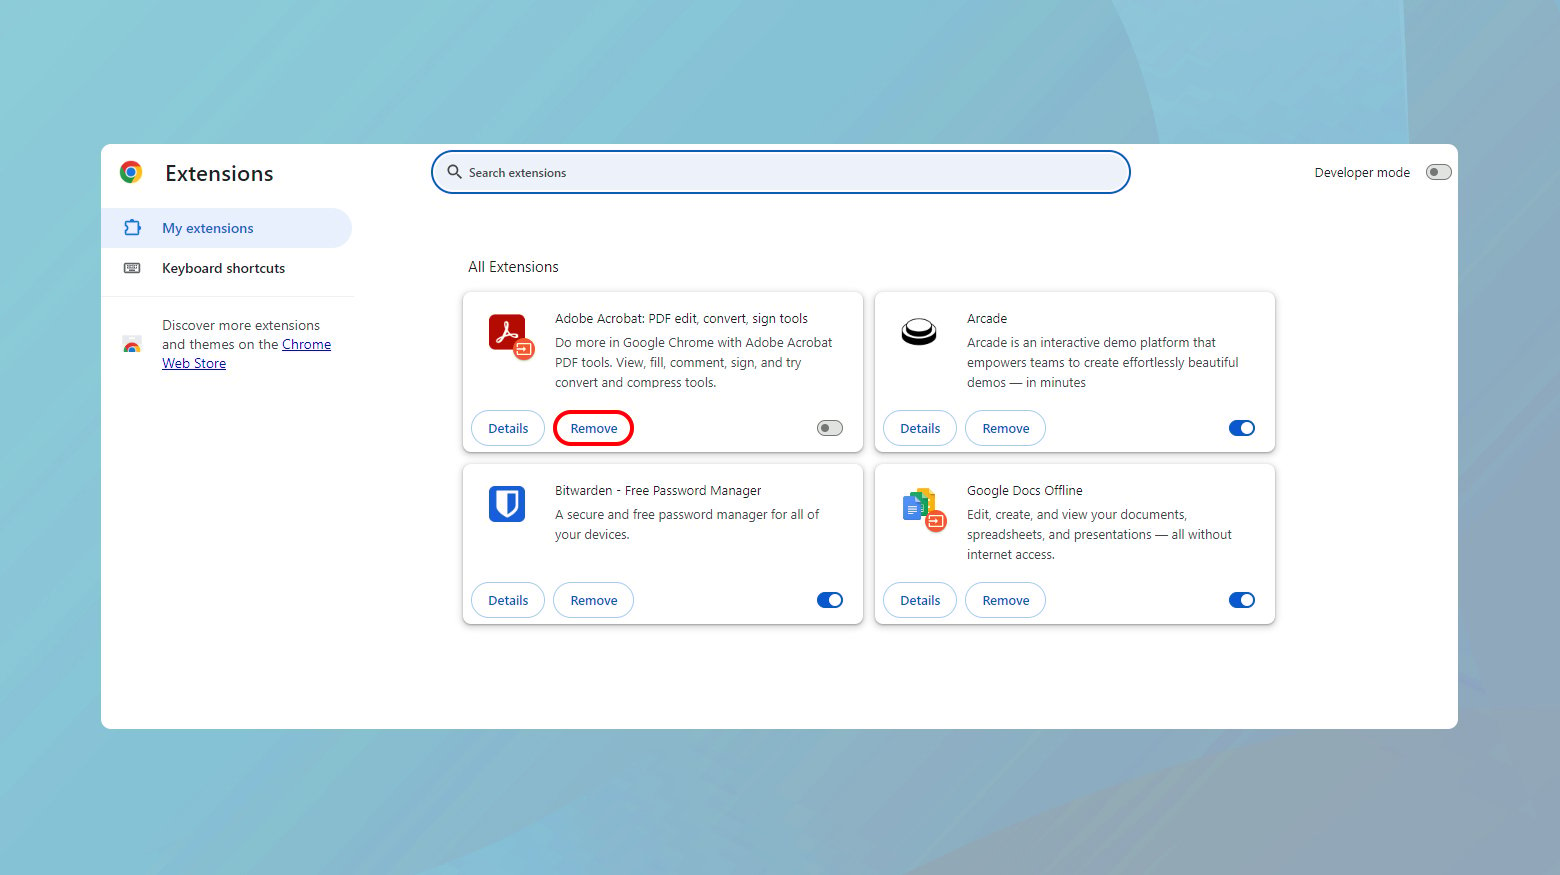
- Click on the three-dot menu icon in the top right corner of Chrome.
- Select More Tools and then Extensions to open the Extensions page.
- Browse through your installed extensions to identify any that were recently added or might interfere with web requests.
- To disable an extension, toggle the slider to the off position. To remove it completely, click on Remove.
- Restart Chrome and try your request again to see if the error has been resolved.
 Uninstalling recent Windows updates
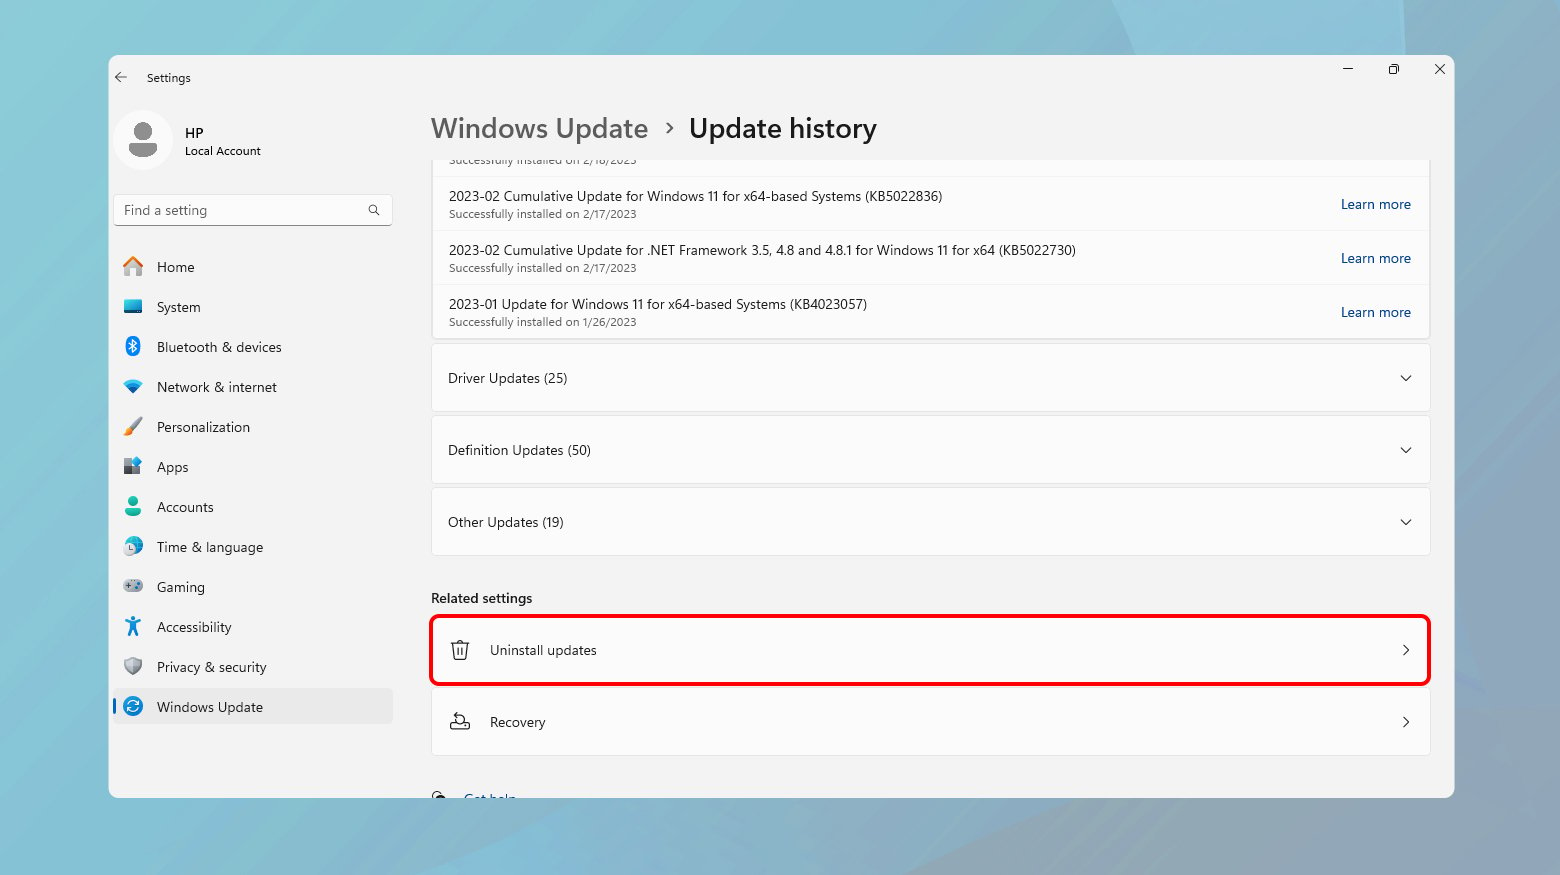
- Open the Settings app and go to Update & Security.
- Click on Windows Update, then View update history.
- Select Uninstall updates to see a list of recent updates.
- Choose the update you suspect might be causing issues and click Uninstall.
- After the uninstallation process, restart your computer and check if the error persists.
Rolling back macOS updates with Time Machine
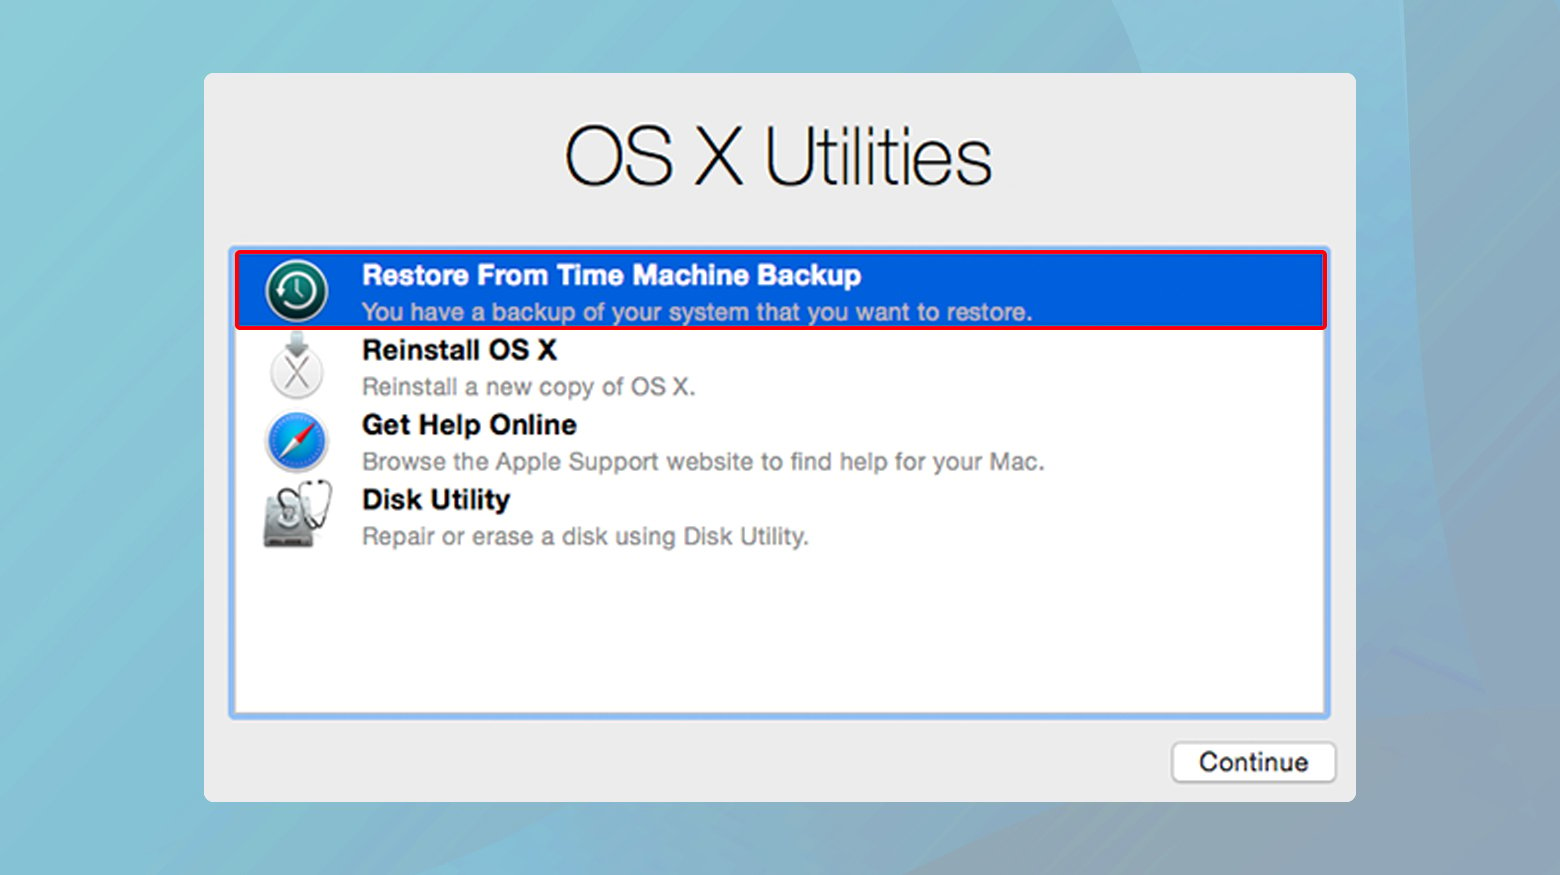
For macOS users, reverting an update requires a Time Machine backup made prior to the update.
- Restart your Mac and hold down the Command + R keys during startup to enter Recovery Mode.
- Choose Restore From Time Machine Backup in the macOS Utilities window.
- Select the backup you want to restore from, ideally one created before the update causing the issue.
- Follow the on-screen instructions to restore your Mac to the selected backup.
Conclusion
In this blog, we tackled the 411 Length Required error by diving into various solutions, from adjusting the Content-Length header to clearing browser caches and managing extensions. We also touched on the potential impact of recent system updates. These strategies aim to address the issue from multiple angles, offering a well-rounded approach to troubleshooting. Understanding these methods can help anyone facing this error navigate towards a resolution, ensuring a smoother web interaction.
Say goodbye to website errors
Achieve peace of mind with 99.99% uptime on 10Web Managed
WordPress Hosting, powered by Google Cloud.
Say goodbye to website errors
Fix all the website errors in one click
Migrate your website to the world's best Managed WordPress Hosting.