In the modern web, WordPress has a pretty big market share. And with good reason. It provides good customization opportunities, a big library of plugins and themes, and a user-friendly graphical interface. Many WordPress website developers create amazing websites without having to write a single line of code. They use plugins and visual builders instead.
But there are cases where it’s all about simplicity and performance (like scripting routine tasks) when the graphical interface is unnecessary. This is when WP CLI comes in handy.
What if I told you that you can do anything with WordPress without a UI, without buttons, or our beloved Dashboard? All you have to do is call commands. You can even use them in your scripts to integrate WordPress with other programs or to automate routine tasks.
Let’s dive in and find out!
What is WP-CLI?
The WordPress ecosystem has many hidden treasures and one of them is WP CLI. So what is it exactly?
WP obviously stands for WordPress and CLI stands for “Command Line Interface.” A CLI is the opposite of a GUI (Graphic User Interface). Everything runs in a so-called “terminal”, the central star of any Unix-like system. Imagine a computer game where you can control your character both via gamepad and via typing commands. The game character is our WordPress installation which reacts similarly to gamepad (GUI) and typed commands (CLI).
In GUI we click buttons that trigger different functions, in CLI we can run commands to trigger the same functionality from the terminal. We can even combine commands in .sh script files to run them in sequence. So, let’s install WP CLI and play around with it.
How to install WP-CLI
WordPress doesn’t come with WP CLI, so you must install it separately. There are many ways to do so (Composer, Homebrew, Docker), but the recommended one is via downloading the .phar file.
Before installing WP CLI you should check if your environment meets minimal requirements:
- UNIX-like environment (OS X, Linux, FreeBSD, Cygwin); limited support in Windows environment;
- PHP 5.6 and later;
- WordPress 3.7 and later. Versions older than the latest WordPress release may have degraded functionality.
If everything is OK, you can just download the wp-cli.phar file via curl or wget:
curl -O https://raw.githubusercontent.com/wp-cli/builds/gh-pages/phar/wp-cli.phar
Next, make sure to check the downloaded file:
php wp-cli.phar --info
If you see information about your environment it means that everything’s OK.
To use WP-CLI from the command line by typing wp, make the file executable, and move it to somewhere in your PATH. For example:
chmod +x wp-cli.phar
sudo mv wp-cli.phar /usr/local/bin/wp
If WP CLI installed successfully then running wp –info should display your environment info. To update WP CLI just run wp cli update.
How to use WP-CLI commands
Let’s see what we’ve got!
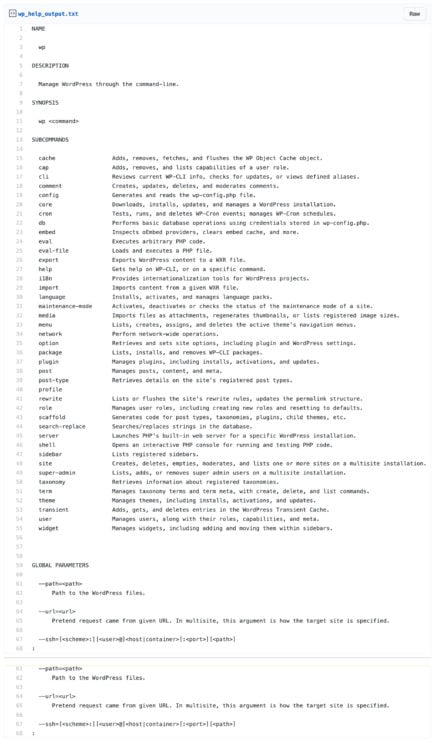
To list all commands write wp help or just wp. You’ll see the man page featuring all commands with their descriptions, and all supported global parameters. To close the information page just type q.
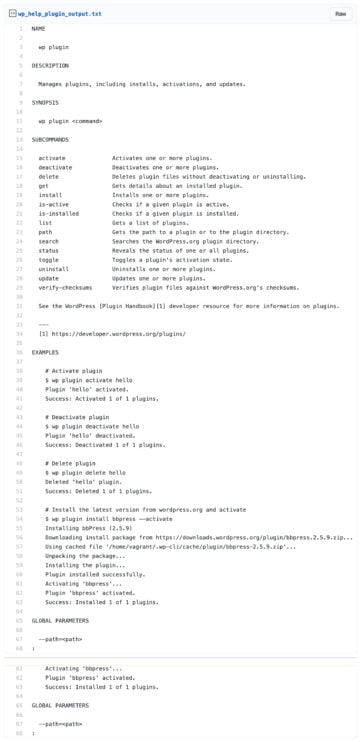
If you want detailed information about a specific command, just run the wp help command. For example, the wp help plugin command will have this output:
Now that we’ve got WP CLI installed, let’s see what we can do.
10 (and then some) Use Cases for WP-CLI
There are many use cases out there, but I will introduce the ones that I most frequently encountered. Each command has many parameters. I will only cover the most used ones, but you can always find additional info by running wp help command.
1. Manage plugins and themes
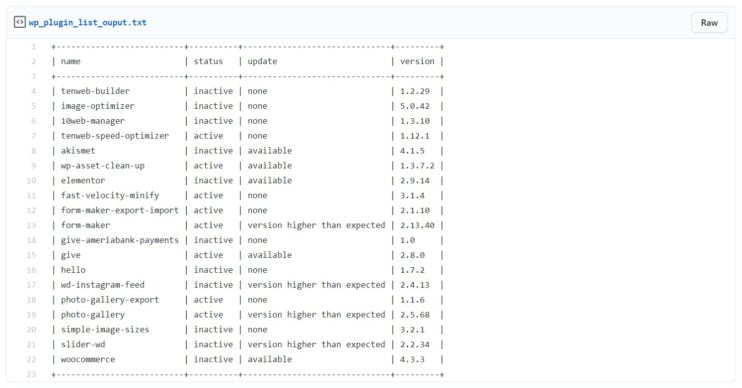
To get information about installed plugins run wp plugin list.
To disable plugins run wp plugin deactivate plugin_name. For example, wp plugin deactivate fast-velocity-minify. Similarly, you can delete, install or update any plugin or theme.
2. Resolving conflicts between plugins and themes
Installing a plugin or theme can often cause some problems, such as critical PHP errors. Ultimately, we can lose access to the plugins page which prevents us from deactivating the plugin.
But, luckily, we can install via WP CLI. Just add the –skip-plugins –skip-themes –skip-packages parameters to any command to tell the WP CLI not to load any plugin, theme, or package. So, in this case, we can deactivate faulty plugins by running wp plugin deactivate plugin_name –skip-plugins –skip-themes –skip-packages. Of course, you can use this separately. You can also pass the comma-separated list of ignored plugins, themes or packages to each one of the parameters.
And here’s some Linux magic for you:
wp plugin list --field=name --status=active --skip-plugins | xargs -n1 -I % wp --skip-plugins=% plugin get % --field=name
This command will iterate through all active plugins and run the command wp plugin get plugin_name without loading the current plugin helping you to find the problematic plugin.
3. Run commands on the remote server
If your WordPress installation is located on another server or in a Docker container, you can pass SSH credentials and run any WP CLI command on the remote server. To do this, just add the –ssh parameter to any command like this:
wp db check --ssh=[<scheme>:][<user>@]<host|container>[:<port>][<path>]
. You may also want to specify the WordPress installation folder. You can do so via the global –path parameter.
You can even create aliases for groupings and easy access to remote servers.
4. Usage in deployment scripts
Many of us are using automated deployment scripts to roll up new versions of our websites. It’s good practice to flush cache after each deployment. You can do this by calling wp cache flush.
Also, you can activate the Maintenance mode via wp maintenance-mode activate and deactivate it via wp maintenance-mode deactivate.
Things can often go wrong, so it’s good to have a database backup. You can create one by calling wp db export. To import the exported database file run wp db import filename.
5. Update WordPress via WP CLI
You can manage WordPress installations via wp core command. You can download, install and configure a fresh WordPress installation just by running
wp core download
wp core config --dbname=mydbname --dbuser=mydbuser --dbpass=mydbpass --dbhost=localhost --dbprefix=mcwp_
wp db create
wp core install --url=http://example.com --title=MyCoolSiteTitle --admin_user=username --admin_password=mypassword [email protected]
The first one commands downloads for the latest WordPress files. The second one generates a wp-config.php file, while the third one creates a database. Finally, the last one installs WordPress and creates an admin user account. Easy!
By running wp core check-update you can get the list of WordPress updates. You can easily update (or downgrade!) your WordPress via wp core update –version=5.6.1 –force. If you don’t specify a version, the latest major version will be used.
6. Search and Replace Command
This one should be in the deployment section, but it’s very handy, so it gets a separate section.
When developing websites we often create them in a local development environment. We arrange them in the staging environment and, if everything is good, deploy them to production. On each step, we need to change URLs in the database from local to staging and staging to production. We can easily do that by running wp search-replace https://example-staging.com https://example.com. This will turn https://example-staging.com into https://example.com in the database.
There are many parameters for this command. You can exclude some tables, try a dry-run which won’t affect the database but will only display the changes instead. You can even export the changed database instead of applying changes. To see all parameters call wp help search-replace. You can, of course, use it for everything else besides the URLs.
7. User management via WP CLI
Via WP CLI we can view the WordPress users list and add, delete or modify any user information. It also allows changing user roles and capabilities.
To view the list of users call wp user list. To get more information about specific users run wp user get username. You can add a new admin user by simply calling wp user create john_smith [email protected] –role=administrator –first_name=John –last_name=Smith –user_pass=password.
To add a capability or role to an existing user, just call wp user add-role username role and wp user add-cap username capability_name. To remove a role or compatibility, replace add-role and add-cap in the command above to remove-role and remove-cap. There are many other things that WP CLI can do with users. To check them out, run wp help user.
8. Configuring WP-Cron to run like a real cron via WP CLI for stability
WP-Cron is a very tricky thing. It has many limitations and tends to hang very often because it works during the request which has an execution time limit. So if you want a stable run of your scheduled tasks you can configure the Linux cron to run scheduled tasks via WP CLI, which usually doesn’t have any limit.
To do this, you first need to disable WP-Cron by adding define(‘DISABLE_WP_CRON’, true); to your wp-config.php file. This will disable running WP-Cron during the HTTP request. Then, we need to edit the crontab file and add our command. For that just run crontab -e. It will open your system’s crontab. You only need to add this line, save it, and exit:
0 * * * * /usr/local/bin/wp --path=/var/www/html/path/to/wp cron event run --due-now
Now we configured our system to run the wp cron event run –due-now command once every hour.
9. Add your own command
One of the biggest advantages of WP CLI is that we can write our custom commands for plugins or themes. To create your first command, use the command WP_CLI::add_command(‘IDENTIFIER’, ‘CLASS_NAME’) where the identifier is what you’ll use in the CLI to call subcommands, and the class name is the class containing all your CLI commands. Here is a simple example of a WP CLI command that returns Hello World.
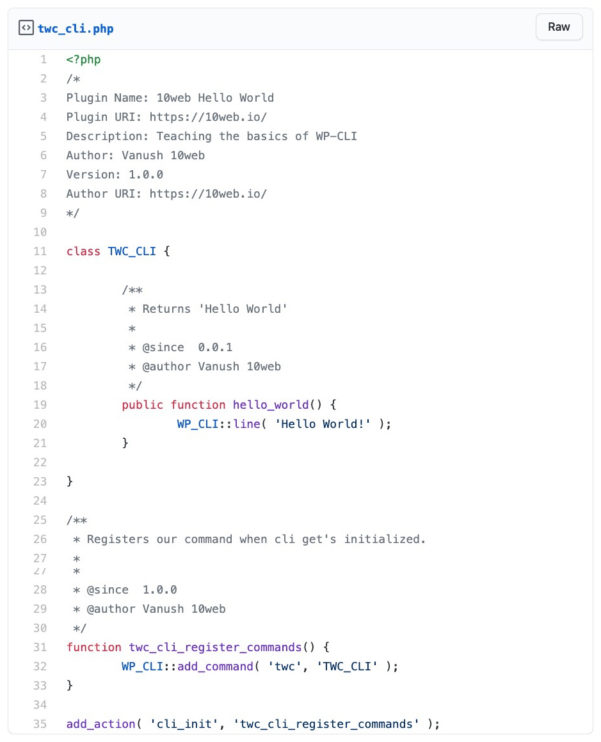
Source
10. And much more
There are plenty of things that you can do via WP CLI. For those who are interested, everything is covered in this Official Documentation.
What’s also useful to know is that there are many packages that extend the functionality of WP CLI. One of my favorite ones is wp profile command. It gives you profiling information about how long each step of WordPress’s loading process has taken, a very useful tool to find the speed bottlenecks of your website. This doesn’t come with the default WP CLI tools, so you need to install it separately.
It can easily be done by running wp package install [email protected]:wp-cli/profile-command.git. The profiler (and its use) is yet another interesting topic in itself. So, rest assured that we’ll dedicate a separate blog article to it in the future.
How we use WP-CLI at 10Web
1. Why we use it
We run many instances with many WordPress websites installed on them, and there is nothing better than managing WordPress installations via WP CLI calls. It provides the flexibility of combining commands with good error handling allowing you to achieve the best possible performance.
2. How we use it
We install and configure new WordPress installations via WP CLI; update or downgrade existing installations using search-replace command after an automated migration to fix URLs; install plugins and themes, and change many wp_option variables using it.
We also have a bunch of custom WP CLI commands to connect newly created websites to our clients’ dashboard, clear cache, and do many other things.
See How 10Web Can Benefit You
Visit our homepage to learn more about the ultimate AI-powered website builder.

That’s all there is to WP CLI for now. If you have questions and remarks you know the drill ― just leave a comment!
Simplify WordPress with 10Web
Simplify WordPress with 10Web
Skip manual work with 10Web Managed WordPress Hosting.