Many countries worldwide, including countries in the EU, Canada, Australia, New Zealand, India, Japan, and South Africa, implement VAT or similar consumption taxes like GST (Goods and Services Tax). Each country has its own rules and rates, but the principle of taxing the value added at each production or distribution stage remains consistent. In this article, we will discuss VAT in the EU.
Adding VAT in WooCommerce is essential for compliance and transparency. It’s a consumption tax applied to goods and services. As an ecommerce store owner, applying the correct VAT rates ensures compliance and builds customer trust. This guide simplifies the process of setting up VAT, configuring tax classes, and ensuring legal compliance within WooCommerce. Following the simple steps outlined below, you will learn how to add VAT in WooCommerce without much trouble.
FAQ
How to add VAT number in WooCommerce?
How do I add VAT on WordPress?
How do I change my tax label to VAT in WooCommerce?
How do I add tax to WooCommerce prices?
EU VAT regulations and compliance
VAT within the European Union involves a set of tax laws and regulations that businesses must follow. It’s important to understand these rules and ensure you’re compliant when selling goods or services before you learn how to add VAT in WooCommerce.
EU VAT rules
The European Union has specific rules for value-added tax (VAT) that affect how you conduct your business. As you learn how to add VAT in WooCommerce, you’ll see that each member state of the EU has its own VAT rates, but the overall framework is governed by EU legislation. Here are some key points to consider:
EU VAT number: To engage in business across the EU and to be VAT compliant, your business will need an EU VAT number. This unique identifier is used for transactions and reporting within the EU0. You can get an EU VAT number by registering with the tax authority in the EU country where your business is based or operates.
VIES: The VAT Information Exchange System (VIES) is a tool that allows you to verify the validity of a VAT number provided by your customers. This is crucial for trust and to avoid fraud.
EU VAT rates: The specific VAT rate can vary from country to country within the European Union. However, they typically range from 15% to 25%. You can find the exact rates for each country in the EU’s official databases or by using plugins that provide this information for WooCommerce.
Compliance with EU VAT laws
To maintain trust and avoid penalties, it’s essential to ensure your WooCommerce store complies with EU VAT laws. Compliance involves several action points:
- Set your store’s location: Under WooCommerce > Settings > General, make sure to set your store’s base country and currency correctly.
- Update your tax rates: Access WooCommerce > Settings > Tax. If you have the right plugin installed, you can automatically input all the EU VAT rates with one click.
- Collect EU VAT numbers at checkout: Integrate a solution that allows you to collect and validate EU VAT numbers during the checkout process. Doing so can automatically exempt VAT for customers with valid numbers.
- Understand tax laws: Stay informed about the tax laws that apply to your transactions. It’s your responsibility to apply the correct tax rates and rules as part of how to add VAT in WooCommerce.
Adding VAT in WooCommerce doesn’t have to be complicated. By following these guidelines and ensuring proper setup, you can smoothly manage VAT on your sales within the EU.
How to add VAT in WooCommerce
WooCommerce allows you to manage multiple tax classes to accommodate different tax regulations like VAT. Each class can have its own set of rates depending on the products and the location of your customers.
Choose among VAT plugins
To streamline how to add VAT in WooCommerce, you’ll want to begin by selecting the optimal plugins from the WordPress.org repository. Visiting WordPress.org, search for WooCommerce VAT to find relevant solutions.
Opt for plugins with high ratings and positive reviews. These often indicate that other users have had success with the plugin. Verify compatibility with your version of WooCommerce and ensure the features match your VAT requirements, such as automatic tax calculation and VAT number validation.
Configure WooCommerce tax settings
Before adding tax rates for your VAT, it’s important to fine-tune your WooCommerce tax settings. Here’s how you can get started:
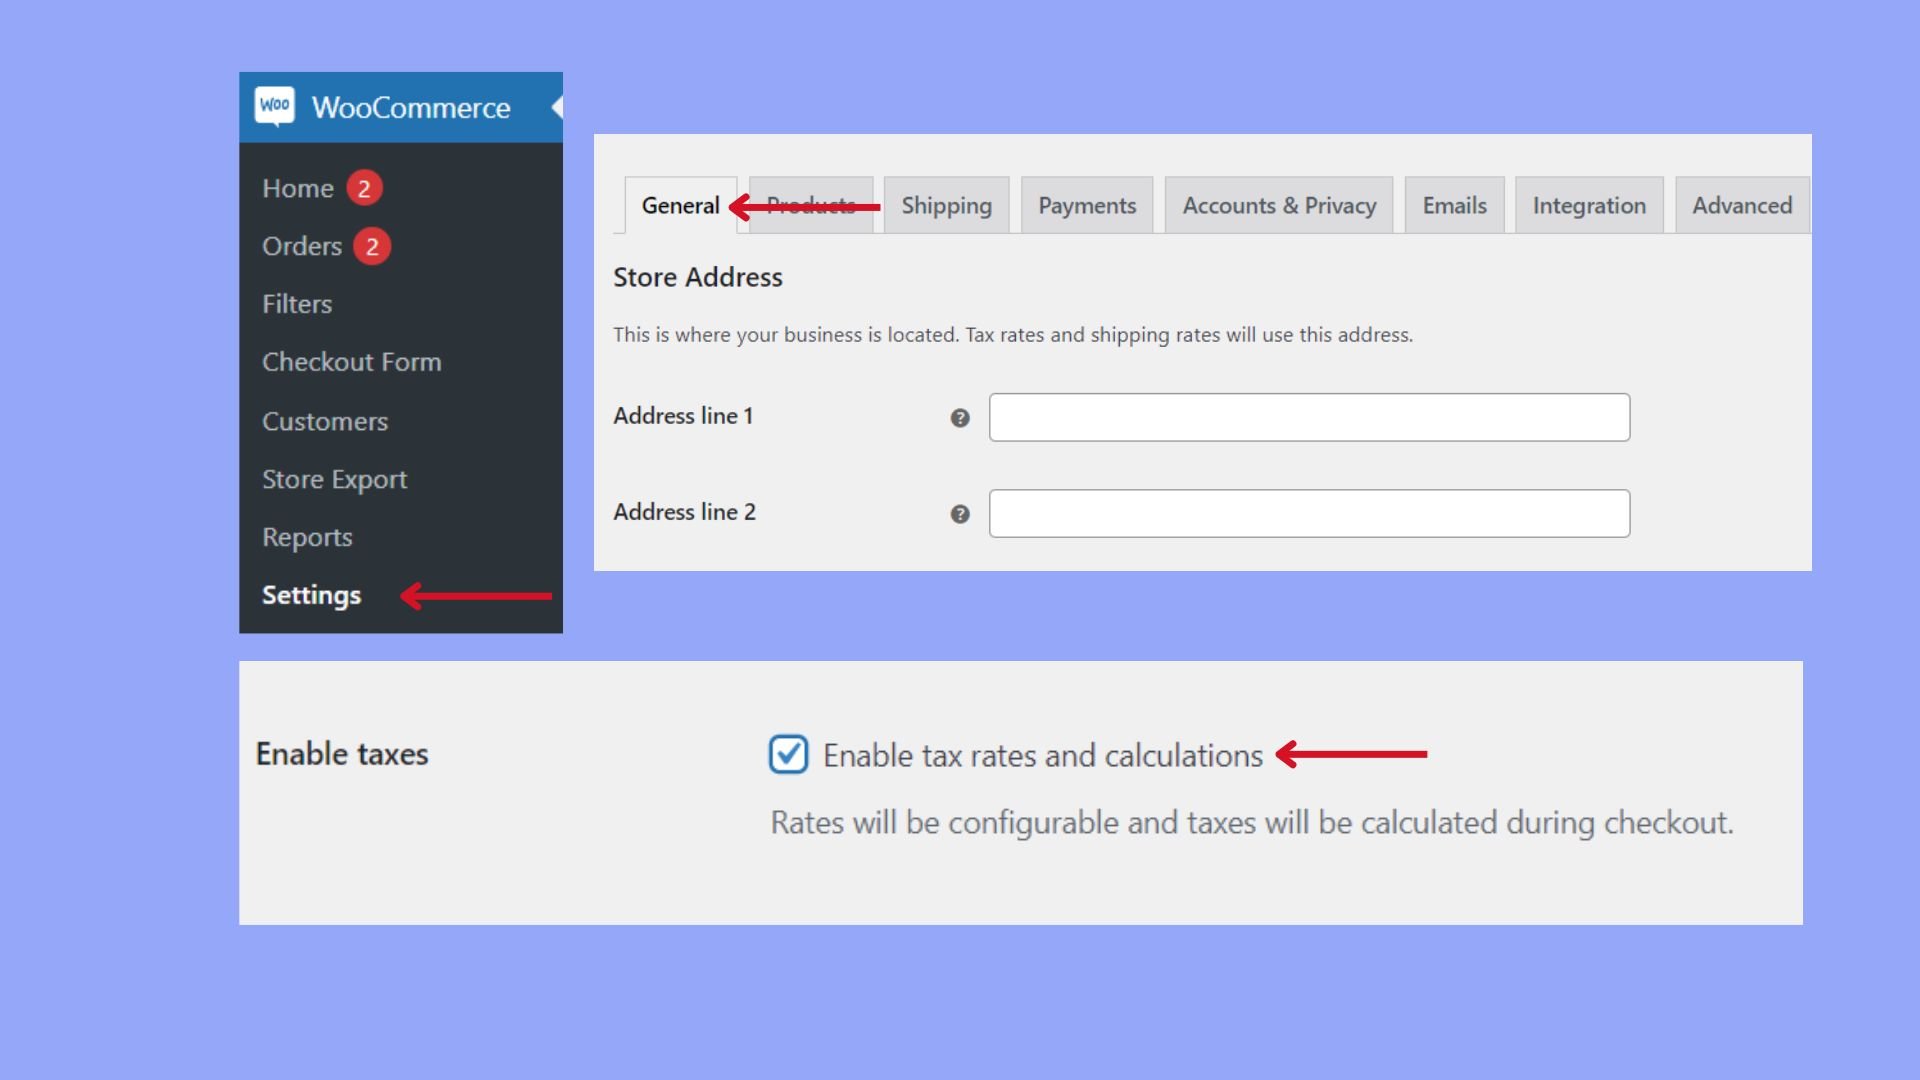
- Go to WooCommerce > Settings > General.
- Select the Enable taxes and tax calculations checkbox to turn on tax functions in WooCommerce.

- Click Save changes to apply your new settings.
Define tax classes and rates
After enabling tax settings, you can define your tax classes and their corresponding rates.
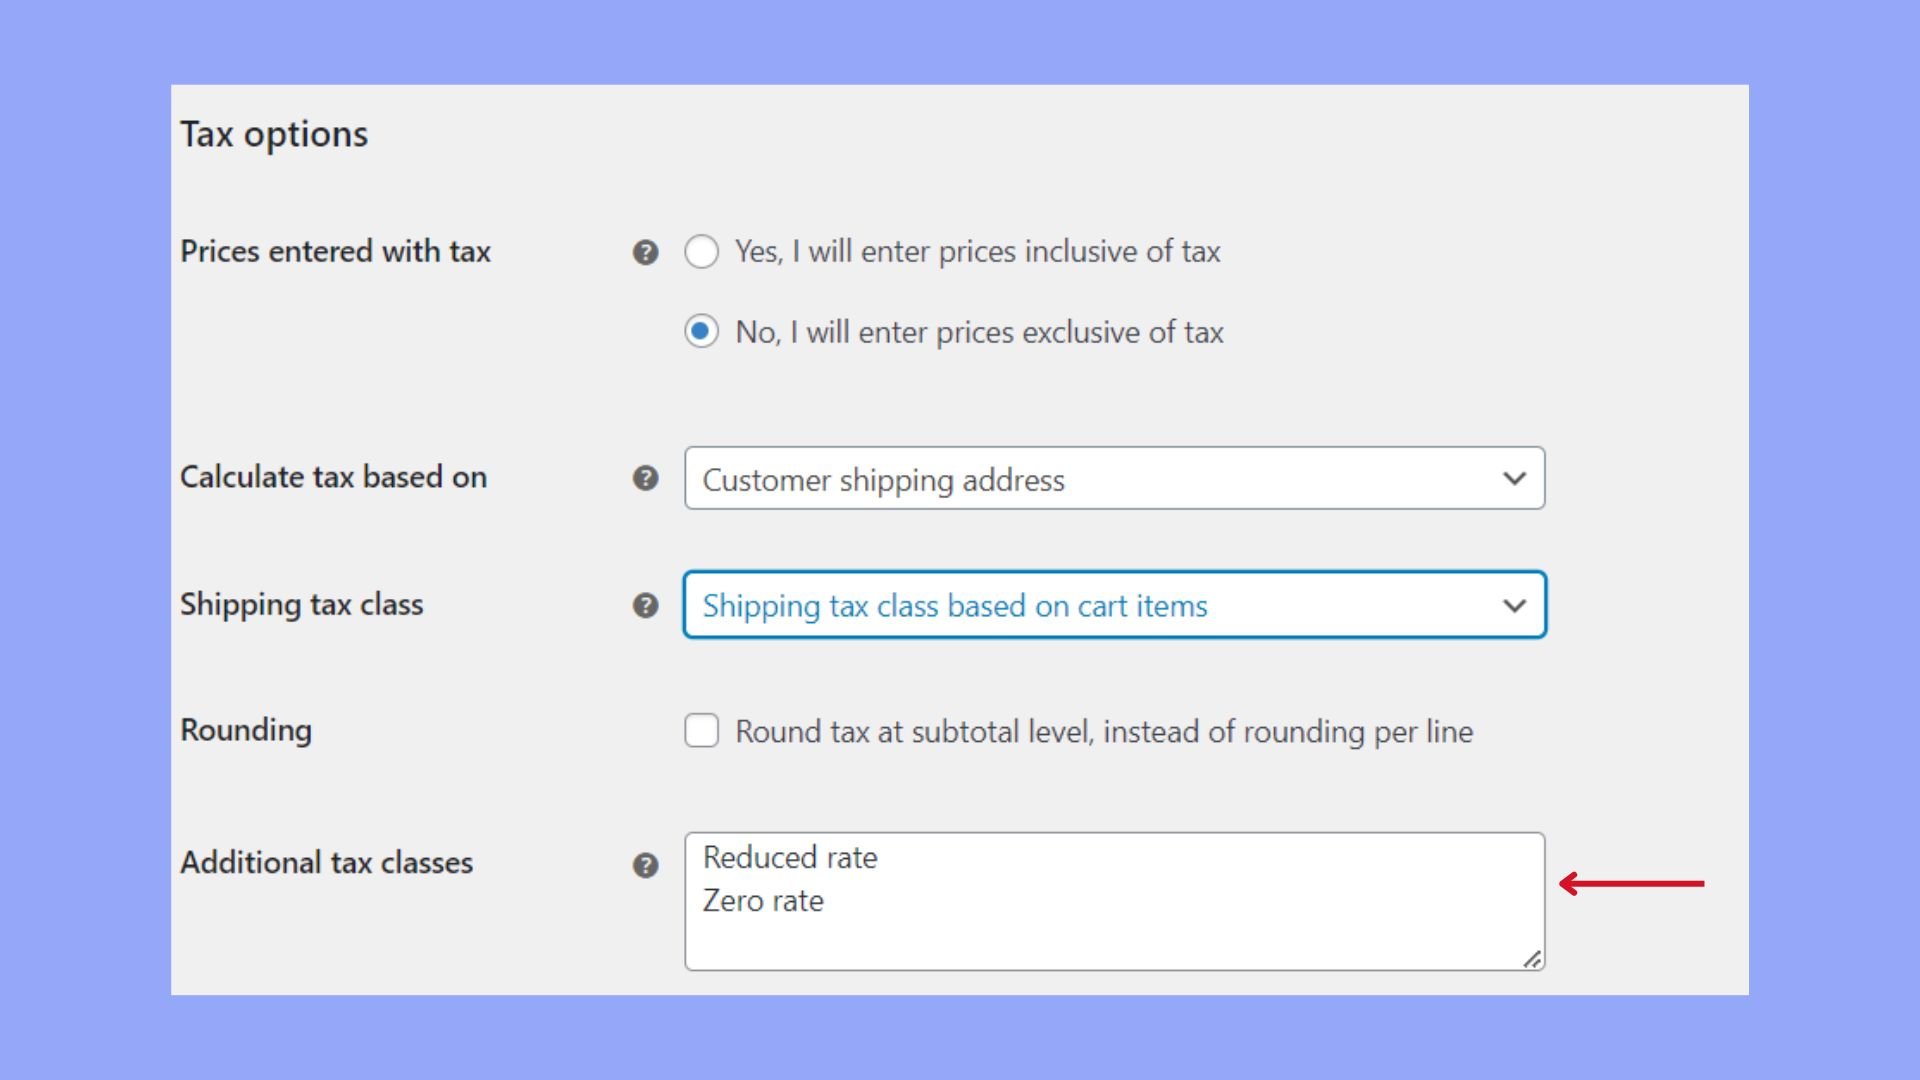
- Go to WooCommerce > Settings > Tax. Here you will see several pre-defined tax classes such as standard rate, reduced rate, and zero rate.
- To add a new tax class for VAT, you can type the class name under the Additional tax classes section. You might want to call it “Digital Goods” or “Physical Goods” based on what you sell.
- Once your tax class is added, set your rates by clicking on the links in the Tax options section. Here’s where you can specify country codes, state codes, tax rates, and other details specific to VAT.
- Make sure you click Save changes after setting each rate to ensure all your inputs are stored.
With these simple steps, you can effectively manage how to add VAT in WooCommerce. Remember to regularly check that your tax settings align with the current tax laws for VAT in your region.
VAT compliance for digital products
Digital products, often have specific VAT rules. In the EU digital products are subject to VAT based on the customer’s location, not the seller’s. To maintain compliance when selling digital goods within the EU, follow these steps:
- Ensure your store’s base location is correctly set under WooCommerce > Settings > General.
- Under the same section, specify your currency options to align with your business.
- Once the location and currency are set, assign the new tax class “Digital Goods” to your digital products.
- Afterward, go to the created “Digital Goods” tax class and input EU VAT rates for every country. WooCommerce allows you to input different rates manually.
Since for digital products VAT is calculated based on the buyer’s location, you can use the geolocation feature to determine where your customers are so you can charge the correct VAT rate. Extensions can also help verify customer locations and apply the correct taxes automatically.
Create your custom online store in minutes with 10Web AI Ecommerce Website Builder and take your business online. 
Looking to sell online?
Product and shipping tax configuration
Setting up tax configuration is essential for ensuring your WooCommerce store is compliant with VAT regulations. This touches on both how VAT is applied to your products and the way it should be calculated for shipping.
Applying VAT to products
When configuring VAT for products in WooCommerce, it’s important to ensure that tax is calculated correctly and displayed to your customers. Follow these steps to apply VAT to your products:
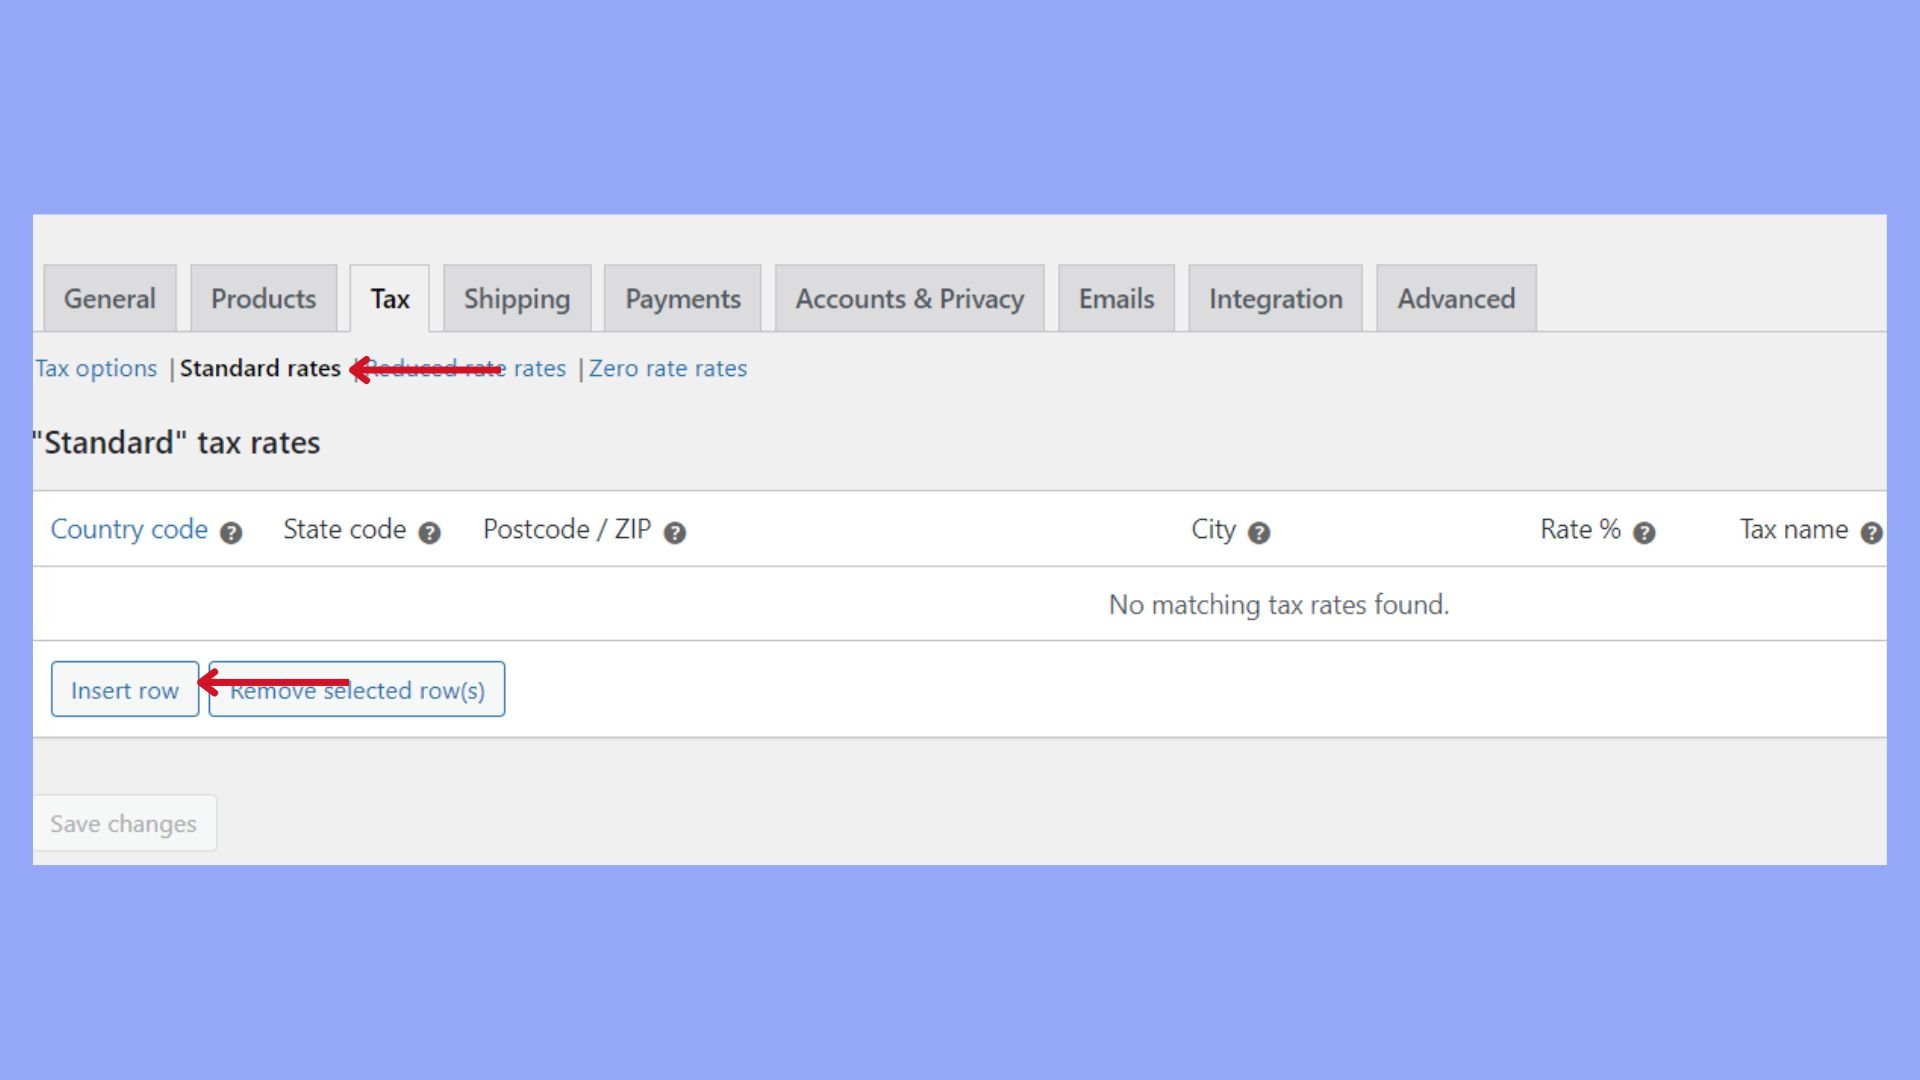
- In WooCommerce > Settings > Tax, choose Standard rates under the Tax tab.
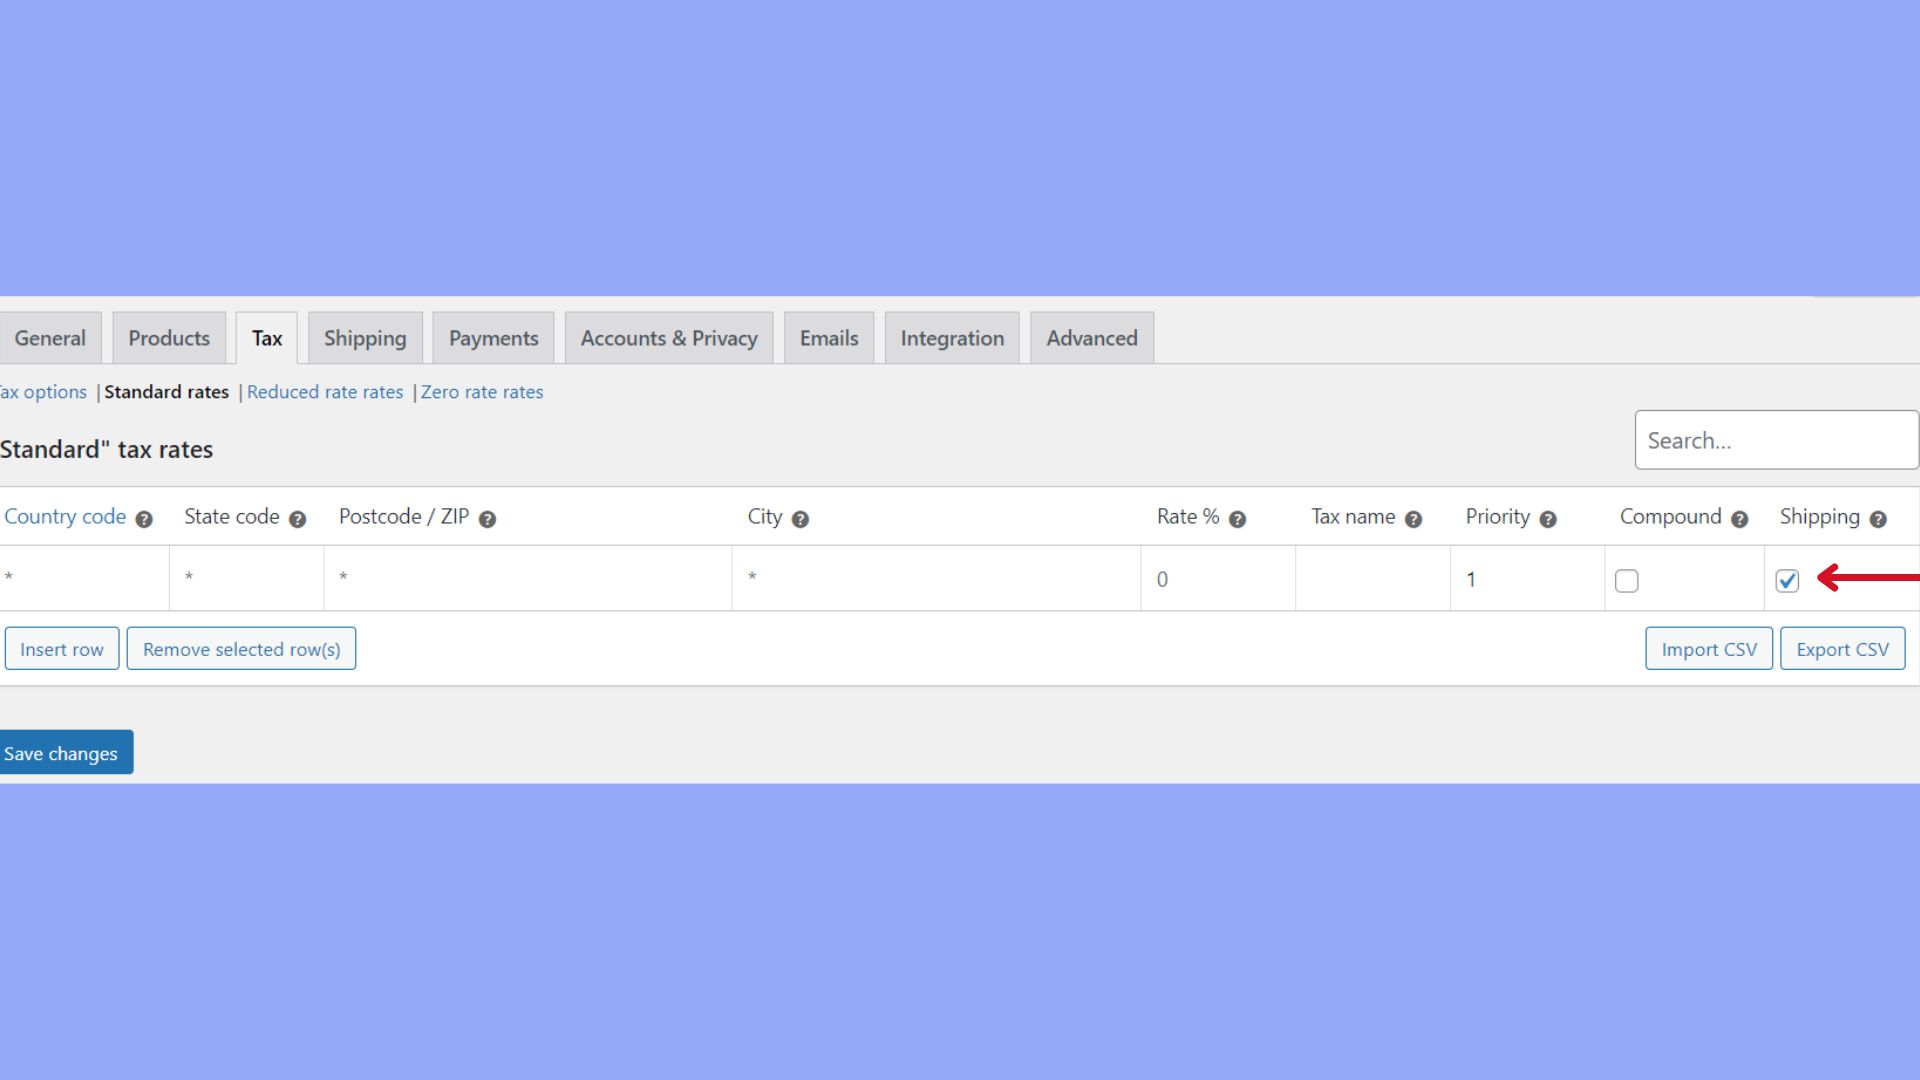
- To add a new tax rate, click on Insert row and fill in the necessary fields such as Country Code, State Code, Tax Rate, Tax Name, and Priority.
- Make sure to check the Shipping checkbox if this tax rate should also apply to shipping.
- Click on Save changes once you’ve entered all the appropriate information.
Following these steps, you’ve set up VAT in WooCommerce for your products.
Handling VAT for shipping
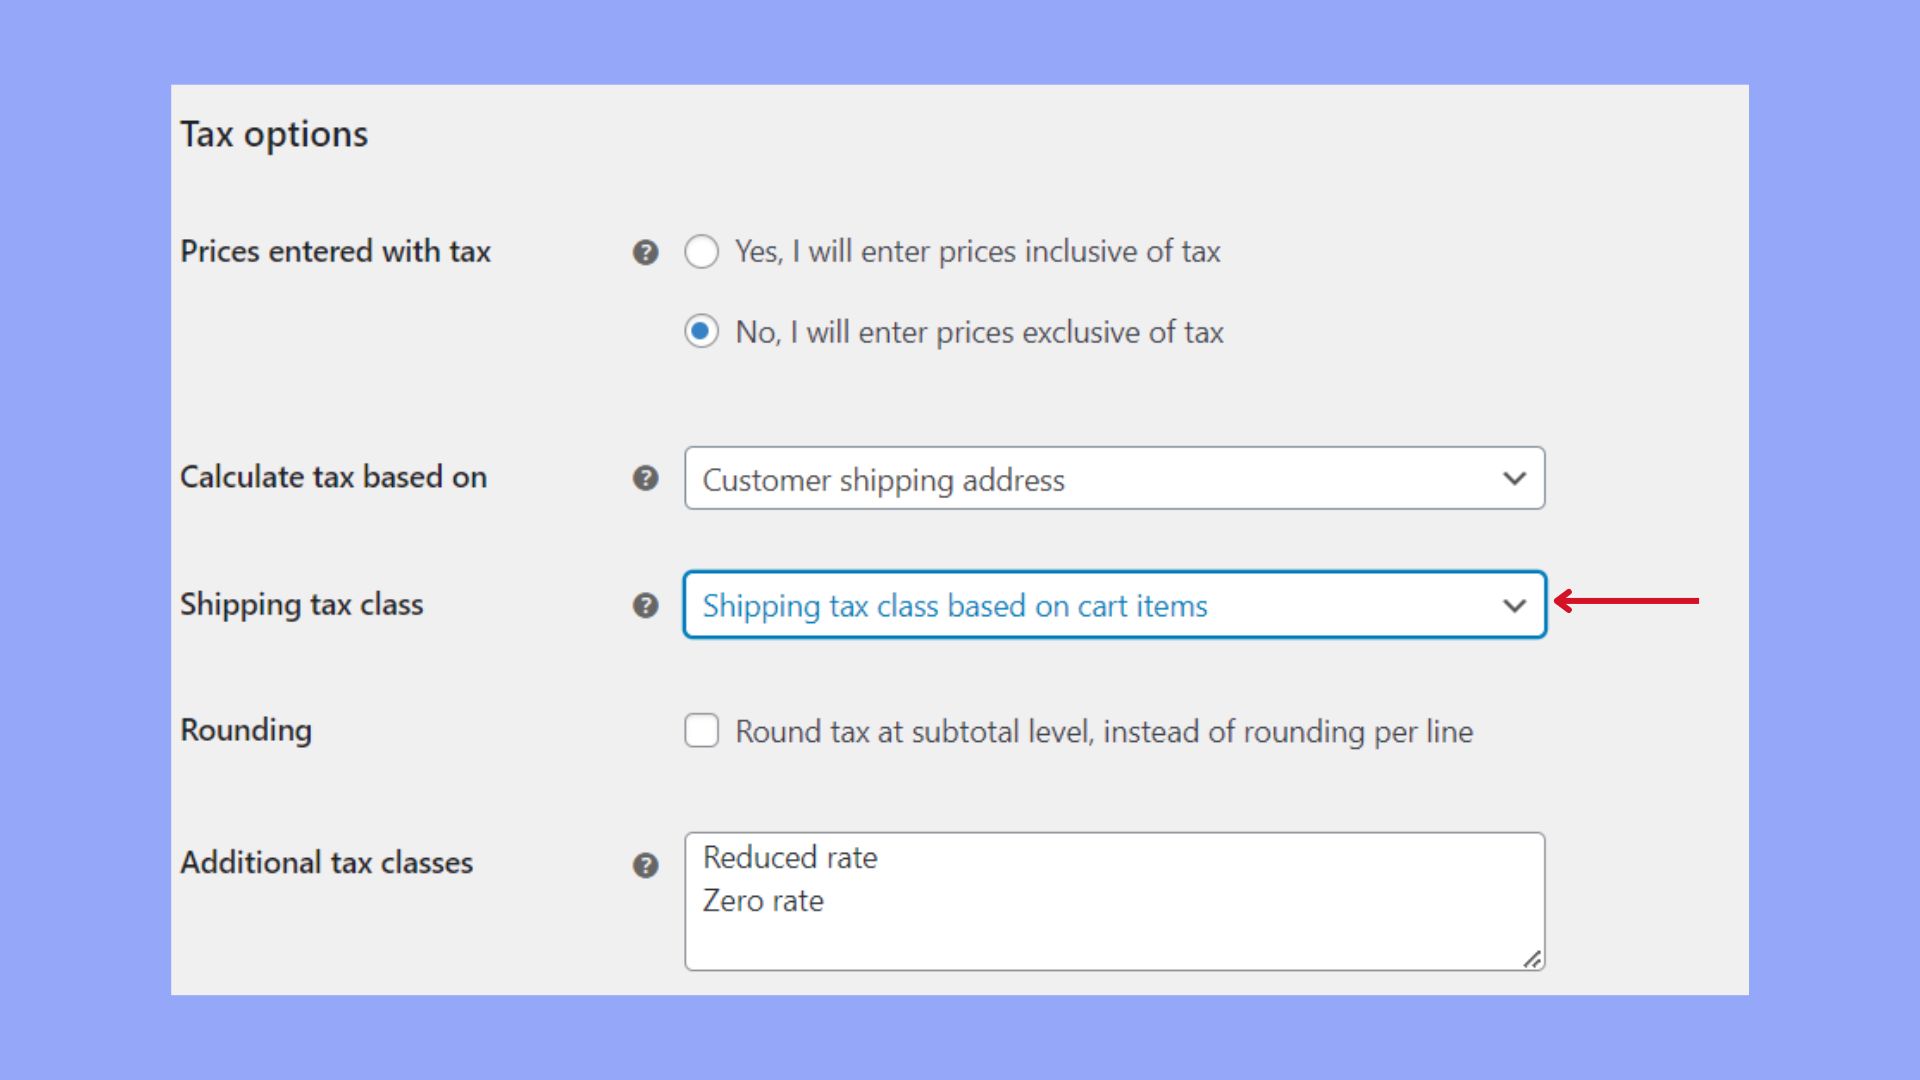
Calculating VAT for shipping can be slightly different from product tax and varies based on your store’s settings. Here’s how to manage VAT for shipping:
- Stay on the Tax settings page within WooCommerce.
- Look for the option labeled Shipping tax class.
- You will find a few choices here, such as Shipping tax class based on cart items and Standard.
- If your shipping costs should vary based on the products in the cart, select Shipping tax class based on cart items.
- If your shipping tax is standard across all products, choose Standard.
- After making your selection, scroll down and click on Save changes.
With these steps, you have configured VAT for both products and shipping, making sure your WooCommerce store aligns with tax regulations.
Customizing price display suffix
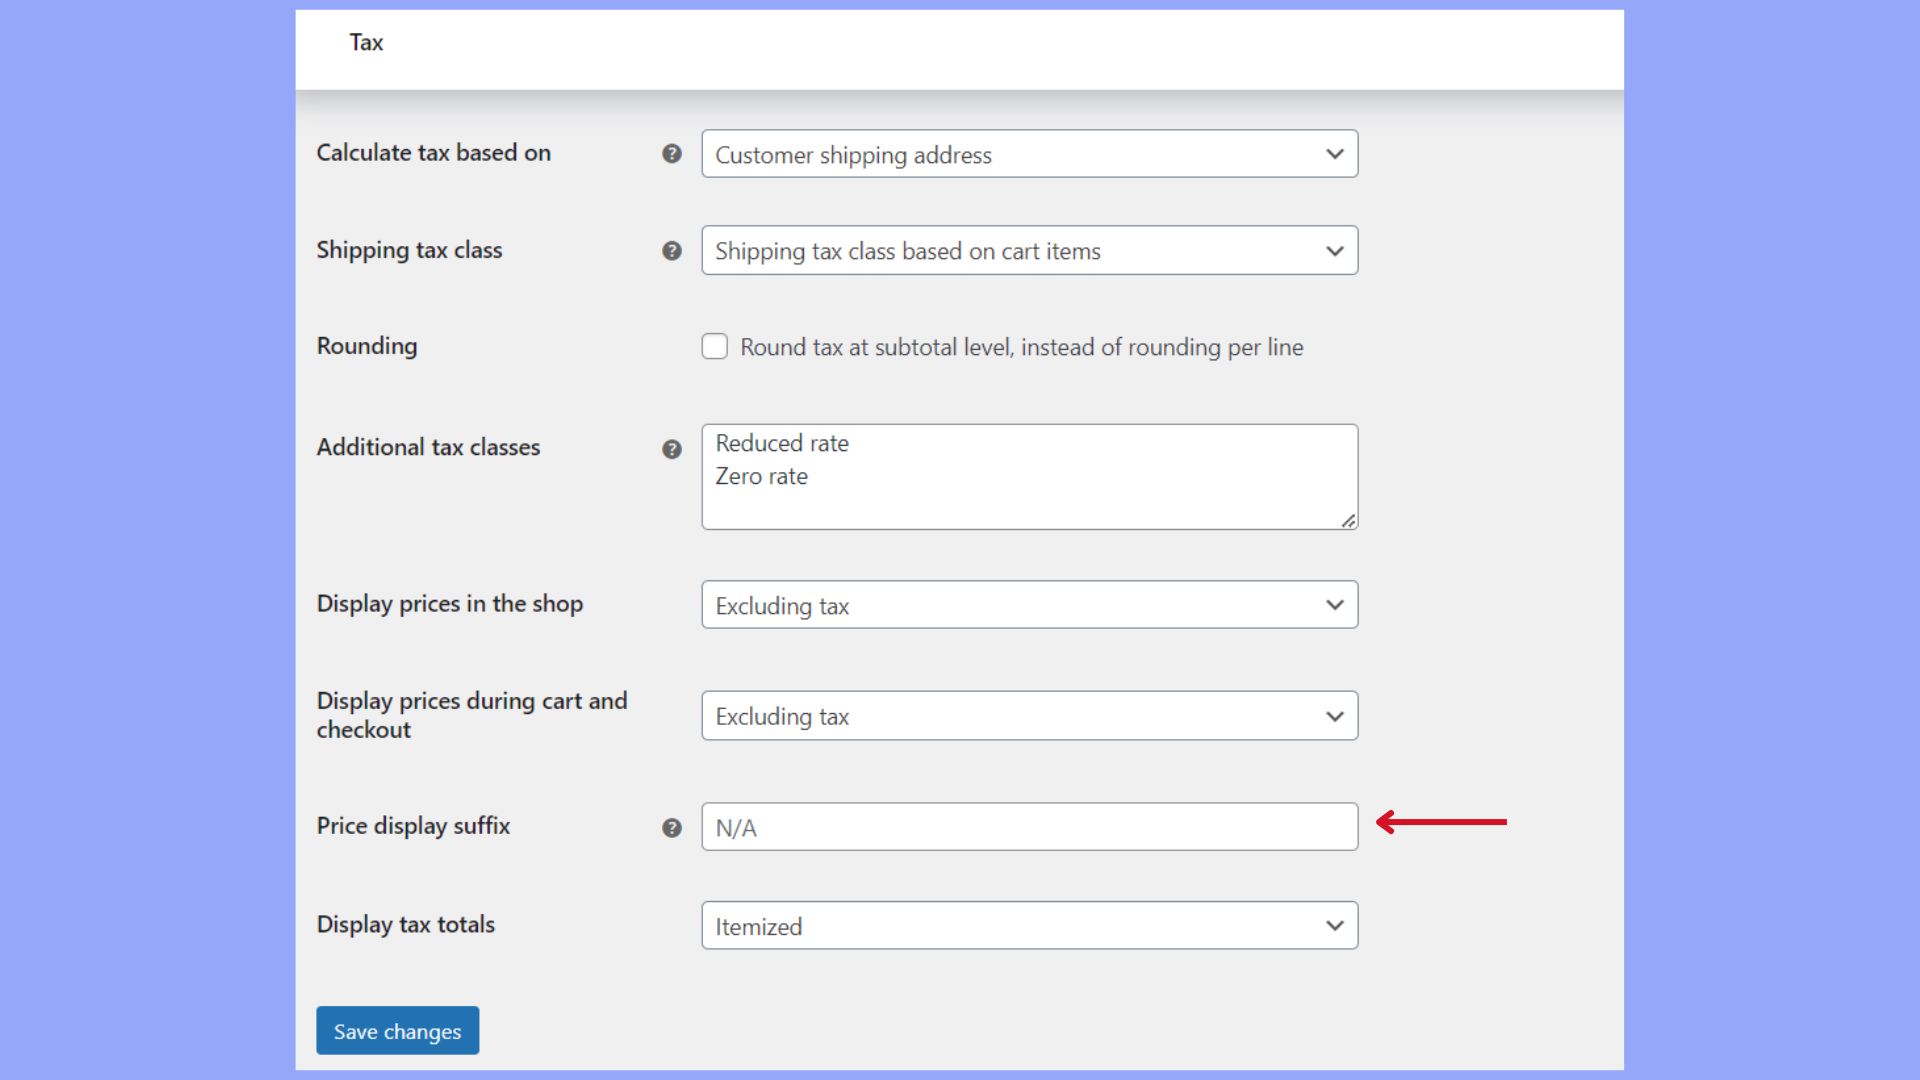
In your WooCommerce store, you might want to show the VAT amount included in the product price. This is a straightforward task that helps your customers understand if the tax is included or additionally charged. Let’s set up a suffix that will appear alongside your prices.
- Go to WooCommerce > Settings > Tax.
- Within the Price display suffix field, type in the text that you want to display. You could use something like, “incl. VAT” if VAT is included in the price.
- If you need to show both inclusive and exclusive tax prices, you can use placeholders provided by WooCommerce such as {price_including_tax} and {price_excluding_tax}.
- Once you’ve customized your price display suffix, click on Save changes.
By customizing the price display suffix, you effectively communicate the VAT included in your product prices, ensuring transparency for your customers.
Optimizing VAT information at checkout
The checkout process is where you need to be extra clear about VAT charges to prevent any surprises for your customers. Here’s how to add VAT in WooCommerce and optimize this information at checkout:
- Make sure to have a VAT rate set up under WooCommerce > Settings > Tax.
- In the Tax Options section of your tax settings, enable displaying tax totals as a Single total.
- Now, head to the checkout page settings by going to WooCommerce > Settings > Checkout.
- If you wish to add a field for customers to provide their VAT number, use a suitable plugin like EU VAT Manager for WooCommerce.
- Once installed and activated, access the plugin settings to customize its functions, such as automatically validating and applying the correct VAT rates during checkout.
- After configuring the settings, visit your checkout page to ensure that the VAT information is displaying correctly and adjust if necessary.
Identifying customer location
It’s essential to determine your customer’s location to apply the correct VAT rates. WooCommerce uses geolocation to detect your customer’s IP address or requests the customer to provide a billing address during checkout. Follow these steps to ensure you identify the customer location correctly:
- Go to WooCommerce > Settings > General.
- Scroll down to find the Default customer location option.
- Choose Geolocate address or Geolocate with page caching support to detect the customer’s IP address. Alternatively, select Shop base address if you need customers to manually enter their address.
- Click Save changes.
By confirming the customer’s location, you can provide an accurate calculation for VAT.
Conclusion
Adding VAT in WooCommerce is a crucial step for ecommerce store owners operating or selling within the EU and other regions with VAT or similar consumption tax regulations. By ensuring proper VAT setup and compliance, you follow legal requirements and build trust with your customers through transparent pricing.
This guide has walked you through the essential steps of configuring VAT in WooCommerce, from setting up tax classes and rates to optimizing VAT information at checkout. By now, you have learned how to add VAT in WooCommerce. Good luck with the tax collection.
Create your custom online store in minutes with 10Web AI Ecommerce Website Builder and take your business online. Create your online store in minutes with 10Web AI Ecommerce Website Builder.
Looking to sell online?
Looking to sell online?
Create your online store in minutes


![]()