You’ve got knowledge to share, but with so many tools, plugins, and setup options to consider, turning it into a structured, sellable online course can quickly become overwhelming. Which tools should you choose? Do you need to know how to code to get started?
WordPress makes it surprisingly doable, even if you’re not a tech pro. With the right setup, you can create a course that’s easy to build, engaging, and ready to sell.
In this guide, we’ll walk you through each step of how to create an online course with WordPress: choosing your topic, launching, monetizing, and more. Let’s see how to use WordPress as your complete e-learning platform.
Why choose WordPress to create your online course?
WordPress gives you full control over your online course, something closed platforms like Teachable or Kajabi don’t offer. With WordPress, you own your content, control your pricing, customize the student experience, and skip platform fees. Here’s why so many creators choose WordPress:
- Ease of use: The dashboard is beginner-friendly. Add a new course, lesson, or quiz with just a few clicks with no coding.
- Plugin power: LMS plugins like Sensei or LearnDash let you build complete course structures with lessons, modules, quizzes, and certificates.
- Sell directly: Use WooCommerce to take payments without relying on external platforms. Set your price, offer coupons, and keep your revenue.
- Total customization: Choose themes built for education and adjust every page to match your brand.
- Built-in SEO: Unlike many closed platforms, WordPress helps you rank in search results and grow your traffic organically.
Best of all, you’re never alone. WordPress has one of the largest support communities out there, so if you get stuck, there’s always help available.
Step 1: Choose your course topic and target audience
The best online courses come from a mix of passion, expertise, and a real need in the market. Start with what you know, then focus on who it’s for.
Find your topic
What kind of questions do people have? What do people need help with? What skills or experience do you have that others want to learn? Make a short list of topics you’re both knowledgeable about and excited about. To get clearer, ask your audience (if you have one) what they’d love to learn from you.
Example: If you’ve been painting with watercolors for years, you could create a beginner-friendly course on layering techniques, materials, or even painting nature scenes.
Know your audience
Who are you teaching, and what problem are you solving for them? Think beyond demographics: what motivates them to take a course like yours? Are they hobbyists, professionals, or total beginners? What would make their lives easier or better after finishing your course?
Example: If you’re teaching mindfulness and yoga, your students might be busy professionals looking to manage stress in just 10 minutes a day.
The more clearly you define your audience, the easier it’ll be to create content, pricing, and messaging that resonates.
Step 2: Setting up your WordPress site
Before you can start building your course, you need a solid foundation: a domain name, reliable hosting, WordPress installed, and the right LMS plugin to power your course content.
1. Choose a domain name and hosting
Your domain is your online identity, so keep it short, relevant, and easy to remember, like learnwithmaria.com or beginnerguitarhub.com. If you’re unsure what to choose, you can use online tools to find and purchase your domain name.
For hosting, go with a provider optimized for WordPress. You can consider using 10Web. It’s a great beginner-friendly all-in-one solution with:
- Managed WordPress hosting
- AI Website Builder to create your site in minutes
- A simplified dashboard you can manage alone
- Automated backups
- Speed optimization
Setup takes just a few clicks with no tech headaches involved. Plus, if you choose one of 10Web’s hosting plans, you’ll also get a free domain name for the first year.
2. Install WordPress and get comfortable
Once your hosting is set, install WordPress (usually one-click). You’ll land on your WordPress dashboard. This is your home base for managing everything. Take a few minutes to explore key sections like:
- Posts and pages: Where your content lives
- Appearance: Customize your site’s design
- Plugins: Add features like quizzes or payment tools
The interface is intuitive, and you’ll get the hang of it quickly.
Remember: If you’re using 10Web, you don’t even need to install WordPress manually. It’s done automatically during setup. Just select your website type (single or multisite), and 10Web takes care of the rest, including the database.
You’ll also get access to a much more user-friendly content and website manager, making everything easier to navigate.
3. Install an LMS Plugin
To turn your WordPress site into an actual learning platform, you’ll need an LMS (Learning Management System) plugin. Popular options include:
- Sensei LMS: Clean, simple, and developed by the team behind WooCommerce
- MemberPress: Great for selling memberships and managing access
To install, go to Plugins > Add New, search for your chosen LMS, and click Install > Activate.
By the end of this step, your site is live and ready to host your first course lesson. Now let’s move on to design and content.
Step 3: Designing and customizing your course
Design plays a huge role in how your course feels to students. A clean, intuitive layout helps them stay focused and engaged, while a clunky one drives them away. In WordPress, your theme and page layout control how everything looks and flows.
1. Choose the right theme for online learning
Choose a WordPress theme that’s built for courses and compatible with your LMS. You want something clean, distraction-free, and mobile-friendly. Themes like Astra, Academy Pro, or Kadence are great options designed with e-learning in mind.
Alternatively, when using 10Web you can use AI Online Course Website Builder, create your website by chatting with AI, and have your website design set up in minutes:
- Describe your online course: Just type what it’s about and who it’s for.
- Let AI build it: Instantly get a full site with products, layout, and copy.
- Customize & launch: Change colors, add your brand, and hit publish.
2. Customize your layout, without touching code
Once you’ve chosen your theme, it’s time to shape your course layout. Navigate to Appearance > Customize to make basic changes. You can also use drag-and-drop builders like Elementor or Gutenberg to place course modules, lesson blocks, and visuals exactly where you want them.
If you’re using 10Web, things get even simpler. Its AI Co-Pilot and built-in drag-and-drop editor let you:
- Click on any element (text, image, button, etc.)
- Chat with the AI to describe what you want to change: like moving blocks, rewriting copy, or updating visuals
- Watch it do the work for you

Build your website in 1 minute
Create your dream website with 10Web AI Website Builder
and take your business online!
Step 4: Creating your course content
Once your WordPress site is ready, it’s time to build the actual course. We’ll walk you through how to do this using Sensei LMS, a popular plugin made by the creators of WooCommerce. If you decide to use a different LMS plugin, the editing process will still be fairly similar. Just make sure to focus on the setup steps and the overall course flow logic.
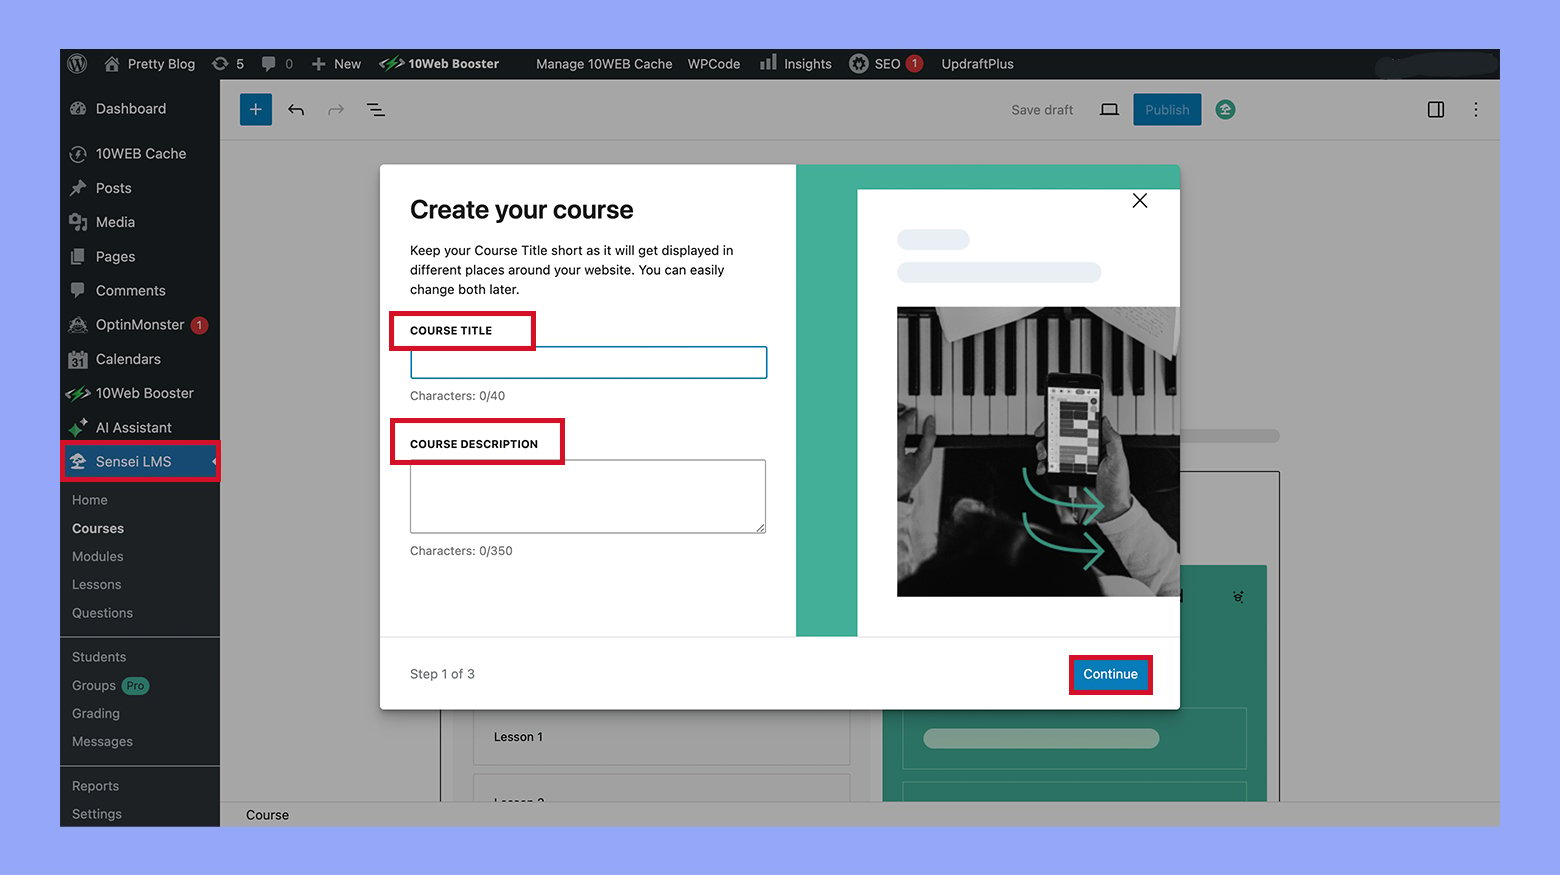
1. Set up the course in Sensei LMS
- Create your course: Go to Courses > Add New in your WordPress dashboard. Add a title, description, and optional details like duration, difficulty level, and a featured image.

- Add lessons: Go to Lessons > Add New and create your first lesson. Add text, images, videos, and quizzes or assignments directly into the lesson editor.
- Publish the course on a page: Head to Pages > Add New and create a new page. Use the Sensei Course Content block in the editor to select and display your course.

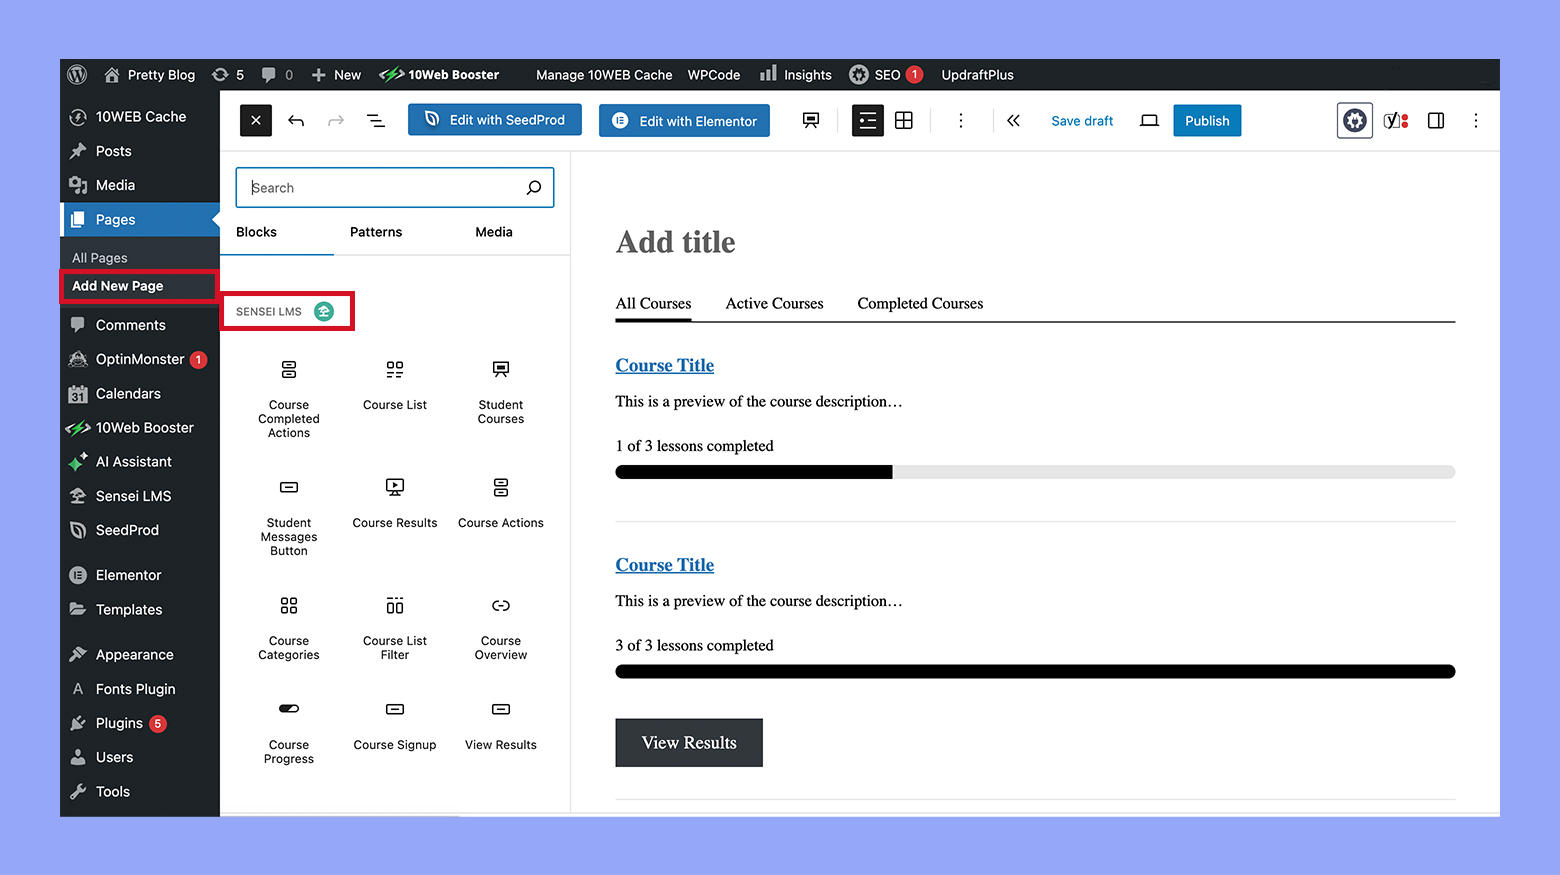
Choose whether to show things like the course description, syllabus, and progress tracker. Customize layout with Gutenberg. If using a Full Site Editing theme, adjust the page from the front end, and when working with 10Web, just use a drag and drop editor or chat with AI to make the changes.
2. Organize your curriculum
Map out your course structure first. A clear, logical flow helps students stay on track and prevents confusion, frustration, or dropping off mid-course. Your courses should have two things:
- Sections: big topics or modules
- Lessons: individual steps within each section
Example layout:
| Section 1 | Section 2 | Section 3 |
| Lesson 1.1 | Lesson 2.1 | Lesson 3.1 |
| Lesson 1.2 | Lesson 2.2 | Lesson 3.2 |
| Lesson 1.3 | Lesson 2.3 | Lesson 3.3 |
Keep it flexible. Start small and expand later based on student feedback.
3. Add engaging media and lesson content
To keep students motivated, use a mix of formats:
- Text: break it into short paragraphs and bullet points
- Images and PDFs: for visual learners or downloadable guides
- Videos: embed directly into lessons via YouTube, Vimeo, or uploaded files
- Audio or quizzes: for variety and interactivity
Lesson template example:
- Title: What’s this lesson about?
- Objectives: What will the student learn?
- Content: Teach your topic in simple steps
- Important note: Highlight something essential
- Media: Add video, audio, or downloads
- Summary: Quick recap of takeaways
When your lessons are structured clearly and include rich media, you create a better learning experience that actually sticks.
Step 5: Enhancing engagement with quizzes and interaction
Creating an engaging online course can significantly boost your students’ learning experience. Quizzes and interactive elements are powerful tools to keep your students involved.
1. Add quizzes to reinforce learning
Sensei LMS makes it easy to insert quizzes right after lessons. Here’s how to use them well:
- Go to any lesson, click Add Quiz, and start adding questions.
- Include multiple choice, true/false, or fill-in-the-blank questions.
- Use Answer Feedback settings to explain why each answer is right or wrong. This gives instant clarity and encourages deeper understanding.
Pro Tip: Keep quizzes short and focused. One quiz per lesson with 3–5 questions is often enough to reinforce key points.
2. Build a learning community
Your course becomes much more valuable when students can connect with each other. The community keeps them coming back.
- Use the bbPress plugin to add discussion forums to your course.
- Create a forum for each module or lesson where students can ask questions, share their own tips or progress, discuss quiz results and lessons.
Encourage interaction by posting prompts like: What was the hardest question for you in this quiz, or how would you apply this lesson in real life? Even with a small group, this kind of interaction builds trust, accountability, and momentum.
Step 6: Marketing and promoting your online course
You’ve built a great course. Now let’s get it in front of the right people. Smart marketing ensures your course gets noticed, without the need to spend thousands on promotion.
1. Start with SEO and content marketing
SEO (Search Engine Optimization) is one of the best long-term strategies for driving traffic to your course. Find keywords your audience searches for (e.g., “beginner watercolor course,” “SAT prep online”). Use them naturally in your course title, page headings, and lesson descriptions. Don’t forget meta titles, URLs, and image alt text.
Explore our guide on best SEO-optimized website builders to make sure you know which one to use when you need it.
Next up is content marketing. It boosts your visibility and builds trust before the sale. You can:
- Create helpful blog posts or SEO-optimized articles that tie into your course topic. (Example: “5 Mistakes Beginners Make with Watercolors” if you teach painting.)
- Embed CTAs (calls-to-action) leading readers to your course or email sign-up.
The goal for both of those is to keep your content useful for the audience. Don’t be overly promotional, and try to be helpful to people. Once they have the trust, they’ll buy from you.
2. Promote through social media & newsletters
Social media builds buzz, especially during launch. If you leverage it right, you might be able to drive traffic to your online source on WordPress and generate sales. Here too, try to be useful, engaging, and fun to interact with:
- Share bite-sized tips, lesson previews, behind-the-scenes content, and testimonials.
- Focus on platforms your audience already uses: Instagram for creatives, LinkedIn for professionals, TikTok for younger learners.
- Use calls-to-action and engagement questions to spark comments.
Email newsletters are another powerful tool for both pre-launch and post-launch. Here’s how to use it:
- Offer a freebie or mini-lesson to build your list early.
- Send teaser content, reminders, early-bird discounts, and launch updates.
- Keep the momentum going post-launch with new tips, bonus content, and special offers.
3. Plan a simple sales funnel
- Pre-launch: Build awareness with content, lead magnets, and waitlists.
- Launch week: Run webinars, go live on social, or do a countdown with bonuses.
- Post-launch: Use testimonials, targeted follow-ups, and limited-time offers to boost late sales.
Track what works using tools like Google Analytics or built-in LMS reports. Refine your strategy based on what drives clicks, sign-ups, and course completions.
Step 7: Launch an MVP before going all in
Many creators get stuck trying to perfect their course before launching, but you don’t need a 12-module masterpiece to start. If you’re wondering how to create an online course with WordPress, the smartest move is to test demand first. Launching a Minimum Viable Product (MVP) helps you:
- Test demand before investing too much time or money
- Get early feedback to improve your course
- Start earning sooner
What your MVP could look like
Here’s a simple checklist to get your first version live in days, not months:
- One course page: Introduce the course, who it’s for, and the benefits
- One module with 2–3 lessons: Keep it focused on solving one specific problem or goal
- Basic media: Use embedded videos, PDFs, or even just well-formatted text
- Simple quiz or assignment: Gauge understanding and encourage completion
- Payment setup: Use WooCommerce to sell your course and collect payments
Why WordPress is perfect for MVPs
- You can add lessons, quizzes, and payment all within your dashboard using plugins like Sensei LMS and WooCommerce
- With tools like 10Web’s AI Copilot, you can even design or tweak your pages just by chatting with the AI
- Once demand is validated, you can easily scale, add new modules, gated content, certifications, and more
Step 8: Monetizing your course
Creating an online course on WordPress is an exciting journey, but it’s also an opportunity to generate income. That’s probably one of the reasons you want to do this in the first place. Making money from your course involves setting up a system to handle payments efficiently and offering memberships or subscriptions for ongoing revenue.
Integrating payment gateways
To accept payments, you’ll need to integrate a payment gateway into your WordPress site. WooCommerce is the most powerful option that supports various payment methods, including PayPal and Stripe.
You can start by installing the WooCommerce plugin and then navigate to WooCommerce > Settings > Payments. Here, you can configure your preferred payment gateways by selecting PayPal or Stripe and entering your account details to enable secure transactions.
When using 10Web’s plan, you won’t need to set up third-party payment tools separately. It includes a built-in payment system powered by Stripe Connect that works directly from your dashboard. Without needing to add an extra plugin or going through additional configurations, you can:
- Accept credit and debit cards
- Apple Pay and Google Pay
- Manage refunds,
- Track payouts
Choose a pricing model
Pick a model that fits your audience and course value:
- One-time payment: Best for standalone or short-term courses.
- Subscription (monthly/yearly): Ideal for ongoing content or access to a course library.
- Freemium: Offer free lessons upfront, unlock the rest with a paid plan.
- Tiered pricing: Give basic access at a low price, premium bonuses (like coaching or extra modules) at higher tiers.
You can implement these models using WooCommerce with extensions like WooCommerce Subscriptions or MemberPress.
Setting up memberships and subscriptions
For a sustainable business model, consider offering memberships or subscriptions. This allows you to build a community and provides your users with ongoing value. To set this up, you’ll need a membership plugin compatible with WooCommerce.
Once you choose and install your membership plugin, go to the Memberships > Add new section to create different levels of access. You can:
- Restrict content by membership level
- Bundle multiple courses under one plan
- Offer trials or limited-time access
Step 9: Providing after-launch support and updates
After launching your online course, providing consistent support and receiving feedback from your students is important to keep your online course successful. This will not only improve the learning experience but also help build a sense of community around your course.
| Task | What to do | Why it matters |
| Respond to student inquiries | Create a Q&A forum or comment section; reply promptly | Shows students their questions are valued and keeps them engaged |
| Gather & use feedback | Use surveys or forms after lessons/modules | Helps you understand what’s working and where to improve |
| Keep content fresh | Announce updates via course dashboard or email | Keeps learners informed and signals that the course is actively maintained |
| Build a community | Set up forums or social groups; encourage peer support | Fosters engagement and reduces your support workload |
| Maintain course functionality | Fix bugs, broken links, or outdated info regularly | Ensures a smooth learning experience |
| Review and update content | Schedule regular audits of material; update lessons as needed | Keeps your course current and aligned with latest trends and standards |
Remember, the success of your online course is greatly influenced by the manner in which you support and update content after its launch. Your attention to the student experience and the quality of education will translate into a better reputation and potentially more students in the future.
Conclusion
Now that you know how to create an online course with WordPress, you’re just a few steps away from turning your knowledge into a real learning experience. With flexible design, LMS plugins like Sensei, and tools for monetization and community-building, WordPress gives you everything you need to launch and grow your course, no coding required.
Ready to begin? Get your course site up and running in minutes with 10Web: managed WordPress hosting, drag-and-drop editing, and an AI Copilot to help you every step of the way.
FAQ
How do I make my own online course? Is WordPress good for online courses? Can you create an online course with WordPress? How do you create a class in WordPress? Can I create dynamic schedules for students based on when they join? How do I track student progress visually on my course site? What’s the easiest way to launch an MVP course in WordPress?