

The Error 1049: Unknown database acts as MySQL’s way of signaling that it’s unable to locate the database you’re attempting to engage with. Essentially, MySQL understands your request but can’t fulfill it because the database in question is, from its standpoint, nonexistent.
Likewise, when you encounter the mysqldump: got error: 1049: unknown database and the MySQL Error 1049 – SQLSTATE: 42000 (ER_BAD_DB_ERROR) Unknown database ‘%s’ messages, you’re essentially facing two sides of the same coin. Both errors signal a disconnect between your actions—whether you’re backing up, exporting, or connecting to a MySQL database—and the database’s actual presence or accessibility on the MySQL server.
In the following blog, we’ll define the two errors, what causes them, and how to fix them.
Understanding “mysqldump: got error: 1049: unknown database”
When you’re engaged in the task of backing up or exporting a MySQL database using the mysqldump utility and you’re greeted with the error message mysqldump: got error: 1049: unknown database, it marks a specific and common challenge in database management. This error surfaces in scenarios where mysqldump attempts to create a backup of a database that, as far as it can tell, does not exist on the MySQL server.
This particular error is noteworthy because it specifically pertains to the process of database backup or export, highlighting a disconnect between the operational intent and the database’s actual state or accessibility. Causes can include:
Typographical errors: Misnaming the database due to a typo or incorrect case (on case-sensitive systems).
Database absence: Attempting to export a database that does not exist on the server.
Permission issues: Running mysqldump with a user account that lacks the required permissions to access the database, thus rendering it “invisible” to that user.
Understanding “MySQL Error 1049 – SQLSTATE: 42000 (ER_BAD_DB_ERROR) Unknown database ‘%s’”
On the other hand, MySQL Error 1049 – SQLSTATE: 42000 (ER_BAD_DB_ERROR) Unknown database ‘%s’ is a broader error that you might encounter when trying to connect to, select, or manipulate a database within MySQL. The %s stands in for the name of the database you’re trying to access. The database operation is halted because MySQL cannot locate the specified database based on the provided name.
This error message is a general indication that the operation involving a MySQL database has failed due to the database being unrecognized. This can occur in a variety of contexts, such as during application initialization, when running SQL queries, or while configuring database-driven processes. The underlying causes often mirror those of the mysqldump error but are encountered in a wider range of database interaction scenarios:
Naming discrepancies: Including typos or case sensitivity issues in the database name.
Nonexistent database: The specified database doesn’t exist on the connected MySQL server.
Access and permissions: The user may not have the right permissions to view or interact with the specified database.
Say goodbye to website errors
Achieve peace of mind with 99.99% uptime on 10Web Managed
WordPress Hosting, powered by Google Cloud.
Fixing the MySQL error 1049
For both error types, the resolution paths share similarities, tailored to address the core issues of naming, database existence, and permissions.
Verify the database name
The accuracy of the database name is paramount. A misplaced letter, an unnecessary space, or a case sensitivity issue on UNIX-like systems can lead you to believe a database doesn’t exist when it was only a typo.
Double-check the database name: Ensure you’ve spelled the database name correctly in your query. Pay extra attention to any underscores, hyphens, and case sensitivity.
Case sensitivity on UNIX systems: Remember, UNIX-like systems are case-sensitive. MyDatabase and mydatabase are considered two different entities.
Consistency is key: Use the same case as when the database was created. If unsure, check existing databases’ names for their case formats.
Confirm the existence of the database
Confirming the existence of a database in MySQL is a critical step in troubleshooting error 1049. This process allows you to see all databases that the MySQL server recognizes, providing a clear picture of what’s available for connection and querying.
How to confirm the existence of a database
- Connect to your MySQL server using the appropriate credentials (username and password).
- Once connected, navigate to Console and run the command:
SHOW DATABASES;
This command lists all databases that the connected user is allowed to see. The output will look something like this:
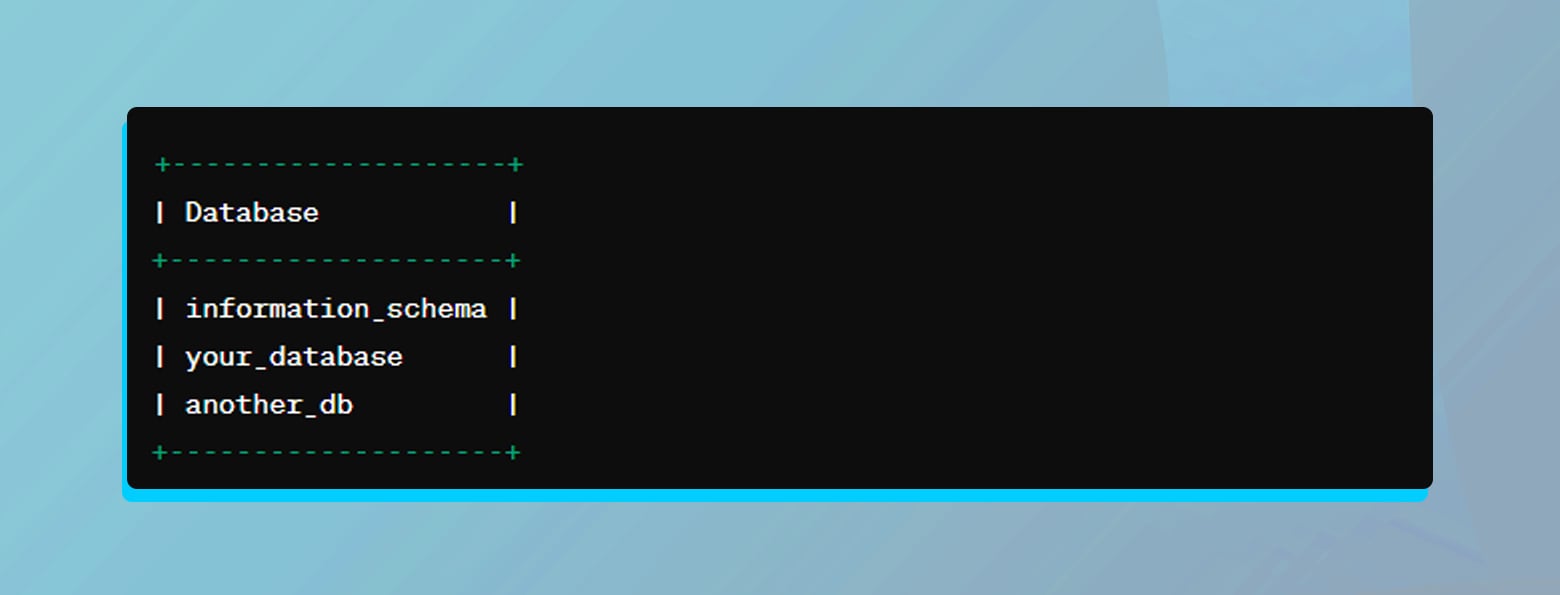
Scan through the list for the database you’re interested in. If it appears in the list, it confirms that the database exists on the server and you have the permissions to access it.
If the database doesn’t appear in the list, it’s either nonexistent, or your user account doesn’t have the permissions to see it. In the case of the latter, consult with your database administrator to ensure your account has the necessary privileges.
If you encounter case sensitivity issues(common on UNIX-like systems), ensure that you match the exact case of the database name in your queries.
Remember, seeing the database in the list does not necessarily mean you have full access rights to perform all actions on it. You might need to check specific permissions, especially if you plan to modify the database or its contents.
Check permissions
Checking permissions in MySQL is an essential step not just for troubleshooting but also for ensuring the security and proper operation of your databases. MySQL’s permission system is designed to control access and operations performed by users, making it a critical aspect of database management.
The permission system helps prevent unauthorized users from accessing or modifying sensitive data, safeguarding your database’s integrity. By assigning specific privileges to different users, MySQL ensures that users can perform only those operations that are necessary for their role, thereby minimizing the risk of accidental or malicious data alteration or deletion.
Review user privileges
- Log in to your MySQL terminal.
- At the bottom of the page, click on Console.
- Type in the syntax to review a user’s privileges and click ctrl+Enter:
SHOW GRANTS FOR 'your_username'@'your_host';
Make sure to replace your_username with the username of the account you’re checking and your_host with the host from which the user connects. The host can be an IP address, a domain name, or ‘localhost’ if the connection is made locally. This will display all the privileges granted to the specified user account. The output might look something like this:
GRANT USAGE ON *.* TO 'your_username'@'your_host' IDENTIFIED BY PASSWORD 'password'

GRANT SELECT, INSERT, UPDATE ON `your_database`.* TO 'your_username'@'your_host'
Analyze the output to understand the privileges assigned to the user. Permissions like SELECT, INSERT, UPDATE, and DELETE are common, but you might see others depending on the user’s role.
Confirm server connection
In environments where multiple databases or instances are running, connecting to the correct MySQL server is not just important—it’s essential. Operating on the wrong server can lead to significant confusion, misapplied configurations, and potentially hazardous data operations.
To guarantee that you’re working with the correct datasets, you must be connected to the server that houses the relevant databases. This ensures that your analyses, updates, and backups are accurate and reliable.
Check your connection details
Review configuration files or connection strings: Begin by examining your application’s configuration files or the connection strings you use. Look for parameters like host, port, user, and password. These parameters determine where and how your application connects to a MySQL server.
Ensure accuracy: Verify that the host parameter matches the intended server’s address. The port should correspond to the port on which the MySQL server listens (default is 3306).
Update if necessary: If any details are incorrect, update them to reflect the right connection parameters. This might require consulting with your network administrator or database manager to get the correct values.
Verify server status
Start with a simple ping command to the server’s address to ensure network connectivity. In your terminal or command prompt, type the following command and hit Enter:
ping your_mysql_server_host
You should see replies indicating that the server is reachable.
For a more direct test, try logging into the MySQL server using the command-line tool.
Execute the following command and enter your password when prompted:
mysql -h your_server_host -u your_username -p
If you connect successfully, you’re on the right server. If not, you may need to revisit your connection details or check the server’s status.
- A successful connection indicates that the server is up and running and that your connection details are correct.
- A failed connection could signify issues with the server itself, your network connection, or inaccuracies in your connection parameters.
Create or recreate a database
A database serves as the primary container for data storage. Without it, you have no structure in place to hold your tables, views, procedures, and other crucial data components. If your applications or scripts reference a specific database that doesn’t exist, they won’t function as intended. Creating the missing database restores functionality and ensures that your data-driven operations can proceed.
How to create a database
- Open your MySQL command-line tool or a MySQL client and connect to your MySQL server with appropriate credentials.
- Execute the CREATE DATABASE command:
CREATE DATABASE database_name;
Replace database_name with the desired name of your database. Ensure the name is unique within the MySQL server and adheres to MySQL naming conventions.
After executing the command, MySQL will create an empty database, ready for you to define its structure and populate it with data.
Use the SHOW DATABASES; command to list all databases and confirm that your new database has been created successfully.
Set appropriate permissions
After creating a new database, ensuring that your user account (or the accounts of those who will be working with the database) has the necessary permissions to access and modify it is crucial. Without the appropriate permissions, users won’t be able to perform basic operations such as creating tables or inserting data.
- In your MySQL dashboard, navigate to Console.
- Enter the following syntax and click ctrl + Enter.
GRANT ALL PRIVILEGES ON database_name.* TO 'username'@'host';
Replace database_name with the name of your newly created database, username with the MySQL user account name, and host with the hostname from which the user connects.
Example:
GRANT ALL PRIVILEGES ON my_new_database.* TO 'myuser'@'localhost';
This command grants all available privileges for the new database to the specified user, allowing full operational control over the database.
To ensure that the changes to privileges are immediately applied execute:
FLUSH PRIVILEGES;
Closing thoughts
In this blog, we have explored how to troubleshoot and resolve MySQL Error 1049, which indicates that a specified database cannot be found or accessed. We have highlighted common causes such as typographical errors, attempting to access non-existent databases, and permission issues. The resolution steps include verifying the database name, confirming its existence on the server, checking user permissions, ensuring correct server connection, and if needed, creating or recreating the database with appropriate permissions.
Say goodbye to website errors
Achieve peace of mind with 99.99% uptime on 10Web Managed
WordPress Hosting, powered by Google Cloud.
Say goodbye to website errors
Fix all the website errors in one click
Migrate your website to the world's best Managed WordPress Hosting.