Managing inventory effectively is crucial for the success of any WooCommerce store. With proper stock control, you can ensure that your products are always available for customers, reduce the risk of overselling, and maintain a smooth operation. This guide will help you to learn how to manage inventory in WooCommerce efficiently from setting up basic configurations to leveraging advanced plugins. Dive into our tips and best practices to master WooCommerce inventory management and keep your online store running seamlessly.
FAQ
How do I manage stock quantity in WooCommerce?
How to make an inventory management system in WordPress?
How do I update my Inventory on WooCommerce?
How to adjust Inventory in WordPress?
Understanding WooCommerce inventory basics
Managing your WooCommerce inventory effectively begins with knowing the basic features available to you. Your WooCommerce store comes with options that help you manage products and control stock management.
Firstly, to get started with managing your inventory, navigate to your WooCommerce settings:
- Log in to your WordPress dashboard.
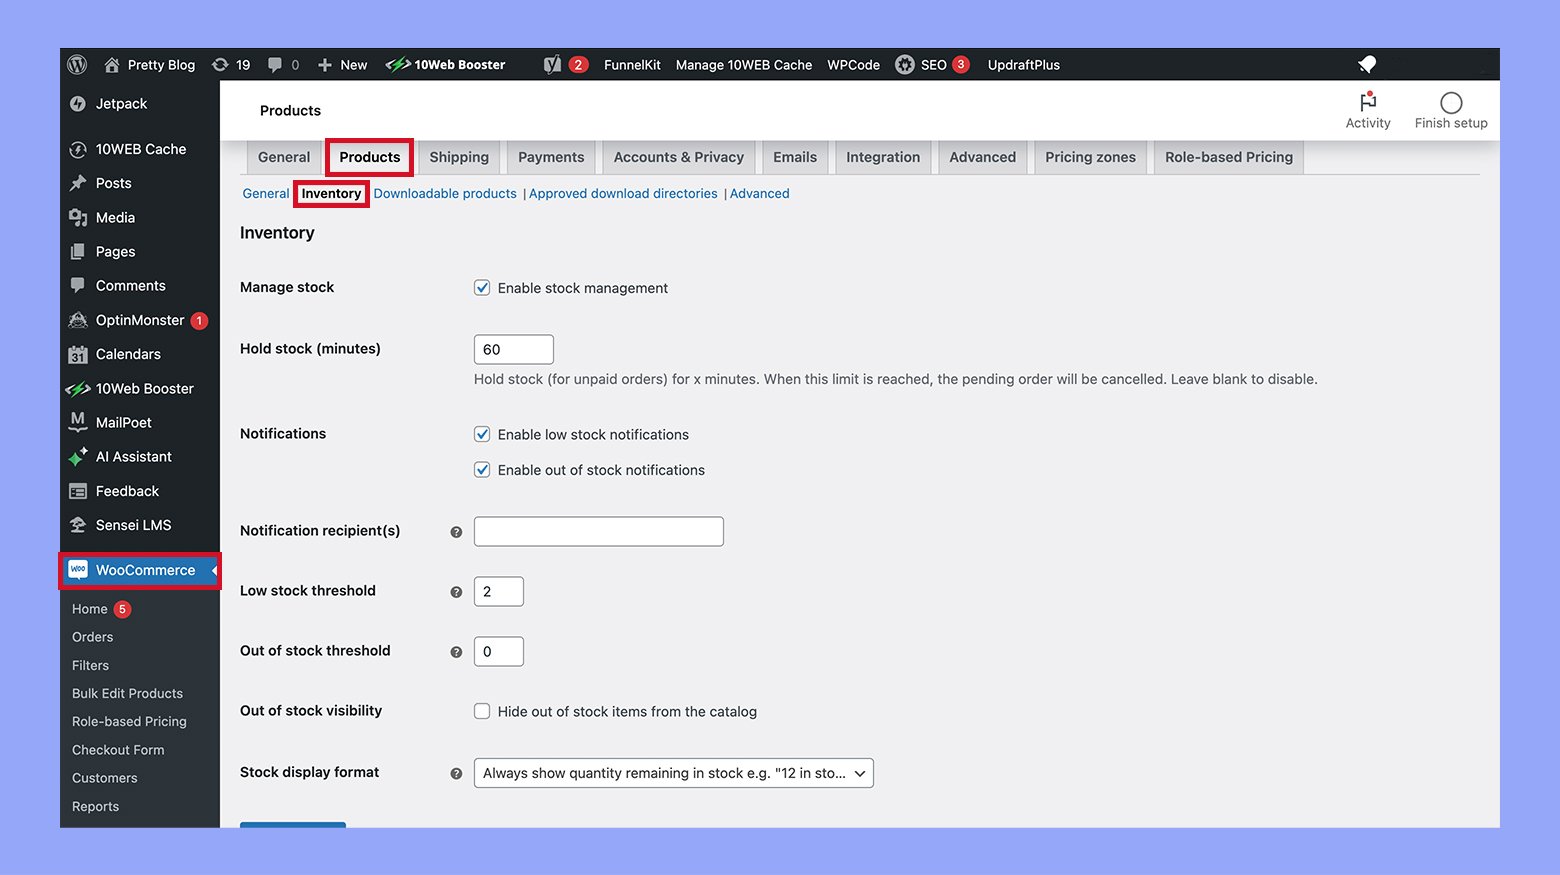
- Go to WooCommerce > Settings > Products tab and click on the Inventory link.
Here, you’ll find the global settings to handle your inventory levels:
- Enable stock management: Automates stock management by auto-updating the inventory numbers when sales are made.
- Hold stock (minutes): Reserves pending orders for a set amount of time before releasing the stock back into availability.
- Notifications: Configures alerts for low and out-of-stock items.
- Out of stock visibility: Choose whether to hide out-of-stock items from your shop.
For each product, you can:
- Set the Stock status: Indicate if a product is in stock, out of stock, or on backorder.
- Specify Manage stock: Tick the box to enable stock quantity tracking for individual products.
- Define Stock quantity: Update the number of items available for sale.
- Apply Low stock threshold: Set the point at which you receive a notification that stock is low.
By familiarizing yourself with these settings, you’ll be on your way to maintaining a healthy inventory that reflects the dynamic nature of your online store. Remember, consistent inventory level monitoring is key to avoiding stockouts and ensuring customer satisfaction. Create your custom online store in minutes with 10Web AI Ecommerce Website Builder and take your business online.

Looking to sell online?
How to manage inventory in WooCommerce
Step 1: Setting up inventory management in WooCommerce
Getting started with inventory management in WooCommerce is straightforward. By configuring basic settings, managing individual products, and using advanced tools, you’ll maintain accurate inventory levels and meet customer demand efficiently.
Configuring basic inventory settings
You’ll first want to navigate to the WooCommerce settings in your dashboard. Here, access the Products tab and click on the Inventory link to open your inventory management settings.
- Locate and select Enable stock management to activate the inventory tracking features.
- Adjust the Hold stock (minutes) to determine how long items will remain in carts before they become available again.
- Set the Low stock threshold to define when you receive alerts about low inventory.
- Define the Out of stock threshold to control when products show as out of stock to customers.
- Input your email in Notification recipient to receive stock notifications.
- Select the Out of stock visibility checkbox if you prefer out of stock products to be hidden on the shop page.

Managing stock for individual products
For more granular control, WooCommerce allows management of inventory at the product level. By editing a product, you can oversee stock on an item-by-item basis.
- Open the product you wish to manage and scroll to the Product data box.
- Click on the Inventory tab within the product settings.
- Enter a unique SKU (stock-keeping unit) for easy tracking.
- Tick the Stock management checkbox to enable stock management for this product individually.
- Specify the Stock quantity to reflect your current inventory of this item.
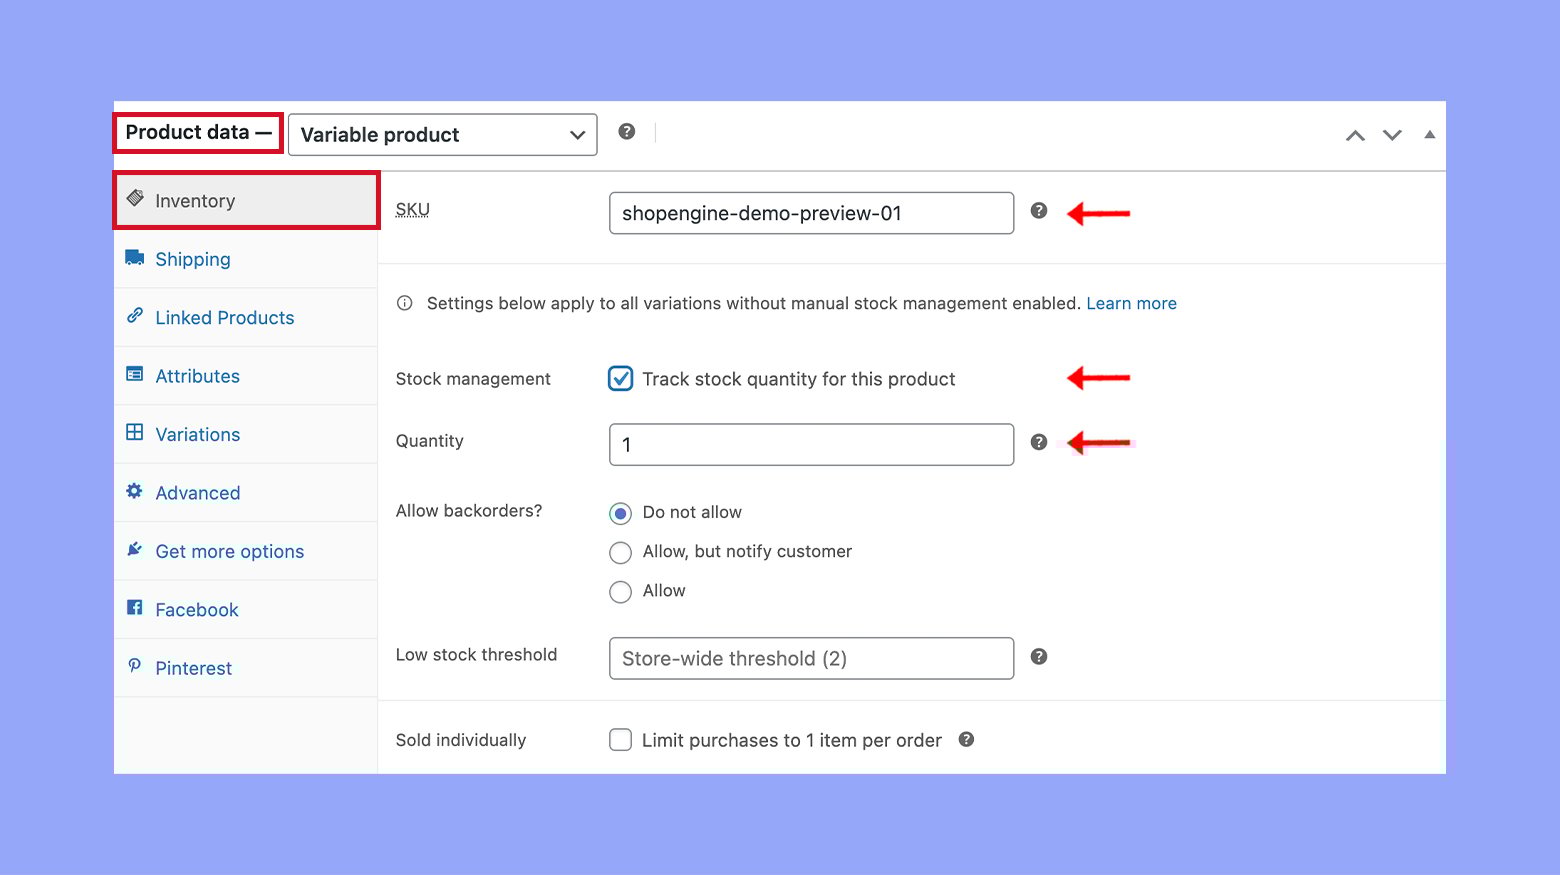
This level of detail ensures that you can keep a close eye on your most important items and update their stock status as needed.
Utilizing WooCommerce inventory management tools
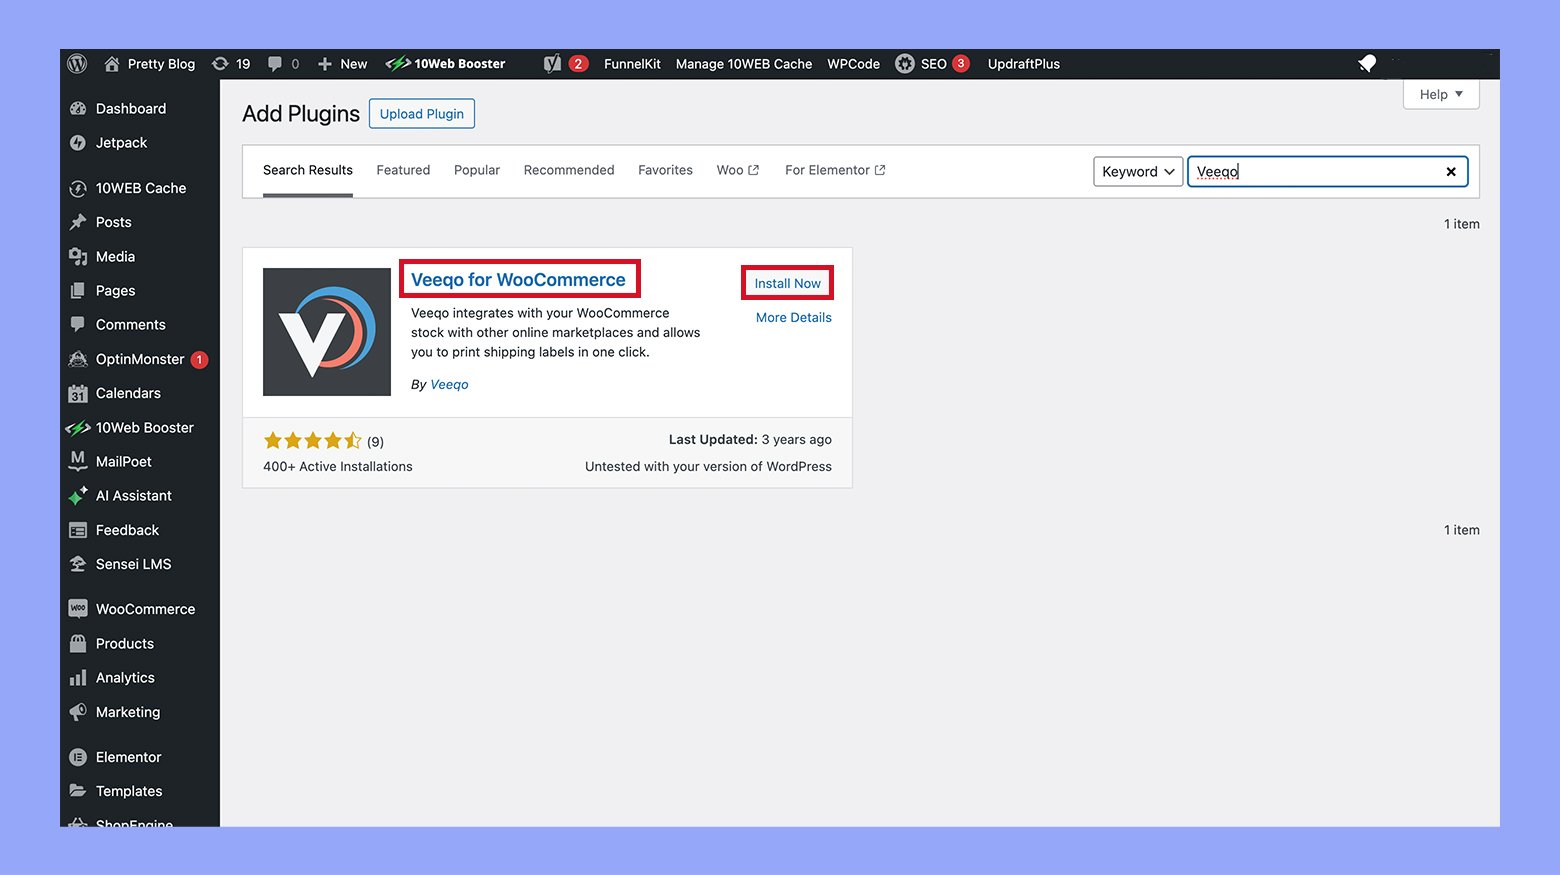
To leverage advanced features for inventory management, consider implementing third-party inventory management tools that integrate with WooCommerce.
- Explore plugins like Veeqo for WooCommerce, which sync inventory across multiple online platforms and provide warehouse management tools.
- Install and activate your chosen inventory management plugin through the Plugins section of your WordPress dashboard.
- Follow the plugin’s setup instructions to connect it with your WooCommerce store.
- Use the plugin’s interface within WooCommerce to streamline complex inventory tasks and improve accuracy.
By setting up these tools, you can automate much of the inventory process, ensuring that your store can scale effortlessly as your business grows.
Step 2: Mastering stock management for variable products
When dealing with variable products in WooCommerce, mastering inventory control is pivotal. You’ll learn how to set up product variants and track stock effectively for each specific option.
Setting up variants and options
Creating variants in WooCommerce allows you to offer a product in different variations, such as size or color. To streamline your product setup:
- Navigate to the Products page from your dashboard.
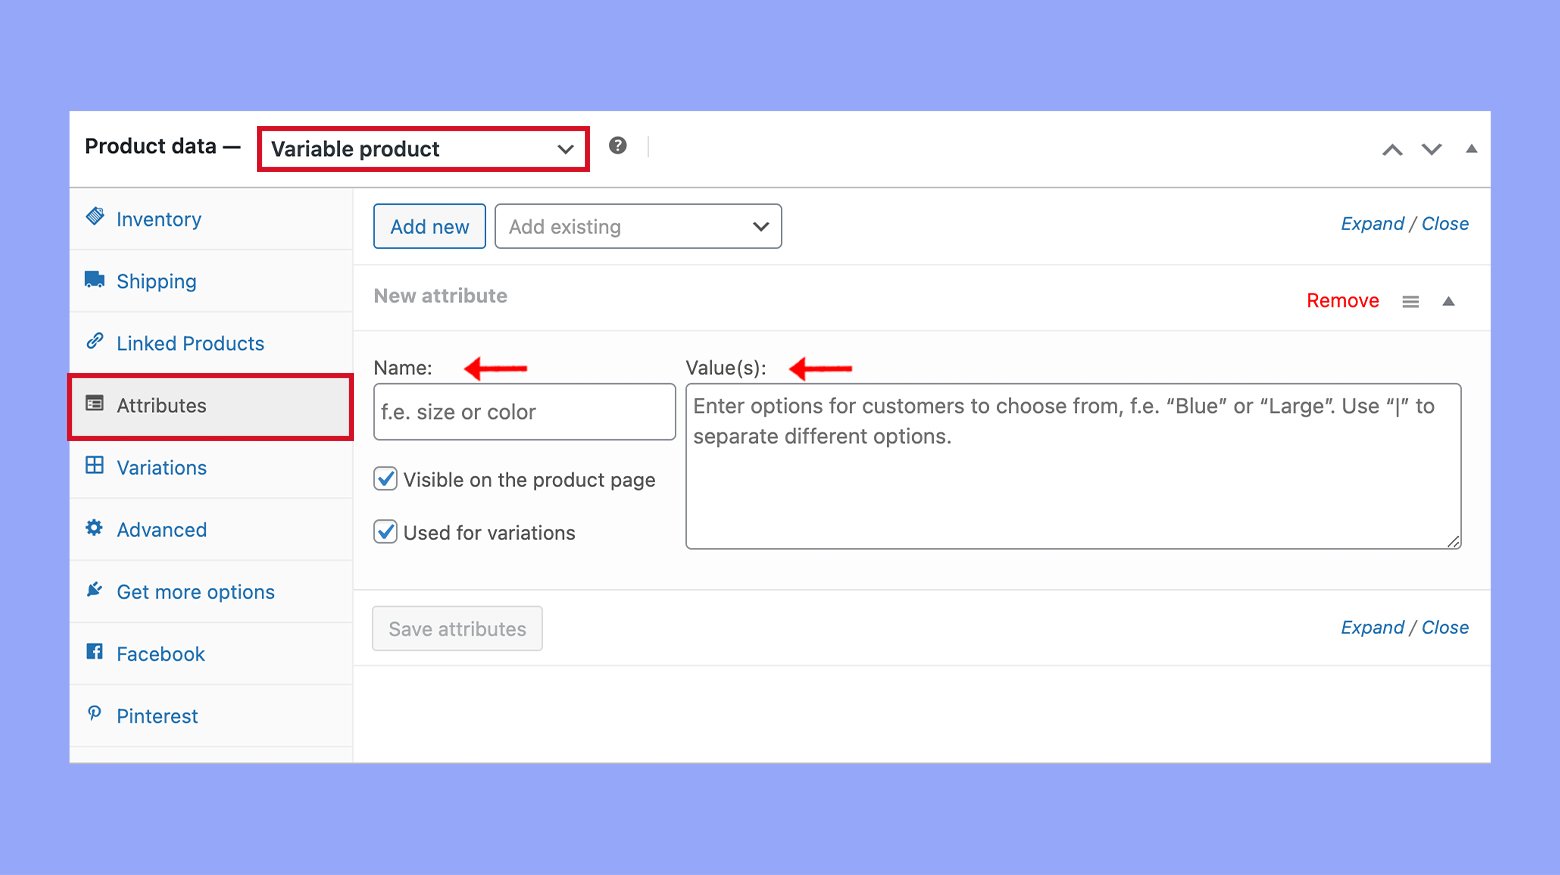
- Click Add New Product, and ensure your product is set as a Variable product from the Product data dropdown.
- Under the same dropdown menu, click the Attributes tab.
- Here, you can define your attributes, like size or color. Click Add after entering each attribute.
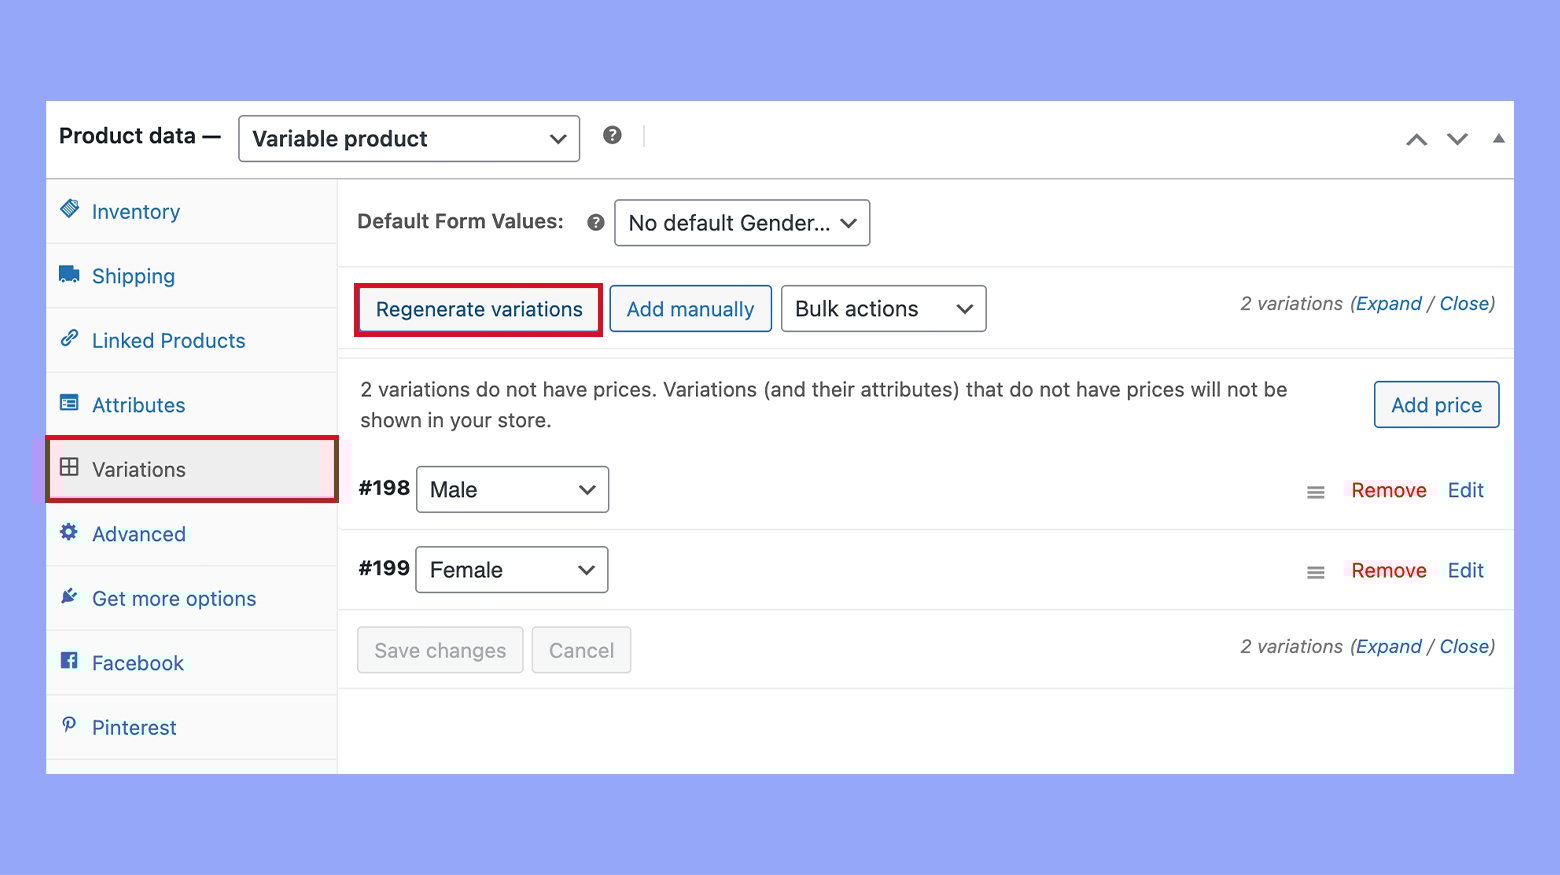
- Once your attributes are set, switch to the Variations tab.
- Select Generate variations to generate combinations.
- Finally, save your changes by clicking Save changes.
Tracking inventory at the variation level
To efficiently manage stock for individual variants, follow these steps:
- From your product edit page, expand the Variations section after setting up your variable product.
- Each variation can have its own inventory settings. Click on the specific variation you want to edit.
- Check the Enable stock management at variation level box.
- Set your stock quantity and the low stock threshold for alerts.
- Remember to click Save changes to update your inventory.
By applying these methods, you can ensure precise inventory tracking for every variation of your product, enhancing your global inventory management capabilities.
Step 3: Leveraging plugins for enhanced inventory control
When managing an online store, leveraging the right plugins can significantly streamline your inventory control process. These tools offer customized functionalities to monitor and manage your stock levels effectively.
Choosing the right WooCommerce inventory management plugin
Selecting a suitable inventory management plugin for your WooCommerce store is crucial for maintaining an organized inventory system. Evaluate WP Inventory Manager for a blend of user-friendliness and advanced features at a competitive price. For more sophisticated needs, the ATUM Inventory Management plugin provides a comprehensive suite of inventory controls. Make sure the plugin you choose integrates well with WooCommerce and meets your store’s specific needs.
- Review plugin ratings: Look for plugins with high ratings on WordPress.org.
- Assess your needs: Determine what inventory features you require – simple stock management or advanced analytics?
- Check compatibility: Ensure the plugin is compatible with your current version of WooCommerce.
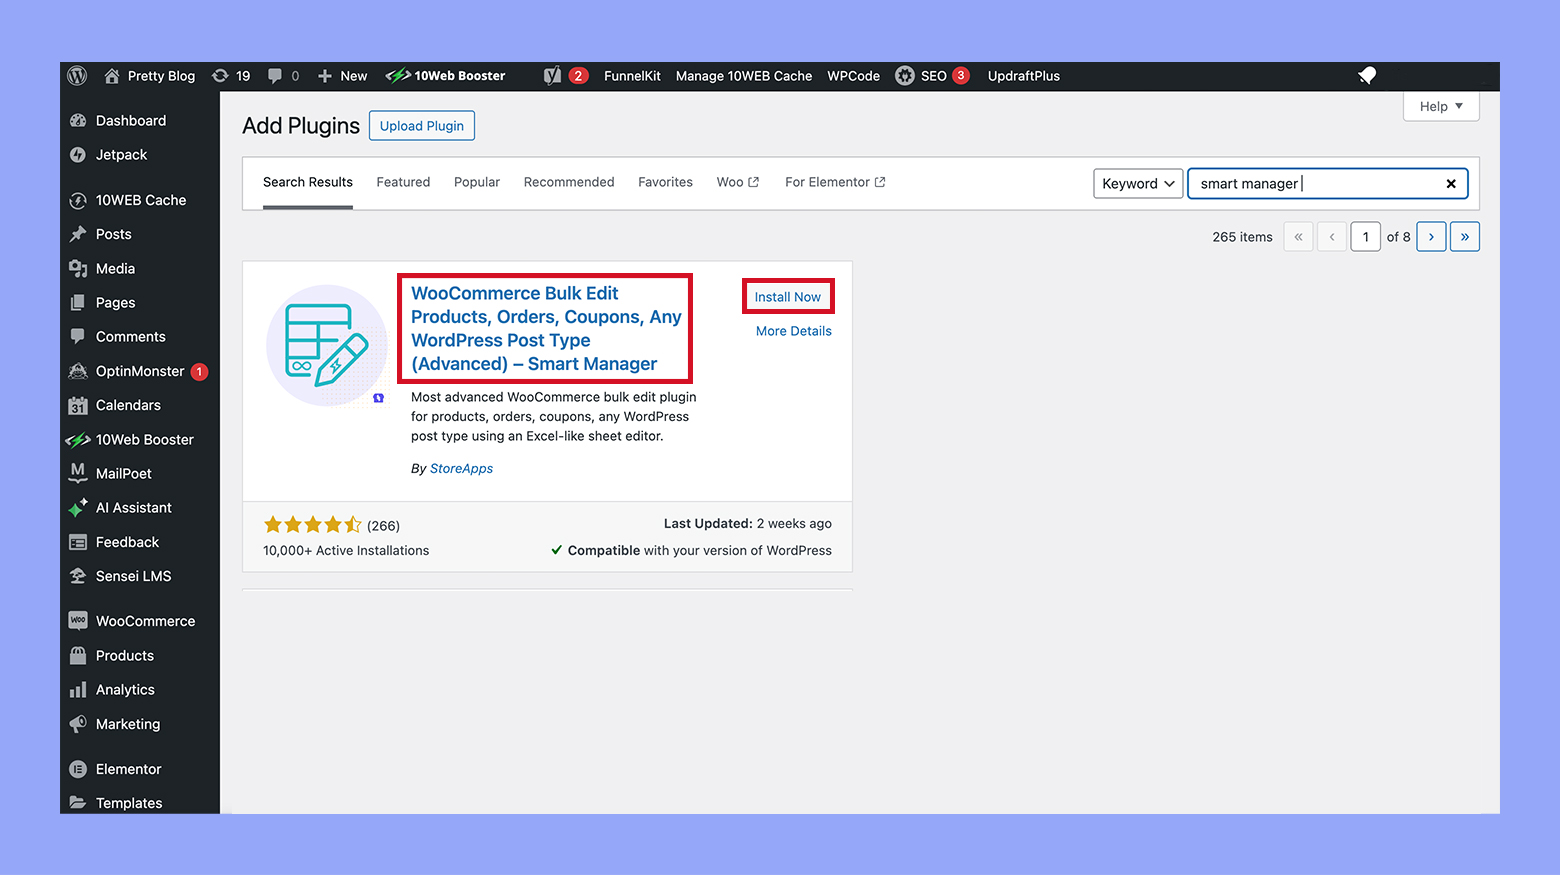
- Consider future scalability: Opt for plugins that will scale with your business, such as Smart manager for WooCommerce.
Implementing stock synchronization plugins
Using stock synchronization plugins like Stock Synchronization for WooCommerce enables you to keep inventory levels consistent across multiple channels or storefronts. This ensures that your stock information is up-to-date and reduces the risk of overselling.
- Navigate to your WordPress admin panel and click on Plugins > Add new.
- Once installed, access the plugin settings to configure synchronization intervals and source URLs.
- Perform a test synchronization to ensure that the plugin is updating inventory quantities accurately.
Exploring advanced features of inventory plugins
Modern inventory plugins offer a range of advanced features that go beyond mere stock counts. With Smart manager for WooCommerce, for example, you can manage stock, customers, and orders up to 10x faster. Look for features like serial number tracking, low stock notifications, or predictive restocking suggestions.
- Serial number tracking: Essential for warranty control and preventing fraud.
- Low stock notifications: Alerts you to replenish stock before it impacts sales.
- Predictive restocking: Analyze sales data to forecast inventory needs.
To effectively leverage these advanced features, invest time in familiarizing yourself with your chosen plugin’s documentation and support resources.
Step 4: Avoiding common stock management errors
Effectively managing your inventory in WooCommerce is key to reducing the risk of common stock management errors, such as overstocking or understocking your products. It ensures you can meet customer demand without having excess inventory that can lead to decreased cash flow or, conversely, lost sales due to stockouts.
Preventing overstocking and understocking
- Regularly review your stock levels to balance demand with supply. Use WooCommerce’s built-in reports or a WooCommerce inventory management plugin to help track your inventory accurately.
- Set up low stock notifications to alert you when items are running low. Navigate to WooCommerce then Settings, choose the Products tab, and click the Inventory link to configure these thresholds.
- Implement lead time calculations to gauge the time needed to restock and avoid overstocking. This thoughtful planning minimizes having too much capital tied up in unsold inventory.
Handling backorders and stockouts
- Prevent overselling by keeping the stock status up-to-date. If you allow backorders, communicate clearly with your customers about the expected restocking dates to maintain trust and satisfaction.
- Avoid stockouts by analyzing sales trends and seasonal fluctuations. Make sure your inventory control system is responsive to these changes in customer demand.
- Utilize the WooCommerce function for managing backorders. You can find this by going to WooCommerce > Settings > Products > Inventory, where you have the option to manage how backorders are handled for each product.
Step 5: Streamlining your order fulfillment process
When you refine your WooCommerce order fulfillment, you’re directly improving customer satisfaction by ensuring products are consistently in stock and orders arrive promptly.
Integrating order management and inventory
Integrating your order management and inventory systems is essential for maintaining accurate stock levels and streamlining your operations. By using the right tools, you can synchronize these processes, reduce manual errors, and save time. Follow these steps to effectively integrate order management with inventory tracking:
Step 1: Install a smart manager plugin to merge your order and inventory systems. This tool allows for bulk editing and simplifies complex tasks right from your dashboard, saving you time and reducing errors.
Step 2: Activate inventory tracking features within the plugin to maintain real-time insight into your stock levels. This prevents overselling and helps to identify reorder points without manual counts.
Optimizing the delivery and storage workflow
Efficient delivery and storage processes are crucial for ensuring timely order fulfillment and maintaining customer satisfaction. By optimizing these workflows, you can minimize delays, reduce errors, and enhance the overall efficiency of your eCommerce operations. Here are the steps to streamline your delivery and storage systems:
Step 1: Assess your delivery system and pinpoint any bottlenecks. Implementing solutions like automated email notifications can keep customers informed and enhance their overall experience.
Step 2: Reorganize your storage facilities for efficiency. Consider the layout and how it affects the picking process, ensuring the fastest-moving items are most accessible to expedite the fulfillment process.
Step 6: Improving inventory visibility and accuracy
Effective inventory management ensures that your WooCommerce store runs smoothly. By enhancing inventory visibility and accuracy, you can reduce errors and make better business decisions. Let’s get into the specifics of customizing stock display formats and ensuring accurate stock quantities.
Customizing stock display formats
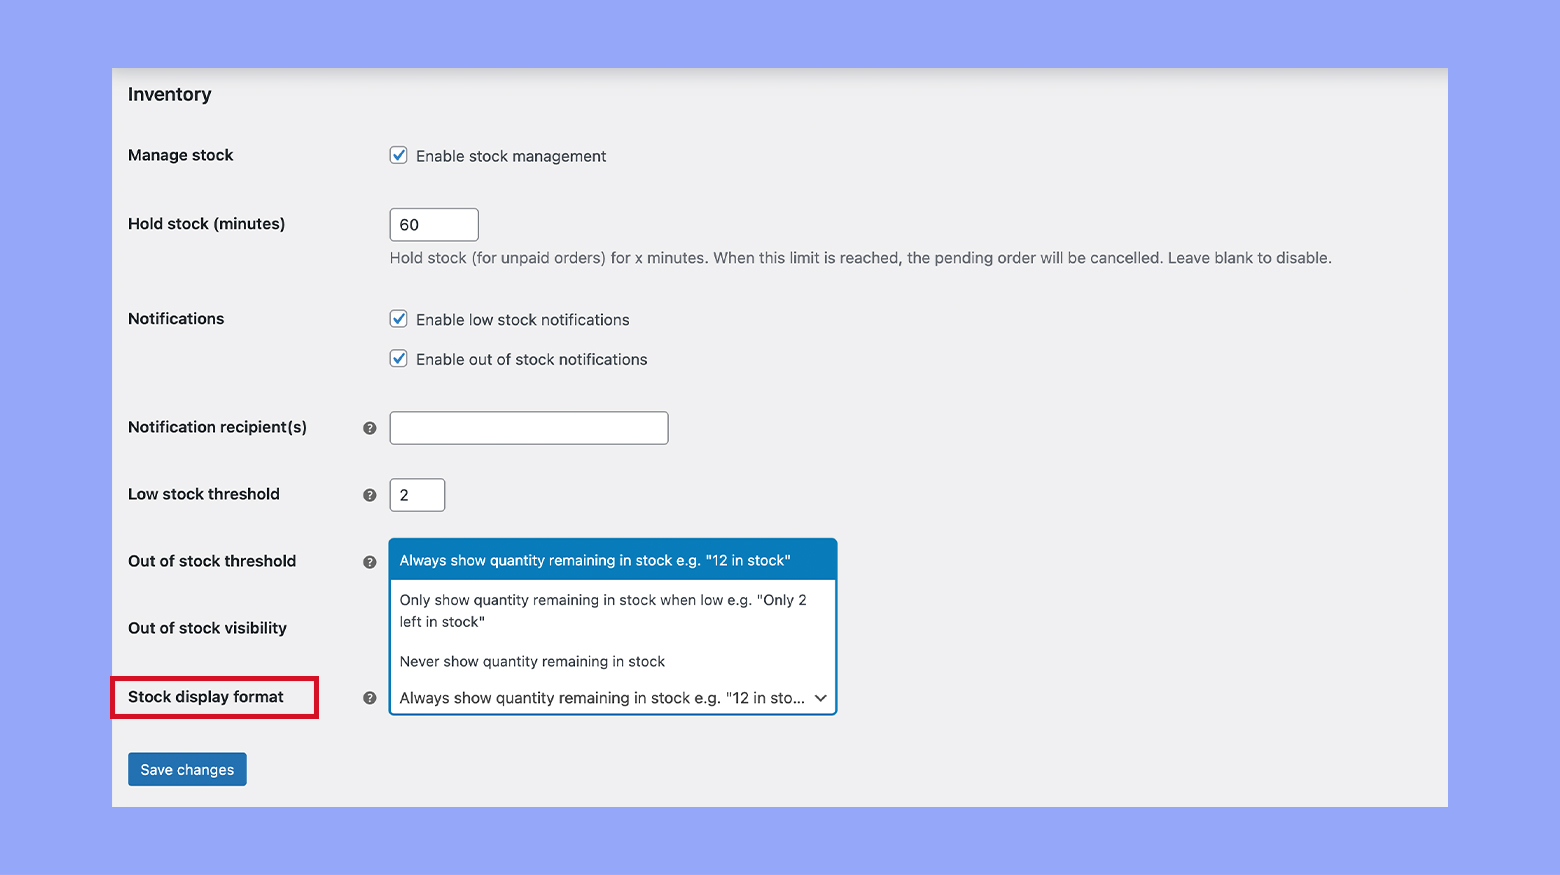
- Navigate to WooCommerce and click on Settings.
- Select the Products tab and find the section labeled Inventory.
- Here, you can adjust the Stock Display Format to show customers how much inventory is available for individual products. This increases transparency and assists with purchase decisions.
- Choose between displaying the actual stock count or only a low stock notification for better stock visibility.
- Don’t forget to press the Save changes button to update your catalog with the chosen display format.
Ensuring accurate stock quantities
- Regularly update your stock information by going to the Products section and selecting each product individually.
- Enter the correct Stock Quantity and ensure the Stock Status is set accurately, reflecting whether the item is in stock or out of stock. This helps in maintaining a clear picture of current stock levels.
- Use the SKU field to track and organize inventory. Assign a unique SKU to each product for easier searching and stock updates.
- For precise adjustments, consider performing a physical inventory count and updating the stock quantities in your WooCommerce dashboard accordingly.
- Lastly, always cross-check your changes for accuracy before finalizing them in your system.
Step 7: Analyzing inventory performance for better decision-making
Effective inventory management can significantly contribute to your WooCommerce store’s profits and efficiency. By leveraging analytics and evaluating sales trends, you can make data-driven decisions that enhance revenue and streamline stock control.
Utilizing analytics for stock forecasting
To harness the power of analytics for stock forecasting, dive into your WooCommerce data. You’ll want to assess historical sales information, allowing you to predict future demand accurately.
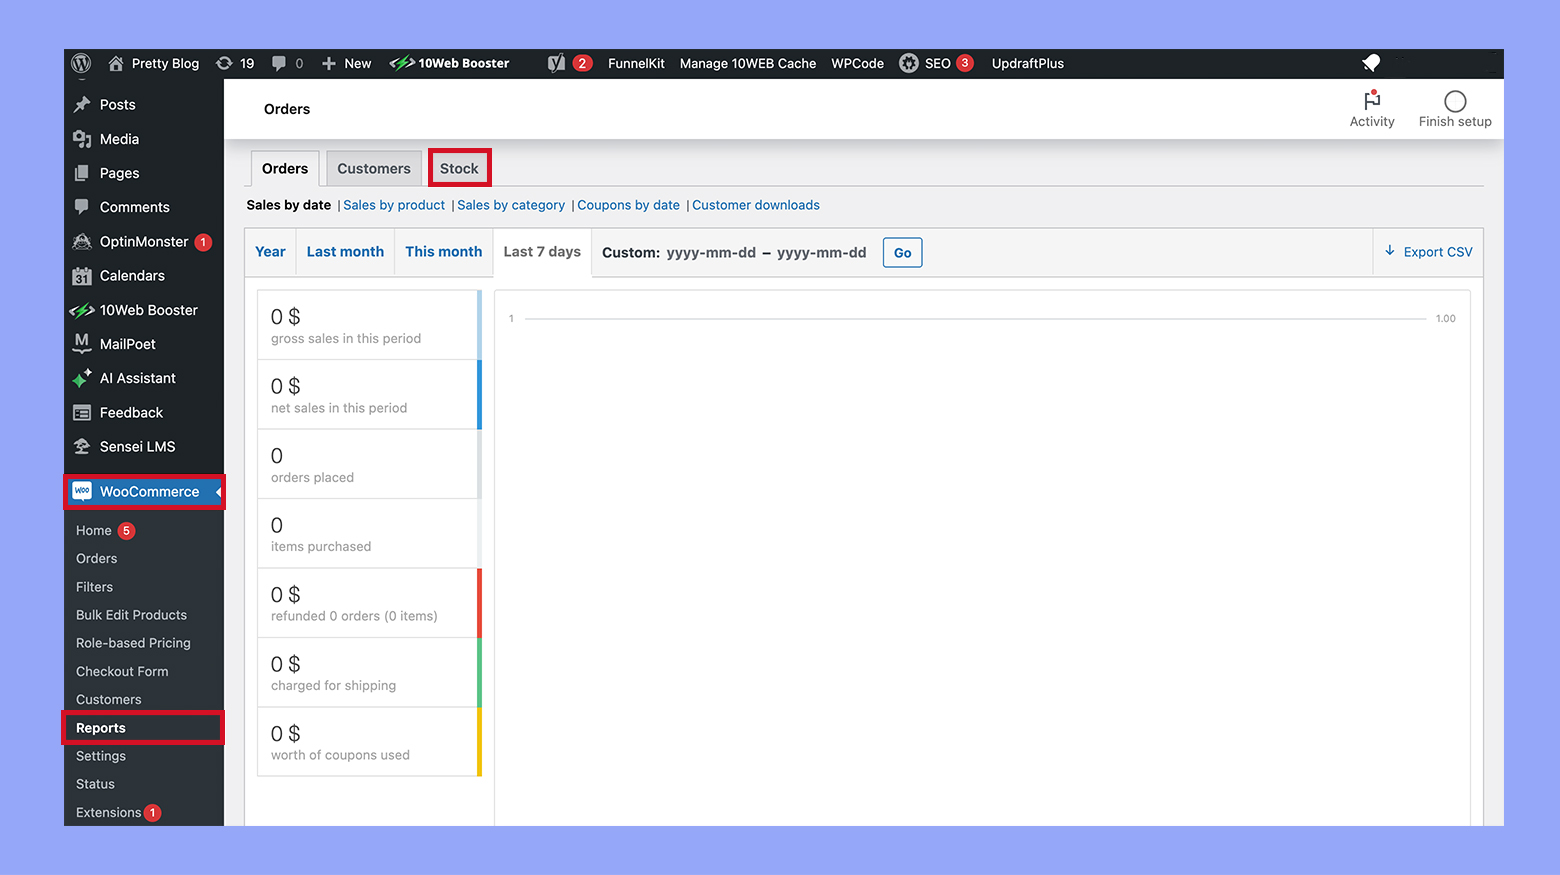
- In the WooCommerce dashboard, click on Reports and then select Stock.
- Look at the Product Sales report and note the sales patterns for different times of the year.
- Use this data to identify products that may need replenishing soon, ensuring consistent cash flow and avoiding stockouts.
- Apply forecasting models by considering factors like seasonal trends, current inventory levels, and upcoming promotions.
Forecasting not only helps with inventory tracking but also bolsters your inventory efficiency, helping to balance stock levels with consumer demand.
Evaluating sales trends to inform ordering
Understanding sales trends is critical for making informed ordering decisions which affect your inventory’s profitability and turnover.
- Navigate to the Analytics section in the dashboard.
- Select Orders and review the Sales by Product analytics to see which items are performing well.
- Analyze the data to determine if any products are trending and may require an increased stock level.
- Consider the Sales by Date to recognize patterns that inform your future ordering cycles.
This subsection is about using real-time sales data to optimize your purchasing strategy, ensure optimal stock control, and prevent loss of revenue due to out-of-stock situations or excess inventory. A data-driven approach to ordering can significantly improve your inventory management and cash flow.
How to manage inventory with 10Web
If you have created your store with 10Web AI Ecommerce Website Builder, you can easily manage your inventory through the intuitive dashboard. 10Web provides a user-friendly interface for stock management, making it simple to update and monitor your inventory levels. Moreover, 10Web offers tools that make it easy to create and manage your store. Here’s how you can access and manage your inventory:
- Use your credentials to log in to your 10Web admin dashboard.
- Navigate to Products:
- On the left-hand menu, click on Products.
- This will take you to the products page where you can see an overview of all your products.
- Access Inventory:
- In the products section, you’ll find inventory details for each product.
- Here you can manage stock quantities, set stock status, and adjust inventory settings for individual products.


By following these steps, you can ensure that your stock levels are accurately tracked and updated, helping you maintain a well-organized and efficient ecommerce store with 10Web.
Conclusion
Effective inventory management in WooCommerce is pivotal for maintaining a thriving online store. By following the tips and steps outlined in this guide, you will learn how to manage inventory in WooCommerc effortlessly, by streamlining your stock control processes, minimizing the risk of overselling, and ensuring that your customers always find what they need. With these practices in place, you’ll not only enhance your operational efficiency but also boost customer satisfaction and drive your business growth. Create your online store in minutes with 10Web AI Ecommerce Website Builder.
Looking to sell online?
Create your online store in minutes


![]()