When managing a WooCommerce store, there are times when you need to perform updates, make significant changes, or troubleshoot issues without allowing customers access to your site. This is where maintenance mode becomes essential. It temporarily disables the front end of your website, displaying a professional message to visitors that your store is undergoing maintenance. This guide will help you learn how to put WooCommerce in maintenance mode, ensuring your site remains professional and your customers stay informed.
FAQ
How do I change WordPress to maintenance mode?
How to activate maintenance mode?
How do I temporarily disable a WordPress website?
Importance of maintenance mode in WooCommerce
When you’re updating your store or making significant changes, you might not want customers to access your WooCommerce site. Maintenance mode is the solution. It’s a feature that temporarily disables the front end of your site for visitors, usually displaying a message that the site is down for maintenance. Meanwhile, as an administrator, you can still access your dashboard to make updates.
Using maintenance mode in WooCommerce is particularly important for several reasons:
- Avoid customer frustration: During updates or changes, having your WooCommerce store in maintenance mode prevents customers from encountering broken pages or incomplete features, which could lead to a negative shopping experience.
- Preserve data integrity: Making changes to your store while it’s live can result in data inconsistencies, especially during database updates or migrations. Maintenance mode ensures that no transactions occur, preserving the integrity of your data.
- Prevent lost sales: If customers encounter issues during checkout or while browsing products, they might abandon their carts or leave your site. Maintenance mode can prevent this by temporarily disabling access until the store is fully functional again.
- Security: During updates, there may be vulnerabilities or unprotected moments. Maintenance mode helps protect your store from potential security breaches by restricting access during this critical period.
- SEO considerations: Like with regular websites, search engines encountering errors on your WooCommerce store can negatively impact your SEO. Maintenance mode ensures search engines are aware of the temporary nature of your site’s inaccessibility.
- Professionalism: Displaying a custom maintenance mode page maintains a professional appearance and communicates to your customers that the site will be back soon, potentially even offering a timeline or alternative ways to contact or stay informed.
Remember, while maintenance mode is active, regular visitors cannot browse your shop or make purchases. Therefore, use this feature judiciously and keep your customers informed about when your store will be up and running again.

Looking to sell online?
Create your custom online store in minutes with 10Web AI Ecommerce Website Builder and take your business online.
How to put WooCommerce in maintenance mode
Step 1: Preparing for maintenance
Before initiating maintenance mode for your WooCommerce store, it is crucial to ensure that your data is safe and that you have an environment to test changes without affecting the live site.
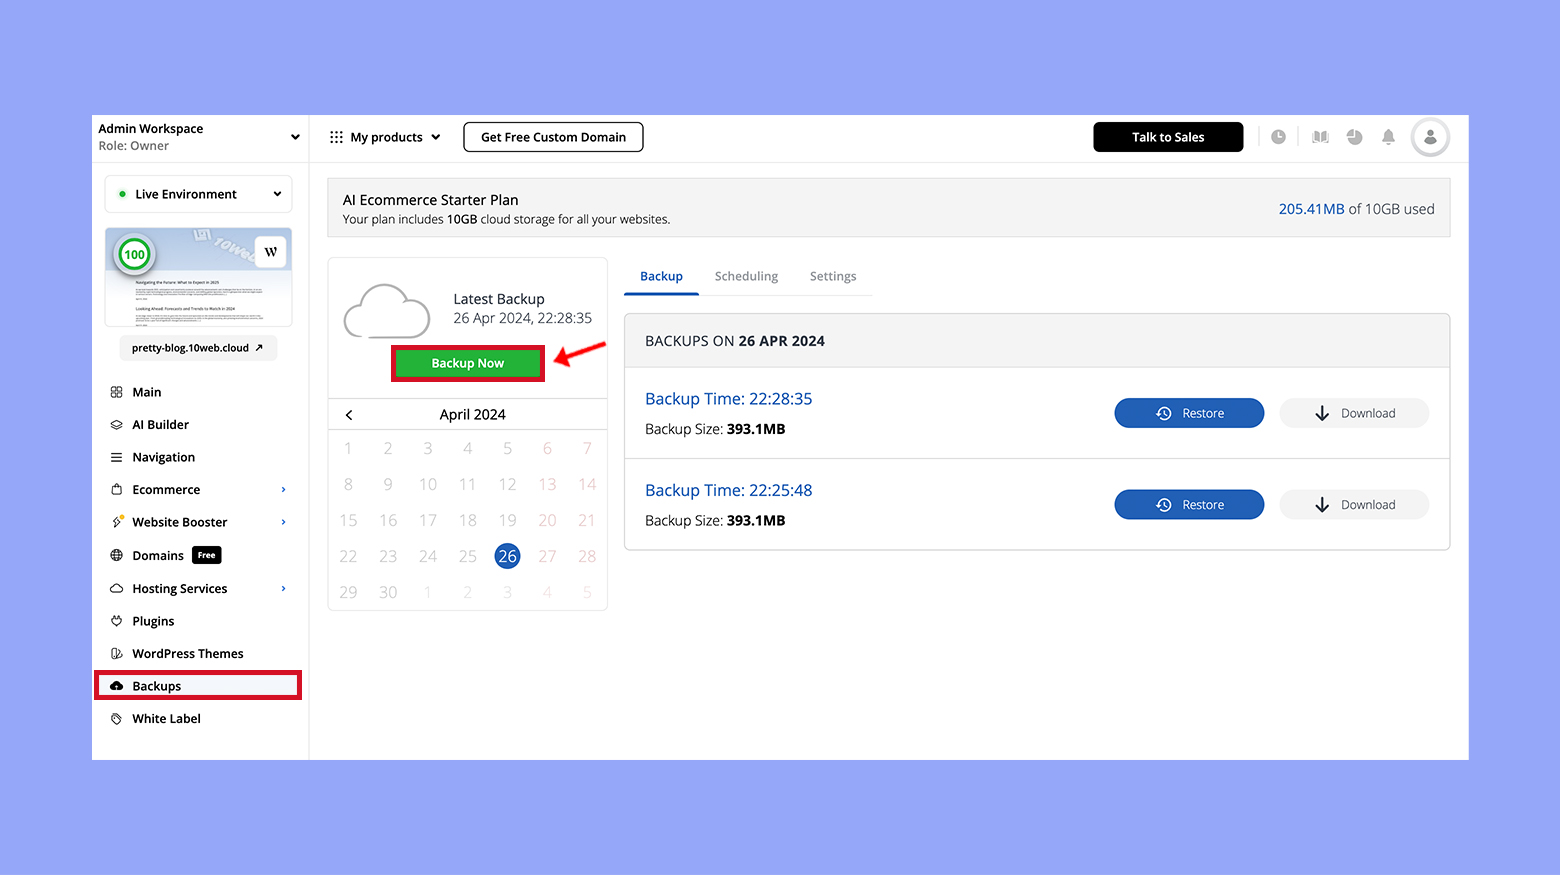
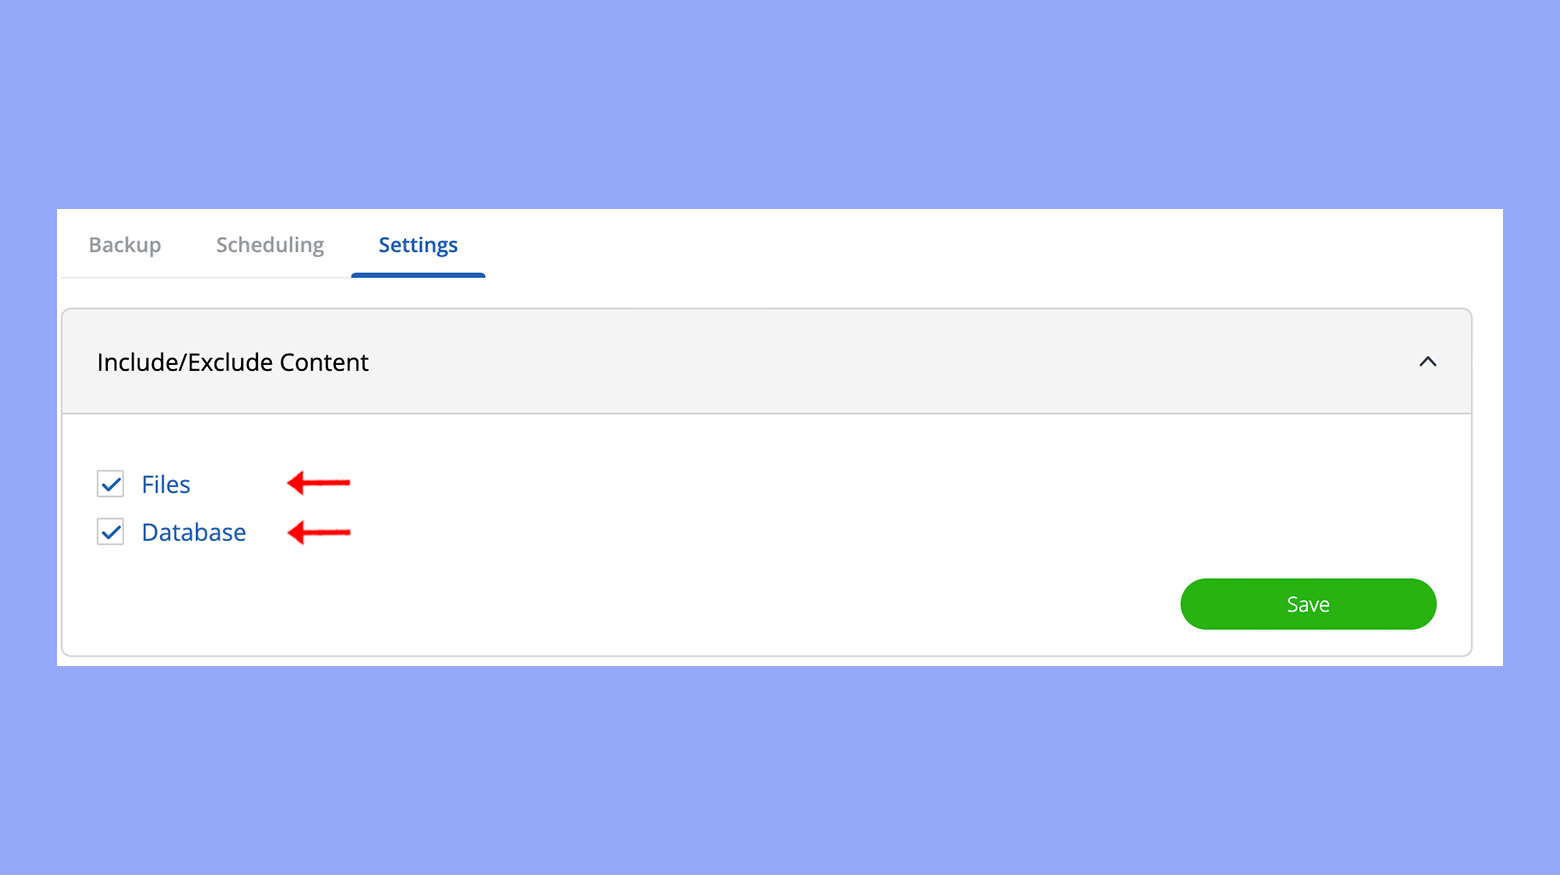
Backup your online store
- Access your hosting dashboard and navigate to the Backups section.
- If you are managing your ecommerce with 10Web AI Ecommerce Website Builder, just click on Backup Now.

- Ensure that you select the option to include both your site files and databases.
- After the backup process is completed, download the backup files to your local storage for safekeeping. Remember, a reliable site backup is your safety net in case of any issues.
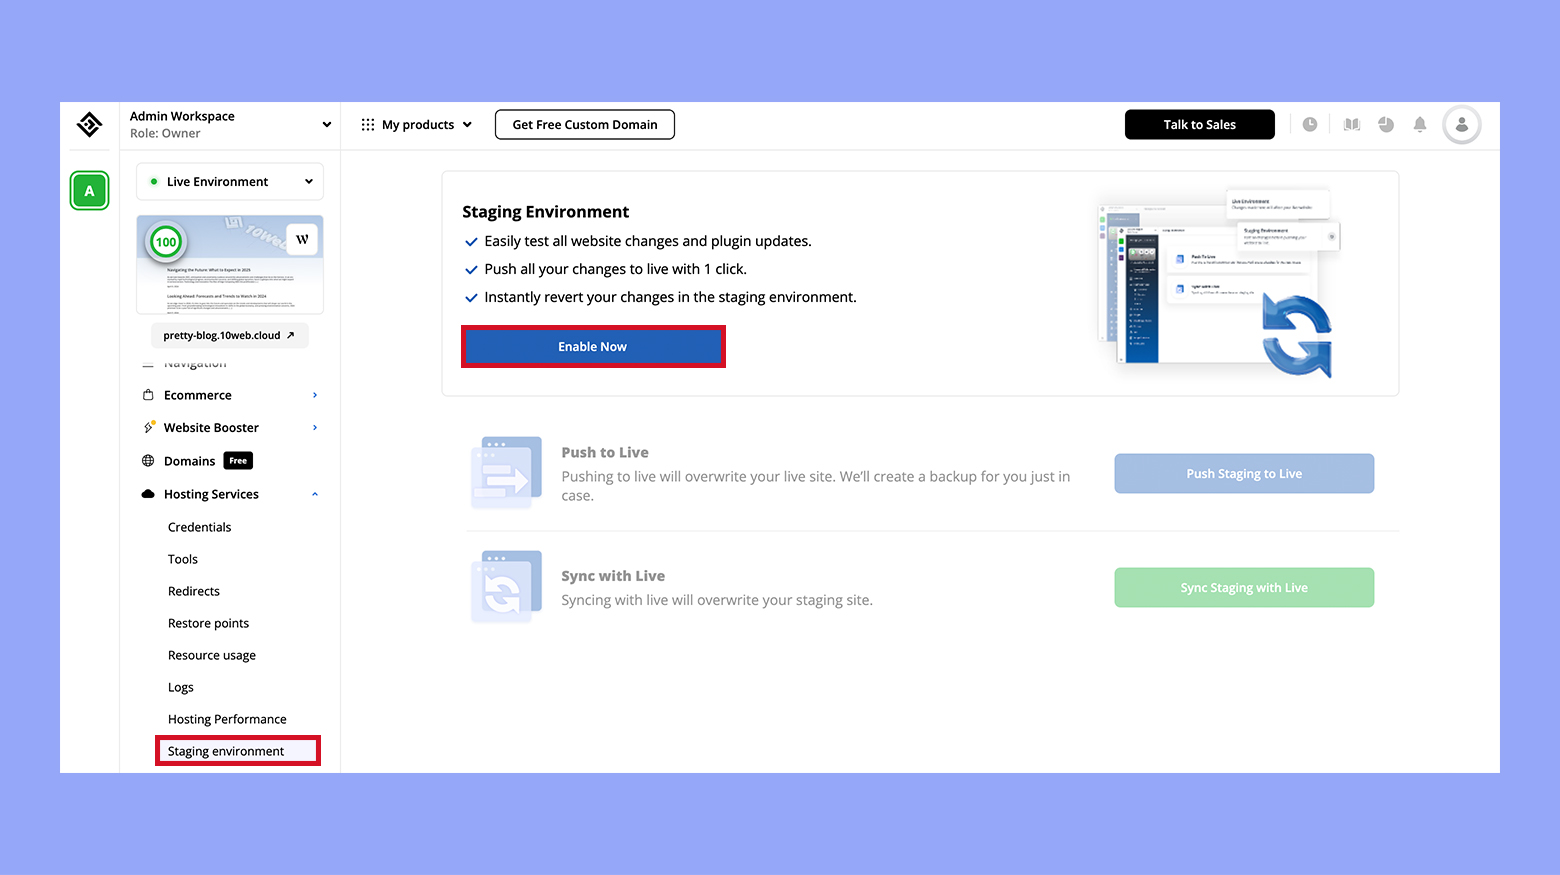
Set up a staging site
- Log in to your web hosting account and locate the section for setting up a staging site. This might vary by host, so look for options labeled Staging or Test Environment.
- Click on the option to Enable now. This will make a copy of your live site where you can perform tests without any risk to your WooCommerce store.
- Once the staging site is ready, you can proceed with testing updates and changes in this controlled environment before applying them to your live site.
By following these steps, your store will be well-prepared for any maintenance or updates with minimized risk to your live site’s operation. Remember to check that your backups have been properly saved and verify that the staging environment is an accurate replica of your live site.
Step 2: Selecting the right maintenance mode plugin
Choosing an effective maintenance mode plugin for your WooCommerce site comes down to compatibility, ease of use, and comprehensive features. These tools help you display a customer-friendly notice during website updates or maintenance, ensuring minimal disruption to your users’ experience.
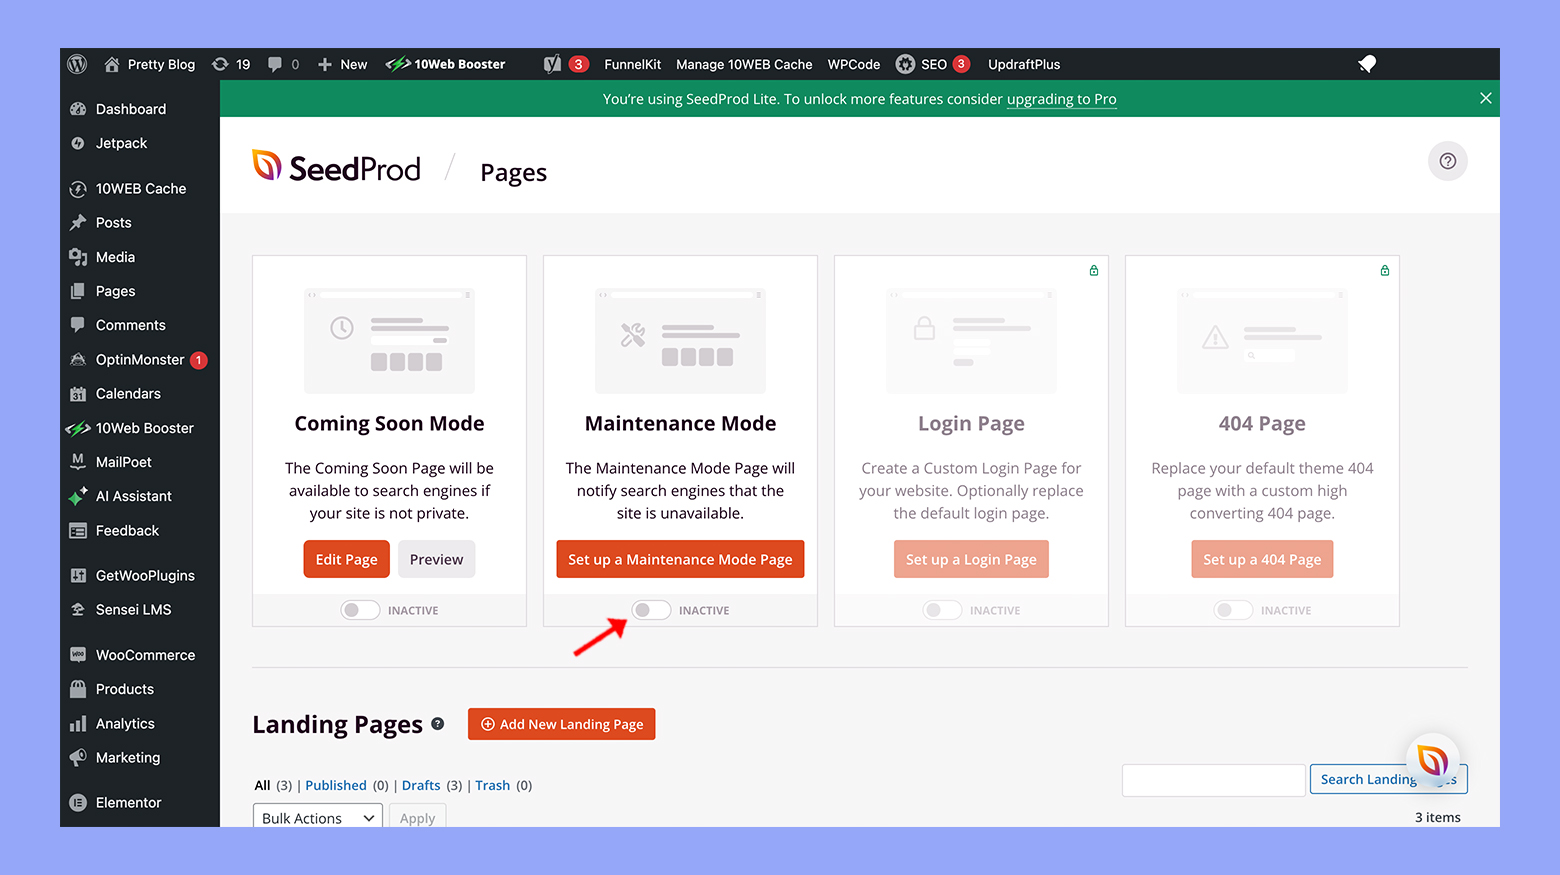
Using SeedProd to enable maintenance mode
With SeedProd, putting your WooCommerce store under maintenance becomes a user-friendly process.
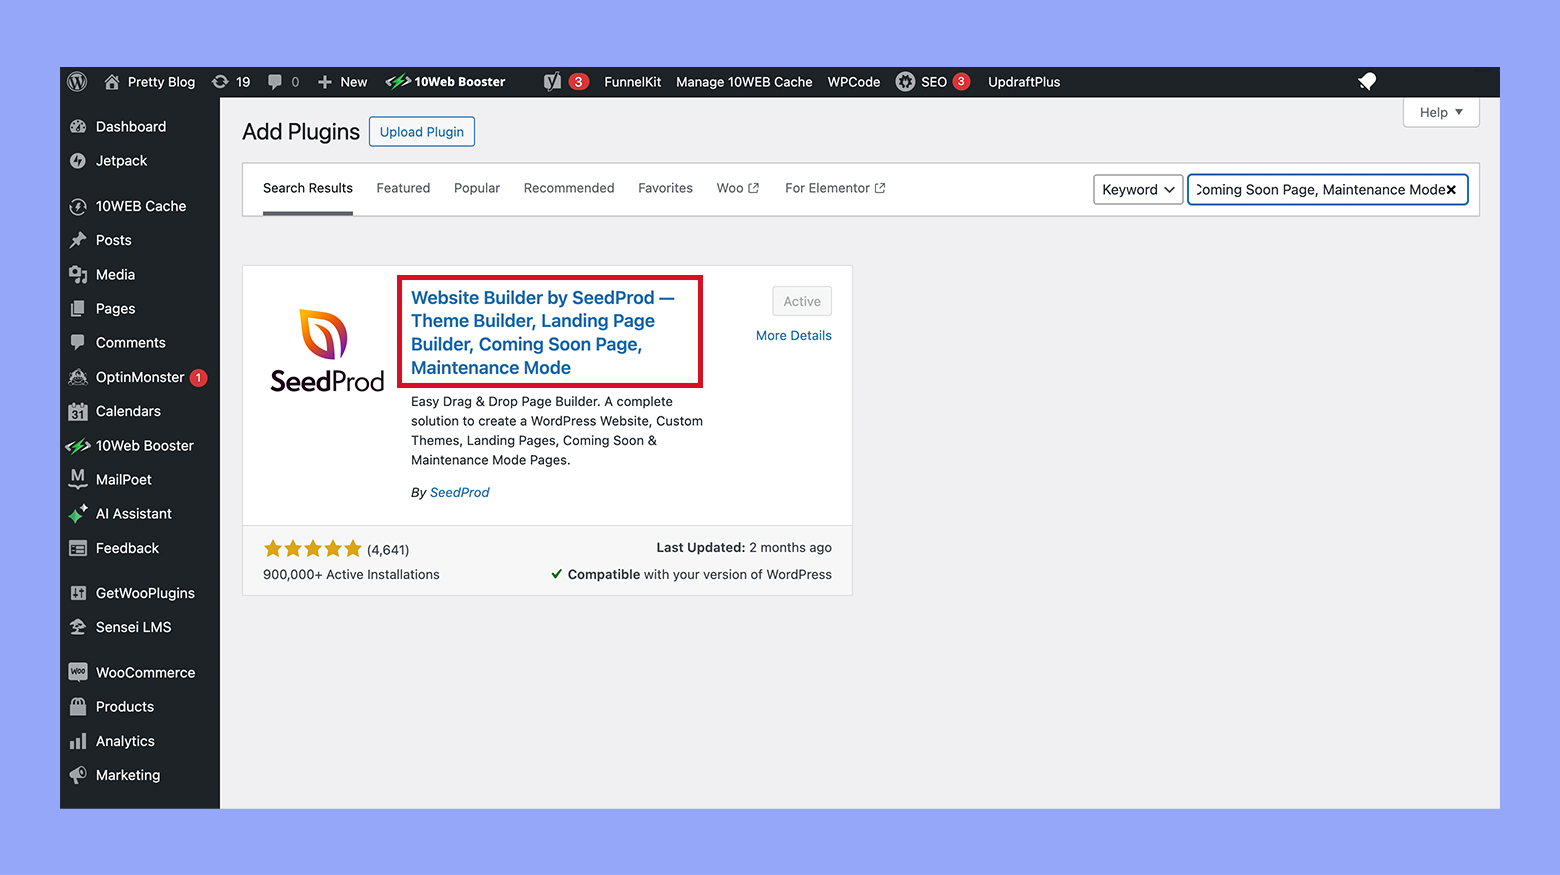
- Install and activate the Website Builder by SeedProd plugin.
- Navigate to SeedProd > Landing pages in your WordPress dashboard.
- Toggle the switch under Coming Soon Mode or Maintenance Mode to Active. This plugin allows for custom maintenance pages that can align with your brand making the downtime look professional.
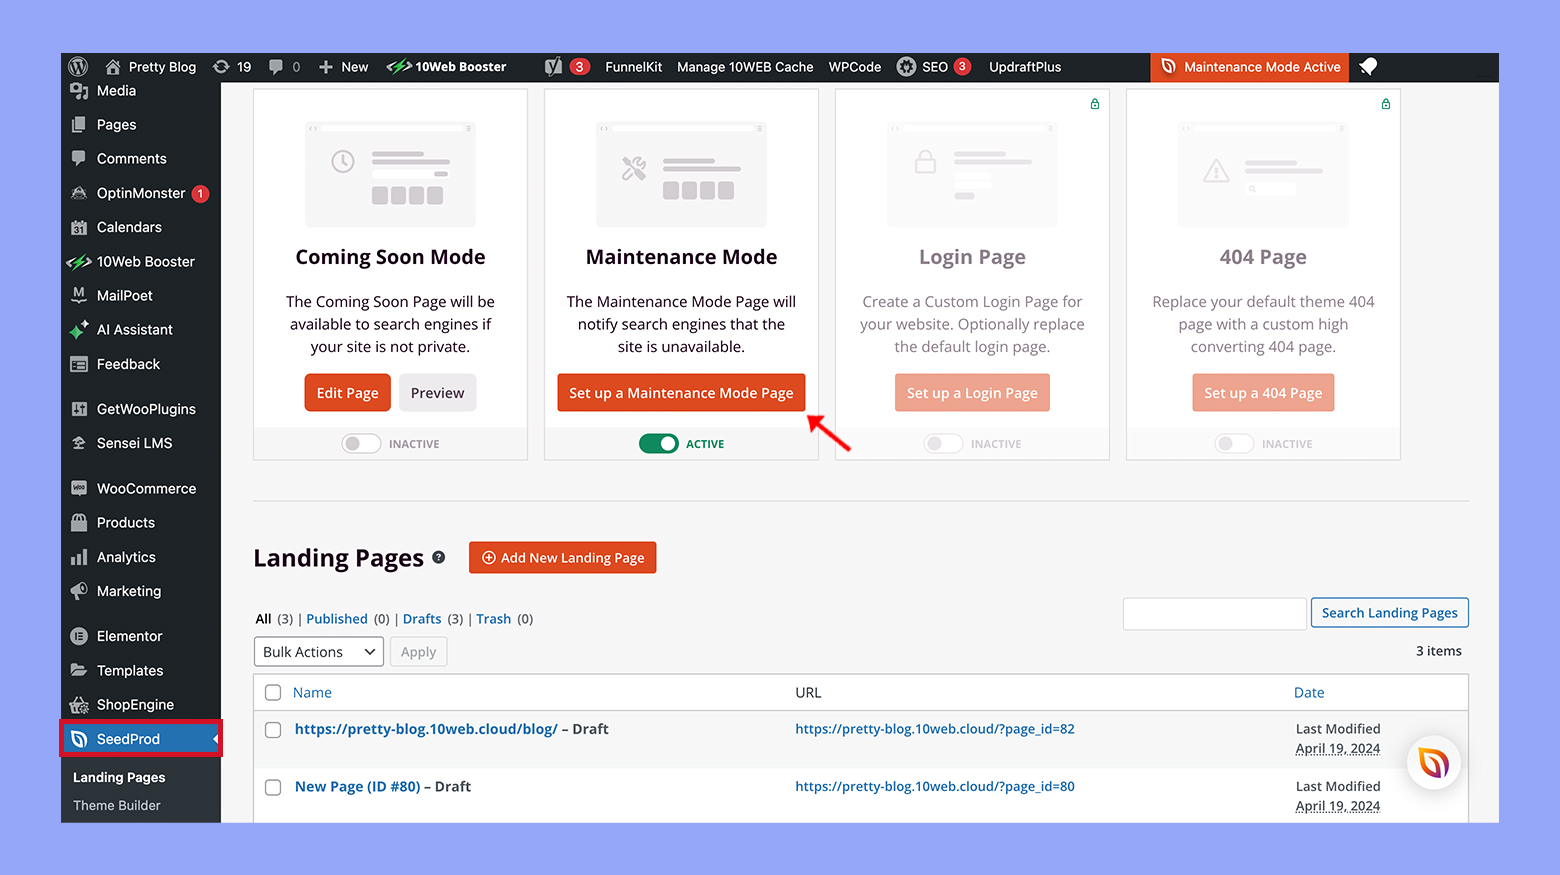
You’ve successfully enabled maintenance mode using SeedProd, and now your store will be temporarily unavailable to your customers, displaying a maintenance mode page instead.
Manual activation via .htaccess file
For a more hands-on approach, you can directly modify your .htaccess file:
- Access your site’s root directory using an FTP client or your hosting file manager.
- Find the .htaccess file and download a copy of it as a backup.
Open the file and add the following code at the top:
# MAINTENANCE-PAGE REDIRECT

<IfModule mod_rewrite.c>

RewriteEngine on

RewriteCond %{REMOTE_ADDR} !^123\.456\.789\.000

RewriteCond %{REQUEST_URI} !/maintenance.html [NC]

RewriteRule .* /maintenance.html [R=503,L]

</IfModule>
- Ensure you replace “123.456.789.000” with your IP address and “/maintenance.html” with the actual maintenance page URL.
- Save the changes and upload the updated .htaccess file back to your server.
By following these steps, you’ve manually activated maintenance mode for your WooCommerce site directly through the .htaccess file. Only your IP address will have access to the site, allowing you to work behind the scenes.
Step 3: Customizing your maintenance page
Creating a unique and informative maintenance page is crucial for maintaining a professional appearance even when your WooCommerce store is under construction. A well-designed maintenance page can provide a positive user experience and keep your customers informed about your store’s status.
Designing the look and feel
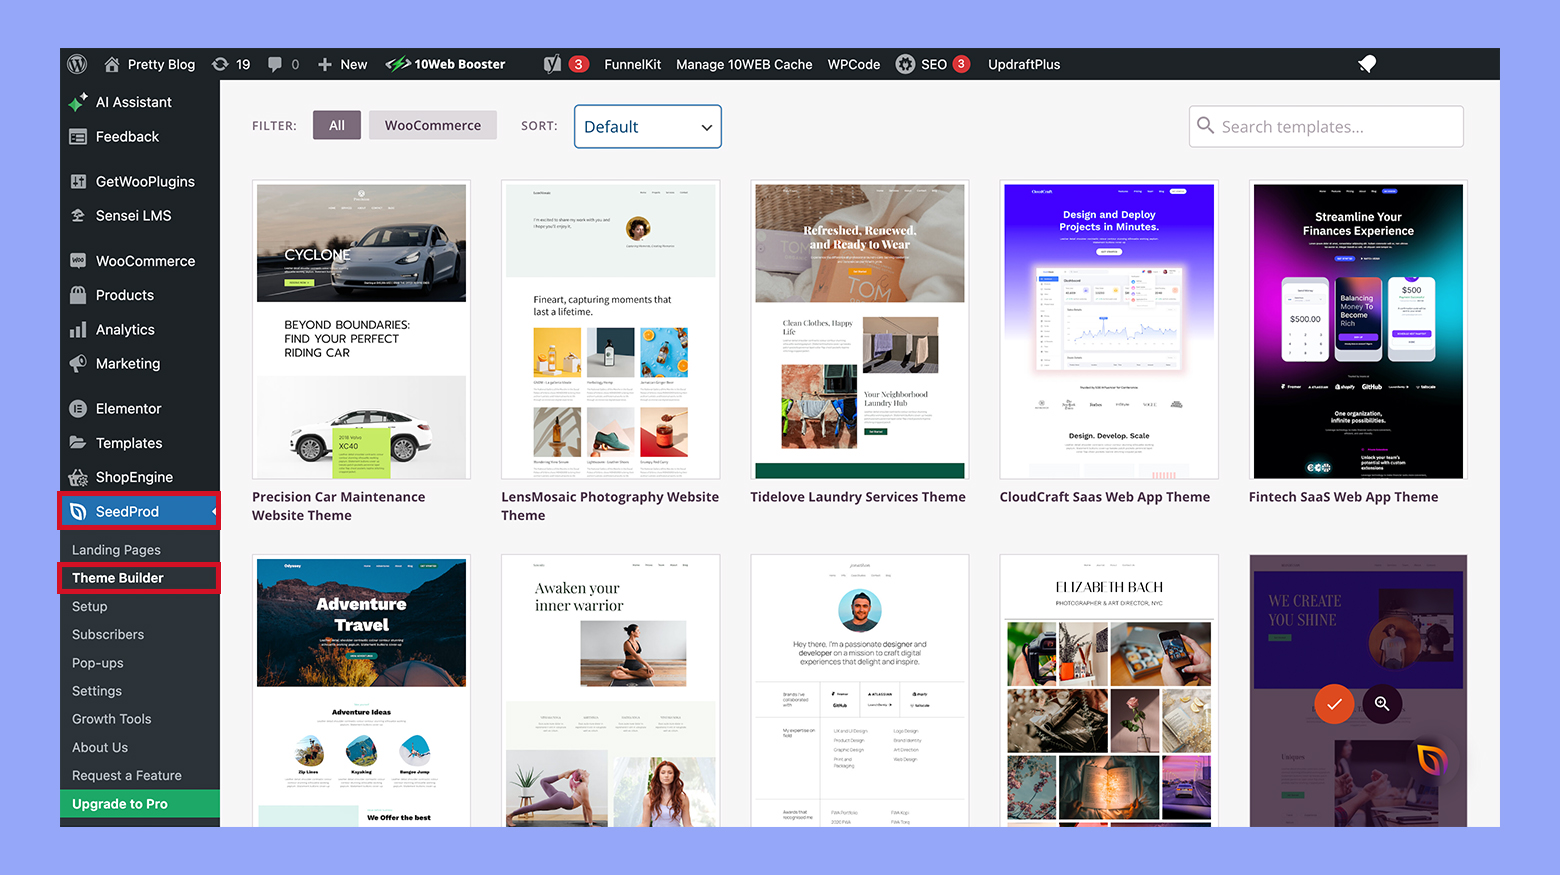
- Navigate to the Theme Builder or Design tab of your chosen maintenance mode plugin.
- Choose from a variety of templates to serve as the foundation for your maintenance page.
- Use the customization options to tailor colors, fonts, and images to match your brand’s look. This ensures your maintenance page aligns with the rest of your site.
- Consider including a countdown timer, which can be both engaging and informative, giving visitors a clear indication of when they can expect the store to be back online.
Adding useful information and features
- Make sure to add a contact form to your maintenance page. This gives visitors a way to reach out to you if they need immediate assistance or have questions.
- Include essential information like the reason for the downtime and anticipated completion. Keeping your customers in the loop can help minimize frustration.
- Add features that might be beneficial during the maintenance period, like a link to subscribe to updates or a field to sign up for notifications once your store goes live again.
- Always ensure the information you add is up-to-date and accurate to maintain trust with your customers during the maintenance period.
Step 4: Managing access during maintenance
When you enable maintenance mode for your WooCommerce store, it’s crucial to manage who can access your site. This involves setting up user roles and permissions and configuring IP whitelisting, so certain individuals can still navigate the store even while it’s under construction.
Configuring user roles and permissions
Managing user access during maintenance relies heavily on defining user roles and permissions.
- Begin by navigating to the Users section in your WordPress dashboard.
- Select the Role you wish to define access for during maintenance.
- Adjust the permissions by ticking the appropriate capabilities that allow or restrict access during maintenance. Ensure that only trusted roles like Administrator or Shop Manager have the Maintenance Access capability.
- Save Changes to implement the new role configurations.
By carefully setting these permissions, you maintain tight access control and uphold your website’s security during maintenance periods.
IP whitelisting for unrestricted access
IP whitelisting provides unrestricted access to your site from specific IP addresses.
- Locate the maintenance mode plugin’s settings option within your WordPress dashboard.
- Access the IP Whitelist section, usually found under the General or Access tab.
- Enter the IP addresses that you want to grant uninterrupted access to. Each IP address must be on a separate line. You can include yours to ensure you have full access during the maintenance phase.
- Confirm or Save your settings to activate IP whitelisting.
This list determines which IP addresses bypass the maintenance page, allowing specific users uninterrupted access to the online store regardless of the maintenance status. It’s an effective piece of your site’s security puzzle, ensuring that only approved parties can view and interact with your website while it’s being updated or fixed.
Step 5: Ensuring SEO and customer experience
When you put your WooCommerce store in maintenance mode, it’s crucial to maintain your search engine rankings and provide a seamless experience for your visitors.
Keeping your SEO rankings intact
To ensure your online store continues to thrive even during maintenance, follow these steps to protect your SEO:
- Use HTTP status code 503: This tells search engines that your site is temporarily down for maintenance, which helps to preserve your current rankings.
- Create an informative maintenance mode page: This page should notify visitors that your website will be back shortly. Remember to add valuable content related to your brand to keep the page engaging.
- Implement a countdown timer or an estimated time: Notifying users when your site will be back encourages them to return, potentially helping to maintain organic traffic.
- Utilize SEO-friendly URLs for your maintenance page: This can include your primary keyword to aid in sustaining SEO performance.
By following these guidelines, you can help ensure that search engines correctly interpret the temporary status of your site and maintain your hard-earned rankings.
Minimizing impact on user and customer experience
Here are some steps to minimize disruption and keep your customers happy while under maintenance:
- Communicate clearly and promptly: Use Email campaigns or social media to inform your customers about the maintenance period before it happens.
- Provide alternative contact information: Displaying an email address or phone number on the maintenance page allows customers to reach out with urgent requests or questions.
- Offer incentives: Consider providing a discount code or exclusive access to certain products once your store is back online as a thank you for their patience.
Taking care of these aspects of customer interaction will help to reduce frustration and ensure that users are more likely to return to your store post-maintenance.
Additional tips
Completing maintenance tasks
Before placing your WooCommerce store in maintenance mode for updates and fixes, ensure you understand what tasks need to be completed. Not only will this streamline the process, but it’ll also reduce the downtime your customers experience.
Executing updates and upgrades
Upgrades and updates are essential for maintaining the performance and security of your WooCommerce store. Follow these steps to ensure a smooth update process:
- Back up your website: Always create a full backup before making any changes to avoid data loss.
- Check compatibility: Verify that your theme and plugins are compatible with the new versions of WordPress and WooCommerce.
- Test updates: Use a staging environment to test WooCommerce updates before going live.
- Perform updates: Update WordPress core, WooCommerce, themes, and plugins to their latest versions.
- Clear cache: After updating, clear your website’s cache to ensure changes take effect immediately.
Addressing errors and warnings
When WooCommerce updates or changes are made, errors and warnings might appear. Address them promptly to keep your store running smoothly.
- Monitor logs: Regularly check your error logs for any issues that need attention.
- Resolve conflicts: If there are plugin or theme conflicts after an update, you may need to deactivate conflicting items and seek alternatives or updates.
- Seek support: Use WooCommerce support for assistance with specific errors or if troubleshooting does not resolve the issues.
- Test fixes: Always test your fixes in a staging environment before applying them to your live site.
By carefully handling maintenance tasks, you’ll minimize disruptions and maintain a secure, efficient online store.
Deactivating maintenance mode
When you’re ready to go live with your WooCommerce store after making updates or changes, you’ll want to deactivate maintenance mode. This ensures that your customers can access your online store again. Here’s how to publish your landing page and bring your site back to the public eye.
- Log in to your WordPress dashboard.
- Navigate to the plugin you used for activating maintenance mode. For instance, if you used SeedProd, go to SeedProd > Landing Pages.
- Find the maintenance mode page you have activated.
- Click on the maintenance mode option, which should currently be set to Active.
- Toggle the switch next to the maintenance mode page to Inactive. This will deactivate the maintenance mode and your site will be live.
Your WooCommerce store should now be accessible to all visitors and they can browse your products, add items to their cart, and complete purchases. Remember to check that everything is working as intended by visiting your site as if you were a customer. If you encounter any issues, you can always reactivate maintenance mode while you resolve them.
Conclusion
Activating maintenance mode in your WooCommerce store is a crucial step when performing updates or significant changes, ensuring a seamless experience for your customers and preventing any confusion or errors. By following this guide, you will learn how to put WooCommerce in maintenance mode properly, keeping your store professional and your customers informed. Remember to always back up your data and test changes in a staging environment before going live.
Looking to sell online?
Create your online store in minutes
Create your online store in minutes with 10Web AI Ecommerce Website Builder.