

Email marketing is an essential part of digital marketing strategy, aimed at reaching your audience directly through their inboxes. However, the effectiveness of this approach hinges on the successful delivery of these emails. A common obstacle that marketers face is the DMARC fail error, which can significantly impede email deliverability. This error indicates a failure in the Domain-Based Message Authentication, Reporting, and Conformance (DMARC) check, a protocol designed to validate the authenticity of email messages. DMARC integrates with two other authentication technologies, the Sender Policy Framework (SPF) and DomainKeys Identified Mail (DKIM), to provide a robust defense against email spoofing and phishing attacks. Essentially, when you encounter a DMARC fail error, it signifies that the email in question hasn’t passed the necessary authentication checks, raising red flags about its legitimacy.
Say goodbye to website errors
Achieve peace of mind with 99.99% uptime on 10Web Managed
WordPress Hosting, powered by Google Cloud.
Variations of the DMARC Fail error
The DMARC fail error can manifest in various ways, depending on the email servers and software in use. Common variations include notifications like “DMARC Policy Not Enabled,” “DMARC Authentication Failure,” or more explicit messages indicating that an email was rejected due to failing DMARC checks. Regardless of the specific wording, the underlying issue remains the same: an authentication failure that needs addressing to ensure email deliverability.
Reasons why the DMARC fail error occurs
Several factors can contribute to a DMARC fail error, each pointing to a potential misconfiguration or omission in the email authentication setup:
DMARC alignment failure: This occurs when the “From” address in the email doesn’t align with the domain purportedly sending the email. It’s a common issue when emails are sent through third-party services without proper alignment.
Improper DMARC alignment mode: Even if the “From” addresses match, incorrect configuration of DMARC policies can lead to failures. This includes setting the policy to a mode that doesn’t align with the sender’s intentions or security requirements.
Missing or invalid DKIM signature: A digital signature that verifies an email’s domain origin. If this signature is absent or fails validation, it triggers a DMARC fail error.
Missing DNS TXT records: DMARC depends on DNS TXT records for SPF and DKIM. If these records are missing or improperly set, it will result in authentication failures.
How to check for DMARC failures in your email campaigns
If you’re encountering issues with email delivery, it’s essential to verify whether your emails are failing DMARC checks. Here’s how you can do this using two primary methods: examining email headers and utilizing DMARC analysis and reporting tools.
Checking the email headers
Every email comes with headers, which are snippets of data providing detailed information about the email’s journey from the sender to the recipient. These headers include the sender’s IP, the time the email was sent, and crucially for our purposes, DMARC authentication results.
Gmail users
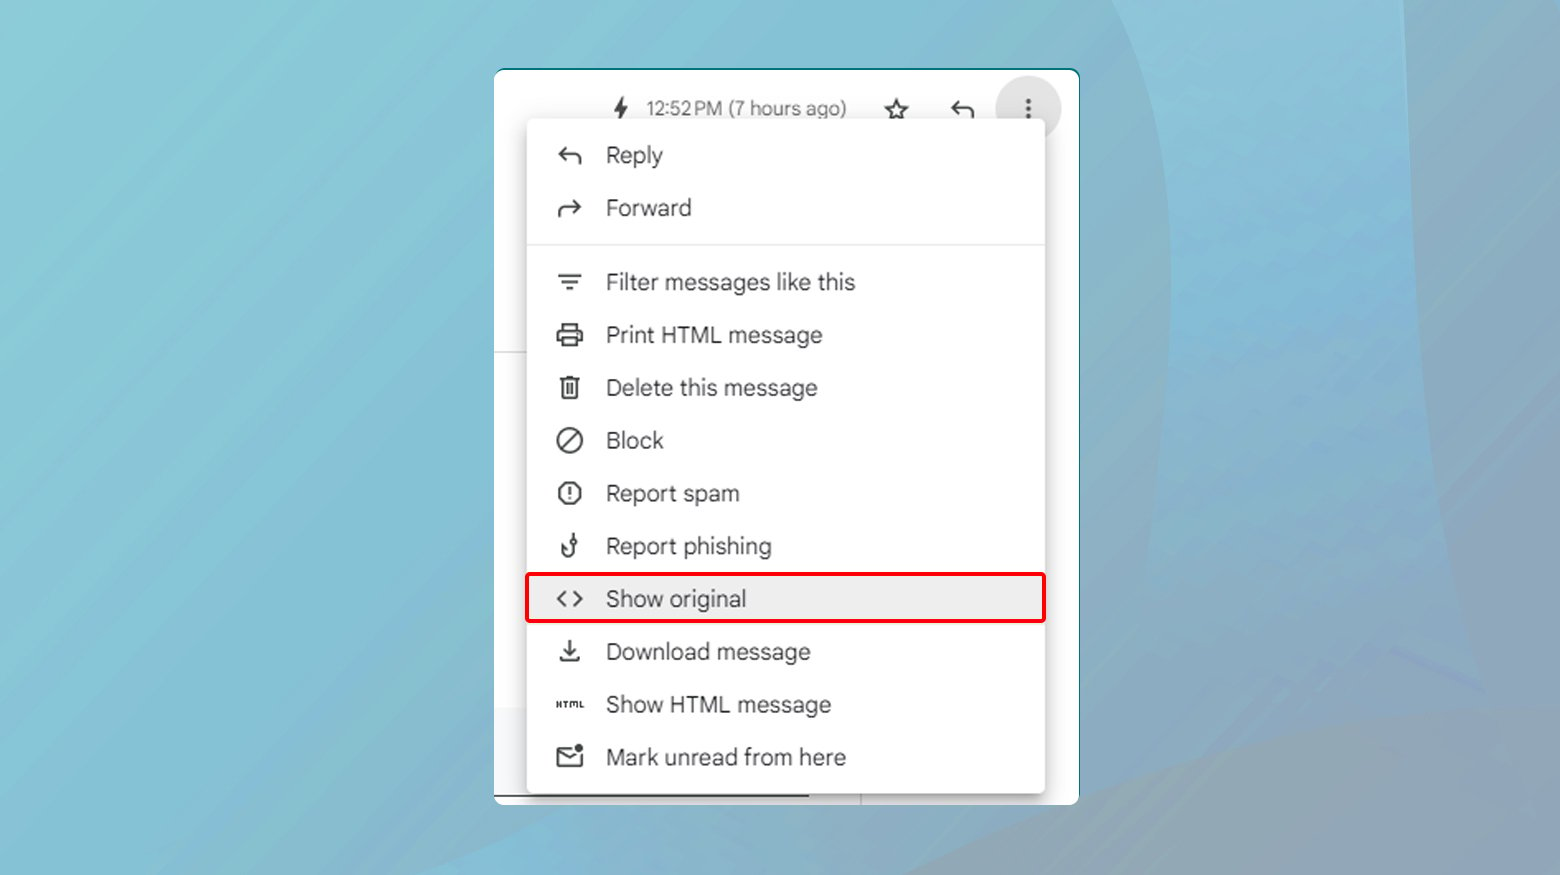
- Open the email and click on the three vertical dots next to the “Reply” button at the top-right corner.
- Select Show original from the dropdown menu. This action opens a new window showcasing the email’s original data, including its DMARC pass or fail status.
- Look for the Authentication-Results section.
A line stating DMARC=pass indicates a successful DMARC check, whereas DMARC=fail means the email didn’t authenticate correctly.
Outlook users
- Open the email and click on View Message Details in the top-right corner.
- Scroll down to the bottom of the message details to find the authentication results and check for a DMARC failure message.
Using DMARC analysis and reporting tools
For a more streamlined approach, especially when handling a large volume of emails, consider using DMARC analysis and reporting tools. These tools can simplify the process of checking emails for DMARC failures.
Google Admin Toolbox Messageheader tool
This free tool allows you to analyze email headers for authentication results, including SPF, DKIM, and DMARC. Copy and paste the email headers into the tool, and it will display whether the email passed or failed DMARC checks.
DMARC report analysis from your email service
Many email services offer DMARC report analysis. These reports are generated when emails fail DMARC checks and provide details such as the sender, recipient, and reasons for failure. This information is invaluable for troubleshooting delivery issues. To receive these reports, you’ll need to add a specific TXT record to your DNS settings, which instructs email servers to send failure reports to a designated inbox.
For detailed instructions on setting up these DNS records and accessing DMARC failure reports, consult with your email service provider. Some providers, like ActiveCampaign, offer DMARC DNS Verification Tools to assist in this process. By adding the correct record, you’ll start receiving failure reports, enabling you to address and rectify deliverability issues more effectively.
Say goodbye to website errors
Achieve peace of mind with 99.99% uptime on 10Web Managed
WordPress Hosting, powered by Google Cloud.
Fixing the DMARC Fail error
Addressing a DMARC fail error involves a multi-step approach aimed at identifying and rectifying the underlying causes.
Setting up SPF, DKIM, and DMARC records
By implementing these protocols correctly, you can significantly improve your email’s chances of landing in the intended inbox, rather than being exiled to the dreaded spam folder. Let’s break down the steps to fix the DMARC Fail error and ensure your emails represent your domain accurately.
Understanding the importance of SPF and DKIM before DMARC
SPF (Sender Policy Framework) and DKIM (DomainKeys Identified Mail) are foundational steps that lay the groundwork for DMARC (Domain-based Message Authentication, Reporting, and Conformance). Without SPF and DKIM, setting up DMARC is like building a house without laying the foundation first.
SPF authenticates the sender’s IP address, allowing your domain to specify which email servers are permitted to send email on its behalf.
DKIM adds a digital signature to your emails, ensuring that the content is not altered in transit. It provides a way to validate a domain name identity associated with a message through cryptographic authentication.
Step-by-step guide to setting up SPF and DKIM
Adding SPF record: The SPF TXT record is crucial for listing the servers that are authorized to send emails from your domain. To add an SPF record, locate your DNS settings and create a new TXT record with the value:
v=spf1 include:_spf.google.com ~all
This line essentially tells the world that emails sent from your domain are valid if they come from a server recognized by _spf.google.com, with a soft fail (~all) for emails from other sources.
Adding DKIM record: For DKIM, you’ll need to generate a public/private key pair. Your email service provider often facilitates this. Once you have your public key, create a new TXT record in your DNS settings with the name typically being
yourselector._domainkey.yourdomain.com
where yourselector is a specific identifier for your key, and yourdomain.com is your actual domain name. The value of this TXT record should follow the format:
v=DKIM1; k=rsa; p=[your public key]
Setting up DMARC
After ensuring SPF and DKIM are correctly set up, you’re ready to add a DMARC record. This TXT record enables you to specify how email receivers should handle emails that don’t pass SPF or DKIM authentication, providing instructions for quarantine or rejection of such emails, and where to send reports of these incidents.
Adding DMARC record
In your DNS settings, create a new TXT record with the name _dmarc.yourdomain.com.
For the value, input something like
v=DMARC1; p=reject; sp=quarantine; rua=mailto:postmaster@yourdomain.com
replacing yourdomain.com with your actual domain.
This configuration instructs email servers to:
- reject emails failing DMARC checks
- quarantine suspicious ones
- and send reports to postmaster@yourdomain.com.
Special note for 10Web useres
If you’re using 10Web, you can manage these records directly through your 10Web dashboard. 10Web’s interface simplifies the process of adding and editing DNS records, making it user-friendly to ensure your email setup is solid.
To access DNS records in 10Web:
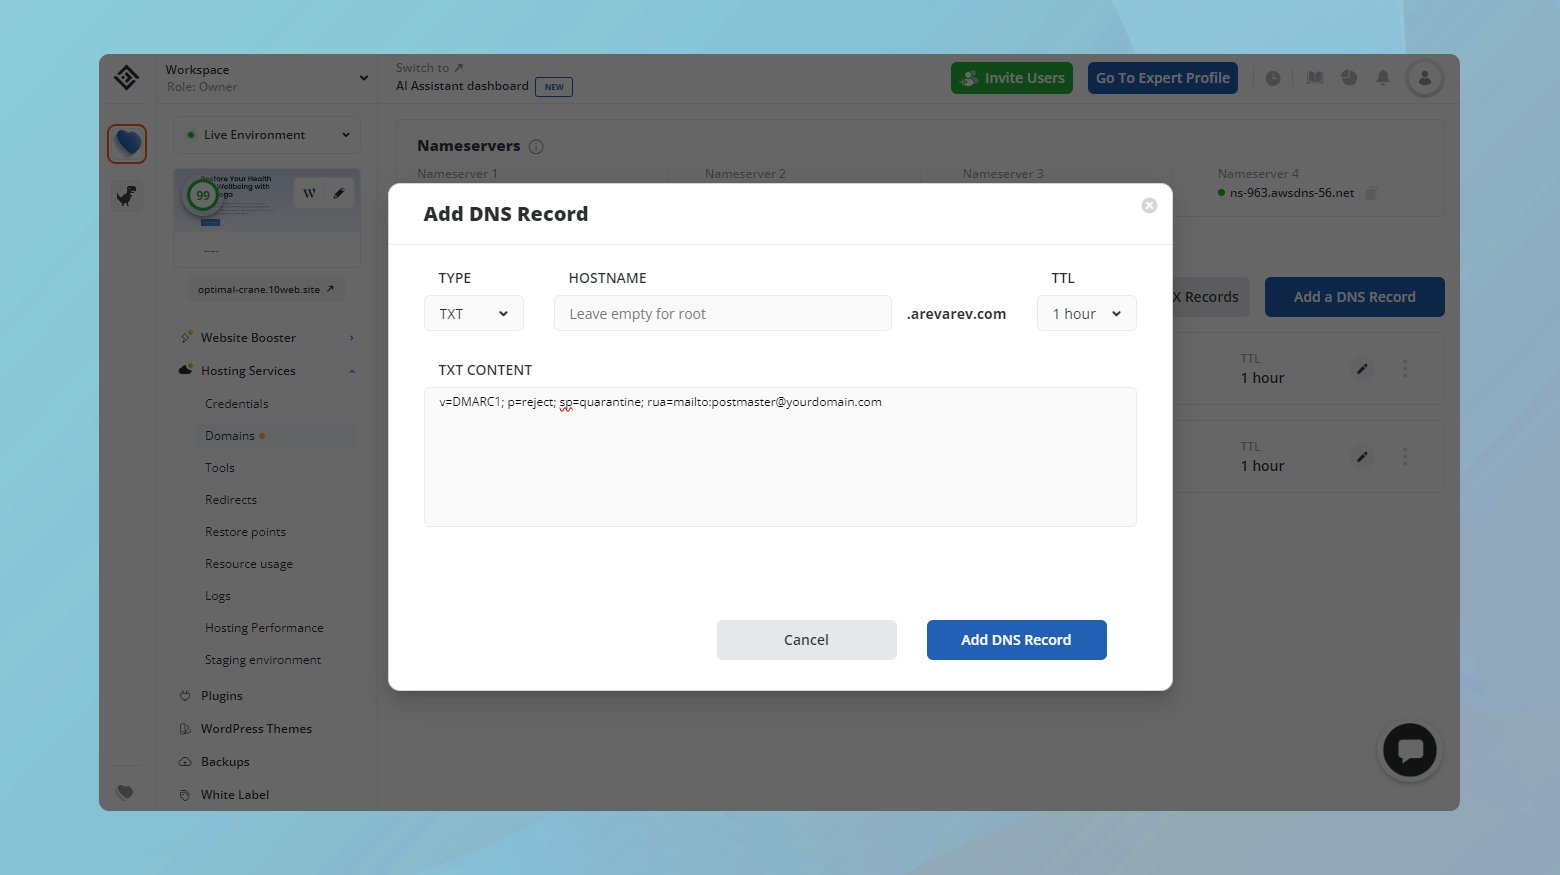
- Log into your 10Web account.
- Click on the website where you want to manage the DNS records.
- Navigate to Hosting Services > Domains.
- Click Manage DNS for the domain where you want to add SPF, DKIM, and DMARK TXT records.
- Then click Add DNS record.
Adjusting your DMARC policy
By setting your DMARC policy to “none,” you allow emails that fail DMARC checks to still be delivered to the recipient’s inbox. This move can be particularly useful for troubleshooting and identifying issues without immediately impacting your email deliverability.
Modifying your DMARC policy to “None”
Changing your DMARC policy to “none” involves updating your DNS settings with a new TXT record. This record instructs email servers how to handle emails from your domain that fail DMARC authentication. Here’s how you can make this adjustment:
Log into the control panel where your domain’s DNS settings are managed. This could be with your hosting provider, domain registrar, or a third-party DNS service.
Look for an existing DMARC record (identified by _dmarc.yourdomain.com). If one exists, you’ll edit it; if not, you’ll add a new TXT record with the following value:
DMARC: "v=DMARC1; p=none; sp=quarantine; rua=mailto:postmaster@yourdomain.com”
Replace yourdomain.com with your actual domain name. This record sets the DMARC policy to “none,” meaning emails that fail DMARC will still be delivered, but it advises quarantine for subdomains and specifies an email address for receiving reports on DMARC failures.
After updating the record, save your changes. Remember, DNS updates can take some time to propagate across the internet.
Considerations for using a “None” policy
While setting the DMARC policy to “none” can help identify deliverability issues without the risk of emails being outright rejected or quarantined, it’s important to recognize the security trade-offs:
Temporary measure: The “none” policy should be viewed as a temporary troubleshooting tool rather than a long-term solution. It does not enforce any action on emails failing authentication, potentially leaving room for abuse.
Monitoring and adjustment: Use this period to monitor your email delivery closely and identify any underlying issues. Once you’ve made necessary adjustments and are confident in your email authentication setup, consider transitioning to a more secure policy, such as “quarantine” or “reject.”
Security implications: Understand that the “none” policy does little to deter spoofing or phishing attempts using your domain. As such, moving to a stricter policy once you’ve resolved deliverability issues is crucial for protecting your domain’s reputation and your recipients’ security.
Authenticating your domain for email marketing with a third-party service provider
When you’re diving into the world of email marketing or sending transactional emails, using a third-party service provider like Mailchimp can streamline your processes and enhance your capabilities. However, to maintain the integrity and deliverability of your emails, it’s crucial to authenticate your domain with the service provider. This process involves editing your DNS records to authorize your chosen provider to send emails on behalf of your domain. Let’s walk through the steps to get this set up correctly.
Verifying domain ownership
The first step in this journey is making sure that you own the domain from which you plan to send emails. You must have control over your domain’s DNS settings, typically through your domain registrar or hosting provider.
Accessing your domain’s DNS settings
To edit your DNS records, you’ll need to access your domain registrar’s control panel. This can vary depending on your provider but is often found in cPanel, Plesk, or a custom dashboard provided by your hosting company, such as the 10Web dashboard for 10Web users. Here’s how you can locate and edit your DNS records in general terms:
- Log into your domain registrar’s control panel.
- Navigate to the section where you can manage your domain’s DNS settings.
- This is where you’ll add the records provided by your email service provider.
Primarily, you’ll be adding CNAME records. These records are crucial for verifying domain ownership and ensuring that your email service provider is recognized as an authorized sender for your domain.
Adding CNAME records for email service provider
Once you’ve accessed your DNS settings, the next step is to add the specific CNAME records provided by your email service provider. Each provider will give you a unique set of records to add. Here’s a generalized approach to this process:
- Obtain the CNAME record information from your email service provider.
- In your domain’s DNS management area, create a new CNAME record.
- Copy and paste the values provided by your email service provider.
- After adding the necessary CNAME records, save your changes.
DNS changes can take some time to propagate across the internet, so it might take a little while before the new settings take effect.
Given that the exact records and steps may vary slightly depending on your email service provider, it’s important to follow their specific instructions closely. They’ll provide all the details needed to correctly set up the DNS records for your domain.
More ways to enhance email deliverability
The world of email deliverability is complex, but armed with the right strategies, you can significantly boost your chances of landing in the inbox.
Choose a reputable email service provider
The first step in ensuring your emails reach their intended destination is to use a reliable and secure email provider. This choice can make a substantial difference because providers with a good reputation are less likely to be blacklisted or marked as spam. Providers like Mailchimp, SendGrid, and Constant Contact have built robust infrastructures and relationships with ISPs (Internet Service Providers) to ensure high deliverability rates for their clients.
Maintaining a clean email list
An often overlooked yet critical aspect of email marketing success is the cleanliness of your email list. Regularly purging inactive subscribers and incorrect email addresses can dramatically improve your engagement rates and, by extension, your sender reputation. Tools and services are available that can help automate this process, identifying and removing subscribers who haven’t engaged with your emails over a specified period.
Crafting careful subject lines
The power of the subject line in determining an email’s fate cannot be understated. Certain words and phrases have been so frequently associated with spam that they trigger filters, even if the content of the email is legitimate. Avoid overly salesy language (“Buy now!”, “Free!”, “Guarantee”), excessive use of capital letters, and multiple exclamation points. Instead, opt for subject lines that are relevant, personal, and provide clear value to the recipient.
Consistency in From name and address
Consistency in your “From” name and address not only helps build brand recognition but also reassures email providers and recipients alike that your emails are legitimate. Switching these elements frequently can confuse recipients and trigger spam filters. Decide on a name and address that clearly represents your business and stick with it across your email campaigns.
Directly engaging with your recipients
If you’re encountering DMARC failures or spam issues with emails sent to specific recipients, a direct approach can sometimes be the best solution. Encourage your subscribers to add your email address to their contacts or allow list. This can be communicated through your website, initial sign-up confirmation emails, or even social media channels. Directly asking subscribers to allow list you not only helps avoid spam filters but also engages your audience in a way that emphasizes the value of your emails.
Conclusion
In this blog, we explored solutions for improving email deliverability, focusing on the setup of SPF, DKIM, and DMARC records. We discussed authenticating your domain with third-party email service providers and addressed additional strategies to prevent emails from being marked as spam. A part of the conversation highlighted adjusting the DMARC policy to “none” as a temporary measure to troubleshoot and identify deliverability issues without affecting email reception, emphasizing the importance of transitioning to a more secure policy for long-term email security and integrity.
Say goodbye to website errors
Achieve peace of mind with 99.99% uptime on 10Web Managed
WordPress Hosting, powered by Google Cloud.
Say goodbye to website errors
Fix all the website errors in one click
Migrate your website to the world's best Managed WordPress Hosting.