Adding Apple Pay to WooCommerce can streamline your checkout process and boost conversion rates. This guide covers ensuring compatibility, installing necessary plugins, configuring settings, customizing the Apple Pay button, optimizing the checkout page, and testing transactions. By following these steps, you can provide a seamless, secure payment option for your customers, enhancing their shopping experience and potentially increasing sales.
FAQ
How can I ensure my WooCommerce store is compatible with Apple Pay?
To ensure your WooCommerce store is compatible with Apple Pay, you need to have a valid SSL certificate installed on your site to enable HTTPS. Additionally, ensure that you are using a version of WooCommerce that supports integration with Apple Pay. It is crucial to set up Apple Pay in a live environment because it may not function correctly on a localhost or development server without proper domain verification.
What plugins are required to integrate Apple Pay with WooCommerce, and how do I install them?
To integrate Apple Pay with WooCommerce, you will need the WooCommerce Payments plugin. First, go to your WordPress dashboard, navigate to Plugins > Add New, and search for “WooCommerce Payments.” Install and activate the plugin, then follow the setup wizard to connect your store to WooCommerce Payments. After installation, go to WooCommerce > Settings > Payments, find the WooCommerce Payments section, click Manage, tick the checkbox for Enable Apple Pay, and save your changes.
How do I test Apple Pay transactions on my WooCommerce store?
To test Apple Pay transactions on your WooCommerce store, first ensure that Test Mode is enabled in your payment gateway settings, which can be found under WooCommerce > Settings > Payments. Conduct a test purchase by adding a product to your cart, proceeding to the checkout, and selecting Apple Pay as the payment method. Click the Apple Pay button and authenticate the transaction using your Apple device. If the test transaction is successful, you’ll receive a confirmation. If it is not successful, check for common issues such as ensuring Apple Pay is enabled, your domain is verified in Stripe, and your server is configured correctly to serve the verification file required by Apple.
Setting up Apple Pay with WooCommerce
Integrating Apple Pay as a payment option on your WooCommerce store can streamline the checkout process for users and potentially increase conversion rates. Setting it up involves a few key stages, from ensuring compatibility to configuring settings in your WooCommerce dashboard.
Checking for compatibility
Firstly, you need to confirm that your WooCommerce setup is compatible with Apple Pay. Here are the essential requirements:
- SSL certificate: You must have a valid SSL certificate installed on your site to enable HTTPS.
- WooCommerce version: Ensure that you are using a version of WooCommerce that supports integration with Apple Pay.
- Environment: Apple Pay should be set up in a live environment as it may not function correctly on a localhost or development server without proper domain verification.
Installing required plugins
If your environment meets the compatibility requirements, the next step is to install the necessary plugins. You need to:
- Install the WooCommerce Payments plugin as it includes Apple Pay support.
- Activate the plugin and go through the setup wizard to connect your store to WooCommerce Payments.
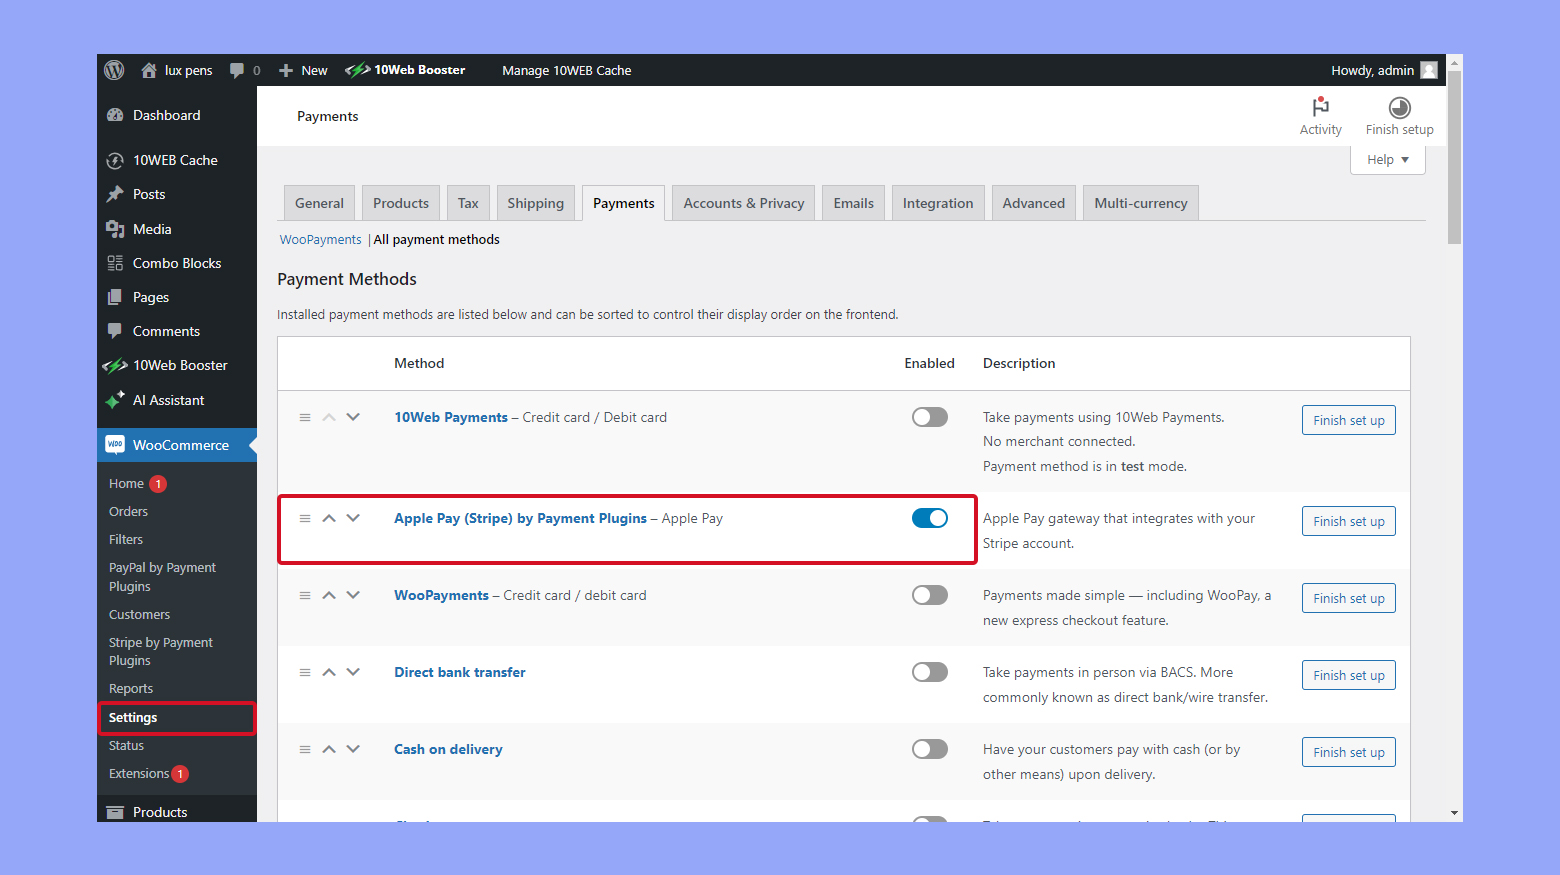
Configuring WooCommerce settings
Once the WooCommerce Payments plugin is installed and activated, you’ll need to configure your settings:
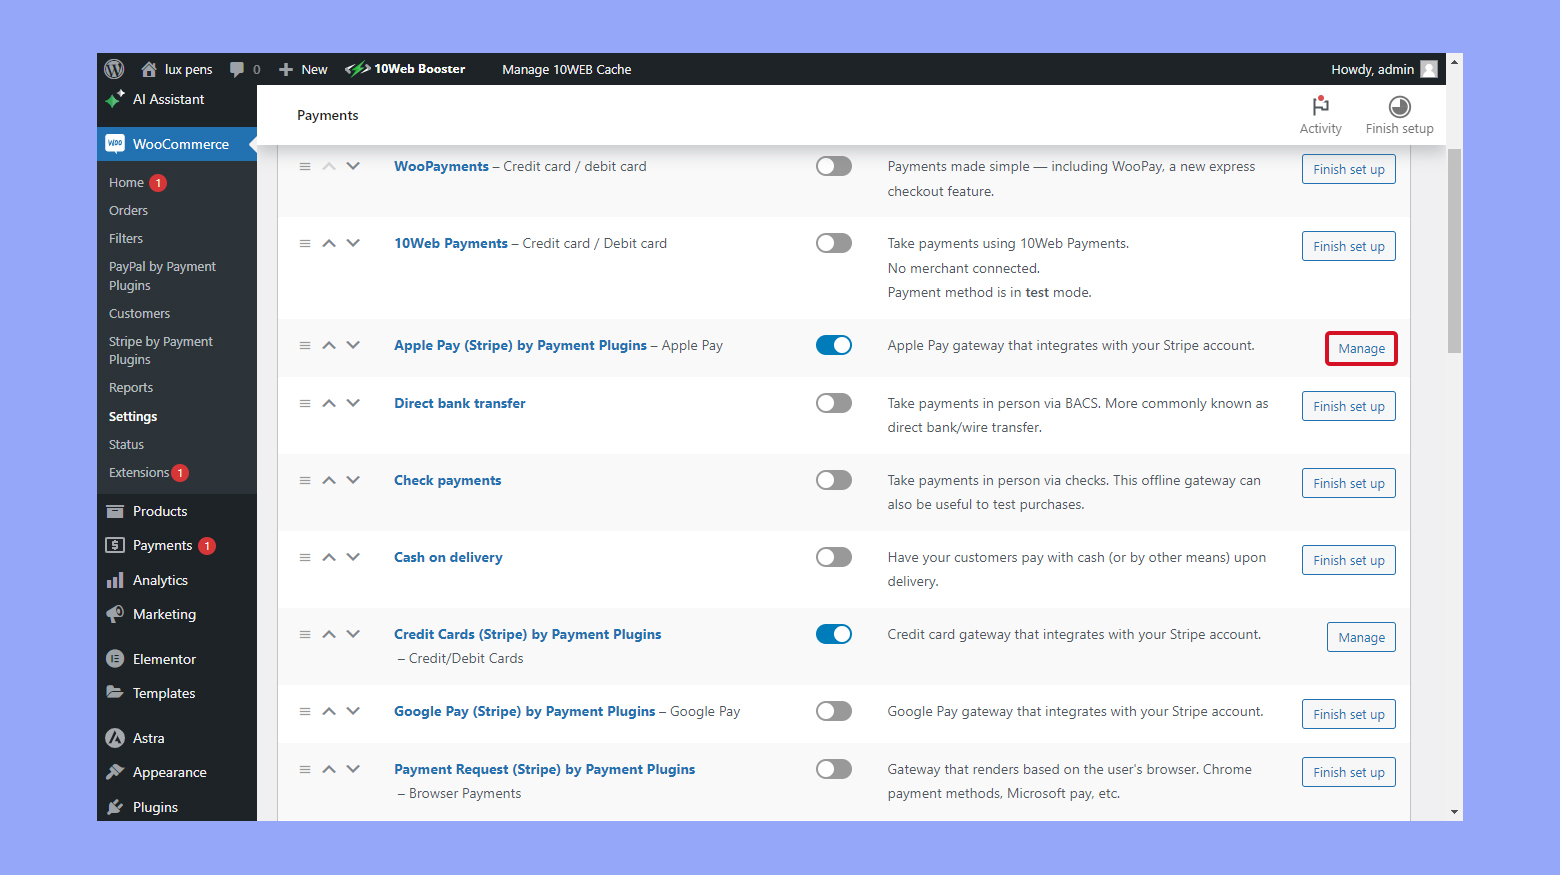
- Navigate to WooCommerce > Settings > Payments in your WordPress dashboard.
- Scroll to find the WooCommerce Payments section and click on Manage.
- Within the payment gateway settings, tick the checkbox for Enable Apple Pay.

- Save your changes by clicking on Save Changes at the bottom of the page.
To summarize, integrating Apple Pay requires checking that your store is technically ready, installing the appropriate plugins, and tweaking your payment settings. Once done, your customers can enjoy the convenience of Apple Pay at checkout.
Create your custom online store in minutes with 10Web AI Ecommerce Website Builder and take your business online. 
Looking to sell online?
Integrating Apple Pay using Stripe
By connecting your WooCommerce store with the Stripe payment gateway, you can easily offer Apple Pay as a payment option to your customers. This not only simplifies the checkout process but also provides a secure and fast payment method.
Creating a Stripe account
To start taking payments with Apple Pay, you’ll first need to create a Stripe account. Stripe will act as your payment gateway, processing credit card transactions securely.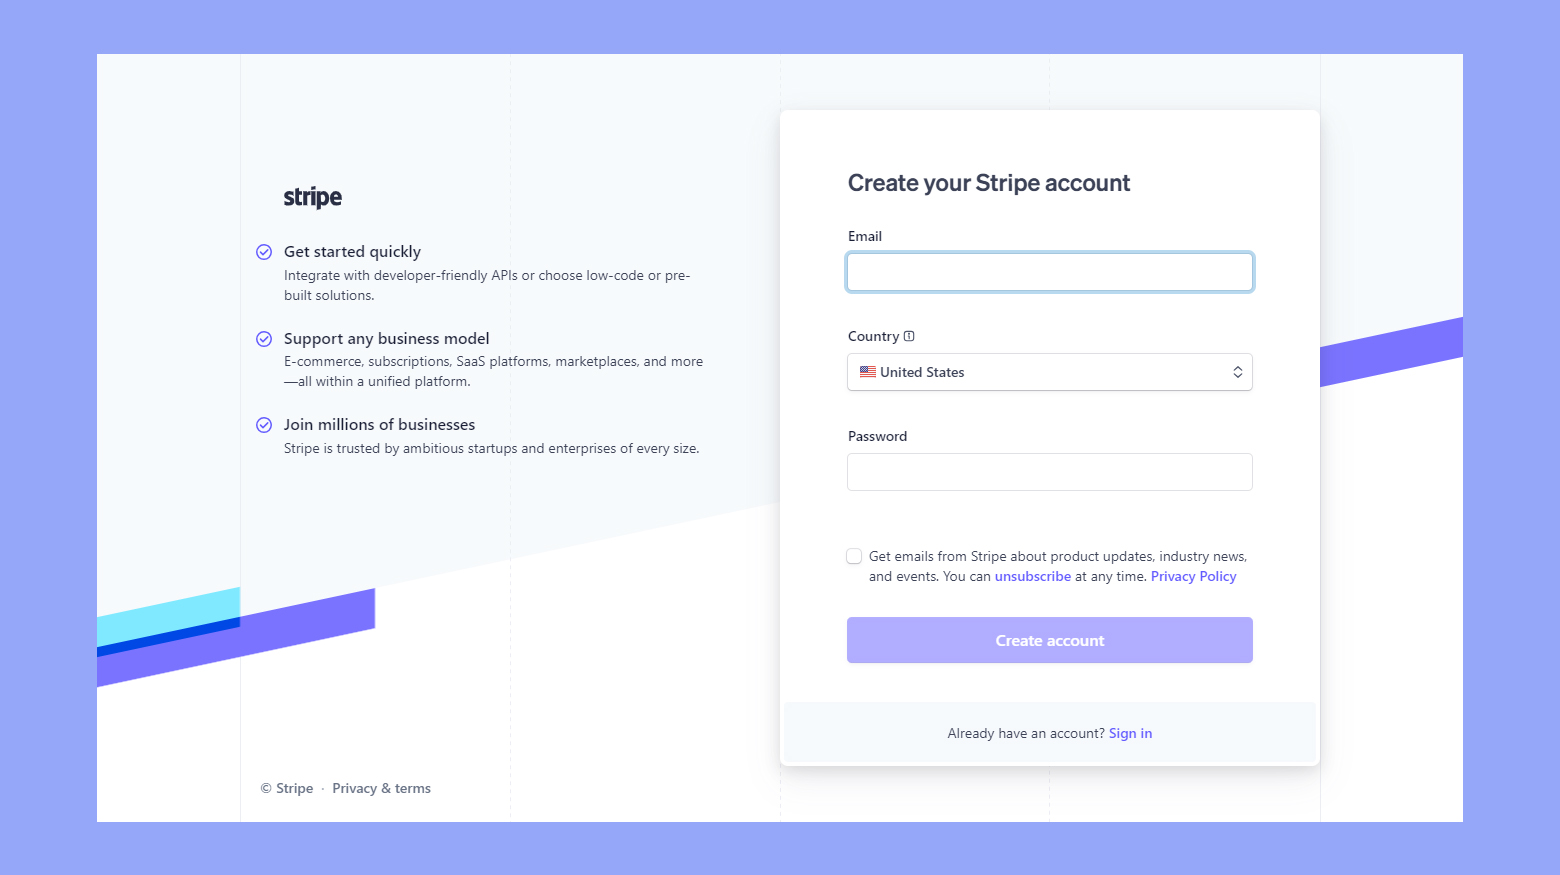
- Visit Stripe’s website and click on the Sign up button.
- Fill out the required information with details about your business.
- Verify your email address and complete the activation of your Stripe account.
Connecting Stripe to WooCommerce
After setting up your Stripe account, the next step is linking it to your WooCommerce store.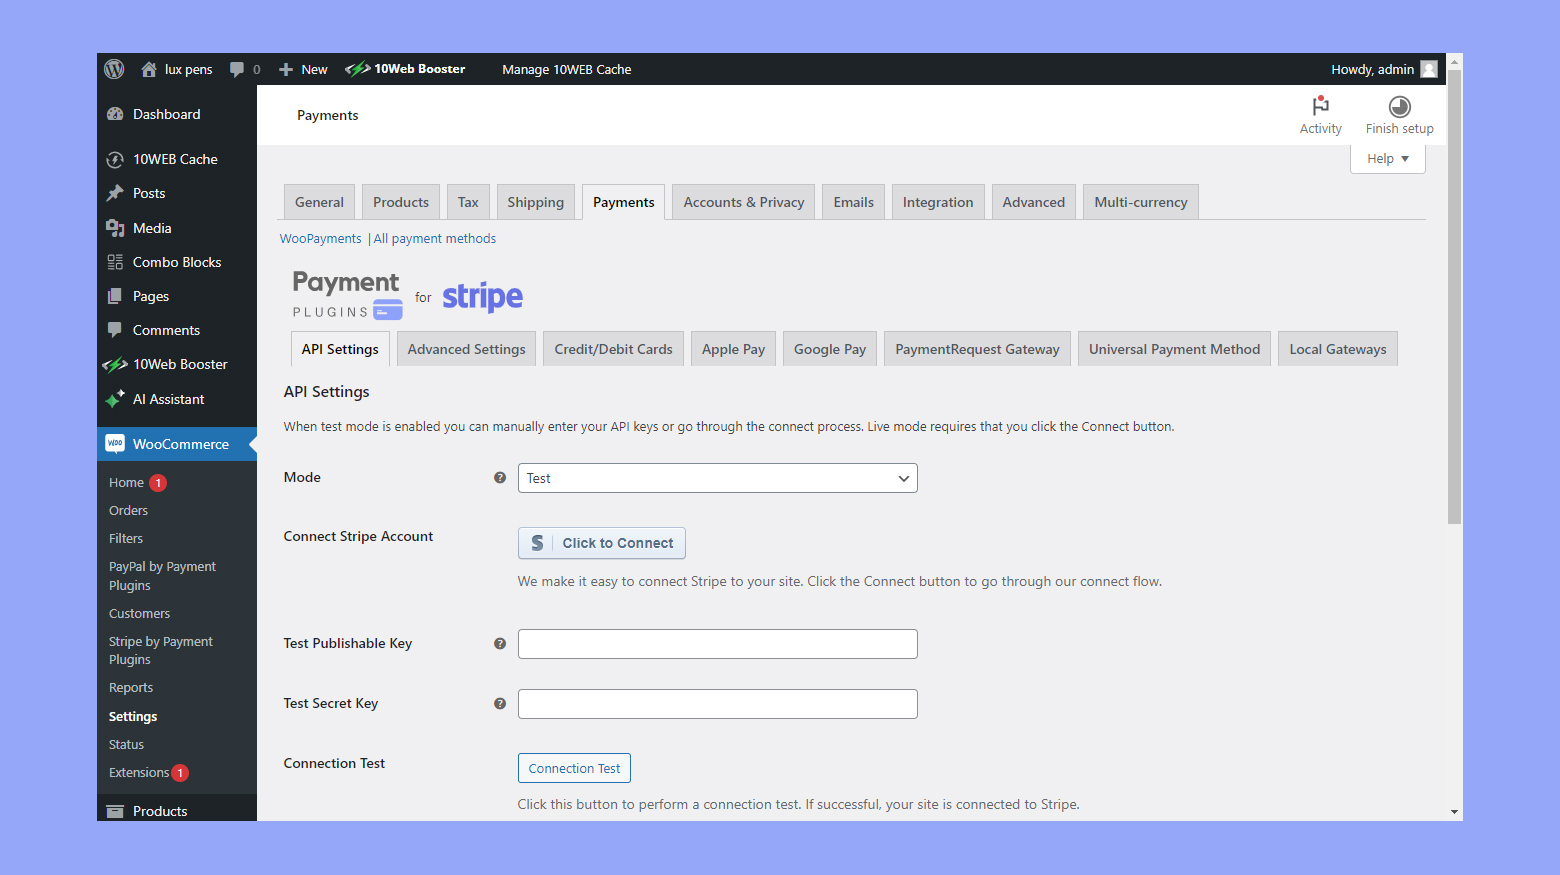
- Log in to your WooCommerce account and navigate to WooCommerce > Settings > Payments.
- Locate Stripe in the list of payment options and enable it by toggling the switch on.
- Enter your Stripe account keys obtained from your Stripe dashboard to connect your account. You can find these in the API section of Stripe.
Enabling Apple Pay in Stripe dashboard
With Stripe connected to WooCommerce, you can enable Apple Pay to allow shoppers to use it on your checkout page.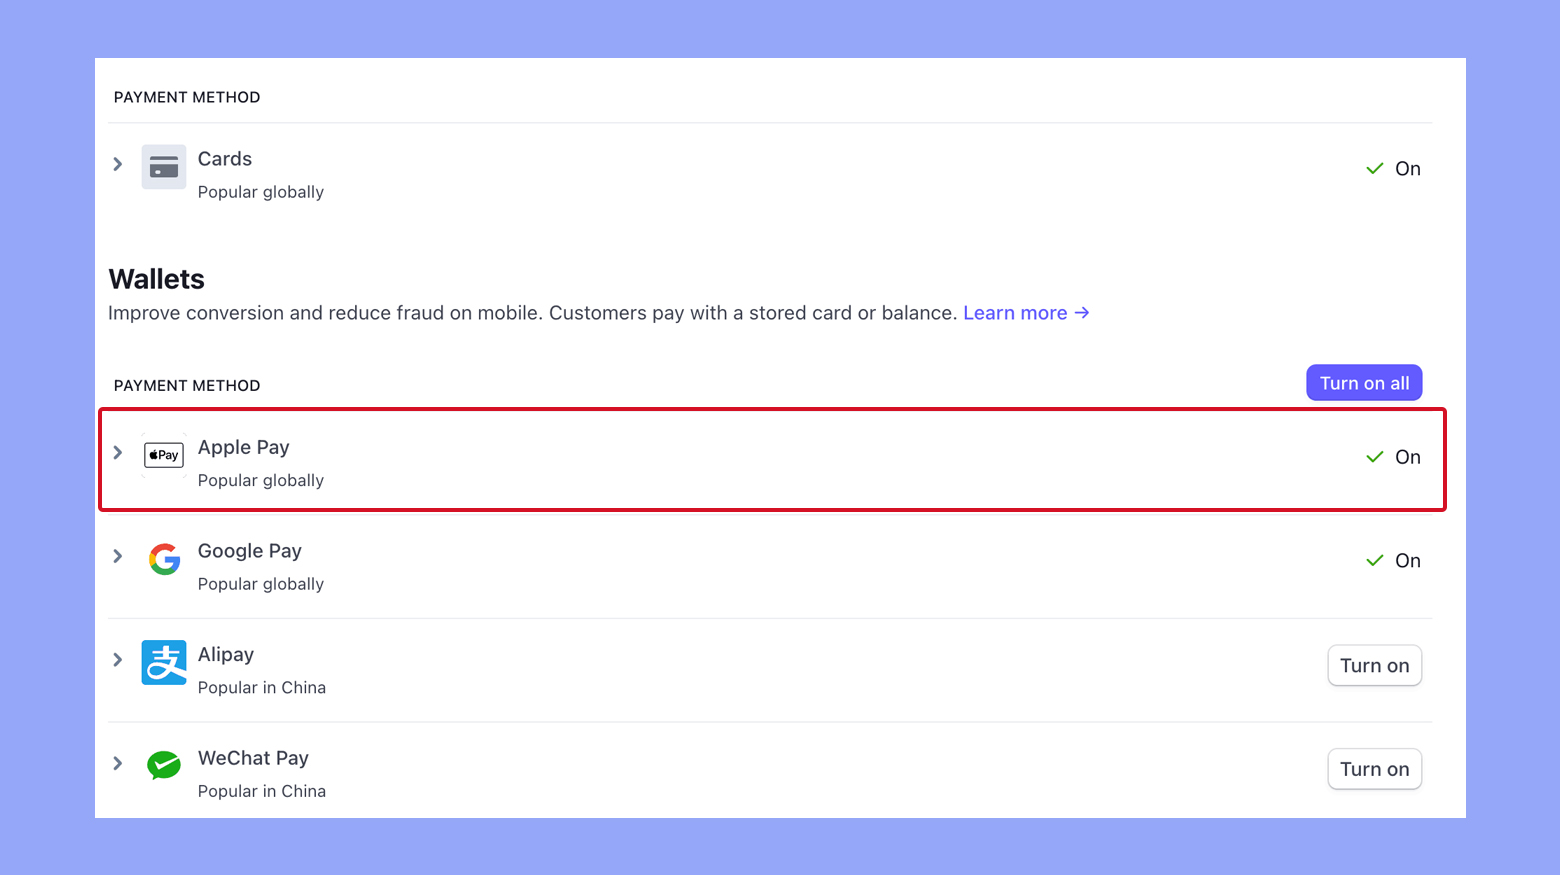
- Go to your Stripe dashboard and select Payments > Payment methods.
- Locate Apple Pay and activate it by switching the toggle to on.
- Add your domain to Stripe under Settings > Payment methods to register it for Apple Pay.
- Place the Apple Pay button on your site through the Stripe settings in WooCommerce to allow customers to see it during checkout.
By following these steps, you’re now ready to offer a smooth and highly secure checkout experience for your customers who prefer Apple Pay.
Enhancing the checkout experience
When integrating Apple Pay into your WooCommerce store, it’s important to focus on creating a smooth and personalized checkout experience for your customers. By customizing the Apple Pay button to match your store’s theme and optimizing your checkout page, you can make the payment process fast, easy, and enjoyable for users on supported devices.
Customizing Apple pay button
To align the Apple Pay button with your site’s aesthetics and enhance user recognition, follow these steps:
- Navigate to the WooCommerce > Settings > Payments section of your WordPress dashboard.
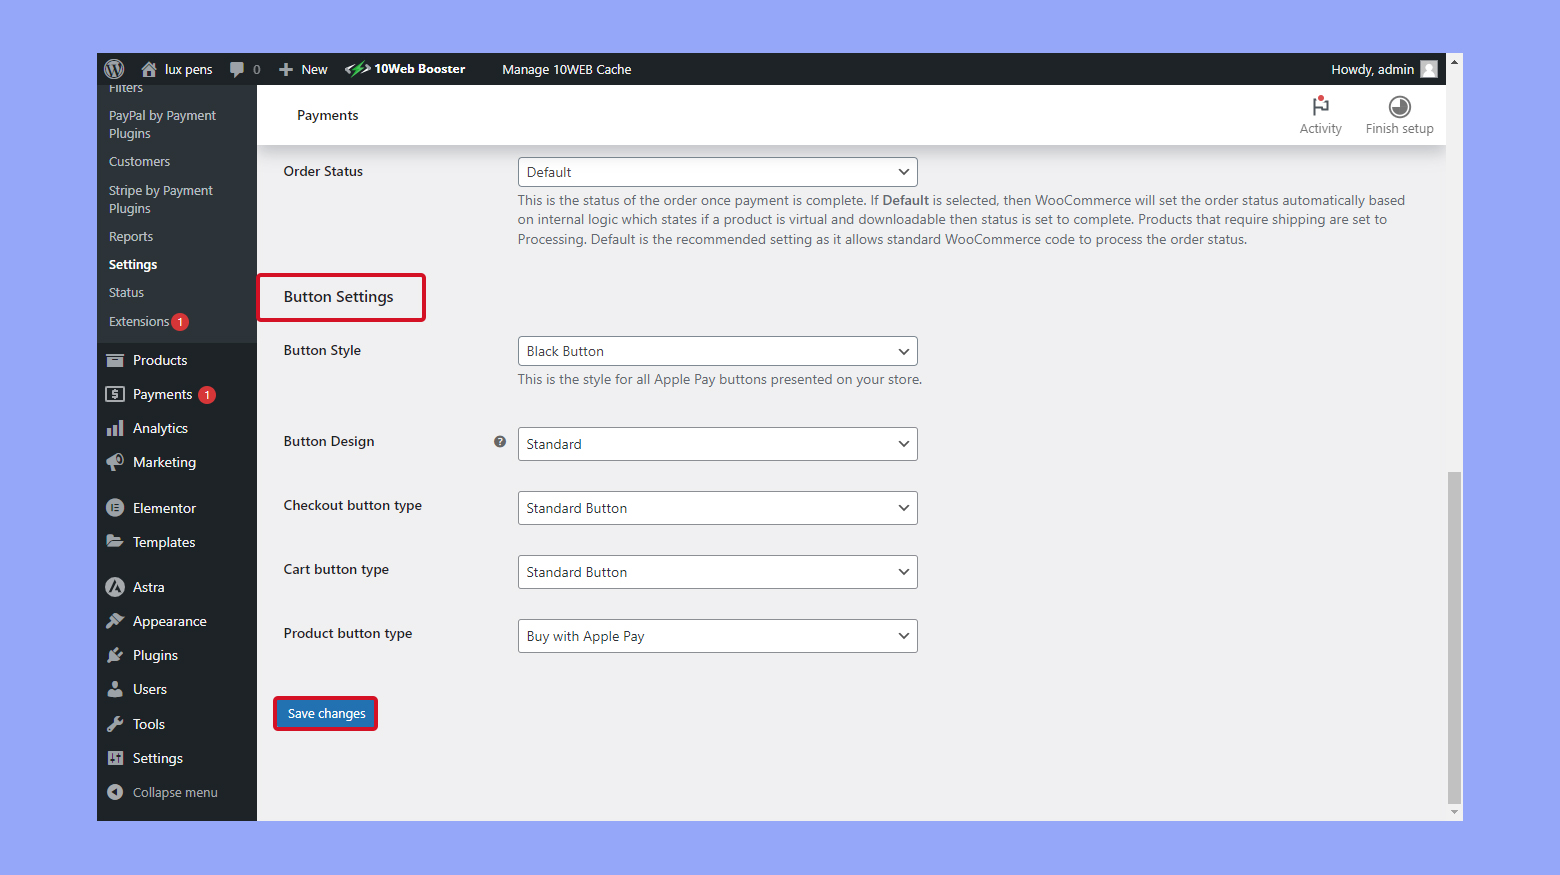
- Click on the Manage button next to the payment method you’re using to process Apple Pay, such as Stripe.
- Look for options to customize the Apple Pay button. Here you can often change the color and style to match your website’s design.
- Make your desired modifications to the button’s design and text.
Remember, consistency in your site’s look helps instill trust and recognition in your checkout process.
Optimizing checkout page
Optimizing your checkout page means fewer obstacles between your customers and completed purchases. Keep the following in mind:
- Supported device: Ensure that your checkout is responsive and functions well on all devices, especially since Apple Pay users will likely be on an iPhone or iPad.
- Checkout process: Streamline the process by removing unnecessary steps and fields that can be handled by Apple Pay, such as billing and shipping information.
- Payment methods: Clearly present Apple Pay as a prominent option along with other payment methods to provide a choice for your customers.
Taking the time to carefully customize and optimize these elements can lead to a more efficient checkout experience and potentially higher conversion rates.
Create your custom online store in minutes with 10Web AI Ecommerce Website Builder and take your business online.
Looking to sell online?
Testing and troubleshooting
Before your customers use Apple Pay on your WooCommerce site, it’s essential to thoroughly test the payment method to ensure a seamless checkout experience. Test transactions help identify any setup issues that could prevent successful payments.
Conducting transactions in test mode
Testing in Test Mode ensures that transaction processing works correctly without having to use real funds. Follow these steps to initiate a test transaction: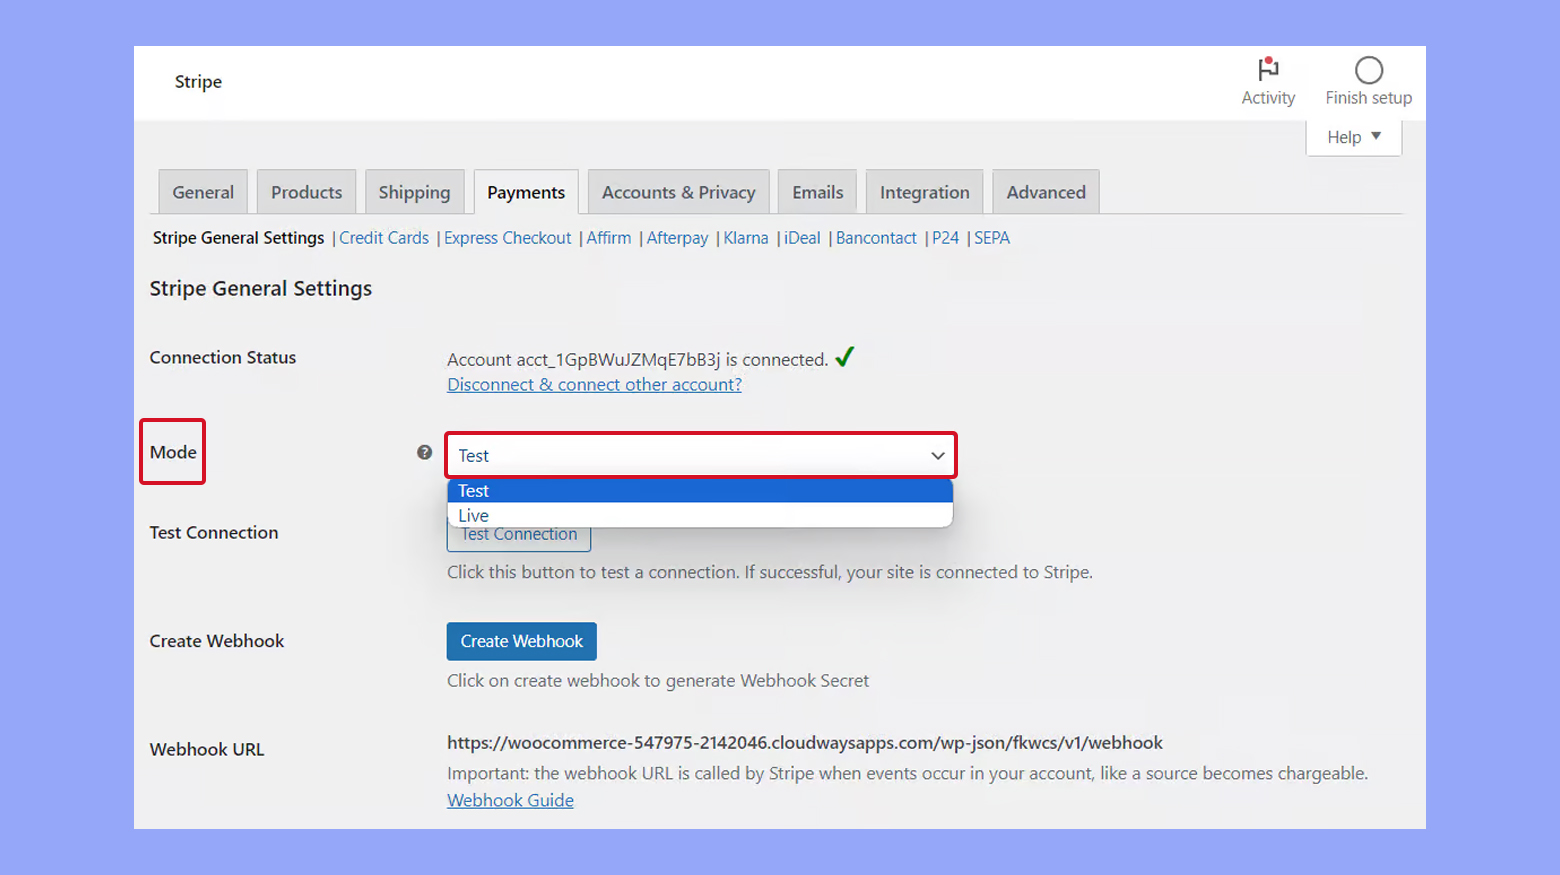
- Ensure Test Mode is enabled in your payment gateway settings. This option is typically found under WooCommerce > Settings > Payments.
- Conduct a test purchase by adding a product to your cart and proceeding to the checkout.
- Select Apple Pay as the payment method. This should display the Apple Pay button.
- Confirm the appearance of the Apple Pay button, and click to initiate the payment process.
- Authenticate the transaction using your Apple device to complete the test.
If the test transaction is successful, you’ll receive a confirmation, indicating that Apple Pay is correctly set up. If not, the troubleshooting process begins.
Identifying common issues
When facing issues with Apple Pay transactions, consider the following checklist to identify and solve common problems:
- Verify that Apple Pay is enabled in the Express Checkouts section of your payment settings. You should see an option to check for Apple Pay / Google Pay.
- Confirm the creation of a verification file on your site, required by Apple to confirm that you can offer Apple Pay.
- Double-check that your domain has been added to the Apple Pay section in your Stripe dashboard.
- Ensure that your server is configured to serve the verification file that Apple uses to authenticate your site’s ability to offer Apple Pay.
By addressing these issues, you can improve the likelihood of smooth and successful transactions via Apple Pay.
Going live and monitoring sales
After setting up Apple Pay, you’re ready to go live and start tracking your WooCommerce sales with precision.
Switching to live mode
To switch to live mode: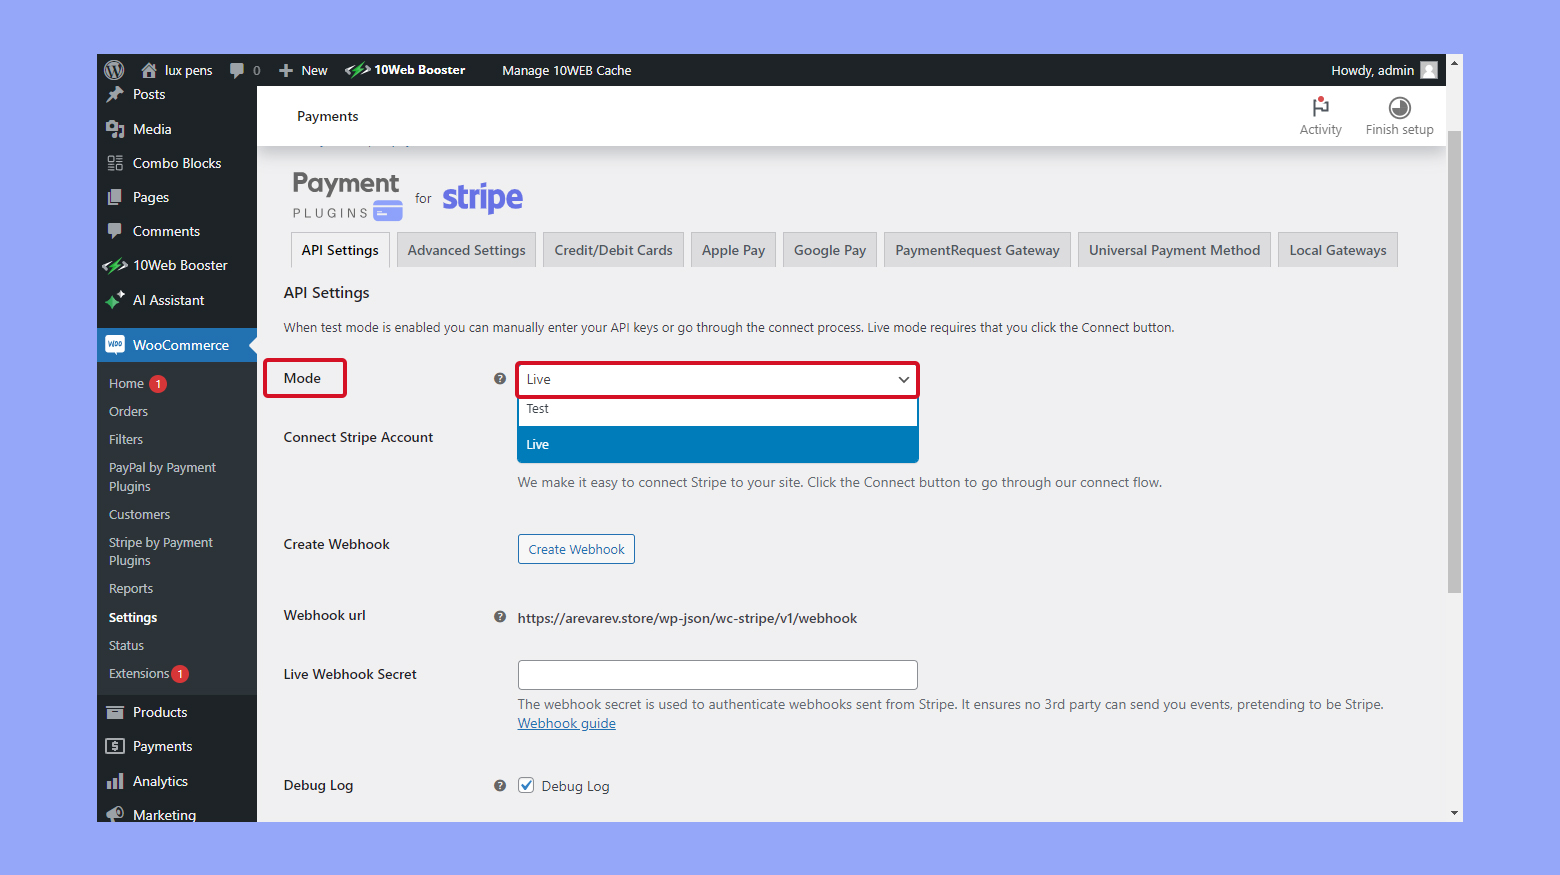
- Navigate to your WooCommerce > Settings > Payments.
- Locate the Stripe payment gateway and click on Manage.
- Within the Stripe settings, make sure Test Mode is disabled to accept real transactions.
- Scroll down and click on Save changes.
Your online store is now live and ready to process payments.
Understanding analytics and reports
WooCommerce provides various analytics and reporting tools to monitor your sales:
- Navigate to WooCommerce > Reports for a detailed breakdown of sales and conversions.
- Use the Orders tab to track purchases and payment processing in real-time.
- Look for the Customers tab to gain insights into customer behaviors and repeat purchases.
By leveraging these analytics, you can better understand your store’s performance and optimize for increased sales.
Conclusion
Integrating Apple Pay with WooCommerce can significantly enhance your checkout process, leading to higher conversion rates and a smoother customer experience. The setup involves ensuring compatibility with SSL, the correct WooCommerce version, and a live environment.
Testing transactions in test mode ensures everything works before going live. Monitoring sales with WooCommerce analytics helps you refine and optimize your store’s performance. By following these steps, you can offer a fast, secure, and efficient checkout experience for your customers.
Create your online store in minutes with 10Web AI Ecommerce Website Builder.Looking to sell online?
Create your online store in minutes


![]()