WordPress is the leading content management system which works great out of the box. However, it doesn’t mean that it doesn’t require speed optimization as many factors can slow down a site. To stay competitive, you need to speed up WordPress site.
After all, a faster site improves user experience and gives search engines positive SEO signals. So by optimizing your site, you can make it rank higher on Google.
That’s why, we have collected the best 31 tips to speed up your WordPress site. The guide covers both beginner and advanced tips. Let’s get started with our guide on how to speed up WordPress site.
FAQ
Do I have to speed up my WordPress constantly or once?
Do page builders slow down WordPress?
What is the fastest database for WordPress?
How do I optimize my WordPress database?
How do I clear my WordPress cache without plugins?
Can I use multiple speed optimization plugins?
Is there a speed plugin that does everything automatically?
How do I fix Core Web Vitals assessment failed WordPress?
How much does Core Web Vitals affect SEO?
Does WordPress automatically optimize images?
How do I optimize images for WordPress for free?
What is the best image optimization plugin?
Does using CDN speed up WordPress?
Why you need to speed up your WordPress site
Before we share the tips to improve WordPress site speed, let’s learn why it is essential to speed up your site.
According to Niel Patel’s analysis on loading time, 47% of the visitors expect the site to load within 2 seconds. In fact, 40% of the visitors will abandon the site if the loading time exceeds 3 seconds. Apart from an increased bounce rate, businesses can also see a revenue reduction (7% for every 1-second delay). WebsiteBuilderExpert also cites similar numbers with the added fact that almost half the number of visitors will never re-visit a slow site.
Furthermore, Google also focuses on sites that load fast. Their rule is to give sites better reach that focuses on positive user experience. So, if Google finds two sites with helpful content, it’ll rank the faster-loading site higher than the slower one. And that’s why every SERP (Search Engine Results Page) guide will tell you to improve your site speed.
Lastly, eCommerce sites should take extra care as online buyers are the most impatient. Online buyers want their sites to load as fast as possible. So, if you’re running eCommerce with WordPress, you need to ensure the fastest load times for the most profitability.
In short, website speed is important because:
- It improves user experience.
- It lowers the bounce rate.
- It helps your site rank higher on Google.
- It improves conversion rates.
- It helps build loyal customers.
Also, it is essential that your WordPress website is optimized for mobile devices.
Understanding Core Web Vitals for WordPress speed optimization
This section will take a closer look at Core Web Vitals. In May 2020, Google introduced a new way to capture page performance. It relied heavily on real-world usage data, which reflects in user experience.
If done right, it can directly impact user experience. For example, managing Core Web Vitals thresholds resulted in a 24% less likelihood of abandoning the site during page load. It also improved web conversion rate, increased page views, and advertising revenues. Moreover, it can also uplift domain rankings. You can read more Core Web Vitals statistics here: WPO Stats.
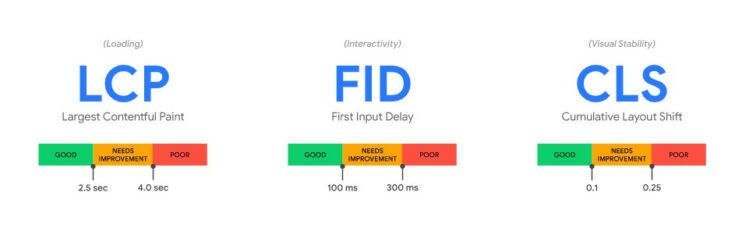
Core Web Vitals comprises three factors, which includes:
| Largest Contentful Paint (LCP) | The LCP calculates the time to load the most meaningful content on the page. In simple words, it affects the user’s perceived site loading. So, a lower LCP means a better user experience, which Google considers when ranking sites. |
| Cumulative Layout Shift (CLS) | The CLS aims to understand the site’s content stability during loading. Like LCP, CLS also requires a low score for better SERP results. A lower score means no to low layout shits, hinting at excellent user experience. |
| First Input Delay (FID | Lastly, we have FID. It calculates the time a user needs to wait before he can interact with anything on the page(such as clicking a link or button). |
WordPress completely supports Core Web Vitals. However, to measure it, you need to use tools such as Chrome DevTools or PageSpeed Insights.
![]()
Run a speed test
One more thing you need to do before starting to speed up WordPress site: Run a speed test. This gives you a clear perspective of where your site stands. Moreover, you can use the tools to check if you meet the standard speed optimization metrics.
We recommend checking out PageSpeed Insights, Pingdom, and GTmetrix. These tools are great and give you detailed reports on different aspects of site performance. Moreover, they also cover detailed Core Web Vitals report, waterfall report, and personalized site grade. If your WordPress is slow, then must run a speed test before proceeding further.
31 tips to speed up your WordPress website (From beginner to advanced)
Beginner tips to speed up WordPress website
1. Use fast and lightweight theme/framework
Theme selection plays a crucial role in your website speed. As WordPress is an open market, you’ll find themes from developers that approach theme designing differently. For example, good-looking themes are mostly unoptimized and result in poor loading time.
On the other hand, some themes offer too-many features that can bloat the theme and make it slow. However, you can always find fast themes that keep the server manageable. Examples include the Astra WordPress theme, the Neve WordPress theme, and the popular GeneratePress theme.
The best way to find a fast theme is to see its test results. We have done the most work for you in our 10 Fastest WordPress Themes Compared blog.
2. Use optimized WordPress plugins
WordPress is popular because it lets you add new features with plugin use. So, if you need to do something (like optimizing images), search for a suitable plugin, and you’re good to go. However, not all plugins follow development guidelines, resulting in poor code. Just like themes, developers need to optimize plugins to ensure optimal performance.
In most cases, the most popular plugins are optimized. But, to be sure, check their reviews out, especially on the WordPress plugin page. These reviews are located in the bottom right section (as shown in the image below).
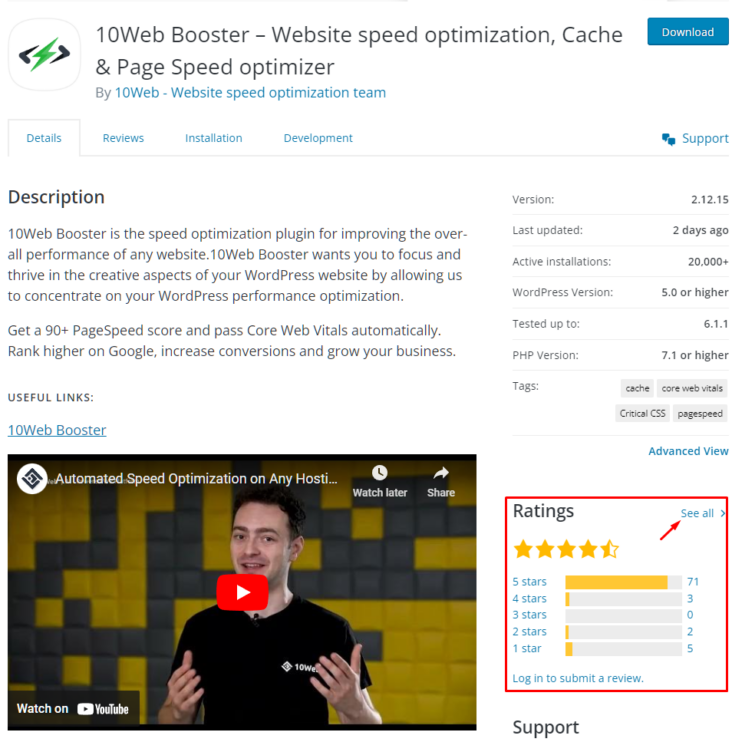
You can click “See all” to read the detailed plugin reviews.
3. Enable a content delivery network (CDN)
A CDN can help you to speed up your WordPress website. This is because it acts as an intermediary when serving visitors’ requests across the globe. But how does it achieve it?
CDN providers such as Cloudflare have several data centers across the globe. So, when you use a CDN with your website, the CDN stores a copy of your site. Next, when a visitor near a particular data center requests the site, the CDN serves it from there, removing the need to load it from the original server. A CDN substantially cuts down the load time, intending to serve the site from the nearest location. To find the right CDN for your website to can see our top picks.
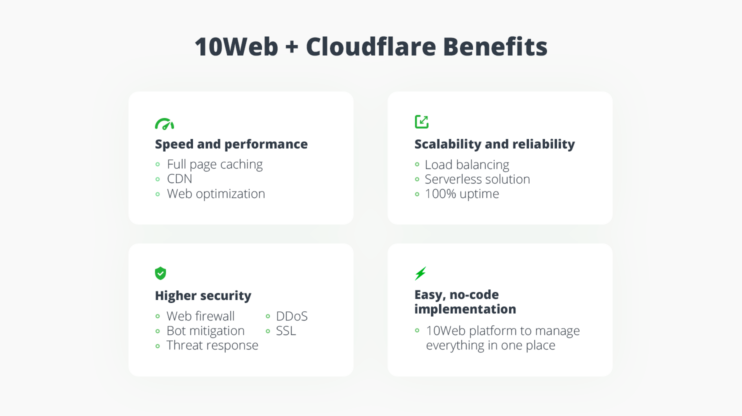
At 10Web, we know the importance of CDN. That’s why we recently partnered with Cloudflare, bringing Cloudflare enterprise integration to 10Web Booster. With 10Web Booster, most WordPress speedup optimization is done automatically, including enabling and using enterprise-ready Cloudflare CDN.
If you opt not to use CDN, you leave users far away from your server, vulnerable to slow site speeds.
4. Optimize images
Images constitute a significant part of any website, be it a blog or a business site. So, without any doubt, you need to optimize them, as unoptimized images can slow down your site.
You can approach image optimization in two ways. You can either manually optimize them or use an image optimization plugin to do the heavy lifting. The first approach takes time and is only advisable for a smaller project. However, automating image optimization can save you time and effort if you constantly add new content to your site (with images).
The WordPress marketplace offers some of the best image optimization plugins that compress images for WordPress. However, some notable ones include EWWW Image Optimizer, Imsanity, and ShortPixel Image Optimizer. These plugins specialize in one thing, i.e., making images size low so that it can speed up the WordPress site.
However, if you’re looking for a complete package, then 10Web Booster can help you achieve the same result. It performs image optimization by first converting images to WebP format (an ideal image format for the web). Next, it creates multiple copies of the image based on the need. So, when rendering, your site can access smaller images on small-screen devices. Moreover, it also implements lazy loading and uses Cloudflare’s Mirage optimization to load pictures on visitors’ devices optimally.
Want to speed up your website instantly?
Get 90+ PageSpeed Score automatically with 10Web Booster ⚡
On any hosting!
5. Use WebP instead of PNG or JPEG
PNG and JPEG work great on the web. Both offer good compression and ensure high-quality visuals for the visitors. However, if you want to go an extra step in saving size while not losing image quality, then you need to use WebP. This is because WebP lossless images are smaller than JPEG and PNG while offering similar image quality.
By switching to WebP, you can make considerable savings in page size, reducing loading times. In addition, you can use plugins such as Optimole and 10Web Booster to automate the process. Both plugins convert any JPEG and PNG automatically to WebP when uploaded.
6. Don’t upload videos directly to WordPress
Alongside images, videos let you interact with your audience, giving you another medium to connect and sell your services.
However, unlike images, you cannot upload videos to WordPress. That’s because video sizes are enormous and can take forever to stream to the client’s machine. It can also drastically slow down web pages, impacting user experience.
To ensure that it doesn’t happen to you, try to upload your video to Vimeo or YouTube. Once uploaded, you can embed the video to your site using the embed code.
7. Enable GZIP compression
Compression is an old computing technique that compresses data to save space. On the Web, it is known as GZIP compression. Compressing your site assets such as CSS, HTML and JavaScript can save precious size, resulting in improved site loading speed.
Enabling GZIP on WordPress is easy. All you need to do is copy-paste the following code into the .htaccess file.
AddOutputFilterByType DEFLATE text/plain
AddOutputFilterByType DEFLATE text/html
AddOutputFilterByType DEFLATE text/xml
AddOutputFilterByType DEFLATE text/css
AddOutputFilterByType DEFLATE application/xml
AddOutputFilterByType DEFLATE application/xhtml+xml
AddOutputFilterByType DEFLATE application/rss+xml
AddOutputFilterByType DEFLATE application/javascript
AddOutputFilterByType DEFLATE application/x-javascript
However, if you’re not comfortable with code, you can use 10Web Booster to do it for you.
8. Get a Good WordPress Hosting
Your site speed optimization process starts with the choice of WordPress hosting. In the era of high competition, almost every second hosting provider claims to be the “best.” Also, new business starters may get deceived with tacky hosting marketing claims of “unlimited.”
Here, this hosting, while providing a low-tier shared hosting, claims to offer you unlimited space, bandwidth, and emails. And, if you choose them, you end up with poor site loading speed and lower than industry-standard 99% uptime.
For starters, shared hosting might be a great pick. However, dedicated or managed WordPress hosting goes a long way for most businesses. There are many options in the market, including SiteGround, Kinsta, and BlueHost. These host providers have dedicated infrastructure and optimization techniques to serve websites faster, saving anywhere between 500-600ms of loading time.
So, how do you pick the right hosting to speed up WordPress site? Well, you need to read online hosting reviews and see how each performs. Then, try to compare different hosting and see their pros and cons. Finally, if you find a fast hosting provider, get the package suitable for you.
We at 10Web take managed WordPress hosting to another level. Our Automated WordPress Hosting, powered by Google Cloud, gives startups powerful hosting. Moreover, we optimize speed with automation, ensuring a 90+ PageSpeed Score. 10Web Automated Hosting Features
9. Cleanup WordPress database
WordPress database works to improve accessibility rather than speed. For example, it’ll store your old content drafts so you can use them later. However, in reality, you don’t need drafts for published posts. Moreover, databases can also contain other unnecessary data such as fake users, spam comments, outdated database records, etc.
To maximize site performance and speed up WordPress site, you need to schedule regular database optimizations and cleanup. As your database remains clean and optimized, servers can work fast, ensuring faster user requests. There are many excellent WordPress database plugins you can use. We recommend checking out WP-Optimize and Advanced Database Cleaner. If you want to read more about Database cleanup and optimization, check out: WordPress Database Optimization Guide which can help you have WordPress clean database for optimal performance.
10. Uninstall and delete unused plugins and themes
A well-optimized WordPress site must also get rid of unused plugins and themes. These unused plugins and themes add junk code to WordPress. The real threat is that they can contain security vulnerabilities, which can impact website performance.
Moreover, when the server backups up the site, it creates copies of unused copies, creating larger backups than necessary. So during the backup process, the server has to spend more resources, slowing its performance.
The best approach is to manually go through the process of removing unused plugins and themes. However, you can also automate the process by using Zapier or IFTT web services.
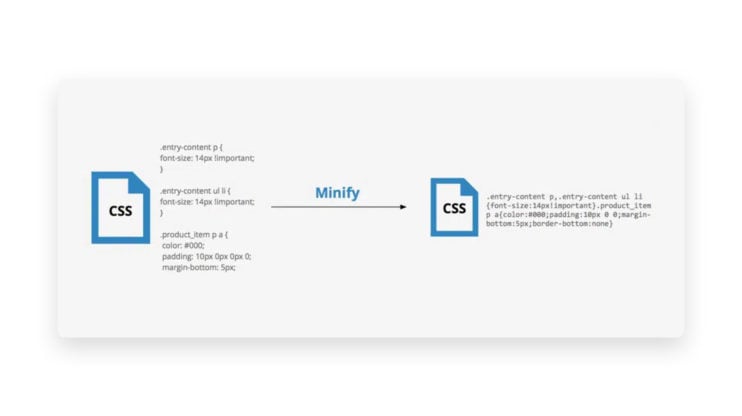
11. Minify HTML, CSS and JavaScript
One of the most common tricks to speed up WordPress sites is to minify HTML, CSS, and JS files. All code contains spaces, comments, and linebreaks. This improves code readability for developers and web admins. However, machines don’t need this luxury.
With minification, any unnecessary characters are removed, reducing file size drastically. It also improves asset transfer during visitors’ requests. Moreover, Web browsers can render the website faster as it doesn’t have to process any unnecessary characters. Overall, you optimize WordPress speed by minifying your WordPress site code.
12. Lazyload images
If your blog post or page has tons of images, you can use the lazy loading technique to load the webpage faster. This technique allows the browser to load images on the user’s browser window as the remaining photos are loaded as the user scrolls down. Therefore, it drastically improves user experience by mimicking faster load times. Technically, it also enhances Core Web Vitals’ Largest Contentful Paint metric.
Also, implementing a lazy load is easy. All you need to do is use a lazy loading plugin such as 10Web Booster, which automates the process. Other well-known lazy load plugins include Rocket Lazy Load and a3 Lazy Load.
Want to speed up your website instantly?
Get 90+ PageSpeed Score automatically with 10Web Booster ⚡
On any hosting!
13. Paginate or limit comments per page
A comment section opens up a place for your community to share their thoughts. However, a high number of comments can hinder page loading. Therefore, limiting comments per page using pagination is always a good idea to ensure optimal page performance.
To enable it, you need to go to the WordPress dashboard. From there, select Settings >> Discussion. You’ll find the option of “Break comments into pages.” Enable it, and put the number of comments you want to display on each page.

14. Disable trackbacks and pingbacks
Another nifty way to speed up WordPress site is to disable trackbacks and pingbacks. These are WordPress ways to alert if any external site links to your site. It tells marketers how the content performs and gets notified when the site gets backlinks. However, it can slow the website as they use server resources and open your site to spammers and DDoS attacks.
You can disable pingbacks and trackbacks by going to Settings >> Discussion, located in the dashboard. Here, uncheck the first two options, and you’re set.

15. Limit external scripts
Websites rely on external scripts to run properly. This is because a web server cannot store everything your site needs. For example, you might need a Google Font to display on your site or use third-party tools and plugins such as Google analytics. Even though external scripts let you add valuable features to your site, having too many of them can slow down your site.
To make your site as fast as possible, try to limit them. However, there are many ways you can circumvent them. For example, you can load the Google font directly from your server, removing any external calls.
16. Limit redirects
Redirects ensure that your site doesn’t get hit by a 404 error. By keeping the error away, you can provide a good user experience. However, it also brings in load time. Basically, the more redirects the page/post has, the more time it’ll take to load. That’s why it is advisable to avoid multiple redirects or keep them to a minimum.
The best way to ensure minimum redirects is to plan early. If you’re sure of what you want on your site, you can avoid significant changes, preventing the issue of high-number redirects.
17. Update WordPress core, plugins, and themes
As a WordPress administrator, you need to monitor updates constantly. WordPress Core, themes, and plugins are frequently updated every few weeks. These updates are majorly focused on features but also fix bugs and performance. In short, you must always keep everything updated to ensure that your website runs without problems.
You can automate the update process using a managed hosting provider such as 10Web Hosting.
WordPress hosting that's fully automated
Host on 10Web's high performance infrastructure and enjoy all the benefits of a secure Google Cloud Partner hosting and website building with AI.
 No credit card required
18. Use WordPress cache plugin
A WordPress cache plugin can help you further speed up your WordPress site. It eliminates the need to compile your site every time a visitor sends a request to the server. Instead, it creates a cached site version that it can serve to the visitor. This way, the server doesn’t have to process requests every time, saving precious server resources.
You can use any of the best WordPress caching plugins, including WP Rocket, WP Super Cache, and W3 Total Cache. If you want a fully automated approach, you can also give 10Web Booster a try.
19. Improve website design to perform better
In the last decade, designers have been focused on creating simpler designs. They not only look good but also capture the user’s attention. However, what makes them more impressive is that simple design loads quickly as they rely on fewer resources.
The best approach is to think forward and use a simple, minimalistic website design. If you already have an established website, then you can plan to move to a simple design, improving performance and user experience.
20. Break down longer posts into multiple parts
To further speed up your WordPress site, you can publish long-form posts into multiple posts. Long-form posts are extensive guides that contain valuable information for the user. They also perform better on Google. However, on some occasions, it is worth breaking them into multiple parts for improved page performance.
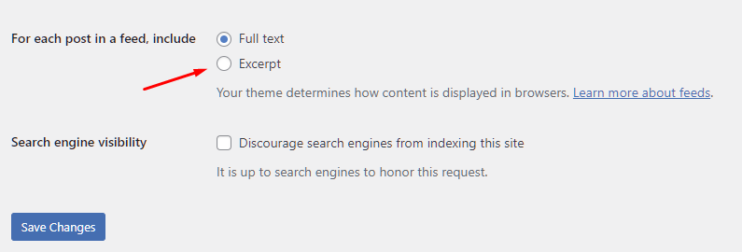
21. Use excerpts on homepage
Not all WordPress themes use experts on the homepage. Instead, they showcase the full post content. This can be ideal for a few blog types or businesses but can directly impact performance.
For showcasing excerpts on the homepage, you need to go to Settings >> Reading. From there, select “Summary” under “For each article in a feed.”
Advanced tips to speed up WordPress website
22. Ensure PHP version Is not outdated
PHP (Hypertext Preprocessor) is at the core of WordPress. It runs on the server side and carries out different tasks required to run a site successfully. Over the years, PHP has seen many updates, including the latest PHP 8.1. The last major update, PHP 7, took place in 2015.
All these updates bring a plethora of features, including significant performance improvements. And that’s why you should update the PHP version to the latest.
It is best to ask your hosting provider to handle the PHP version update. If you’re self-hosting, you can follow online guides or ask a PHP developer to do the update for you.
23. Reduce post revisions
WordPress has provisions to store previous WordPress posts. Doing so enables users to restore to the previous post versions as needed.
That’s a great feature! However, it can also lead to database clutter, reducing its performance. Right now, there is no limit on the number of post revisions. It is best to disable post revisions or limit them per post. This way, your website doesn’t suffer from overloading the database with unnecessary information
To change post revisions per post, open up wp-config.php. It is located in your site’s root folder. Now, copy-paste the code below at the end of the file.
define( 'WP_POST_REVISIONS', 3 );
Here, we configured the post-revisions feature to save three revisions. To completely turn off post revisions, set the number to 0.
24. Schedule background tasks based on rraffic intensity
You may have scheduled background tasks to manage your website as a webmaster. It can be updates, security checks, backups and running regular intervals. However, these tasks can impact server performance, resulting in high website load time.
To speed up WordPress site, running these tasks during low-traffic periods is best. This way, you prevent your server from overloading while ensuring optimal performance when needed. Also, use a traffic analysis tool to know when your site gets low traffic and use the information to schedule tasks accordingly.
25. Reduce database calls
Any theme or plugin makes database calls. However, the quality and number of these database calls depend entirely on the developers. As a result, you’ll now find more poorly coded themes than good ones. These poorly coded themes fail to follow WordPress standard practices, such as making too many database calls or direct database calls. This can impact performance as the server is kept busy with unnecessary calls.
The solution to this is to use an optimized theme. However, if you’re an advanced user, you can optimize your theme’s code, especially when using a child theme.
26. Disable content leaching
Content leaching or hot linking occurs when a website links to your content directly rather than hosting on its own. This way, they can leach your content without worrying about any cost or performance hit on their server. Moreover, your server needs to serve these requests, making it slow.
You can prevent hotlinking in many ways, including using a CDN that offers hotlink protection, adding code to the .htaccess file, disabling right-click functionality, and adding watermarks to your images.
The code to disable hotlinking is below. Just copy-paste the code below on your .htaccess file; it’ll stop anyone from leaching your content.
RewriteEngine on
RewriteCond %{HTTP_REFERER} !^$
RewriteCond %{HTTP_REFERER} !^http://(www\.)example.com/.*$ [NC]
RewriteRule \.(gif|jpg|jpeg|bmp|zip|rar|mp3|flv|swf|xml|php|png|css|pdf)$ - [F]
Note: Make sure to change example.com to your domain.
Despite these measures, if you find someone hotlinking, proceed and issue a Digital Millennium Copyright Act (DMCA) notice. You can also block the offender’s IP address to prevent them from accessing your site.
27. Implement a DNS Level Website Firewall
Using a DNS-level website firewall helps you protect your site from malicious actors. In general, these firewalls are fine-tuned to block brute-force attacks. However, these attacks, while trying to gain access to the site, also impact server performance and can lead to Distributed Denial-of-service(DDoS) attacks.
Using DNS-level website firewalls such as Cloudflare or Sucuri can help protect your site from malicious actors and even try these attacks. In fact, 10Web offers support for CloudFlare.
Want to speed up your website instantly?
Get 90+ PageSpeed Score automatically with 10Web Booster ⚡
On any hosting!
28. Manually fix HTTPS/SSL errors
You’ll find mixed content errors when you convert HTTP to HTTPS/SSL. These errors can affect SEO and user experience. To fix these issues, you can use the Really Simple SSL plugin. However, it can cost your site performance as the plugin first catches all URLs and then convert them to HTTPS.
To ensure that you don’t take a performance hit, it is advisable you manually fix all affected URLs.
29. 404 page should be light-weight
Many businesses may create fancy 404 pages to attract the audience. However, a fancy 404 page is not a good idea for performance as they are resource intensive. That’s why it is best to create a minimalistic 404 page that is easy to load and doesn’t give the server a lot of queries to process.
30. Leverage browser caching
Our last advanced tip to speed up the WordPress site is leveraging browser caching. It works similarly to CDN, where you cache your site on remote locations to serve to close visitors. This improves performance. In browser cache, the browser creates a cache when it first visits the site. For example, it can store static elements such as CSS, JavaScript, and even HTML on the local browser cache.
So, the next time the visitors load the site, it requires fewer network connections, resulting in faster website loading time. You can enable browser caching using WordPress plugins such as W3 Total Cache. There are also other browser cache-specific plugins, such as Cache Enabler.
However, if you don’t want to use a plugin, you can also enable browser caching by adding the code in the .htaccess file.
## Leverage Browser Caching in WordPress via .htaccess ##
<IfModule mod_expires.c>
    FileETag MTime Size
    AddOutputFilterByType DEFLATE text/plain text/html text/xml text/css application/xml application/xhtml+xml application/rss+xml application/javascript application/x-javascript
    ExpiresActive On
    ExpiresByType text/html "access 600 seconds"
    ExpiresByType application/xhtml+xml "access 600 seconds"
    ExpiresByType text/css "access 1 month"
    ExpiresByType text/javascript "access 1 month"
    ExpiresByType text/x-javascript "access 1 month"
    ExpiresByType application/javascript "access 1 month"
    ExpiresByType application/x-javascript "access 1 month"
    ExpiresByType application/x-shockwave-flash "access 1 month"
    ExpiresByType application/pdf "access 1 month"
    ExpiresByType image/x-icon "access 1 year"
    ExpiresByType image/jpg "access 1 year"
    ExpiresByType image/jpeg "access 1 year"
    ExpiresByType image/png "access 1 year"
    ExpiresByType image/gif "access 1 year"
    ExpiresDefault "access 1 month"
</IfModule>
## Leverage Browser Caching in WordPress via .htaccess ##
Bonus tip: Use 10Web Booster
By now, it should be clear that optimizing your website for speed requires effort. Beginner and advanced tips to maximize WordPress speed need effort and time to implement. However, we ensured that you didn’t have to do everything manually.
Our 10Web Booster plugin is an automation-powered WordPress solution that takes care of most of these tips. In fact, it can help you cover Core Web Vitals and give you an automated 90+ PageSpeed score with the help of industry-leading Cloudflare Enterprise CDN.
To get started, you need to enable the 10Web Booster plugin and activate the plugin. You may also need to update DNS to use Cloudflare enterprise, giving you unparalleled security and performance.
Currently, the 10Web Booster plugin automates the following aspects:
- JS minification and compression
- HTML and CSS minification and compression
- iFrame and video lazyload
- Image lazyload
- Critical CSS use
- Page and resource cache
- Full website caching
- Image optimization
- Converting image format to WebP
- Optimized font delivery
- Contain-specific image resizing
- Remove or delay non-critical third-party JS
You can get started for free with 10Web Booster which includes homepage optimization and 5 more pages. We also offer 10Web Booster Pro, which offers full website optimization and CDN.
Conclusion
Well, that leads us to the end of our 31 tips to speed up WordPress site. By following all these tips, you can make your WordPress site fast. We recommend starting with beginner tips to see how far you go. The advanced tips require some technical and coding skills. These need patience and skill to implement.
However, if you want an easy and automated solution to WordPress speed optimization, check out 10Web Booster. It’s free.
Want to speed up your website instantly?
Get 90+ PageSpeed Score automatically with 10Web Booster ⚡
On any hosting!


![Featured image for 5 Best WordPress Image Optimizers in 2023 [Comparison] article](https://10web.io/blog/wp-content/uploads/sites/2/2023/05/image-optimizers-742x416.png)