Learning how to change the default shop page in WooCommerce can enhance your online store’s functionality and aesthetics.
This guide explains the necessary steps to customize the default shop page, offering various methods, from using WordPress settings to advanced customizations. Tailoring your shop page can improve user experience and reflect your brand identity.

Looking to sell online?
Create your custom online store in minutes with 10Web AI Ecommerce Website Builder and take your business online.
FAQ
How to choose a shop page in WooCommerce?
- Go to your WordPress dashboard.
- Navigate to WooCommerce > Settings.
- Click on the Products tab.
- Under Shop pages, select the desired page from the Shop Page dropdown menu.
- Click Save changes.
How do I make the shop page the homepage in WooCommerce?
- Go to your WordPress dashboard.
- Navigate to Settings > Reading.
- Under Your homepage displays, select A static page.
- Choose your shop page from the Homepage dropdown menu.
- Click Save changes.
What is the default page in WooCommerce?
The default page in WooCommerce is the Shop page. It displays all your products and is typically created automatically when WooCommerce is installed.
How do I create a custom shop page in WordPress?
- Go to your WordPress dashboard.
- Navigate to Pages > Add New.
- Create a new page and add your desired content and design elements.
- Use shortcodes or custom templates to display products.
Why can't I edit my WooCommerce shop page with Elementor?
Elementor doesn’t support direct editing of the WooCommerce default shop page. To edit a shop page with Elementor:
- Create a new page and design it with Elementor.
- Use Elementor’s WooCommerce widgets to add product elements.
- Use the new edited shop page as your normal shop page.
Alternatively, you can use Elementor Pro, which offers more advanced WooCommerce editing capabilities.
How do I change my shop URL in WordPress?
- Go to WooCommerce > Settings.
- Click on the Products tab.
- Under Shop pages, select the new page from the Shop Page dropdown menu.
- Click Save changes.
- (Optional) Redirect old URL to new URL:
- Install a redirection plugin like “Redirection” from the WordPress plugin repository.
- Set up a redirect from the old shop URL to the new shop URL to ensure users and search engines are directed correctly.
Understanding the WooCommerce default pages
When you set up WooCommerce, it automatically creates specific pages that are essential for your online store to operate smoothly.
- Shop: This is your main storefront, where products are displayed. No additional content is needed on this page, as it serves as a product archive.
- Cart: Features the WooCommerce Cart Block and shows current cart contents.
- Checkout: Contains WooCommerce Checkout Block, presenting shipping and payment options.
- My Account: Utilizes the [woocommerce_my_account] shortcode to show customer-related information like orders and account details.
- Terms and Conditions: Though not mandatory, it is strongly advised to have this for customer checkout agreement.
How to change the default shop page in WooCommerce settings
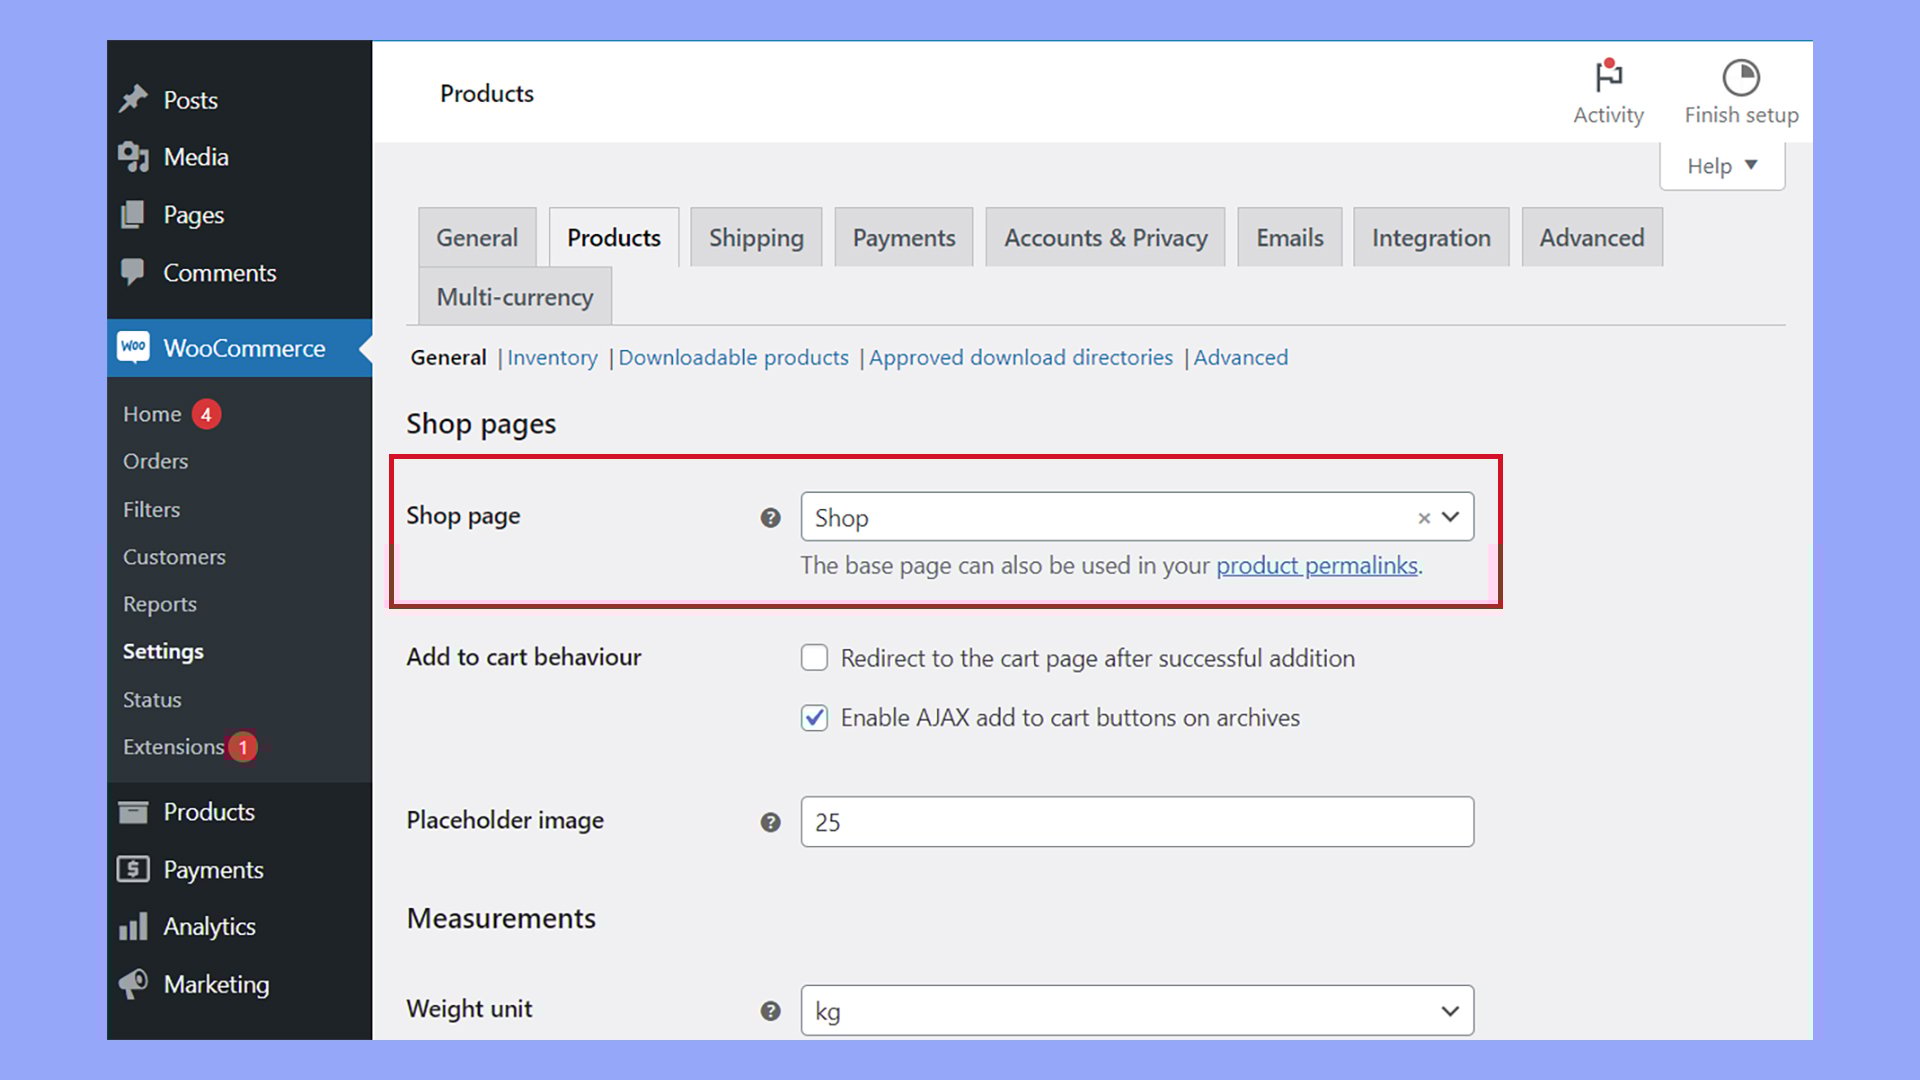
To change the default shop page, navigate to WooCommerce > Settings > Products.
Here, you can select a new page from the Shop Page dropdown to replace the default shop page. Remember, this just instructs WooCommerce to display shop content on the chosen page.
Understanding the WooCommerce shop page
The shop page is unique because it’s an archive template, which is not directly editable. It’s a PHP file that produces dynamic shop content and functions differently from typical WordPress pages.
This setup ensures a consistent display of your products, no matter what theme or customizations you apply. Even though you can’t edit the shop page directly, you can change the default shop page’s layout, design, and overall appearance.
Methods to change the default shop page in WooCommerce
Different methods to edit the default shop page include:
- Custom coding: Create a custom shop template file if you are comfortable with HTML, CSS, PHP, and coding.
- WordPress Customizer: Some settings can be adjusted via the WordPress Customizer to modify shop page aspects.
- Block editor: Use blocks to create a new page layout.
- Page builder: Utilize a page builder to craft a new product archive template or a custom shop page.
- Ecommerce themes: Some WooCommerce-compatible themes come with their own settings to edit the shop page.
- Plugins: There are plugins available that allow you to customize the shop page without coding.
Changing the default shop page in WooCommerce settings
To change your default shop page in WooCommerce, you’ll need to access your WooCommerce settings from the WordPress dashboard.
The process is straightforward and involves a few clicks within the WooCommerce settings panel.
Here are the steps you should follow:
- Log in to your WordPress dashboard.
- In the sidebar menu, hover over WooCommerce and click on Settings.
- Navigate to the Products tab located near the top of the settings page.
- Within the Products settings, you will find a drop-down menu next to Shop page. Click on this drop-down to see a list of all your pages.
- Select the page you want to set as your new default shop page from this drop-down menu.
- After selecting your new shop page, click the Save changes button at the bottom to apply your new settings.
Selecting a different page as your shop page changes its slug, and this page will now serve as the main product archive, displaying your shop’s items.
Any existing content on the new shop page will be overridden by your normal shop page content.
How to change the default shop page’s appearance
The WooCommerce Shop page serves as your virtual storefront, and customizing it can both reflect your brand and enhance your customers’ shopping experience.
Fortunately, even though changing the shop page in WooCommerce’s settings doesn’t change the default shop page content, there are several methods to tailor your shop’s layout, content, and features.
WordPress Customizer
To change the appearance of your default shop page using the Customizer:
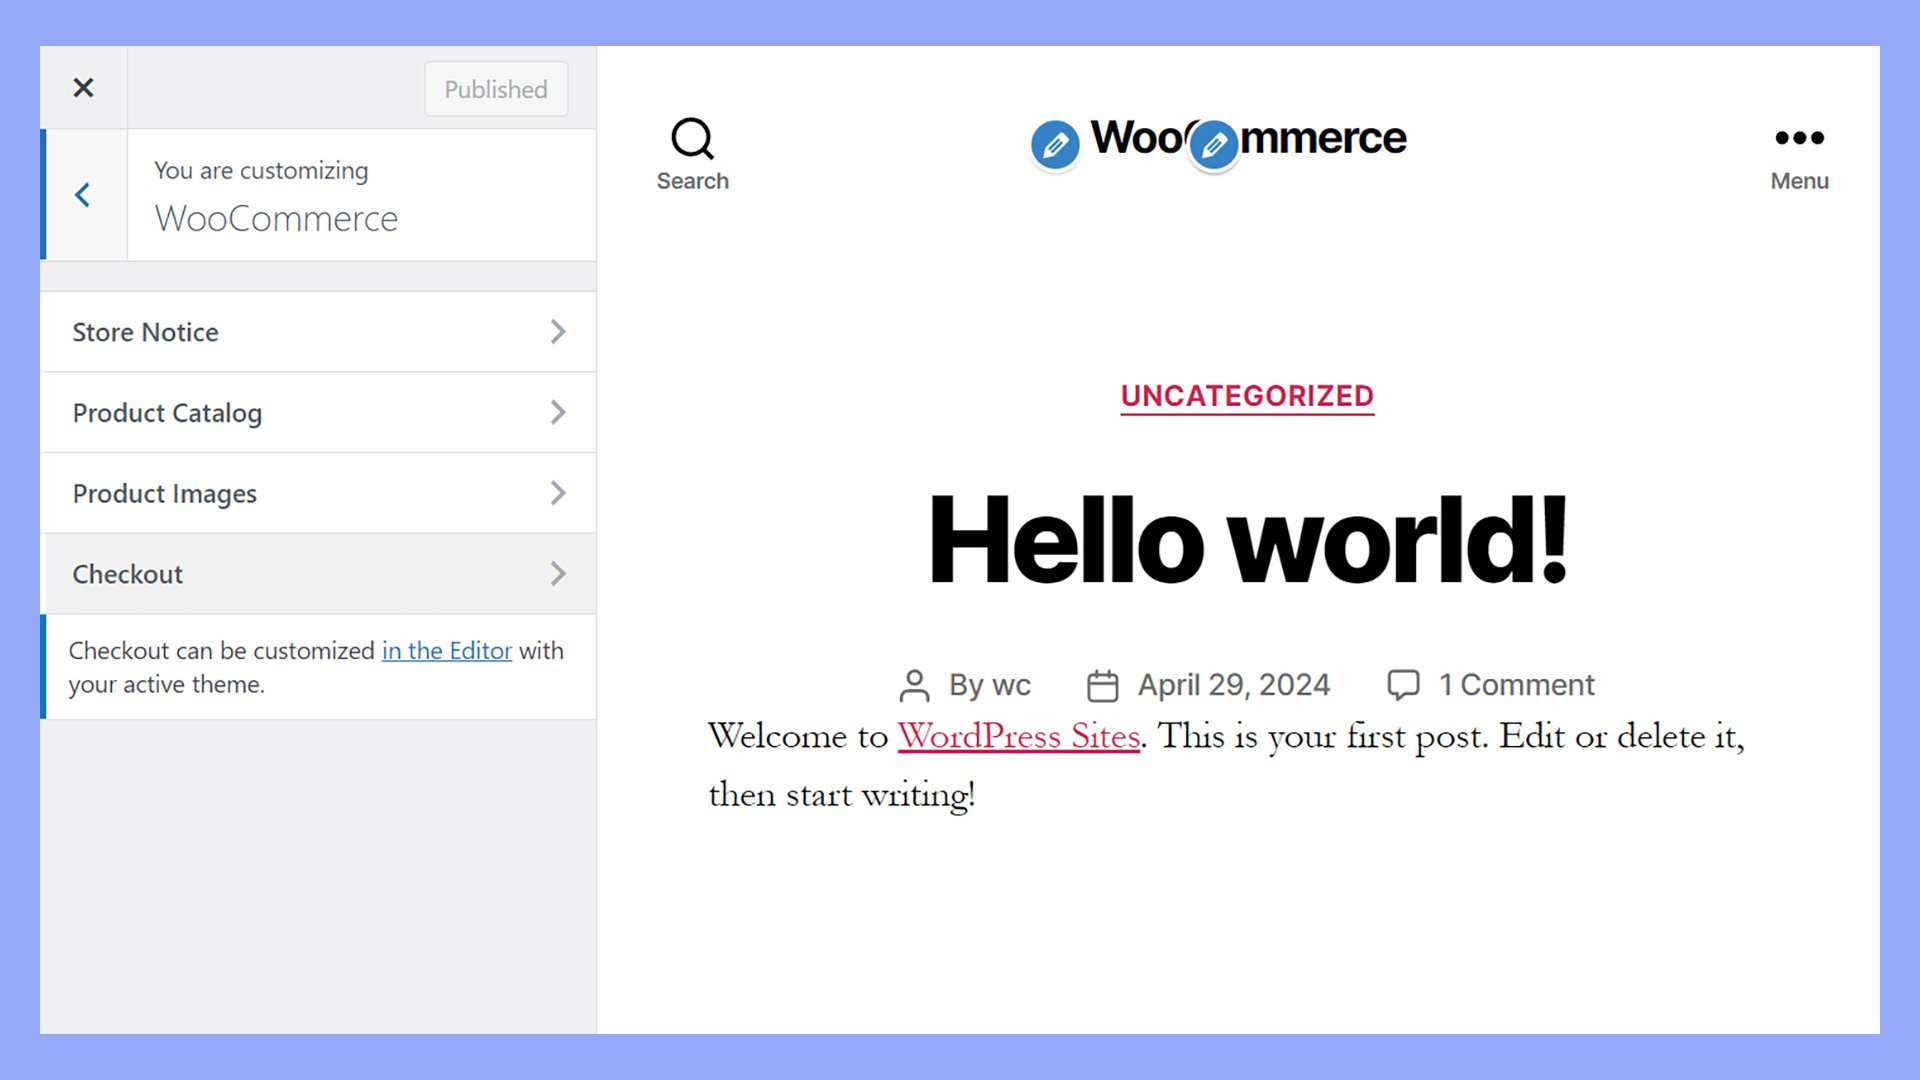
- Navigate to Appearance → Customize.

- Click on the WooCommerce section to expand it.
- Here you can tweak various options like Store Notice, Product Catalog, and Product Images.
- Adjust settings such as how products are displayed, image sizes, and the default sorting order.

Using CSS for visual tweaks
Changing the visual elements of your shop page can make it stand out. Use CSS customizations to alter style, color, and font:
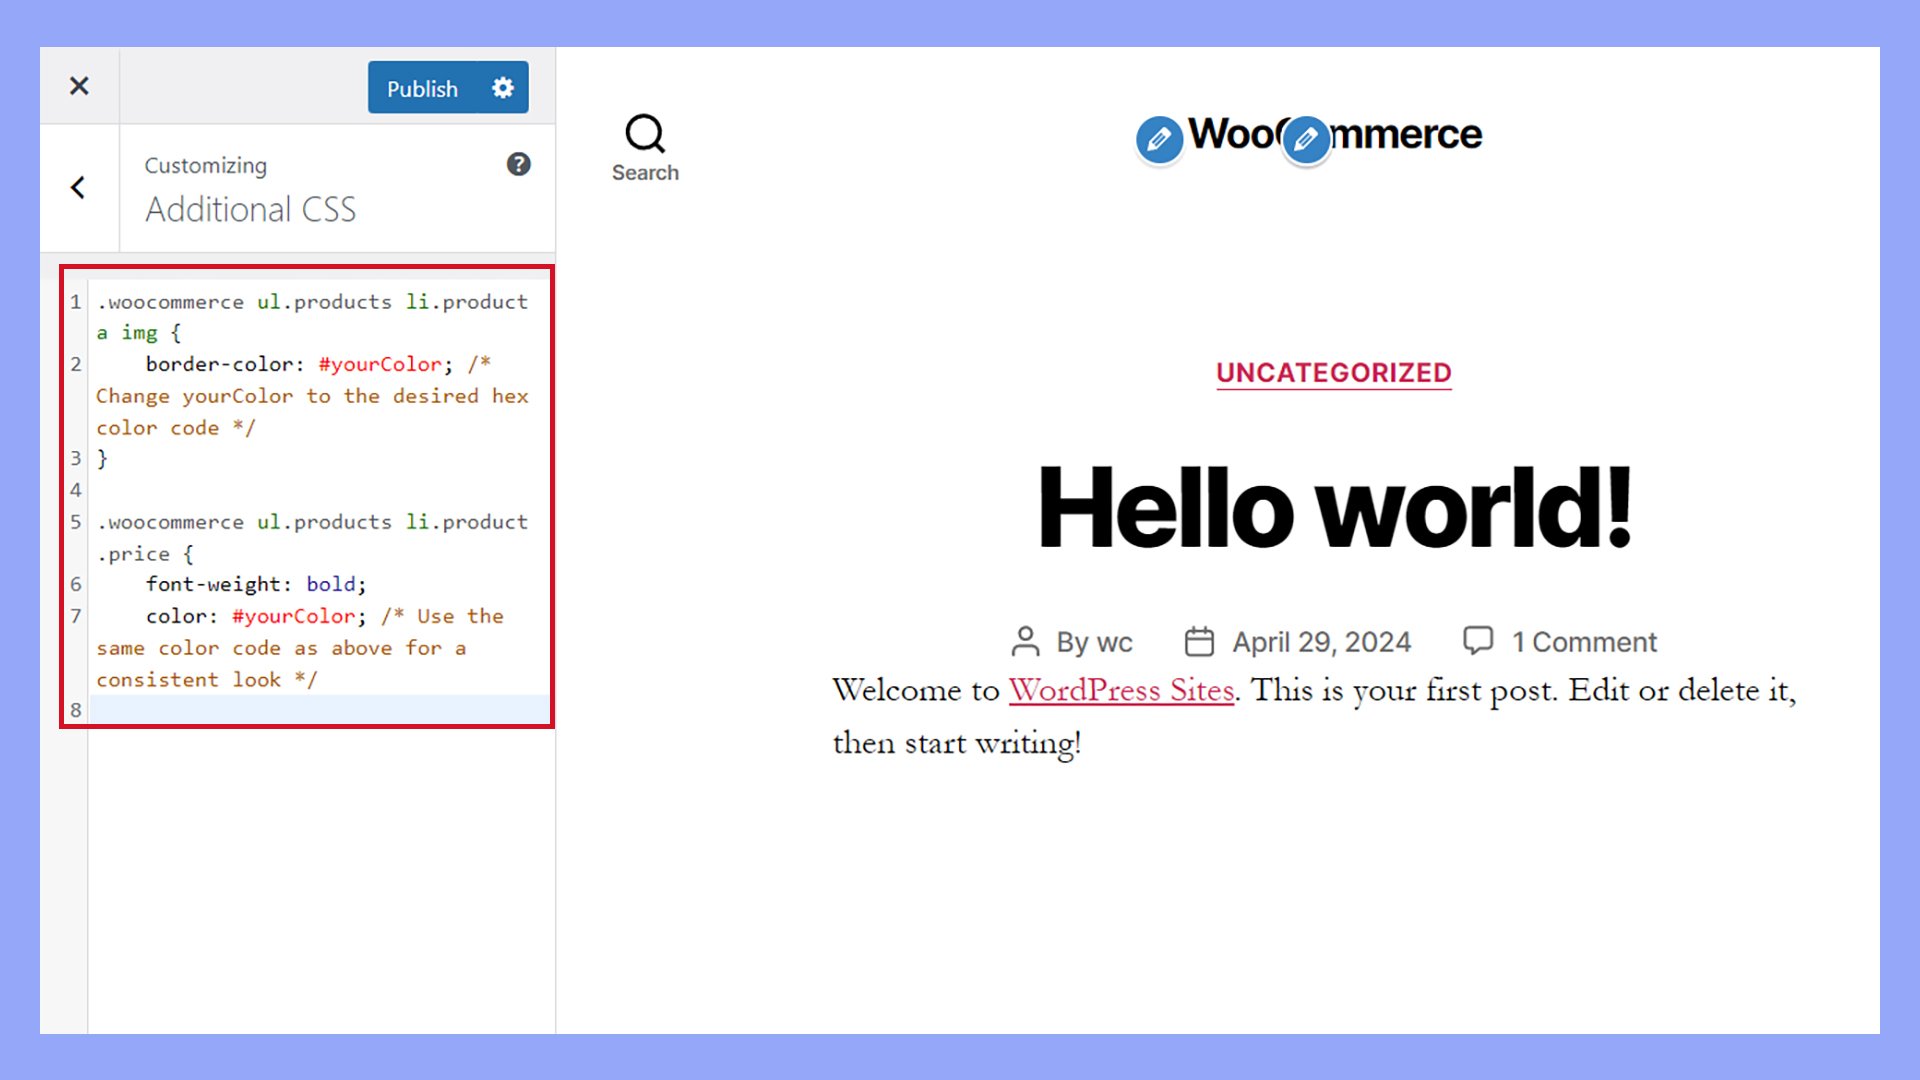
- Navigate to Appearance > Customize in your WordPress dashboard.
- Open the Additional CSS section.
- Here, you can add your custom CSS rules. For example:
/* Change the background color of all product titles */ .woocommerce-loop-product__title { background-color: #eaeaea; color: #333; font-family: 'Helvetica', sans-serif; } - Click the Publish button to apply your changes.
With CSS, you can ensure that your shop page’s visual appeal aligns with your brand’s identity. This will offer a consistent and enjoyable experience for your shoppers.
Changing the shop page with an ecommerce theme
Choosing one of the many available ecommerce-focused themes can open a wealth of options to customize the store’s appearance.
For instance, using the Astra theme’s options:
- Go to Appearance → Customize.
- Choose the Global or WooCommerce section, depending on your theme.
- Modify product catalog settings, including layout, sidebar options, and grid settings.

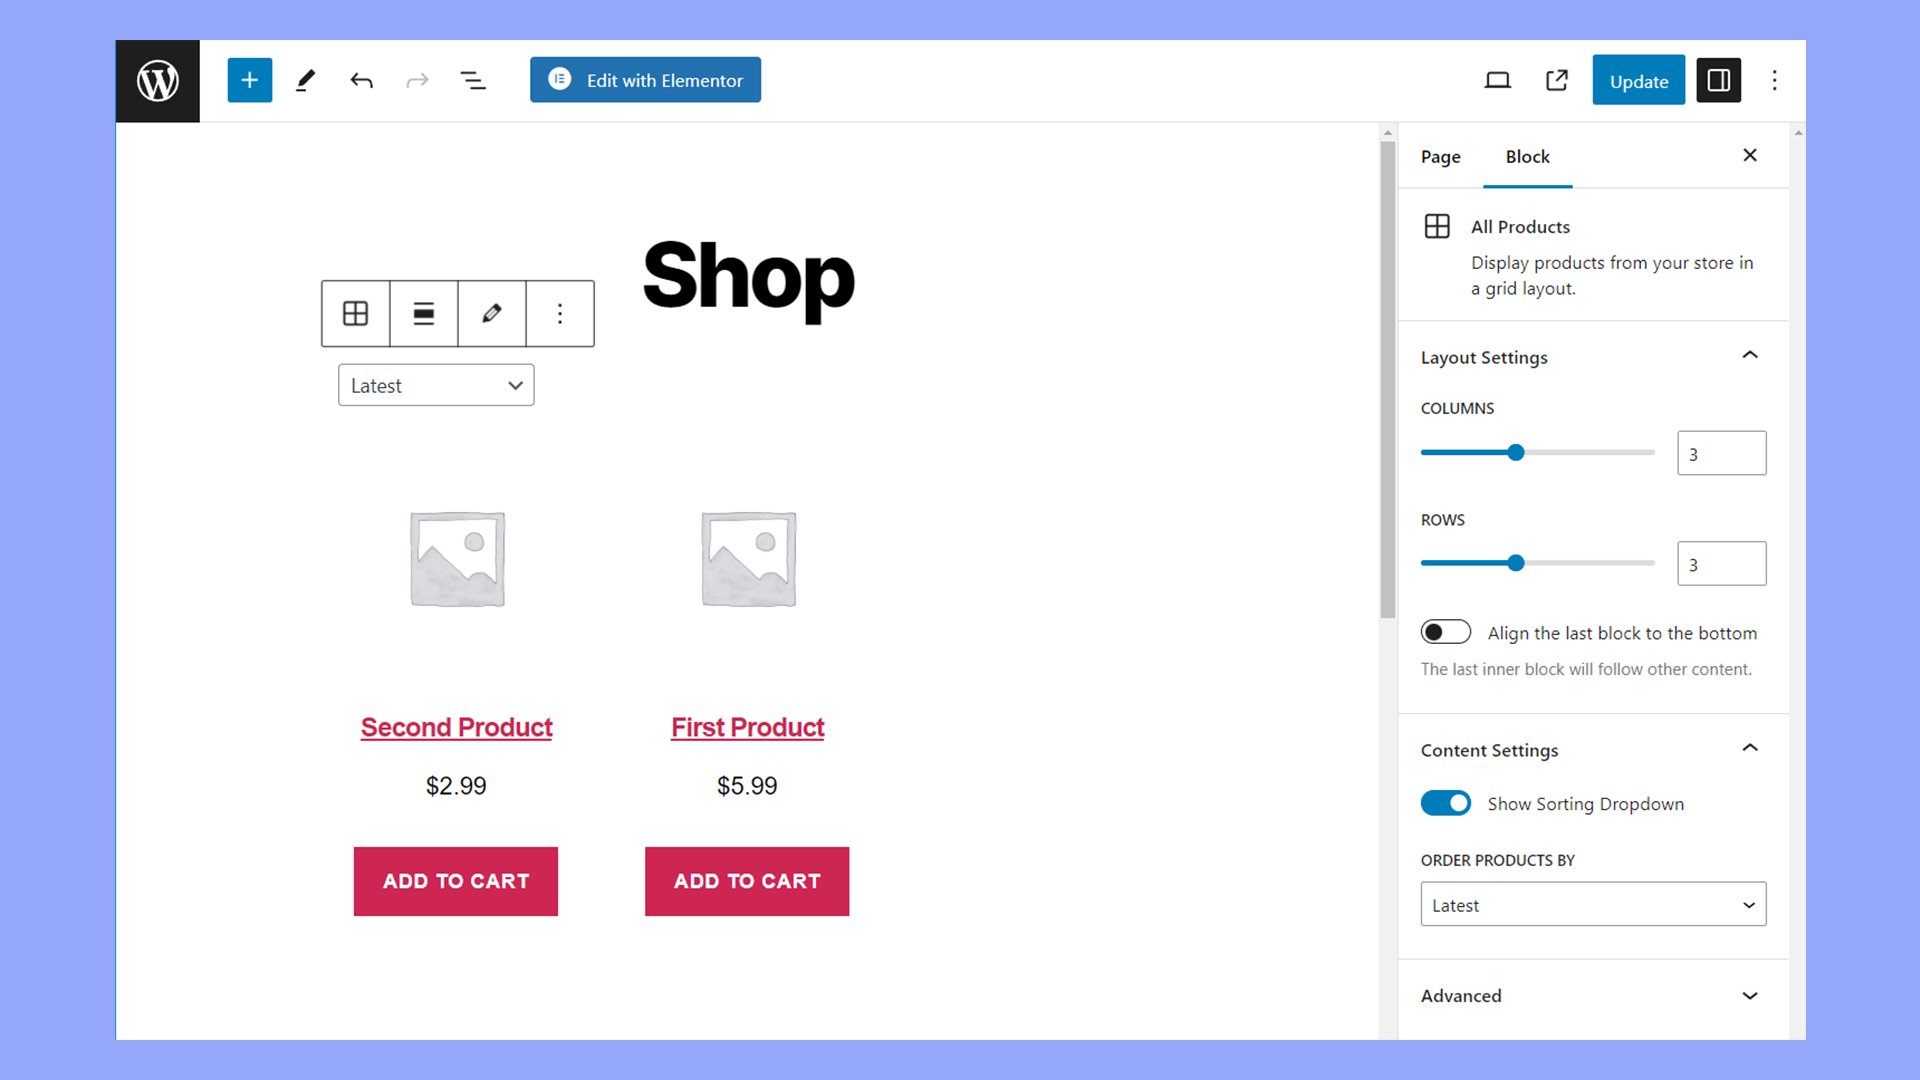
Building a new shop page in the block editor with blocks and shortcodes
You can use the various WooCommerce blocks available in the block editor to design a custom shop page.
To design a new shop page with the block editor:
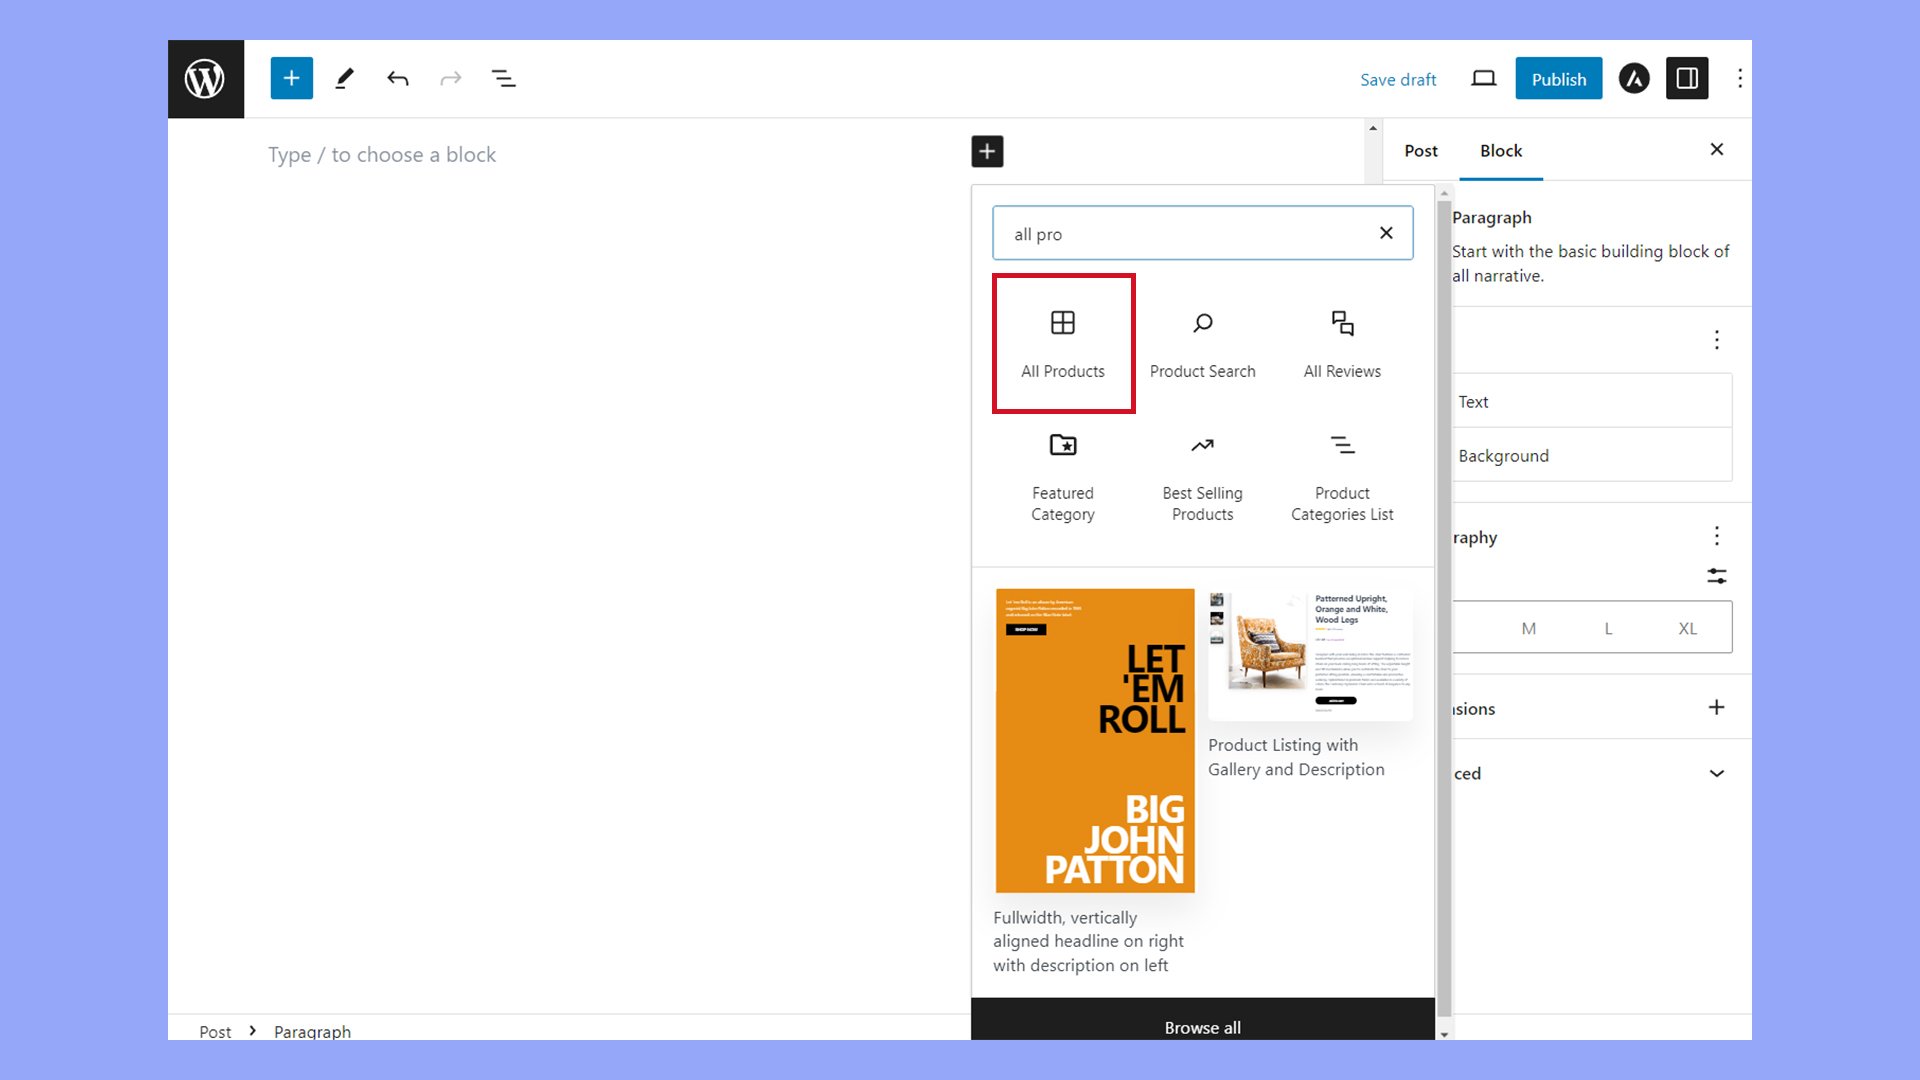
- Navigate to the Pages section, then click Add New.
- Use blocks such as Products, Featured Products, or Categories to add and arrange your items.
- Integrate WooCommerce shortcodes with the Shortcode block if specific customizations are needed.
WooCommerce depends on its default pages to function correctly. If you decide to create a new page that serves as a shop page, you may want to consider redirecting the old shop page URL.
Why redirect the WooCommerce shop page?
Before diving into the how-to, it’s important to understand the reasons behind redirecting your WooCommerce shop page:
- Improved user experience: Directing users to a more relevant or updated page can enhance their browsing experience.
- SEO benefits: Proper redirection ensures that search engines recognize the new URL, preserving your SEO rankings.
- Website restructuring: As you revamp your site, redirecting helps maintain site integrity and prevents broken links.
- Promotions and campaigns: Redirecting to a promotional page can boost sales during special campaigns.
Steps to redirect the WooCommerce shop page
To redirect the old WooCommerce shop page to a new URL, you can use a plugin or modify your site’s code. Below, we’ll explore both methods.
Method 1: Using a plugin
Plugins are the easiest way to set up redirects without touching any code. Here’s how you can do it:
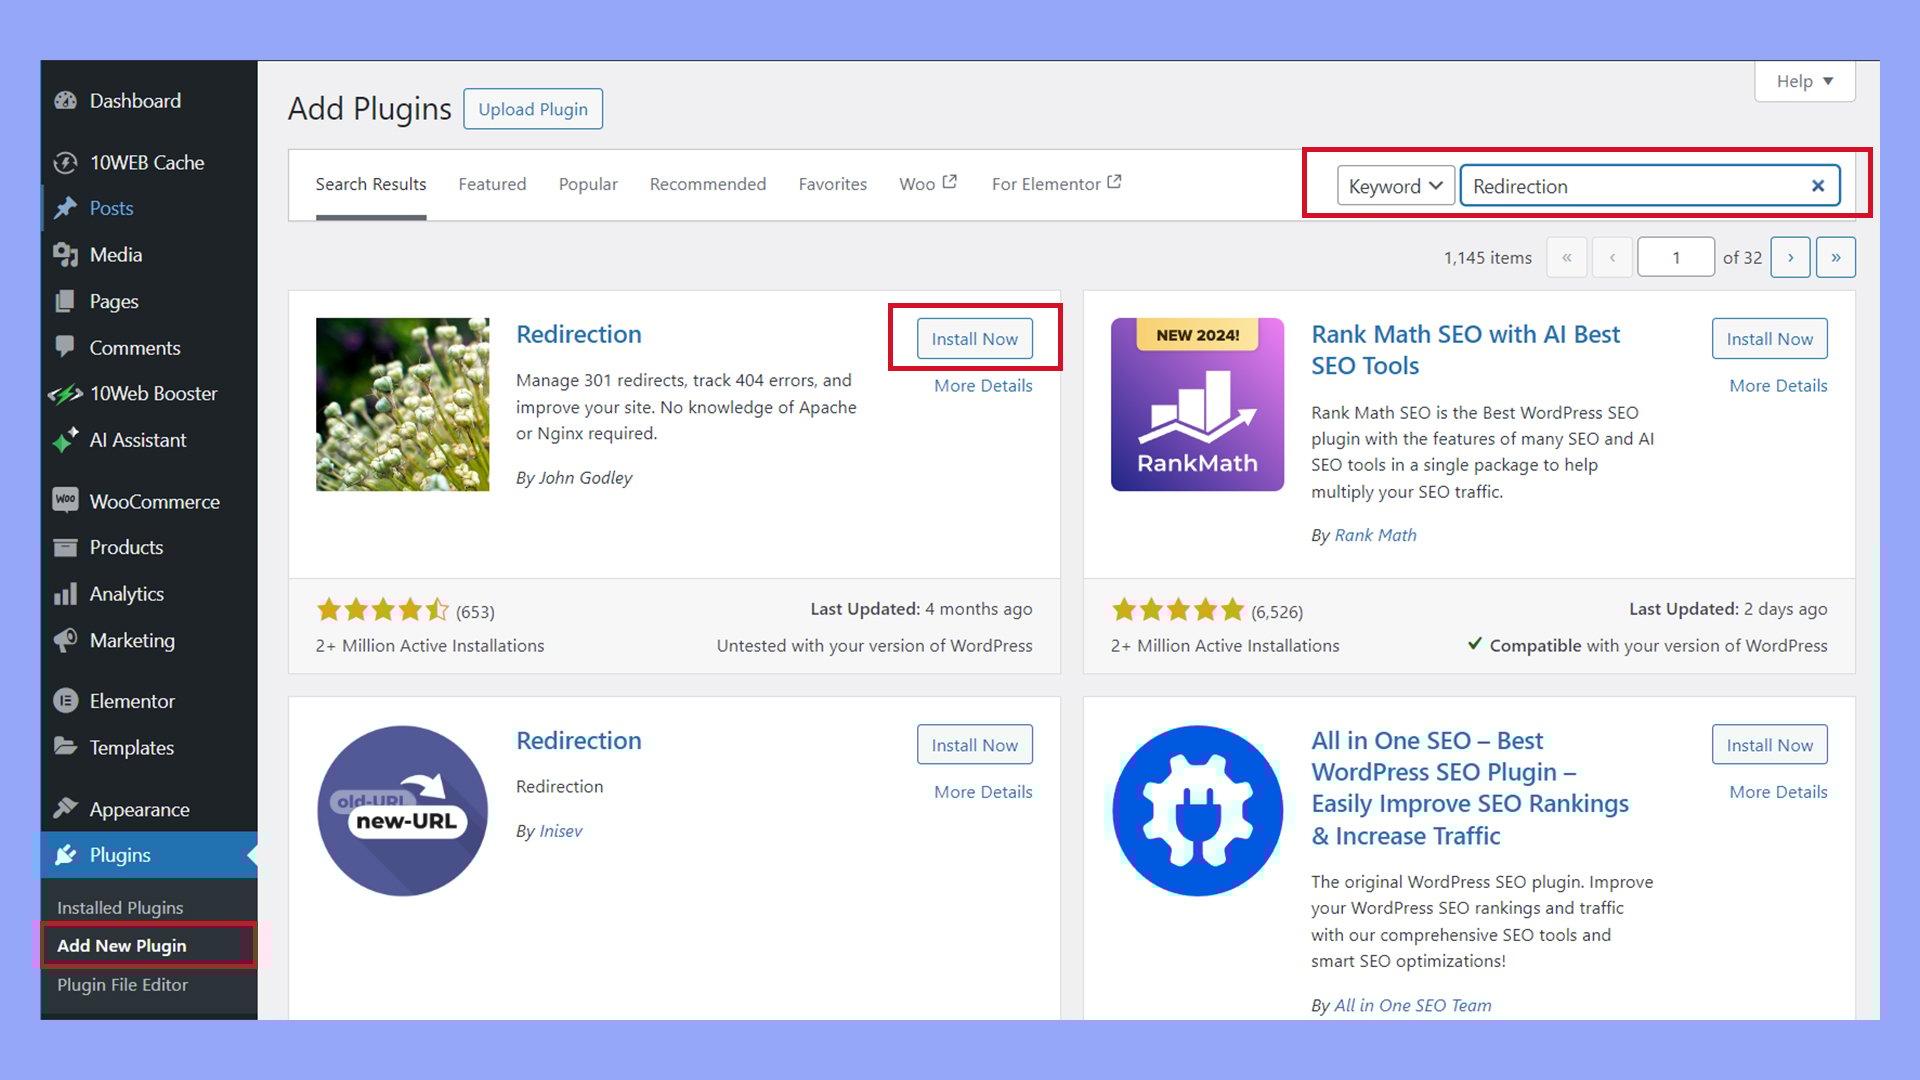
Step 1: Install and activate a redirect plugin
- Go to your WordPress dashboard.
- Navigate to Plugins > Add New.
- Search for a redirection plugin, such as “Redirection” by John Godley.
- Click Install Now, then Activate.
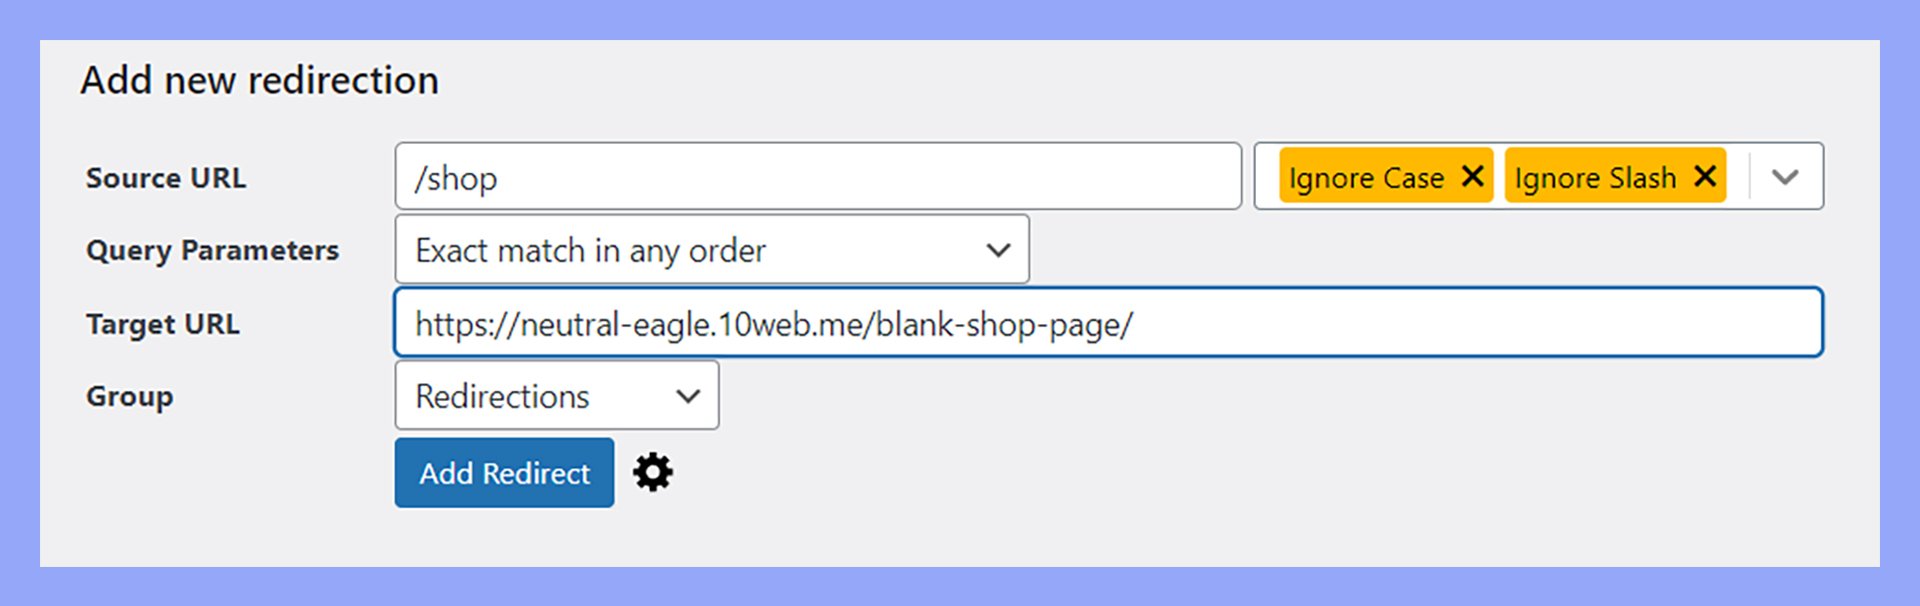
Step 2: Set up the redirect
- After activation, go to Tools > Redirection.
- Click Start Setup to start the setup wizard. Follow the prompts.
- After setup, in the Source URL field, enter the relative URL of your default WooCommerce shop page (e.g.,
/shop). - In the Target URL field, enter the new URL where you want to redirect the shop page (e.g.,
/new-shop).

- Click Add Redirect.
Step 3: Test the redirection
- Locate and hover over the new redirect in the list at Tools > Redirects.
- Click Check Redirect.
- Ensure it redirects to the new URL seamlessly.
Remember to try the redirect in an incognito window or clear your browser cache if you experience any unexpected behavior. Old data stored in the browser can interfere with seeing updated changes to your website.
Method 2: Using code (functions.php)
If you prefer to handle redirection without a plugin, you can add a snippet to your theme’s functions.php file. Here’s how:
Step 1: Access the Theme File Editor
- From the WordPress dashboard, go to Appearance > Theme File Editor.
- Locate and open the
functions.phpfile of your active theme.
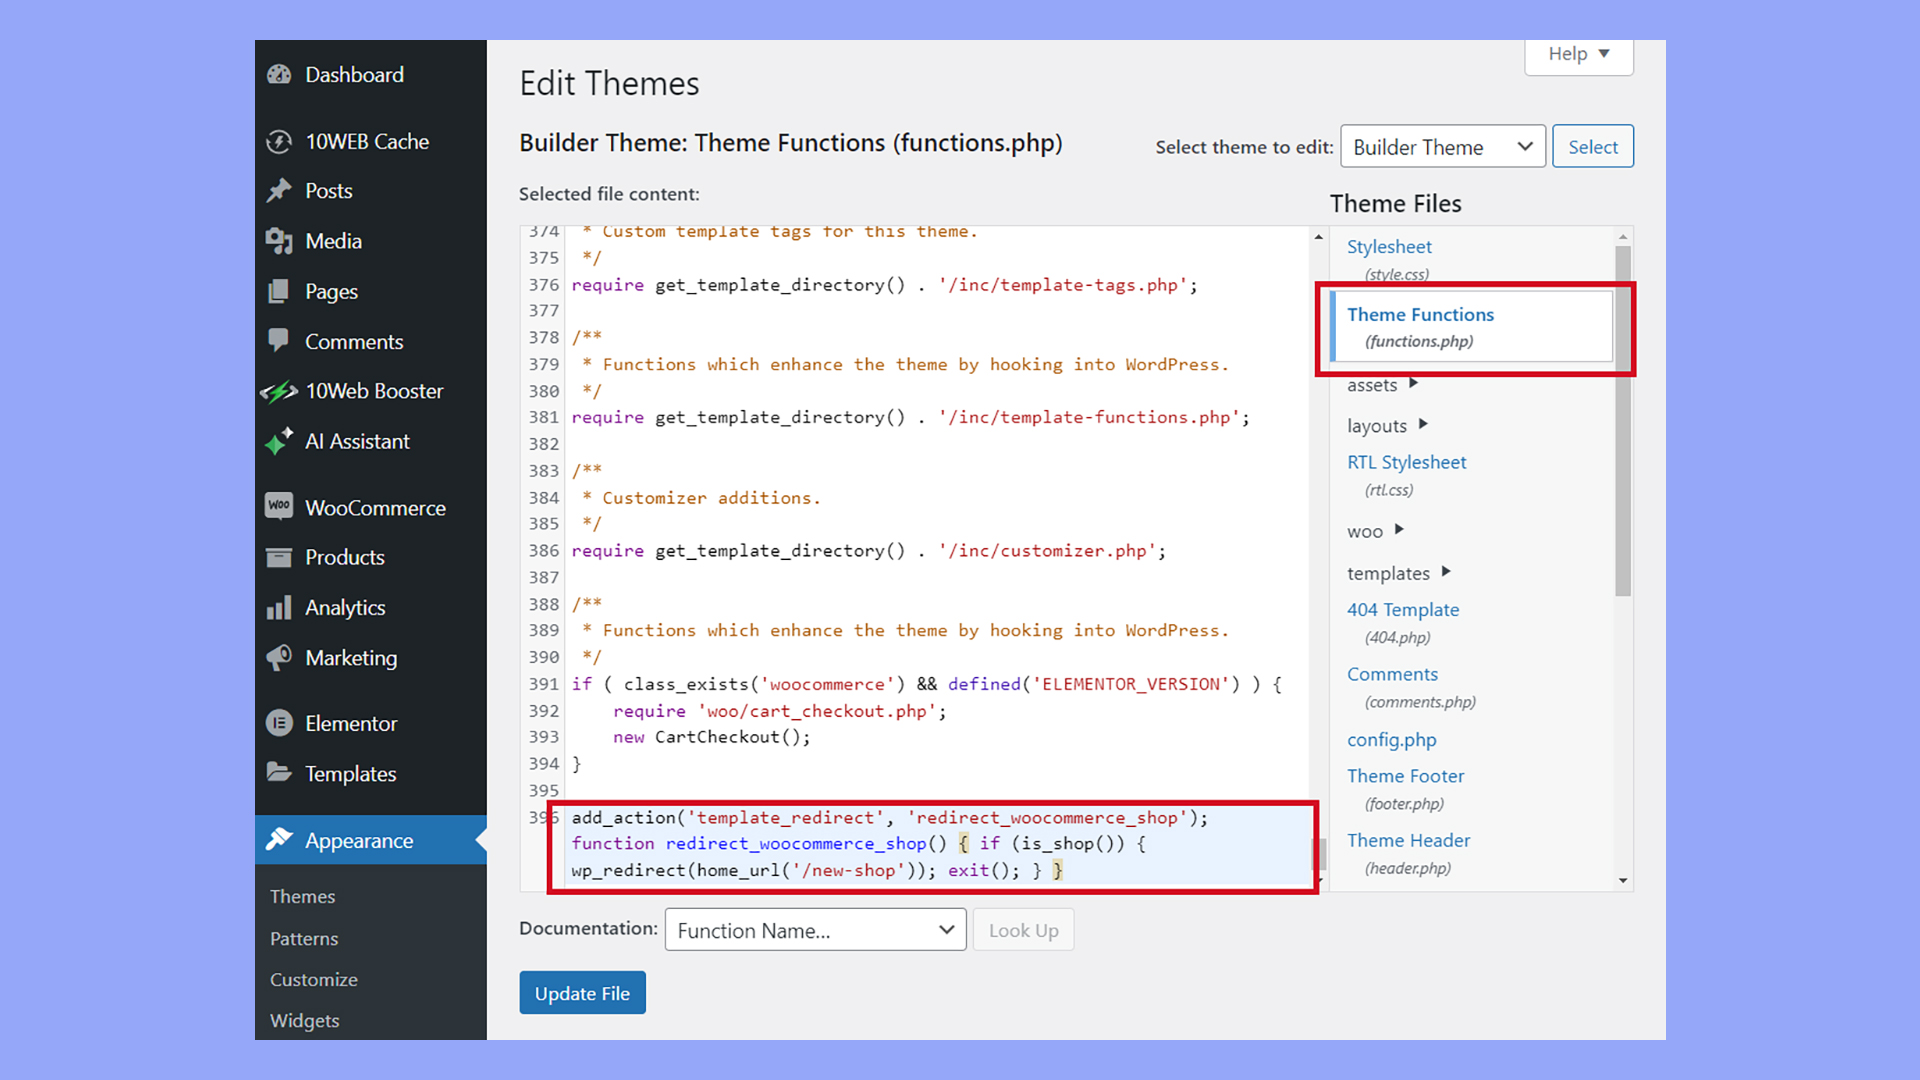
Step 2: Add the redirection code
- Add the following code snippet to your
functions.phpfile:add_action('template_redirect', 'redirect_woocommerce_shop'); function redirect_woocommerce_shop() { if (is_shop()) { wp_redirect(home_url('/new-shop')); exit(); } }- Replace
'/new-shop'with the URL path you want to redirect to.
- Replace
Step 3: Save and test
- Save the changes to the
functions.phpfile. - Open a new browser tab and enter the original shop page URL.
- Ensure it redirects to the new URL correctly.
Creating a new product archive template with a page builder
Page builders like Elementor and the 10Web Builder provide drag-and-drop functionality to change the default shop page in WooCommerce to suit your needs. The user-friendly interface makes it easy to lay out your shop page by dropping in WooCommerce widgets to create a product archive template. This template can be set to replace the default shop page automatically.
For example, to change the default shop page with the 10Web Builder:
- Go to Templates > 10Web Templates and select the Archive tab.
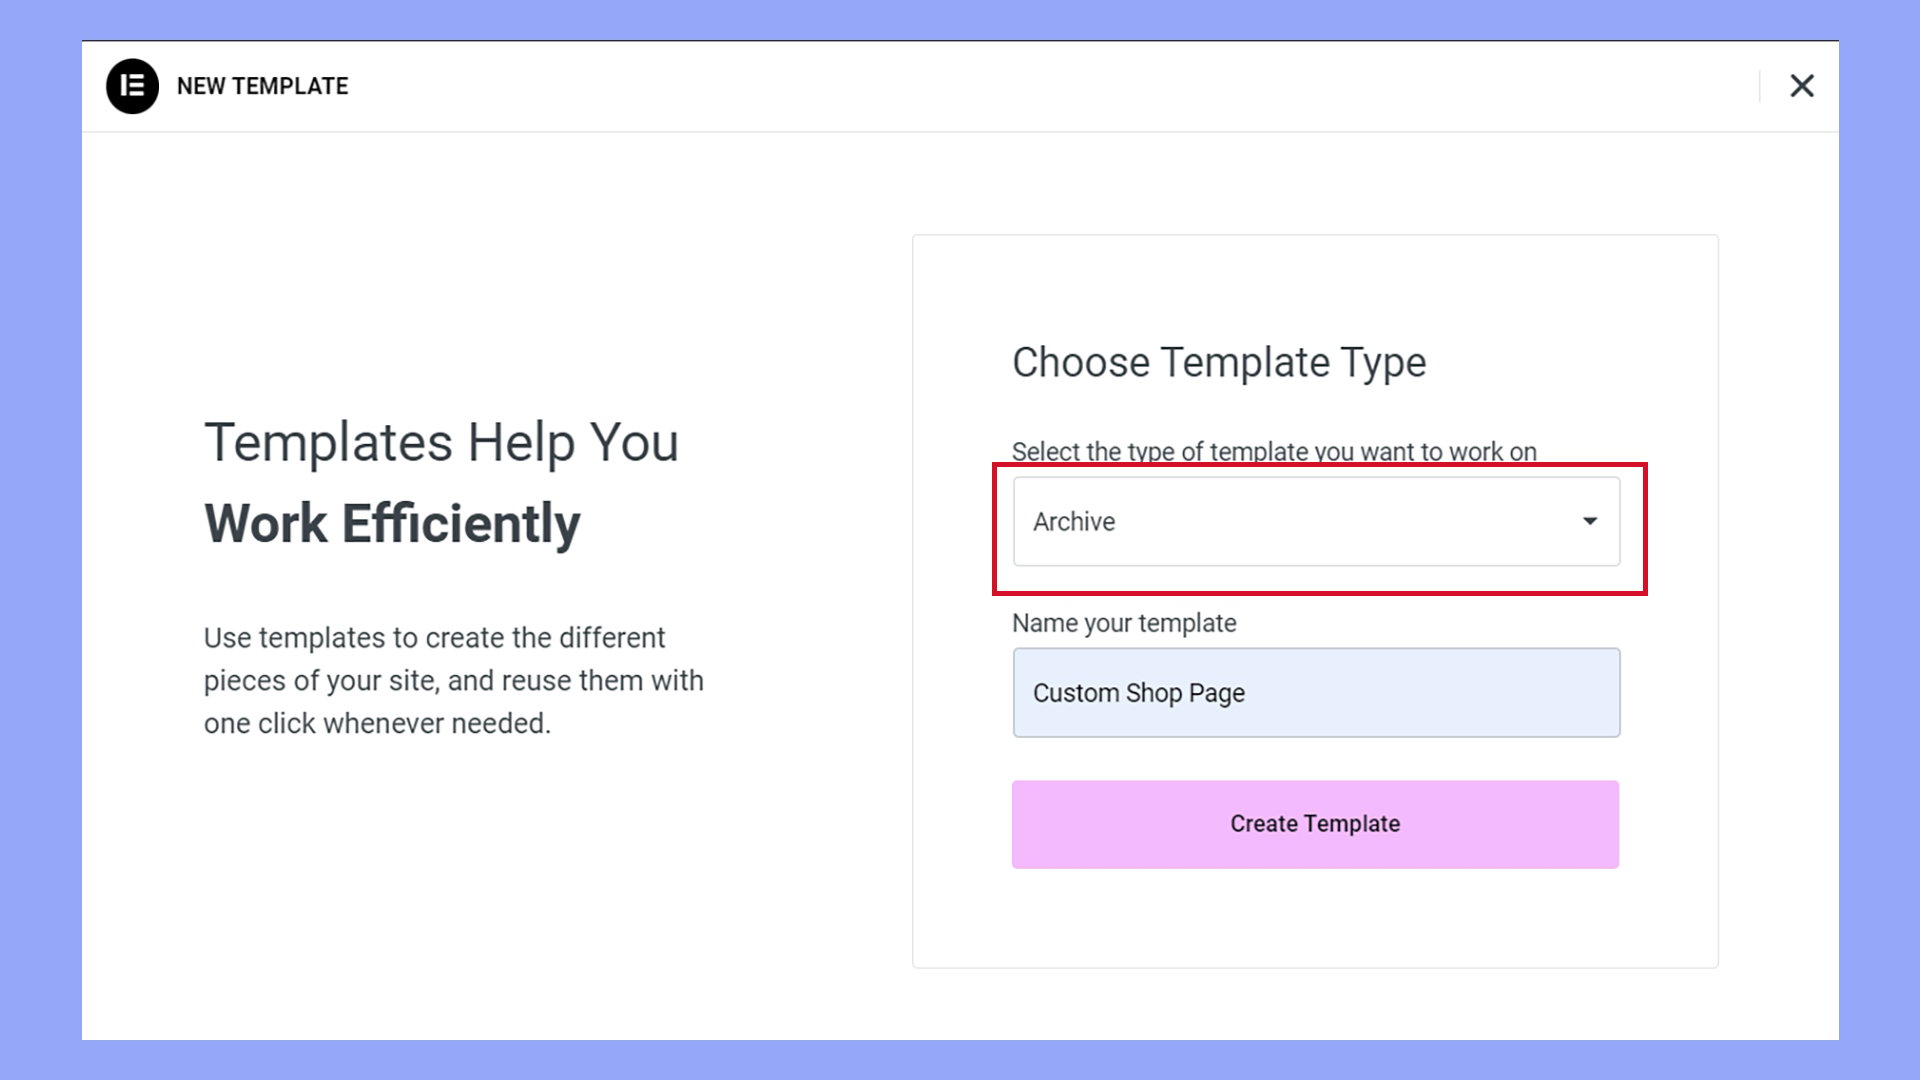
- Click Add a new template.
- Select Archive as the type of template you want to work on and enter a template name.
- Click Create Template.
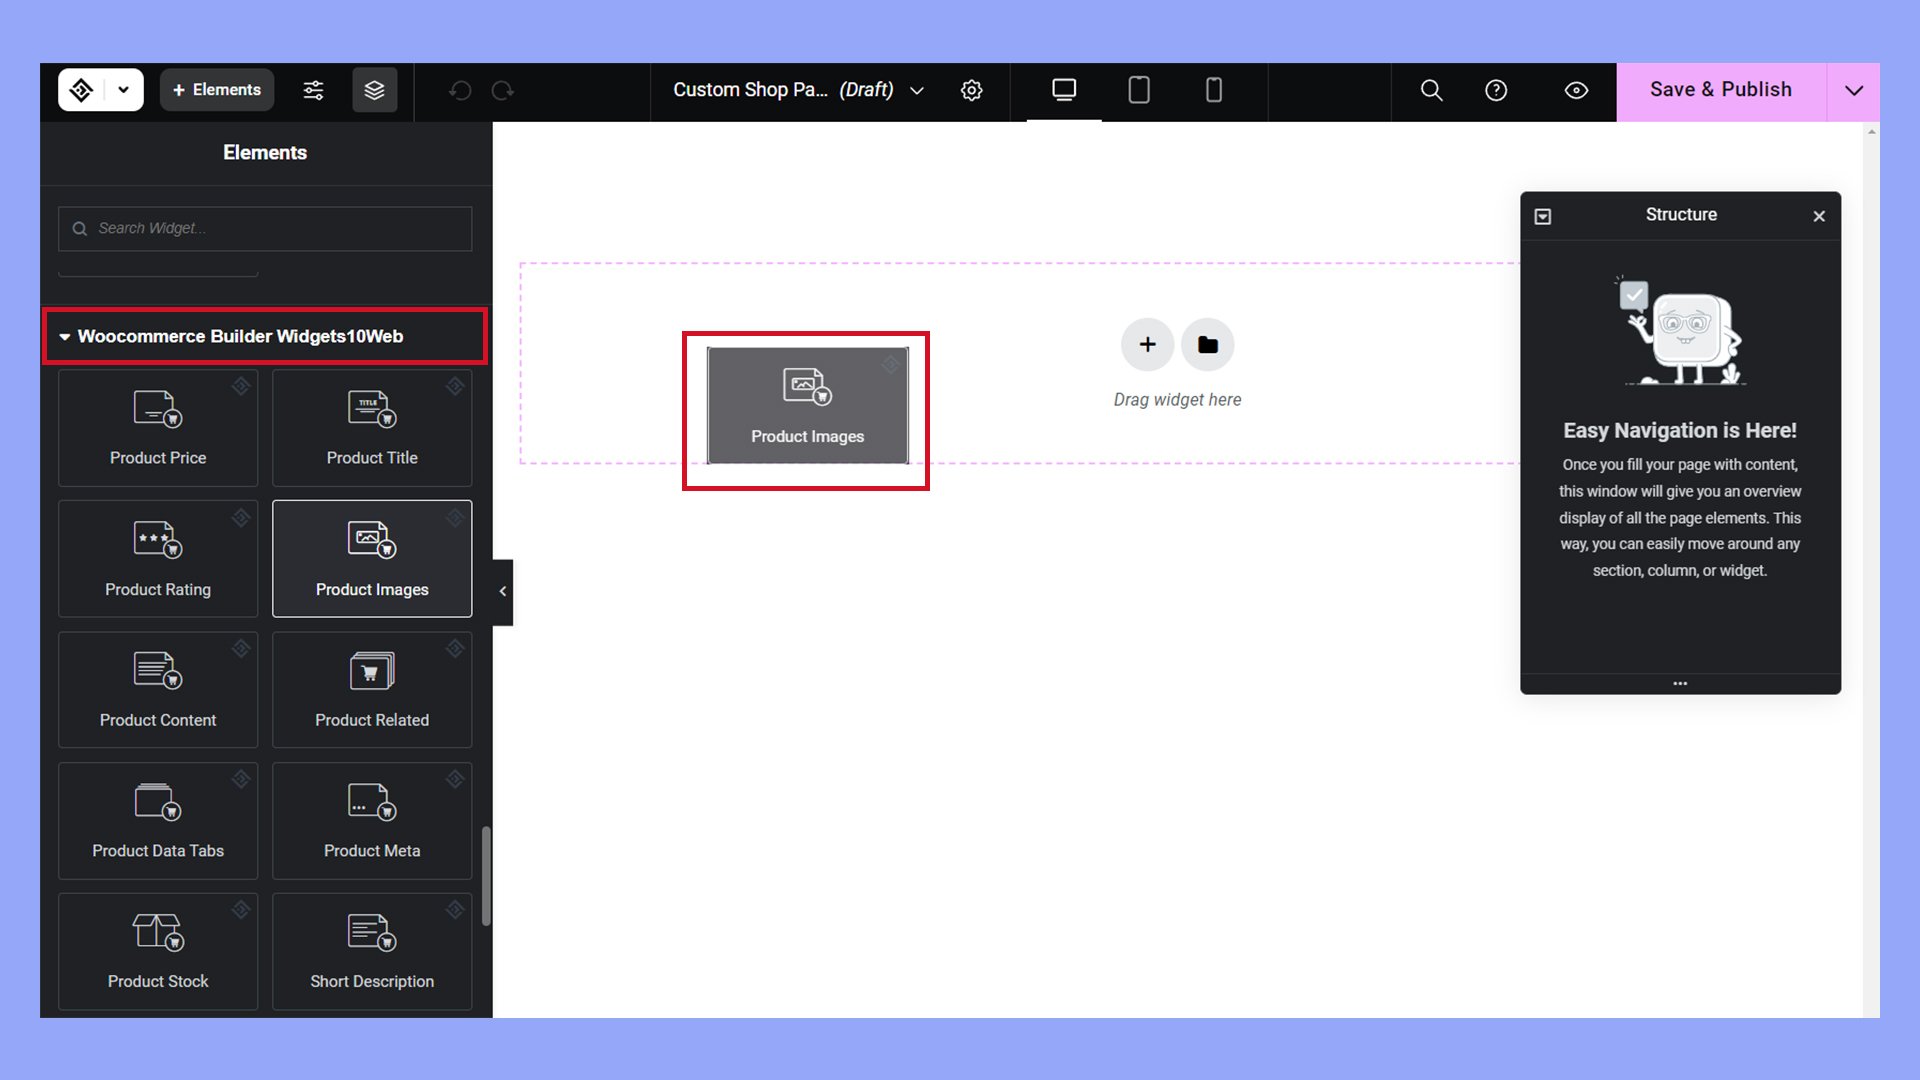
- Use the WooCommerce widgets to create a shop page layout that suits your needs. You can also add headings, text, and other widgets to customize the page.
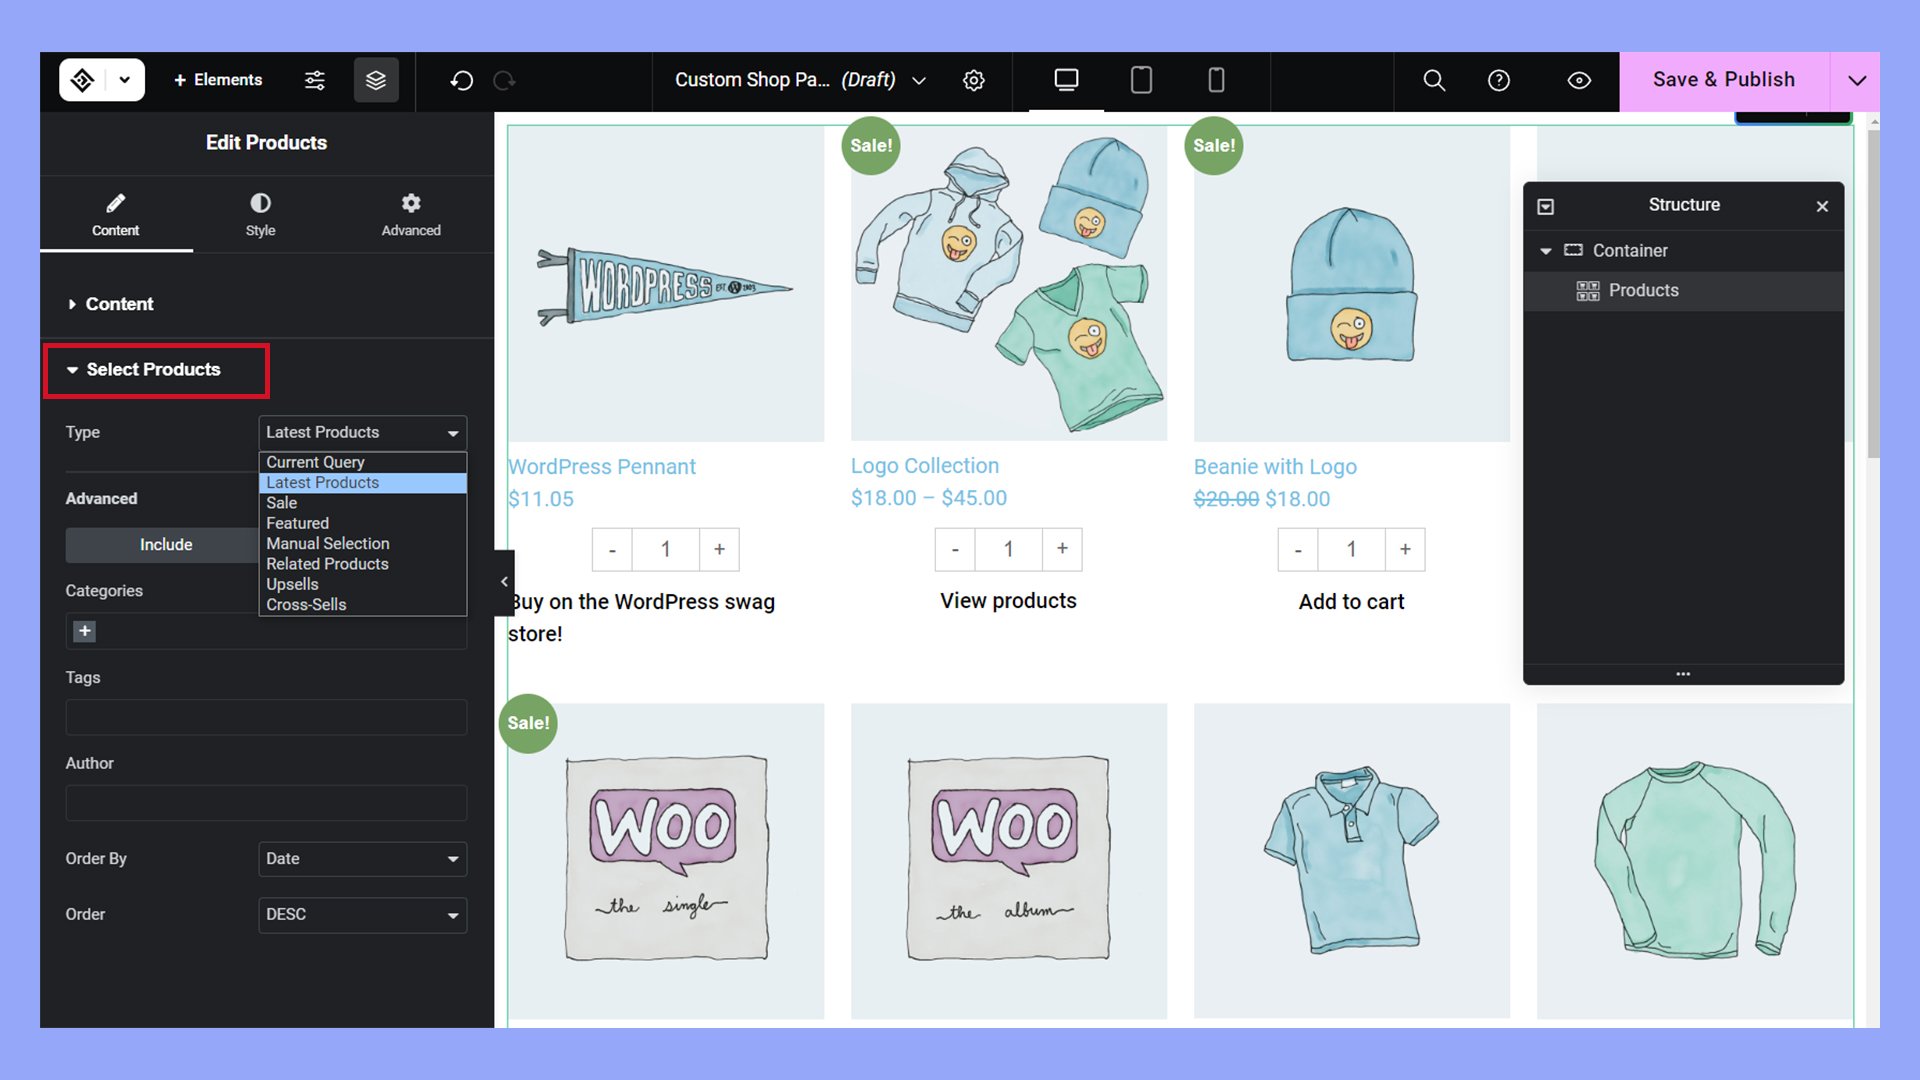
- Try the Products widget to get started with a customizable product grid. The Content, Style, and Advanced tabs allow you to fine-tune the appearance and control which products will display.
- Click Save & Publish when you’re finished editing the new shop page.
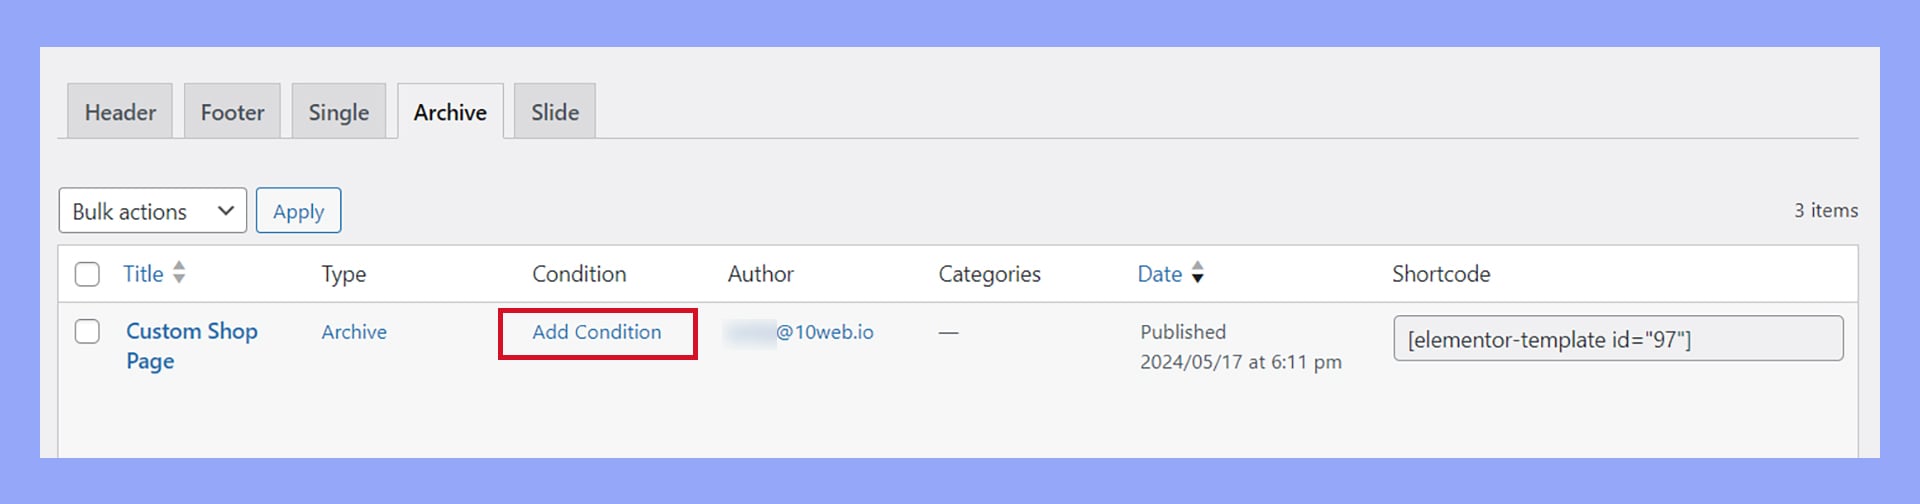
- Navigate to Templates > 10Web Templates in the WordPress dashboard.
- Click the Archive tab.
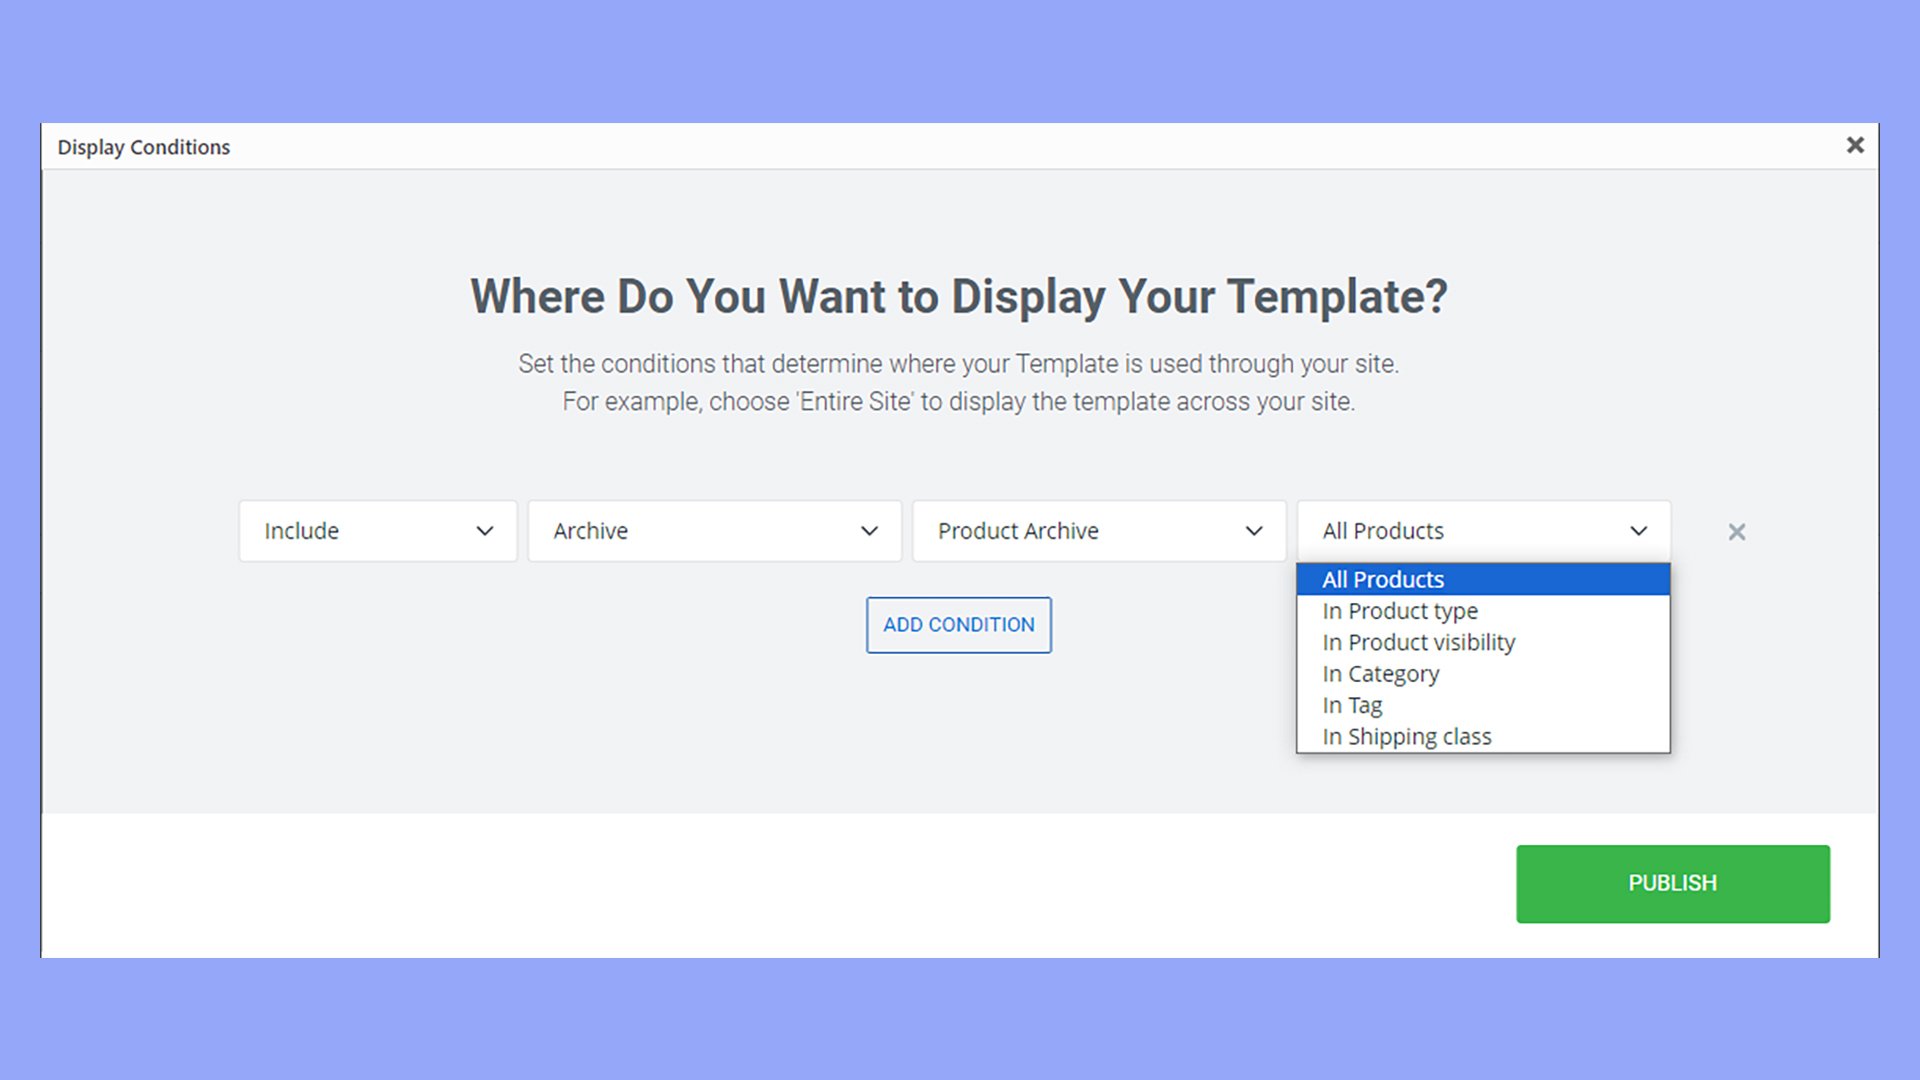
- Locate the new template you just published, and click Add Condition.

- To change the default shop page to the new template, select the following options from the dropdown menus as shown: Include, Archive, Product Archive, All Products.
- Click Publish.
Now when someone visits your store, they see the new custom shop page.
Looking to sell online?
Create your custom online store in minutes with 10Web AI Ecommerce Website Builder and take your business online.
Plugins that can help change the shop page
Several plugins offer custom shop page solutions:
- WooCommerce Product Table provides options for displaying products in a table format.
- Beaver Builder or Elementor plugins allow you to drag-and-drop design your Shop page.
- WooCommerce Customizer offers simple adjustments through a user-friendly interface.
Modifying template files manually
To manually customize your shop template:
- Create a child theme to preserve your changes when updating your theme.
- Copy the
archive-product.phpfile into your child theme. - Make your code edits to reflect the new layout. This requires familiarity with PHP and WooCommerce hooks and filters.
Further enhancing shop functionality
To enhance your WooCommerce shop’s functionality, you’ll need to use the wide array of available plugins and tweak various settings to optimize the shopping experience.
Your store’s success hinges on these improvements delivering a seamless and user-friendly interface for your customers.
Optimizing the shopping experience
Your focus should be on making the shopping experience as intuitive and pleasant as possible. This can be achieved through several optimizations.
- Ensure your shop page is running smoothly by checking load times and eliminating any unnecessary bloat. You can use performance plugins to help you with this task.
- Customize your shop page layout to make it easy for customers to find what they’re looking for through the use of categories, filters, and search bars. Plugins can help lay out these elements in a user-friendly manner.
- To avoid confusion, use a redirect plugin to redirect customers from the old default shop page to the new one you have set up.
Advanced customizations
When you’re ready to go beyond basic theme settings, delving into advanced customizations offers far greater control over your WooCommerce shop page’s look and functionality.
Modifying functions.php for custom functionality
To enhance your shop’s features, you might need to modify the functions.php file in your theme:
- Access your WordPress theme’s directory via FTP or the WordPress theme editor.
- Locate the
functions.phpfile. - Before making changes, create a backup of this file.
- Add your custom code at the end of the file to introduce new functions or modify existing ones. For example:
// Add a custom message to the shop page add_action('woocommerce_before_shop_loop', 'your_custom_function'); function your_custom_function() { echo '<p style="font-weight: bold;">Welcome to our store!</p>'; } - Save the changes.
Customizing functions.php allows you to add or modify shop page features like adding special messages, changing layout behaviors, or even introducing new sorting options.
Marketing and SEO best practices
The success of your WooCommerce shop page depends greatly on your SEO and marketing efforts. Applying strategic best practices in these areas can significantly increase your shop’s visibility and drive more sales.
Enhancing shop page SEO
Step 1: Optimize product titles and descriptions
Your product titles and descriptions should be clear and descriptive and include keywords that potential customers are likely to search for. Use tools like Google’s Keyword Planner to determine the best keywords for your products.
Step 2: Improve your site’s speed
Site speed is a ranking factor on search engines like Google. Optimize your images and consider using a content delivery network (CDN) to fast-track loading times.
Step 3: Use high-quality images
High-resolution images can influence a shopper’s decision and show up in image searches. Name your images descriptively and use alt tags with relevant keywords. Alt tags improve accessibility and help search engines understand your page content.
Step 4: Implement structured data
Structured data helps search engines understand your content. It can also enhance your listings in search results with rich snippets. Use schema markup for your product listings to make them stand out.
Step 5: Optimize your URLs
Ensure that your shop and product URLs are short, readable, and include keywords. Avoid long strings of numbers or irrelevant characters.
Step 6: Build quality backlinks
Encourage reputable, relevant websites to link back to your shop. This can improve your site’s authority and visibility on search engines.
Step 7: Utilize social media
Social signals play a role in SEO. Share your products on social networks, and make it easy for others to do the same directly from your product pages. Encourage customer engagement with personalized responses that show your customer appreciation.
Effective ecommerce marketing strategies
Step 1: Develop a strong brand identity
Your brand sets you apart from competitors and can drive customer loyalty. Make sure your shop page reflects your brand identity through consistent colors, logos, and messaging.
Step 2: Engage in email marketing
Take advantage of plugins and services available for WordPress and WooCommerce to build your email list and keep in touch with customers. Send out newsletters, product updates, and personalized offers to encourage repeat business.
Step 3: Leverage retargeting ads
Use retargeting campaigns to reach users who have visited your site but have not made a purchase. Platforms like Google AdWords can help you display ads to these potential customers as they visit other sites.
Step 4: Utilize user-generated content
User-generated content, such as customer reviews and photos, can enhance credibility and encourage sales. Feature this content on your shop page to build trust with new customers.
Conclusion
By understanding how to change the default shop page in WooCommerce, you gain control over your store’s appearance and functionality.
Whether through simple settings adjustments or advanced custom coding, customizing your shop page can significantly enhance the shopping experience and align with your branding goals.
Looking to sell online?
Create your online store in minutes
Create your online store in minutes with 10Web AI Ecommerce Website Builder.