Integrating payment gateways is crucial for any ecommerce platform to function smoothly. This guide focuses on how to connect Stripe with WooCommerce, providing a step-by-step approach to seamlessly link these two powerful tools. By enabling Stripe, businesses can offer a secure and diverse range of payment options to their customers. We’ll cover the prerequisites, the actual integration process, and tips to ensure a successful setup. Whether you’re a novice or an experienced webmaster, this article will help you enhance your online store’s payment capabilities.

Looking to sell online?
Create your custom online store in minutes with 10Web AI Ecommerce Website Builder and take your business online.
FAQ
How to connect WooCommerce and Stripe?
How to connect a Stripe account with WordPress?
How much does it cost to use Stripe with WooCommerce?
How do I add a Stripe Webhook to WooCommerce?
Setting up the prerequisites
Before you can explore how to connect Stripe with WooCommerce, ensure you have laid the foundation by tackling a couple of critical preliminary steps.
Ensuring WooCommerce is installed and updated
To get started, guarantee that you have WooCommerce installed on your WordPress site. If it’s already installed, make sure it’s updated to the latest version for optimal performance and security.
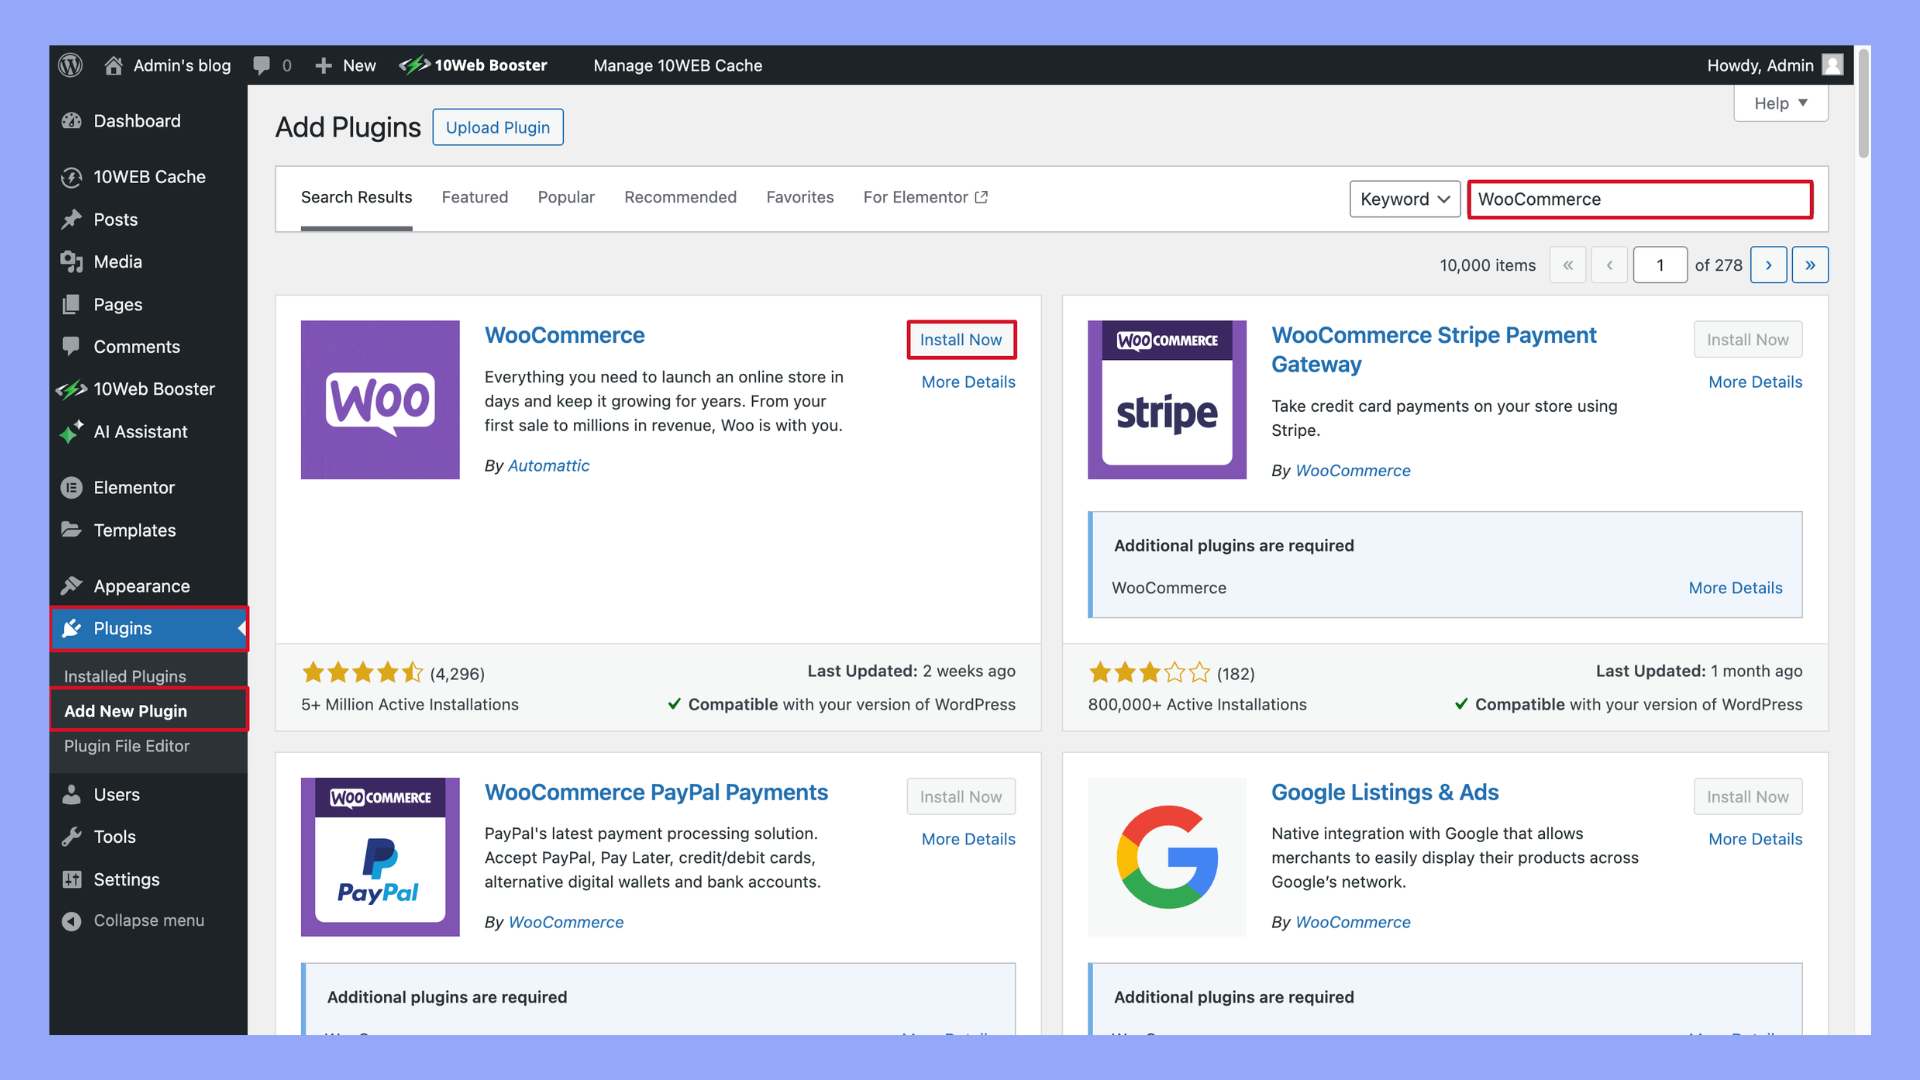
- Access your WordPress dashboard and navigate to the Plugins section.
- If WooCommerce is not yet installed, click on Add New and search for the WooCommerce plugin.
- Click on Install Now for the WooCommerce plugin, followed by Activate to enable it on your site.

- If the plugin is already installed, click on Updates to check for any new versions and select Update Now if an update is available.
Signing up for a Stripe account
You’ll need a Stripe account to receive payments, so sign up for one if you haven’t already.
- Visit the Stripe website and click on Start now to create a new account.
- Fill in your email, full name, and create a password, then click Create Account.
- Follow the on-screen instructions to set up your business information and bank details.

These initial steps ensure that you have the fundamental components in place for a successful integration of Stripe with your WooCommerce store.
Looking to sell online?
Create your custom online store in minutes with 10Web AI Ecommerce Website Builder and take your business online.
5 Steps to connect Stripe to WooCommerce
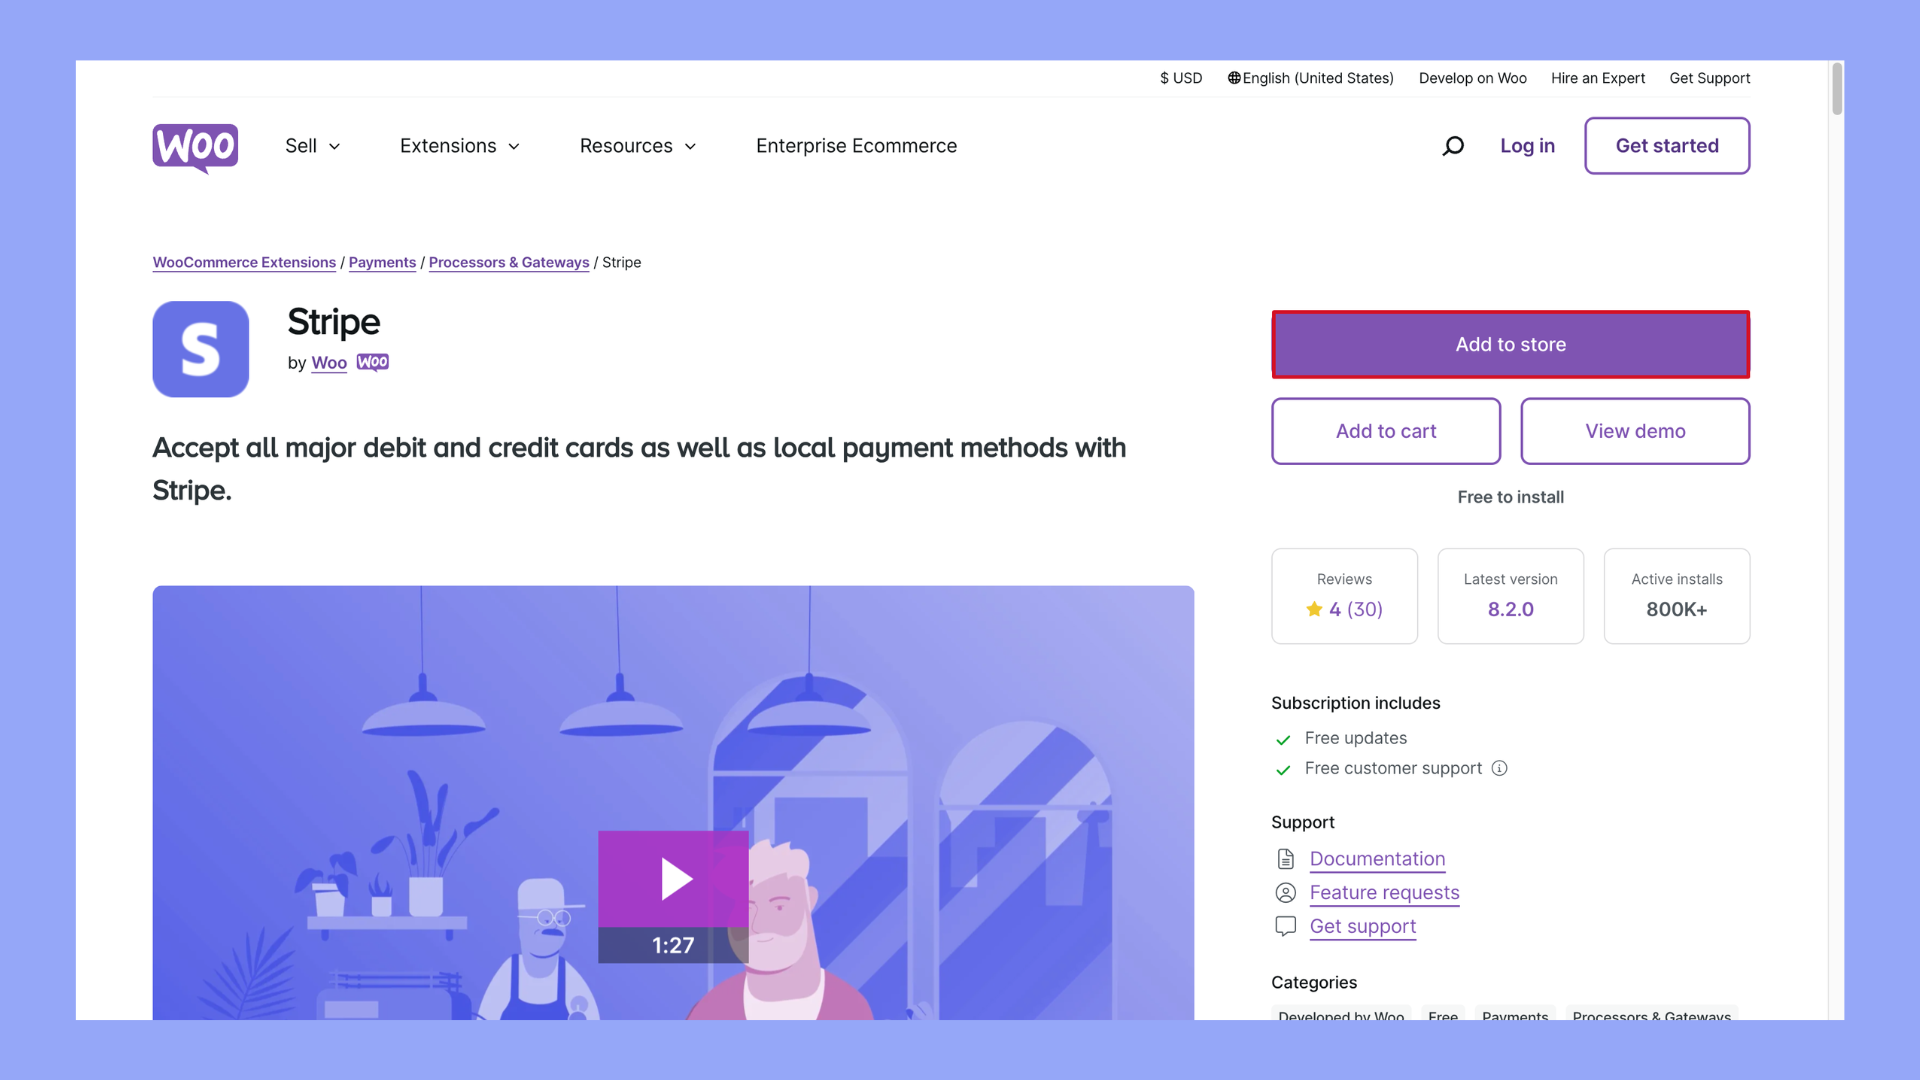
Before you start, make sure you have a Stripe account ready to link to your WooCommerce store. This integration allows for a seamless flow of transactions directly through your ecommerce platform.
Once the plugin is activated, you’ll need to configure the settings to connect Stripe with WooCommerce:
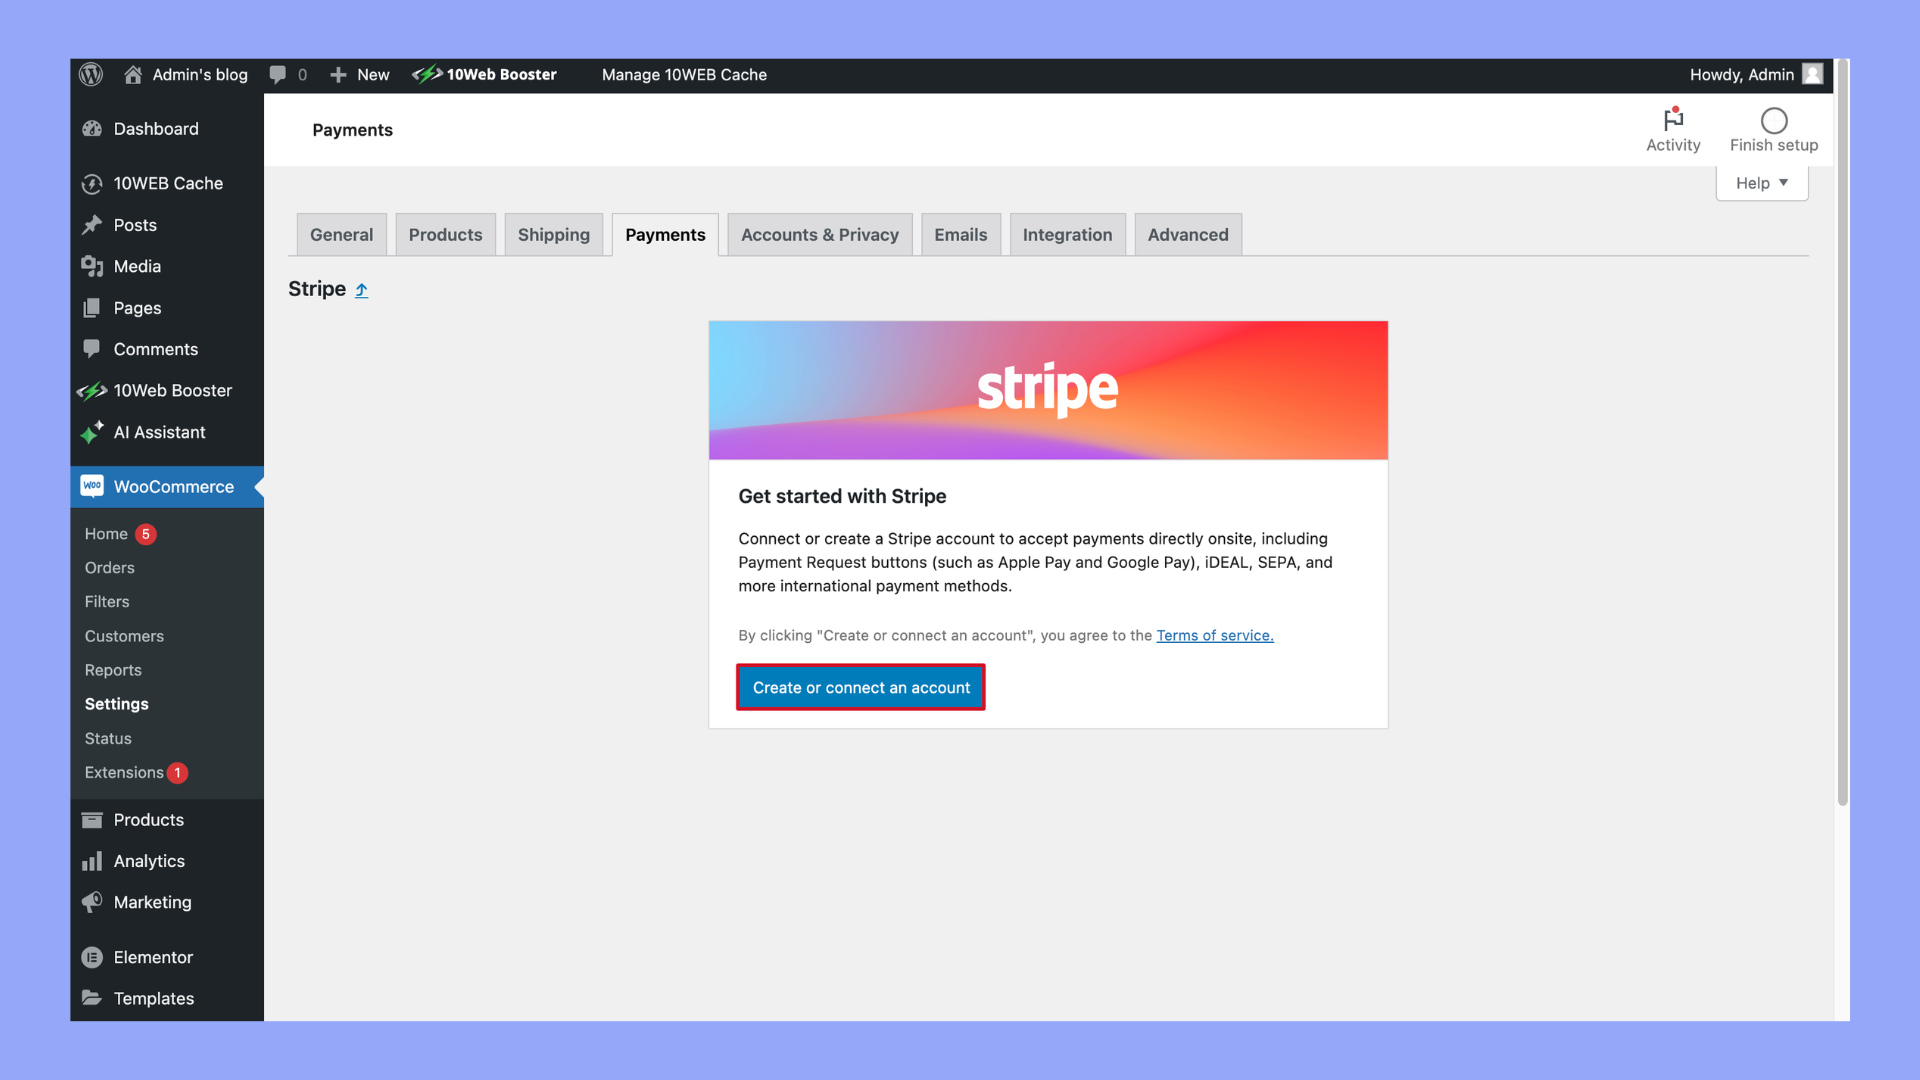
- Go to WooCommerce > Settings > Payments.
- Find the Stripe payment method and click Manage next to it.
- You will see an option to Connect or Create your Stripe account. If you already have one, choose Connect. If you’re new to Stripe, follow the prompts to create an account.
- After connecting, you’ll be directed back to your WooCommerce settings to configure the extension.
- Enter the necessary Stripe API keys into the respective fields and adjust any settings to match your preference for transactions.
As you follow these steps, refer to the Stripe WooCommerce extension documentation for a detailed step-by-step guide. Remember, successfully linking your Stripe account ensures a secure and efficient checkout process for your customers.
Alternative: Downloading and uploading the plugin manually
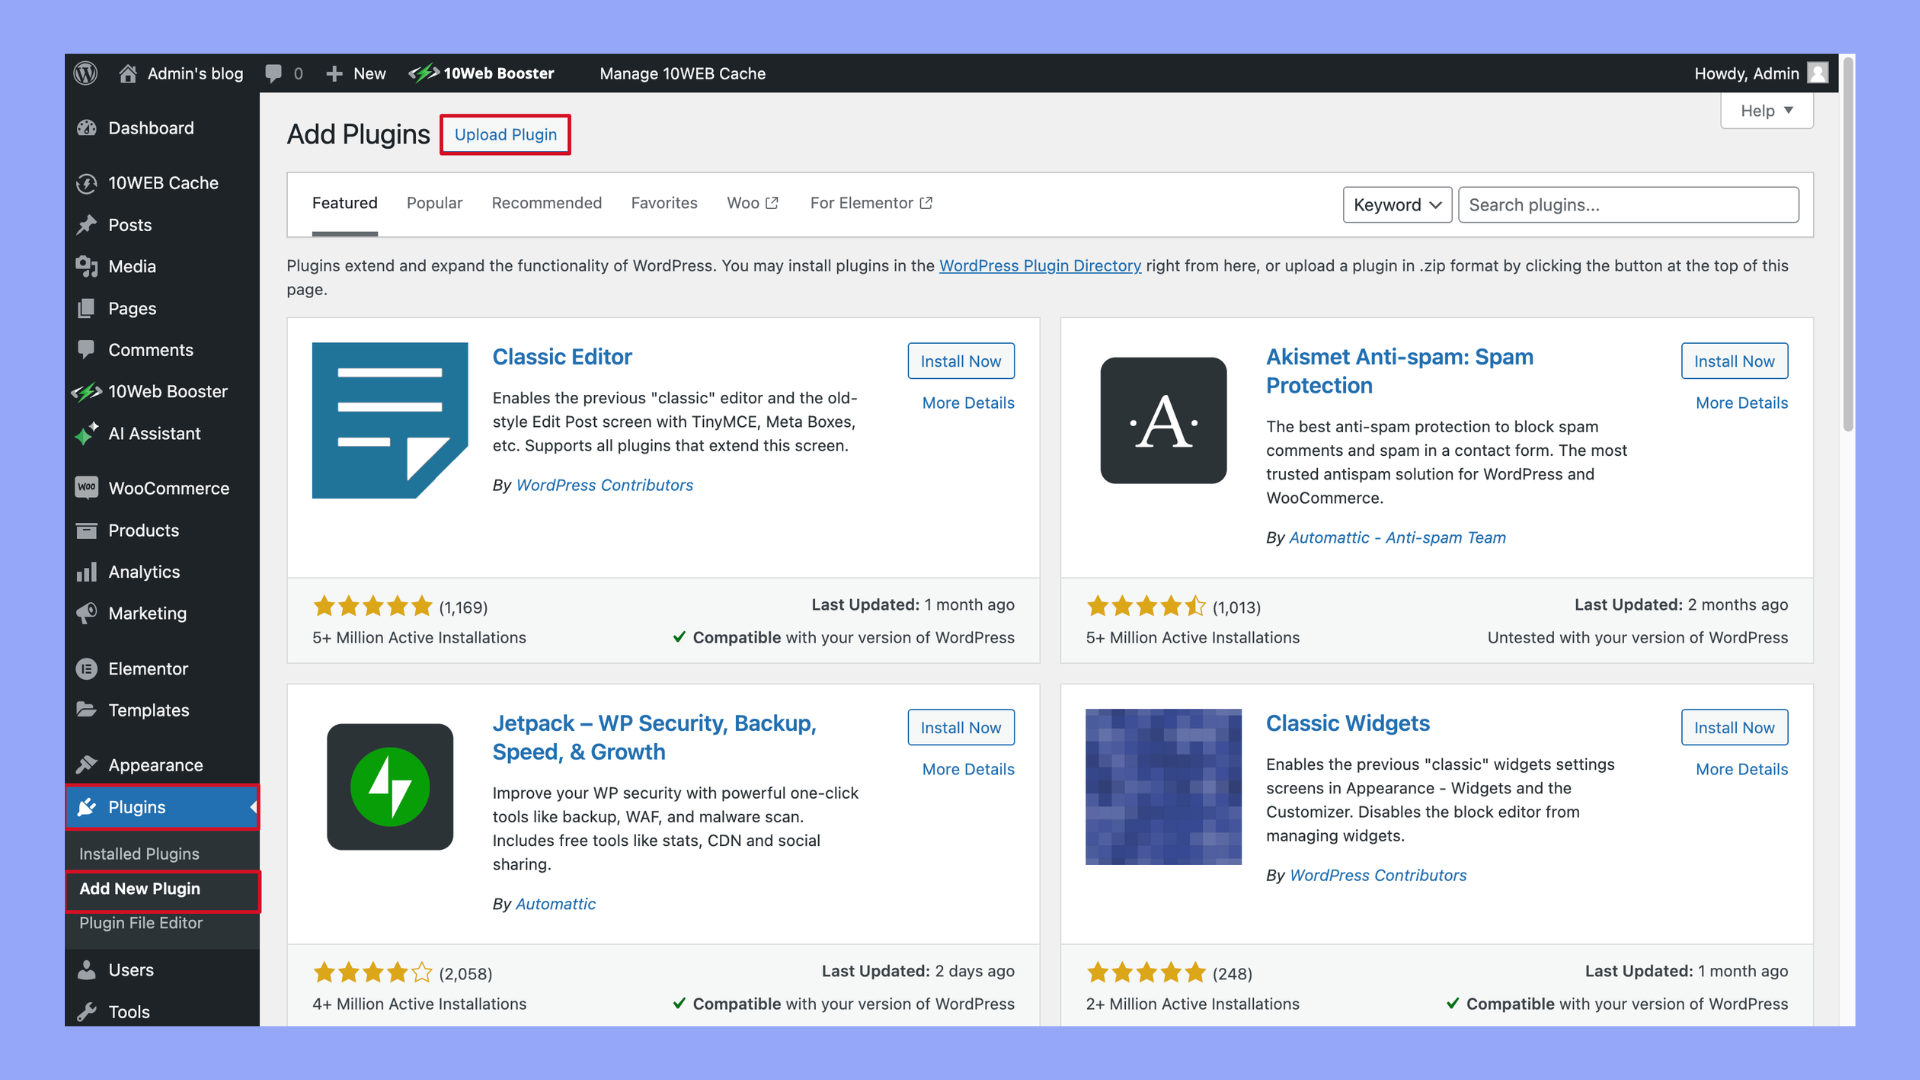
If you’re unable to install the Stripe WooCommerce extension directly from your WordPress dashboard, you can manually upload the plugin with the following steps:
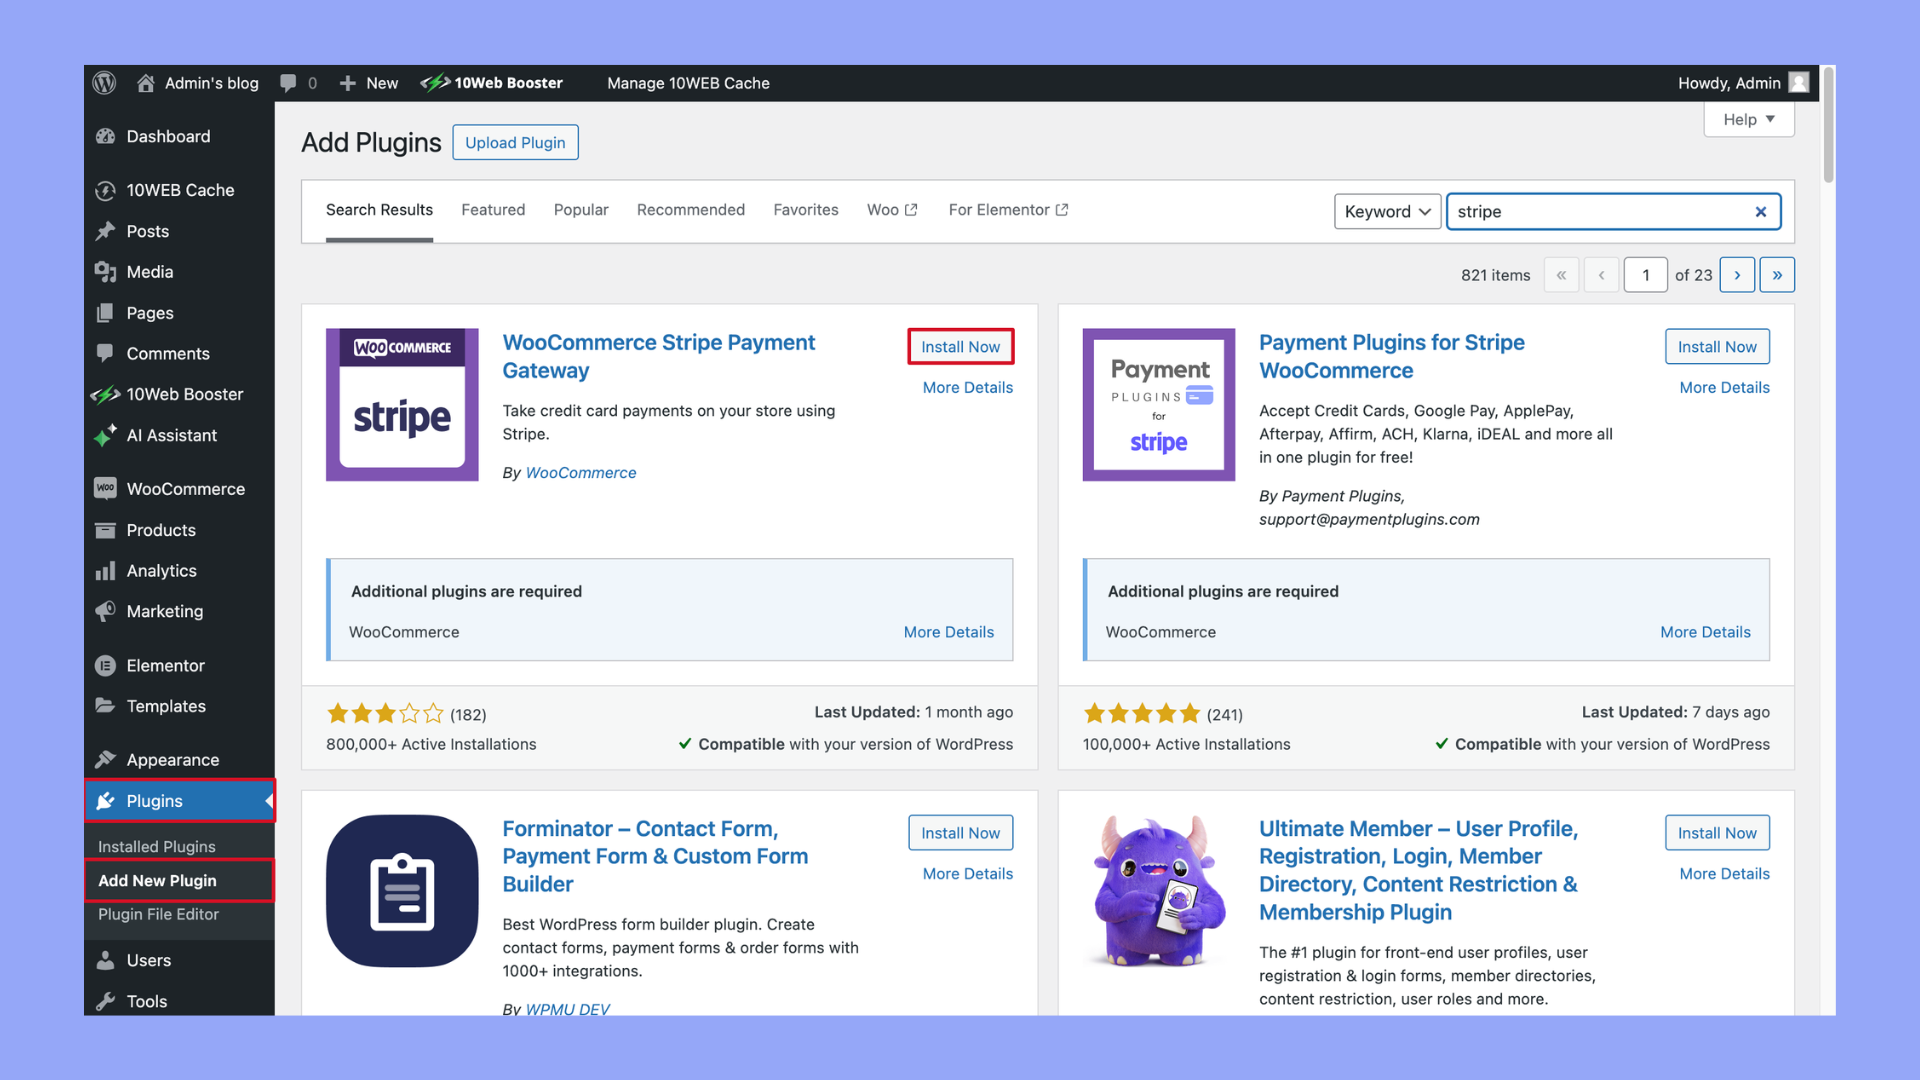
- Download the Stripe WooCommerce extension from the WooCommerce marketplace or another trusted source.
- Log in to your WordPress site and navigate to Plugins > Add New.
- Click on the Upload Plugin button at the top of the page.
- Choose File to select the plugin zip file you downloaded and then click Install Now.
- After the plugin has been installed, click Activate Plugin to enable the Stripe extension on your WooCommerce site.
Configuring the stripe plugin
Before diving into the details, it’s important to know that configuring the Stripe plugin requires access to your Stripe account for API keys and a tour through WooCommerce settings to ensure a smooth payment process for your customers.
Navigating to WooCommerce settings for payment
- Begin by logging into your WordPress dashboard.
- Once you’re there, look for the WooCommerce tab on the left-hand side menu and click on it.
- Inside the WooCommerce section, click on Settings to proceed.
- In the Settings area, you’ll find various tabs; click on the Payments tab to view all payment options available. Here you’ll see Stripe listed among them.
- Find the Stripe payment method and click on Manage, to open the necessary settings page where you will configure the plugin.
Entering Stripe API keys
- To integrate Stripe with your WooCommerce, you’ll need your publishable key and secret key from your Stripe account. These are like special passwords that allow WooCommerce to communicate securely with your Stripe account.
- To obtain these, you’ll need to log in to your Stripe account and navigate to the Developers section. Then click on API keys.
- Once there, you will see your publishable key and secret key. These are unique to your account and it’s vital they remain confidential.
- Back in your WooCommerce Stripe settings, locate the fields for entering your publishable key and secret key and fill them in accordingly.
- Be sure to save your changes after entering the API keys, this will ensure your Stripe account is connected, and you’re ready to accept payments.
By following these steps, you’re on your way to mastering how to connect Stripe with WooCommerce and providing a seamless checkout process to your customers.
Enabling Stripe payments
Looking to sell online?
Create your custom online store in minutes with 10Web AI Ecommerce Website Builder and take your business online.
In this section, you’ll learn how to set Stripe as the primary way to accept payments on your WooCommerce site and configure the essential settings for your checkout page.
Configuring Stripe as the default payment method
When you’re ready to accept payments with Stripe, making it the default option ensures a smooth transaction experience for your customers. Here’s how to get started:
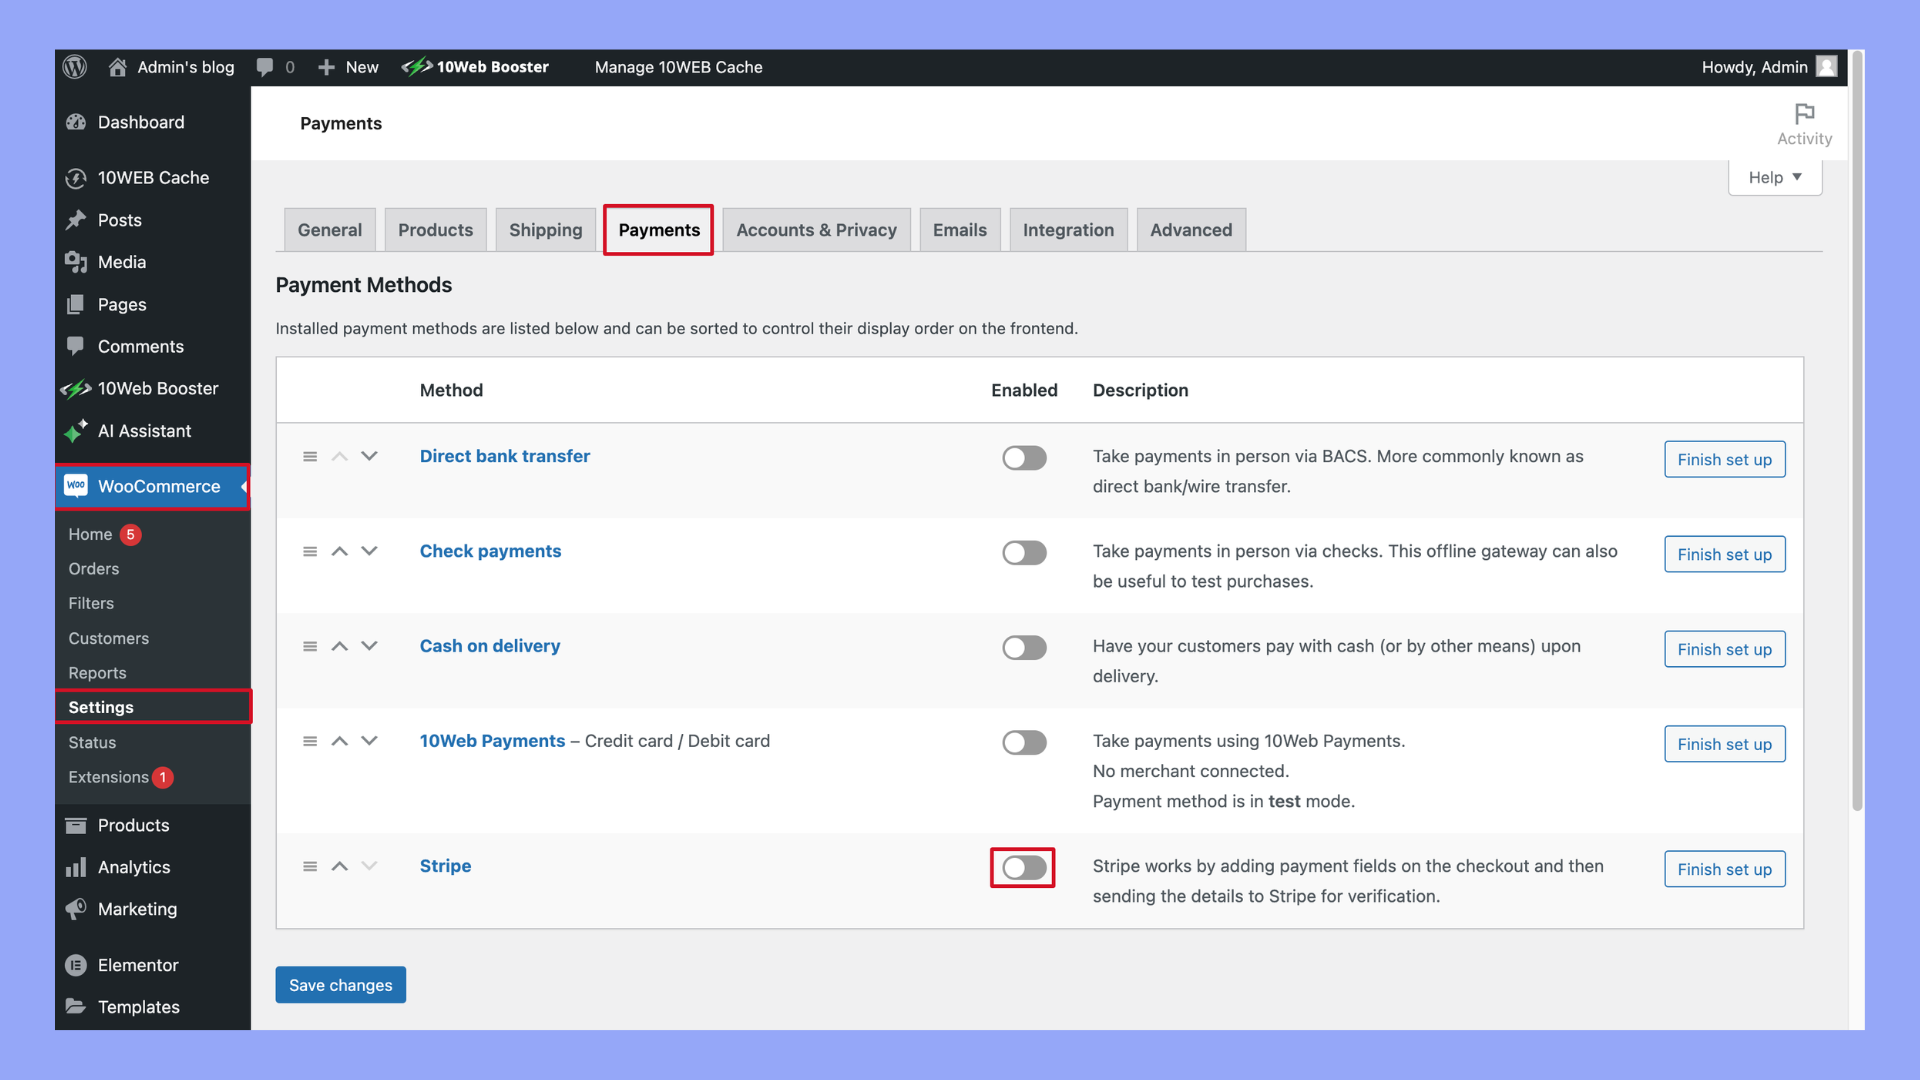
- Navigate to your WordPress dashboard and go to WooCommerce → Settings → Payments.
- You will see a list of payment methods available. Look for Stripe – Credit Card (Stripe) and use the toggle to enable it. This activates Stripe for use on your site.
- Once Stripe is enabled, click on the Set up button or Manage if you’d previously set it up.
- In the Stripe settings, make sure to enter your live API credentials provided by Stripe to process real transactions. These can be obtained from your Stripe account dashboard.
- Save changes to ensure the payment gateway is updated with your API details and is now the default payment option.
Setting Stripe as your default payment method allows your customers to pay with major credit cards and debit cards directly on your checkout page.
Setting up Stripe checkout settings
Fine-tuning your Stripe checkout settings will create a secure and convenient checkout process. Let’s optimize these settings:
- From the Stripe settings, locate the Payment Request Buttons section. Here, you can enable features like Apple Pay and Google Pay for a quicker checkout experience.
- Customize your checkout page appearance by adding your brand’s logo and setting a theme color in the Stripe style options.
- Ensure Webhooks are set up correctly by visiting the Webhooks section and configuring the endpoints as per Stripe’s documentation. This will keep your website and Stripe in sync, managing events and payment updates.
- Review and configure additional payment options such as Saved Cards functionality that allows returning customers to use their previously saved payment details for faster checkout.
Adjust these settings to align with your business’s needs and enhance the customer’s checkout experience. Remember to always Save changes after any modifications to apply the new settings.
Customizing Stripe features
Before diving into the specifics, understand that customizing Stripe features within WooCommerce allows you to provide a tailored checkout experience for your customers, improving satisfaction and potentially increasing sales.
Exploring additional Stripe payment options
By offering various payment methods through Stripe, you can cater to the preferences of a wider audience. The Stripe extension for WooCommerce supports popular payment options like Apple Pay, Google Pay, and Alipay. To set these up:
- Log in to your Stripe dashboard.
- Navigate to the Settings section.
- Under the Payment methods area, select the options you want to offer, like Apple Pay, Google Pay, and Alipay.
- Save your changes and ensure they are also configured within your WooCommerce settings.
Integrating subscriptions and recurring payments
If you’re offering subscriptions or other forms of recurring payments, Stripe’s integration with WooCommerce can manage these payments securely and efficiently. This involves using Stripe Billing for better subscription management:
- Confirm that you have the WooCommerce Subscriptions extension installed.
- In your Stripe dashboard, go to Billing and set up your subscription plans and pricing.
- Back in your WooCommerce settings, link these plans to the products or services you’re offering.
- Test the subscription sign-up and payment process to ensure everything operates smoothly.
Remember, taking the time to customize these features not only helps in streamlining your payment process but also enhances your customers’ checkout experience.
Testing the Stripe integration
Before you start accepting real payments, it’s essential to ensure that everything is working correctly. The process of testing your Stripe integration with your WooCommerce store is straightforward and consists of two main steps: creating a test product and conducting a sandbox transaction.
Creating a test product
- Log in to your WordPress Dashboard and navigate to Products > Add New.
- Fill in the product name and description with the placeholder text such as “Test Product”.
- Set a simple price for the product – for example, $1.00.
- Click on the Publish button to make your test product available in your WooCommerce store.
Conducting a sandbox transaction
- Go to WooCommerce > Settings > Payments and toggle the Enabled checkbox next to the Stripe payment option.
- Click on the Stripe option and ensure that you have the Test mode enabled. This allows you to simulate transactions without actual charges.
- Copy your Test Publishable Key and Test Secret Key from your Stripe account and paste them into the respective fields.
- Scroll down and click Save changes.
- Visit your store as a customer would, add the test product to your cart, and proceed to checkout.
- Enter the Stripe test card details such as 4242 4242 4242 4242 as the card number, any future date for the expiry, and any three digits for the CVC.
- Finalize the transaction by clicking Place order.
Once you’ve completed these steps, you should receive a confirmation of the test order, and a corresponding test transaction will appear in your Stripe dashboard. This process ensures that your WooCommerce Stripe payment gateway setup is correct and that you can safely process transactions.
Looking to sell online?
Create your custom online store in minutes with 10Web AI Ecommerce Website Builder and take your business online.
Troubleshooting common issues
When you’re learning how to connect Stripe with WooCommerce, you might encounter a few obstacles. It’s important to approach these methodically to ensure a streamlined troubleshooting process.
Dealing with failed transactions
- Check Stripe’s dashboard: First, visit your Stripe dashboard to review any failed transactions. Look for error messages that explain why the transaction failed.
- Review transaction fees: Ensure that the transaction fees are correctly accounted for and that your account balance covers them.
- Analyze the error codes: Stripe provides specific error codes. Refer to Stripe’s documentation to understand what each code means.
- Contact support: If you can’t resolve the failed transaction on your own, reach out to Stripe’s support for further assistance.
Resolving configuration errors
- Verify API keys: Confirm that your Stripe API keys are correctly entered in your WooCommerce settings. You’ll find these in the API credentials section.
- Enable debug mode: Turning on Debug mode in the Stripe extension’s advanced settings can help you pinpoint issues by logging errors as they occur.
- Consult FAQs: Use both Stripe’s and WooCommerce’s FAQs to find solutions to common configuration errors.
- Update documentation: Keep your integration documentation updated after resolving any issues, as it will help in troubleshooting future errors.
Remember, successful troubleshooting is all about meticulous attention to your setup’s details and knowing where to find help when you need it.
Enhancing security measures
When connecting Stripe with WooCommerce, it’s vital to ensure that your customers’ payment information is protected. This means taking measures to fortify the security of your online store and payment processing.
Enabling SSL for secure payments
SSL, or Secure Sockets Layer, is essential for creating a secure connection between your customer’s browser and your server. This secures the data transfer, particularly during payment transactions. Follow these steps to enable SSL:
- Acquire an SSL certificate from a trusted certificate authority.
- Install the SSL certificate on your hosting account for your WooCommerce store‘s domain.
- Ensure that your WooCommerce settings are configured to force secure checkout:
- Go to WooCommerce in your WordPress dashboard.
- Click on Settings and select the Advanced tab.
- Under Page setup, ensure that the Force secure checkout option is checked.
Setting up Stripe Radar
Stripe Radar is a suite of fraud detection and prevention tools that are automatically included with your Stripe account. It helps analyze and block fraudulent payments, thus enhancing security. To set up Stripe Radar and configure its control settings, take these steps:
- Log in to your Stripe Dashboard.
- Navigate to the Radar section to review the default settings.
- For additional protection, enable 3D Secure which adds an authentication step for customers making a purchase.
- Customize Radar’s rules to fit your business by going to Settings within the Radar section of your dashboard.
Looking to sell online?
Create your custom online store in minutes with 10Web AI Ecommerce Website Builder and take your business online.
Monitoring and managing Stripe transactions
Effectively monitoring and managing your transactions is crucial for maintaining a healthy financial status for your ecommerce business. Stripe provides robust tools through its dashboard to track payments, manage refunds, and handle disputes directly within WooCommerce.
Accessing Stripe reports and analytics
To get the most out of your sales data, familiarize yourself with the Stripe dashboard. This is your hub for all financial information:
- Log in to your Stripe account.
- Navigate to the Reports section to access transaction data.
- Here, you’ll find a thorough breakdown of transactions, including payments, refunds, and other movements.
- Analyze your sales trends using detailed analytics tools to strategize accordingly.
Stripe’s reporting features help track your revenue and understand your customers’ purchasing habits, which is instrumental for forecasting and scaling your business.
Handling refunds and chargebacks
Sometimes, you’ll need to process a refund or deal with a chargeback. Stripe simplifies this through WooCommerce:
- Go to your WooCommerce dashboard, and select Orders to view all transactions.
- Click on the specific order you wish to refund.
- Inside the order details, you’ll see an option to issue a refund. Press the Refund via Stripe button to proceed.
- Enter the amount you wish to refund, and Stripe will process it and send the funds back to the customer’s bank account.
For chargebacks, Stripe will notify you via the dashboard and guide you through the response process. Keeping a close eye on these ensures you can quickly resolve any disputes and maintain positive relationships with your customers.
Monitoring order statuses within WooCommerce and the Stripe dashboard will also aid in managing disputes, keeping transactions transparent for both you and your customers.
Integrating 10Web Payments
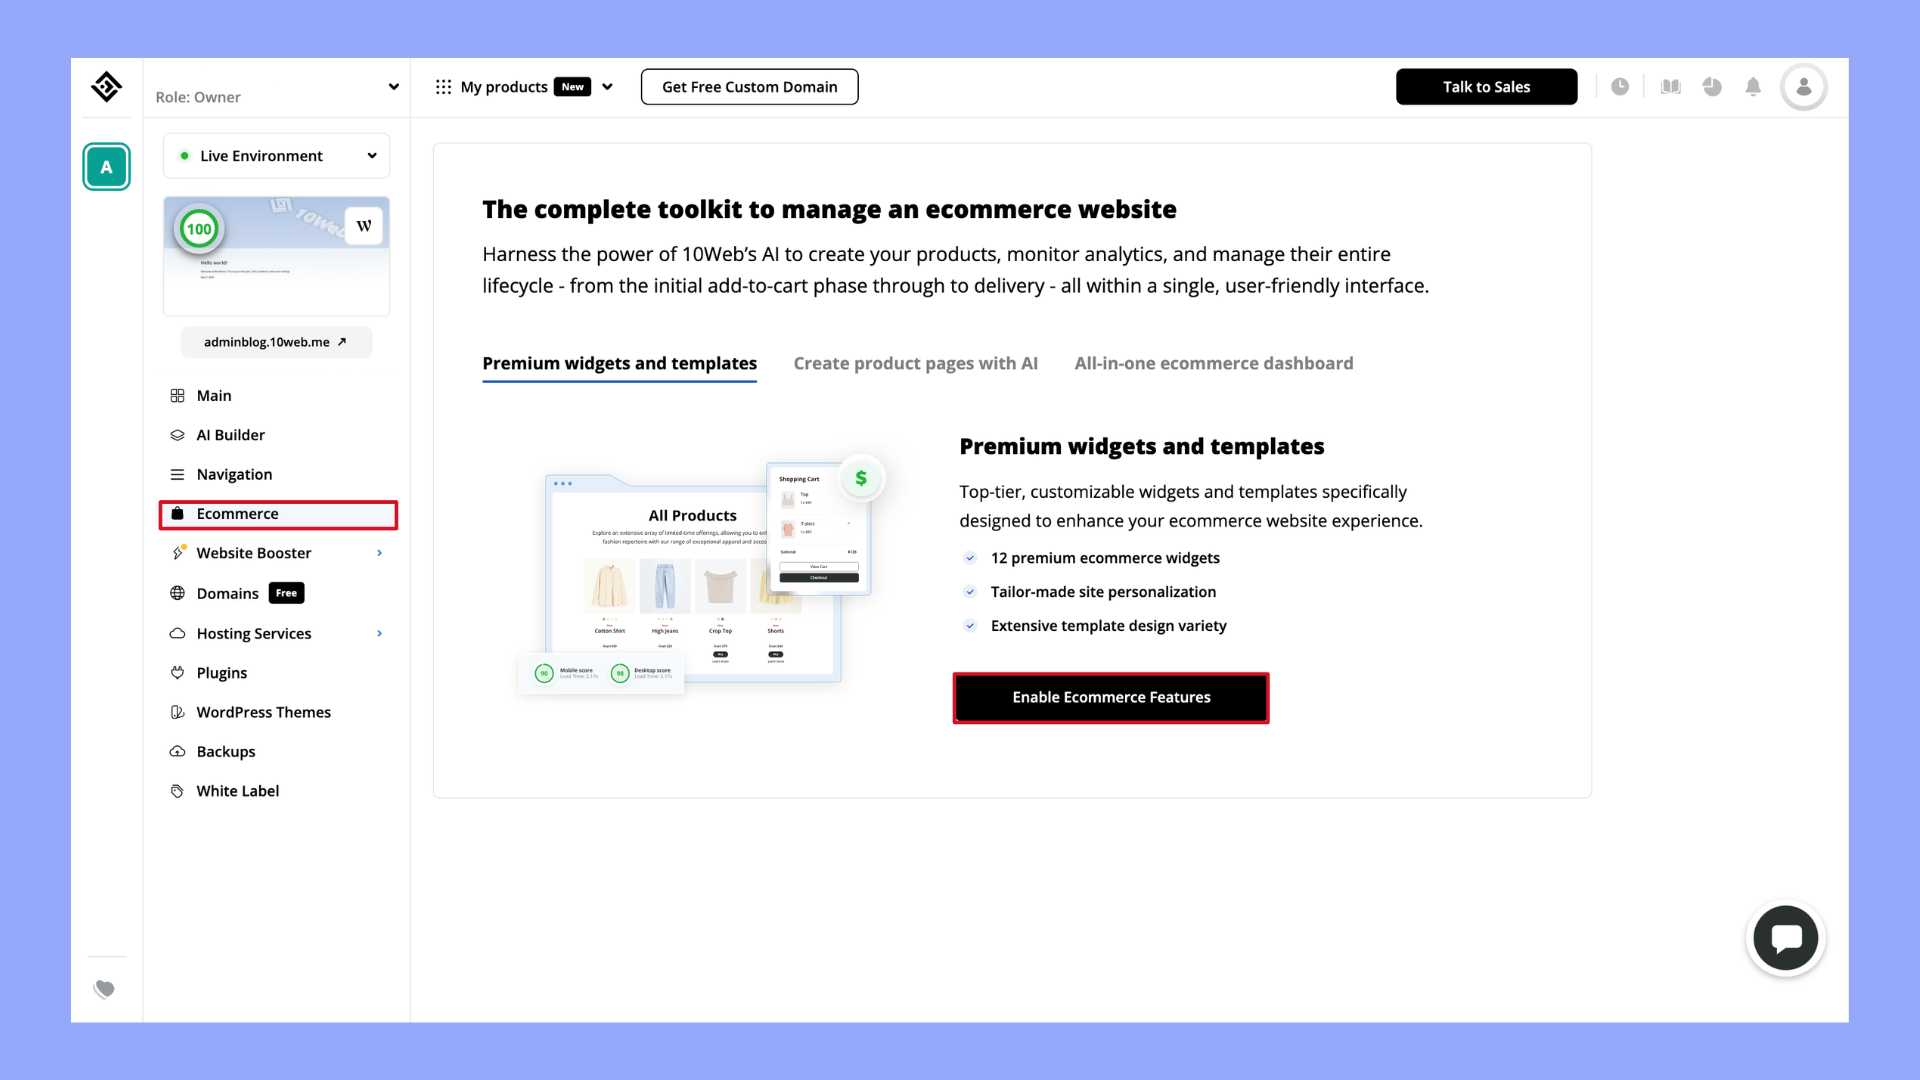
While Stripe offers a secure and functional payment gateway for WooCommerce, incorporating 10Web Payments can provide an enhanced user experience with several additional benefits.
10Web Payments includes all-encompassing features available with every 10Web Ecommerce plan, delivering a streamlined process for managing online transactions. A unified dashboard allows store owners to control their products, customers, orders, and payments from one intuitive interface, reducing the need to switch between different panels. Additionally, 10Web Payments promises an automated setup, securing transactions with the 3D-Secure protocol and accepting a wide array of credit and debit cards, which facilitates a broader customer reach and improved store accessibility.
Conclusion
In conclusion, connecting Stripe to WooCommerce can significantly enhance your ecommerce platform’s efficiency and customer satisfaction. By following the steps outlined in this guide, you can ensure a seamless integration, allowing you to process payments securely and diversify your transaction options. Remember to test the integration thoroughly to avoid any disruptions in your payment process. With Stripe now a part of your payment system, you’re well-equipped to provide a smoother, more reliable shopping experience that can help grow your business.
Looking to sell online?
Create your online store in minutes
Create your online store in minutes with 10Web AI Ecommerce Website Builder.