Setting up an online store can be a daunting task for beginners, but with WooCommerce, the process becomes straightforward and manageable. This guide will walk you through how to set up WooCommerce, from installation to customization, helping you create a fully functional ecommerce site. Learn essential steps to get your online store running smoothly and efficiently.
FAQ
Is it hard to set up WooCommerce?
Is WooCommerce free for beginners?
What is WooCommerce and how do you use it?
Can I install WooCommerce for free?

Looking to sell online?
Create your custom online store in minutes with 10Web AI Ecommerce Website Builder and take your business online.
Prerequisites to setting up WooCommerce
Before diving into the creation of your online store with WooCommerce, it’s essential to ensure that your foundation is solid. Here’s what you need to get started:
- WordPress: WooCommerce is a plugin designed for WordPress. You must have a WordPress website to begin. If you don’t have one, setting up a WordPress site should be your first step.
- Backup your website: Use a reliable backup plugin like UpdraftPlus or BackupBuddy to avoid data loss.
- Hosting: A reliable web host is crucial for your WordPress website’s performance. Choose a host that offers good uptime, support, and can handle your expected traffic.. One of the best options you can choose is the 10Web Managed Website Hosting, where you will be able to benefit from the managed WordPress hosting that will ensure you get speed and security over your website.
- SSL certificate: For security and to gain your customers’ trust, an SSL certificate is necessary. It encrypts data and changes your site from HTTP to HTTPS. Most hosting providers offer a free SSL certificate.
- PHP: WooCommerce runs on PHP. Make certain your hosting environment uses a recent version of PHP, ideally PHP 7.4 or higher for better performance and security.
Once these prerequisites are met, you’ll be ready to start configuring WooCommerce and adding products to your new online store. Remember, a smooth start leads to a smoother journey in managing your online business!
How to set up WooCommerce
In this section, you’ll learn how to set up WooCommerce by following a simple, step-by-step process to get your online store up and running efficiently. We’ll cover everything from installing the plugin to configuring essential settings, ensuring your store is optimized for a smooth customer experience. By the end, you’ll be ready to add products, manage inventory, and start selling with ease.
Step 1: Installing the WooCommerce plugin
- Begin by logging into your WordPress dashboard.
- Navigate to Plugins > Add New.
- In the search bar, type WooCommerce and press Enter.
- Once you find the WooCommerce plugin, click on Install Now.
- After the installation is complete, click on Activate to enable the WooCommerce plugin on your site.
Step 2: Filing the store details
- Upon activation, you’ll be presented with the WooCommerce Setup Wizard.
- Fill in your store details, including your address, the country you’re operating from, and preferred currency.
- Answer a few questions about the nature of your store and the type of products you plan to sell.
Step 3: Adding products
To add products in WooCommerce, follow these straightforward steps:
- Log in to your WordPress dashboard.
- Navigate to WooCommerce and select Products.
- Click Add New at the top.
- Enter the product name and description.
- Scroll down to the Product Data section and select the appropriate product type (e.g., simple, variable).
- Fill in the price, inventory details, shipping information, and other relevant data.
- Add a product image and any additional gallery images.
- Set a product category and tags.
- Finally, click Publish to make the product live in your store.
Step 4: Payment setup
- Choose which payment methods you’d like to offer your customers.
- WooCommerce provides options such as Direct Bank Transfer, Check Payments, Cash on Delivery, and PayPal by default.
- If you are using 10Web’s Ecommerce plan, you will have the option of using the 10Web Payment as well.
- You can add other payment options by integrating additional payment gateways.
Step 5: Shipping configuration
- Go to your WordPress dashboard.
- Navigate to WooCommerce > Settings and click on the Shipping tab.
- Click on Add Shipping Zone.
- Enter a Zone Name (e.g., Domestic, International).
- After defining the shipping zone, choose Flat Rate, Free Shipping, or Local Pickup.
- Click Add Shipping Method.
Step 6: Recommended extensions
- The Setup Wizard may suggest some WooCommerce extensions that could be beneficial for your store.
- Review each recommendation and decide whether to install it now or skip and potentially add it later.
By completing these steps, your online store’s foundation will be established, allowing you to move on to adding products and customizing your store’s appearance.
How to set up ecommerce website using 10Web
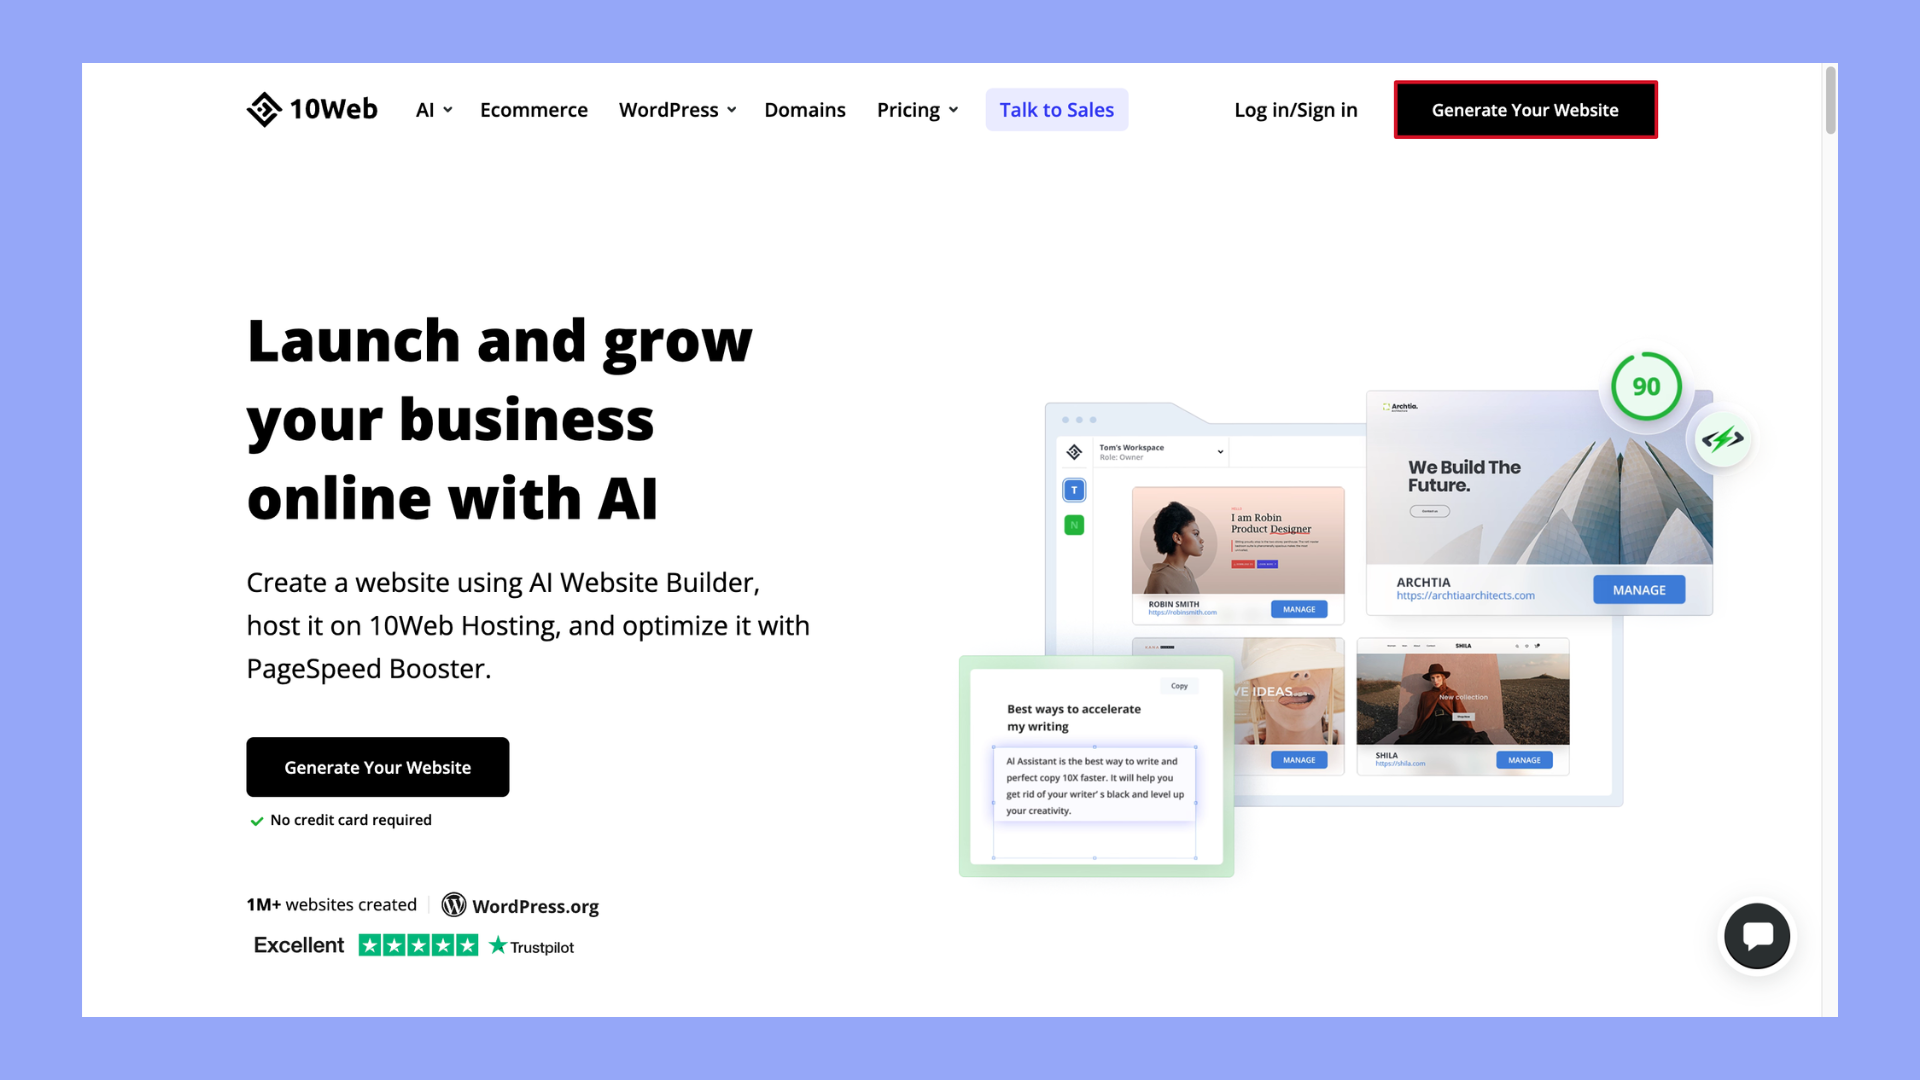
By using 10Web AI Ecommerce Website Builder, creating ecommerce websites has become quicker and easier. 10Web’s AI Ecommerce Website Builder is built on WooCommerce, which allows users to benefit from all of the features and functionalities that WooCommerce offers, but with improved interface and quicker setting up process, making it easier to use for everyone. So, with 10Web, you will be able to create an ecommerce website within minutes, without any complications.
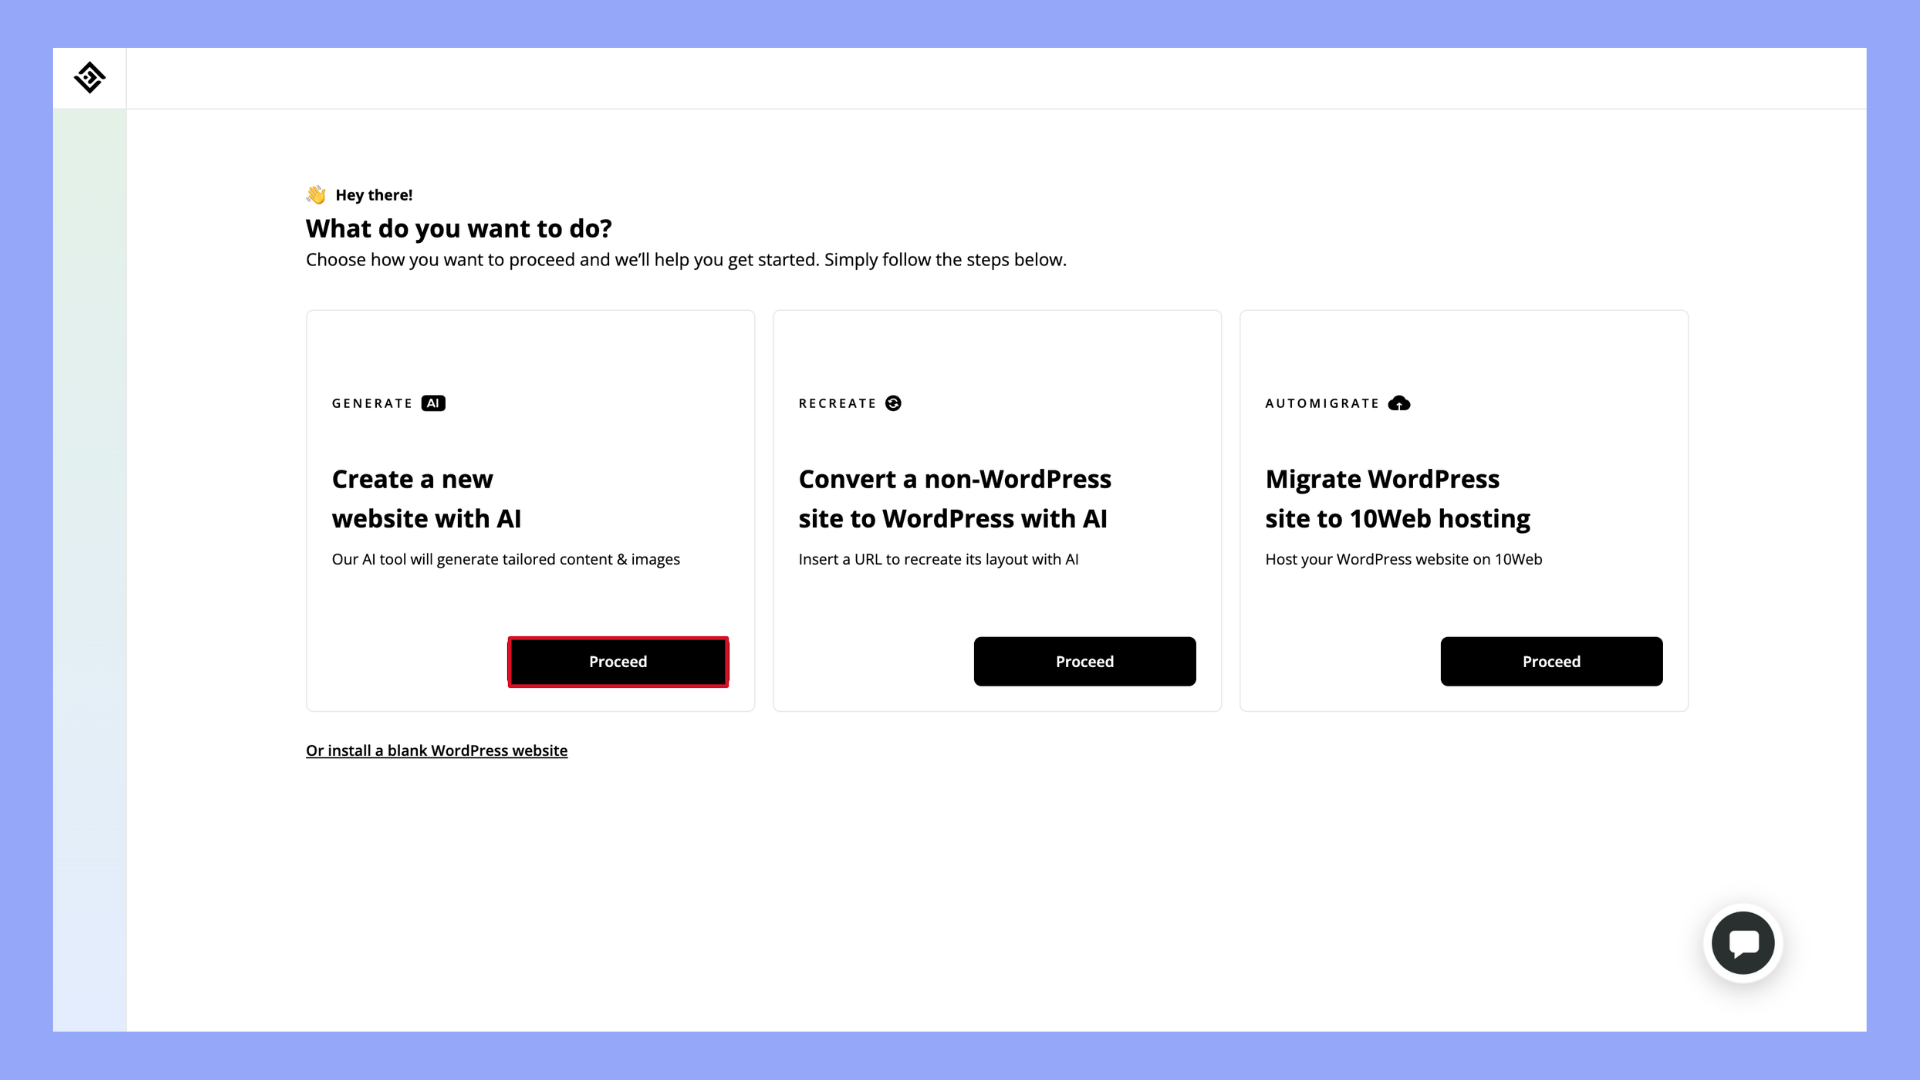
Here is a step-by-step guide to create an ecommerce website using 10Web:
- Go to 10Web’s website and click on Generate Your Website.

- To create a website using AI, choose the option Create a new website with AI and click Proceed.
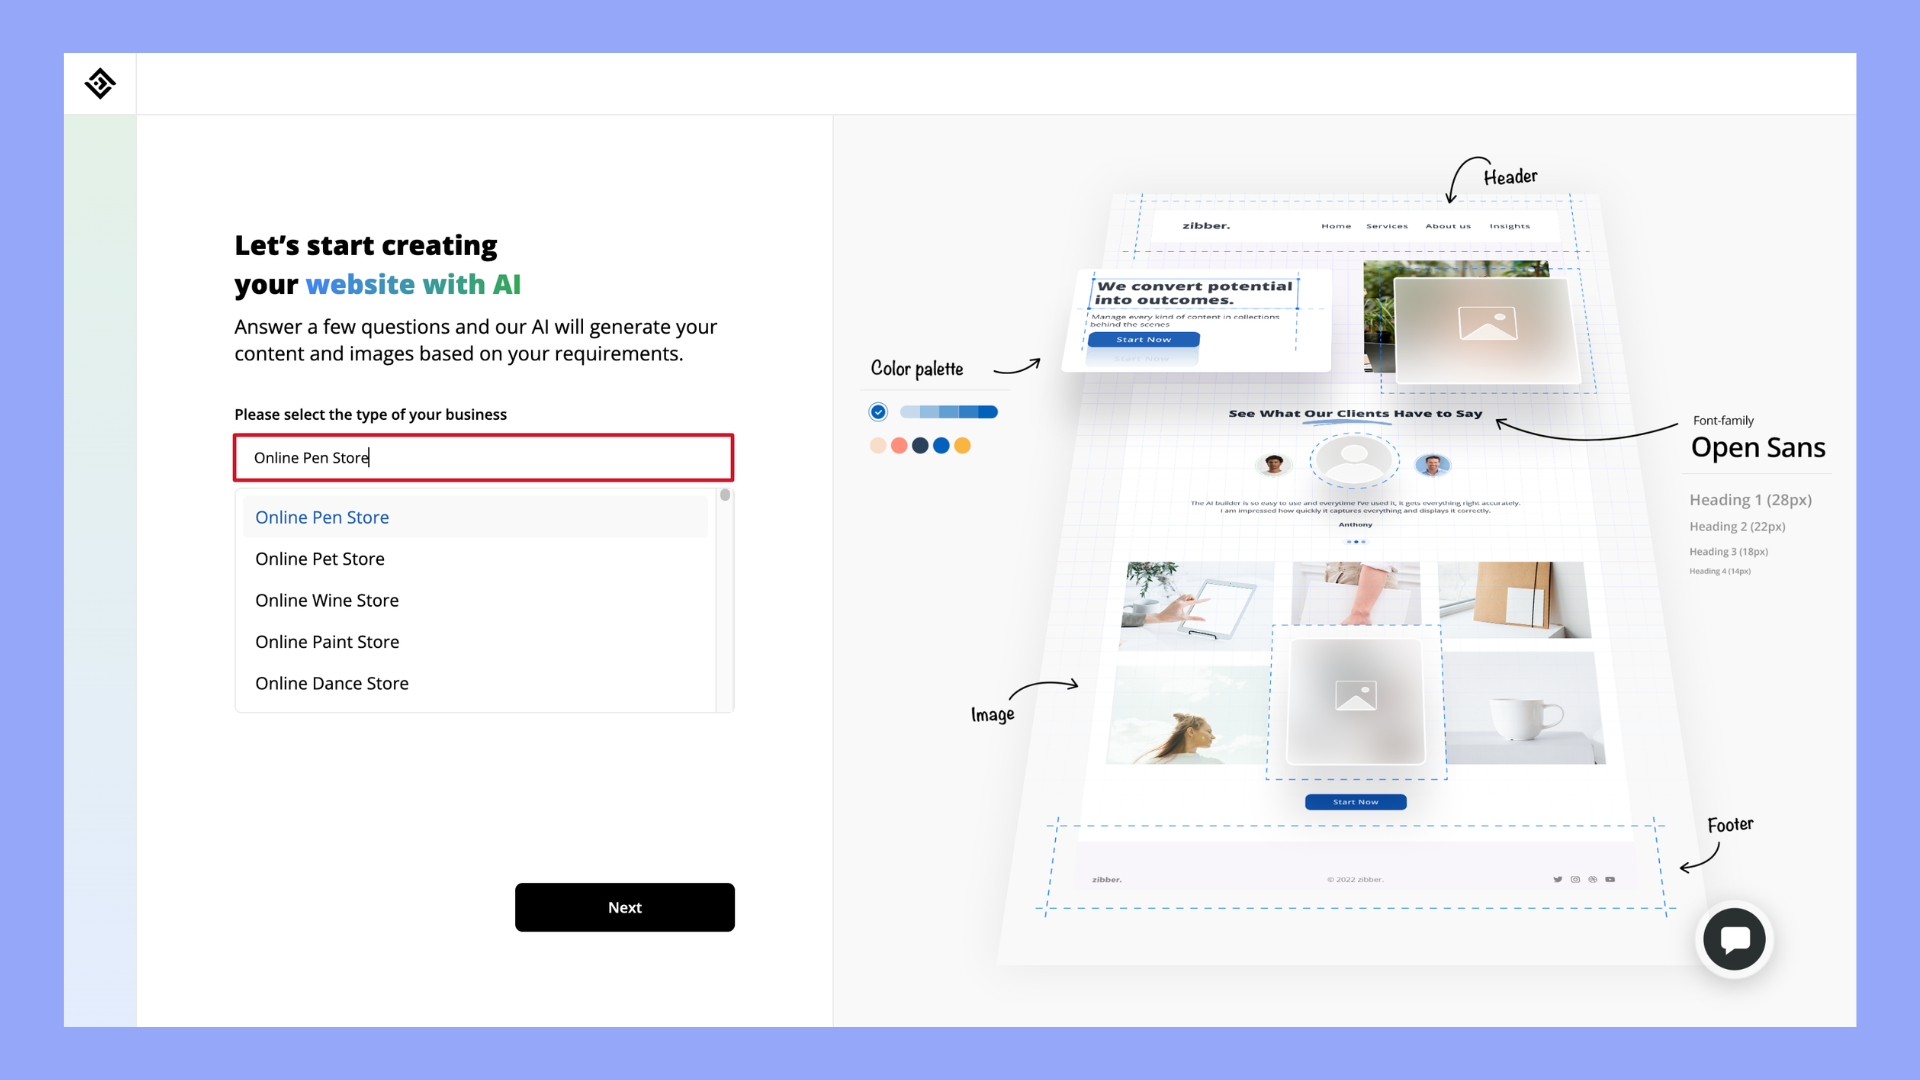
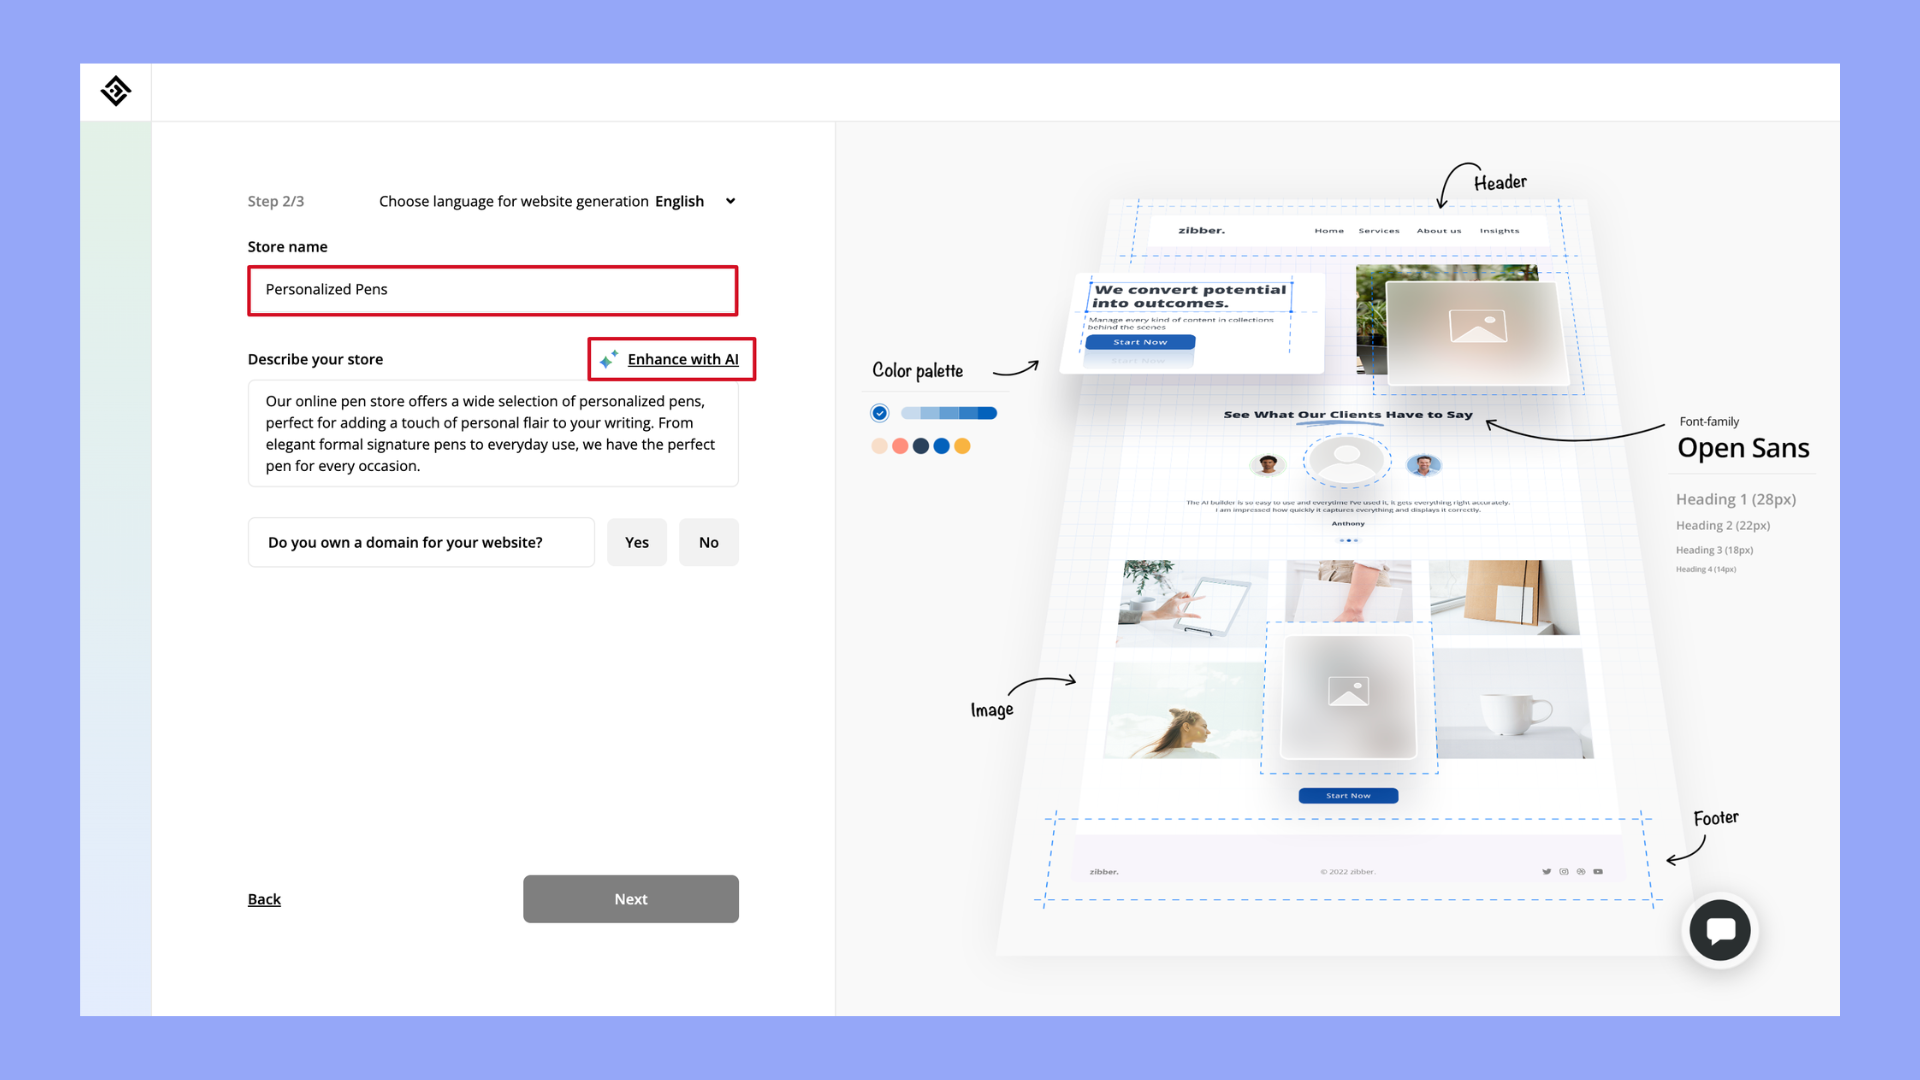
- Next you will need to answer a few questions regarding your website so that the AI can generate exactly what you want. First, select the type of ecommerce website you want to generate.
- Insert your brand name, and describe your store, such as what are the unique products that you sell and services that you offer. Once you write the keywords, click on Enhance with AI, which will generate your store’s description for you.
If you don’t have a domain, you will be provided an option to choose and buy one later during the website generation. You will be able to find and buy a domain name with the help of 10Web Domains that suit your website.
- The products and categories are automatically filled with AI, however, if you want to change anything you can edit the AI’s suggestions and click Finalize.
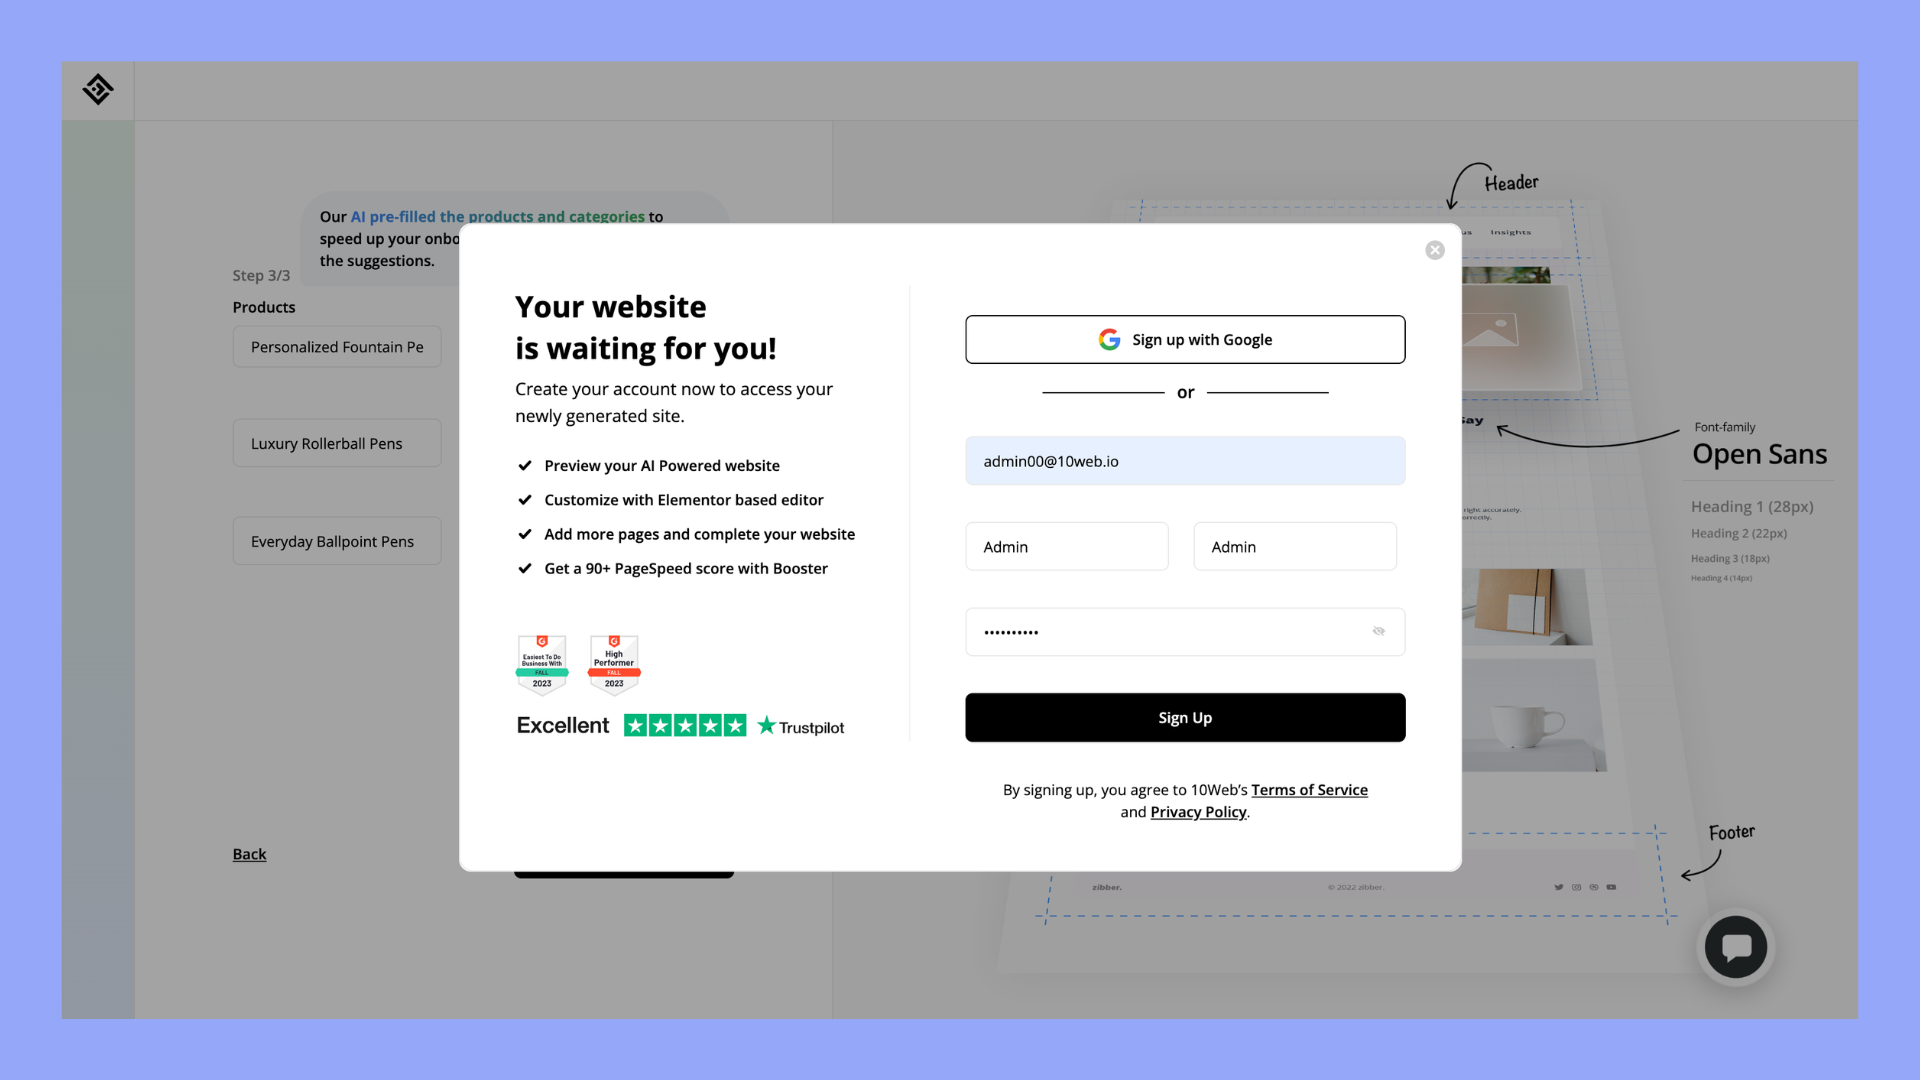
- If you do not already have an account on 10Web, create an account by signing up.
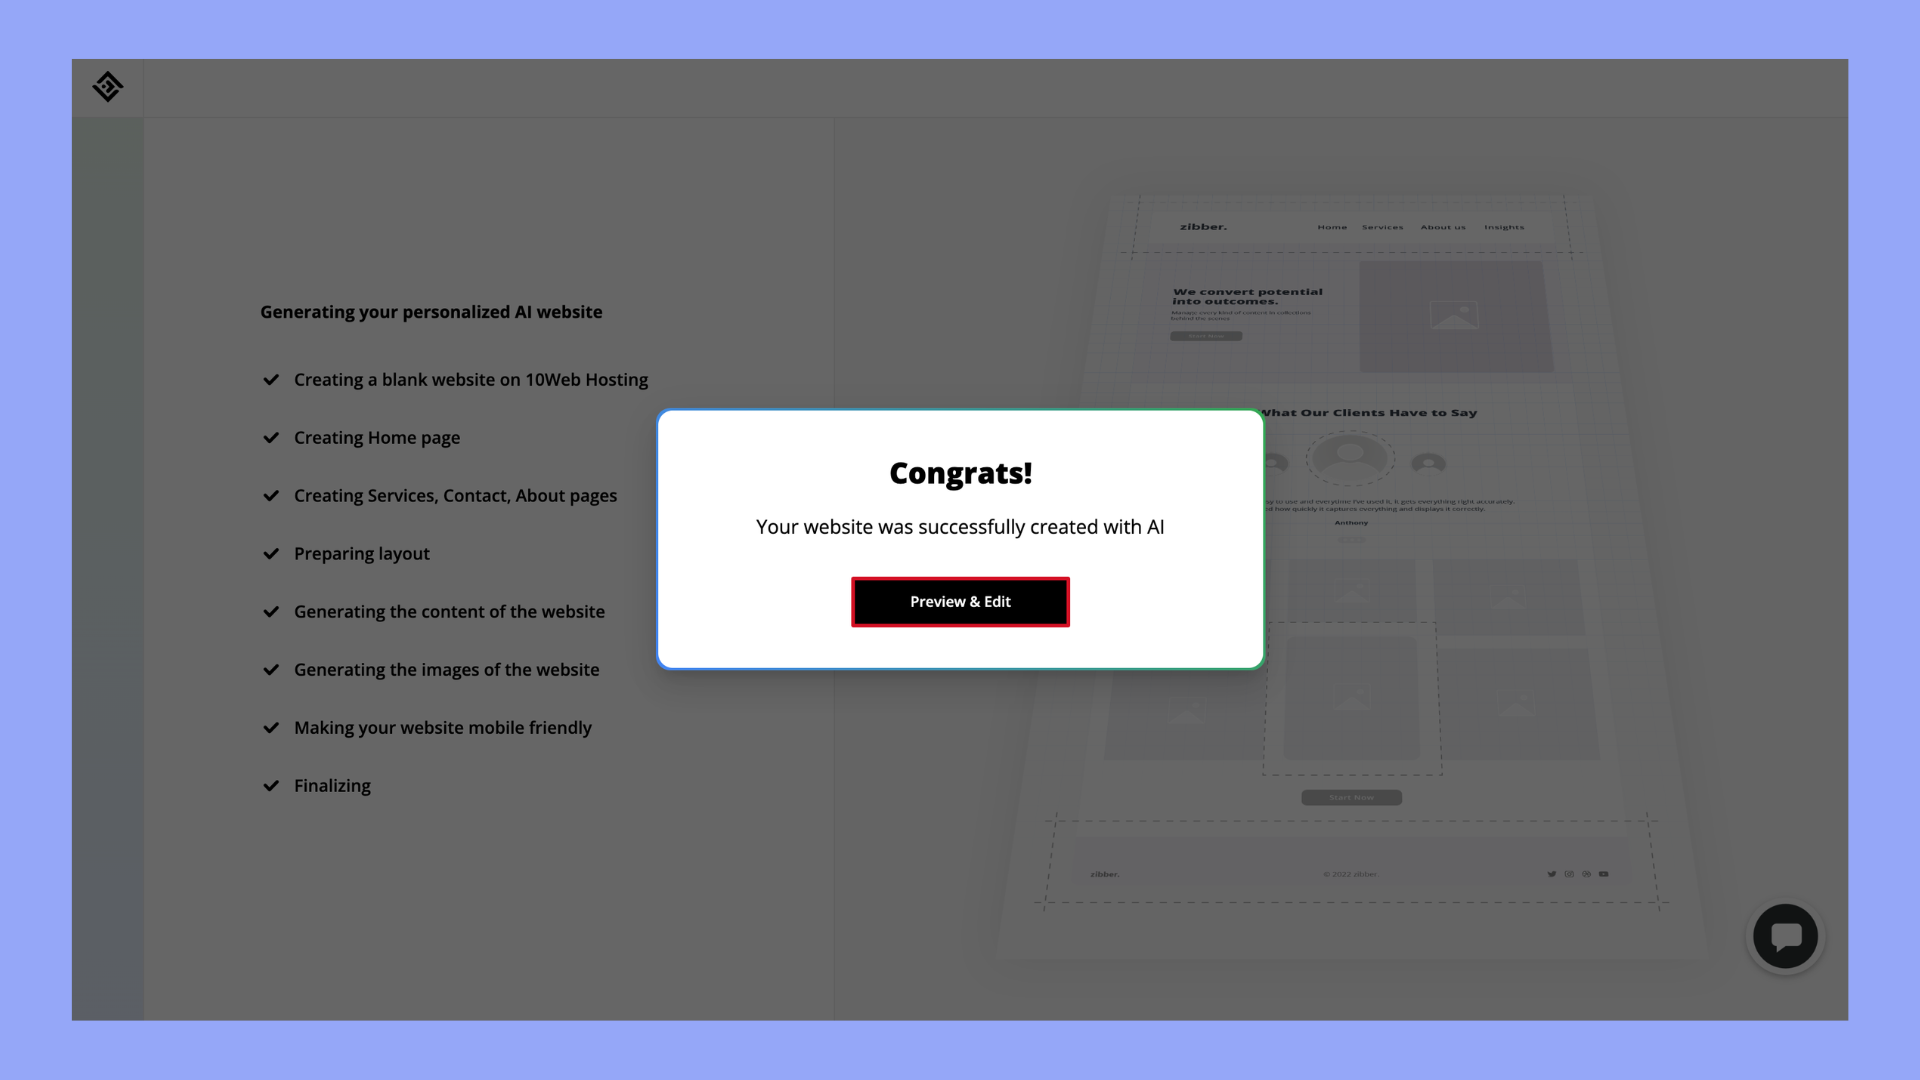
- Once you have signed up successfully, you will need to wait a couple of minutes for the AI to generate your website. When the website is generated, you can preview and edit it however you want.
- The website should look something like this:
Preview
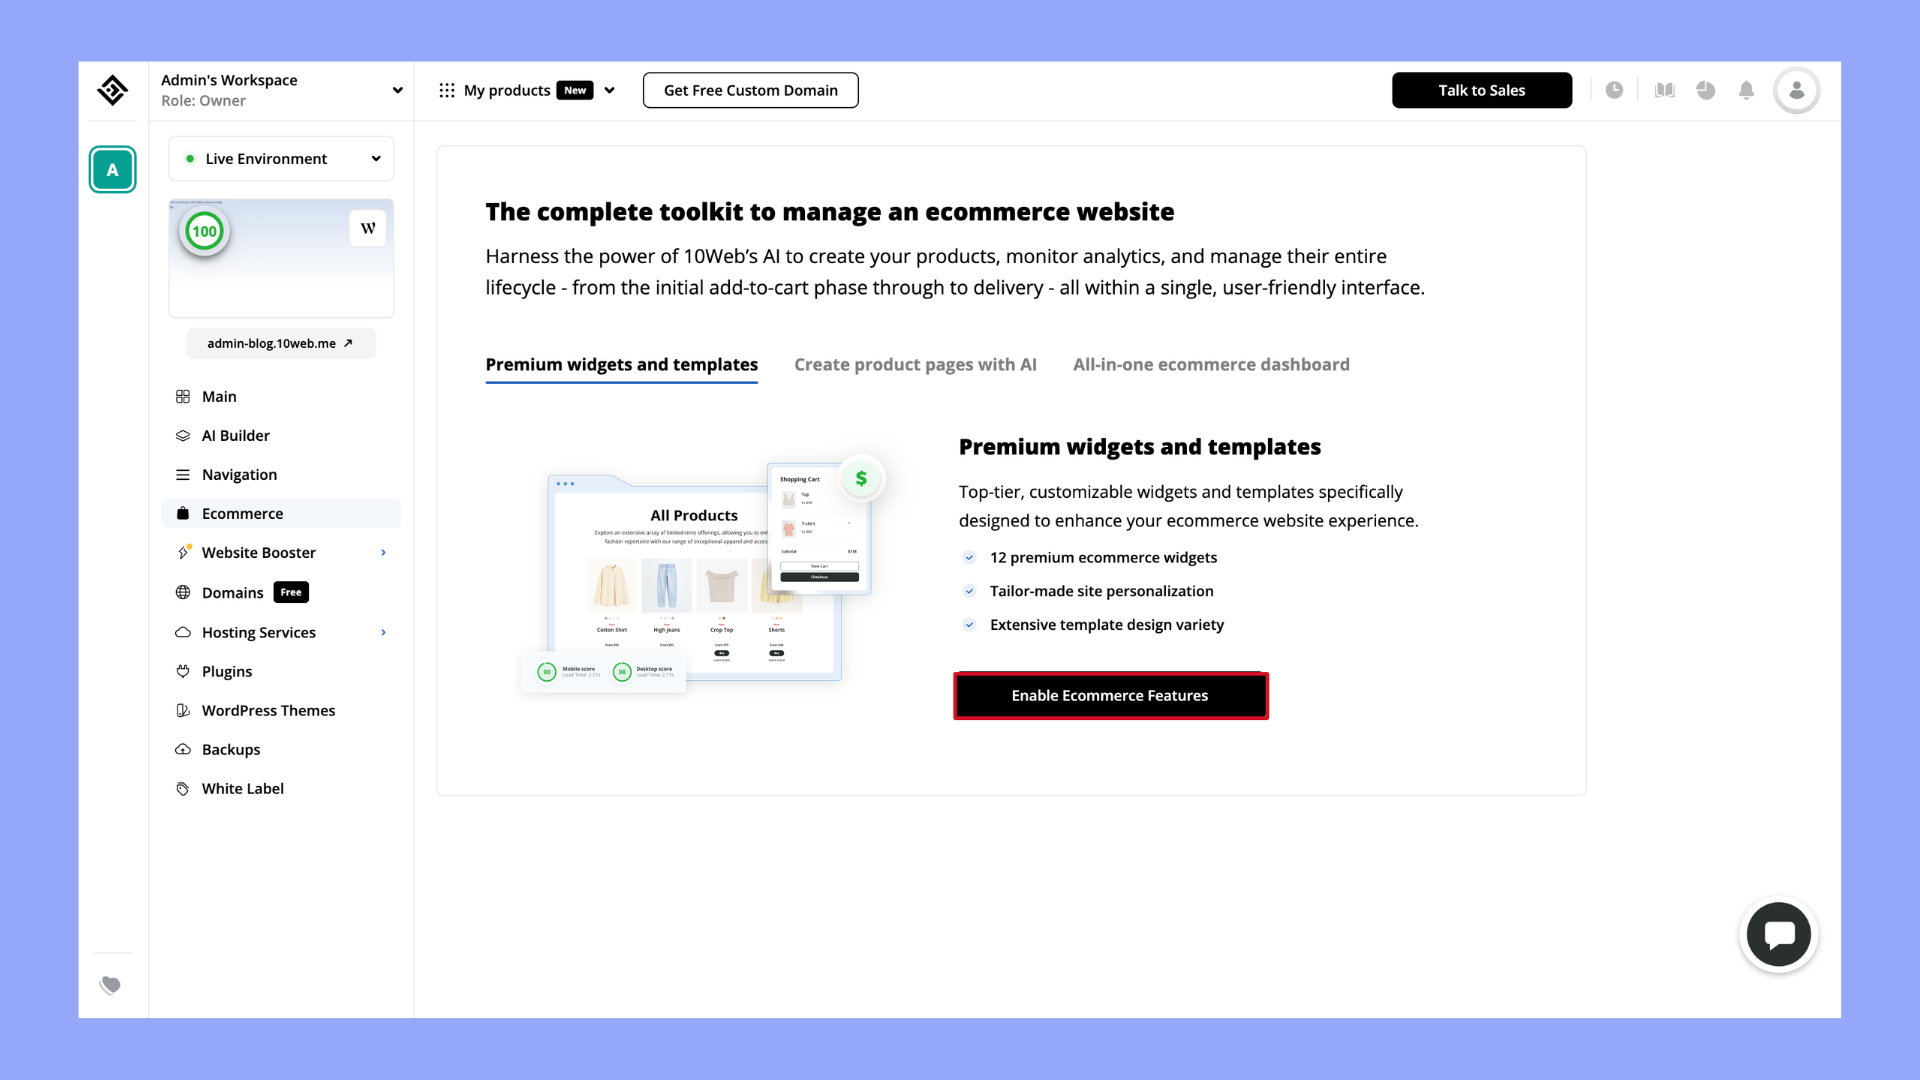
- After the website is generated, activate the ecommerce features by clicking on Ecommerce on the left hand side from the 10Web dashboard , then Enable Ecommerce Features.
- Once the ecommerce features are activated, you will need to configure the website settings to set up your online store.


Setting up your store from the 10Web dashboard
When using 10Web to create your ecommerce website, you will be able to set up your online store from a single platform, which makes navigating between sections easier and less time consuming.
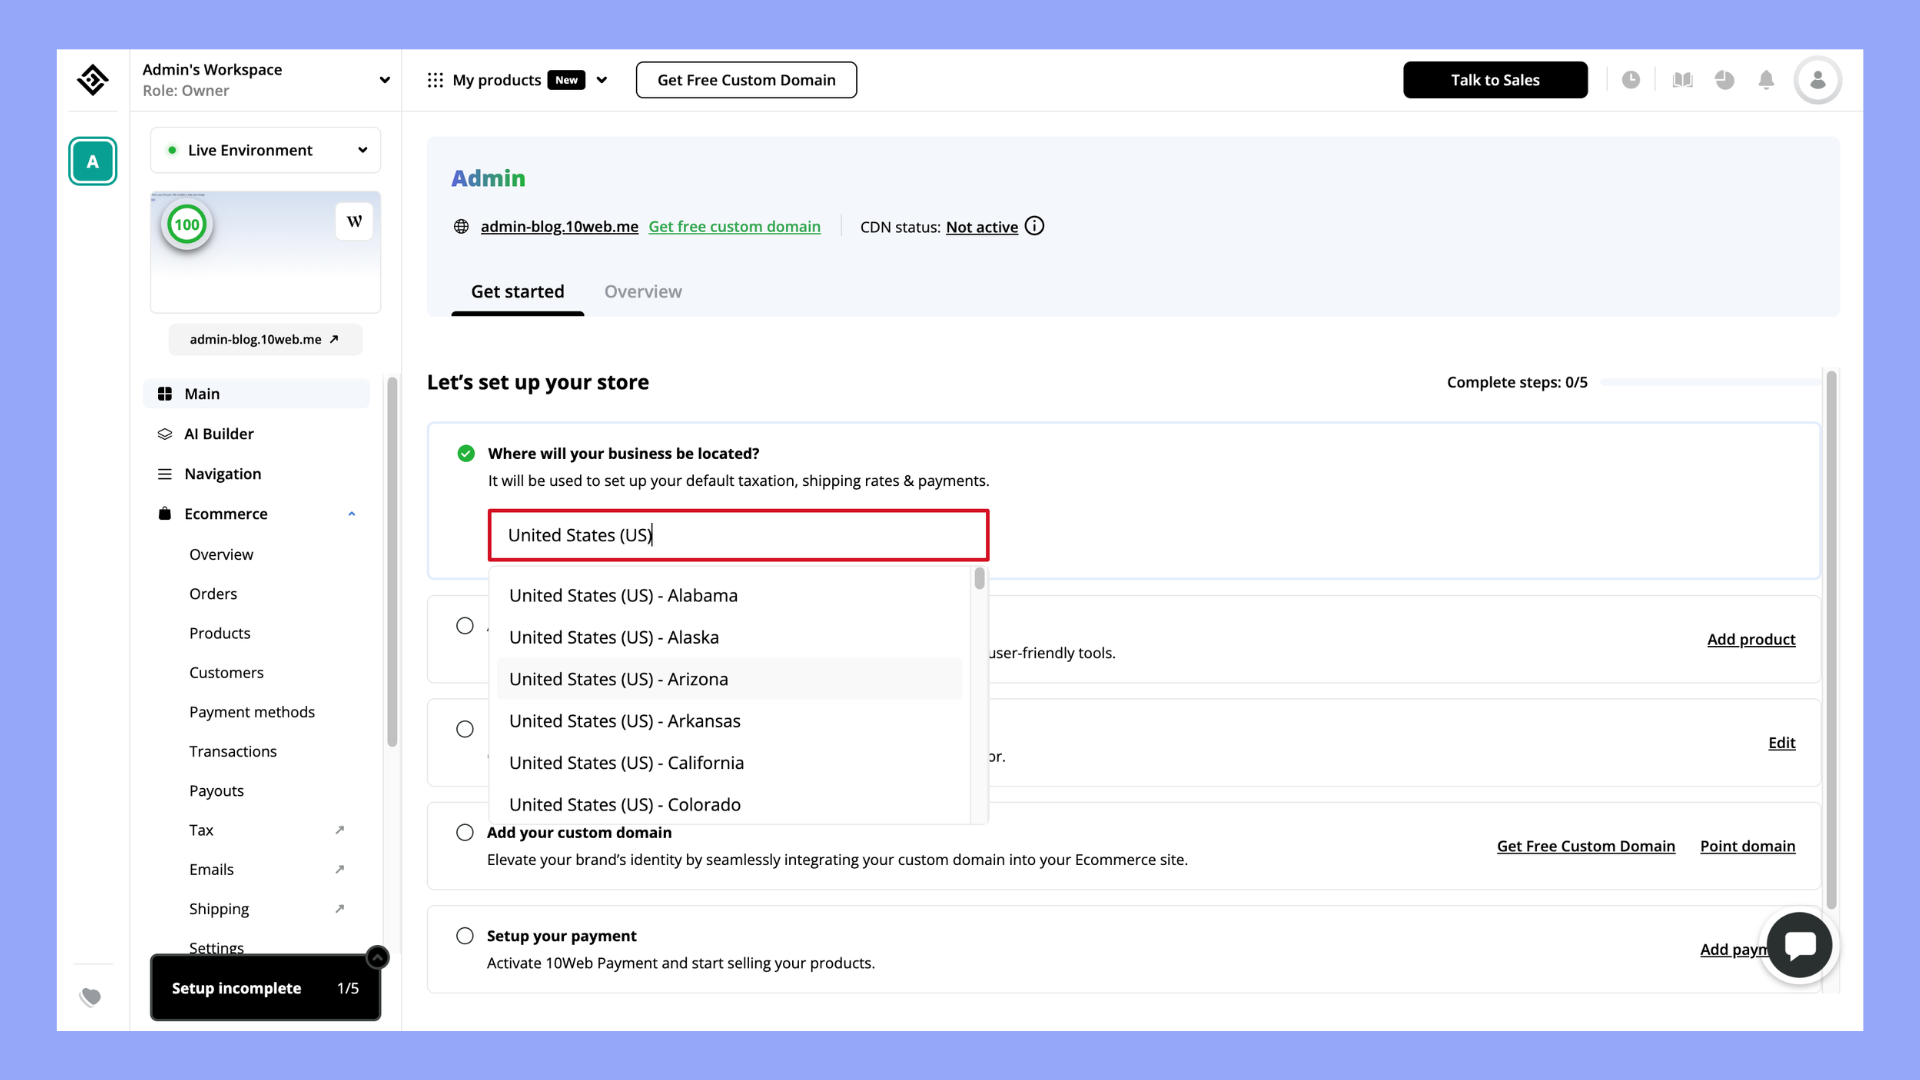
Location
Choose the location of your online store so that 10Web will be able to set up default taxation, shipping rates & payments.
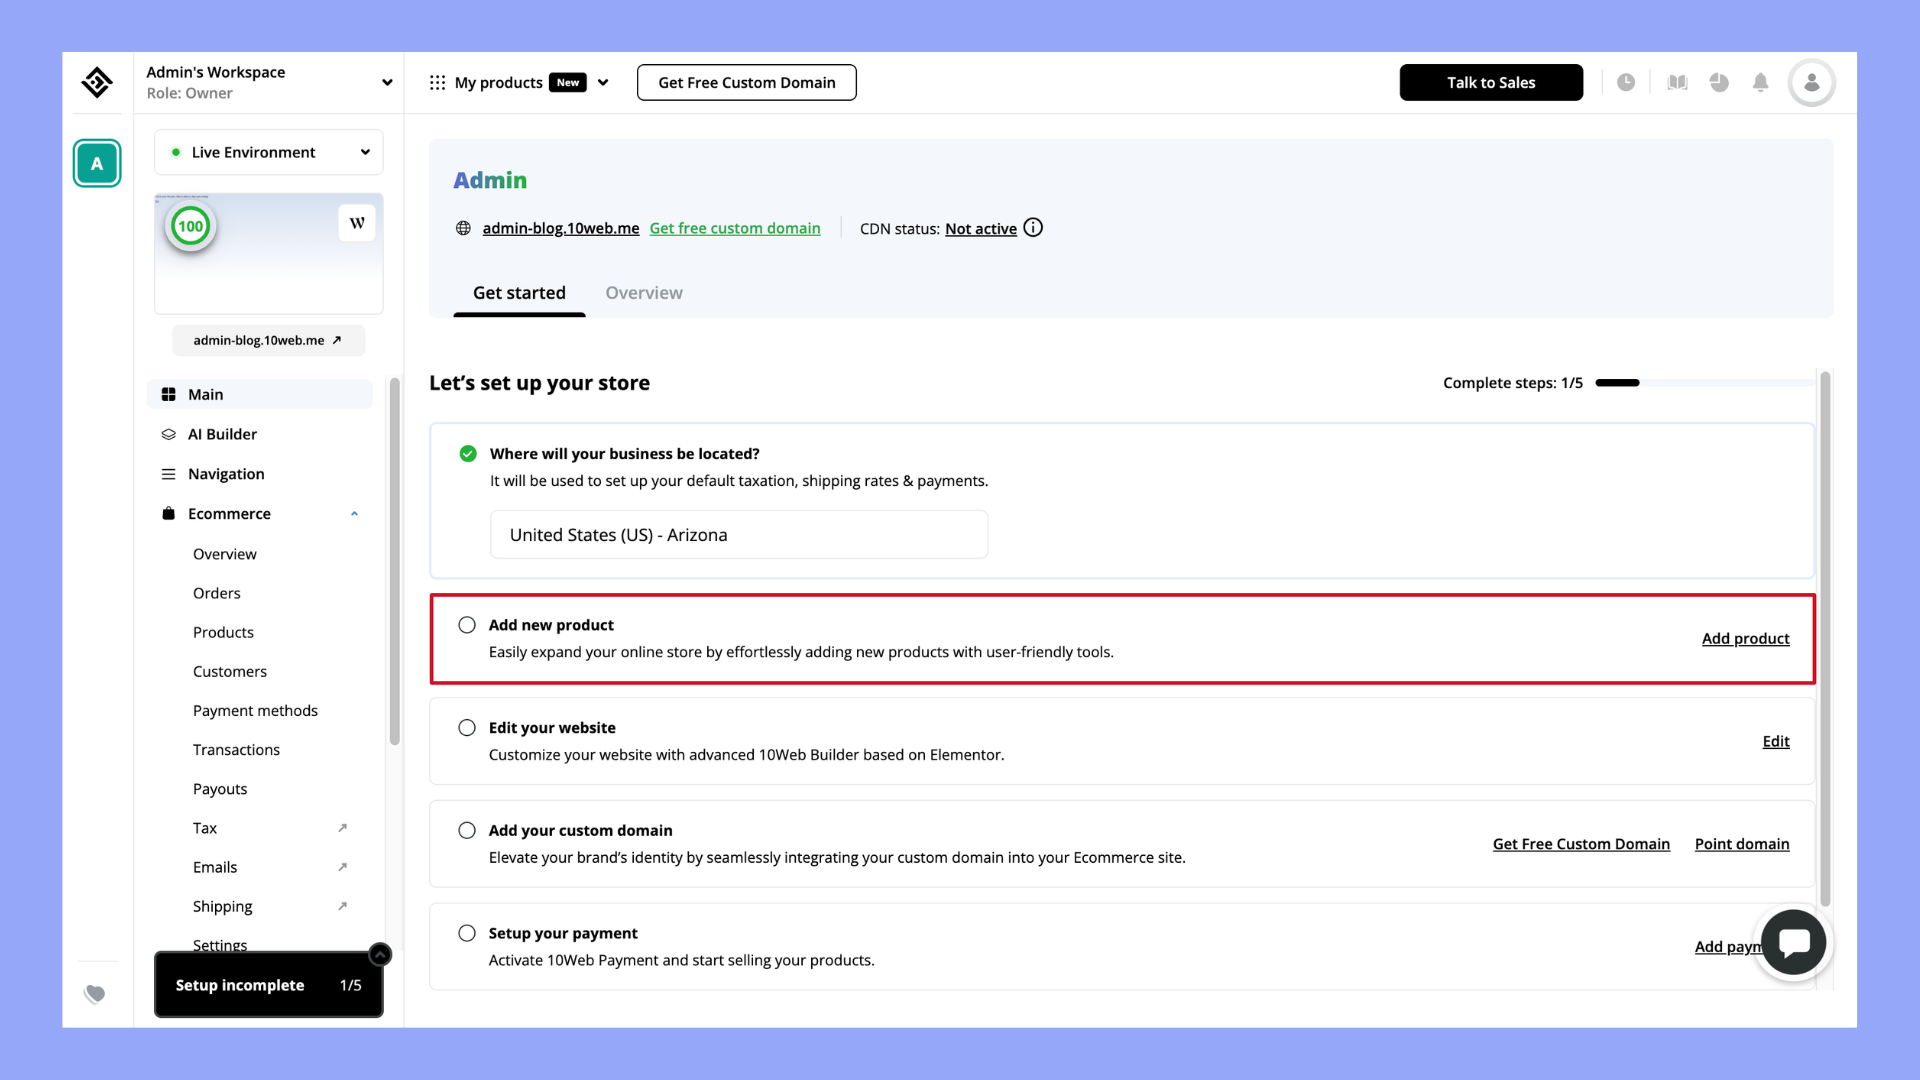
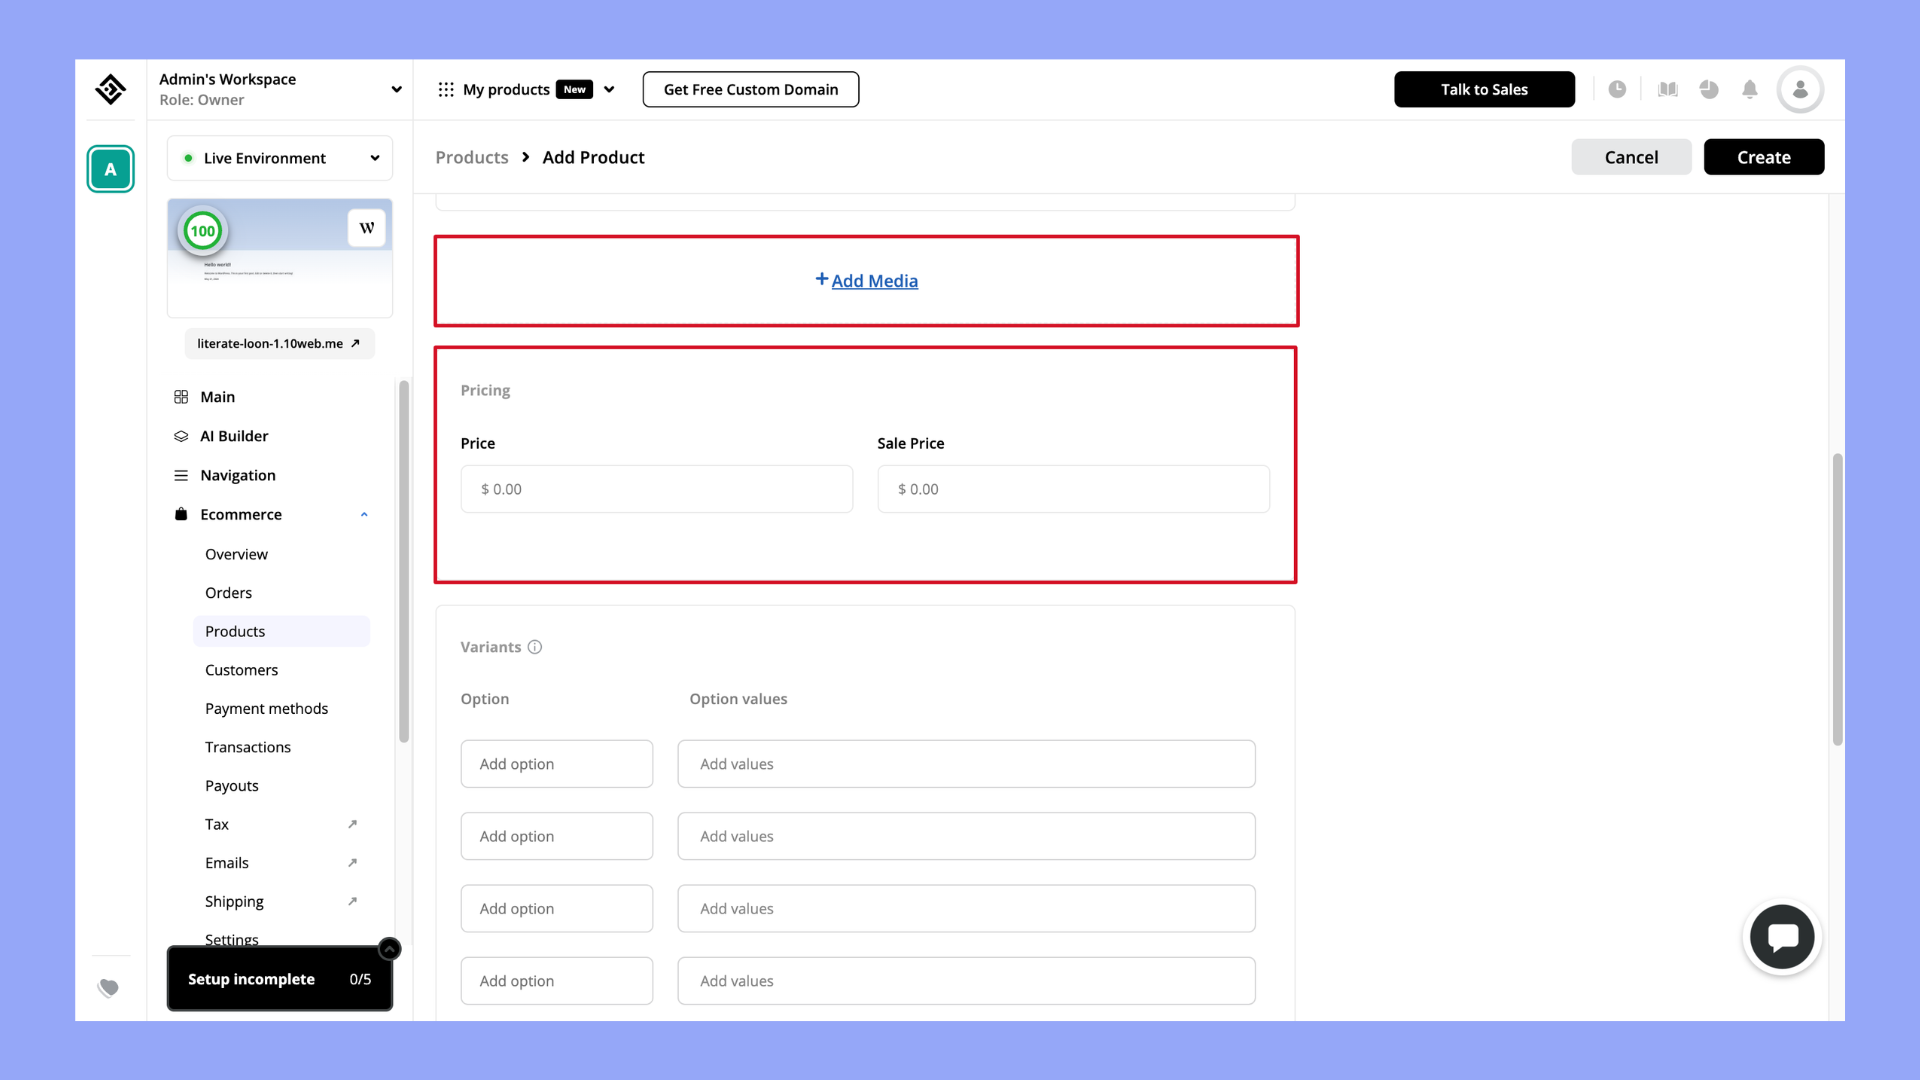
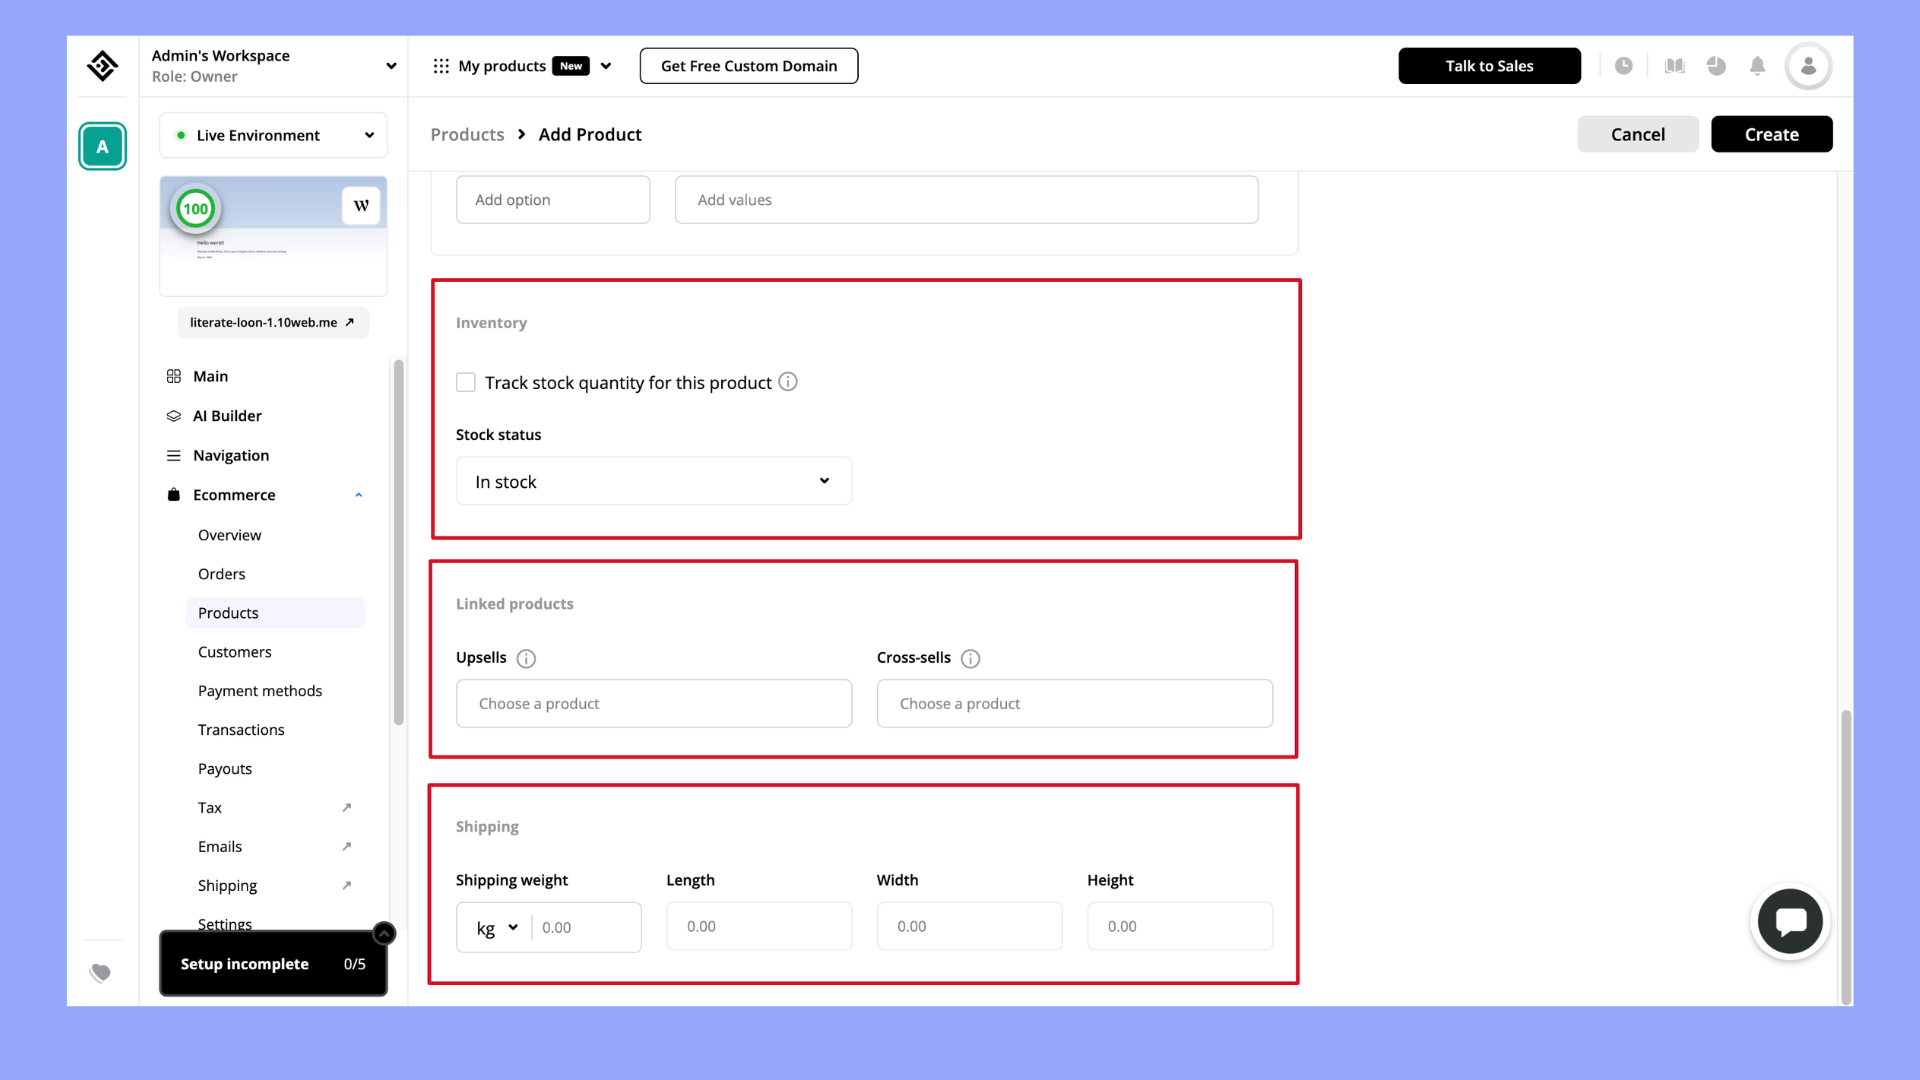
Add products
Adding products using 10Web is similar to adding products using WooCommerce, however by using 10Web you will benefit from better UX design, work on a single platform, and have integrated AI tools that can speed up the set up process.
- Click Add new products to add all of your products on your ecommerce site.
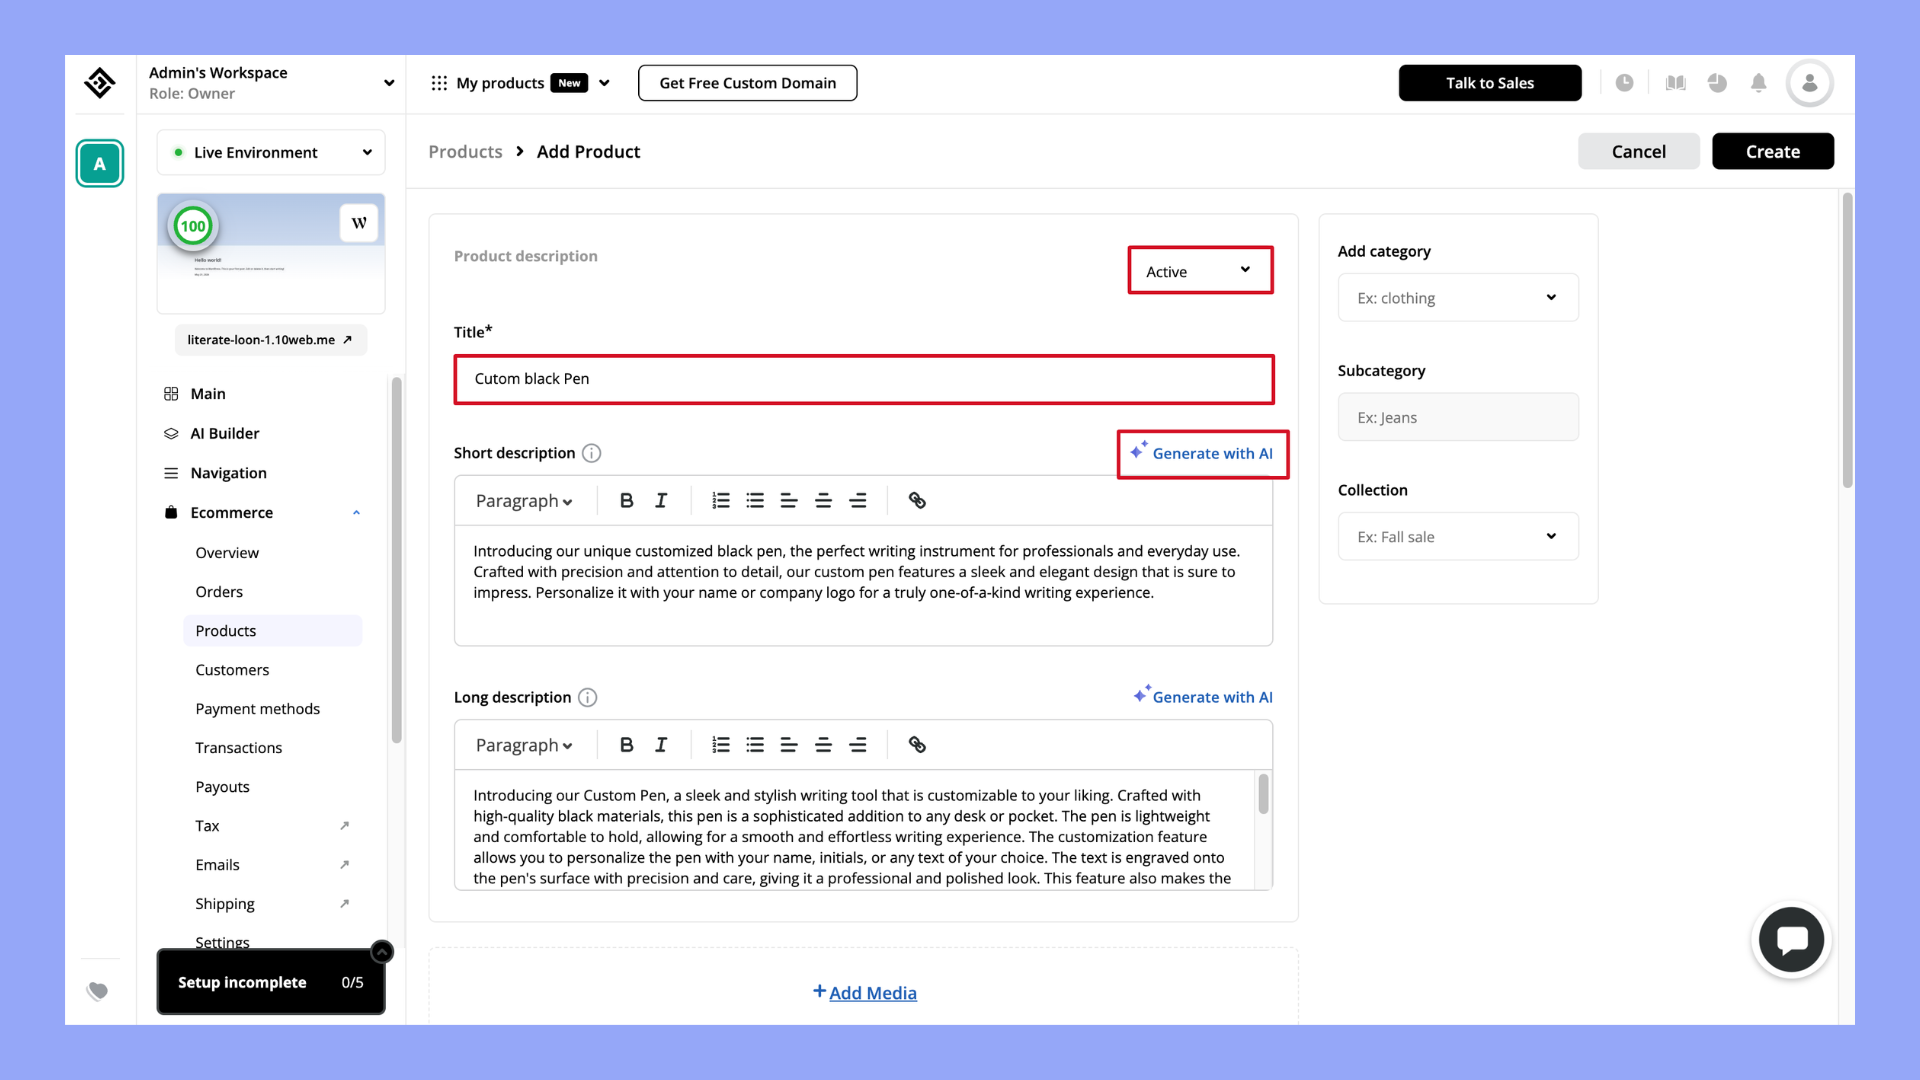
- Adding products through 10Web allows you to generate descriptions using AI. Once you’re in the Add Product section, click on Generate with AI and enter keywords that relate to the product that you want to add and click Generate.
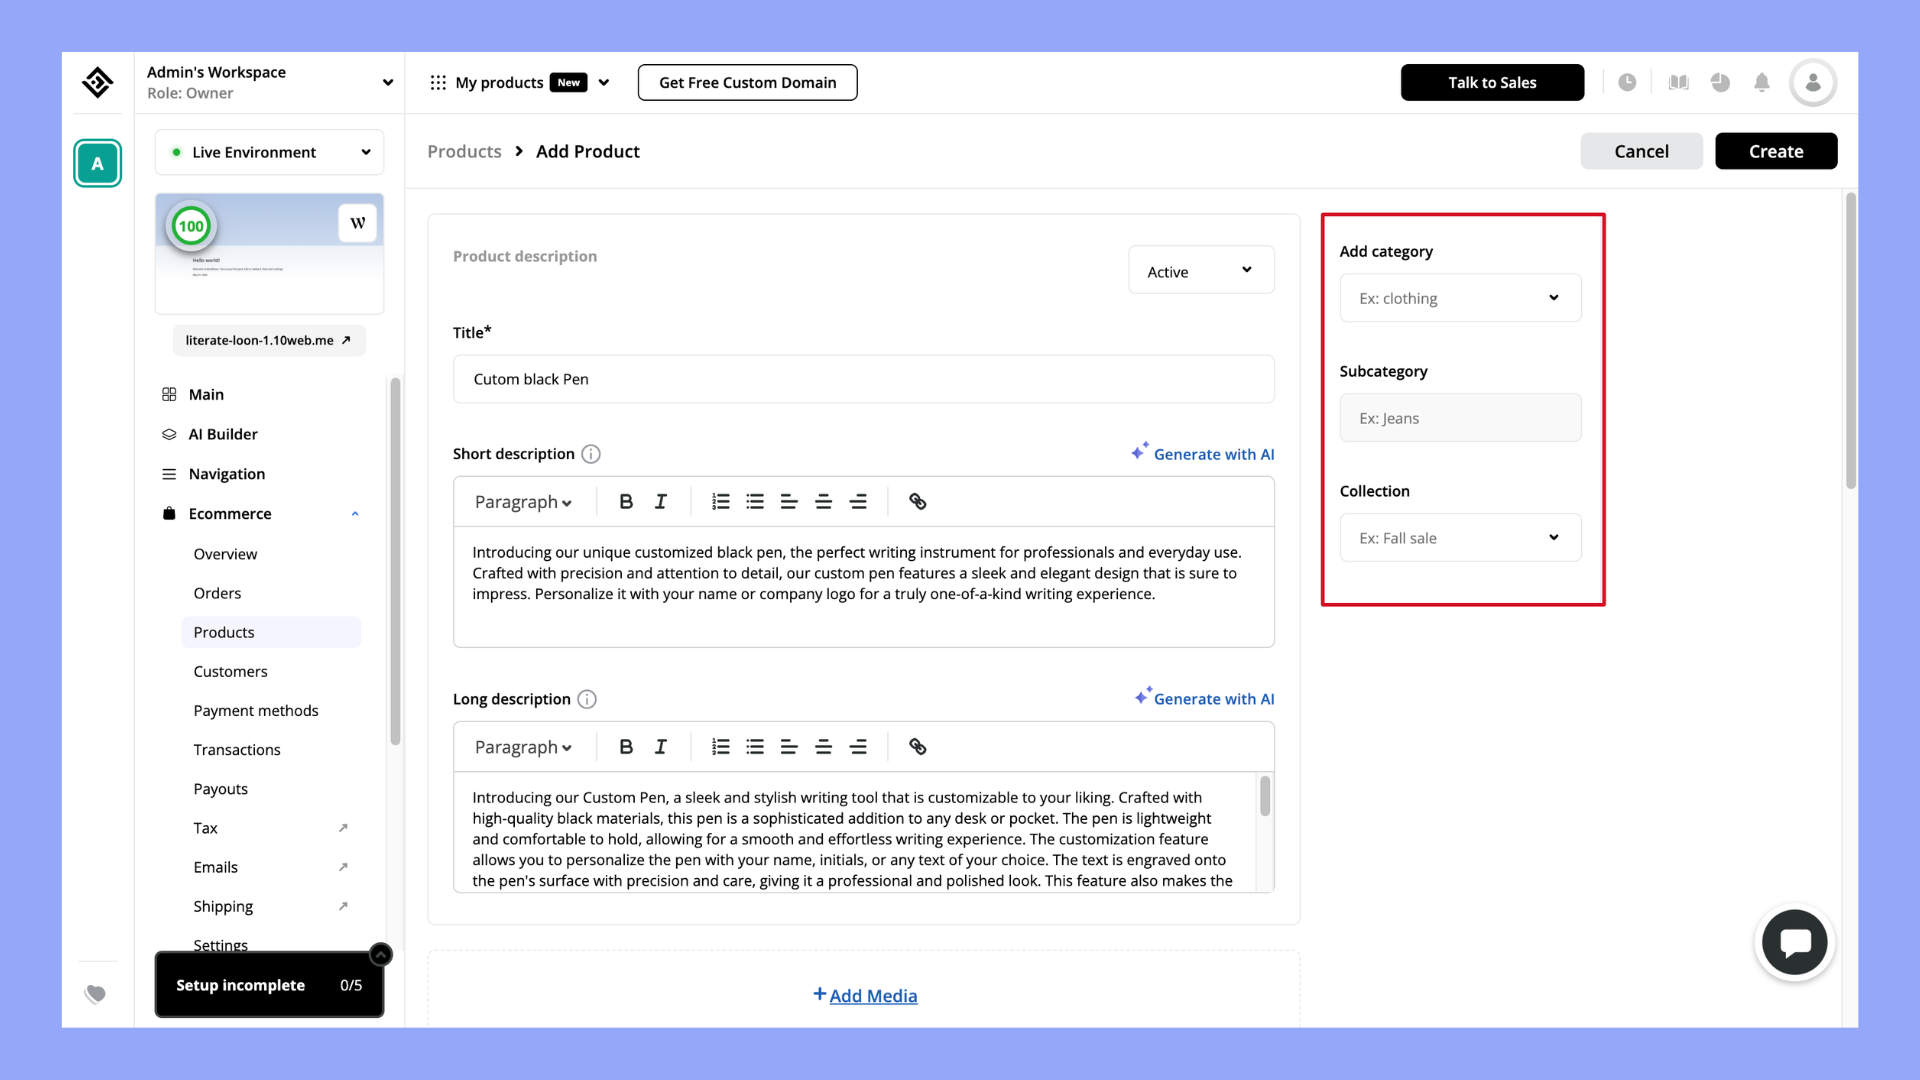
- Categorize your products by clicking on the Add category. You also can add a Subcategory and Collection for the product.
- Add pictures of your product, its price and sale price if it’s on sale.
- Finally, fill in the Inventory and Shipping details which will allow your customers to know whether the product is available and what the products’ details are.
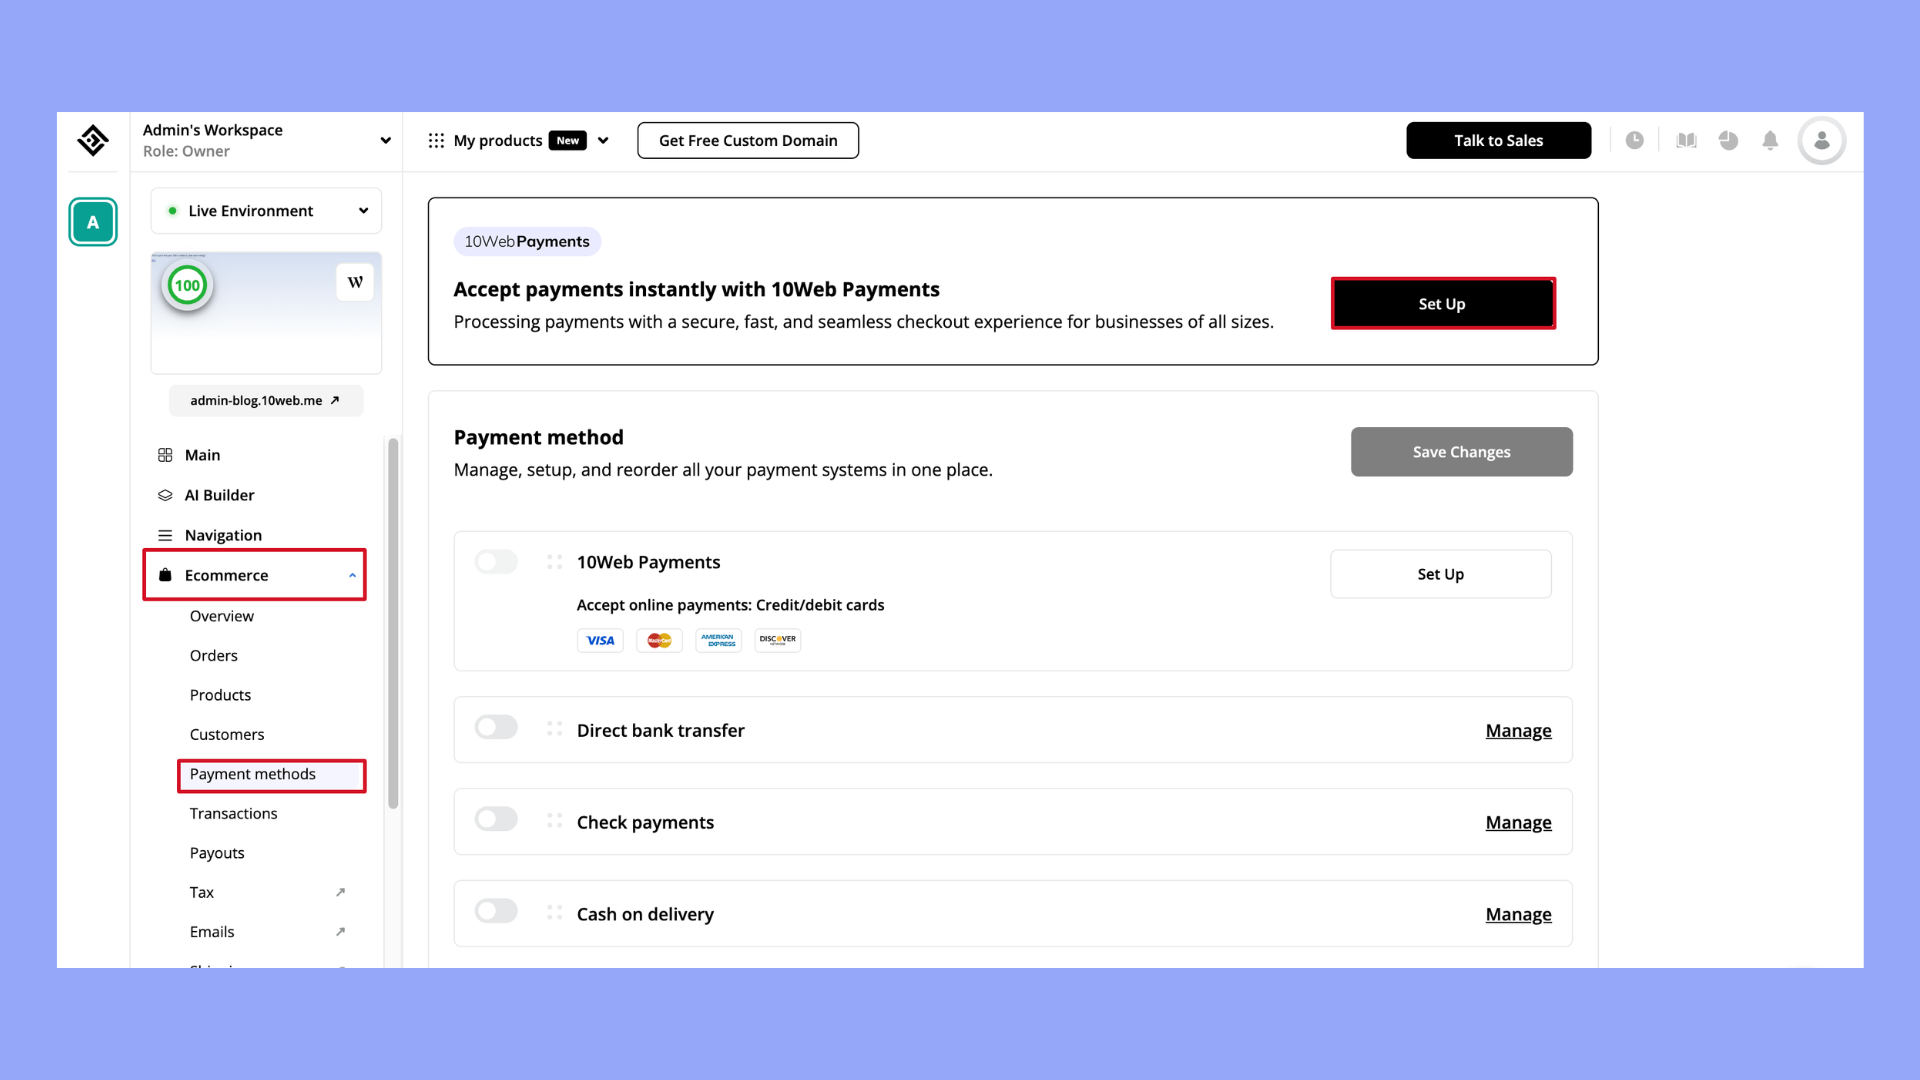
Payment
When you use the 10Web Ecommerce plan, you also have access to 10Web Payment. Here are the steps to activate it:
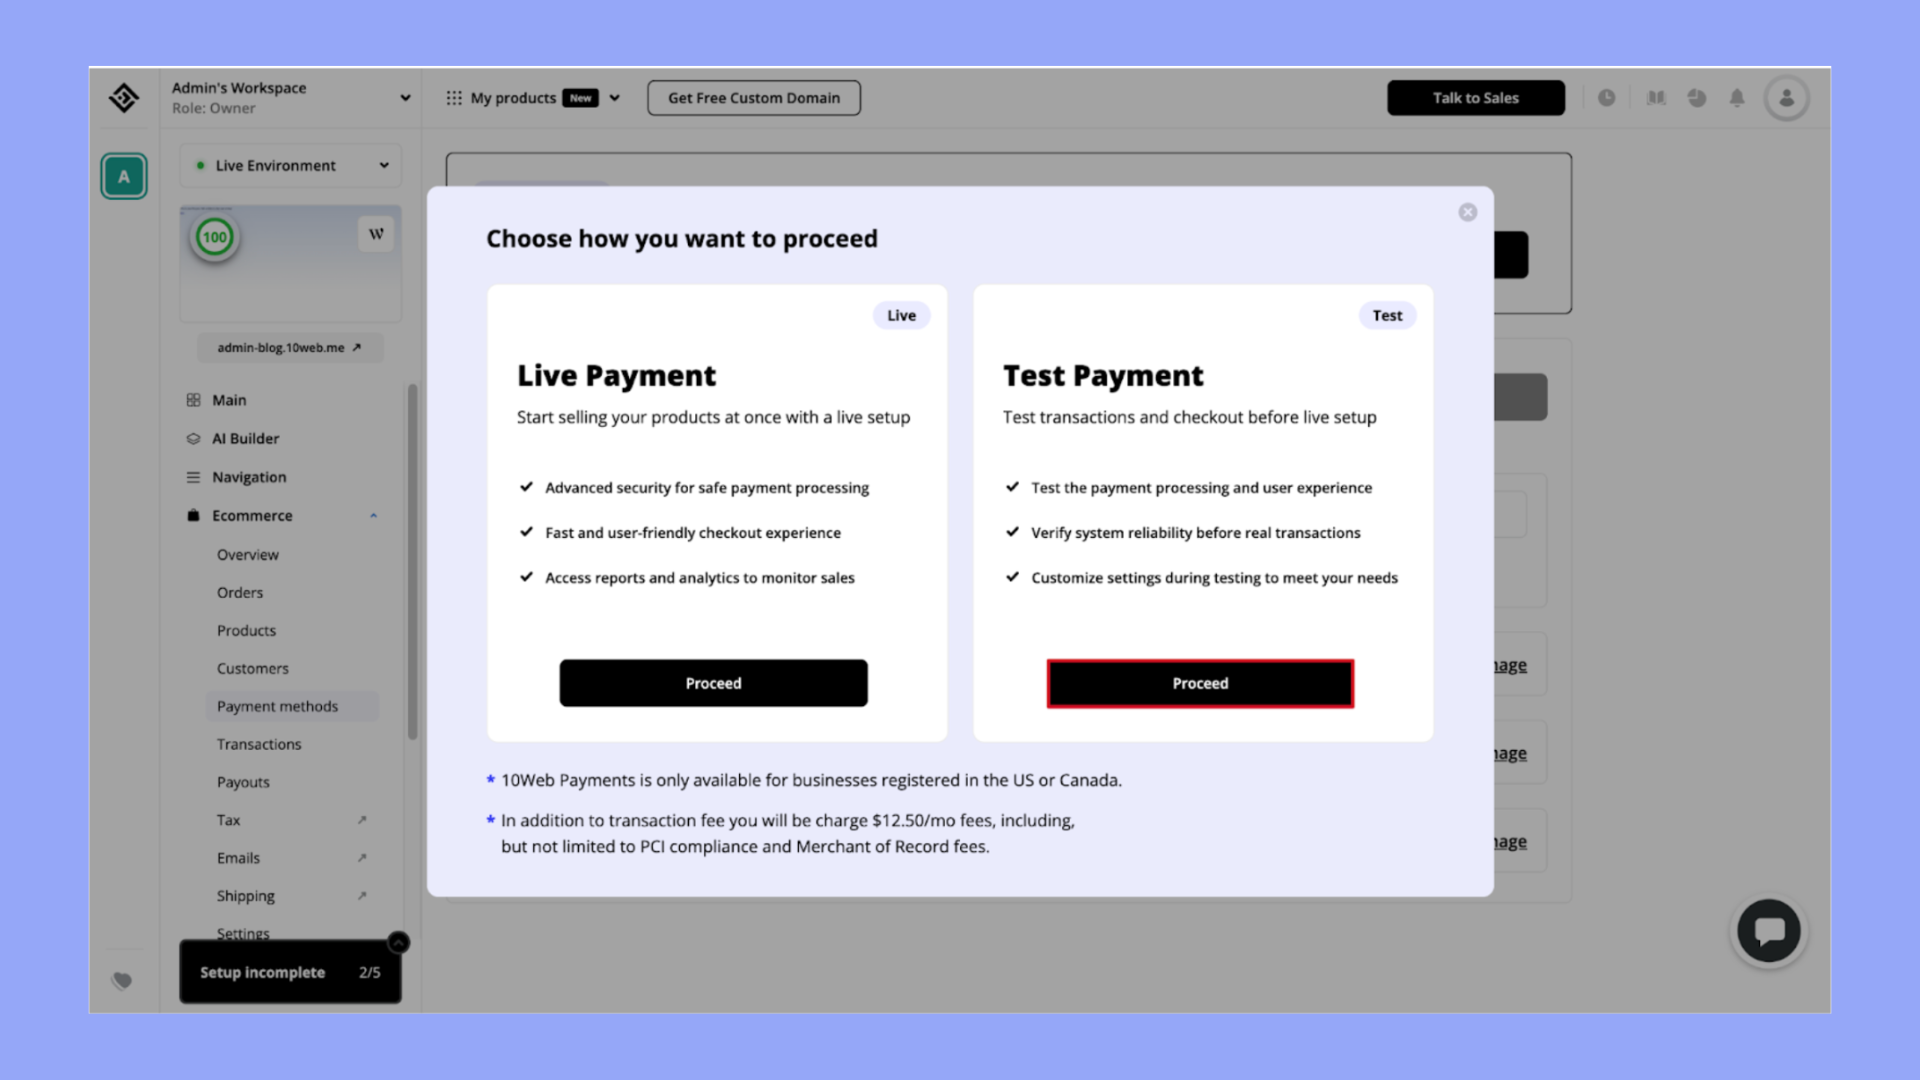
- Go to Payment methods and click on Set Up.
- Before making the payments live, you can test the payment to see how the processing for users works.
- To test the payment, ensure that the information that you enter corresponds to the following:
Card number CVC Expected result 4242 4242 4242 4242 Any 3 digits Success 4000 0046 5062 9995 402 Failure – Insufficient funds 3622 7206 2716 67 Any 3 digits Failure – Invalid card - Once you have done all the tests and are satisfied with the results, enable the payment method by clicking on the Enable Live Payment.

By following these steps, you can easily set up a fully functional ecommerce website using 10Web AI Ecommerce Website Builder. This platform simplifies the process of creating and managing an online store, enabling you to focus on growing your business. Start building your ecommerce site and take advantage of 10Web’s seamless integration and AI-driven tools.
Looking to sell online?
Create your custom online store in minutes with 10Web AI Ecommerce Website Builder and take your business online.
Configuring WooCommerce settings
When you start how to set up WooCommerce, it’s essential to configure various settings tailored to your online store’s needs. These include general store settings, product options, tax configurations, shipping methods, payment gateways, and more.
1. General settings
Begin by configuring your store’s basic details to establish its identity and operational parameters. This foundational setup ensures your store is properly localized and ready for transactions. You can follow these steps:
- Navigate to WooCommerce > Settings > General.
- Enter your store’s address to set up the base location.
- Configure currency options and selling locations.
- Save changes with the Save changes button.
2. Products settings
Set up your product preferences to tailor how your items are managed and displayed. This step ensures your store’s inventory and product details are accurate and consistent.
- Go to WooCommerce > Settings > Products.
- Define measurements for weight and dimensions.
- Adjust inventory management settings.
- Click Save changes to apply your product settings.
3. Tax settings
Efficient tax handling is crucial for compliance and transparency. Configuring your tax settings helps manage different tax rates and display options for your store.
- Access the tax settings under WooCommerce > Settings > Tax.
- Add rows to input tax rates for different regions.
- Choose whether to display prices with or without tax in your store.
- Save your tax setup with the Save changes button.
4. Shipping settings
Establishing clear shipping parameters is vital for order fulfillment. Set up shipping zones and methods to offer accurate and flexible delivery options for your customers.
- Navigate to WooCommerce > Settings > Shipping.
- Create shipping zones and assign specific rates or free shipping.
- Detail any specific shipping methods like flat rate or local pickup.
- Finalize your choices by clicking on Save changes.
5. Payments settings
Ensure seamless transactions by configuring your payment gateways. This step allows you to manage and prioritize the payment methods available to your customers.
- Access WooCommerce > Settings > Payments.
- Enable or disable payment gateways such as PayPal or Stripe by toggling the button next to each option.
- Arrange the payment methods in your preferred order.
- Confirm changes by pressing Save changes.
6. Accounts and privacy settings
Managing user accounts and privacy settings is essential for customer trust and regulatory compliance. Configure account creation and privacy options to safeguard user data and streamline account management.
- Head over to WooCommerce > Settings > Accounts & Privacy.
- Configure account creation permissions and privacy options.
- Ensure account erasure requests are handled correctly.
- Update the settings using the Save changes button.
7. Emails settings
Customize your store’s email communications to enhance customer engagement. Setting up your email options ensures timely and relevant notifications are sent to your customers.
- Go to WooCommerce > Settings > Emails.
- Customize email templates and manage sender options.
- Opt in or out of specific notification types.
- Save your email settings with Save changes.
8. Integration settings
Enhance your store’s functionality by integrating with external services. Configuring integrations allows you to leverage additional tools and analytics for better store performance.
- Visit WooCommerce > Settings > Integration.
- Set up connections with external services like Google Analytics.
- Follow the specific setup for each integration offered.
- Apply configurations by clicking Save changes.
9. Advanced settings
Gain finer control over your store’s operations with advanced settings. This section lets you manage essential pages, APIs, and webhooks for a more customized WooCommerce experience.
- Navigate to WooCommerce > Settings > Advanced.
- Manage pages, such as the cart and checkout pages.
- Configure REST API and Webhooks if needed.
- Solidify your advanced settings with the Save changes button.
By following these steps, your WooCommerce store will be well on its way to providing a smooth and personalized shopping experience for your customers.
Looking to sell online?
Create your custom online store in minutes with 10Web AI Ecommerce Website Builder and take your business online.
How to add and manage products
Adding products to your WooCommerce store is a crucial step towards building your online presence. It’s a simple process, but there are several types of products you can sell, including physical items, digital downloads, and subscriptions.
Product types
Understanding the different product types in WooCommerce is essential for effectively showcasing what you sell. This knowledge helps you categorize and manage products accurately.
- Simple products: These are tangible items with no options, like a book.
- Variable products: These offer variations, such as size or color, each with its own price, stock, and SKU.
- Grouped products: A collection of related products sold separately.
- Digital products: Downloads like software or music.
- Subscriptions: Products with recurring payments.
Adding products
Adding products to your WooCommerce store is straightforward. This section guides you through the necessary steps to list new items in your online shop.
- Navigate to Products > Add New.
- Enter your product name in the Product name field.
- Add a detailed description in the main description area.
- Offer a concise summary in the Product short description box.
- Choose the right product type from the dropdown menu.
Managing inventory
Proper inventory management ensures your store operates smoothly. Learn how to track and update stock levels to prevent overselling and maintain customer satisfaction.
- Locate the Product data box.
- Switch to the Inventory tab.
- Fill in the SKU, stock status, and if managing stock, enter the quantity.
- Update the stock quantity to reflect sales.
Uploading products
Efficiently uploading products in bulk saves time and keeps your store updated. This section explains how to use WooCommerce’s importer tool for batch product uploads.
- Use the built-in importer found under Products > All Products > Import.
- Prepare a CSV file with product details.
- Upload the file and map the fields accordingly.
Consistently managing and updating your product information ensures customers have the best data and improves your store’s usability.
Looking to sell online?
Create your custom online store in minutes with 10Web AI Ecommerce Website Builder and take your business online.
Launching the store
Launching your WooCommerce store is an exciting final step in the journey of setting up your online presence. By this point, you’ve walked through the WooCommerce setup checklist, crafted your pages, and are ready to bring your ecommerce website to life. Here’s how to make your online store go from behind-the-scenes to front-and-center in the digital marketplace.
- Review your homepage: Your homepage is the virtual front door to your business, so ensure it’s welcoming and accurately represents your brand. It should be clear, inviting, and easy to navigate.
- Inspect your pages: Go through each page of your website – about, contact, shop, and any others you’ve set up. Make sure all the links work, the content is correct, and the design is consistent.
- Test your checkout process: Run several test transactions to ensure the checkout process is smooth. This involves everything from adding items to the cart to completing a purchase.
- Configure sales-tax settings: Depending on where your business is located and where you sell, set up the appropriate tax rates and rules within the WooCommerce settings.
- Set up shipping: Confirm that all your shipping options and costs are correctly entered and that they cater to your target market.
- Implement marketing strategies: Prepare your email marketing, social media campaigns, and any promotional activities you plan to use to attract visitors to your store.
- Go live: When everything looks good and works well, it’s time to launch. Access your dashboard and find the option to take your site live.
- Announce your store: After launching, announce the opening of your store through your chosen marketing channels to generate traffic and start making sales.
Remember that launching is just the beginning. Continuous monitoring and tweaking will help maintain a fresh and engaging online store that attracts customers and generates sales.
What WooCommerce hosting should you use
When setting up your online store with WooCommerce, choosing the right hosting provider is crucial for the performance and reliability of your website. Start by considering the following factors:
- Performance: A host with optimized performance for WooCommerce can provide a faster shopping experience for your customers.
- Uptime: Look for a host that guarantees a high uptime percentage, ensuring your store is online and available around the clock.
- Support: Prioritize hosts that offer dedicated customer support and have WordPress and WooCommerce expertise to help you with any issues that arise.
- Security: Select a host with strong security measures to protect your store and customer data.
- Scalability: As your business grows, so should your hosting. Choose a host that enables you to easily upgrade your plan for more resources.
- Backup: Ensure your host offers regular backups so you can restore your site in case of accidental loss of data.
However, when you use 10Web as your hosting provider, you will be able to benefit from one of the best hosting solutions available that provides all the abovementioned.
Customizing your WooCommerce store
Personalizing your WooCommerce store enhances the shopping experience for your customers and helps your brand stand out. Follow these steps to customize your store’s appearance:
- Access the customizer by navigating to WooCommerce > Home in your WordPress dashboard.
- Start by clicking the Start customizing button or select the Customize your store link to enter the customization portal.
- Within the customizer, you’ll find options to:
- Choose a theme: Select from a variety of existing themes that match your brand.
- Adjust fonts and colors: Make your text and elements align with your brand’s palette.
- Modify layouts: Arrange your content and products as desired to optimize user flow.
- Use these tools to create a cohesive and visually appealing online presence. Remember, your website is the digital storefront for your business, so make it inviting and easy to navigate.
Looking to sell online?
Create your custom online store in minutes with 10Web AI Ecommerce Website Builder and take your business online.
Editing WooCommerce templates
Editing your WooCommerce templates allows you to customize the look and feel of your online store. You can tailor the design to match your brand identity, improve user experience, and stand out from the competition.
- First, you’ll need to access your WordPress theme files. You can do this via an FTP client or through your hosting provider’s file manager.
- Inside your theme directory, look for WooCommerce’s template files, often located in a folder named woocommerce.
- Before making changes, copy the template file from the plugins/woocommerce/templates directory to your theme’s woocommerce folder to prevent losing your customizations during updates.
- Open the template files you wish to edit. These files are PHP files and you can add or move content by hooking into WooCommerce’s actions and filters.
- After making your changes, save the files and upload them back to your theme directory.
- Always test your website after editing template files to ensure that everything is working as expected. Make sure to check the responsiveness and that no functionality is broken.
By following these steps, you can successfully make changes to your WooCommerce templates and enhance your online store. If you’re not comfortable with coding, consider using a visual editor or seeking assistance from a professional developer.
Optimizing WooCommerce store
When you’re learning how to set up WooCommerce, remember that optimization is key for a smooth, fast-loading online store. A well-optimized WooCommerce store not only provides a better shopping experience but also improves your search engine rankings. Here are some effective ways to enhance your store’s performance:
- Upgrade your hosting: Start with a reliable, performance-optimized hosting solution that can handle your store’s demands as it grows.
- Implement a CDN: Use a Content Delivery Network (CDN) to distribute your store’s content across the globe, reducing load times for international customers.
- Optimize your database: Maintain your store’s database by regularly deleting unnecessary data and optimizing tables.
- Configure key settings: Review WooCommerce’s settings, adjusting them for optimal performance and user experience.
- Disable AJAX cart fragments: If your store isn’t heavily relying on cart updates, consider disabling AJAX cart fragments to reduce requests and speed up your site.
By following these steps, your WooCommerce store should see improved loading times and overall performance, creating a more enjoyable environment for your customers.
Conclusion
In conclusion, setting up WooCommerce is a streamlined process that empowers you to create a successful online store. By following this beginner’s guide, you’ve learned how to install, configure, and customize WooCommerce to meet your business needs. With your store now up and running, you’re well-equipped to manage your products, track sales, and grow your online presence. Embrace the tools and features WooCommerce offers to ensure your ecommerce venture thrives.
Looking to sell online?
Create your online store in minutes
Create your online store in minutes with 10Web AI Ecommerce Website Builder.