Learning how to update the WooCommerce database is essential for maintaining a secure and efficient online store. This guide outlines the significance of the WooCommerce database in updates, the necessary precautions before proceeding, and detailed steps to perform the update safely through your WordPress dashboard or WP CLI.
FAQ
How to update the database in WooCommerce?
To update the database in WooCommerce, go to your WordPress dashboard, navigate to WooCommerce > Status > Tools, and click the Update Database button.
How to update the WooCommerce database manually?
To update the WooCommerce database manually, use the WP-CLI command wp wc update or access the WooCommerce System Status page and use the available tools for database updates.
Is it safe to update a WooCommerce database?
Yes, it is generally safe to update a WooCommerce database, but it is crucial to back up your database and site before proceeding to prevent data loss.
Where is the WooCommerce database located?
The WooCommerce database is located within your WordPress database, typically in the same database where your WordPress site is installed. It uses custom tables with the prefix wp_woocommerce_.

Looking to sell online?
Create your custom online store in minutes with 10Web AI Ecommerce Website Builder and take your business online.
Understanding the WooCommerce update process
When updating your WooCommerce store, you’re ensuring that your shop benefits from the latest features, bug fixes, and security improvements. It’s essential to understand how the WooCommerce database fits into this process, where to find comprehensive update details, and the direct steps to perform the update through your WordPress dashboard.
The role of WooCommerce database in updates
The WooCommerce database is a critical component that stores all your shop’s data, including products, orders, and settings. When you update WooCommerce, the update may include changes to the structure of your database to accommodate new features or improve performance.
So, before updating your WooCommerce database, make sure that your WordPress site is prepared for the update. This means verifying compatibility, performing a backup, and establishing a safe testing environment. These precautions allow you to restore your site in the event of an update issue.
Checking the changelog
Before proceeding with any updates, it’s a good practice to review the changelog. The changelog provides a detailed list of what’s new, what’s been fixed, and any other changes that come with the latest version of WooCommerce. Checking this will help you understand the update’s impact and whether any of the changes directly pertain to features you use.
Don’t forget to check on plugins, themes, and extensions to ensure compatibility.
Setting up a staging environment
Use a staging site to test the update securely without affecting your live site. A staging site is an exact replica of your live site where you can run the update and test for compatibility while your live site remains untouched.
How to update your WooCommerce database
Upgrading your WooCommerce database is a critical process that can be done either automatically or manually. While automatic plugin updates help keep your site running efficiently and securely, it may be best to turn off automatic updates for a plugin like WooCommerce for more control over the process.
Particularly for busy stores, it’s important to plan for updates during your least busy store hours. An automatic update at an inopportune moment may lead to conflicts or data loss.
Step 1: Perform a backup
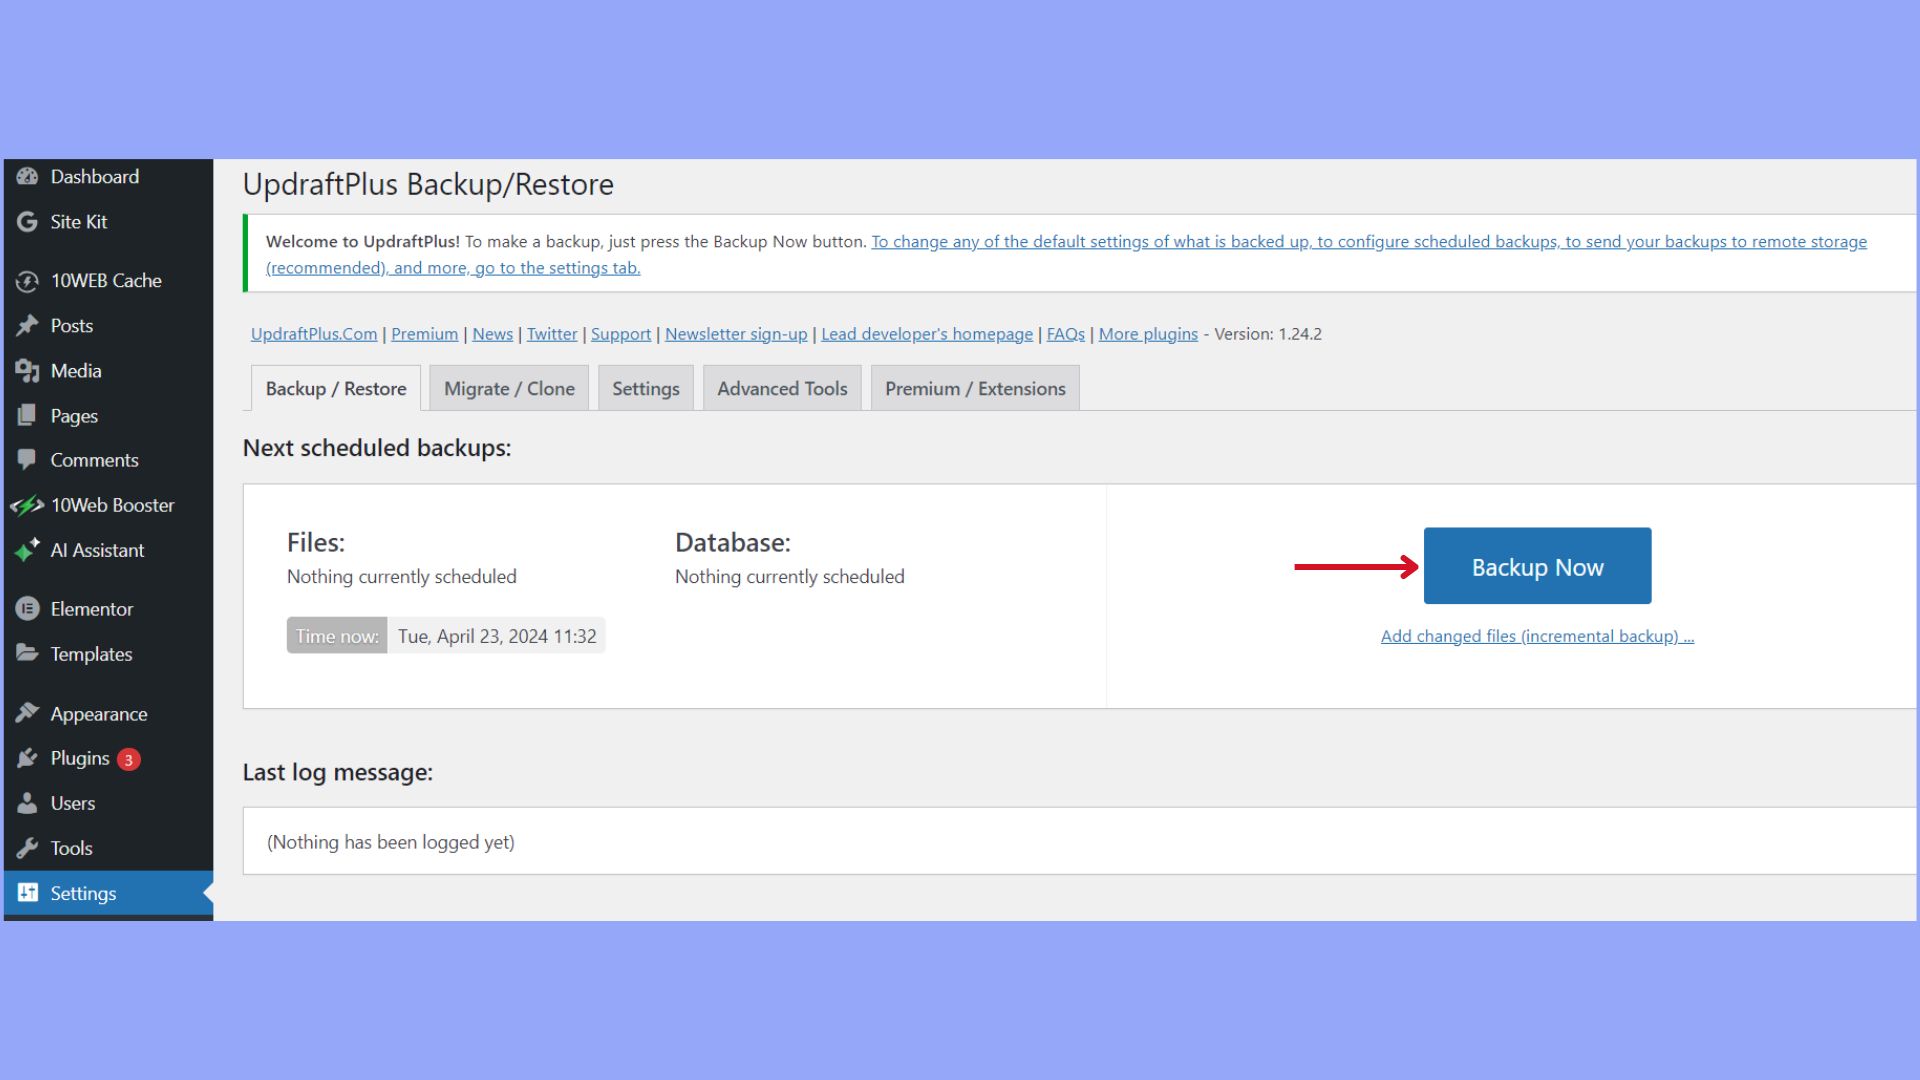
Always perform a fresh site backup before you attempt any updates. There are several methods to obtain a complete backup that includes your site files and database. Backing up the database allows you to restore the database in case something goes wrong with the update.
- Using a backup plugin: Make sure the backup plugin you choose backs up the files and database. Check how the plugin uses the backup to restore the site if necessary.

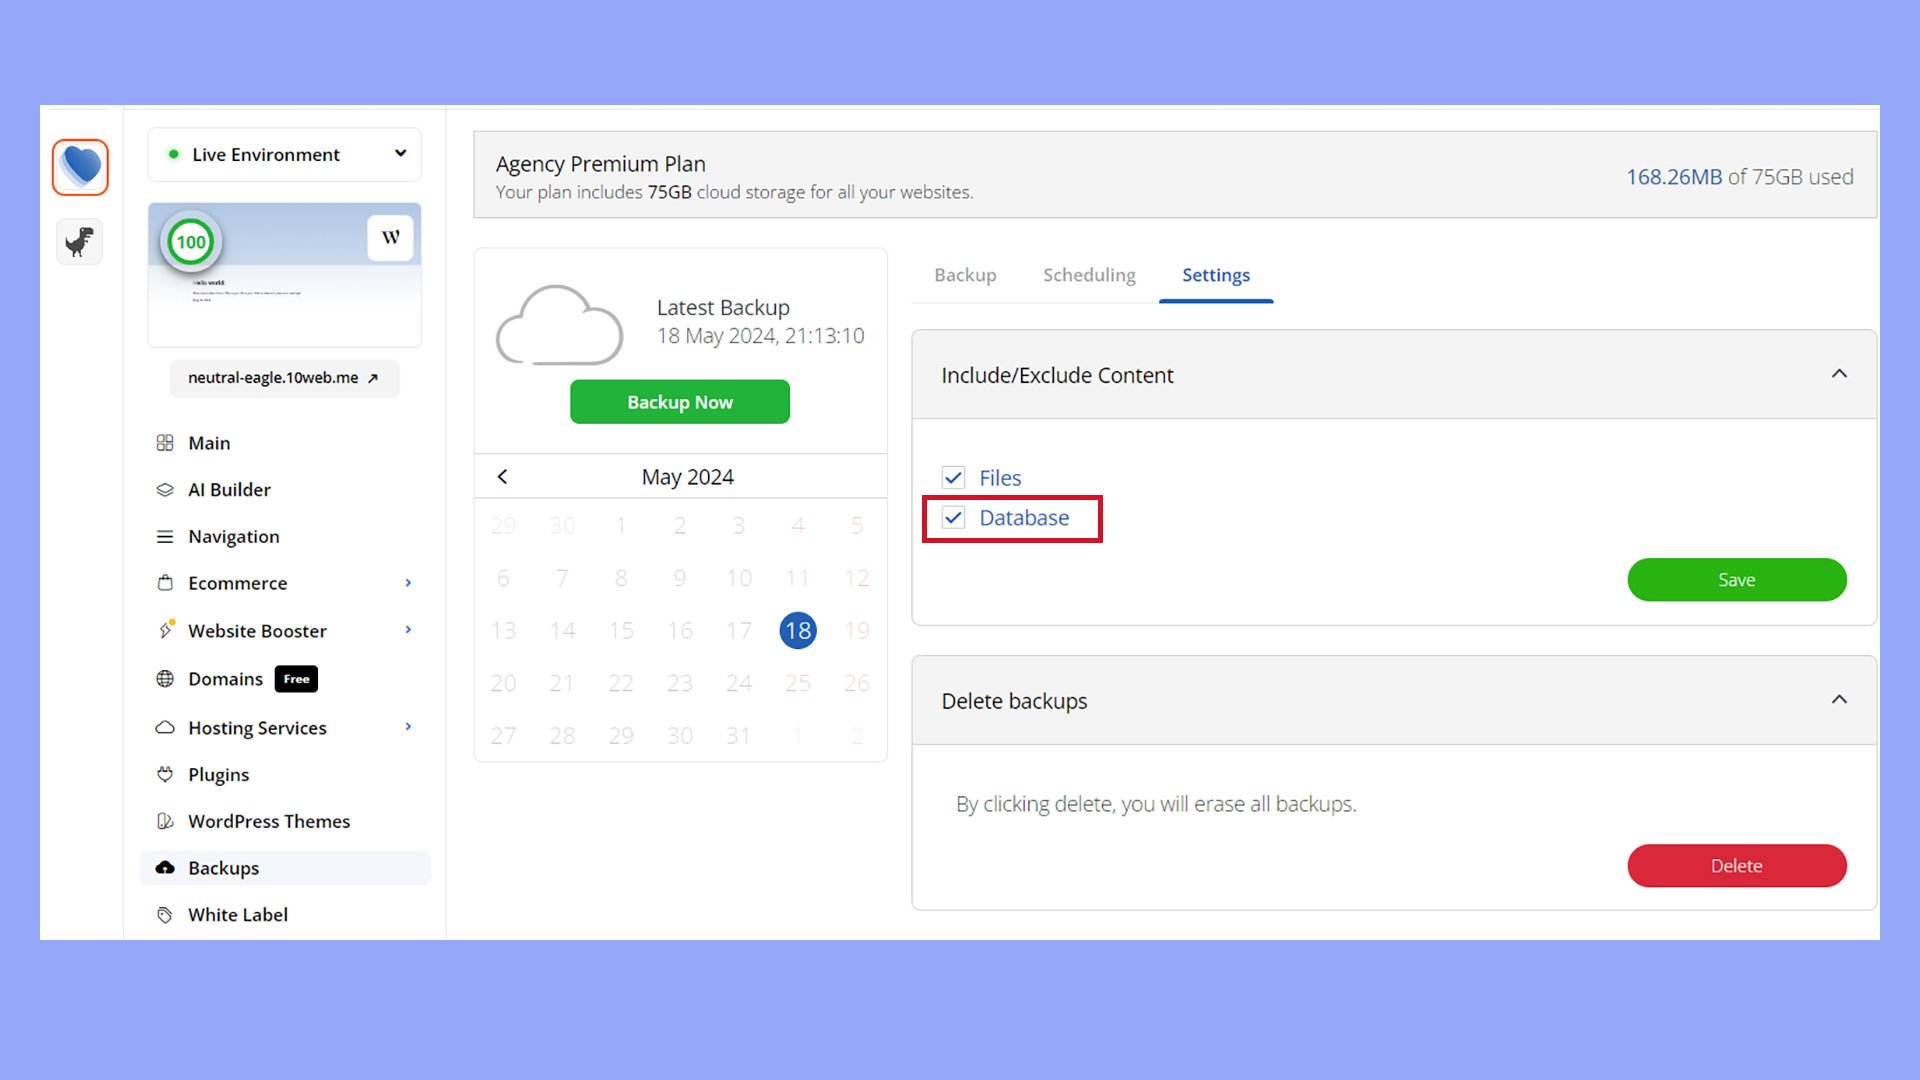
- Use your hosting provider’s backup solution: Many web hosts provide a backup service to keep your site safe and secure. For instance, 10Web’s backup service allows you to back up the site files and database on an automatic schedule.
- Manually back up your site: Download all your site files via SFTP and back up the database.
Looking to sell online?
Create your custom online store in minutes with 10Web AI Ecommerce Website Builder and take your business online.
Step 2: Set up a staging environment and maintenance mode
Depending on your web host, you may have the ability to set up a staging site in your hosting control panel. For example, 10Web customers can set up a staging site from the 10Web dashboard.
- Log in to your 10Web dashboard, and click Manage on the site you want to update.
- Select Staging Environment from the dropdown menu on the top left.
- Click Hosting Services > Staging Environment.
- Click Enable Now.
- Once enabled, you can switch between live and staging environments via the dropdown menu at the top of the left sidebar.
This process may look different on other web hosts. If you can’t easily create a staging environment, you can try restoring your backup to a new site and testing the database update there.
While your staging site is an exact copy of your live site, that won’t hold true for long if you’re dealing with a busy ecommerce site. In that case, you may want to consider putting the live site in maintenance mode while you work on updating the database in the staging site.
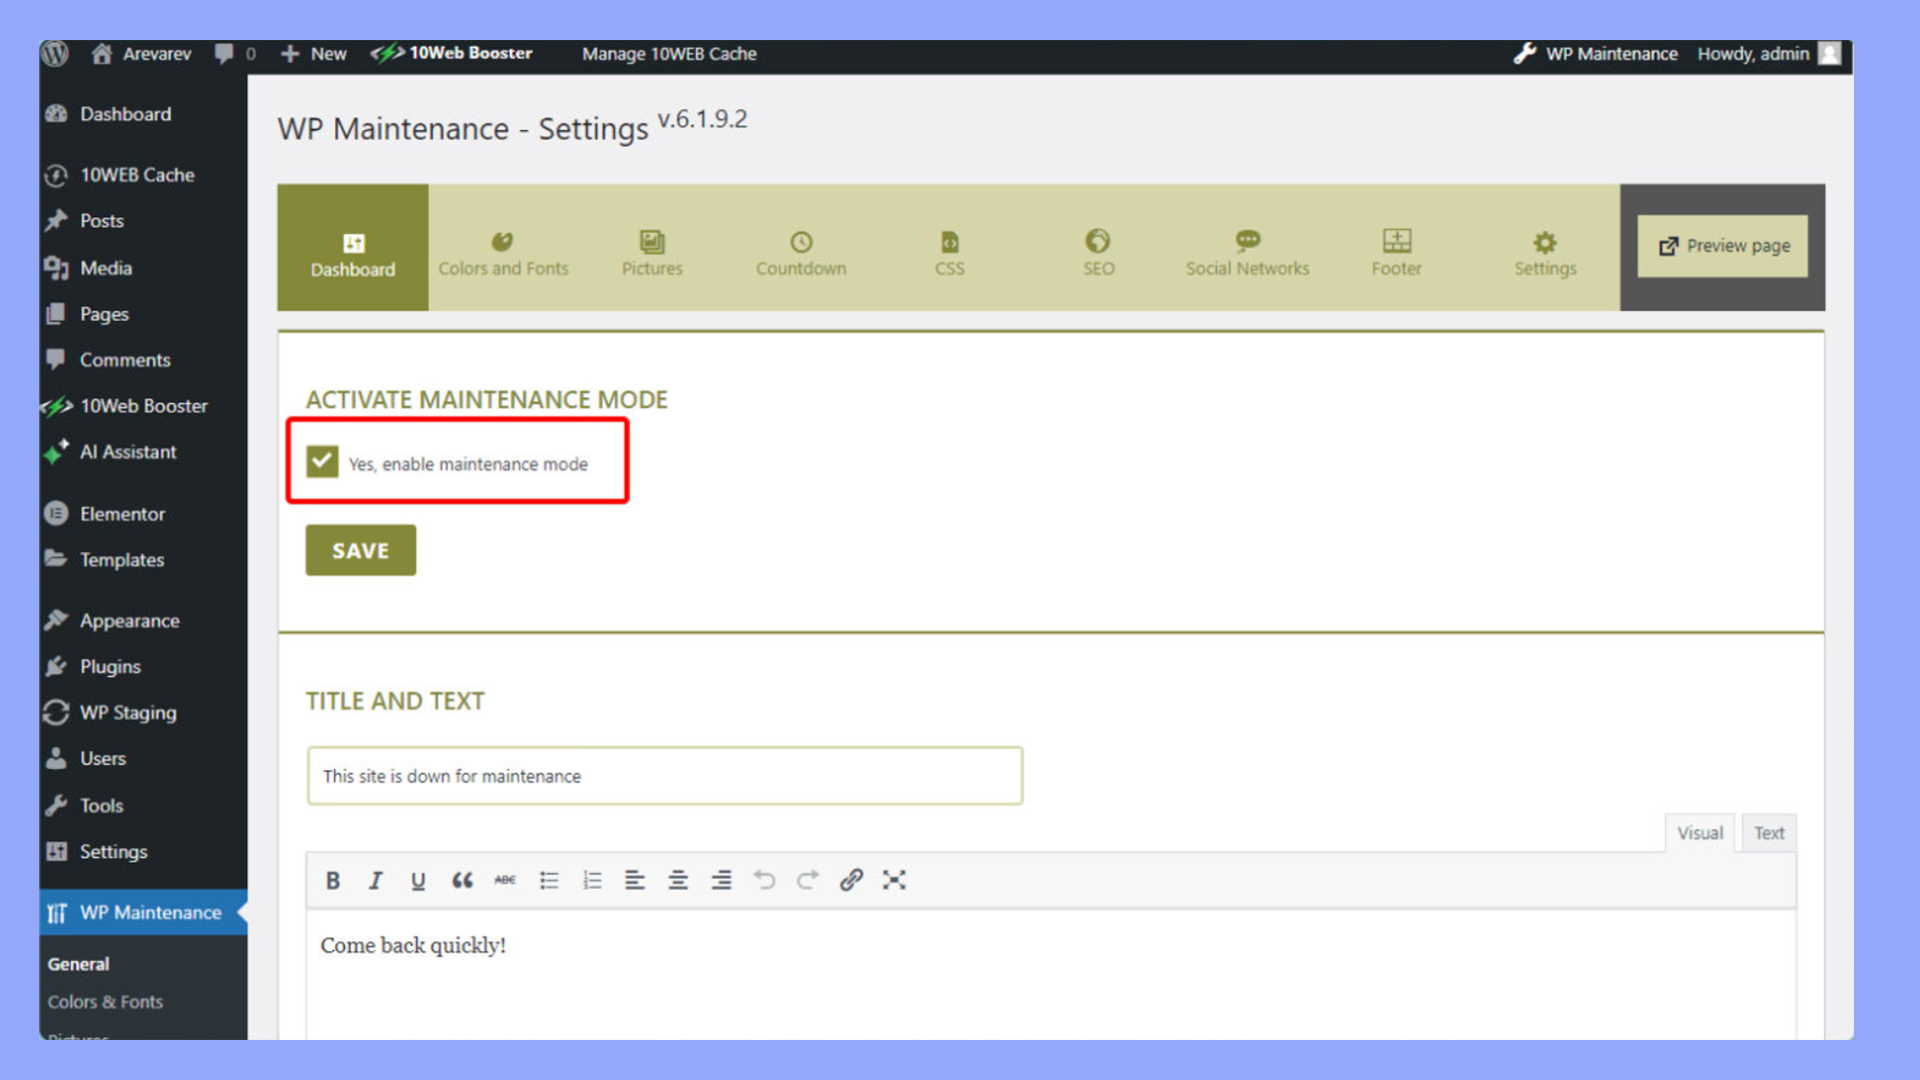
This way, you’re less likely to experience any conflicts between the live and staging sites when you’re ready to push the updates live.
Step 3: How to update your WooCommerce database
Once you have a reliable backup and testing environment, it’s time to try updating the WooCommerce database. We’ll explore two ways to do this.
Updating the WooCommerce database via the WordPress dashboard
This is the most straightforward method. Follow these steps on your staging site to ensure a smooth update:
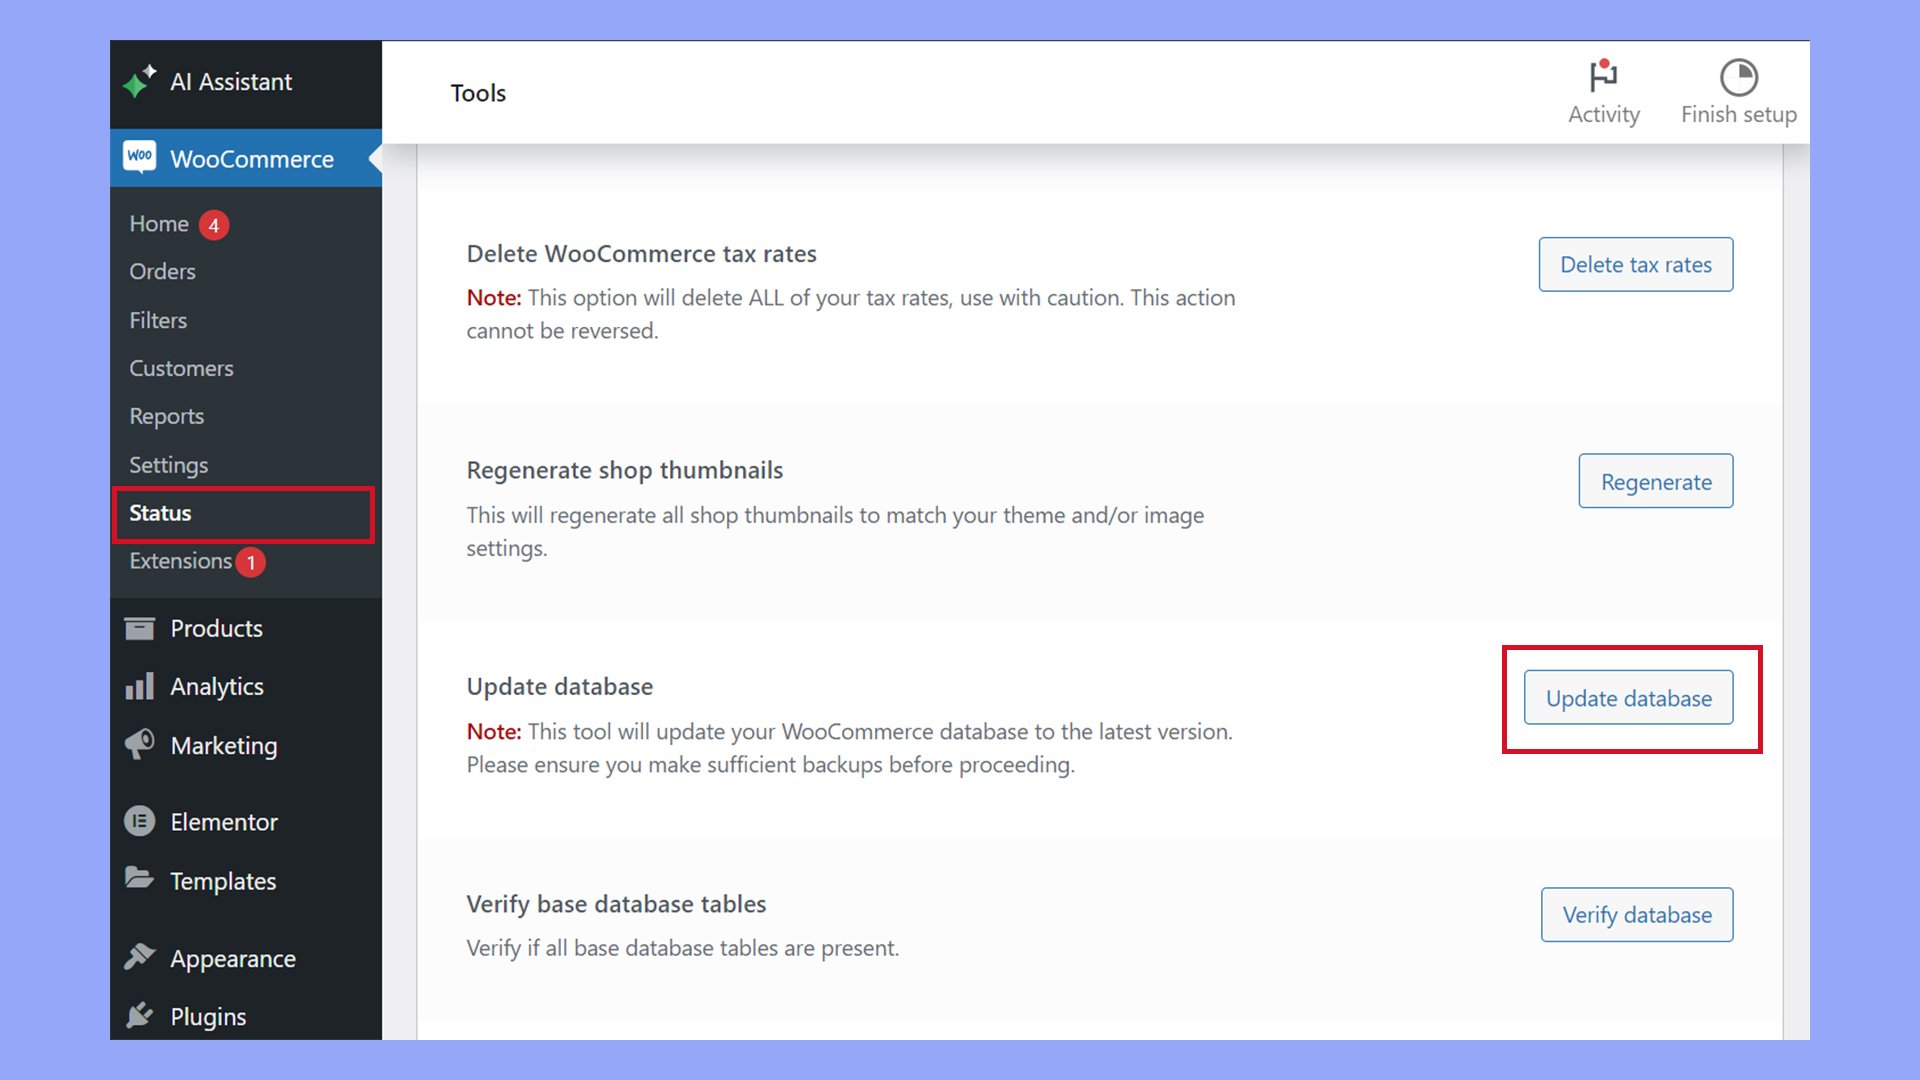
- Navigate to your Dashboard and click on WooCommerce > Status.
- Select the Tools tab.
- Before you proceed, ensure that you have a backup of your site.
- Scroll down and locate the Update database option.
- Click Update database to start the process.
Updating your WooCommerce database via WP CLI
WP CLI is a useful tool for users comfortable with the command line. It allows you to update WooCommerce with precision and speed.
- Open your command line interface.
- Navigate to your WordPress installation directory.
- Run
wp wc updateto start the WooCommerce database update process. - Wait for the process to complete; depending on your database size, this may take some time.
Post-update actions
After completing the WooCommerce database upgrade, it’s crucial to ensure everything is functioning correctly before pushing the changes to the live site. Your store’s health depends on cautious steps taken after an update.
Verifying the update
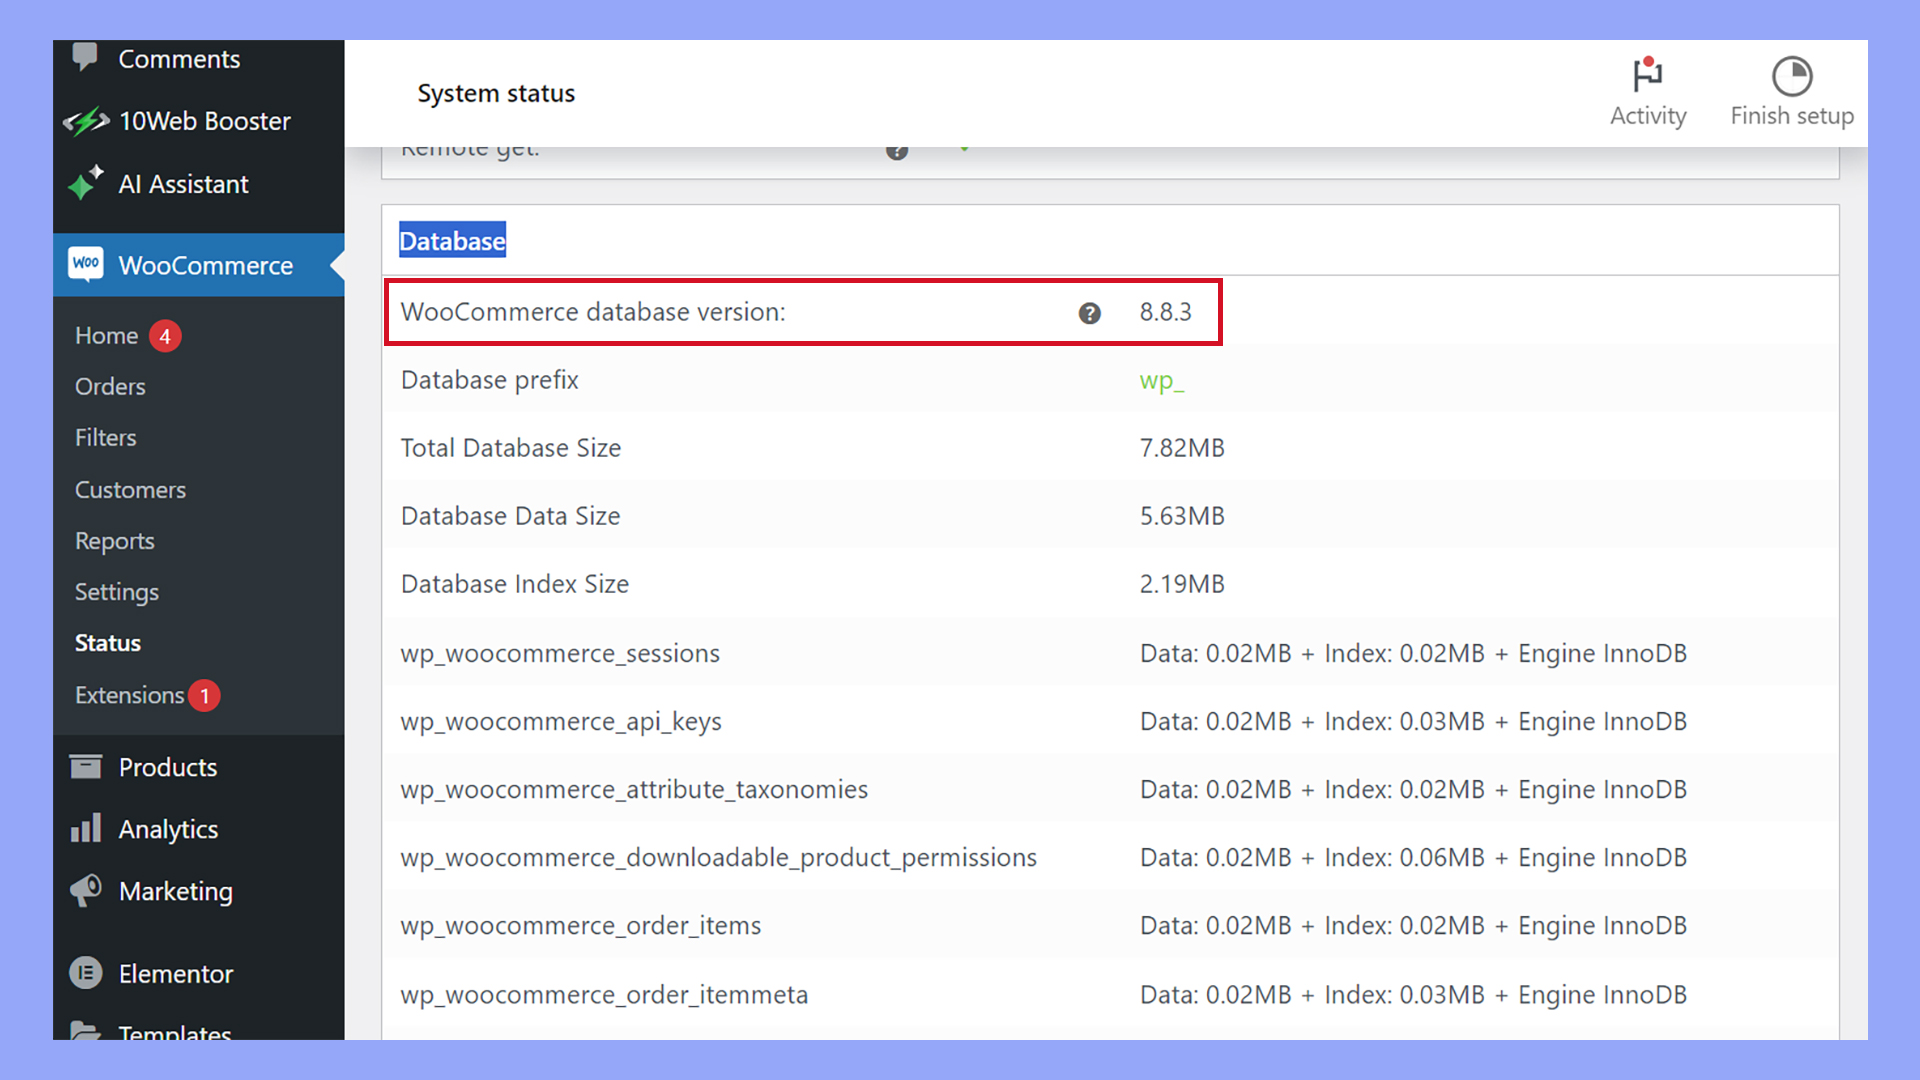
- Navigate to WooCommerce > Status in your WordPress dashboard.
- Check the System status for any notifications of successful updates.
- Confirm that all updates to plugins, themes, core WordPress files, and the database have been applied.
Testing for issues and compatibility
- Thoroughly test key functionalities, such as checkout processes and payment gateways, to ensure compatibility.
- Check your store on different devices and browsers for consistent performance.
- Evaluate theme compatibility; ensure your visual elements display correctly.
Clearing cache and resolving errors
- Clear your website’s cache to allow for performance enhancements to take effect.
- If any errors are present, consult WooCommerce documentation or support to resolve them.
- Monitor the site for 24-48 hours for any unexpected behavior or errors, and address them promptly.
Troubleshooting common update issues
It’s not unusual to encounter issues during an update, and knowing how to troubleshoot them is part of maintaining a healthy WooCommerce store.
- Maintenance mode error: If stuck in maintenance mode, delete the
.maintenancefile from your WordPress installation via FTP. - Timeouts and other errors: Extend the PHP time limit, increase the memory limit, and make sure you are running the latest PHP version recommended by WooCommerce.
- If you encounter specific update errors, consulting WooCommerce’s documentation or support forums can provide you with directed fixes for those issues.
Pushing to live
If everything looks good after updating the database, it’s time to push the staging site’s changes to the live site. The exact process to push to live looks a bit different depending on your setup and hosting provider. For example, to push changes to live on 10Web:
- Navigate to the website you wish to sync.
- At the top bar, select the environment drop-down menu.
- Locate the staging environment and click the gear icon beside it, or go to Hosting services, select more, then choose Staging environment.
- On the Manage Environment page, click on Sync Staging With Live.
- Enter the site’s name in the provided field, then click Sync With Live.
Conclusion
Updating your WooCommerce database ensures your online store runs smoothly with the latest features and security enhancements. By following the outlined steps on how to update your WooCommerce database, you can minimize risks and maintain optimal performance. Always back up your site, use a staging environment, and verify updates to keep your WooCommerce store robust and reliable.
Looking to sell online?
Create your online store in minutes
Create your online store in minutes with 10Web AI Ecommerce Website Builder.