When managing an online store with WooCommerce, adding variable products is essential. Variable products allow for variations like size or color on a single product page, simplifying inventory and enhancing user experience. This blog will cover setting up attributes, creating variations, and optimizing product pages to cater to diverse consumer needs, ensuring a streamlined shopping platform.
FAQ
How do I upload a variable product in WooCommerce?
How do I set product variations in WooCommerce?
How do I import variable products into WooCommerce for free?
How do I add a variable product to the cart button in WooCommerce?
Create your custom online store in minutes with 10Web AI Ecommerce Website Builder and take your business online. 
Looking to sell online?
Understanding variable products in WooCommerce
When managing your online store with WooCommerce, grasping the concept of variable products is pivotal for providing a range of options to your customers and enhancing their shopping experience.
Defining variable products
Variable products in WooCommerce are a specific product type that allows you to offer a set of variations on a single product, with control over prices, stock, image, and more for each variation. These can include different sizes, colors, materials, or any other attributes you wish to offer. It’s an ideal setup if your product comes in different variations that do not require separate product pages for each option.
To get started: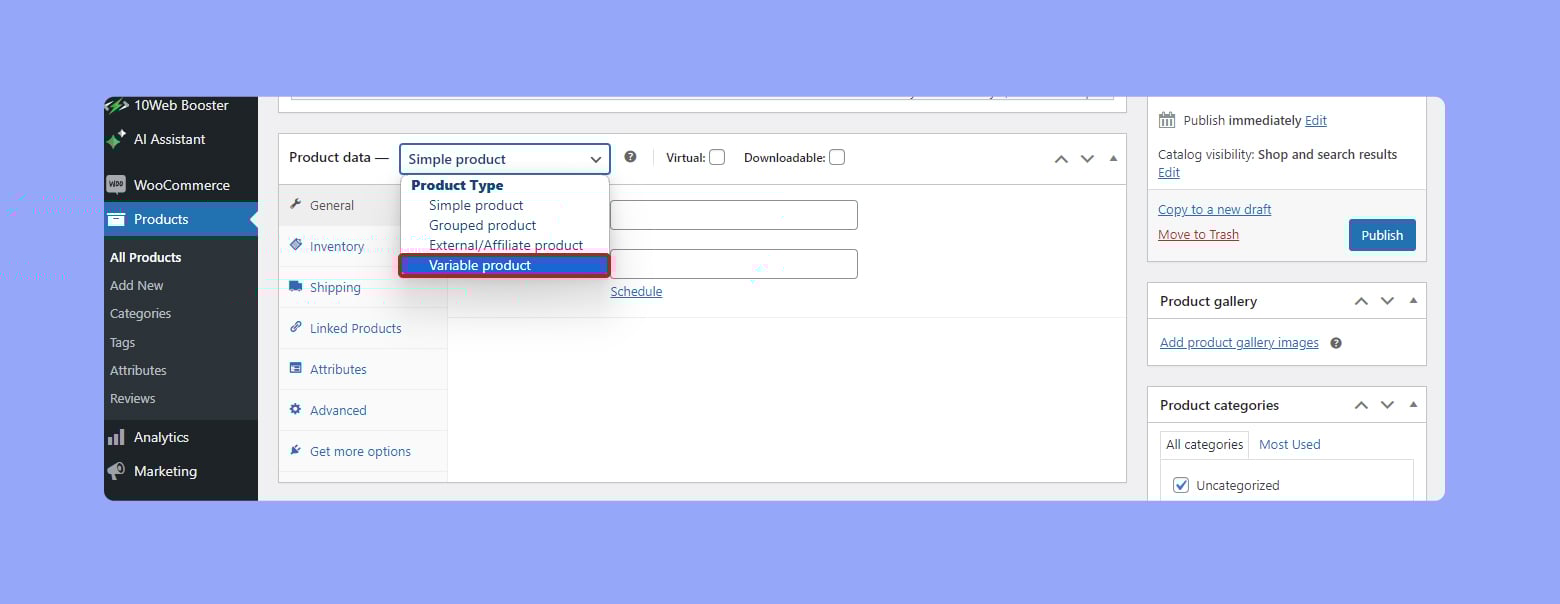
- Go to Products > Add New.
- Select Variable product.
Benefits of variable products
Variable products offer significant benefits:
- Enhanced customer experience: By giving shoppers the ability to choose from various options, you cater to a broader range of preferences and improve customer satisfaction.
- Streamlined inventory management: You can track inventory for each variation, simplifying the stock management process.
- Efficient product management: Instead of creating multiple product pages for each variation, you maintain one page with multiple options, saving you time and keeping your online store organized.
In each variation, you’ll have the flexibility to adjust specific aspects such as price, stock status, and images according to the selected attributes, making sure every detail matches the customers’ potential choices perfectly.
By incorporating variable products into your WooCommerce store, you’re making a step towards a more dynamic and customer-friendly shopping platform that can adapt to a variety of consumer needs and preferences.
Setting up product attributes
To effectively manage a variable product in WooCommerce, you’ll need to set up attributes that define variations such as color, size, or material.
Creating global attributes
Global attributes are attributes that apply to more than one product in your WooCommerce store.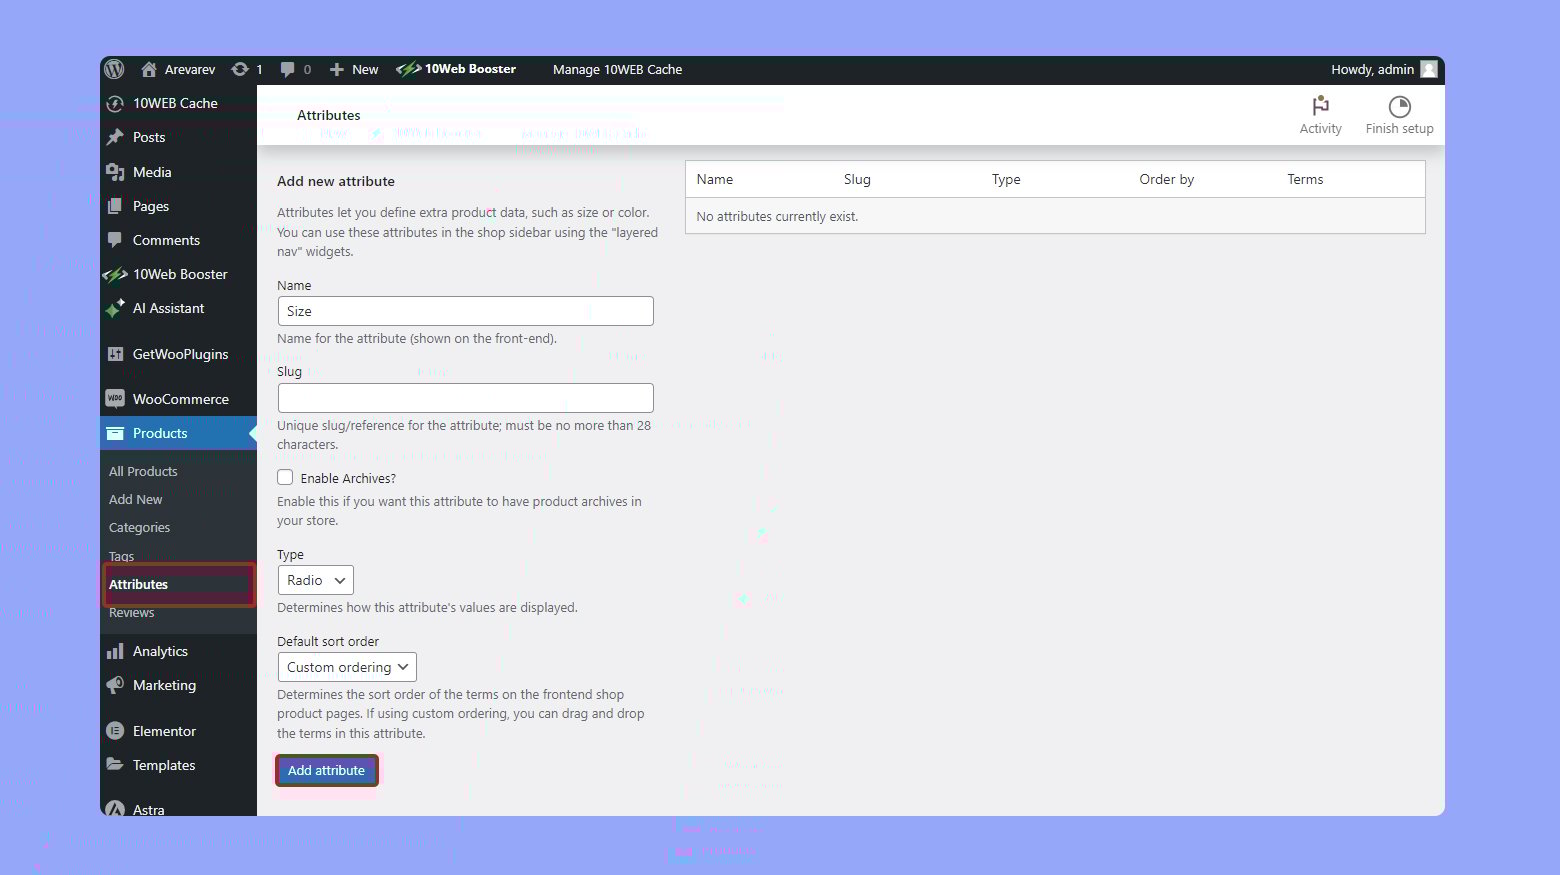
- Start by navigating to Products > Attributes in your WordPress dashboard.
- To add a new attribute, enter the attribute name, such as color or size, in the Name field under Add new attribute.
- Press the Add attribute button to save your new attribute.
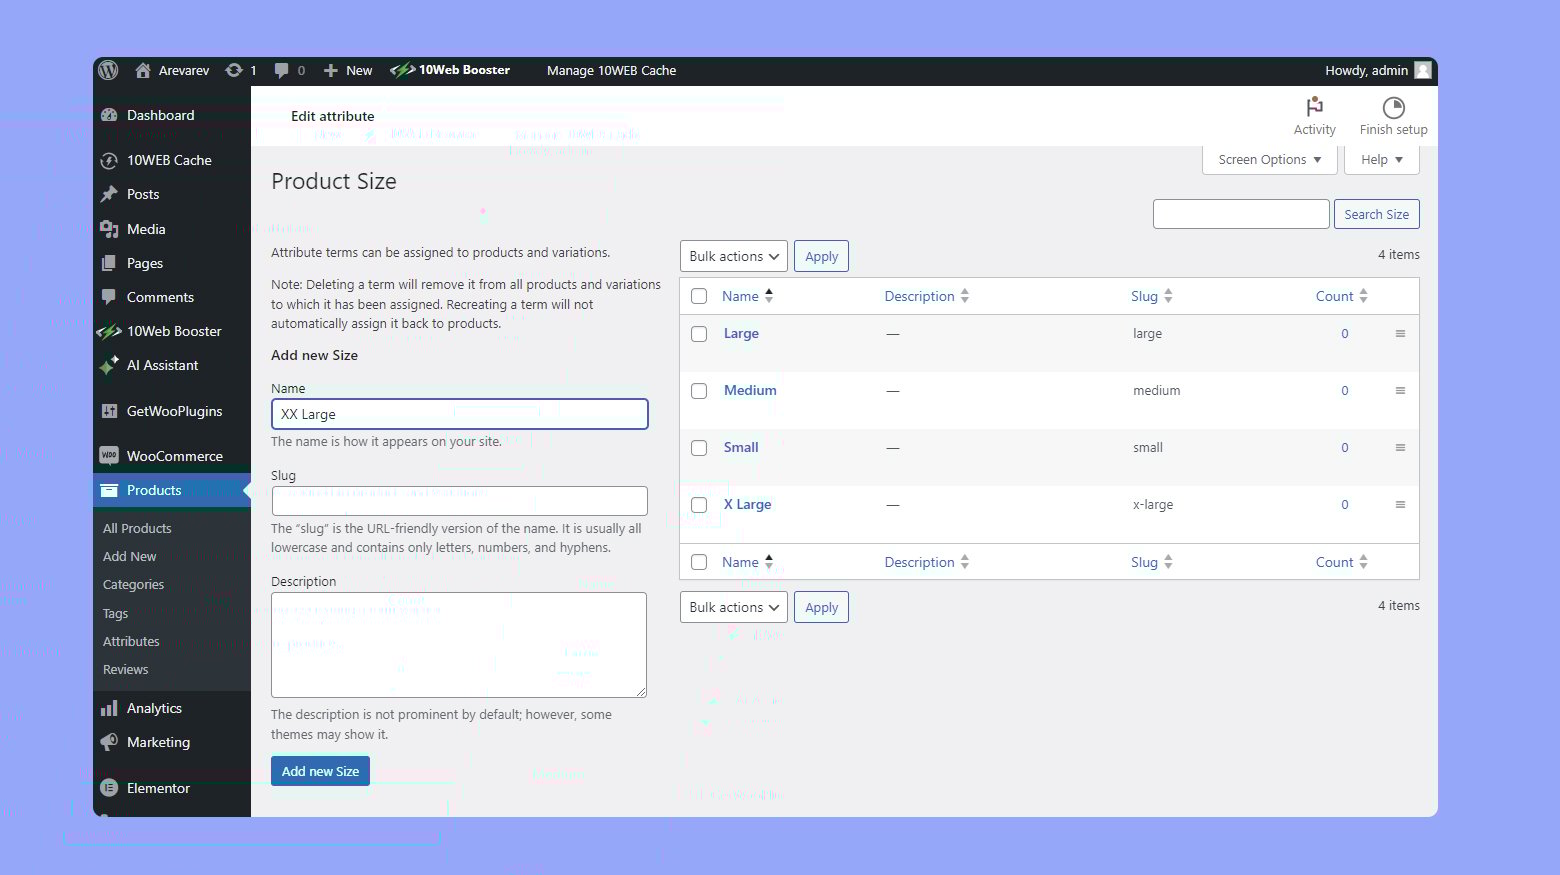
After creating a global attribute, you need to configure the terms.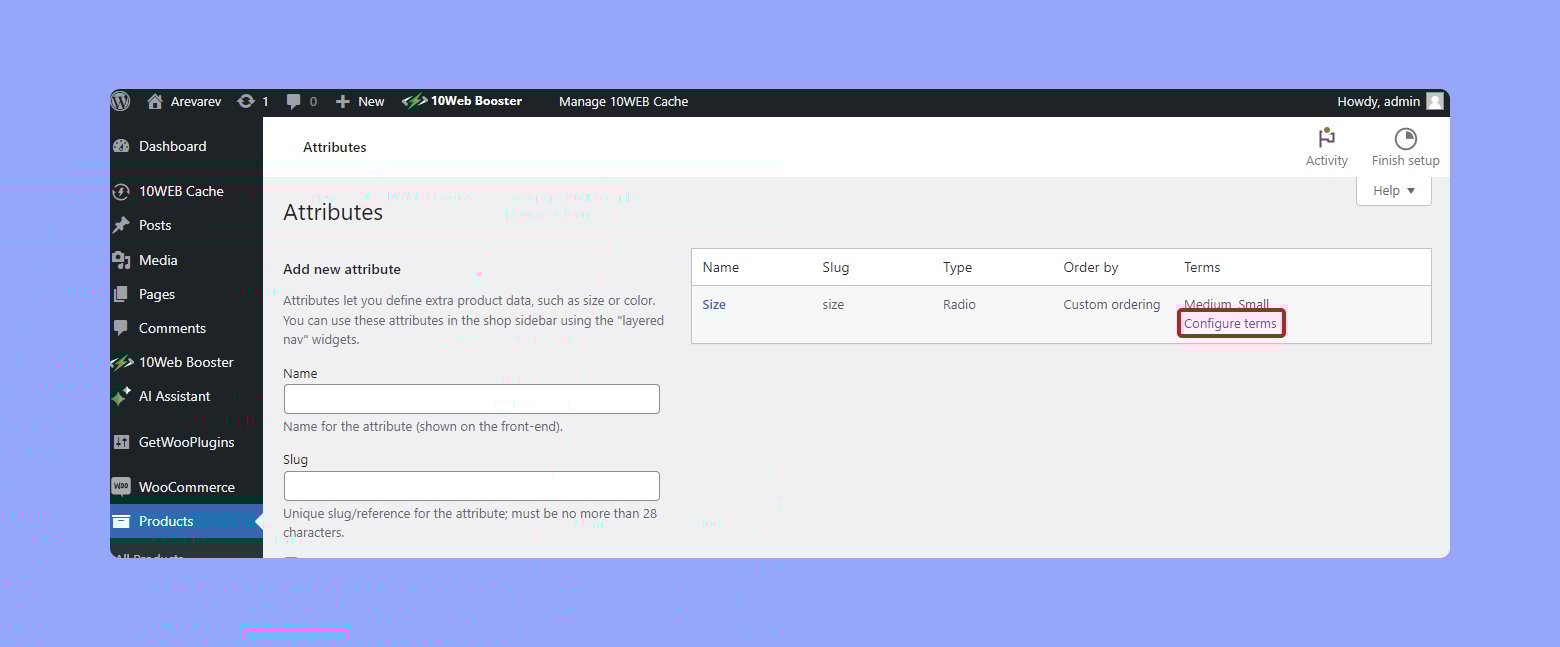
- Hover over the attribute name and click Configure terms.
- Here, you add the specific values related to the attribute, like “blue” or “red” for color.
- Enter a name for the term and click Add new (attribute name).
Repeat these steps to set up more global attributes and their values as required for your products.
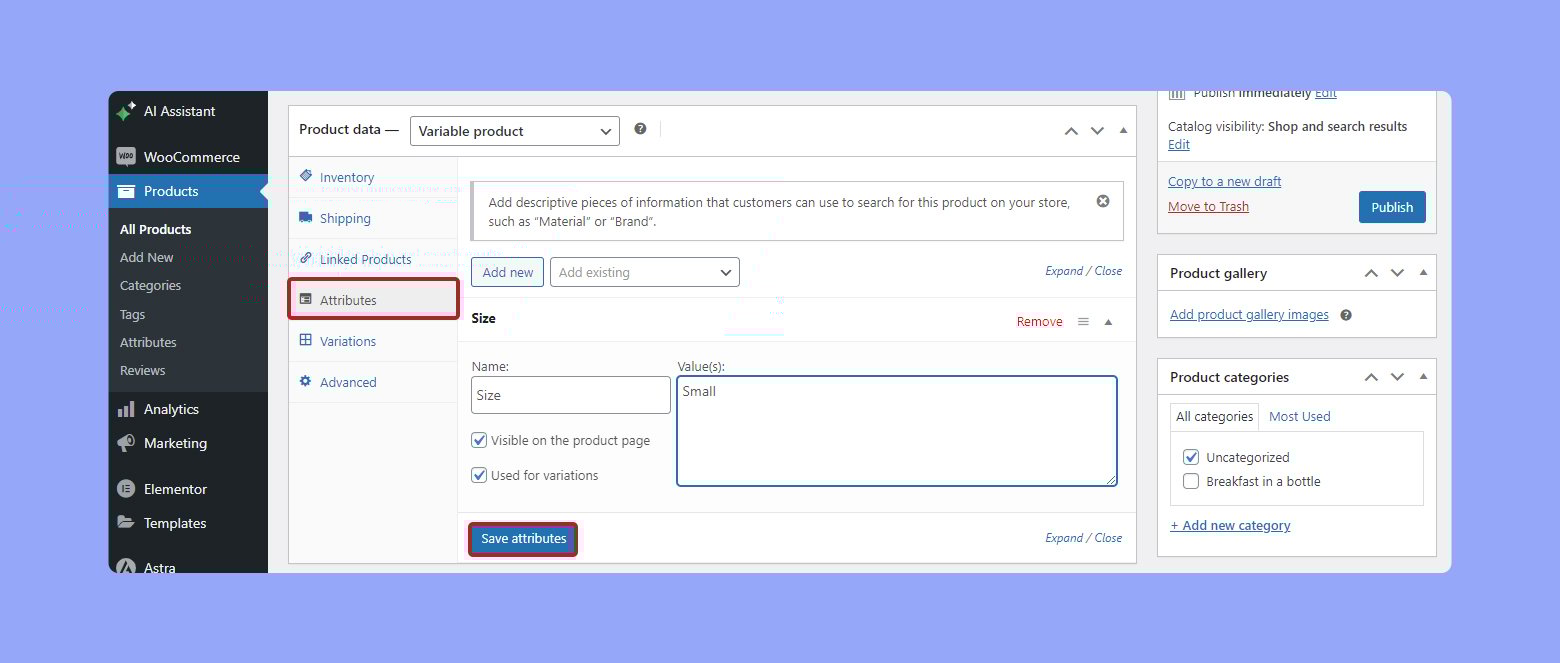
Adding custom attributes
Custom attributes are used when an attribute applies only to a single product.
- Go to Products and select the product you want to edit.
- Scroll down to the Product data panel.
- Click on Attributes, then select Custom product attribute and click Add.
- Enter the name and value(s) for your attribute, such as “material” with values “cotton”, “leather”, or “silk”.
- To enable the attributes for generating variations, make sure to check the Used for variations checkbox.
- Click Save attributes to apply them to your product.


Now your product has custom attributes which can be used to create specific product variations that customers can select when purchasing an item. Use these steps to add as many custom attributes as your product requires.
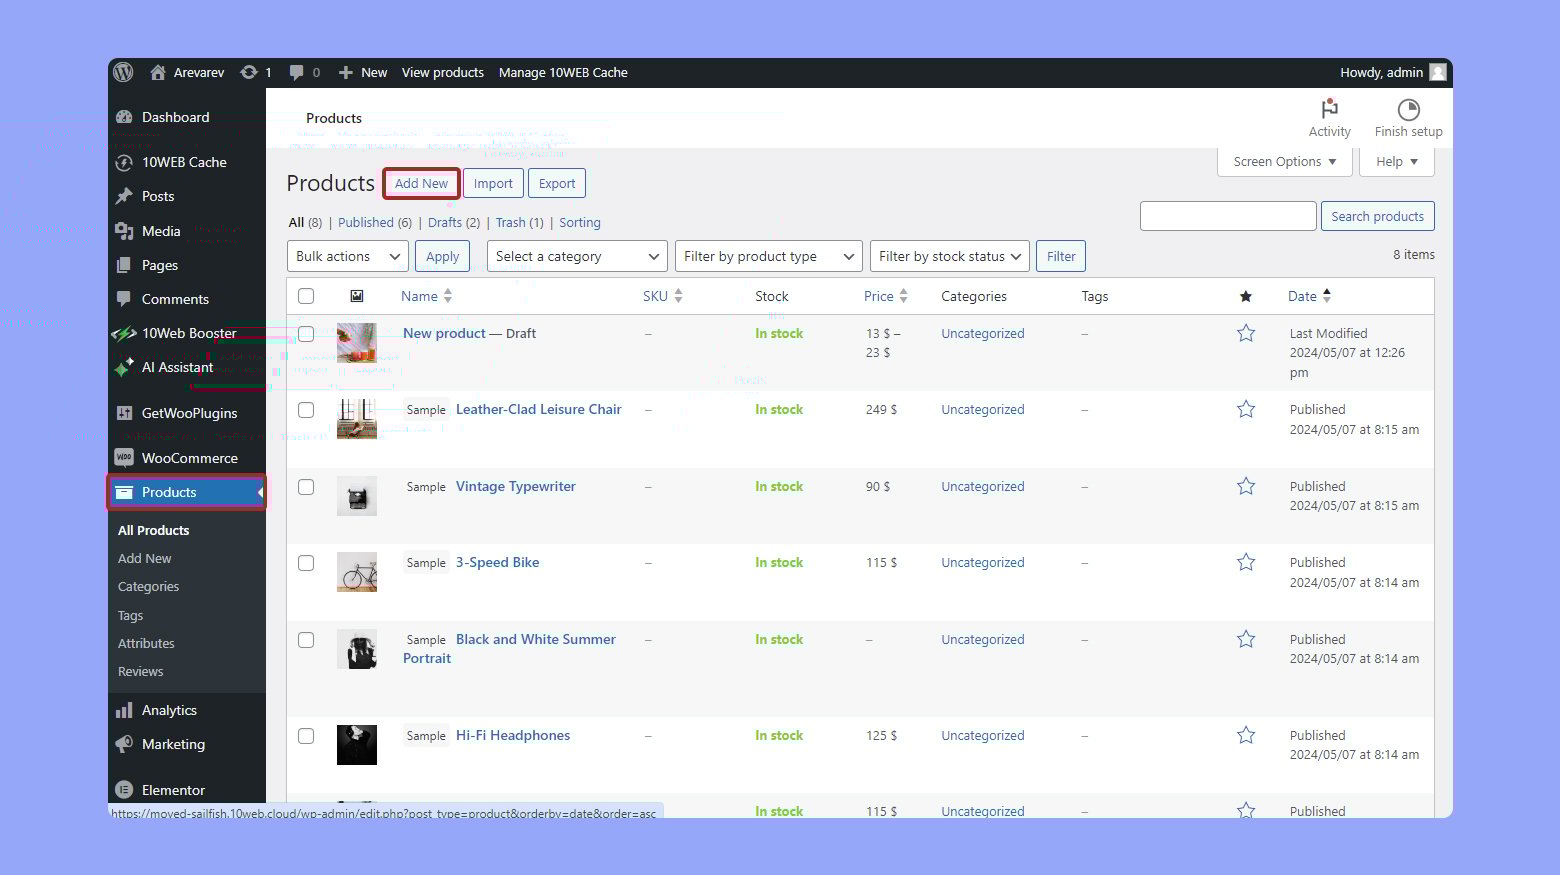
Adding a new variable product
When managing your online store with WooCommerce, adding a variable product allows you to offer a selection of variations to your customers, each with its own SKU, price, and stock level.
- Log in to your WordPress dashboard.
- Click on Products to access your product management page.
- Click on Add New to start creating a new product.
- Scroll down to the Product data section. From the dropdown menu, choose Variable product.
- Enter the product name.
- Optionally, add a SKU for inventory tracking.

- Upload images for your product and its variations.
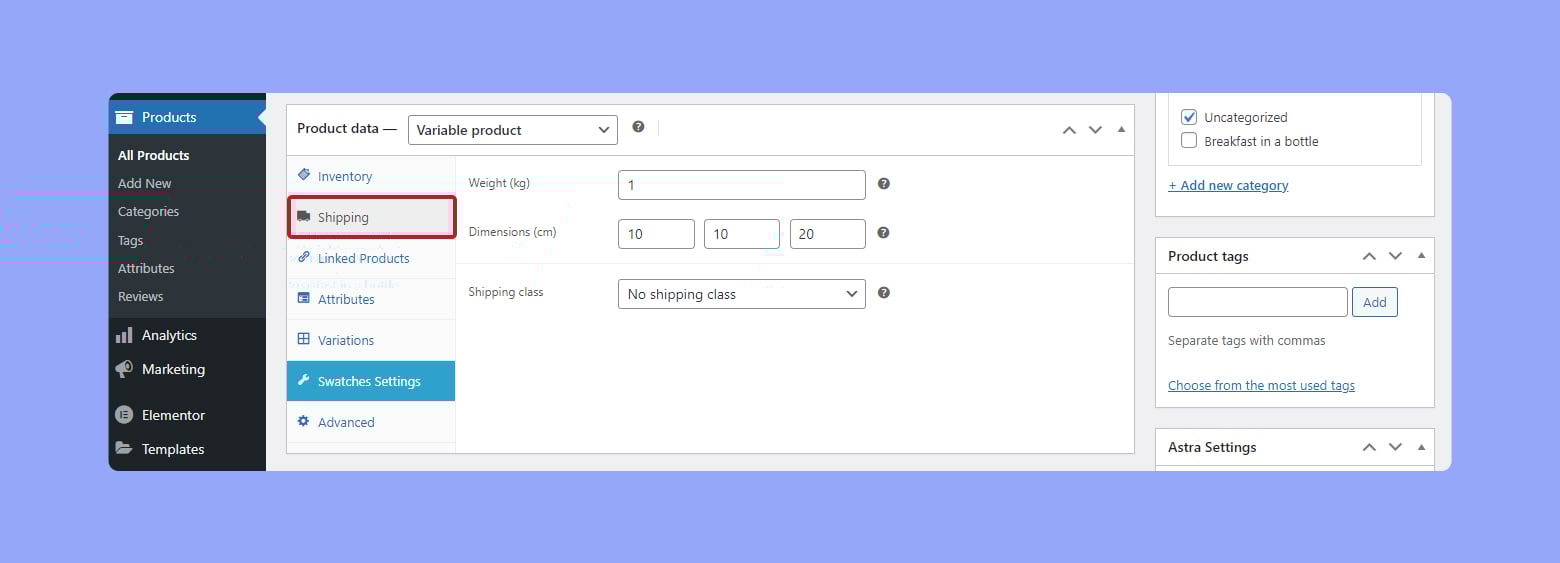
- Specify product dimensions and weight for accurate shipping calculations.

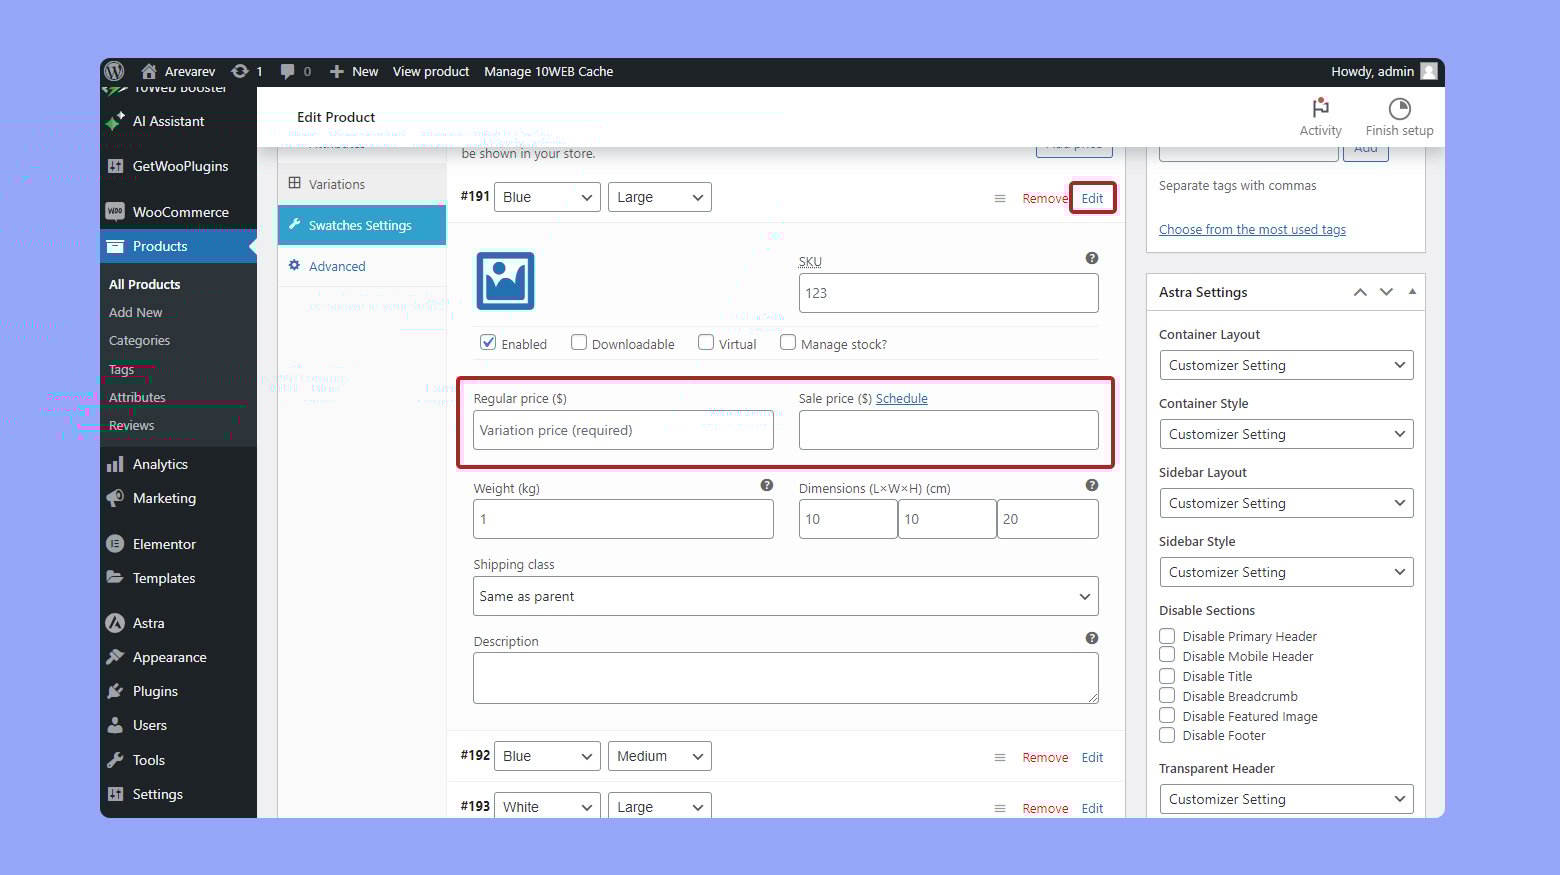
- Set the regular and sale price by editing each variation.
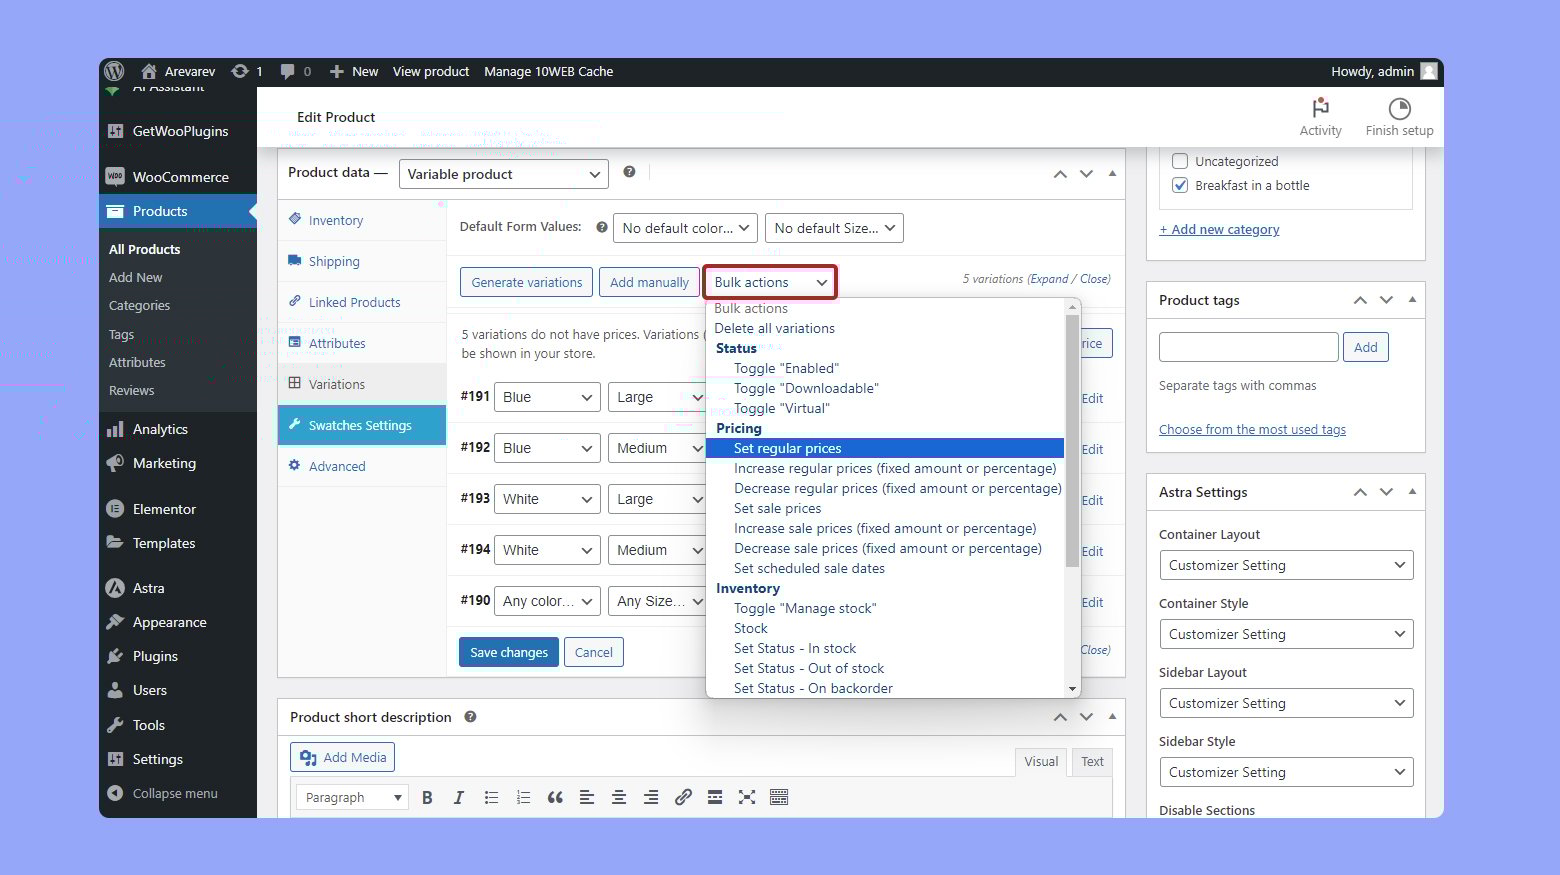
- Alternatively, set the same price for all variations via bulk actions.
- Update stock status to reflect availability.
- Specify if the product is virtual or downloadable.
- If the product requires shipping, select the appropriate shipping class to calculate shipping costs accurately.
- Click the Publish or Update button to save your product.
Create your custom online store in minutes with 10Web AI Ecommerce Website Builder and take your business online.
Looking to sell online?
Creating variations for your products
In WooCommerce, adding variations to your products allows customers to select different options, such as size or color, before purchasing. This customization enhances the shopping experience and can lead to increased sales.
Using default WooCommerce features
To begin with the default features of WooCommerce, navigate to Add New Product under Products in your WordPress dashboard. After adding the product name and description, locate the Product data box and select Variable product from the dropdown menu. Now you’re ready to set up your variations:
- Click on the Attributes tab.
- Choose an attribute you want to have variations of or create a new one by selecting Custom product attribute and clicking Add.

- Input the details for your attribute, such as Name (e.g., Color), and add the values separated by a vertical bar (|), like Red|Blue|Green.
- Don’t forget to tick the checkbox labeled Used for variations to ensure these attributes are available for creating distinct product variations.
Next, switch to the Variations tab.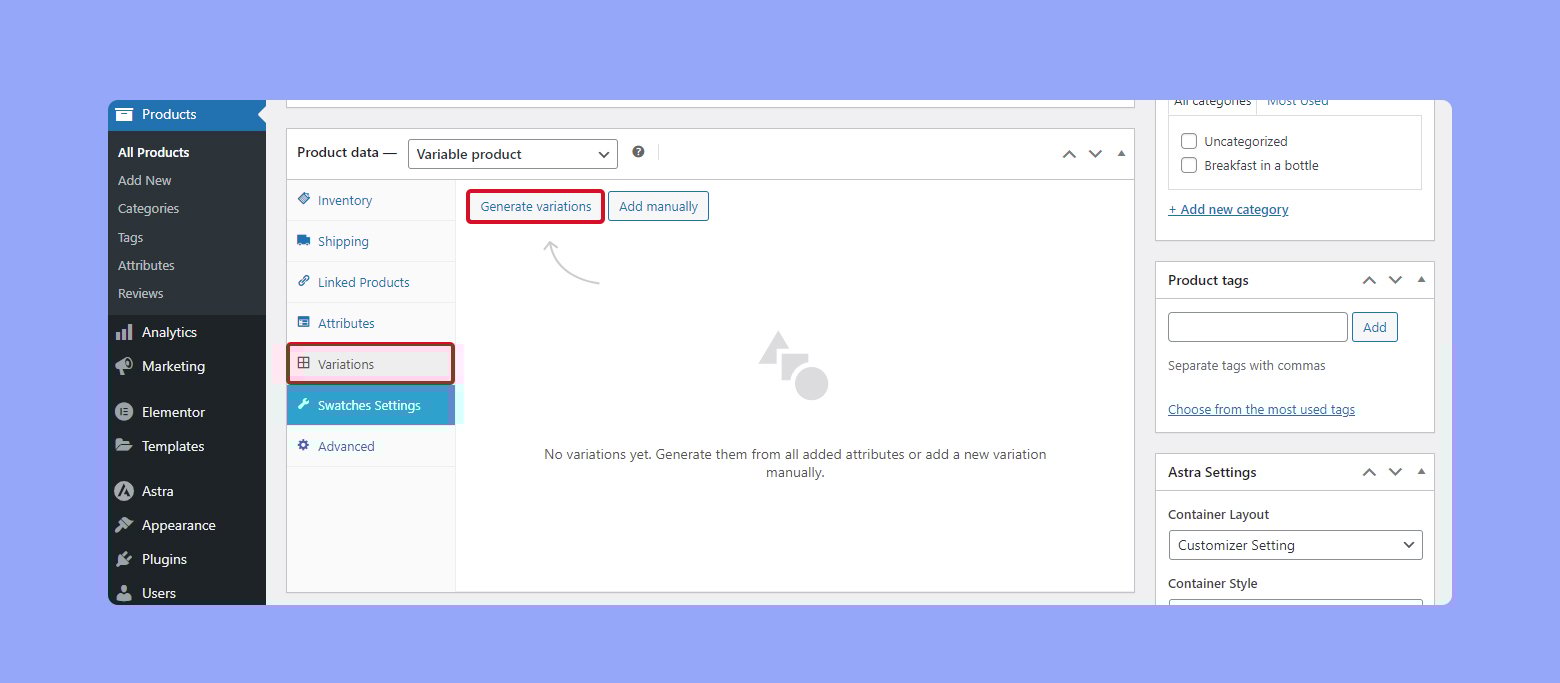
- To add a variation, click on Generate variation or add the variations manually.
- From here, you can modify each variation’s specifics, including stock quantity, price, images, and more. If you’d like, you can also manage stock at the variation level by entering a specific Stock quantity.
Implementing custom variation solutions
While WooCommerce provides robust options for creating product variations, you might find the need for more tailored solutions to enhance your customers’ experience, like using color swatches instead of dropdowns.
- Consider plugins that allow for more visually appealing options, such as color swatches or image swatches.
- These plugins often offer an easy way to configure additional display features for your variations. You can display color options as color swatches, making them instantly recognizable and user-friendly.
By following these steps and possibly incorporating custom variation solutions, you can present a more dynamic and inviting product page that caters to your customers’ preferences.
Enhancing product pages for variations
When adding variable products to your WooCommerce store, enhancing the product pages is essential for providing a seamless shopping experience. Effective use of images and user interface elements like swatches can greatly enhance the perception and functionality of your product offerings.
Optimizing images and layout
Your product page is the showcase of your items, so it’s crucial that you present each variation with high-quality images. The product image should change as the user selects different variations. This makes it much easier for customers to visualize their choices and can help in their decision-making process.
- Layout: Maintain a clean layout that highlights the differences between variations.
- Images: Use professional, high-resolution photographs for each variation.
- Quick view: Enable a Quick view feature to allow users to see the product details without navigating away from the current page.
Improving user interfaces with swatches
Dropdown menus can limit the user experience by hiding available options. Using swatches is a more visual and user-friendly approach:
- Swatches: Replace the traditional dropdown menu with swatches to allow customers to see all available options at a glance.
- Variation Swatches for WooCommerce plugin: Install this plugin to enable swatches for your product variations.
- Tooltip: Employ a tooltip feature to offer more information on hover, which can help customers understand unfamiliar terms or differentiations.
By implementing these improvements, your product pages will be more engaging and conducive to a satisfying shopping experience.
Managing inventory for variable products
When dealing with variable products in WooCommerce, keeping a meticulous track of your stock for each variation is crucial. This helps prevent overselling and ensures customers have a clear view of what’s available. Backorders and comprehensive stock management settings give you control and flexibility with your inventory.
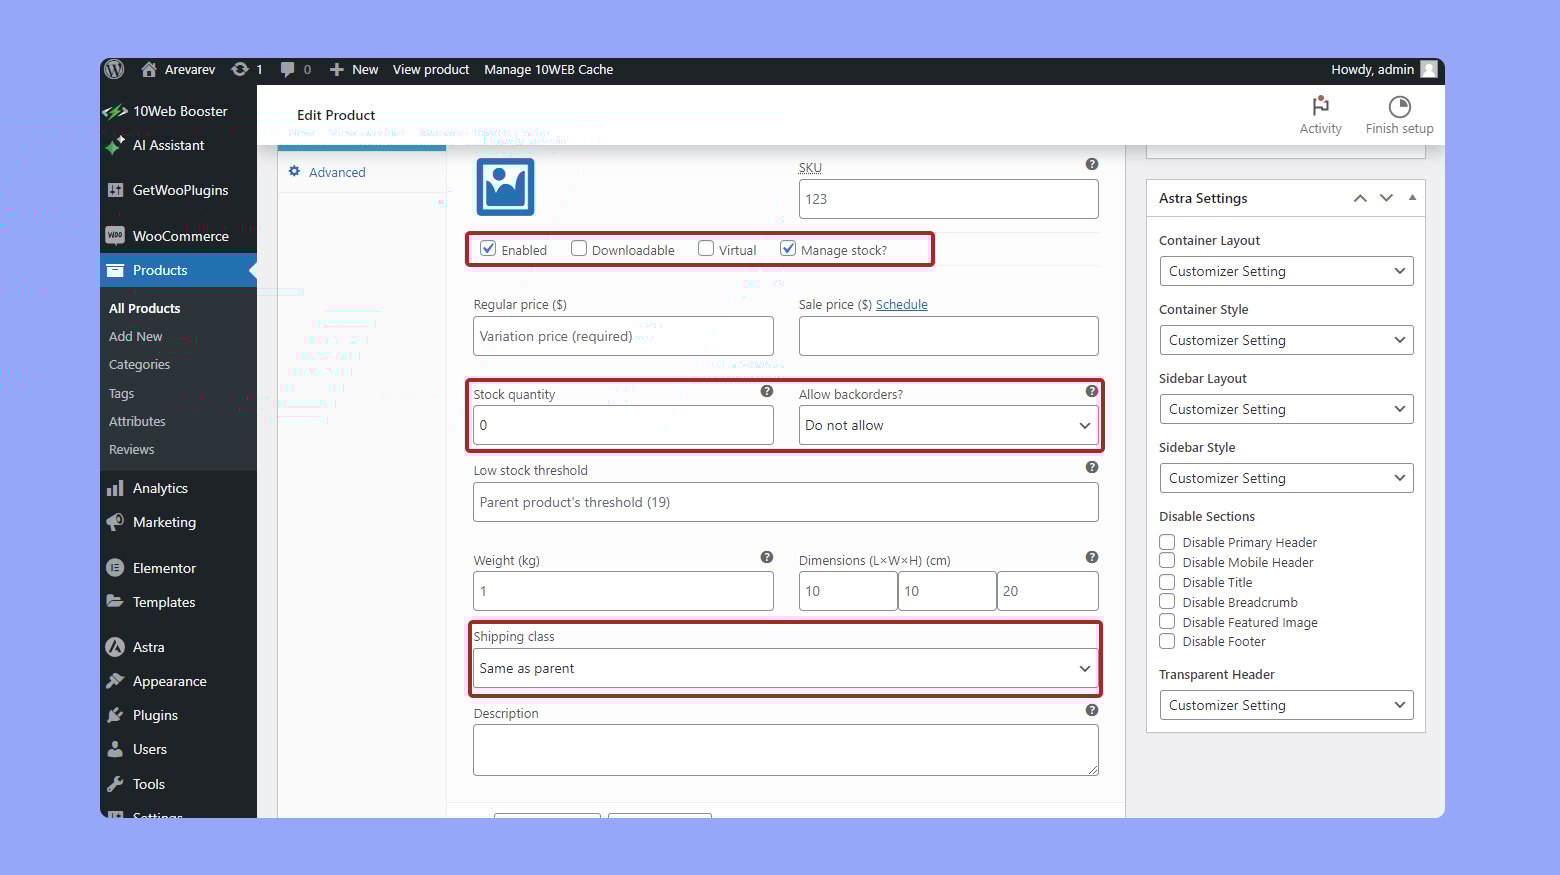
Tracking stock for each variation
To maintain accurate inventory levels for your variable products, you need to track the stock for each variation individually.
- Navigate to WooCommerce > Products and click on the product you wish to manage.
- Under the Product data section, select the Variations tab.
- Choose a specific variation from the list or add a new one if needed.
- Look for Manage stock? and check the box to enable stock management for this variation.
- Set your Stock quantity, and WooCommerce will automatically update the Stock status as In Stock or Out of Stock based on the quantity you enter.
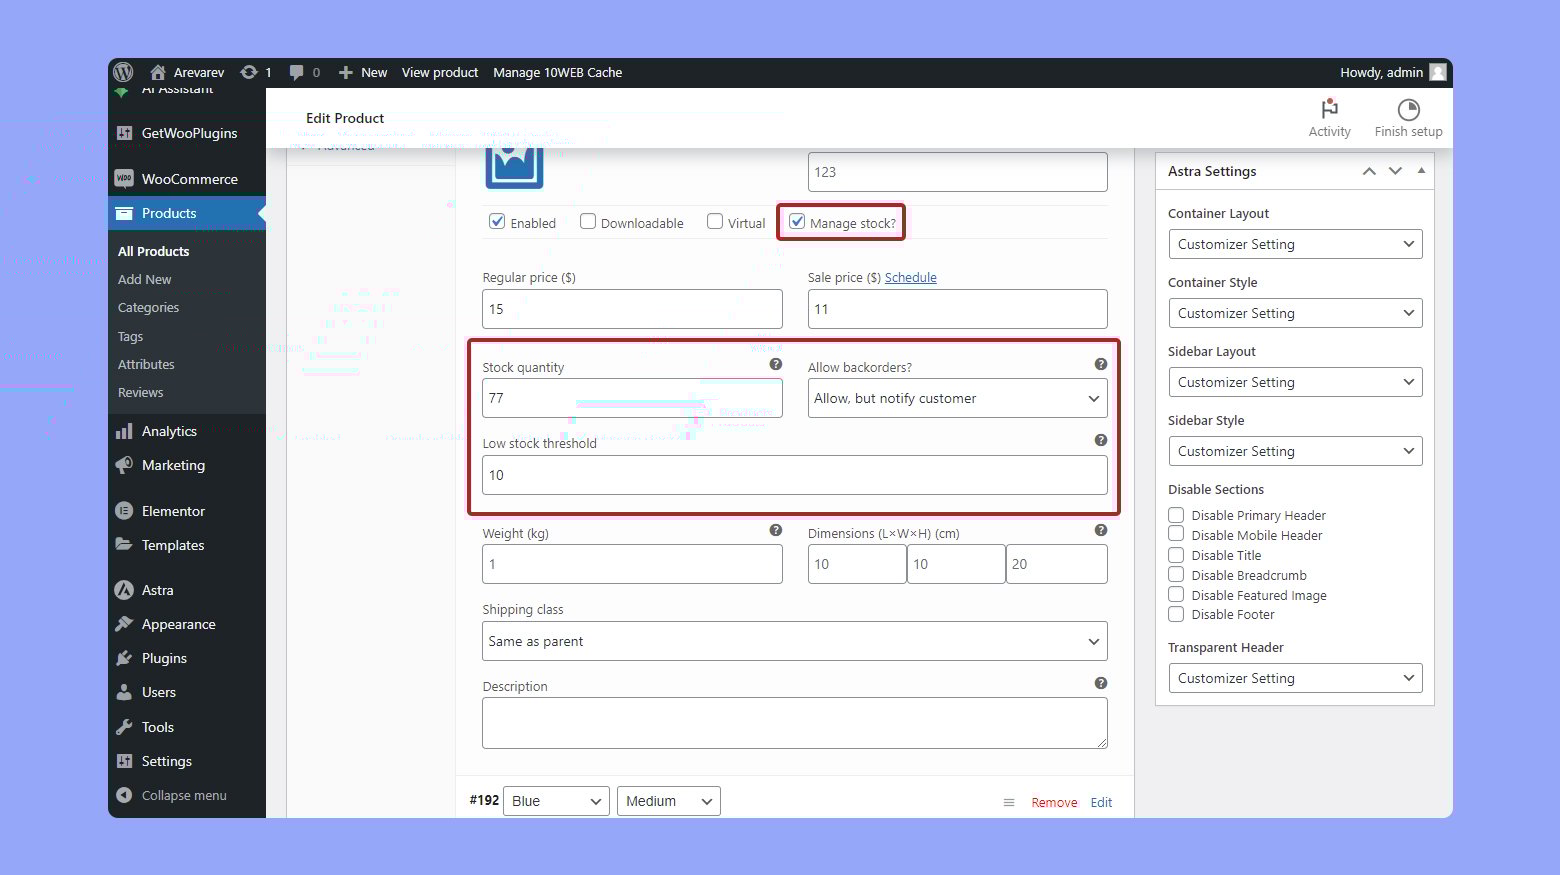
By tracking each variation, you ensure that your stock numbers are always up to date, providing a better experience for your customers.
Create your custom online store in minutes with 10Web AI Ecommerce Website Builder and take your business online.
Looking to sell online?
Configuring backorders and stock management
You have the option to manage your stock at a more granular level by configuring backorders and overarching inventory settings.
- Under the Variations tab, you can set Allow backorders to your preferred option:
- Do not allow – This prevents backorders completely.
- Allow, but notify customer – This allows backorders but informs customers that their order may be delayed.
- Allow – This option enables backorders without any customer notification.
Remember, enabling backorders can help maintain sales momentum even when stock is low, but be sure to communicate clearly to avoid customer dissatisfaction. Your stock management strategy should balance responsiveness with customer expectations to create a smooth shopping experience.
Optimizing your variable product listings
Creating variable product listings in WooCommerce can greatly enhance your customers’ shopping experience. By effectively using SEO techniques and leveraging extensions, you can maximize product visibility and potentially increase your conversions and average order value (AOV).
Using SEO techniques
When it comes to optimizing your variable product listings, ensuring they are search engine friendly is your first step. Start by constructing descriptive and keyword-rich product titles that reflect the variations you offer, such as size or color. You should also pay attention to your meta descriptions, implementing relevant keywords that not only describe the product but also match the search queries your potential customers might use.
In addition, it’s beneficial to include alt text for all images, which should be as descriptive as possible. Alt text helps search engines understand the content of your images, contributing to better visibility in image searches and overall SEO performance.
Remember, the slug of each product page—the URL—should be clean, readable, and keyword-focused. This makes it easier for search engines to crawl your site and for users to remember the URL.
Leveraging extensions and plugins
WooCommerce has a plethora of extensions and plugins designed to help optimize your product listings for speed and efficiency. Choose plugins that compress images to speed up your page load times, as faster loading can improve both SEO rankings and user experience.
For instance, consider using plugins that offer lazy loading, where images only load when they scroll into view. This reduces initial page load time, which can be crucial for mobile users.
Moreover, to boost average order value and conversions, seek out extensions that suggest related products or enable bundling options. This encourages customers to add more items to their cart and provides a personalized shopping experience. Doing so can subtly guide your customers towards higher-value purchases, thereby optimizing your AOV.
Remember to regularly check the performance of these plugins and trim any that slow down your site, as speed is a key factor in both user experience and conversions.
Advanced customizations for experienced users
In this section, you’ll learn to personalize your WooCommerce variable products by coding custom functions and modifying templates. These advanced techniques allow you to exceed the standard offerings and tailor your eCommerce experience directly from the WordPress dashboard.
Coding custom functions
Custom functions provide you with the power to implement unique features and workflows in your WooCommerce store. You can add these functions directly to your theme’s functions.php file or within a custom plugin. For example, to automate discounts for bulk purchases, you can write a snippet that adjusts pricing based on the quantity ordered.
Ensure you have access to your site’s WP dashboard and that you are comfortable modifying your theme’s code. Remember to always back up your site before making changes to the code.
Modifying templates for unique displays
To alter how variable products appear on the front end, you might need to delve into WooCommerce template files. These are located in the woocommerce/templates/ directory. You can override these templates by copying the file into a similarly named directory within your theme, preserving the path.
For instance, to change the product display layout, copy single-product.php to your theme and customize it accordingly. This allows for greater control over the design and user experience on product pages.
Keep in mind that any updates to WooCommerce could overwrite your custom templates if not placed in the correct directory within your theme. Additionally, consider using a child theme to prevent losing your customizations when updating the parent theme.
By mastering these advanced customizations, you enhance both the functionality and aesthetics of your WooCommerce store, ensuring a unique shopping experience for your customers.
Create your custom online store in minutes with 10Web AI Ecommerce Website Builder and take your business online.
Looking to sell online?
Troubleshooting common issues with variable products
Sometimes, setting up variable products in WooCommerce can come with its own set of challenges. Here’s how you can navigate some of the common issues to ensure a smooth experience for your customers.
Resolving configuration errors
When adding variable products, you might encounter configuration errors that prevent you from moving forward. To address these:
- Check attributes: Ensure you have added attributes correctly under Product data > Attributes. They need to be configured with the Visible on the product page and Used for variations options ticked.
- Verify variations: In the Variations tab, each combination should have a set price, and stock status should be properly managed if stock management is enabled.
- Clear transients: Sometimes, old cached data can cause issues. You can clear transients by going to WooCommerce > Status > Tools and select Clear transients.
- Permalinks reset: If variations are not showing, resetting the permalinks can help. Navigate to Settings > Permalinks and simply save the changes without altering anything to refresh the permalink structure.
Handling variation display problems
Variation display problems are commonly faced by customers who cannot see all available options or the variations they select do not update the product image or price.
- Ensure variation images are set: Each variation can have its own image. Confirm that images are uploaded and assigned correctly to each variation.
- Use default form templates: Custom templates can sometimes interfere with the display of variations. Try switching back to the default WooCommerce templates to see if the issue persists.
- Test for plugin conflicts: Disable all non-WooCommerce plugins and switch to a default theme like Storefront to see if there’s a conflict causing the display error.
- Update WooCommerce: Keep your WooCommerce plugin updated as each update comes with fixes and improvements that can resolve existing issues.
By following these steps, you should be able to resolve most of the configuration and display issues associated with variable products in WooCommerce, leading to a better user experience and fewer support requests.
Conclusion
In managing your WooCommerce store, adding and optimizing variable products is essential for offering diverse product variations like size and color on a single page. By understanding the setup of attributes, variations, and advanced customizations, you can streamline your store’s inventory management and enhance the customer experience.
Key takeaways
- Understanding variable products
- Setting up attributes and variation
- Adding variable products
- Optimizing product page
- Inventory management
Apply these strategies to optimize your WooCommerce store’s product pages, ensuring streamlined inventory management and a seamless shopping experience. By mastering variable products, you’ll be able to meet diverse consumer needs, improve customer satisfaction, and potentially boost sales.
Create your online store in minutes with 10Web AI Ecommerce Website Builder.Looking to sell online?
Create your online store in minutes


![]()