Using WooCommerce transforms your WordPress website into a dynamic ecommerce platform, ideal for selling both physical and digital products. This article covers the essential steps of how to use WooCommerce, from installing WooCommerce after setting up your WordPress site to choosing the right hosting environment and configuring your store’s settings. Follow this guide to efficiently navigate the setup wizard, customize your store, and manage your products, ensuring a seamless and successful online selling experience.
FAQ
What is WooCommerce and how do you use it?
WooCommerce is an open-source ecommerce plugin for WordPress designed for small to large-sized online merchants. It is used by installing the plugin on a WordPress website, setting up your store by adding products, and configuring settings like payment and shipping.
How to use WooCommerce step by step?
- Install WooCommerce on your WordPress site.
- Configure your store’s details, including location, currency, and payment methods.
- Add products, including details such as name, price, and images.
- Set up shipping options and tax settings.
- Customize your store’s appearance with themes and extensions.
- Test your store, and go live.
Is WooCommerce easy to use?
Yes, WooCommerce is user-friendly, especially for those familiar with WordPress. It offers a guided setup wizard and has a large community for support, making it accessible for beginners.
Do I need a WordPress site to use WooCommerce?
Yes, WooCommerce requires a WordPress website to function, as it is a plugin designed specifically for WordPress.
Getting started with WooCommerce
Before diving into the world of WooCommerce, it’s crucial to understand the basics of setting it up on your WordPress website. Initially, you’ll need to ensure that you have a web host and a domain name to get your ecommerce site up and running.
Create your custom online store in minutes with 10Web AI Ecommerce Website Builder and take your business online. 
Looking to sell online?
Introduction to WooCommerce
WooCommerce is a powerful and flexible ecommerce plugin that integrates seamlessly with your WordPress website, turning it into a fully functional online store. Whether you’re in the retail industry or looking to sell digital products, WooCommerce provides a versatile platform to cater to a variety of online sales needs.
Installing WooCommerce
To install WooCommerce, make sure you have WordPress installed on your hosting account. Here’s a quick guide to get WooCommerce up and running:
- Obtain a domain name from a reliable registrar.
- Choose a web host that meets the requirements for running WooCommerce and WordPress. It’s important to select a host that can handle the demands of your ecommerce traffic.
- Install WordPress on your hosting account, which is often provided as a one-click install by many web hosts.


After setting up WordPress, follow these steps to install WooCommerce:
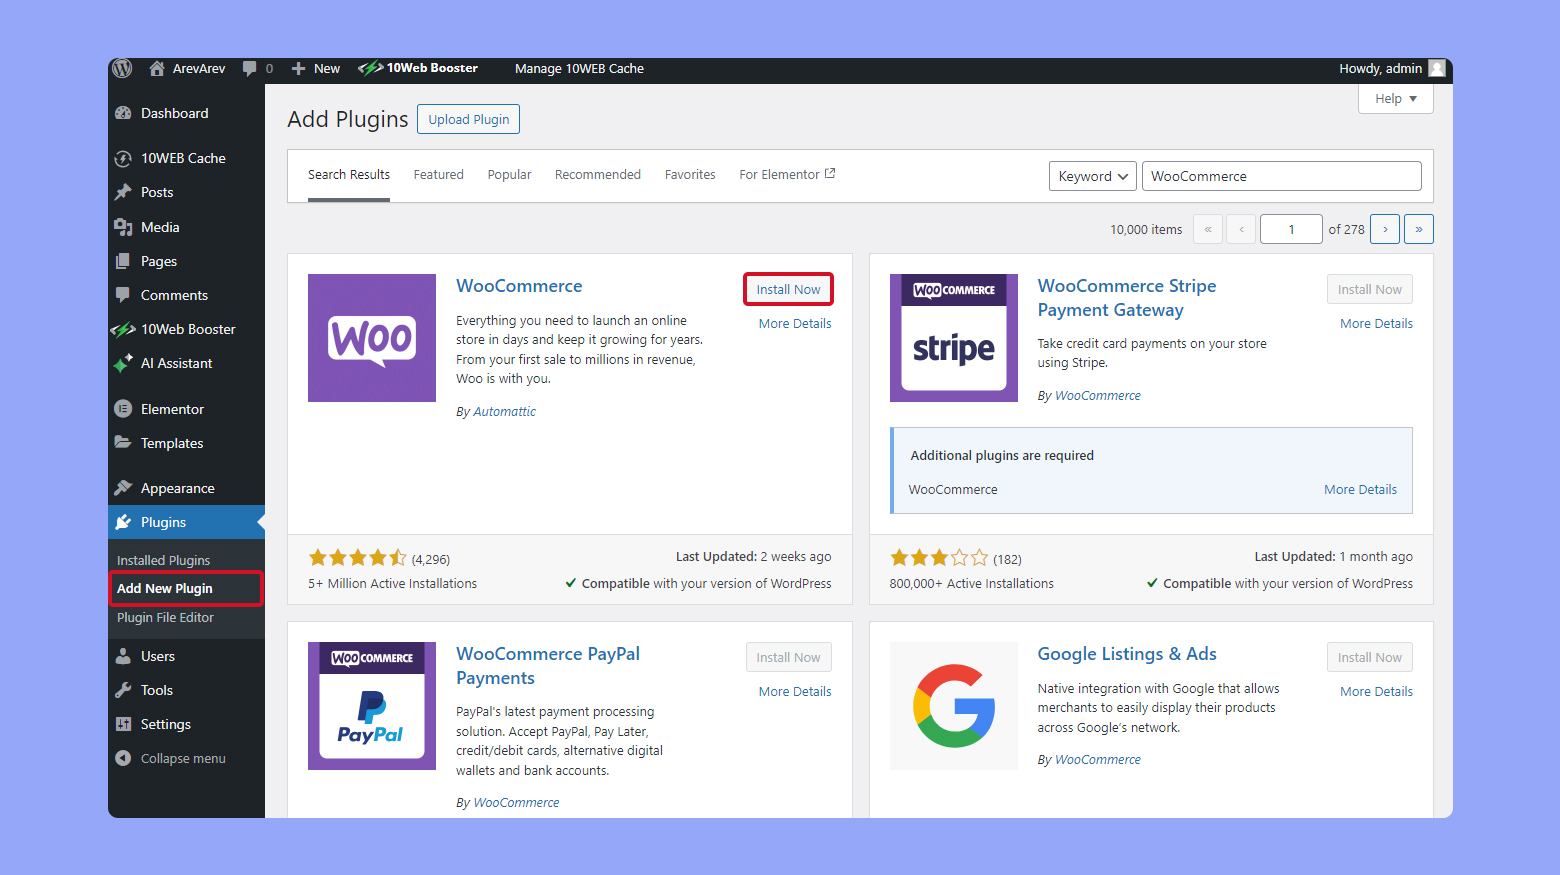
- Navigate to your WordPress dashboard.
- Go to Plugins > Add New.
- In the search field, type WooCommerce and hit Enter.
- Find the WooCommerce plugin and click Install Now.
- After installation, click Activate.
Once activated, the WooCommerce setup wizard will guide you through the process of setting up your online store, including payments, shipping, and product additions. This hands-on approach ensures your store is tailored to your specific requirements, giving you the foundation to start selling quickly and efficiently.
Setting up your WooCommerce store
Starting your own online store is a significant step, and WooCommerce provides a straightforward process to help you launch successfully. Follow these key steps to ensure your WooCommerce store is configured for your business needs.
Navigating the setup wizard
When you first install WooCommerce, you’ll be greeted by the Setup Wizard. This is where you begin tailoring your store’s functionality to match your business. It’s designed to guide you through the most essential settings, such as currency, payment methods, and shipping options. Follow the prompts carefully to set up the core aspects of your WooCommerce store.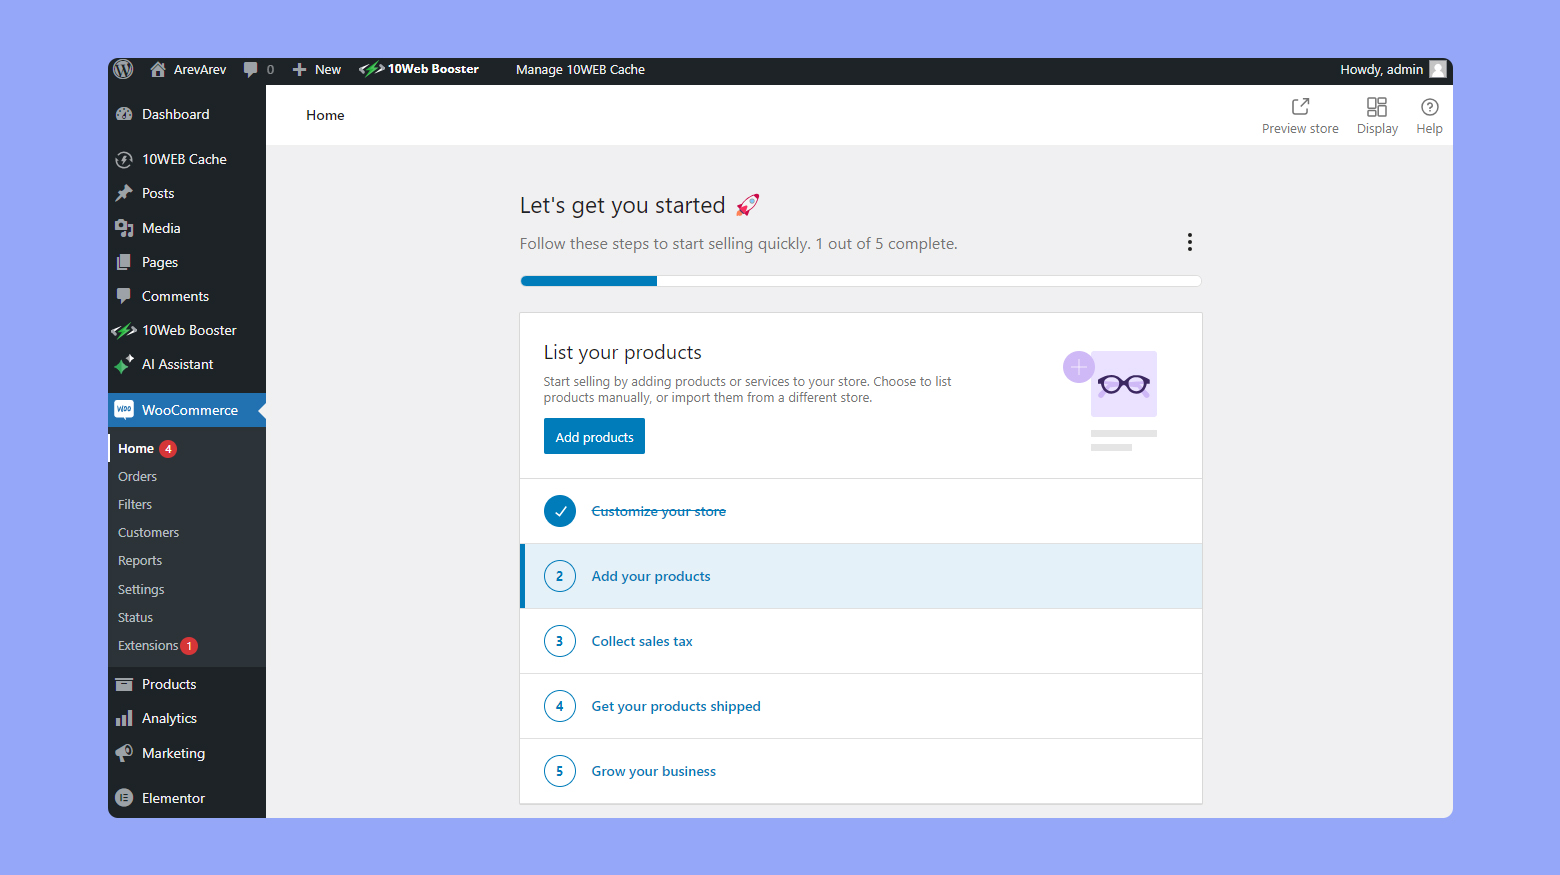
The wizard will prompt you through several steps where you’ll set up key aspects of your store:
- Currency: Choose the currency that your store will operate in.
- Payment methods: Select and configure the payment gateways you want to offer (e.g., PayPal, Stripe, bank transfers).
- Shipping options: Define how you will handle shipping, including setting up shipping zones and rates.
Move through each screen of the Setup Wizard by following the prompts and filling out the necessary information. Each step is designed to configure a crucial part of your store’s functionality.
Adding business details
Next, you’ll need to provide important business details. This includes your store’s name, address, and what type of goods you’ll be selling. Access this section through the Dashboard, and fill in the information accurately. These details are crucial as they can affect:
- Tax calculations: Accurate location details ensure correct tax rates are applied.
- Shipping methods: Address information helps in setting up applicable shipping zones and fees.
Setting up hosting environment on platforms like 10Web
For a successful online presence, your store needs reliable hosting. Platforms like 10Web offer hosting solutions specifically optimized for WooCommerce. They handle the technical side of things, allowing you to focus on your business. Go to 10Web and select a hosting plan that suits your store’s size and traffic expectations, then follow the platform’s instructions to migrate or create your WooCommerce site.
10Web offers an intuitive Ecommerce Website Builder where you can create and manage your store. If you are a 10Web user, after installing the WooCommerce plugin, you can quickly and easily configure your store through the 10Web dashboard. Design your store using the 10Web Builder, then create new products, check your orders, manage payments and more.
Create your custom online store in minutes with 10Web AI Ecommerce Website Builder and take your business online.
Looking to sell online?
Configuring your store
When setting up your WooCommerce store, configuring its backbone is essential for a smooth operation. You’ll tweak general settings, set up payment and shipping methods—all to ensure that your store reflects your brand and functions efficiently.
General settings
Properly setting up the general settings in WooCommerce is crucial for personalizing your store’s identity and ensuring its operations align with your business strategies. These settings help dictate how transactions are processed, where your products are sold, and how prices are displayed. Here’s a guide to configuring your store’s general settings effectively.
To set up general settings:
- From your WooCommerce dashboard, navigate to Settings > General tab to start customizing your store’s basic features.
- Enter your primary business location in the Store Address field. This address is critical as it influences tax rates and shipping calculations.
- Choose where you want to sell your products by selecting your selling locations. You can opt to sell globally, only in specific countries, or restrict sales to certain regions.
- Set a default customer location to help automate tax and shipping calculations. This setting should reflect the most common location of your customers or be set to geolocate to detect the customer’s location automatically.
- Select the currency in which your products will be priced. Go to the Currency options section and choose from a dropdown list of available currencies. This setting will determine how prices are displayed across your storefront.
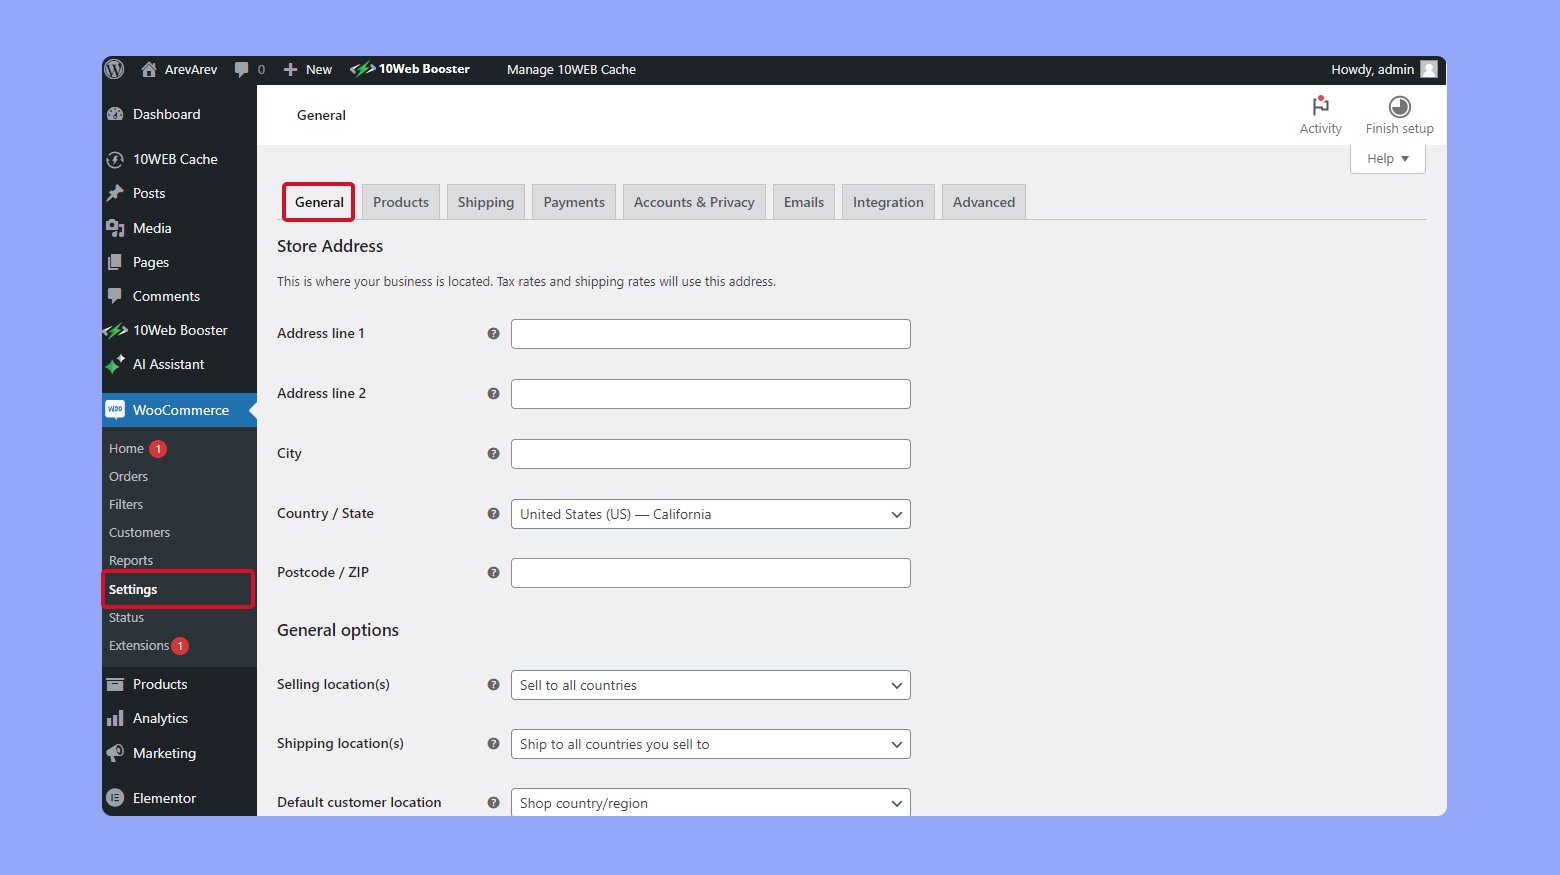
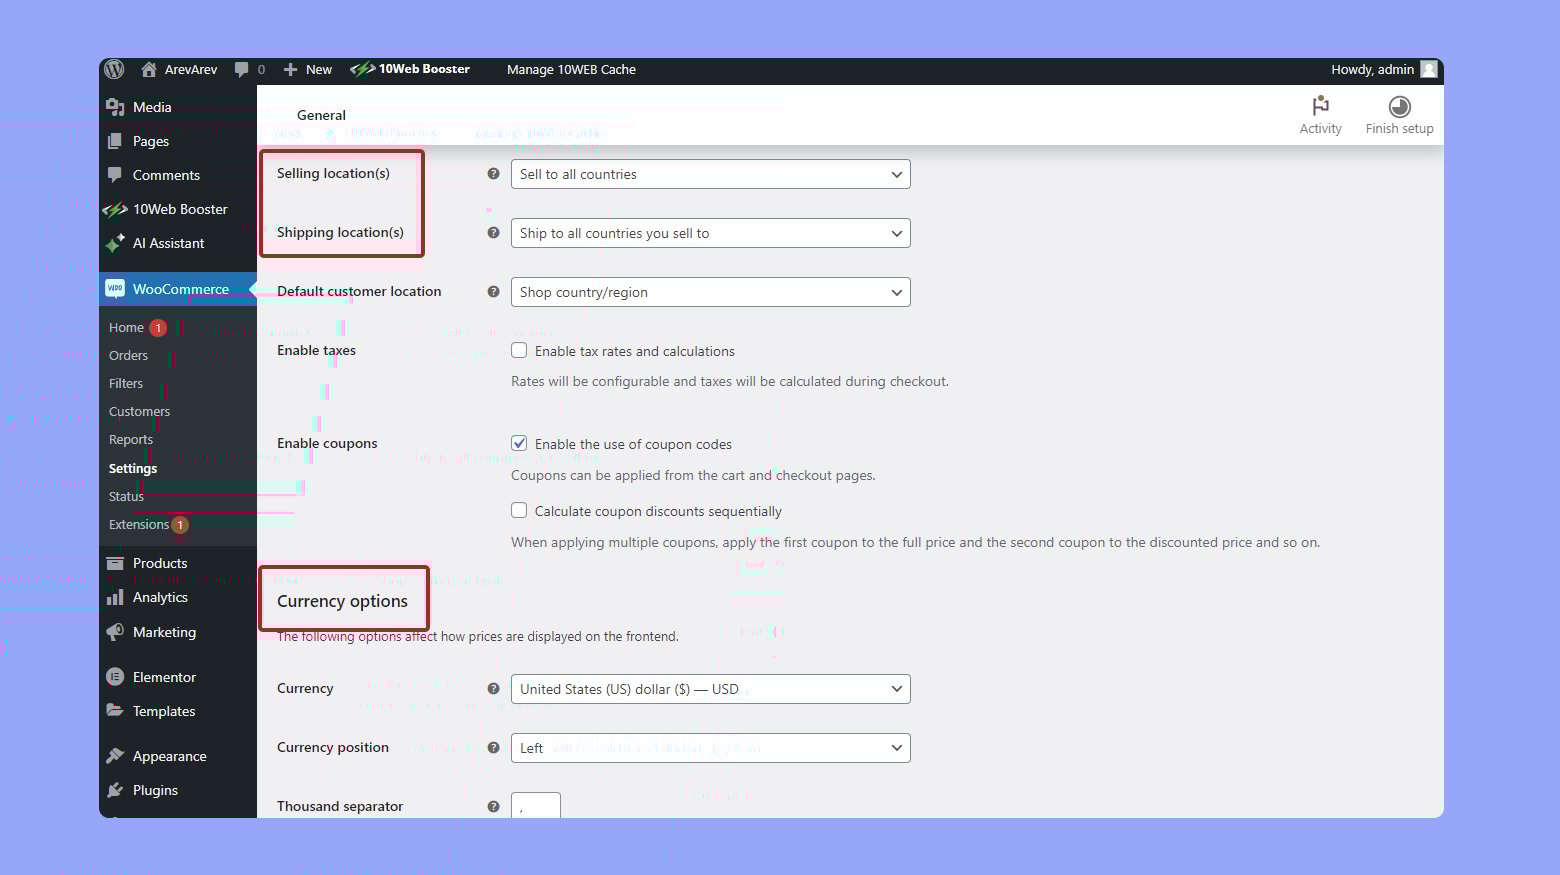
Adjusting the general settings allows you to tailor your store to local business regulations and customer preferences. By setting up your store and customer locations accurately, you simplify the calculation of taxes and shipping costs, ensuring compliance and accuracy.
Setting the right currency enhances the shopping experience by displaying prices in the customer’s local or preferred currency.
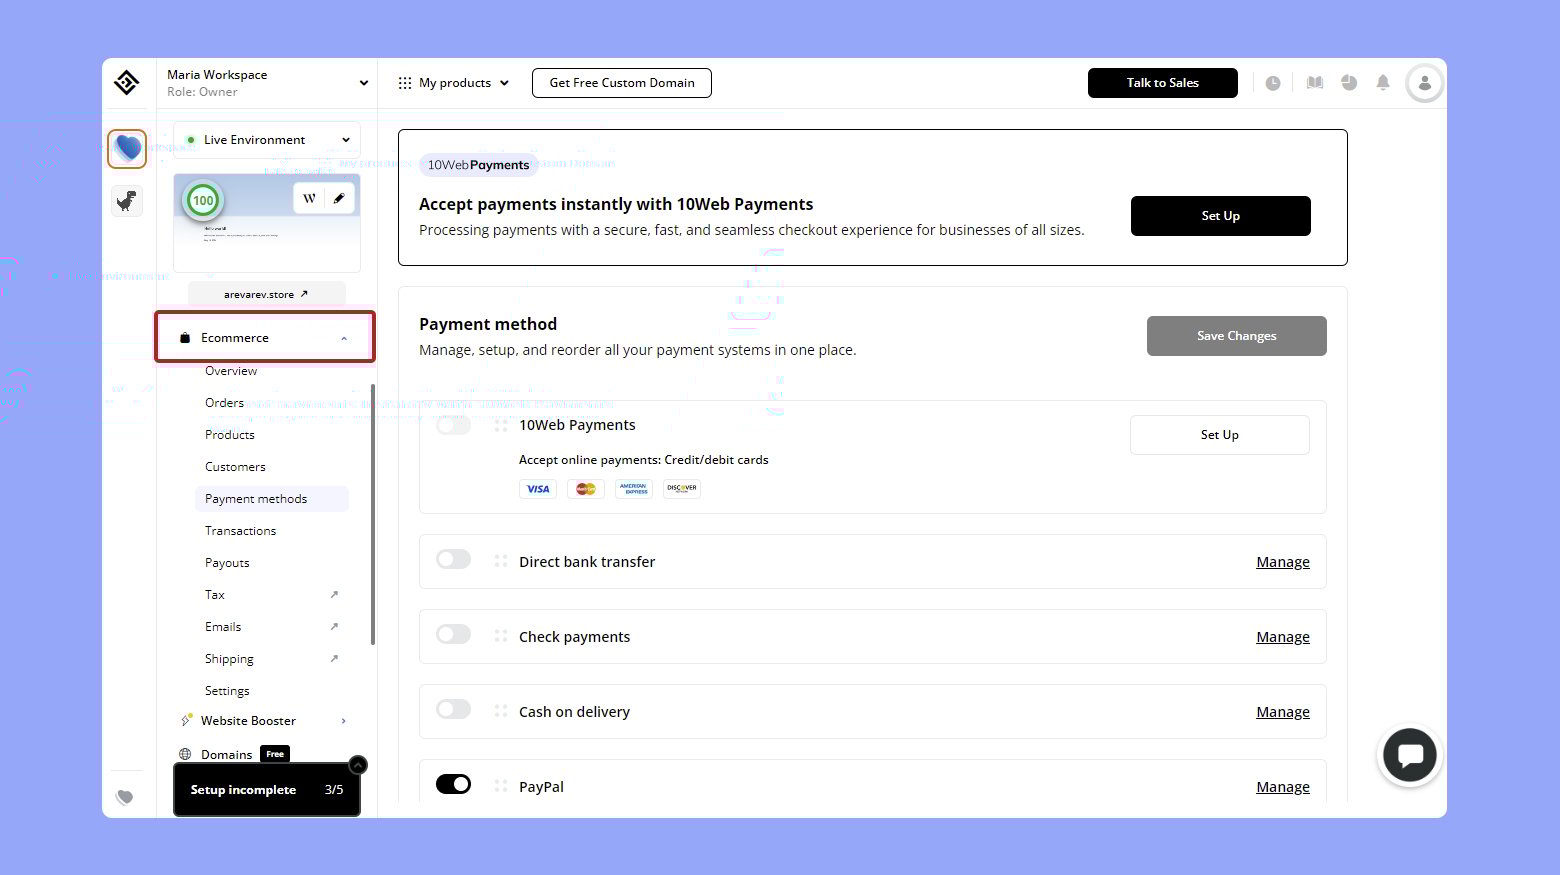
Configuring payment gateways
Configuring the right payment gateways is a vital part of setting up your WooCommerce store. It ensures that transactions are processed smoothly and securely, providing your customers with flexibility and peace of mind. Here’s a detailed guide on how to activate and set up popular payment options like PayPal and Stripe.
Benefits of proper configuration:
- Security: Properly entering your payment gateway credentials ensures that all transactions are secure, protecting both you and your customers from potential fraud.
- Customer convenience: Offering multiple payment options like PayPal and Stripe makes it easier for customers to purchase from your store, catering to their preferred payment methods.
- Operational efficiency: Smooth payment processes reduce transaction errors and administrative overhead, making your ecommerce operation more efficient.
To set up payment gateways:
Navigate to your WooCommerce dashboard, go to Settings, and click on the Payments tab. This area lists all available payment methods.
Activating PayPal

- Find PayPal in the list and toggle it to Enable. This makes PayPal visible as a payment option on your checkout page.
- Click on Set up or Manage next to PayPal.
- Enter your PayPal email address and other required credentials in the provided fields to connect your store to your PayPal account.
Setting up Stripe
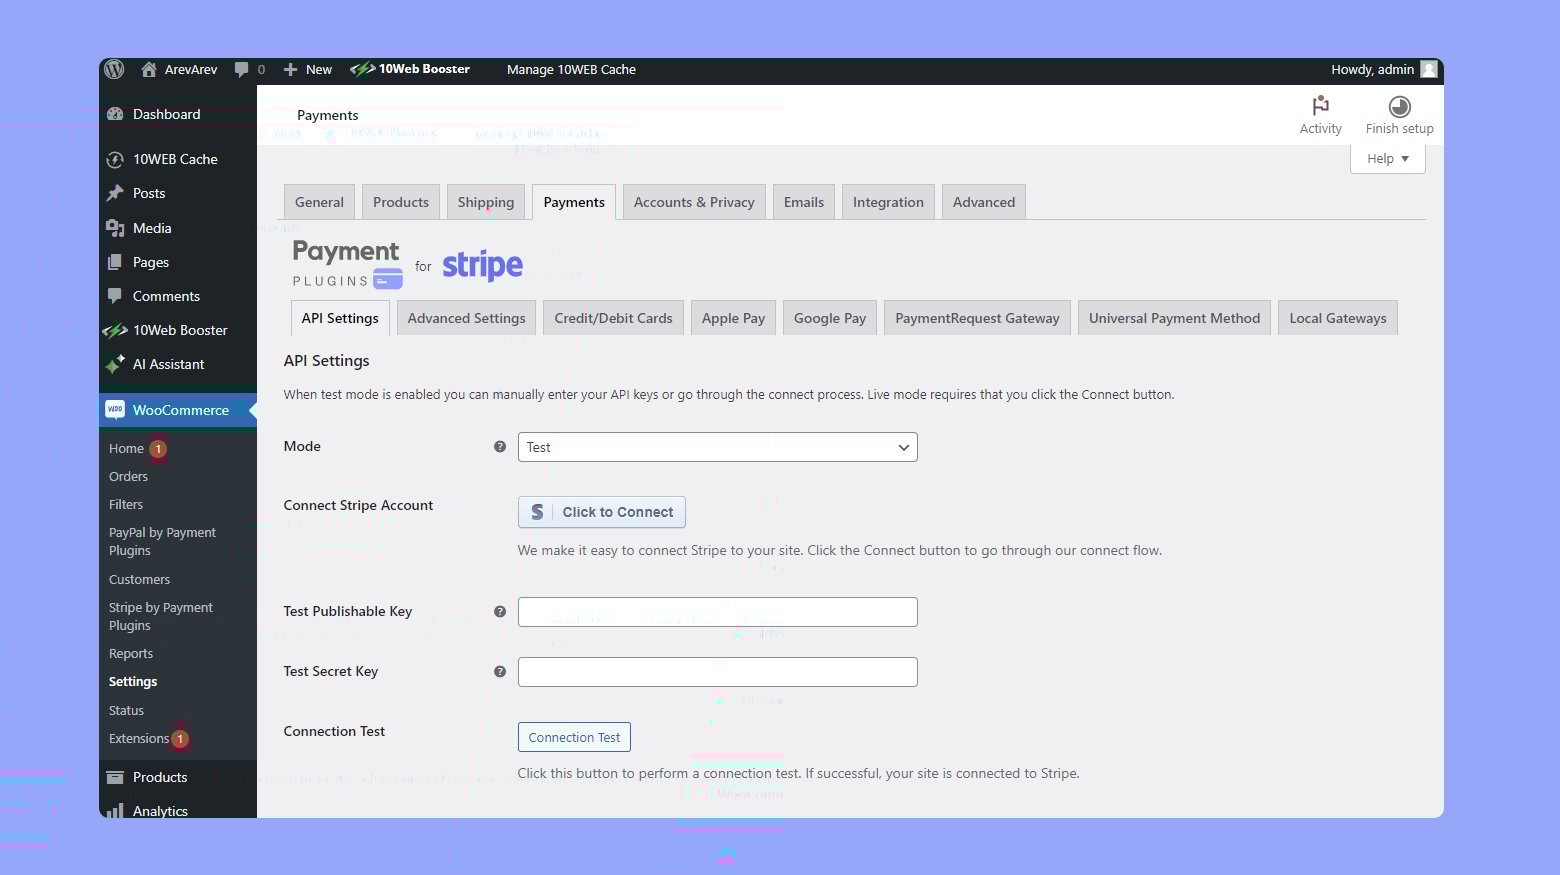
- Before you can activate Stripe, ensure that the Stripe plugin is installed on your WooCommerce site.
- Once installed, return to the Payments tab, find Stripe, and toggle it to Enable.
- Similar to PayPal, click on set up or Manage next to Stripe.
- Here, you will need to enter your Stripe API keys and adjust any additional settings like transaction emails or payment capture options.
Create your custom online store in minutes with 10Web AI Ecommerce Website Builder and take your business online.
Looking to sell online?
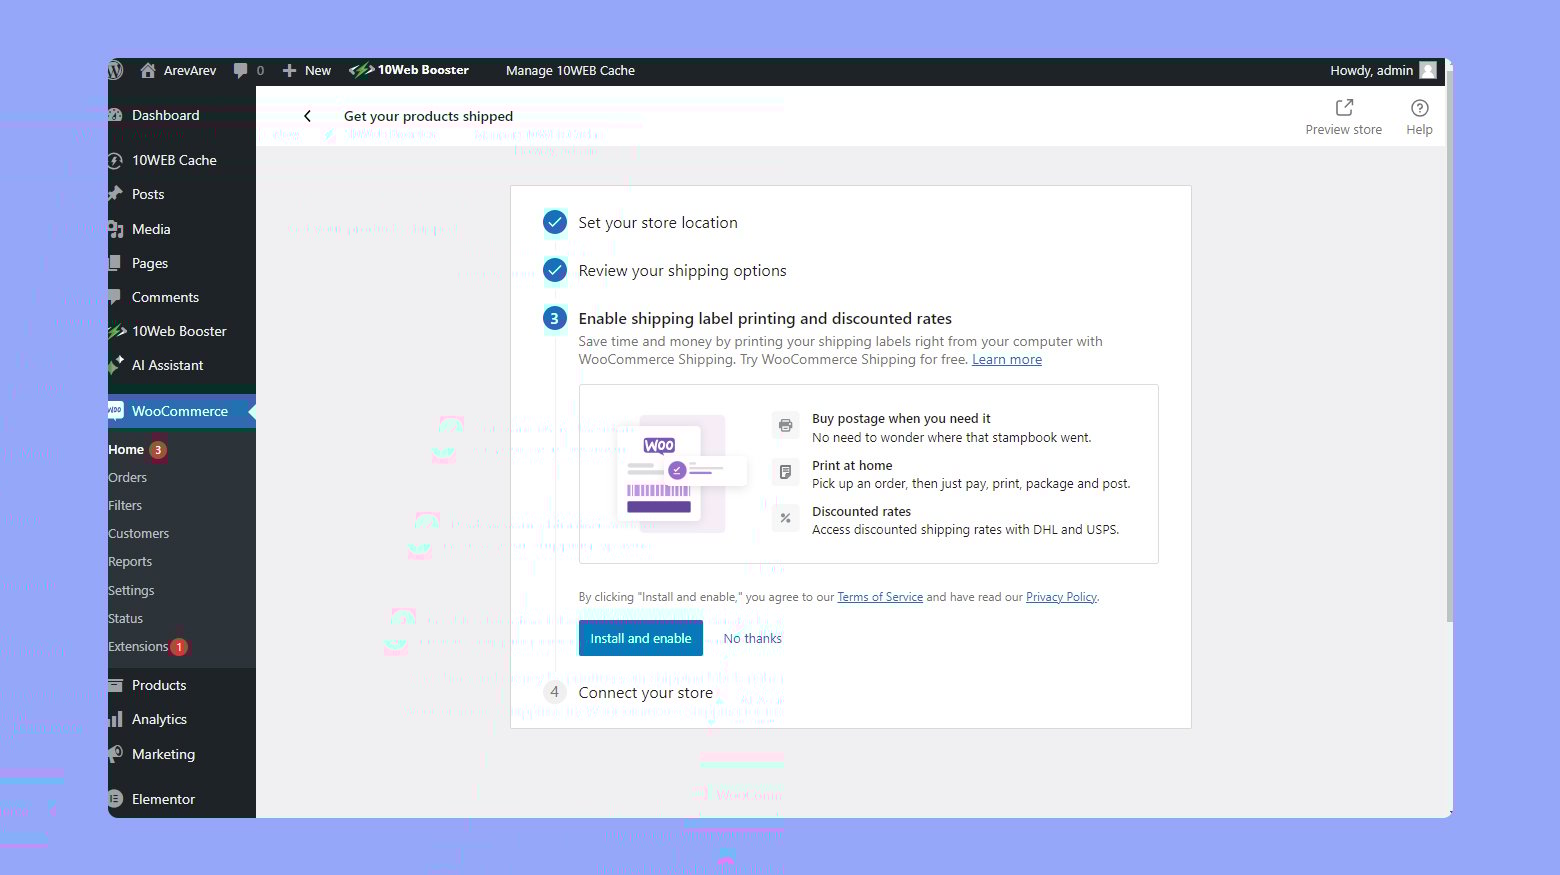
Setting up shipping methods
Setting up efficient shipping methods in WooCommerce is crucial for ensuring that your products reach your customers promptly and at reasonable rates. Proper configuration of shipping zones, rates, and tax settings also ensures that each product’s final price is accurately calculated, keeping your store regulatory compliant.
Benefits of shipping configurations:
- Customer satisfaction: Accurate and flexible shipping options improve customer satisfaction by providing clear expectations and affordable choices.
- Regulatory compliance: Correct tax and shipping settings ensure that your store complies with local laws and regulations, avoiding legal issues.
- Operational efficiency: Streamlined shipping processes make it easier to manage orders, inventory, and customer service.
To configure shipping in WooCommerce:
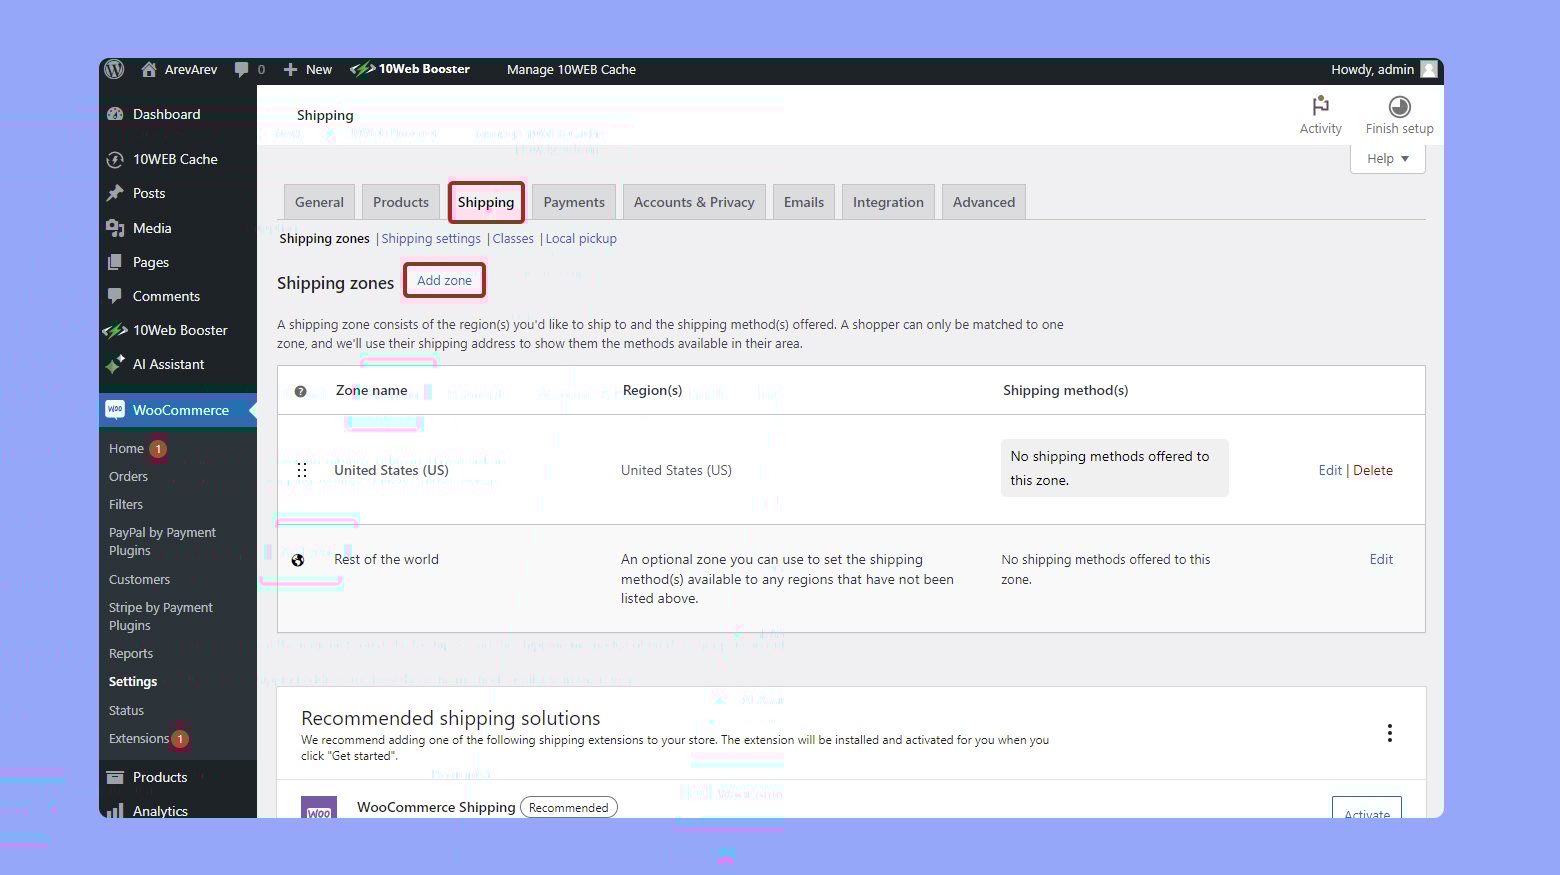
- Go to your WooCommerce dashboard, click on Settings, and then select the Shipping tab. This is where you will manage all aspects of shipping.
- Click on Add zone to define the geographic areas where you ship products. Each zone can have different shipping methods and rates.
- Give each shipping zone a descriptive name that easily identifies the geographic area, like North America or Europe.
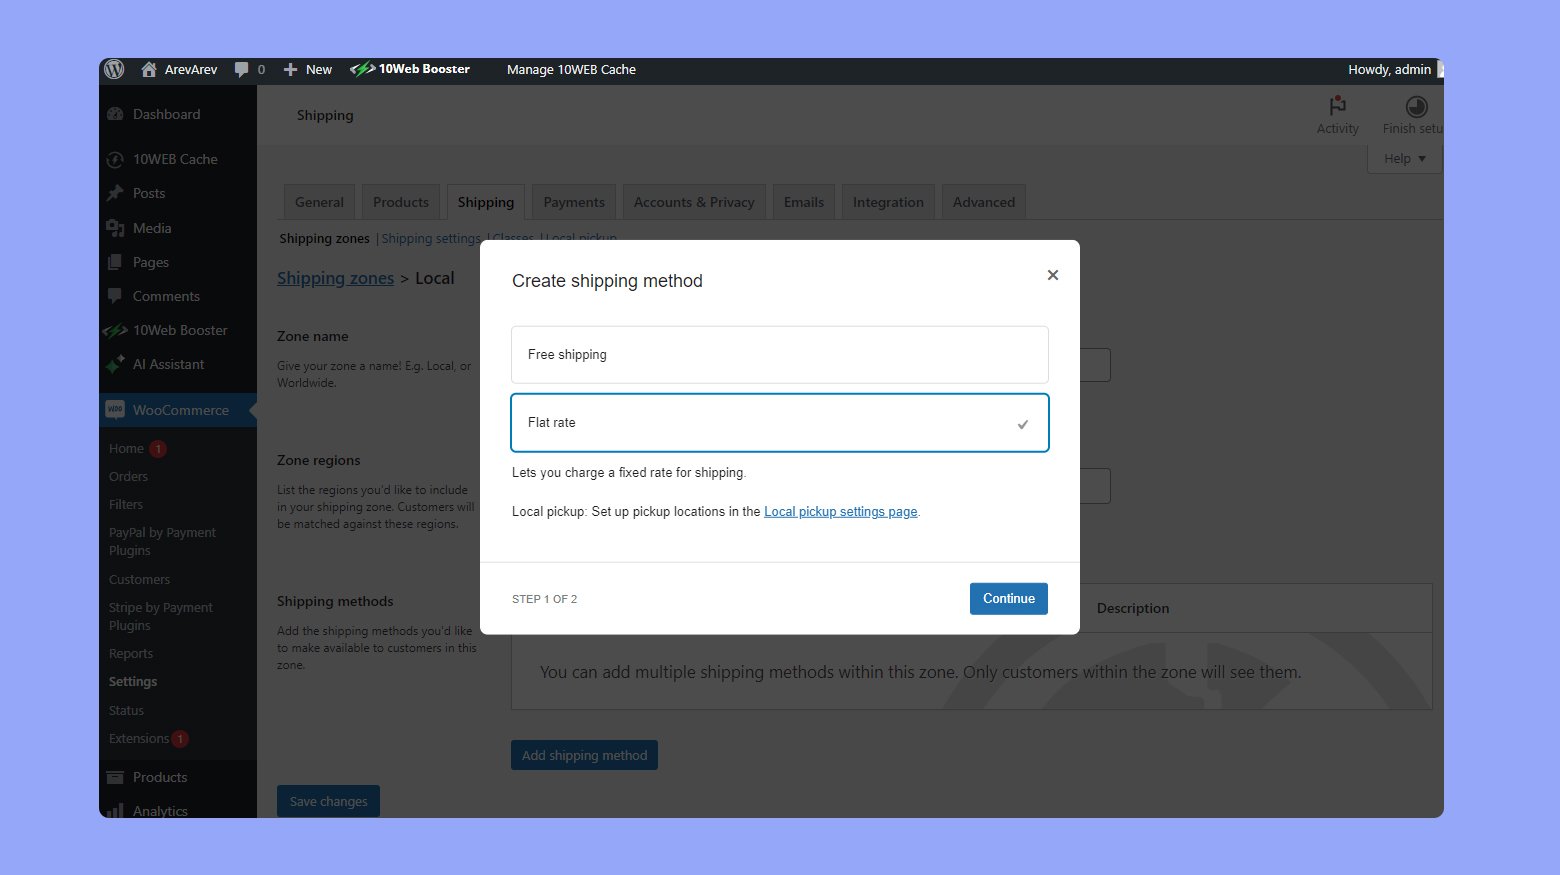
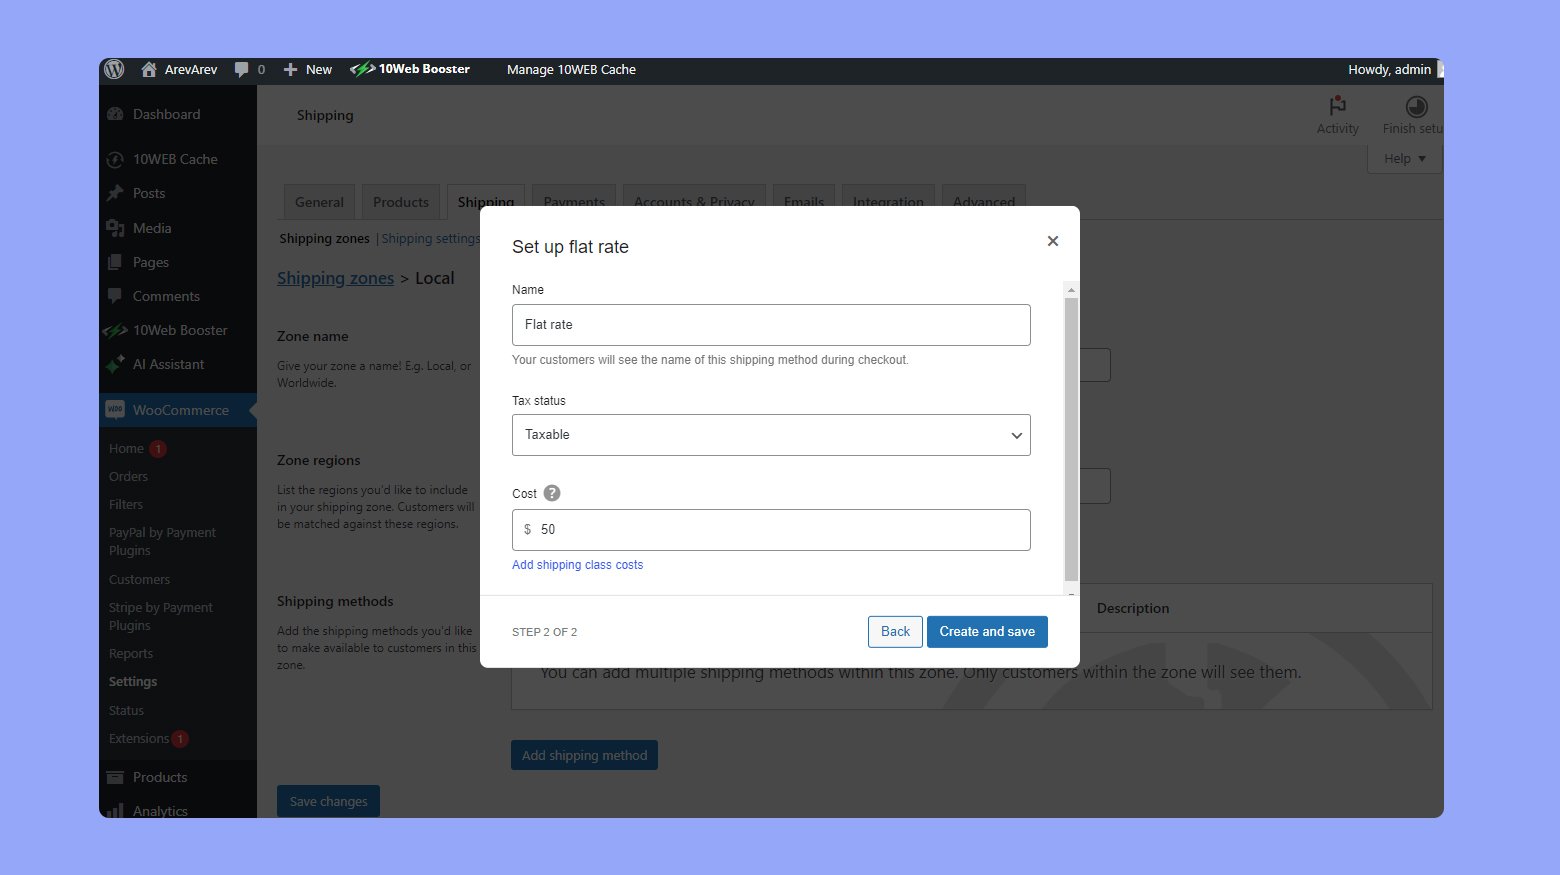
- For each shipping zone, you can add various shipping methods:
- Free shipping: Ideal for promotions or minimum order thresholds.
- Flat rate: Set a fixed shipping rate for all orders within the zone.
- Live rates: Integrate with carriers to offer real-time shipping rates based on package weight, dimensions, and destination.
For a detailed guide on setting shipping zones, you might find the following link helpful: Building an online store on WooCommerce.
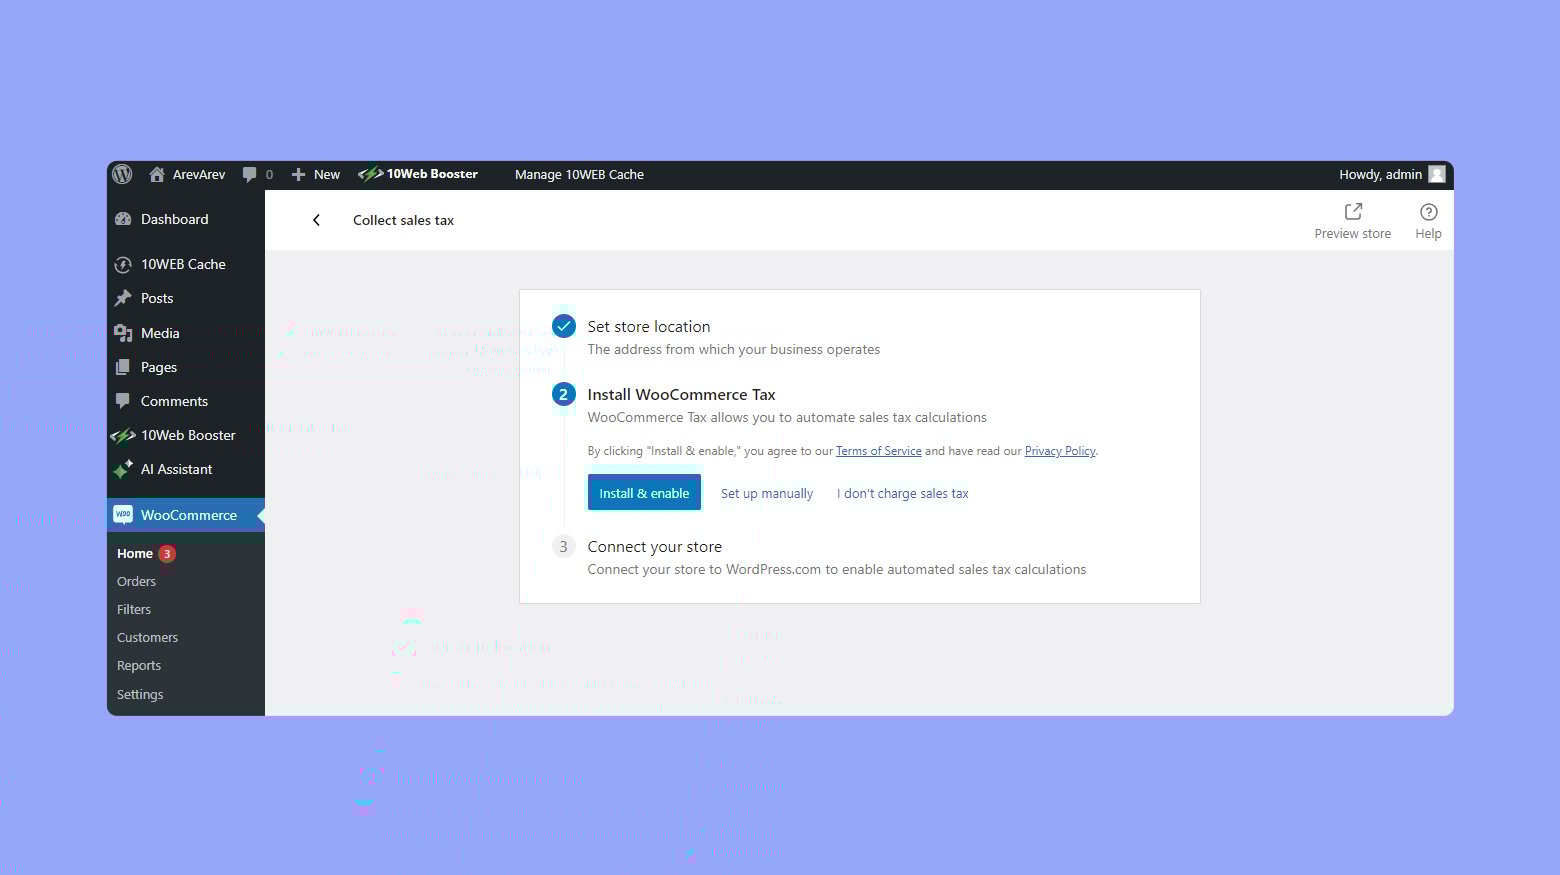
- Ensure that your shipping prices reflect the correct tax calculations by navigating to Settings and selecting Tax.
- Configure tax settings to apply automatically based on your customer’s shipping address and your store location.
Designing your online store
When setting up your WooCommerce online store, the visual appeal and usability of your site play crucial roles in attracting and retaining customers. A well-designed storefront can significantly impact shopper engagement and sales conversion.
Choosing a WooCommerce theme
Your journey to a stunning online store begins with selecting a WooCommerce theme. Themes are pre-made design templates that you can apply to your store to instantly change its look and feel. When choosing a theme, ensure it’s both aesthetically pleasing and functional.
Your theme should also be responsive, meaning it looks good on any device, whether it’s a desktop or mobile phone. Some popular themes that you might consider include Astra, a highly customizable and fast theme, and Storefront, the official WooCommerce theme. You can find themes directly from your WordPress dashboard or through reputable marketplaces.
Customizing store design
After selecting a theme, it’s time to tailor your site‘s design to fit your brand and products. Start by navigating to the Appearance section in your WordPress dashboard, where you’ll access Customize. Here, you can adjust colors, fonts, and layout settings. Pay special attention to your homepage, as it’s often the first impression customers have of your store.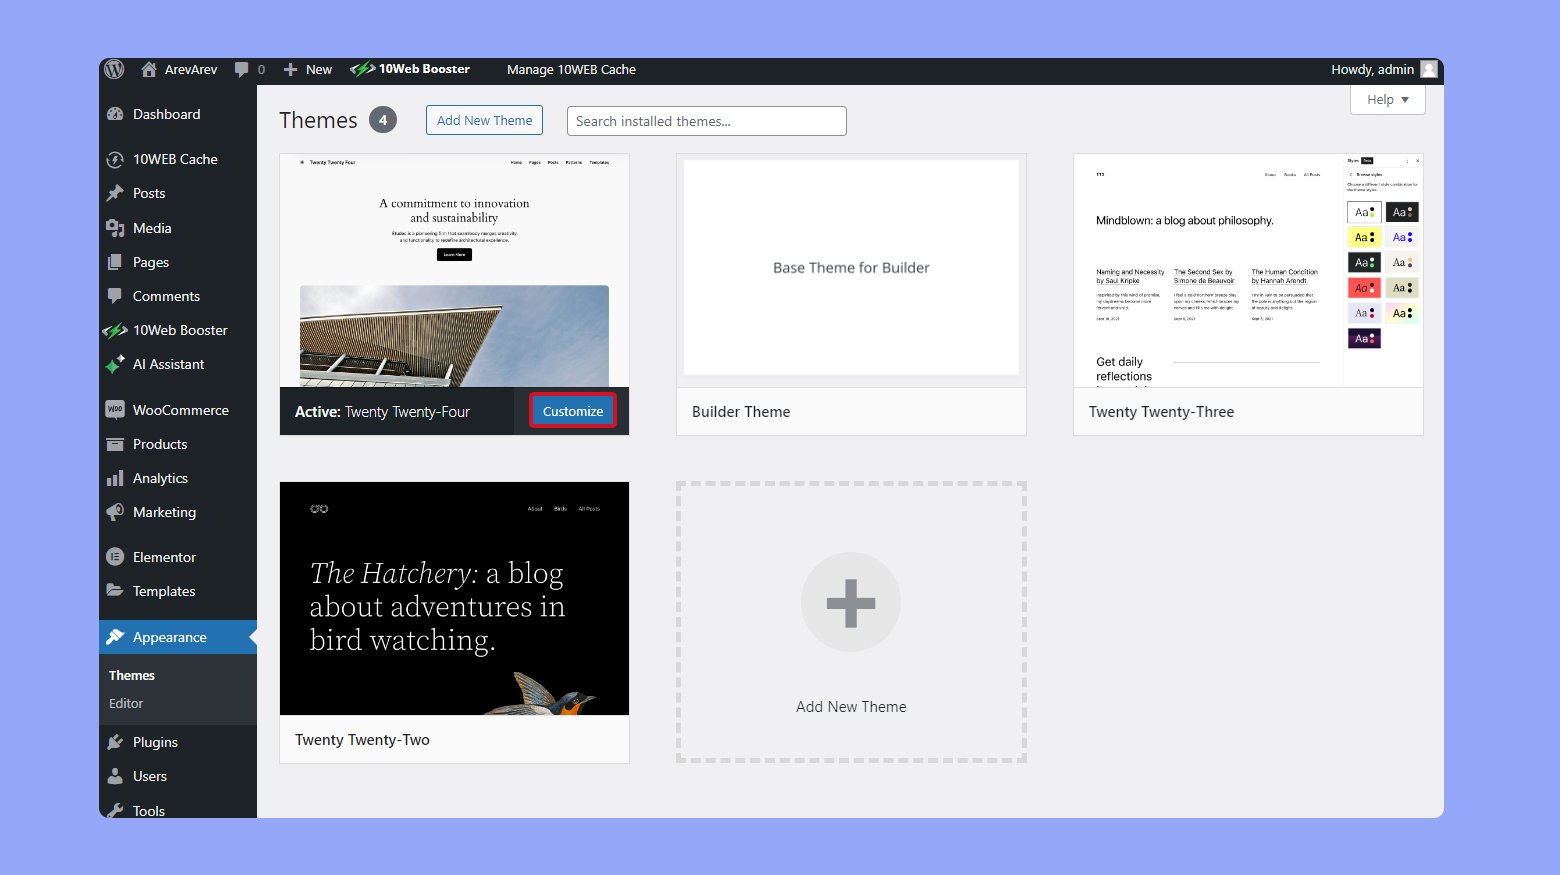
For more in-depth customization, many themes offer options panels and additional plugins to extend functionality. You can refine product pages, adjust checkout experiences, and create unique landing pages. Remember, effective design is not just about looks—it’s about creating a cohesive customer journey from homepage to checkout.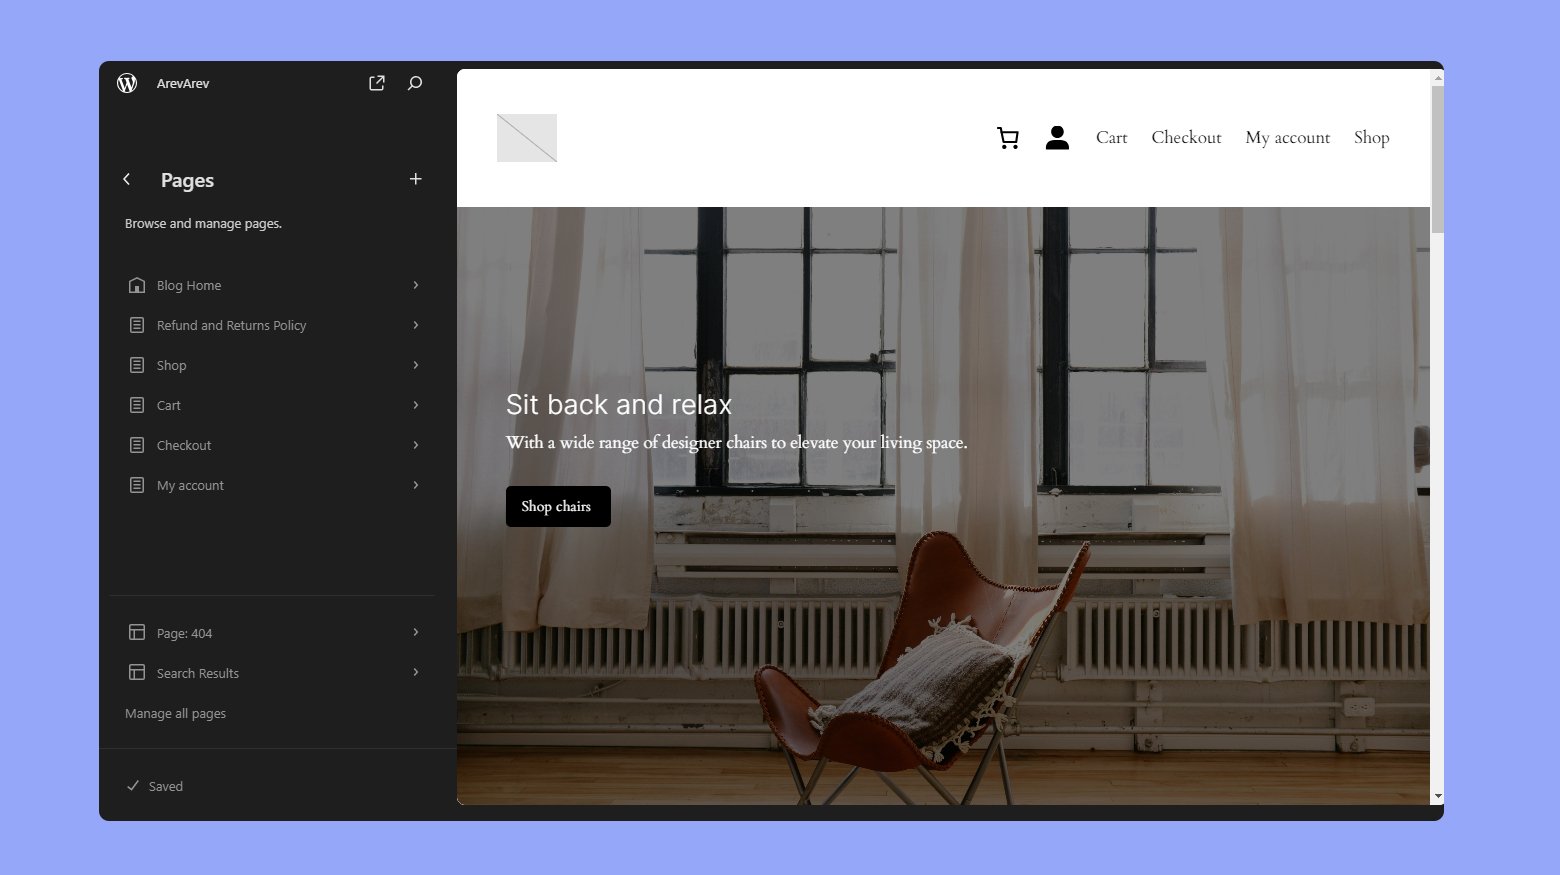
Incorporate elements that enhance the shopping experience, such as clear navigation, straightforward menus, and prominent Add to cart buttons. Tools like the page builder Elementor can help design and organize your content visually, without needing to code.
10Web users can customize their store design using the 10Web Builder. Simply click on the edit button next to the page you want to customize. 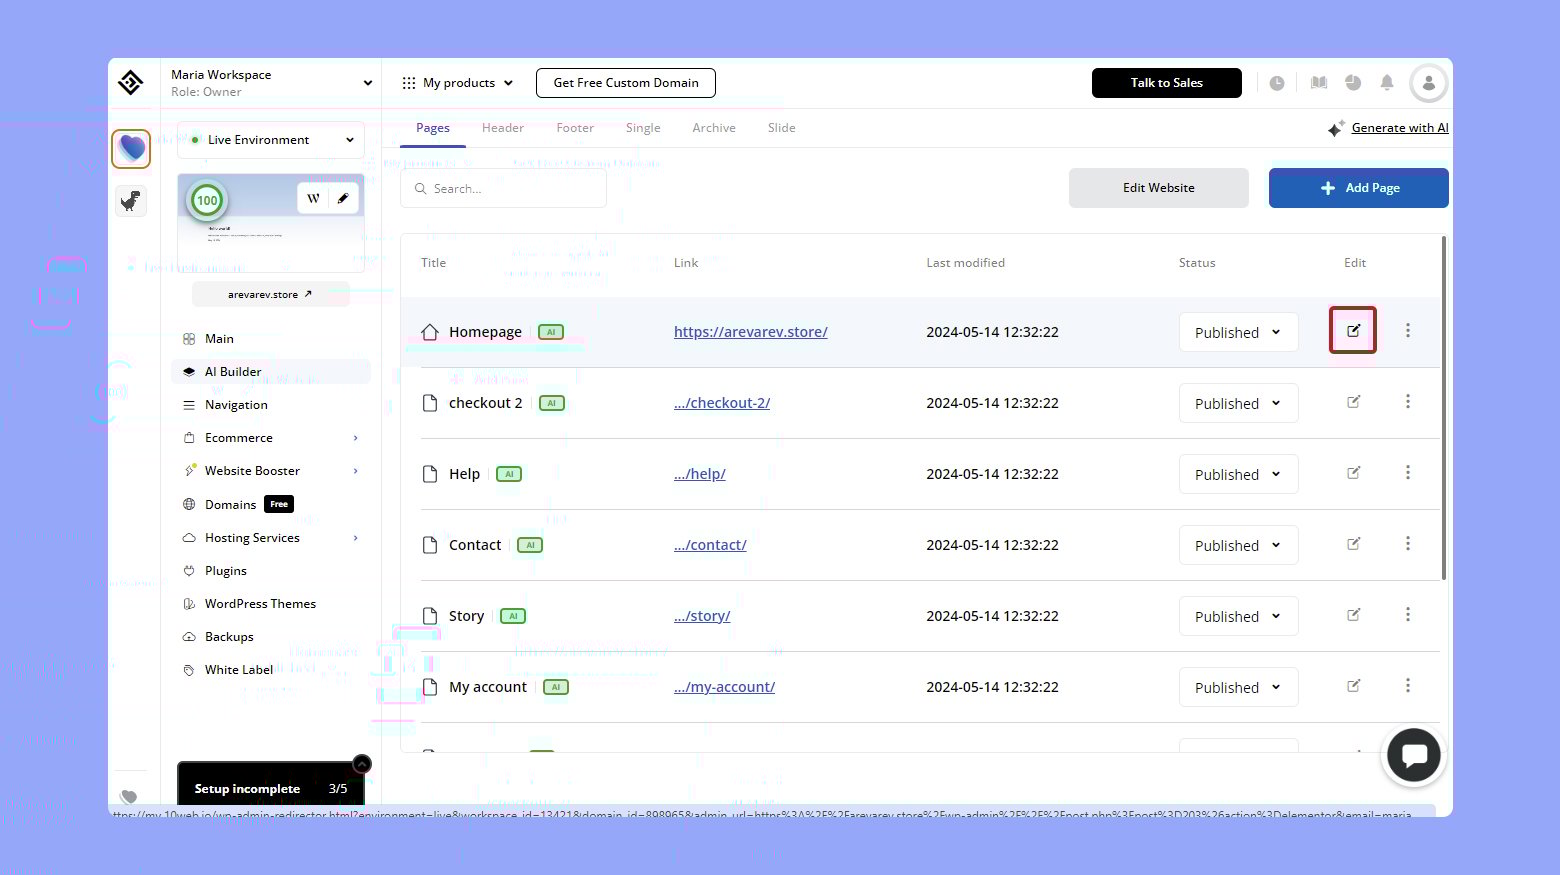
Ensuring your store stands out with a custom design reflects your brand’s unique style and can help drive sales. Take advantage of the various customization options WooCommerce offers to create an attractive and efficient online store.
Create your custom online store in minutes with 10Web AI Ecommerce Website Builder and take your business online.
Looking to sell online?
Product management
In the diverse world of WooCommerce, your ability to effectively manage your online storefront hinges on mastering product management, from categorizing your items to populating your store with a diverse inventory.
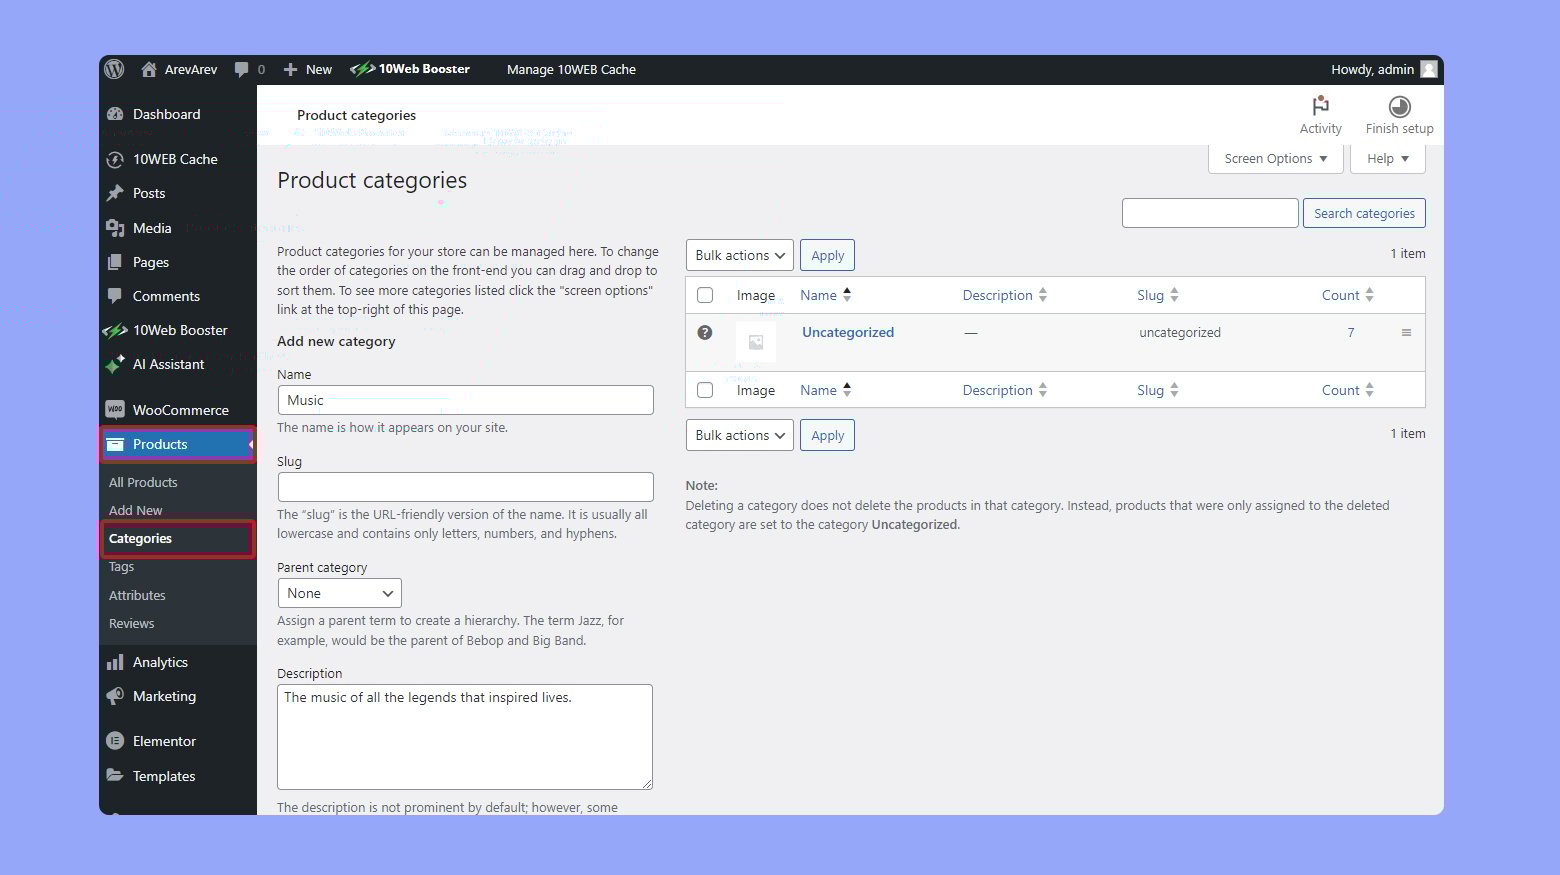
Creating product categories
To keep your storefront organized and navigable, you need to create and manage product categories. Assigning products to the right categories helps your customers find what they’re looking for with ease and can improve search engine visibility. These are some of the benefits of having product categories:
- Clearly marked categories help customers quickly find what they need.
- Descriptive titles and details improve search engine rankings.
- Organized categories make inventory oversight easier as your store expands.
Here’s how to get started:
- Log in to your store’s admin panel, navigate to Products > Categories.
- Click Add New Category. This option is typically at the top or side of the category list.
- Enter a clear, descriptive name for your category in the Name field.
- Fill in the Description box to provide more details about the products in this category, which can also aid in SEO.
- Click Add New Category to save the changes.
- In the product settings, select this new category from a dropdown menu or checkbox list to link products to it.
- If possible, rearrange your categories by dragging and dropping them in the order you prefer.
Adding new products
Expanding your store’s inventory is a great way to attract more customers and meet their diverse needs. Here are the benefits:
- Streamlines the process of product listing, making it quick and easy to expand your inventory.
- Helps maintain accurate and thorough product information for better inventory management.
- Allows you to cater to different product types and preferences, enhancing customer experience.
Steps to add new products:
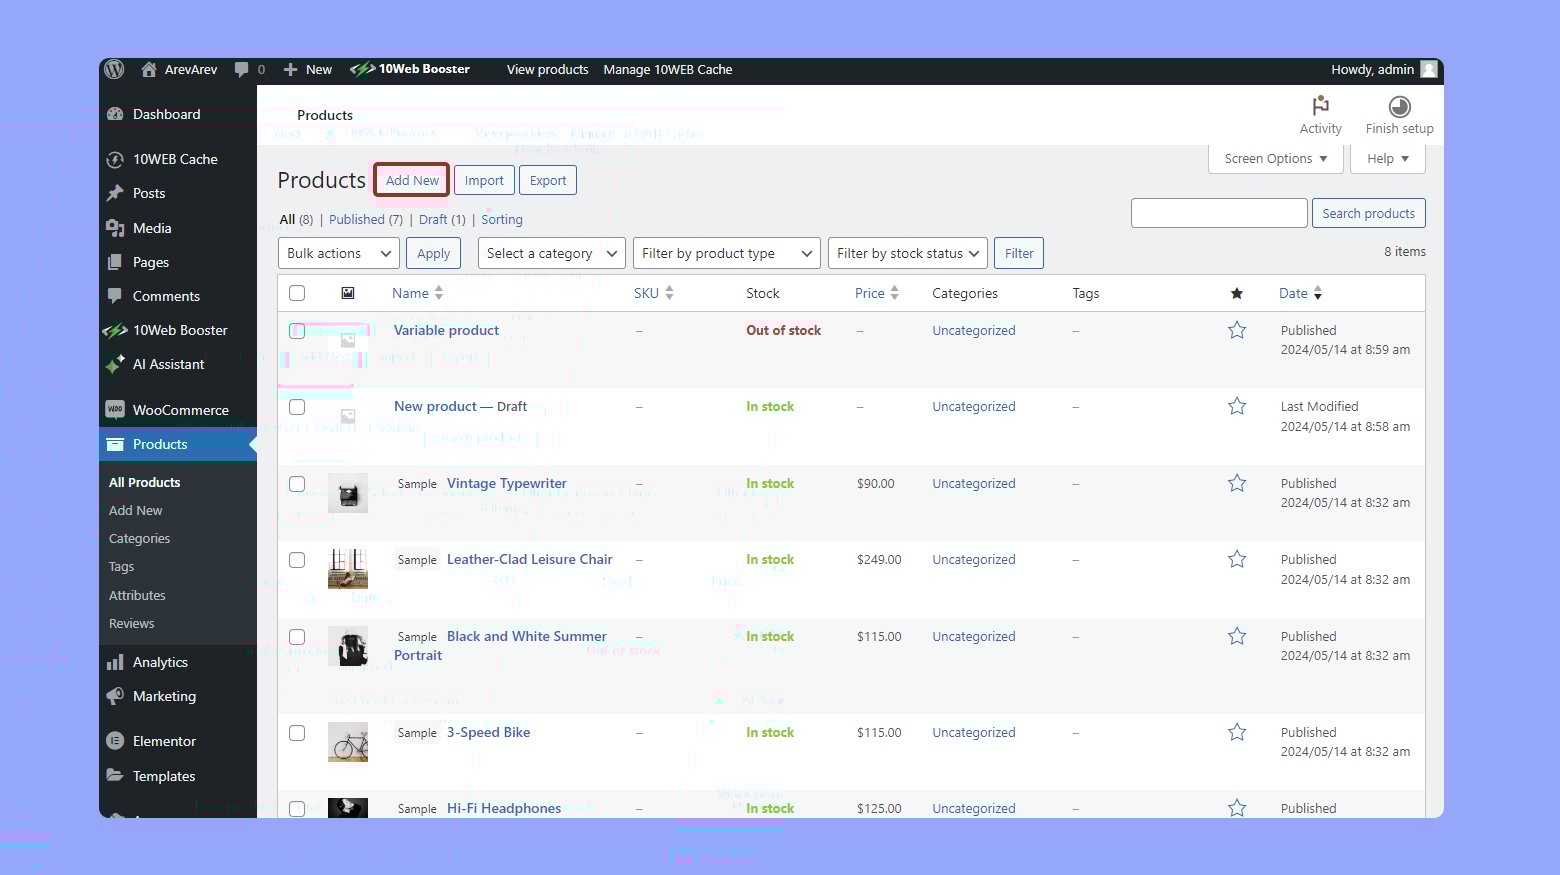
- Access your store’s admin area, go to the Products > Add New.
- Start by adding the product name in the designated field.
- Follow this by writing a detailed description that will appear on the product page.
- Enter essential details including:
- Price: Set your selling price.
- Tax status: Specify if the product is taxable, and the tax class if applicable.
- Inventory data: Manage stock levels by entering inventory quantities, and set the stock status to reflect availability.
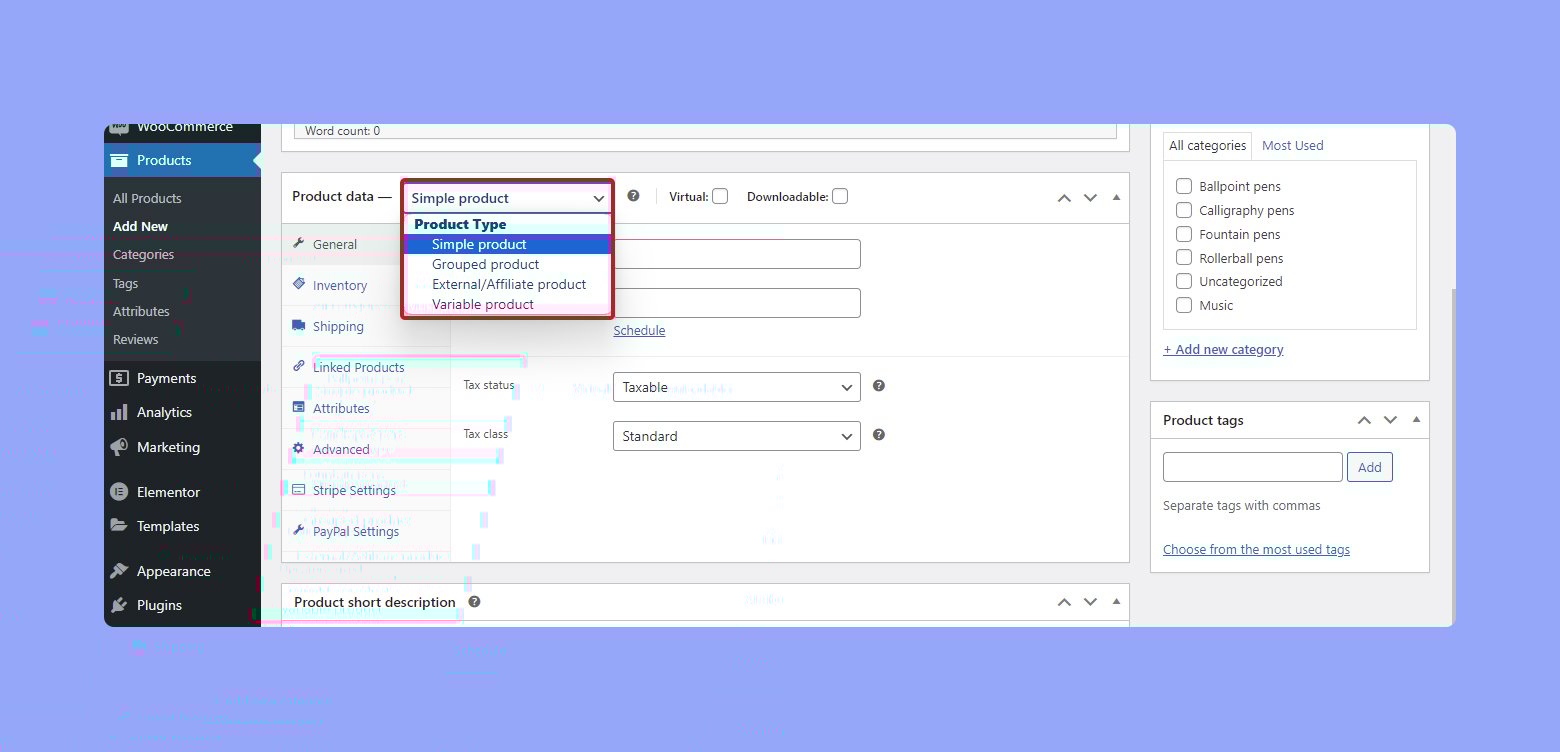
- Determine the type of product you are listing:
- Simple product: A standard item with no variations.
- Grouped product: A collection of related products that can be purchased individually.
- External/affiliate product: Products you sell but do not stock, where buyers are redirected to another site.
- Variable product: An item available in different variations like size or color.
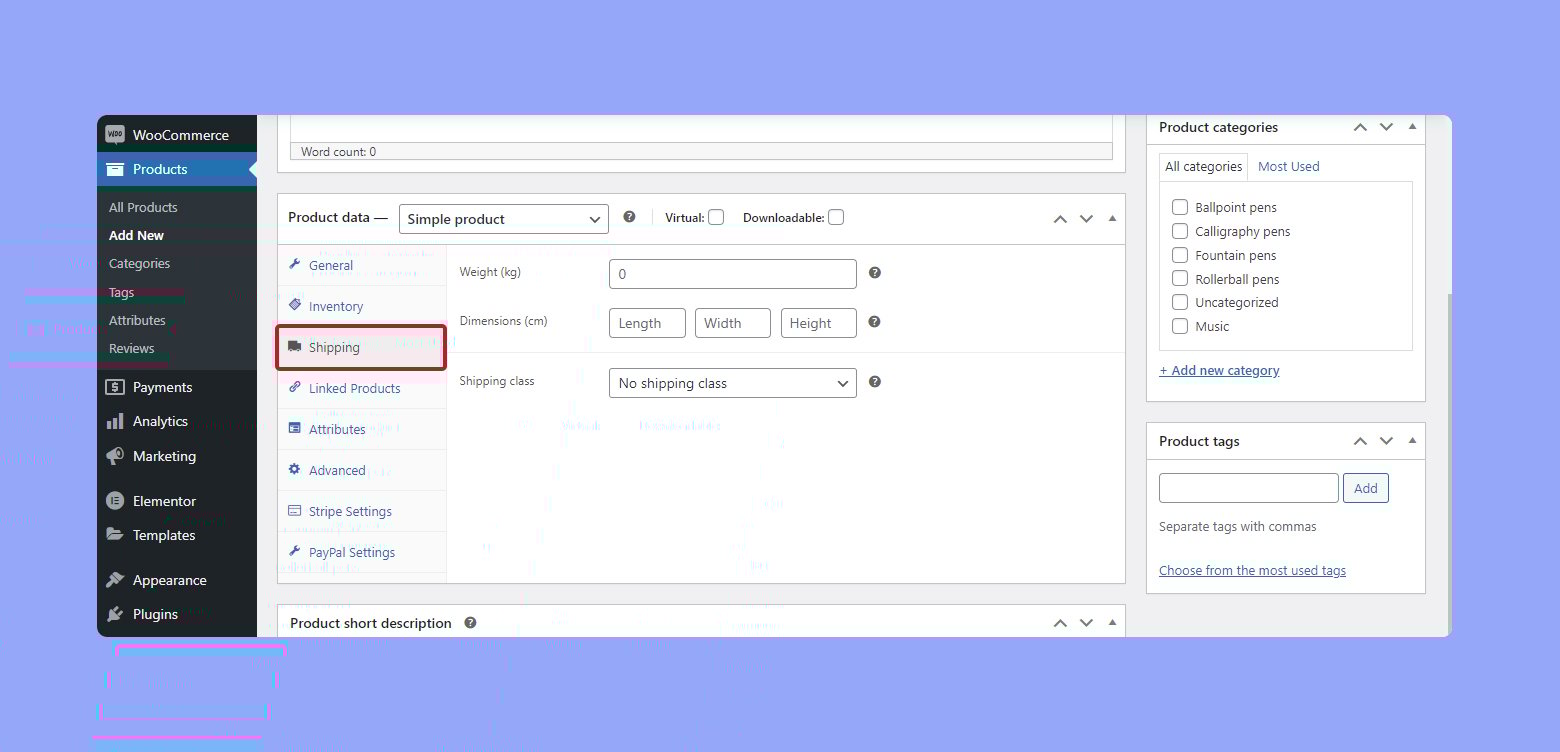
Setting up product data
Properly setting up product data is crucial for presenting clear and detailed information about the items you sell. This not only helps customers make informed purchasing decisions but also optimizes your inventory management.
The benefits of product data:
- Provides comprehensive details that help customers understand exactly what they are buying.
- Allows for easy selection of preferences like size and color, improving the shopping experience.
- Keeps track of stock levels accurately, preventing overselling and helping with restocking decisions.
To set up product data in your WooCommerce store:
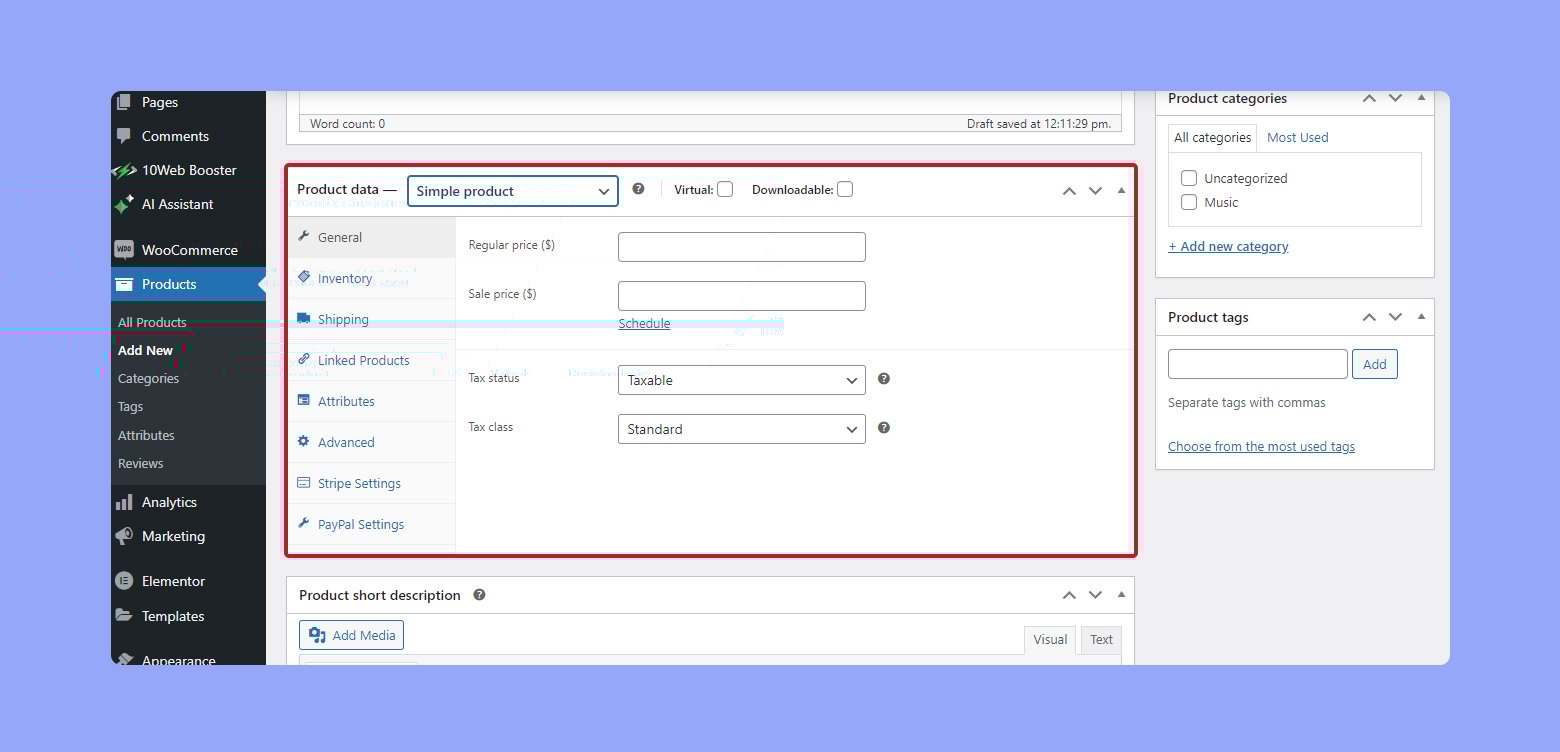
- When adding a new product or editing an existing one, locate the Product Data window. This is typically found just below the main description area.
- Choose a product type:

- Simple product: Majority of shipped products.
- Grouped product: Related simple products that are grouped and can be purchased together.
- External/Affiliate product: A product described and listed on your site but which is also sold elsewhere.
- Variable product: A product that has variations. For example, a shoe in different sizes, colors, and materials.
- Decide if your product is:
- Physical: A tangible item that requires shipping.
- Downloadable: A digital file that customers can download after purchase.
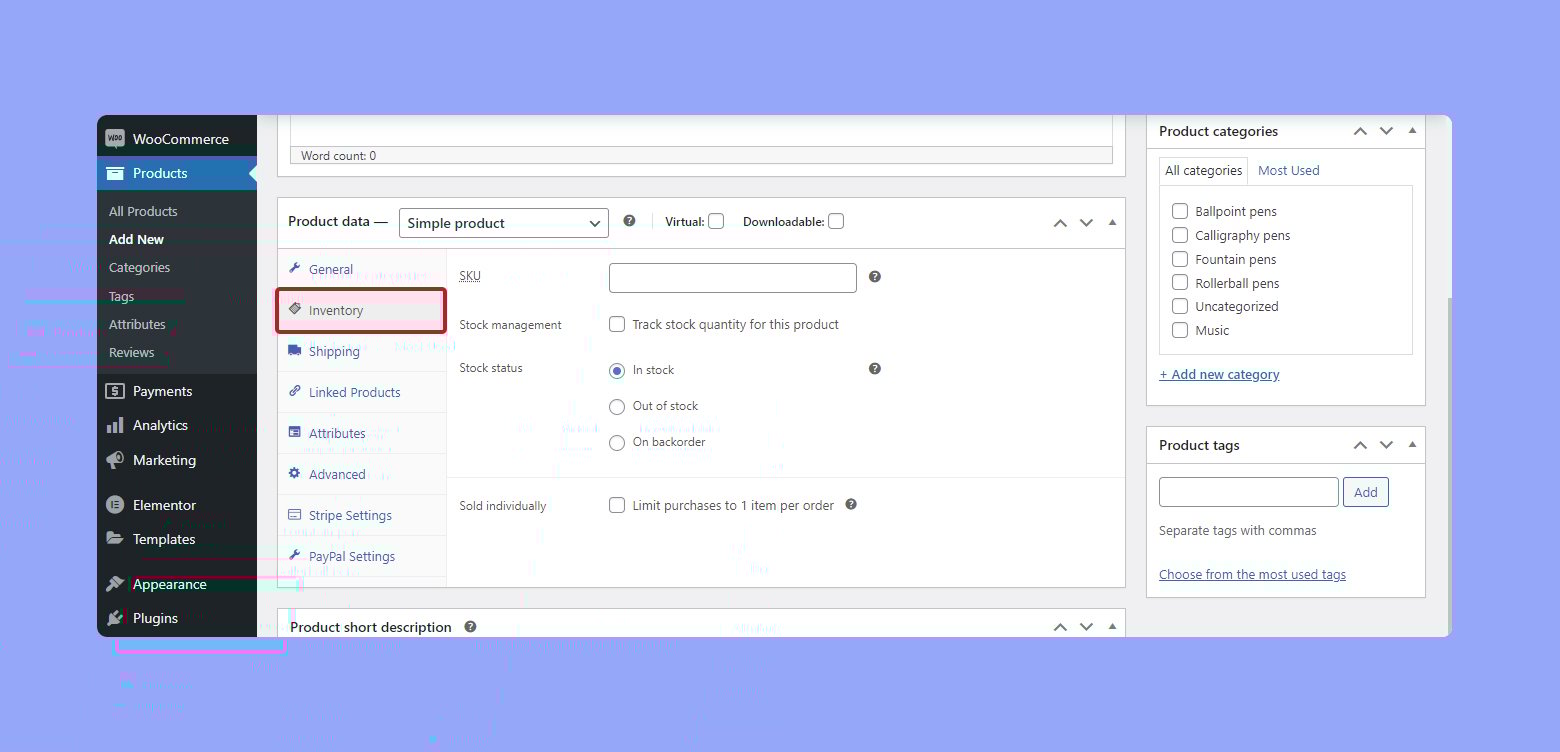
- Manage inventory:
- Stock quantities: Update the number of items available. This is crucial for physical products.
- Stock status: Indicate whether the product is in stock, out of stock, or on backorder.
- Set up shipping by defining the weight, dimensions, and shipping class.
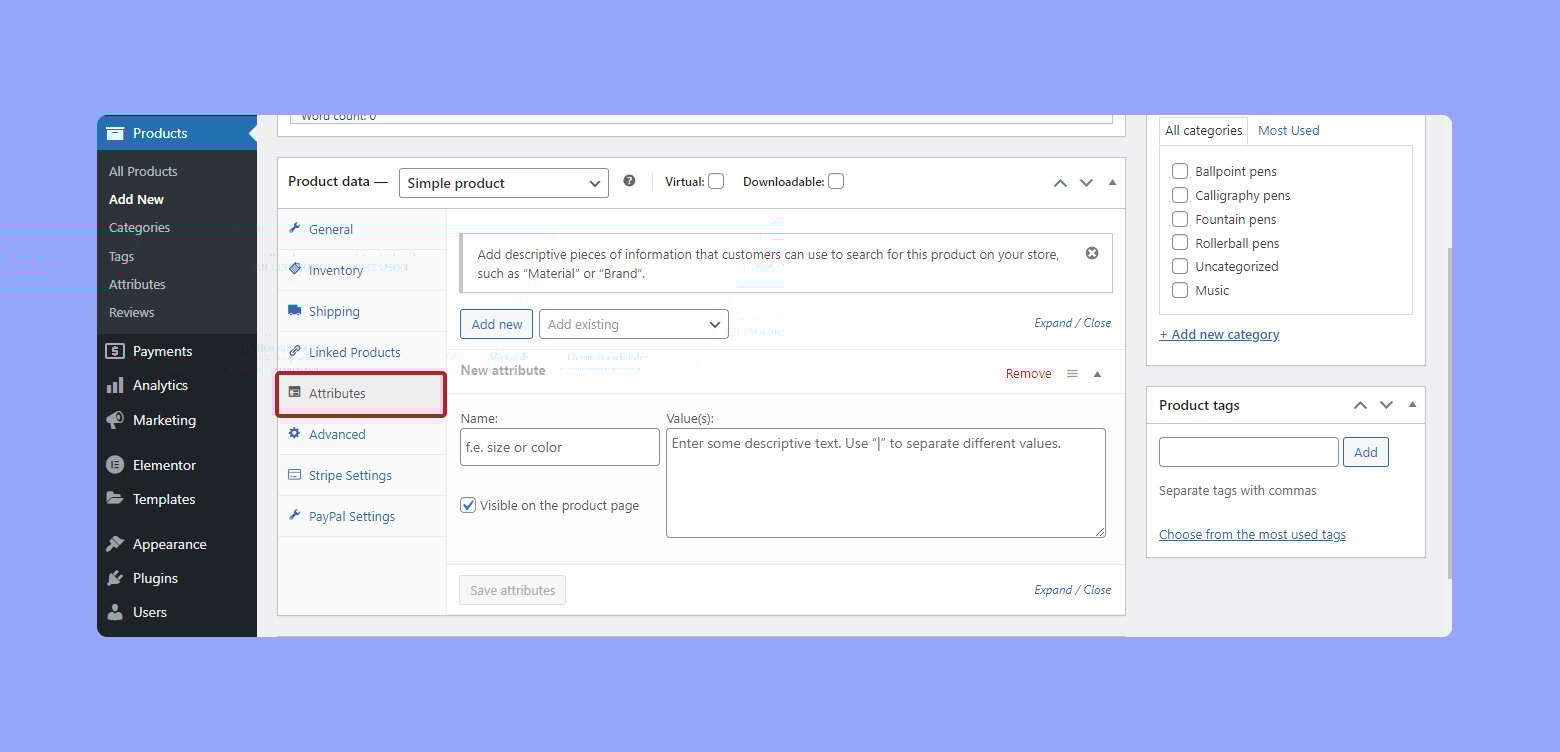
- Add attributes that define product variations, such as size or color. This allows customers to select their preferred version of the product. For each attribute:
- Name the attribute: For example, Color.
- Set values: For instance, Red, Green, Blue.
- Use attributes for variations: If selling a variable product, use these attributes to create different variations. Each variation can have its own SKU, price, and inventory settings.
Create your custom online store in minutes with 10Web AI Ecommerce Website Builder and take your business online.
Looking to sell online?
Advanced functionality
Expanding the capabilities of your WooCommerce store can greatly enhance the value you offer to your customers. Here is how you can extend your store’s functionality with advanced features like extensions and bookings.
Utilizing WooCommerce extensions
By incorporating WooCommerce Extensions, you can add a variety of advanced functionalities to your store that cater beyond the basics. Whether you’re looking to integrate marketing tools or manage intricate inventory, there’s likely an extension that meets your needs. For instance, to boost your marketing efforts, you might be interested in integrating analytics tools for a clearer understanding of customer behaviors.
Here’s a brief overview of extension categories and what they can offer:
- Marketing: Improve your store promotion and customer engagement.
- Analytics: Gain insights into sales data to make informed decisions.
- Shipping: Connect with major shipping carriers for real-time rates.
- Accounting: Sync with software to simplify financial management.
Selecting the right extensions requires evaluating your store’s specific requirements and growth objectives. Once chosen, installing them is straightforward—navigate to Plugins > Add New within your WordPress dashboard.
Setting up bookings and subscriptions
To offer services or products on a recurring basis, implementing Booking and Subscription plugins is integral. These WooCommerce plugins expand your store to support services like appointments, rentals, or ongoing subscriptions.
Here are your steps to get started:
- Choose plugins that best align with the services you wish to offer.
- Install the plugin through the Add New option under the Plugins tab.
- Configure the settings to customize the booking or subscription model to match your business approach.
Making use of dedicated booking systems can grant your customers the ease of selecting and reserving timeslots for services you offer, hence elevating service convenience. Similarly, WooCommerce Subscriptions enable you to create and manage products with recurring payments, which can ensure a steady income stream for your business. Remember, the key to successful integration lies in tailoring these plugins to the unique contours of your services and support framework.
Marketing and extensions
When you’re ready to grow your online store, understanding and utilizing the right marketing tactics and WooCommerce extensions can make a significant difference in your revenue and customer reach.
Enhancing your store with plugins
To maximize the potential of your WooCommerce store, plugins are indispensable. They add functionality that can transform your basic WordPress site into a powerhouse ecommerce platform. For example, you can enrich your store with WooCommerce-compatible local store management to help with inventory tracking and transaction reports.
- Inventory Management Plugins: Keep track of your stock levels and predict future sales.
- SEO Plugins: Improve search engine visibility for your products and store pages.
Remember to check for compatibility and read the reviews before installing new plugins.
Promoting products online
Marketing your products is just as critical as the products themselves. Use extensions to connect with potential customers across various channels.
- Email Marketing Plugins: Send newsletters, product updates, and personalized offers.
- Social Media Integration: Share your products on social platforms and integrate social reviews on your product pages to build trust.
Incorporating strategic marketing campaigns can help you reach new audiences and sell products. Take advantage of tutorials that walk you through each step of setting up your marketing extensions to begin promoting your products effectively.
Optimization and maintenance
To ensure your WooCommerce store runs smoothly and securely, it’s essential to focus on optimization for speed and performance, maintain regular updates and backups, and implement security best practices.
Improving store speed and performance
Your ecommerce store‘s loading time is crucial for customer satisfaction and SEO rankings. Start by choosing quality web hosting tailored for WooCommerce, as it significantly impacts your store’s response time.
Moreover, regularly optimize your website images, use caching, and minimize the number of plugins to enhance your store’s performance. Keep an eye on WooCommerce’s performance by periodically checking the WooCommerce > Status section for any actionable tips.
Managing updates and backups
Stay current with WooCommerce and WordPress site updates to take advantage of the latest features and improvements. Before updating, always create backups of your website. This can be done through plugins or your web hosting service’s backup solution. Consider automatic backups for convenience, and test your backups regularly to ensure they’re functioning properly. If you need a guide on managing updates and backups, the WooCommerce documentation offers comprehensive instructions.
Implementing security best practices
Security is non-negotiable for your ecommerce store to protect customer data and maintain trust. Use strong passwords, enable HTTPS by acquiring an SSL certificate, and consider security plugins like Jetpack for real-time defense. Keep all software up-to-date, and use secure payment gateways to process transactions safely. To enhance your store’s security, follow the principles laid out in the WooCommerce security best practices.
Maintaining your WooCommerce store is an ongoing process, but with these steps, you’ll provide a safe and excellent user experience for your customers.
Conclusion
Using WooCommerce on your WordPress website transforms it into a powerful ecommerce platform, enabling you to sell a range of physical and digital products with ease. This article has guided you through the initial steps of setting up WooCommerce. It also covered the key aspects of customizing your store, managing your products, and expanding its functionality with extensions.
Using this information, you can now effectively create and manage your own online store. Implement these steps to ensure your WooCommerce setup is optimized for your business needs, enhancing your store’s functionality and your customers’ shopping experience. Dive into configuring your store’s general settings, payment gateways, and shipping methods to start selling products tailored to your market and operational goals.
Create your online store in minutes with 10Web AI Ecommerce Website Builder.Looking to sell online?
Create your online store in minutes


![]()